
Introduction
The term user engagement can refer to any action taken by a user on a website such as for instance posting a comment, executing a search query, responding to a quiz, reading an article or studying the weather forecast. To track such user engagement activities we rely on DMP events (a.k.a performance events).
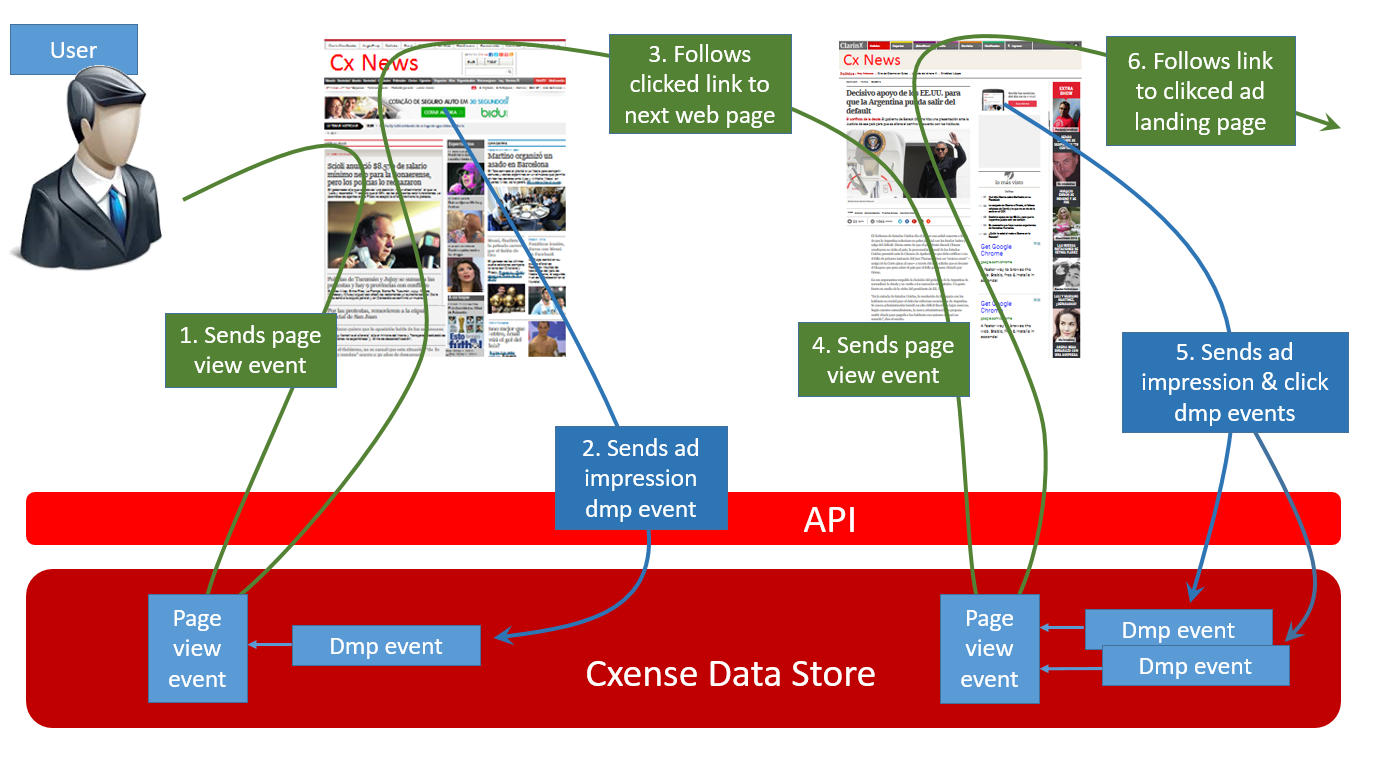
As we see in the figure above, whereas page view events (a.k.a traffic events) relates to how the user moves from page to page and holds information about the page visits as such (at what time the visit took place, how long time the visit lasted, what browser did the user use, from which location did the user access the page, etc), DMP events deal with the users interaction with the content on the page during the visit. The page view event related steps are green and the DMP event related steps are blue.
In this case the DMP events are fired off to report on ad campaign impressions and clicks. At the top of the first page an ad is being displayed, but the user does not act upon it (that is why blue step 2 is an impression type dmp event). On the second page he is shown another ad and this time the user actually clicks on it and is then taken to the ad's landing page (green step 6), but before he gets there two DMP events, an ad impression type event and an ad click type event, have been fired off (blue step 5).
In the final task of this tutorial we will track the time a certain area of a web page is visible to the user as illustrated in the graphic below. The transparent area on top of the web page represents the browser window at any time. We can see how it in its current position has been scrolled down a little bit from the top of the page.
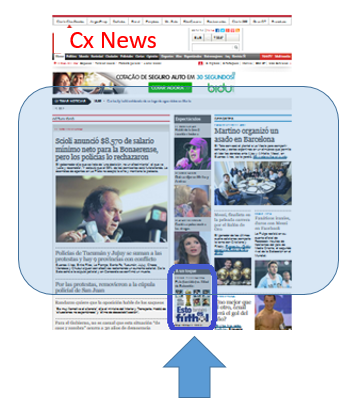
The blue circled area pointed to by the arrow above illustrates an area that one wants to track. In this tutorial that area is represented by a HTML div tag.
Prerequisites
For the cX.sendEvent() function that the tracking depends upon is to work, DMP must have been enabled and the site must have been set up with an LTS cube. Enabling DMP and LTS is done with an e-mail request from your Cxense account manager or Cxense onboarder to support@piano.io.
Simple Element Tracking
The HTML page template code below shows how one can do simple element events such as onclick, onmouseover, etc. The example template consists of the following two parts:
-
An HTML element with some activity related to it that we want to track (for instance that the mouse hoovers over it). In the example below the HTML element someHtmlElement is being tracked relative to the activity someElementEvent.
-
A function that holds the code that reports the engagment activity to Cxense. In the example below this is represented by the function sendEvent(). This function will again make use of the Cxense API functions cX.sendEvent() for the actual reporting.
<!DOCTYPE html>
<html>
<body>
    <script type="text/javascript" src="http://cdn.cxense.com/cx.js"></script>
    <script type="text/javascript">
		cX.setSiteId('9999999999999999999');
		cX.sendPageViewEvent();

		var persistedQueryId = '1234567890123456789012345678901234567890'
		var prefix           = 'xyz';
		var origin           = 'webpage';
		cX.setEventAttributes({ origin:prefix + '-' + origin, persistedQueryId:persistedQueryId });

		function sendEvent(eventType, eventName) {
 			cX.sendEvent(eventType, { action: eventName });
 		}

	</script>

 	<div>
 		<someHtmlElement onSomeElementEvent="sendEvent('event_type', 'event_name')">
	</div>
</body>
Variables
Here is a description of the variables in the code above:
-
origin - A string used for identifying the source system of the reported event. It could for instance be website for a regular web page event, cxdisplay or dfp for a Cxense Display or a Double Click for Publisher ad respectively, etc.
-
event type - A string that gives the event category, for instance impression, click, hoovering, visibility, etc
-
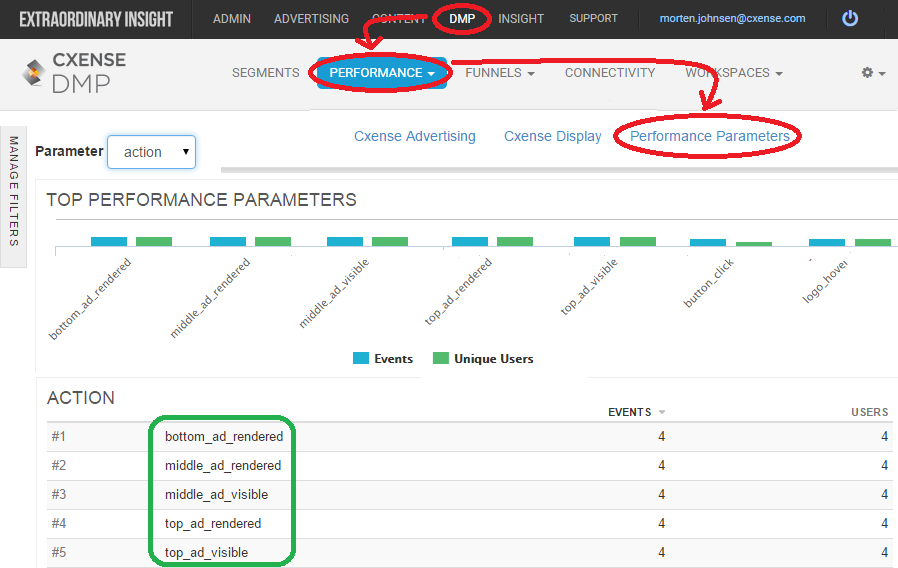
event name - Example of a customer parameter value. The parameter name (in this case action) will appear in the DMP performance data GUI as shown in the GUI figure further down (the event names are circled in green and will show if the parameter name action is picked in the drop down as the custom parameter to show the values for)
-
prefix - This is your 3-letter customer prefix. Contact your Cxense representative if you have yet to receive it.
-
persistent query id - A persitent query is a pre-formulated and pre-authenticated API call to which an id has been assigned. A specific API function call can thus be performed at any later time simply by referencing the id. Your Cxense representative will provide you with the id, or alternatively you can use the script in the next section to generate it.
Functions
Two Cxense library functions are used in the template:
-
cX.setEventAttributes() - Needs to be called once before cX.sendEvent(eventType() is called in order to set the origin and the persistent query of the DMP event to be sent. (Hence it could perfectley well be moved out of the sendEvent() function to be called only once before the first call to sendEvent())
-
cX.sendEvent(eventType) - Reports the DMP event. Every single call to this function will be executed.
Real HTML Elements and Events
The example template contained a non-existing HTML element and event. Below we see some examples with actual HTML elements and events.
<div>
	<button onclick="sendEvent('button_event', 'button_click')">Click me!</button>
</div>

<div>
	<a href="http://www.cxense.com/">
		<img onmouseover="sendEvent('image_event', 'image_mouse_over')" src="https://www.cxense.com/wp-content/uploads/2015/05/logo.png">
	</a>
</div>
Generating the Persistent Query Id
The Python 3.x script below will produce the persistent query Id required by the html code above.
_username     = "<YOUR CXENSE USER ID>"
_secret       = "<YOUR CXENSE API KEY>"

import json, datetime, hmac, hashlib, http.client

def cxApi(path, obj):
    date = datetime.datetime.utcnow().isoformat() + "Z"
    signature = hmac.new(_secret.encode('utf-8'), date.encode('utf-8'), digestmod=hashlib.sha256).hexdigest()
    headers = {"X-cXense-Authentication": "username=%s date=%s hmac-sha256-hex=%s" % (_username, date, signature)}
    connection = http.client.HTTPSConnection("api.cxense.com", 443)
    connection.request("POST", path, json.dumps(obj), headers)
    response = connection.getresponse()
    status = response.status
    responseObj = json.loads(response.read().decode('utf-8'))
    connection.close()
    return status, responseObj

def errorHandling(status, response, message):
    if status != 200:
        raise Exception("%s (http status = %s, error details: '%s')" % (message, status, response['error']))

def createPersistentQuery():
    status, response = cxApi('/persisted/create', {"path":"/dmp/push", "request":{"events":[]}, "mutable":{"events":True}})
    errorHandling(status, response, "Unable to create a persistent query")
    return response

print(createPersistentQuery())
Engagment Reporting
The collected data can be viewed under the Performamce tab of the DMP menu option.
Advanced Element Tracking
So far we have seen how we can track relative simple events such as onclick and onmouseover etc. We will now look at more complex cases such as visibility tracking.
<!DOCTYPE html>
<html>
<head>
    <meta charset="utf-8" />
    <title>Advanced Element Tracking</title>
</head>
<body>

    <script type="text/javascript" src="http://cdn.cxense.com/cx.js"></script>
    <script type="text/javascript">
		cX.setSiteId('9999999999999999999');
		cX.sendPageViewEvent();
		cX.trackElement({ elementId: 'my_div', trigger: {
				on: function(state) { return state.visibility.timeHalf >= 1.5; }, // Seconds
				callback: function(state) {
					cX.setEventAttributes({ origin: '<CUSTOMER-PREFIX>-' + 'website', persistedQueryId:'<YOUR PERSISTED QUERY ID>' });
					cX.sendEvent('Visibility', { action: 'my_div_is_visible' });
				}
			 }
		});

	</script>

	<div id="my_div">My Div</div>
</body>
In this example we are tracking the visibility of the div my_div at the bottom of the page code.
Real Examples
Actual working code examples can be found here.