
Introduction
There is an infinite number of ways of looking at the user traffic data gathered by Cxense Insight and no matter how many of these that the Cxense Insight GUI supports, there will always be cases where yet another view into the data would have been the optimal one. To address this, Cxense Insight comes with the ability to create and maintain workspaces. A workspace is a customer provided Cxense Insight GUI page. The page can hold any number of workspace widgets, each providing one (composite) piece of information that may be represented as a string, a number, a table or a graph.
The usage guide Cxense Insight UI: Custom Workspaces describes in general how to go about create workspaces and adding workspace widgets to it.
Implementing a Workspace
Creating a new Workspace
The "Hello World!" Widget
Below we see how to create the Hello World version of a workspace (red route). We can either start the new workspace by copying an already prepared workspace template (green route) or by starting completely from scratch by adding our first widget to the workspace (blue route). In this case we go the blue route.
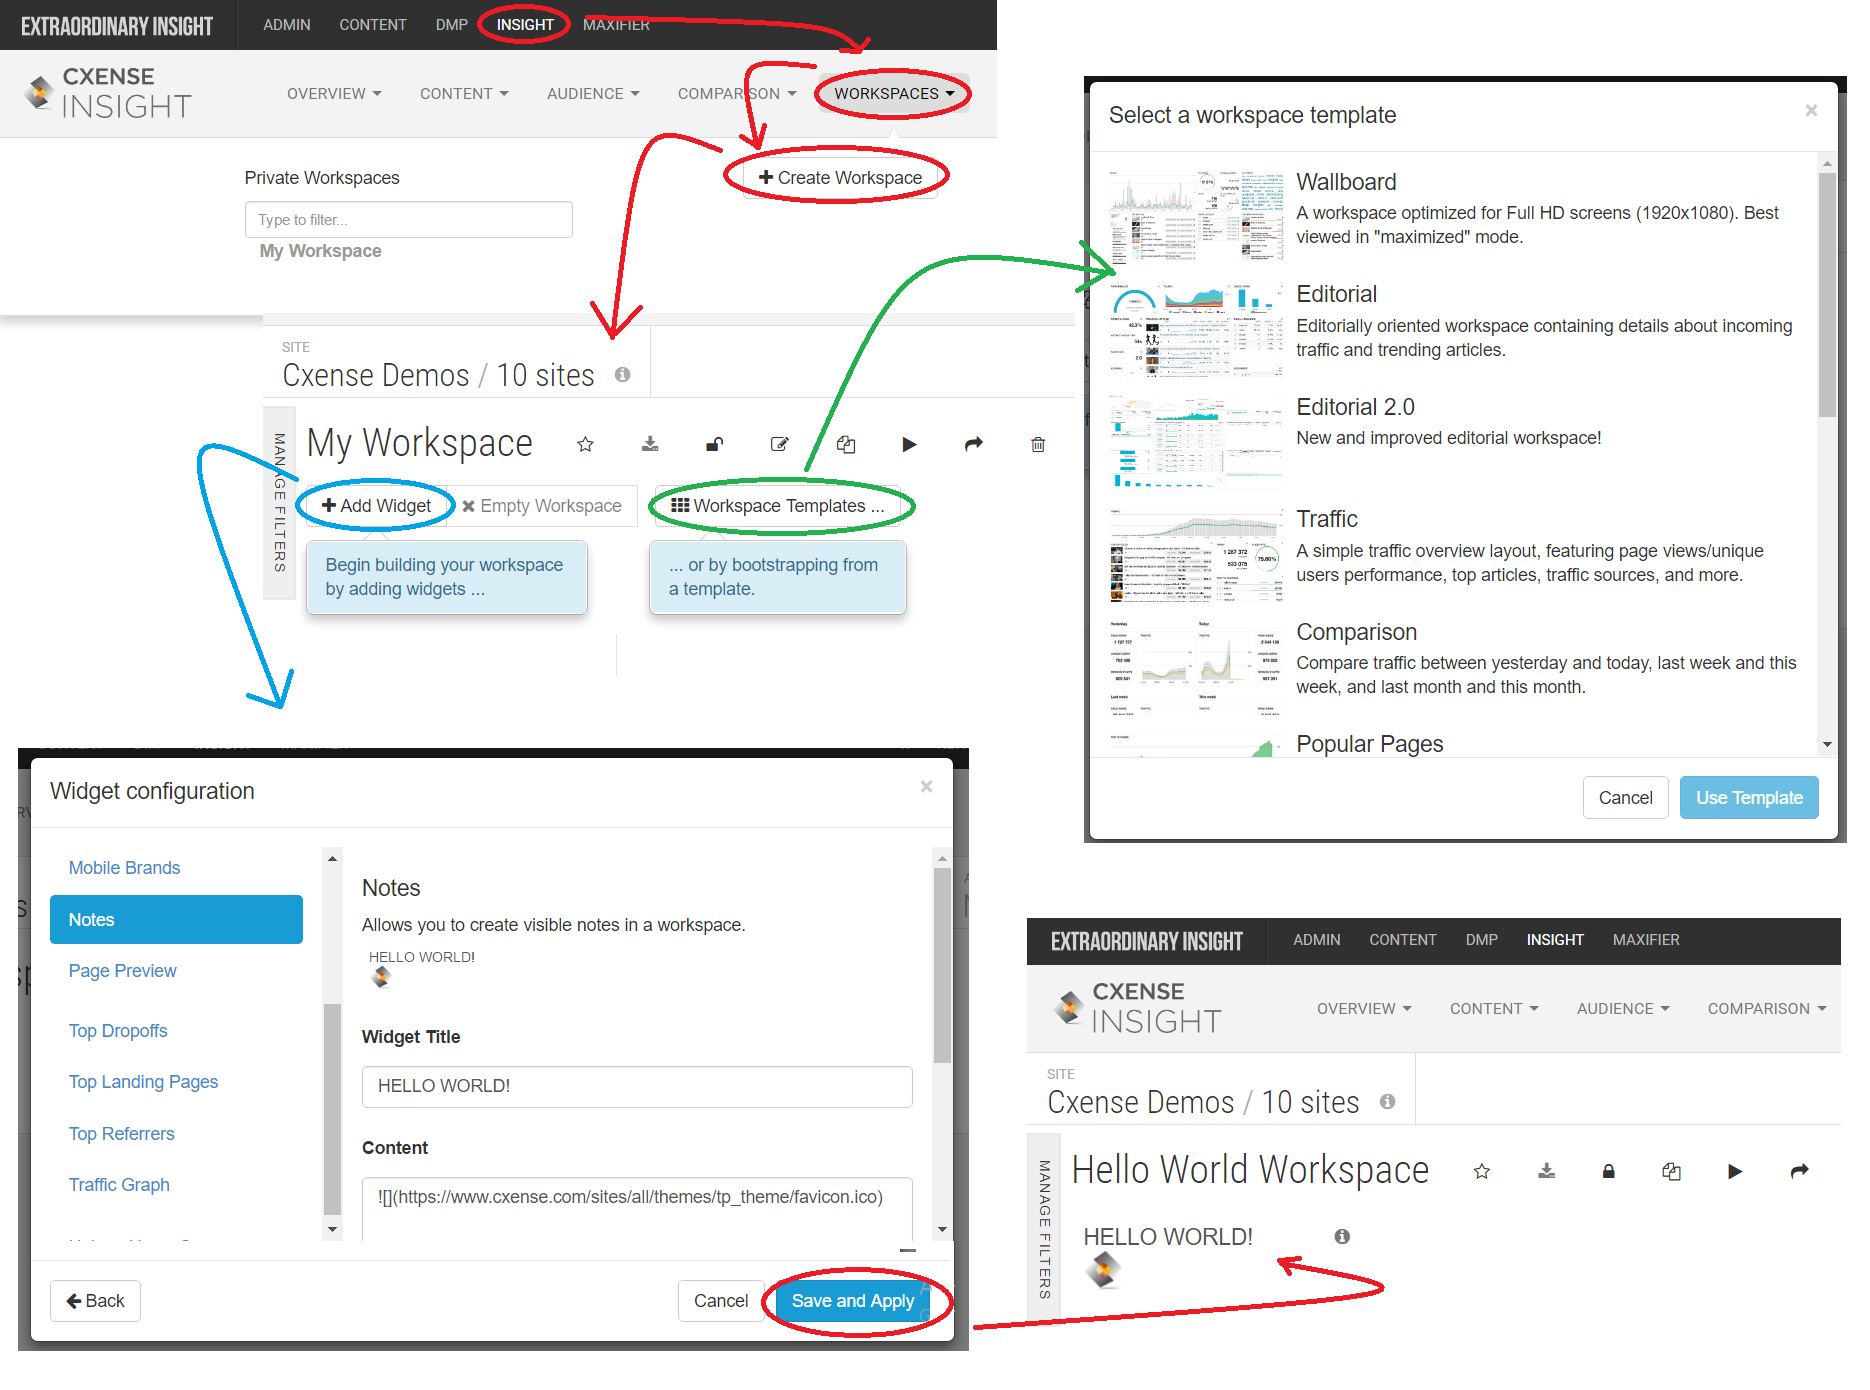
After the blue arrow and before the Widget configuration appear we select to choose a widget rather then to create the widget. Once inside the widget configuration we select the Note option and add HELLO WORLD! as the widget title and some markup with link to the Cxense logo to the Content field:

To the bottom right of the graphic above we see the resulting single widget workspace after we have changed the title (do this by making sure that the padlock icon is in unlocked position and then click the pencil to be allowed to edit the title).
Adding a Traffic Widget
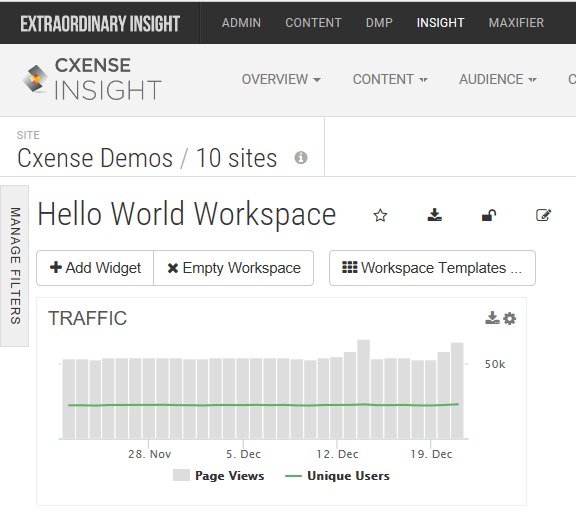
Even though it can be practical to have the ability to add formatted text or other type of static content to a workspace, we have to admit that our Hello World! widget is not very useful. So in our next example we have thrown that widget out and replaced it with a traffic widget. The end result looks like this when used with the 10 sites under the Cxense Demos site group:
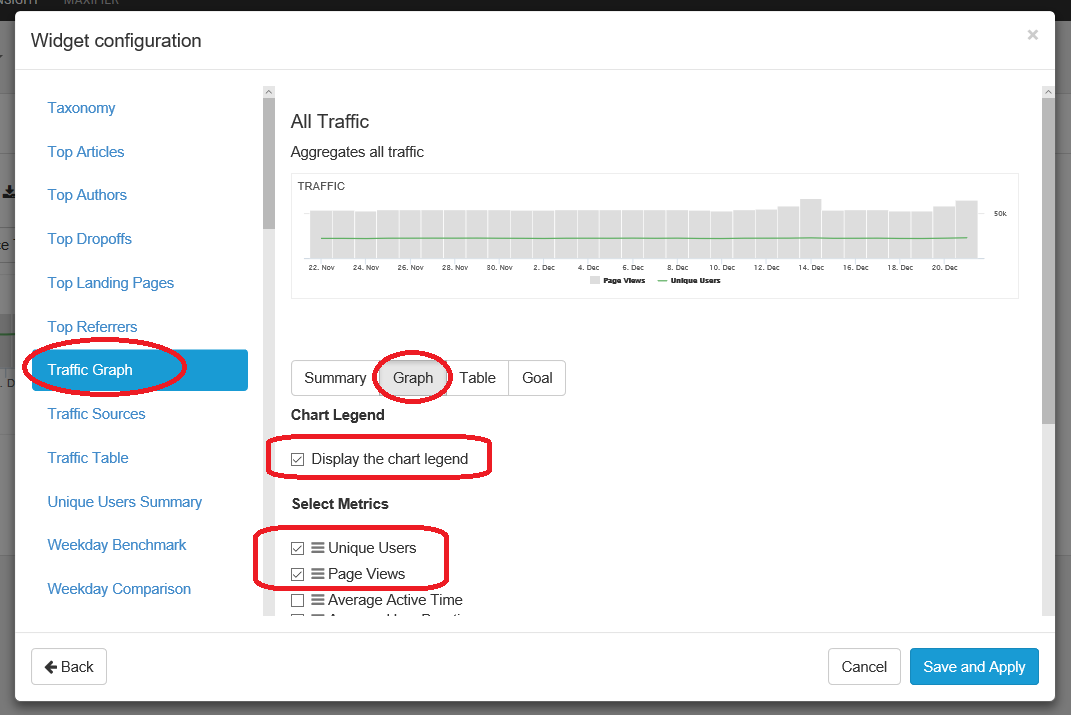
The configuration that went into making this is shown below. Notice how we chose the the pre-made Traffic Graph widget and then selected to show unique users and page views. We also configured there to be an explanation to what each color used would represent (chart legends)
Widget with Fixed Settings
In the previous example we made a widget that will show data for the sites and site group selected in the GUI above the workspace. The same goes for the the time period of the data shown. That is decided by the date selected up in the right corner above the workspace. And this is normally the desired way of operating a widget. The content shown is decided by the selected menu bar options. However, there are times when you want to lock the data shown to some fixed entities, it be site/site group, time period, or some user characteristics such as being on a mobile, etc.
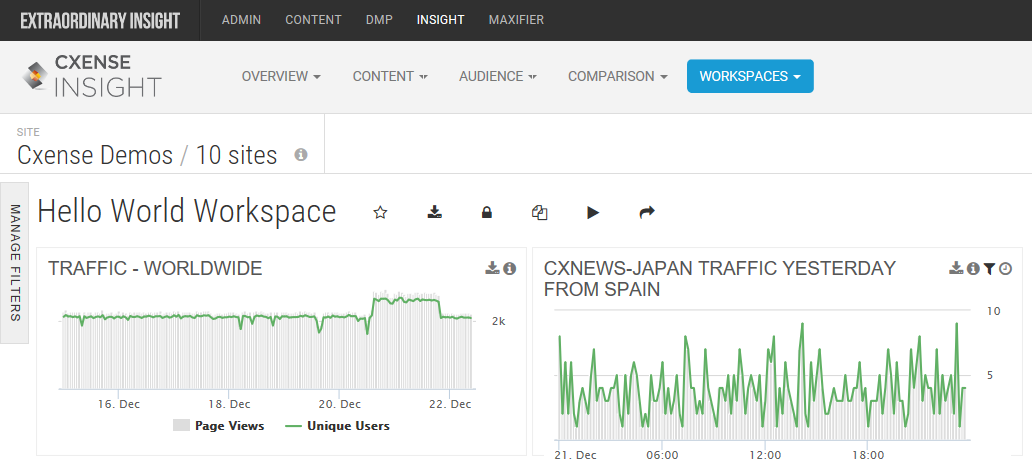
The next widget we are going to make will be very similar to the previous one, except this time around we will lock it in time (always show yesterday's data), site (only show data for the CxNews-Japan site) and in user location (only show data for users accessing the site from Spain):
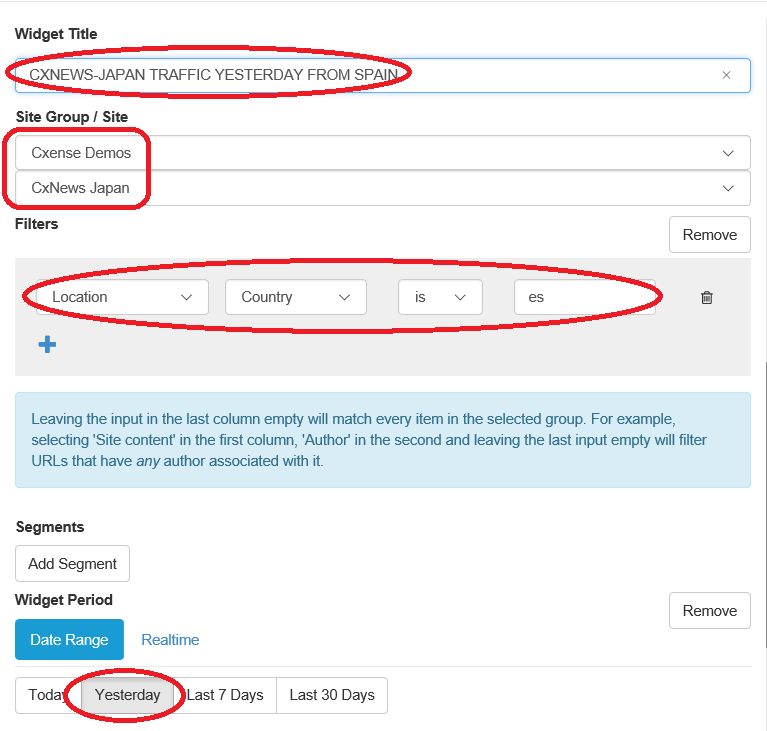
Notice both above in the configuration as well as below in the resulting workspace, how we made changes to the widget title to reflect what aspects that have been frozen. This is important as otherwise users of the workspace will think it is defect when they cannot change the data range etc.
Sharing/Showing a Workspace
One can of course make workspaces soley for one's own use. However, more often than not, one want in one way or another to share the workspace with other.
Sharing a Workspace
The most common way to share a workpace with other users is to make it accessible to all members of a particular site group. This is done by clicking on the share icon circled in red below and select a site group from the drop down that will appear,
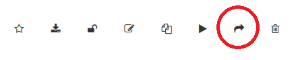
Be aware that it is not possible to unshare a shared workspace. Instead you need to make a private copy of the workpace and then delete the shared version.
Workspace Carousel
Another way to share a workspace or a set of workspaces, is to display them on some monitor that many have access to. In the case of several workspace one can click the play icon to the left of the share icon we circled in red above. That will allow us to select workspaces from a list of accessible workspace and give a display time for how long each workspace is to be shown before the next workspace is shown.
Workspace with External Content
Cxense offers a list of prepared widgets as well as widget functionalities that can be selected and used in workspaces. Even though this list is constantly growing, one is always likely to get in the situation that one want to display some information in a way not currently supported by any Cxense widget. However, that does not mean that one cannot do it, but you will have to code it yourself.
The "Hello World!" External Content Widget
Let start of with a simple Hello World! style example of an widget with external content:
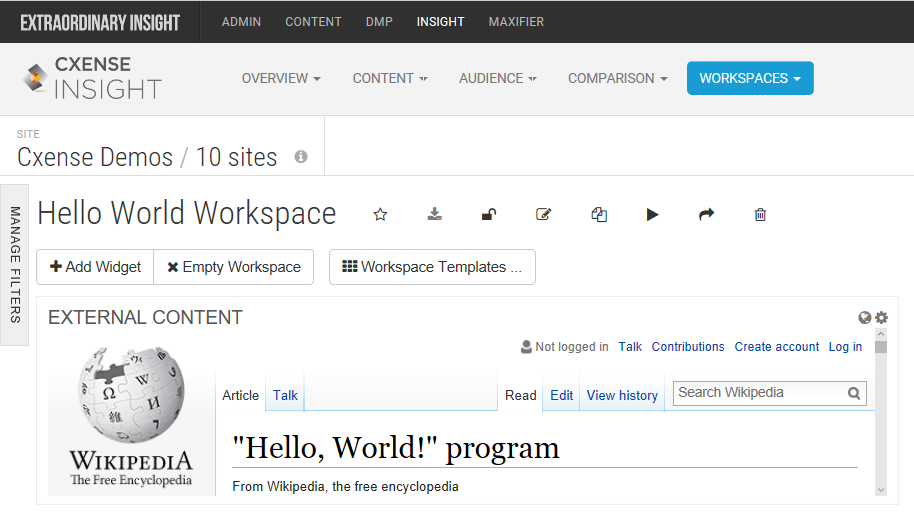
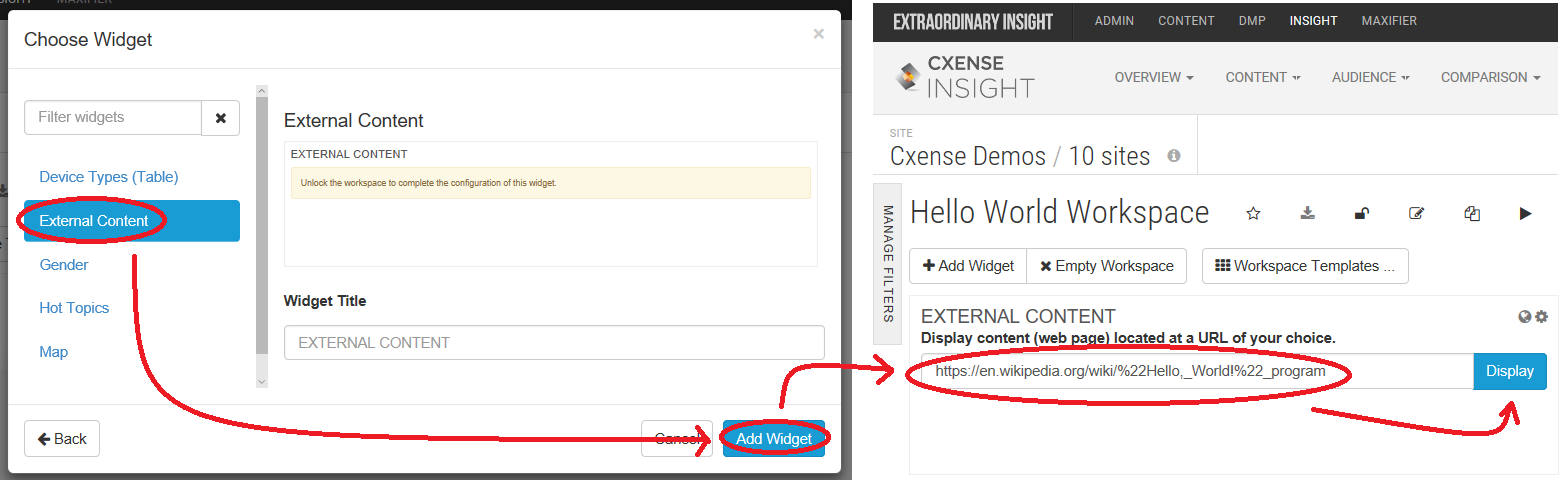
As one can see, the widget above shows the "Hello Worlds!" program Wikipedia page. With other words, the external content shown is that of the link https://en.wikipedia.org/wiki/%22Hello,_World!%22_program. And below we show how we went about doing that:
What we did above worked because Wikipedia uses the https protocol. If the URL had started with http:// instead of https://, it would not have worked unless one specifically allow mixed protocol content via the browser as shown in the Firefox (left) and IE (right) examples below:
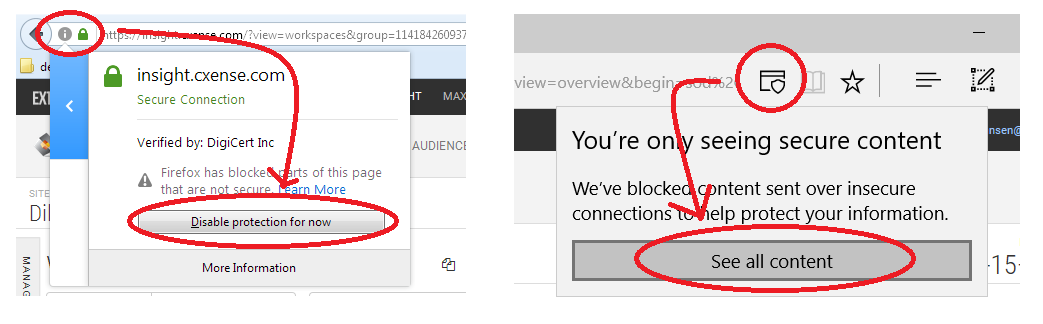
If one does not have access to a SSL certified server to store one's content and one find the browser setting workaround not being an acceptable workaround, then one can approach Cxense to hear if the content can be stored on one of Cxense server's within the cxense.com domain.
Integrating External Content with the Cxense Insight GUI
Once again our Hello World example failed to really present anything useful to the user of the workspace. However, the next example will show what the external content widget is really meant to do: Provide a meaningful and informative view into the Cxense data in a way that is currently not supported by any of the widgets offered by Cxense
Let's imagine we want to know how many news article that one have published for any given time period and have that compared to the same time period leading up to it. Hence, if one are looking at yesterday, then one also want to see the numbers for the day before yesterday (the example shown below), if the time period is a three day period some time ago, then we also want the 3 days just before that period.
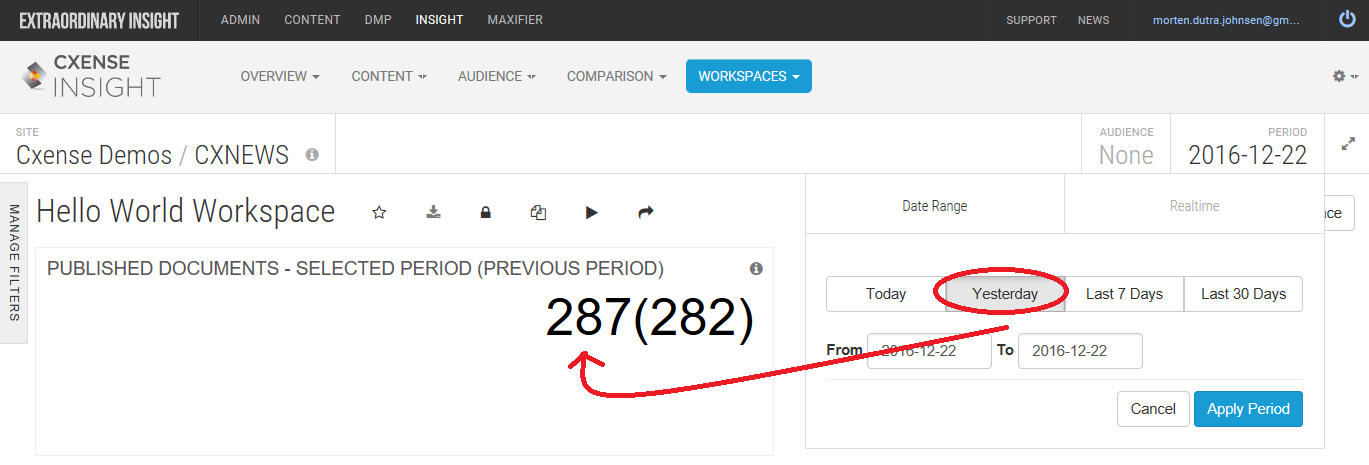
The GUI selected time period is handed over to the external content as URL parameter in the URL that we enter into the widget (see the previous example) . Notice the site, start and stop parameters. The variables quoted with double curly brackets are replaced (in its entirety) with the actual site id, the start date and the end date respectively.
http://dilshan.co.nf/insight_workspace/test.html?siteId={{site}}&start={{start}}&stop={{stop}}&filter={{filter}}
And here is the external web page code used to produce the numbers in the widget above:
<!DOCTYPE html>
<html>
    <head>
        <meta charset="UTF-8">
        <title>External Content - Count of Published Documents</title>
        <style>
            div {
                font-family: Roboto Condensed,Helvetica Neue,Helvetica,Arial,sans-serif;
                font-size: 50px;
                text-align: right;
            }
        </style>
    </head>
    <body>
        <div>
            <span id="docCountSelectedPeriod"></span>(<span id="docCountPreviousPeriod"></span>)
        </div>

        <script type="text/javascript" src="http://cdn.cxense.com/cx.js"></script>

        <script>
	        // Test code for when testing standalone independent of the Cxense widget
            //var urlParameterStr  = "?siteId=1144059307339176686&start=Thu%20Jan%2022%202016%2000%3A00%3A00%20GMT%2B0530&stop=Thu%20Jan%2022%202016%2003%3A00%3A00%20GMT%2B0530";
        </script>

        <script>
            var urlParameterStr  = urlParameterStr  || location.search;

            function getURLParameterValue(parameterName, urlParameterStr) {
                return decodeURIComponent((new RegExp('[?|&]' + parameterName + '=' + '([^&;]+?)(&|#|;|$)').exec(urlParameterStr) || [null, ''])[1].replace(/\+/g, '%20')) || null;
            }

            function getTimeIntervals(start, stop) {
                var timeIntervals = {'selected':{start:null, stop:null}, 'previous':{start:null, stop:null}};
                if (typeof stop !== 'undefined') {
                    timeIntervals.selected.stop = new Date(stop);
                } else {
                    timeIntervals.selected.stop = new Date(start);
                }
                timeIntervals.selected.start = new Date(start);
                timeIntervals.previous.stop = new Date(timeIntervals.selected.start);
                timeIntervals.previous.start = new Date(timeIntervals.selected.start);
                timeIntervals.previous.start.setMilliseconds(+timeIntervals.selected.start-timeIntervals.selected.stop);
                return timeIntervals;
            }

            function genRequestObj(siteId, startTime, stopTime) {
                return {
                    'siteId': siteId,
                    'filter': 'filter(recs-publishtime:range[time("' + startTime + '"), time("' + stopTime + '")])'
                };
            }

            function genApiUrl(path, persistedQueryId, requestObj) {
                return 'https://api.cxense.com' + path + '?callback={{callback}}'
                    + '&persisted=' + encodeURIComponent(persistedQueryId)
                    + '&json=' + encodeURIComponent(cX.JSON.stringify(requestObj));
            }

            function displayResult(data, tagId) {
                if (data.hasOwnProperty('httpStatus') && data['httpStatus'] === 200) {
                    document.getElementById(tagId).innerHTML = data['response']['totalCount'];
                } else {
                    throw 'No or bad http status';
                }
            }

            var siteId = getURLParameterValue('siteId', urlParameterStr);
            var start  = getURLParameterValue('start', urlParameterStr);
            var stop   = getURLParameterValue('stop', urlParameterStr);
            var filter = getURLParameterValue('filter', urlParameterStr); // GUI filtering retrieved here, but not used for anything in this example
            var timeIntervals = getTimeIntervals(start, stop);
            var path = '/document/search';
            var persistedQueryId = '3e348c51362b64a5644492e0d92af3dcb925c2f2';

            var requestObj = genRequestObj(siteId, timeIntervals.selected.start.toISOString(), timeIntervals.selected.stop.toISOString());
            var apiUrl = genApiUrl(path, persistedQueryId, requestObj);
            cX.jsonpRequest(apiUrl, function(data) {
                displayResult(data, 'docCountSelectedPeriod');
            });

            var requestObj = genRequestObj(siteId, timeIntervals.previous.start.toISOString(), timeIntervals.previous.stop.toISOString());
            var apiUrl = genApiUrl(path, persistedQueryId, requestObj);
            cX.jsonpRequest(apiUrl, function(data) {
                displayResult(data, 'docCountPreviousPeriod');
            });
       </script>
    </body>
</html>
The code above involves the use of a persisted query. If you are not familiar with that concept, check out the Persisted Query Tutorial.