
Introduction
Instrumentation is a general term for using any type of measuring device to perform quantitative measurements. A clock, a measuring cup and a measuring tape are all everyday examples of devices that can be used for instrumentation. Even though the term instrumentation is used within the software industry as well, in that case one normally relay on some form of measuring technique rather than a measuring device. Below we see a very simple example of software instrumentation in which we measure the time a function takes to be executed:
startTime = time.time()
myFunction()
stopTime = time.time()
print("The function completed in " + str(stopTime - startTime) + " ms")
The most common motivations for instrumenting Cxense products are:
-
What is the ROI for purchasing a particular Cxenese product? Is the use of Cxense resulting in more page views, more conversions, more user engagement, etc.?
-
Is one feature configuration performing better or worse than some other configuration for the same feature?
-
Are there some components on my pages that are better at driving traffic than others?
Built-in Instrumentation
Several of the Cxense products have built-in instrumentation or some framework that facilitate instrumentation.
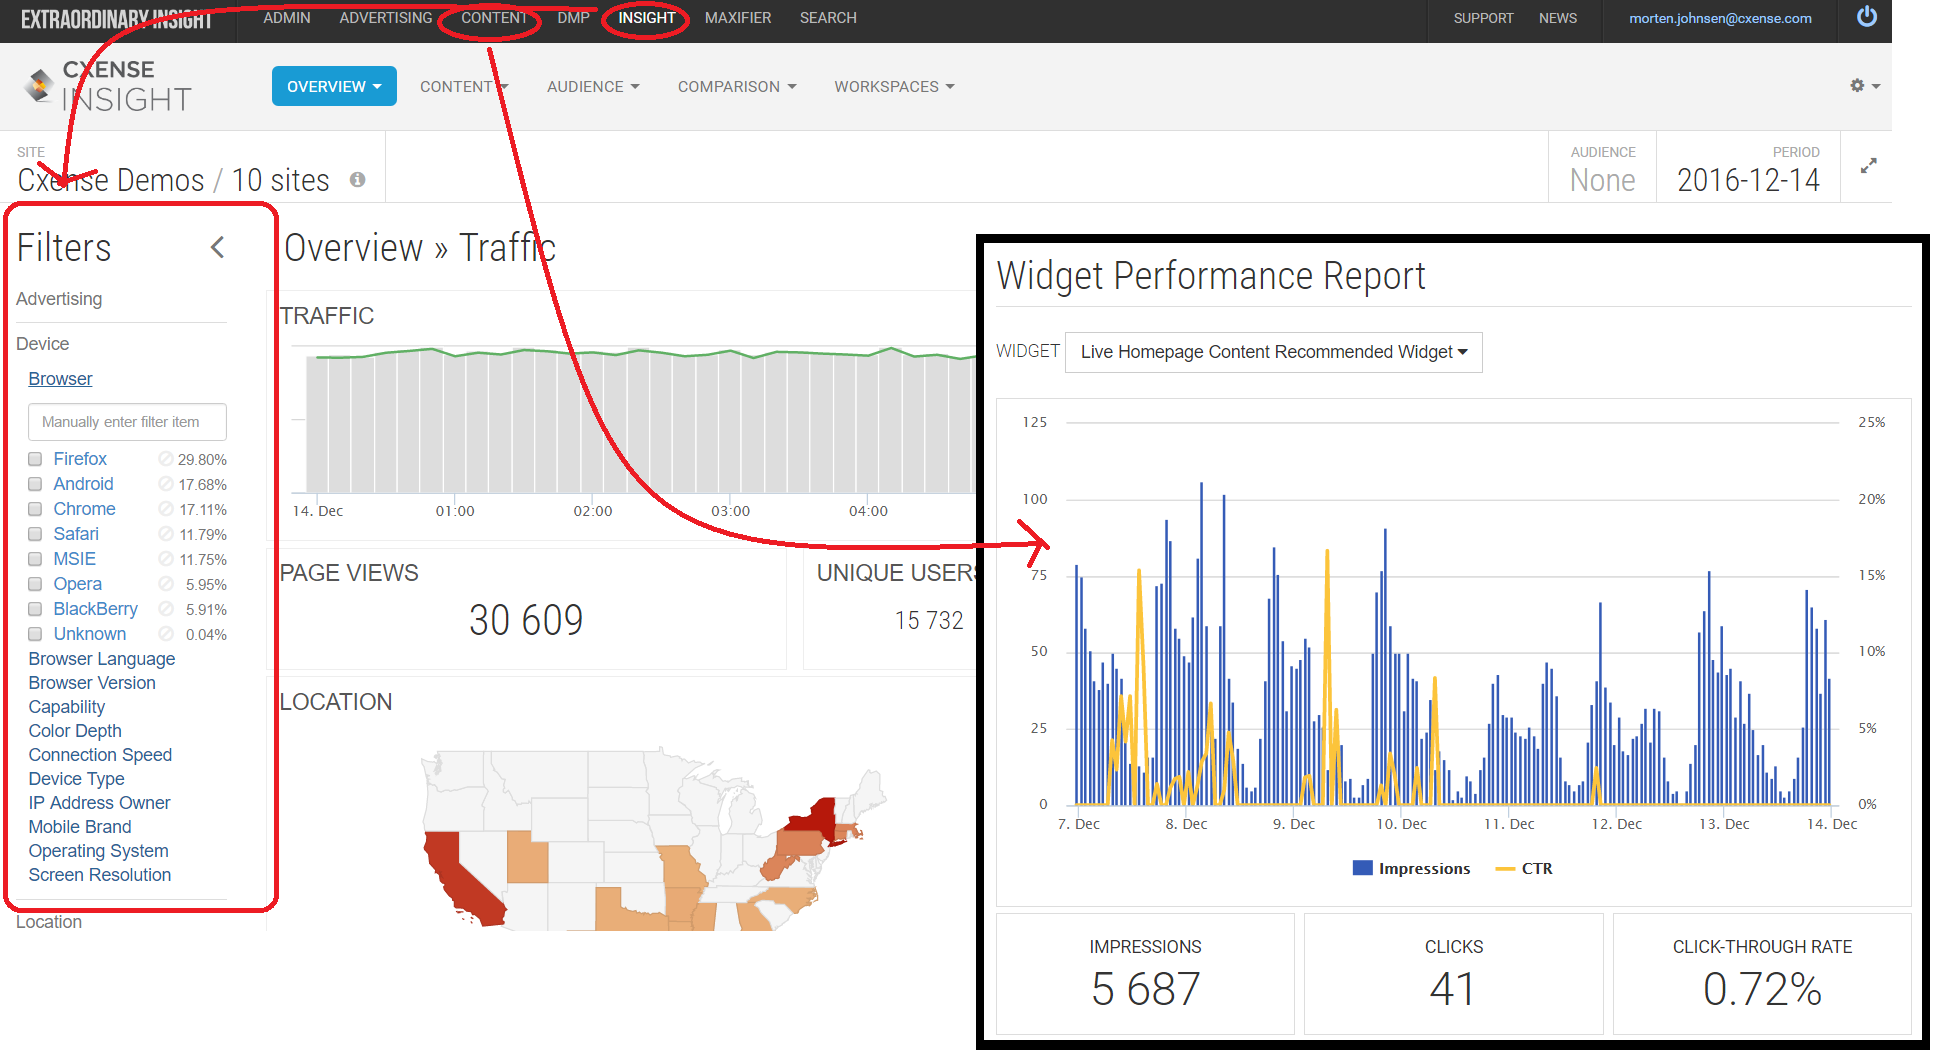
To the left we see the filtering feature of the Cxense Insight GUI that can be used to drill down into sub set of the content and/or the user traffic. To the right we see Cxense Content Recommendation widget performance statistics.
Instrumentation Workspace
For Cxense Content Recommendation a socalled workspace with external content (see Worspace Tutorial) has been prepared and can be adapted for one's own site and content rec widgets. The first step is to create the widget as shown by the arrows in the figure below:
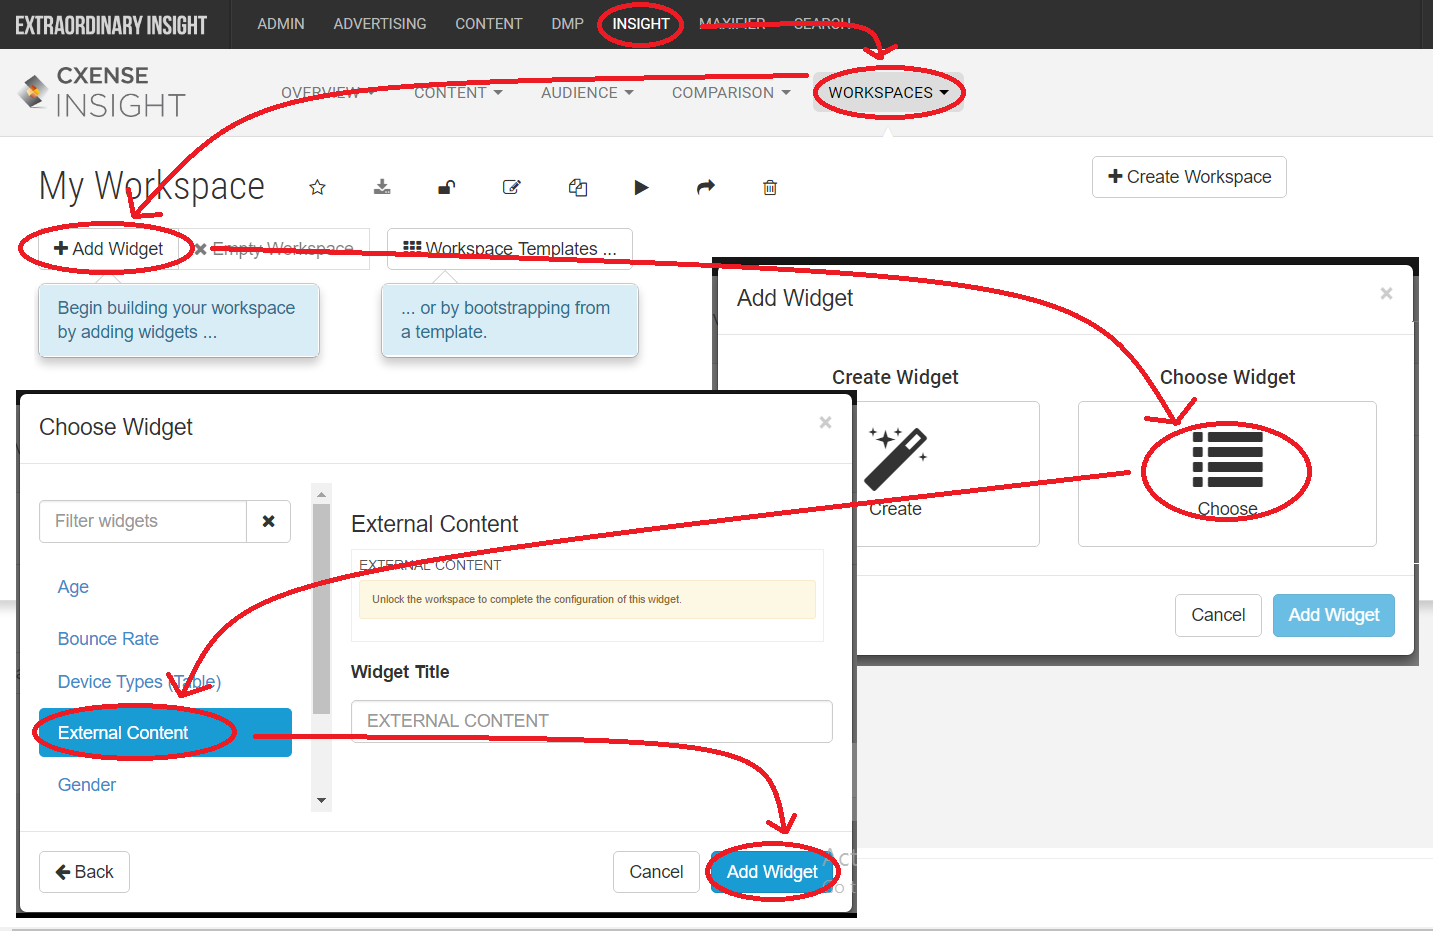
In the single input field in the window appearing next (after clicking the Add Widget button), copy in the URL below. This will give an overview of all widgets part of the site group selected in the GUI framework surrounding the workspace.
https://onboarding.cxense.com/public/insight-widgets/content-performance.html?siteId={{site}}&siteGroupId={{group}}&clk=dmp:click&imp=dmp:impression&start={{start}}&stop={{stop}}&filter={{filter}}&totalonly=true
The next URL will give more details about a particular widget. Before pasting the URL into the workspace widget, replace <SITEID> and <WIDGETID> with the actual site id and Cxense Content widget id respectively.
https://onboarding.cxense.com/public/insight-widgets/content-performance.html?siteId=<SITEID>&widgetId=<WIDGETID>&clk=dmp:click&imp=dmp:impression&start={{start}}&stop={{stop}}&filter={{filter}}
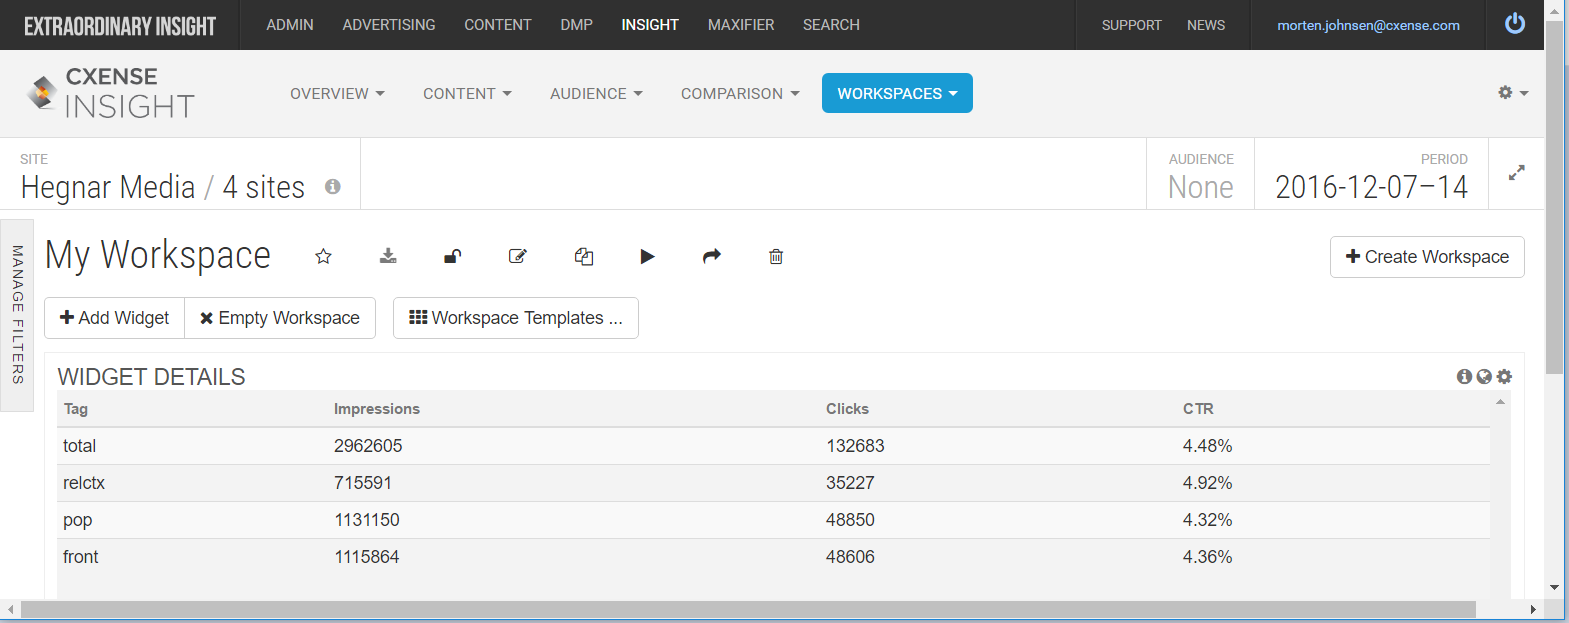
Below we see the stats available after applying the second URL to an external workspace widget:
Exercise: Given you have access to a site group with active content rec widgets, create the external workspace showing both type of statistics (overall and site/widget specific).
Custom Instrumentation
In this section we will be adding our own additional instrumentation. We can do that in the following ways:
-
Using meta tags
-
Using Customer Parameters
-
Using URL parameters
Using Meta Tags
The simplest form of custom instrumentation is to mark pages based on some characteristics of their content using Cxense meta tags. A very typical use case for this is to mark pages as either being inside or outside the paywall. Cxense meta tags are described here. The 3 letter code xyz is a placeholder for your customer prefix.
<meta name="cXenseParse:xyz-access" content="free"/>
<meta name="cXenseParse:xyz-access" content="paid"/>
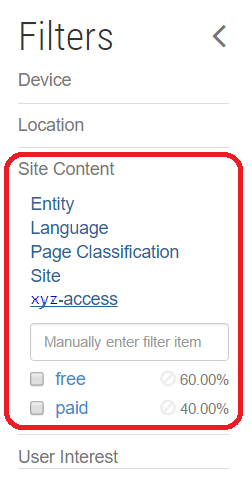
The amount of page views of the two types can then be read using the filters all the way to the left in the Cxense Insight GUI:
Exercise: Add a paywall meta tag to your site, re-crawl the pages for the tag to be registered, then verify that the tag values appear within the filter widget in the GUI.
Using Custom Parameters
In the section above each page ended up with one static value and there would be no difference from one user visit to another. Either the page was a free page or a page that had to be paid for reading. However, if the content may change from one user visit to another, then meta tags cannot be used. In the next example we will be faced with content that will change from one user visit to another.
In the next example we will imagine that we want to find out if the color of an anchor text has any effect on the how many clicks it will get.
The web page code below have a list of colors that is going to be tested out (line 5). Each time someone opens the page, one color is randomly picked from the set of test colors. That color is added to the rest of the page view data as a custom parameter (line 11) and uploaded to Cxense Insight (line 12). The same color is set for the anchor element in line 26 by the code in line 25 and 21.
<html>
   <head>
      <script>
         // A test color is randomly picked from a set of test colors
         var testColors = ['red', 'green', 'blue', 'yellow', 'purple'];
         var testColor = testColors[Math.floor(Math.random() * testColors.length)];

         // The test color is reported to Cxenese together with the rest of the page view data
         var cX = cX || {}; cX.callQueue = cX.callQueue || [];
         cX.callQueue.push(['setSiteId', '9222364973424511877']);
         cX.callQueue.push(['setCustomParameters', { 'color': testColor }]);
         cX.callQueue.push(['sendPageViewEvent']);

         // Asynchrnous loading of the Cxense cx.js library
         (function(d,s,e,t){e=d.createElement(s);e.type='text/java'+s;e.async='async';
         e.src='http'+('https:'===location.protocol?'s://s':'://')+'cdn.cxense.com/cx.js';
         t=d.getElementsByTagName(s)[0];t.parentNode.insertBefore(e,t);})(document,'script');

         // The anchor text is set to the picked test coloer
         function onLoad(color) {
            document.getElementById("testLink").style.color = color;
         }
      </script>
   </head>
   <body onload="onLoad(testColor)">
      <a id="testLink" href="nextPage.html">Link to next page</a>
   </body>
</html>
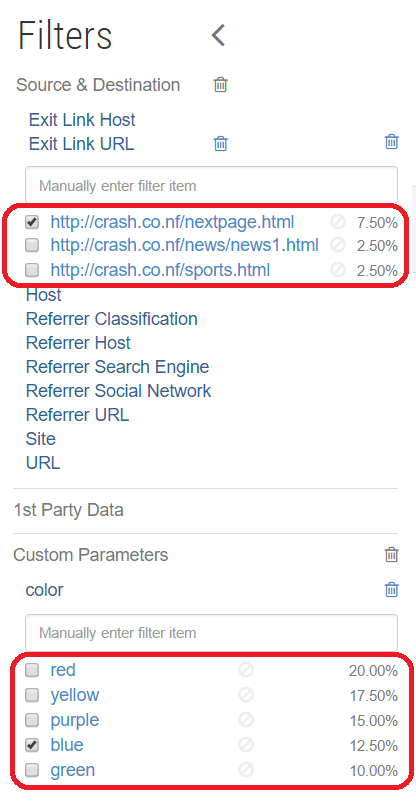
Below we see the filtering options of Cxense Insight (it is positioned all the way to the left in the Cxense Insight GUI). The two red circles shows the page view data related to the anchor element (the link) in line 26 above. The top one allows us to filter on page views that had the referenced page in line 26 as the next next page. The bottom red circle holds the tests colors and how often each of them was picked in percentage (as reported by line 11 above). By locking the Exit URL as done in the top red circle and then selecting one of the colors at time in the bottom red circle, we can see which color led to the most impressions and/or unique user users.
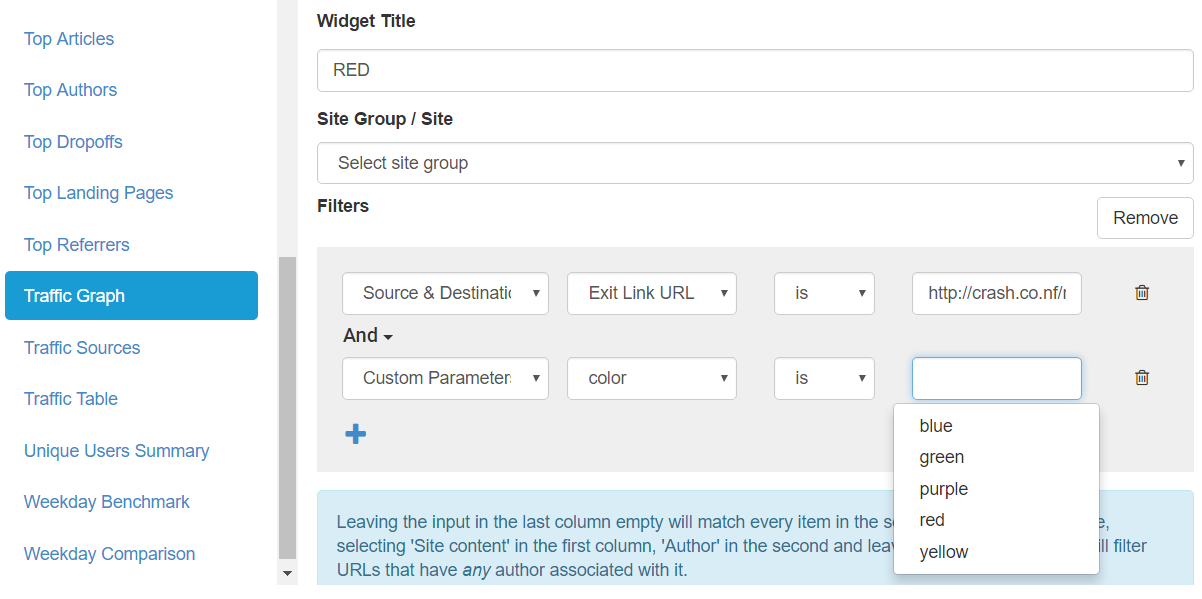
Playing around with the filters gives us the results we want, but it is not a very user friendly way of obtaining the information. It would be better if we created a workspace that automatically obtained the same information. Below we are making one workspace with one widget per color showing the number of clicks on the anchor text (if you are not familiar with workspaces, you can learn how to set them up in the Workspace Tutorial).
The finished workspace ends up looking like this:

Exercise: Publish the test page and create a custom workspace that shows the number of clicks for each color.
Using URL Parameters
In this next example we will learn how we add the very same customer parameter color from the previous example above as a URL parameter. The URL version of the same parameter has the prefix cx_.
In the new version of the web page, we have added one link for each of the test colors. Notice how each of the links has the URL parameter cx_color added to the URL given in the href HTML parameter.
<html>
   <head>
      <script>
         var cX = cX || {}; cX.callQueue = cX.callQueue || [];
         cX.callQueue.push(['setSiteId', '9222364973424511877']);
         cX.callQueue.push(['sendPageViewEvent']);

         (function(d,s,e,t){e=d.createElement(s);e.type='text/java'+s;e.async='async';
         e.src='http'+('https:'===location.protocol?'s://s':'://')+'cdn.cxense.com/cx.js';
         t=d.getElementsByTagName(s)[0];t.parentNode.insertBefore(e,t);})(document,'script');
      </script>
   </head>
   <body>
      <a style="color:red" href="nextPage.html?cx_color=red">Link to next page</a> <br>
      <a style="color:green" href="nextPage.html?cx_color=green">Link to next page</a> <br>
      <a style="color:blue" href="nextPage.html?cx_color=blue">Link to next page</a> <br>
      <a style="color:yellow" href="nextPage.html?cx_color=yellow">Link to next page</a> <br>
      <a style="color:purple" href="nextPage.html?cx_color=purple">Link to next page</a>
   </body>
</html>
This time around the percentage following the different colors in the GUI will tell the whole story (no exit link must be set).
Exercise: Deploy the page above, but change the name of the parameter to cx_color2 for it not to be mixed up with the data obtained from the previous exercise.
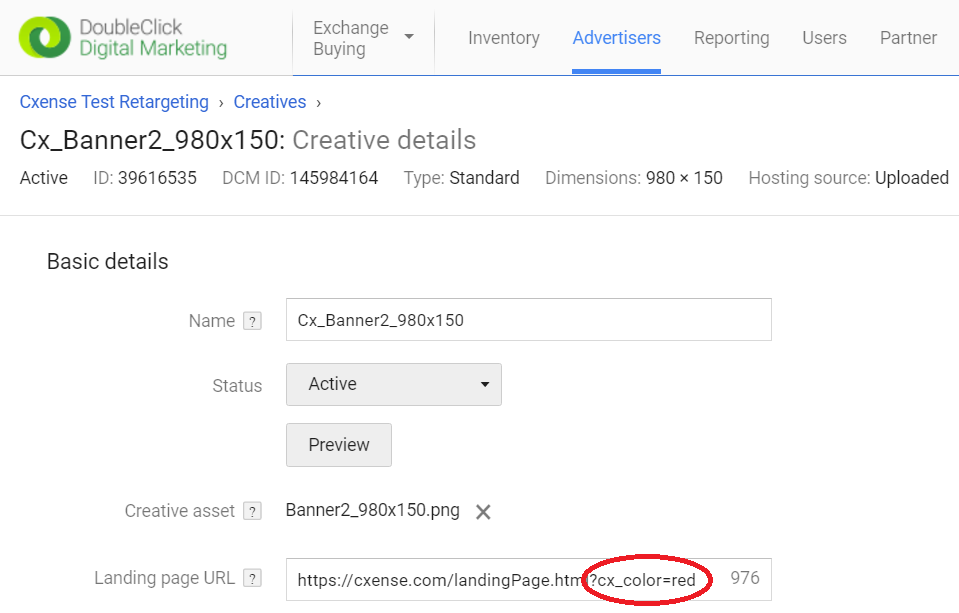
The instrumentation URL parameters do not necessarily need to stem from web page code that we are writing (or in control of). Below you see how the same red color parameter we added to our code above can be added to the click URL of a Google DFP ad:
Standard Custom Parameters
To speak about standard custom parameters sounds like a contradiction. How can something custom be standard? However, the term stems from the fact that Cxense by convention uses certain custom parameter over and over to measure the same things. These "reserved" custom parameters are listed below.
|
Tag/Parameter/Key Name |
Intended Usage |
|---|---|
|
cx_source |
Used by Cxense Content to track all page views that are a result of a content recommendation widget has been clicked (the value of cx_source is set to cxrecs). Can be added to competitor's content recommendations for A\B testing between Cxense and competitor product as shown here: XML
|
|
cx_navSource |
To track from where (which page component) a user comes to the next page. XML
|
|
cx_campaign |
To track the performance of ad campaigns. XML
|
|
cx_creative |
To track the performance of creatives. XML
|
|
cx_tag |
Track what type of content branch delivered a given recommendation. This tag can be inserted via the Content Rec content config as explained here in order to see it in the Content Rec Performance GUI. If added as above, then it will also appear in the Cxense Insight |
|
cx_artPos |
Measure performance per position in the content recommendation widget. Carousels are the typical use case. JavaScript
|
|
<customer_prefix>-access |
Track which side of the paywall a document is XML
|
|
subscriber |
Track the subscriber status of the user. JavaScript
The subsriberStatus would hold values such as subscriber, nonsubscriber, registered, expired, etc. |
|
cx_channel |
Tracks Facebook Instant Articles JavaScript
|
Using External 3rd party Tools
An alternative to built-in or custom instrumentation is the use of third party tool such as Google Experiment. A tutorial on how to compare Cxense with a competitor using Google Experiment is in the making