
Introduction
A render template is a piece of code that unpacks a data structure to visualize some object that was referenced within the structure. In Cxense render templates are used to convert data structures representing ads or content recommendations into HTML. With other words, a render template is used to determine the visual layout of an ad or a content recommendation. In this tutorial we will learn how to implement a render template in general and Cxense Advertising ads templates in particular.
With the new Content Recommendation GUI the creation and use of render templates is something that takes place behind the scene and inside an iFrame. However, sometime the page environment makes it necessary, or at least much more convenient, to use a render template. For instance, if the web site already has a very complex CSS structure that one depends on and that is too big and cumbersome to move inside the Cxense Content Recommendation Style component, then it is better to substitute the GUI developed iFrame and instead insert a render template direct into the page code.
The "Hello World!" Rendering Example
Below we see an example that is totally independent of any Cxense product or approach. It will show what normally goes into the implementation and use of a render template:
-
a data structure with date to be rendered (the variable data)
-
a template and/or code to do the rendering (the function renderFunction())
-
a target element where the rendering output is to be placed
<!DOCTYPE HTML>
<html>
    <body>

		<!-- The html output generated by the rendering code will be inserted within this target element -->
		<div id='targetElement'></div>

		<script>
			// Rendering code for unpacking the data and generating the html (the layout)
			function renderFunction(data) {
				var imgElement = document.createElement('img');
                imgElement.src = data.image;
                imgElement.alt = data.title;
                var anchorElement = document.createElement('a');
                anchorElement.href = data.clickURL;
                anchorElement.appendChild(imgElement);
                return anchorElement;
			}

			function insertObject(targetElement, data) {
				document.getElementById(targetElement).appendChild(renderFunction(data));
			}

			// Some example data object
			data = {
			   image : 'smile.jpg',
			   title : 'Hello World!',
			   clickURL : 'http://www.cxense.com',
			}

			insertObject("targetElement", data);
		</script>

	<body>
<html>
Below we see the what the browser output would look like assuming you have a 300 x 250 pixel image file called smile.jpg with the famous icon shown below in the same directory as the file above. In the following we will go through a series of examples each taking our render template approach to the next level while at the same time always producing one and the same output, the smiley below with the Hello World! flyover text and www.cxense.com click url.
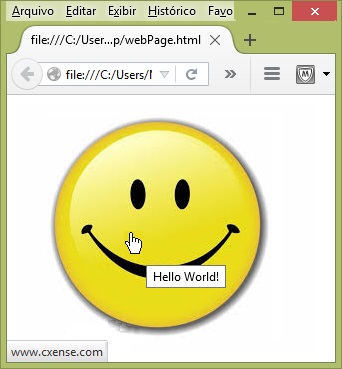
The net effect of the rendering code above was that we converted the data structure into the html seen below.
<!DOCTYPE HTML>
<html>
    <body>

		<div id="targetElement">
			<a href="http://www.cxense.com">
				<img title="Hello World!" alt="Hello World!" src="smile.jpg" target="_blank">
			</a>
		</div>

	<body>
<html>
This Cxense independent example showed us what a render template in principle is all about. In the next section we will do the same thing all over, but now with a Cxense facilitated render template.
Using Cxense Templating Language
In the example above we only used standard HTML and Javascript. Cxense has it's own templating language with a syntax very much like Microsoft Ajax Templating.
The code below produces the exact same smiley output as in the example above. But here we have replaced the Javascript rendering function with the more readable Cxense template code that also has a smaller footprint.
<!DOCTYPE HTML>
<html>
    <body>

		<!-- Include the cx.js script that contain rendering support functionality -->
		<script type="text/javascript" src="http://cdn.cxense.com/cx.js"></script>

		<!-- The html output generated by the rendering code will be inserted within this target element -->
		<div id="targetElement"></div>

		<!-- Rendering code for unpacking the data and generating the html (the layout) -->
		<div id="templateElement" style="display: none;">
			<a tmp:href="{{ data.clickURL }}">
            	<img tmp:title="{{ data.title }}" tmp:alt="{{ data.title }}" tmp:src="{{ data.image }}">
			</a>
		</div>

		<script>
			// Some example data object
			data = {
			   image : 'smile.jpg',
			   title : 'Hello World!',
			   clickURL : 'http://www.cxense.com',
			}

			cX.renderTemplate('templateElement', 'targetElement', data);
		</script>

	<body>
<html>
The first thing we did was to include the Cxense library file cx.js. From that library we use the function cX.renderTemplate() to do the rendering job. The function takes 3 arguments:
-
templateElement - the div where the rendering code resides
-
targetElement - the div where the resullt of the rendering is to be placed
-
data - the data structure to be converted into HTML
Observe the render template code within the template element. Gone is all the javascript code we had in the first example and instead we now have a HTML template with variables in double brackets that the cX.renderTemplate() function substitutes with live data. (Later we will see that the template may also contain javascript code even though it is absent in this simple example).
Including the Render Template from another File
In the examples so far all code has been in one file. However, render templates normally resides in a different file than the file actually displaying the rendered object. In the next example we will separate the rendering from the displaying of the rendered object.
We have stored the render template code from the previous example in the file renderTemplate.html. In addition we will now create the file webPage.html with the HTML below as its content. The latter file includes the output of the former via the use of the cx.js library function cX.insetWidget(). The function is one of two functions used for including render template files. The other one is cX.insertAdSpace(). The two functions do very similar things. cX.insertWidget() is used when dealing with content recommendations whereas cX.insertAdSpace() is used for ad placements. In the code below both function calls are included, but one of them is commented out.
<!DOCTYPE HTML>
<html>
    <body>

		<!-- Include the cx.js script that contain rendering support functions -->
		<script type="text/javascript" src="http://cdn.cxense.com/cx.js"></script>

		<!-- The output generated by the rendering code below will be inserted right before this div -->
		<div id="targetElement"></div>

		<!-- Script that executes the rendering code and places the output within the target element -->
		<script type="text/javascript">
			cX.insertWidget({ renderTemplateUrl: 'renderTemplate.html', insertBeforeElementId: 'targetElement', width: 300, height: 250 });
			//cX.insertAdSpace({ renderTemplateUrl: 'renderTemplate.html', insertBeforeElementId: 'targetElement', width: 300, height: 250 });
		</script>

    </body>
</html>
Opening the file webPage.html in a browser will now show the very same smiley we saw before using only renderTemplate.html.
Render Templates and Matryoshka Dolls

As you might have realized already, working with render templates is very much like playing with Matryoshka Dolls (a.k.a Russian nesting dolls). For those not familiar with the traditional Russian dolls, the thing to know here is that each doll can be put inside the next one until only the biggest one is left to be seen. Render templates works very much the same way as illustrated by the figure below:
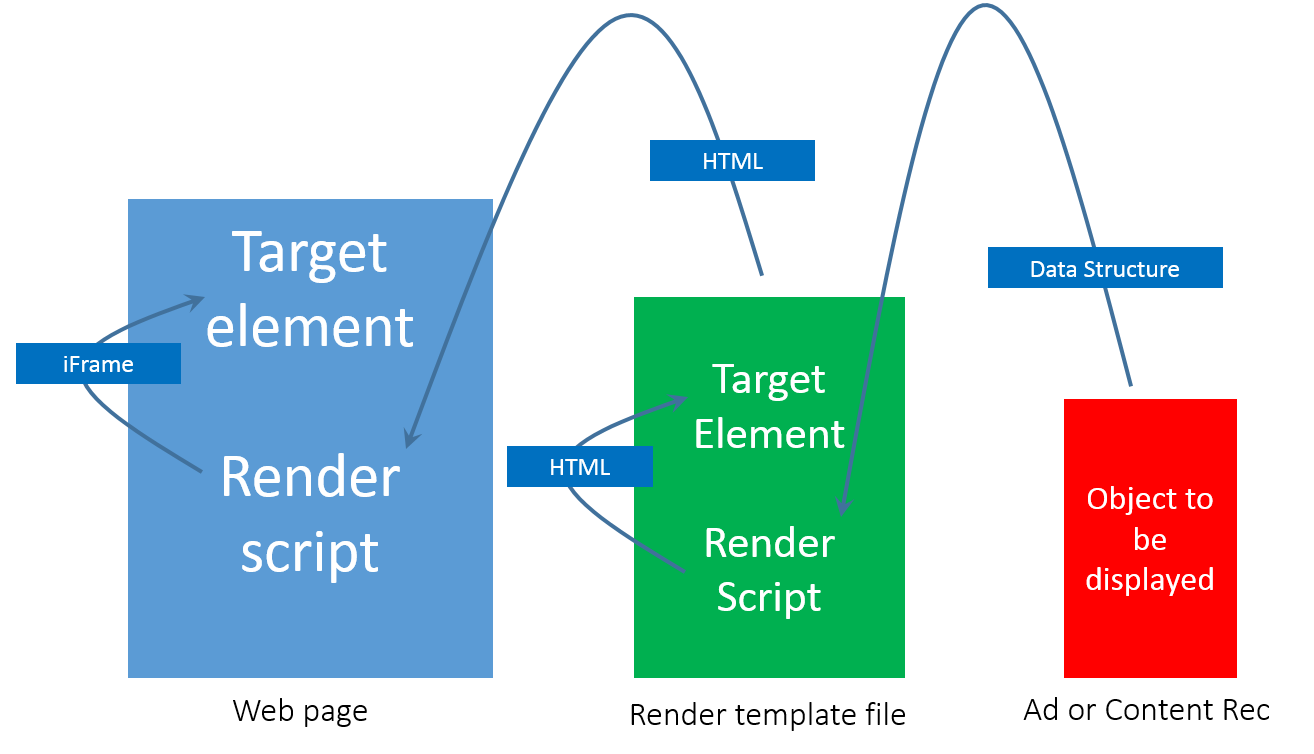
The blue and the green boxes above correspond to the two files wegPage.html and renderTemplate.html respectively, whereas the red box is the data structure with the information about the object to be displayed (the smiley in our case). In all examples so far the red box has actually resided within the green one, and it will continue to do so one more example. However, the red box is normally retrieved from a Cxense server in the shape and form of a content recommendation or an ad (something we also will do further down).
In this next example we will replace the simple data structure that we have used so far with a in-line copy of data for a real ad from Cxense Advertising. But even in this case we have simplified the data structure a bit and we are only showing the relevant part of the structure. However, the paths to all attributes are the actual ones.
<!DOCTYPE HTML>
<html>
    <body>

		<!-- Include the cx.js script that contain rendering support functionality -->
		<script type="text/javascript" src="http://cdn.cxense.com/cx.js"></script>

		<!-- The html output generated by the rendering code will be inserted within this target element -->
		<div id="targetElement"></div>

		<!-- Rendering code for unpacking the data and generating the html (the layout) -->
		<div id="templateElement" class="template">
			<!--%
			var ads = data.searchResult.spaces[0].ads;
			for (var i = 0; i < ads.length; i++) {
				var ad = ads[i];
				%-->
				<a class="url" tmp:href="{{ad.clickUrl}}" target="_blank">
					<img tmp:src="{{ad.creative.source}}" border="0" width="{{ad.creative.spec.width}}" height="{{ad.creative.spec.heigth}}", title="{{ad.creative.description}}", alt=""/>
				</a>
				<!--%
			 }
			 %-->
		</div>

		<script>
			// Some actual (but simplified) data from our ad server
			data = {
				"searchResult": {
					"spaces": [{
						"ads": [{
							"creative": {
								"description": "Hello World!",
								"source": "http://cdn-content-production.cxpublic.com/e91d0143a6fbff1711aa7f2be9a3ac36a14c899a7f61b6d9e33915887923b2c8.png",
								"spec": {
									"height": 250,
									"width": 300
								},
							"clickUrl": "http://adserver.cxad.cxense.com/adserver/click/ArTg_98L7xxPzk_ly7xFqS3y-omCBB8-kgE9yTUYwv_-DeuKKbmE40I_gTN9246BCS9e4YfO_jUNkGIQF8cup91bW4phiJSjlEEBzwx8lz3rQ2Qb8FIrg43U5tcSfBgJu1TMXTmduthoW4W20DKa2c3a10R9QfTWAyxL3NZtAVwXFkOMMrziNGlNaXUqsQ26DZ71"
							},
						}]
					}]
				}
			}

			cX.renderTemplate('templateElement', 'targetElement', data);
		</script>
	<body>
<html>
By using a copy of actual real data it is easier to illustrate the purpose of the render template javascript code located between the start and stop tokens <!–% and %-->. The first line of this code is
var ads = data.searchResult.spaces[0].ads;
In this case the variable data was created by us further down in the file, but the variable will have the same name and structure also in the case it is the framework that makes the variable accessibe (as we will see in the next example).
Retrieving Data from a Cxense Server
In the next example we retrieve the data structure of an ad using the Cxense Advertising ad space id. The function cX.insertAdSpace() will retrieve the data structure and hand it over to the render template as the variable data and then parse the template element replacing double bracket expressions and executing all Javascript code between <!–% and %–>. In the end it will place the generatated output just before the target element.
<!DOCTYPE HTML>
<html>
    <body>

		<!-- Include the cx.js script that contain rendering support functionality -->
		<script type="text/javascript" src="http://cdn.cxense.com/cx.js"></script>

		<!-- The html output generated by the rendering code will be inserted within this target element -->
		<div id="targetElement"></div>

		<!-- Rendering code for unpacking the data and generating the html (the layout) -->
		<div id="templateElement" class="template">
			<!--%
			var ads = data.searchResult.spaces[0].ads;
			for (var i = 0; i < ads.length; i++) {
				var ad = ads[i];
				%-->
				<a class="url" tmp:href="{{ad.clickUrl}}" target="_blank">
					<img tmp:src="{{ad.creative.source}}" border="0" width="{{ad.creative.spec.width}}" height="{{ad.creative.spec.heigth}}", title="{{ad.creative.description}}", alt=""/>
				</a>
				<!--%
			 }
			 %-->
		</div>

		<script>
			cX.insertAdSpace({
				adSpaceId:'000000016250247d',
				templateElementId: 'templateElement',
				targetElementId: 'targetElement',
			});
		</script>
	<body>
<html>
Generic & Reusable Render Templates
There is one big problem with the last example. The ad space id is set in the file renderTemplate.html. That means that the render template file can only be used for one particular ad space, something that will severely hamper any reuse. In the next example we will correct that by moving the ad space id up a level and into the file webPage.html as illustrated in the graphics below.
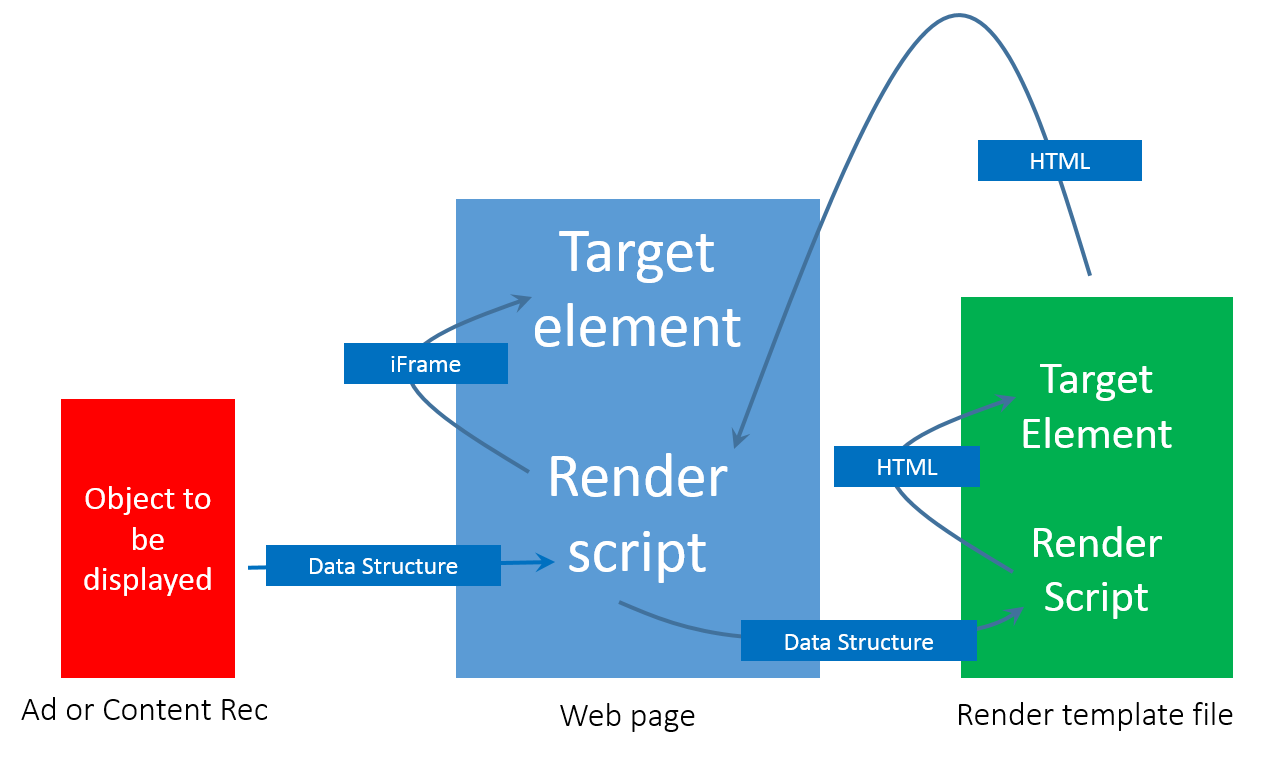
Notice how it is now the webPage.html file that retrieves the data object and passes it on to the renderTemplate.html file. After that the processing is done exactly as before.
<!DOCTYPE HTML>
<html>
    <body>

        <!-- Include the cx.js script that contain rendering support functions -->
        <script type="text/javascript" src="http://cdn.cxense.com/cx.js"></script>

        <!-- The output generated by the rendering code below will be inserted right before this div -->
        <div id="targetElement"></div>

        <!-- Script that executes the rendering code and places the output within the target element -->
        <script type="text/javascript">
            cX.insertAdSpace({
                adSpaceId:'000000016250247d',
                targetElementId: 'targetElement',
                width: 300,
                height: 250,
                renderTemplateUrl: 'renderTemplate.html'
            });
        </script>

    </body>
</html>
However, for the information that is now set and gathered in webPage.html to reach the file renderTemplate.html where it is to be used, we have set the parameter forwardHashArgs to true as shown below.
<!DOCTYPE HTML>
<html>
    <body>

		<!-- Include the cx.js script that contain rendering support functionality -->
		<script type="text/javascript" src="http://cdn.cxense.com/cx.js"></script>
		<!-- The html output generated by the rendering code will be inserted within this target element -->
		<div id="targetElement"></div>

		<!-- Rendering code for unpacking the data and generating the html -->
		<div id="templateElement" class="template">
			<!--%
			var ads = data.searchResult.spaces[0].ads;
			for (var i = 0; i < ads.length; i++) {
				var ad = ads[i];
				%-->
				<a class="url" tmp:href="{{ad.clickUrl}}" target="_blank">
					<img tmp:src="{{ad.creative.source}}" border="0" width="{{ad.creative.spec.width}}" height="{{ad.creative.spec.heigth}}", title="{{ad.creative.description}}", alt=""/>
				</a>
				<!--%
			 }
			 %-->
		</div>

		<script>
			cX.insertAdSpace({
				templateElementId: 'templateElement',
				targetElementId: 'targetElement',
				forwardHashArgs: true
			});
		</script>
	<body>
<html>
Below we see an alternative implementation to the one above that will give the exact same output. The difference in the approach is that in the alternative below we do not use the Cxense Templating language, but instead take care of all the rendering with our own code via the function myRenderFunction(). The function takes two arguments, the ad structure (data) and the parameter list from the insertAdSpace function at the bottom.
<!DOCTYPE HTML>
<html>
    <body>

		<!-- Include the cx.js script that contain rendering support functionality -->
        <script type="text/javascript" src="http://cdn.cxense.com/cx.js"></script>

		<!-- Rendering code for unpacking the data and generating the html -->
		<script>
			function myRenderFunction(data, context) {
				var ads = data.searchResult.spaces[0].ads;
				for (var i = 0; i < ads.length; i++) {
					var ad = ads[i];
					var anchor = document.createElement('a');
					anchor.target = "_blank";
					anchor.href = ad.clickUrl;
					var img = document.createElement('img');
					img.src = ad.creative.source;
					img.border = '0';
					img.width = ad.creative.spec.width;
					img.height = ad.creative.spec.heigth;
					img.title = ad.creative.description;
					img.alt = "";
					anchor.appendChild(img);
				}
			}
		</script>

        <script>
            cX.insertAdSpace({
                forwardHashArgs: true,
				renderFunction: myRenderFunction
            });
        </script>
    <body>
<html>
Content Recommendation Data Examples
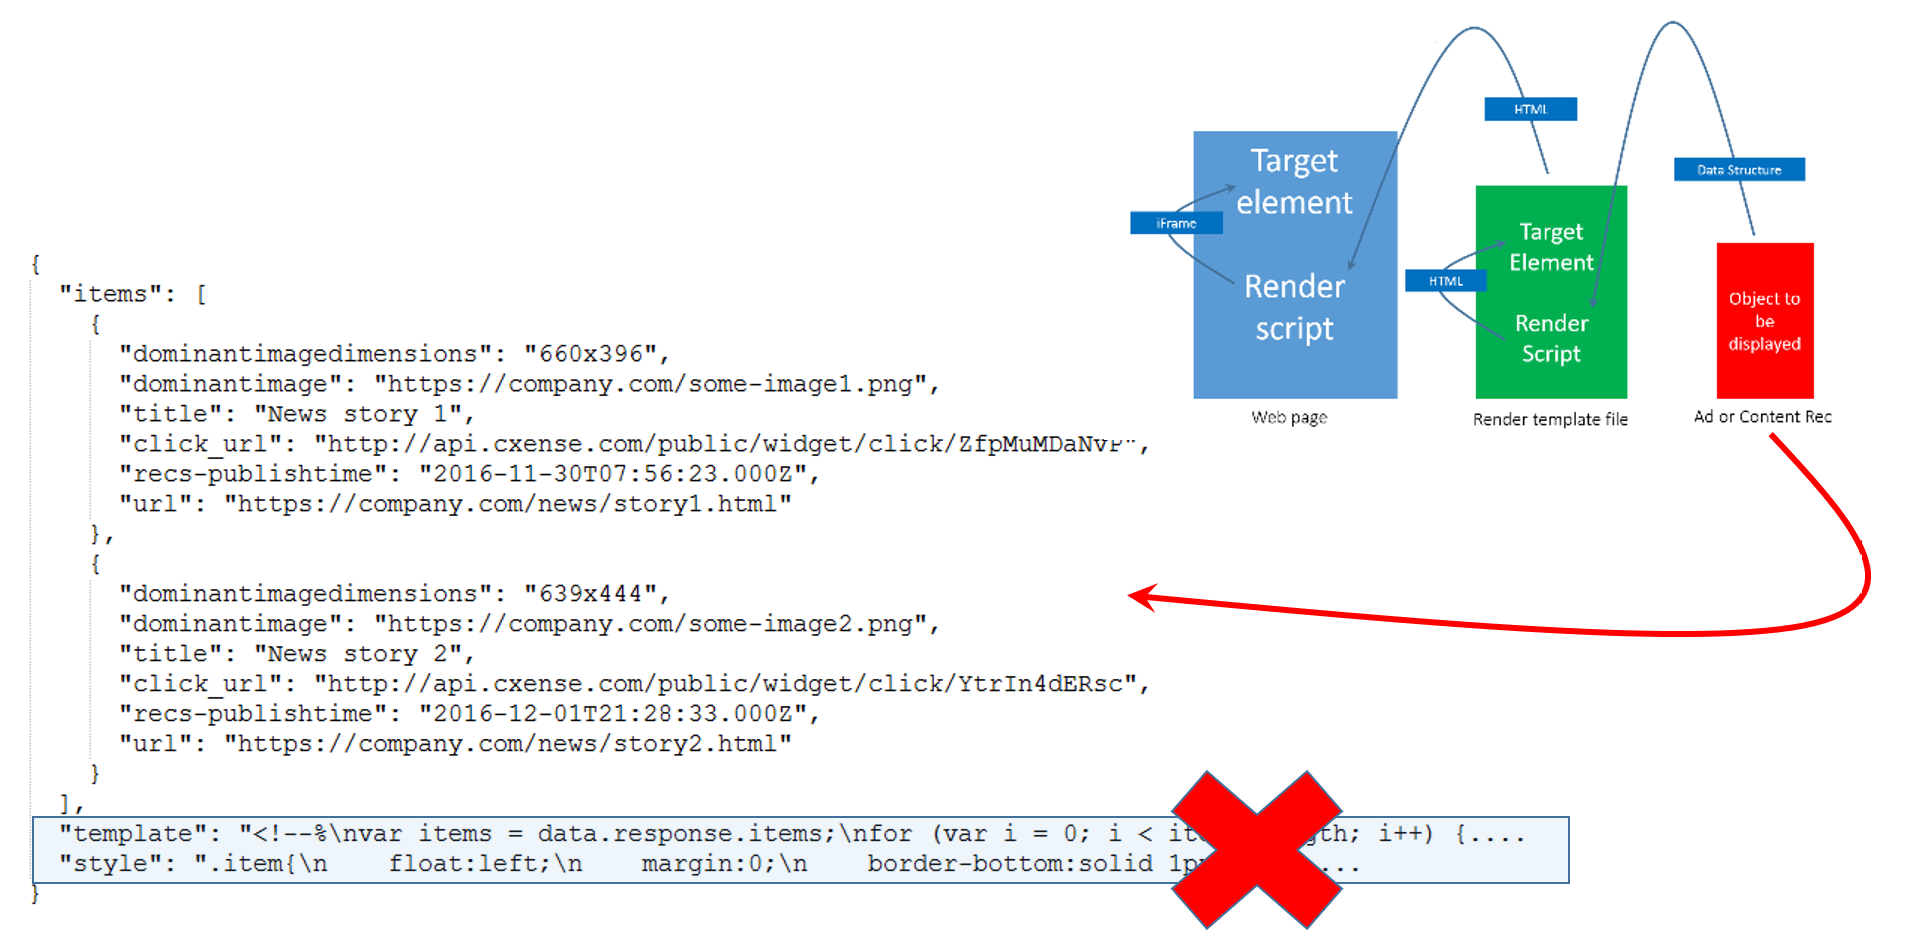
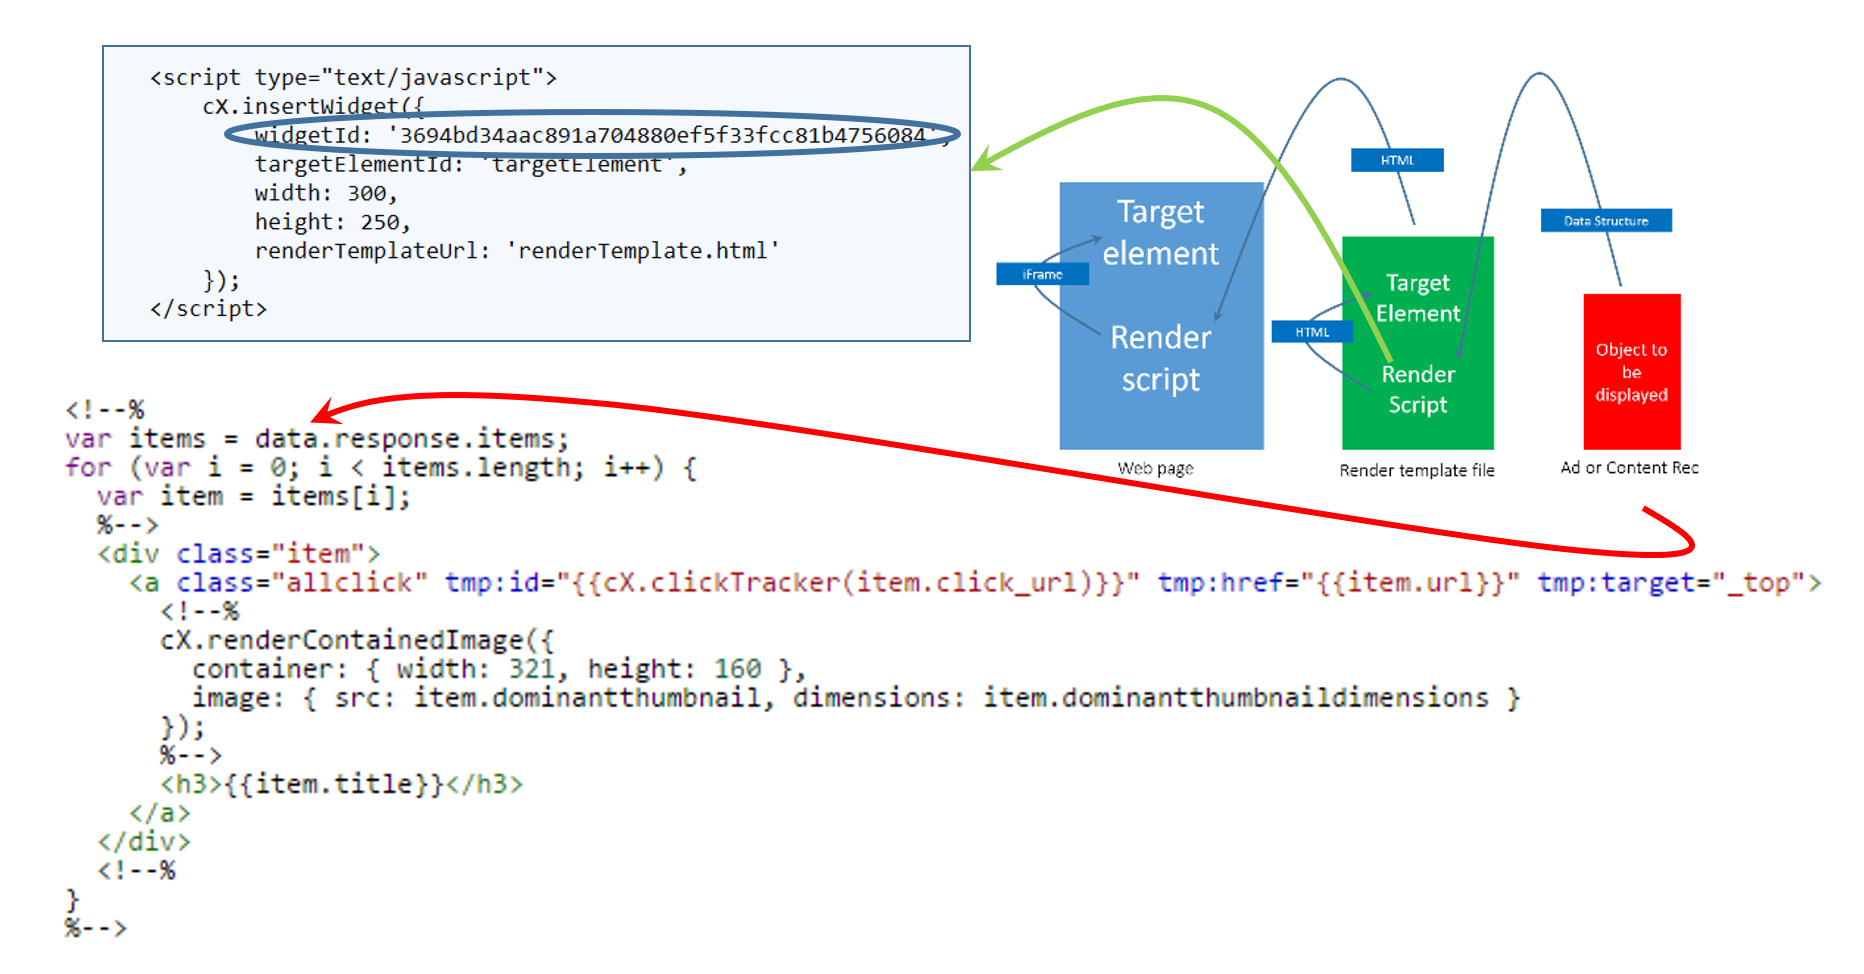
All Cxense examples used in this tutorial has been based on Cxense Advertising. Below we see what Cxense Content Recommendation data would look like. The template and style components has been crossed out as they would only exist if one used the Cxense Content Recommendation Portal page to configure all aspects of the recommendation (the opposite use case of using render template/function):
And the unpacking code would also look different. Below we have just copied the default code provided by the Content Recommendation GUI into the web page:
Uploading the Render Template File to the CDN
The render template file can reside on the same customer server as the web page that makes use of it, However, it is also possible to store the file on the Cxense CDN for efficent access. For this we use the Render Template Editor that is found under the admin tab at http://insight.cxense.com as shown in the graphic below (click on it for larger size).
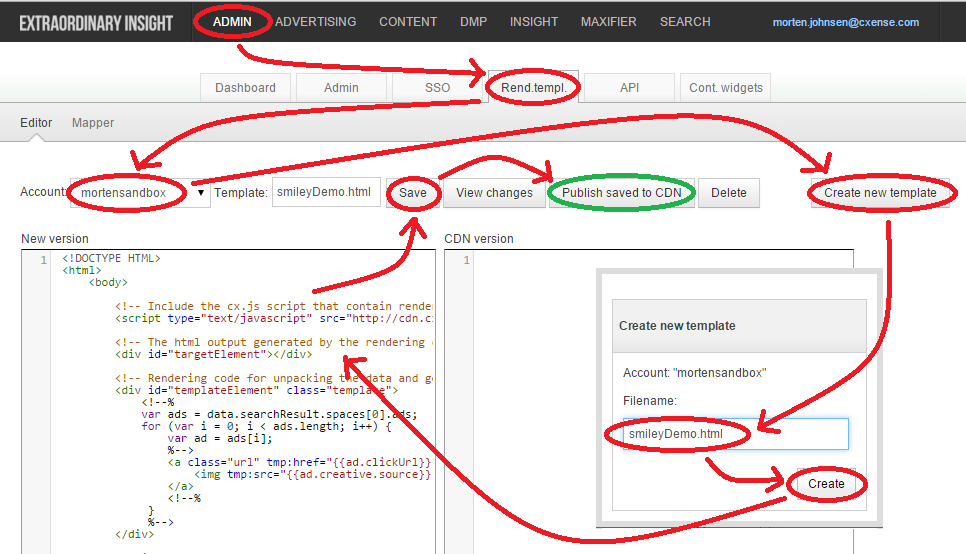
In the graphic above we named the render template file smileyDemo.html and as shown below, we then have to change the render template url parameter to http://cdn.cxpublic.com/smileyDemo.html.
<!DOCTYPE HTML>
<html>
    <body>

        <!-- Include the cx.js script that contain rendering support functions -->
        <script type="text/javascript" src="http://cdn.cxense.com/cx.js"></script>

        <!-- The output generated by the rendering code below will be inserted right before this div -->
        <div id="targetElement"></div>

        <!-- Script that executes the rendering code and places the output within the target element -->
        <script type="text/javascript">
            cX.insertAdSpace({
                adSpaceId:'000000016250247d',
                targetElementId: 'targetElement',
                width: 300,
                height: 250,
                renderTemplateUrl: 'http://cdn.cxpublic.com/smileyDemo.html'
            });
        </script>

    </body>
</html>
Further Learning - More Examples
The following tuturials will go in further depth of the various aspects of Cxense render template creation:
-
cx.js simple HTML templating (also included in the next page)
-
Creative template / Client-side template-based rendering
-
Using the render template editor (also included in the previous page)