
We’ve migrated our documentation to a new site, which means some URLs have changed.
Audience

Accelerated Mobile Pages (AMP) Integration

Piano Insight and Accelerated Mobile Pages (AMP) Implementation

The Accelerated Mobile Pages (AMP) Project is an open source initiative to build web pages for static content that render fast, with a focus on mobile devices.

Because AMP is based on "AMP HTML" and "AMP JS", Piano has implemented an AMP compatible tracking solution.

The implementation

Piano Insight integration into AMP pages is done by adding our amp-analytics tag at the start of the <body> section (see below for a full-page example)

<amp-analytics type="cxense">
    <script type="application/json">
    {
        "vars": {
            "siteId": "1234567890"
        }
    }
    </script>
</amp-analytics>

NB! Remember to replace the siteId with your site ID!

The tag above requires the 'amp-analytics' extension JavaScript included in the <head> section:

<script async custom-element="amp-analytics" src="https://cdn.ampproject.org/v0/amp-analytics-0.1.js"></script>

Inside the Piano Insight Dashboard

Within the Piano Insight dashboard, you can now analyze the traffic and user engagement of your AMP-specific content simply by doing a filter for the Custom Parameter 'cx_channel'. This Custom Parameter will be available once the above code implementation is carried out. By selecting this cx_channel => 'amp' custom parameter filter, you'll be filtering the various Dashboards to only show you the stats/information of who are engaging with your AMP content.
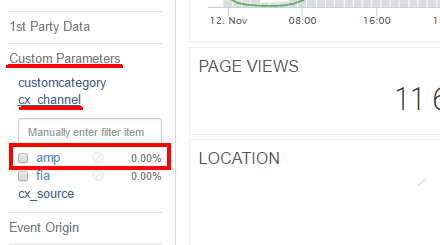
image-20211217-120911.png


Custom Parameters

Custom Parameters can be passed by updating the above basic script like below;

<amp-analytics type="cxense">
    <script type="application/json">
    {
        "vars": {
            "siteId": "1234567890"
        },
        "extraUrlParams": {
            "cp_<CUSTOM_PARA_NAME>": "<CUSTOM_PARA_VALUE>"
        }
    }
    </script>
</amp-analytics>

Each Custom Parameter must be prefixed with cp_ and then, replace <CUSTOM_PARA_NAME> and <CUSTOM_PARA_VALUE> according to the Custom parameter Syntactical restrictions

ID Syncing

Traditional ID Syncing done via addExternalId can be done by modifying the basic script like below;

<amp-analytics type="cxense">
    <script type="application/json">
    {
        "vars": {
            "siteId": "1234567890"
        },
        "extraUrlParams": {
            "eit0": "<PREFIX>",
            "eid0": "${clientId(<NAME_OF_COOKIE>)}"
        }
    }
    </script>
</amp-analytics>

Replace <PREFIX> with the Site Group Prefix and <NAME_OF_COOKIE> with the Name of a Cookie that is saved on the Website that will hold the value of the External ID.

Segment Members

Segment Memberships can be retrieved for use in the following manner. This will be a separate Tag to the one described above.

<amp-list src="https://api.cxense.com/profile/user/segment?persisted=<PERSISTED_QUERY_ID>&amp;json=%7B%22identities%22%3A%5B%7B%22id%22%3A%22CLIENT_ID(cX_P)%22%2C%22type%22%3A%22cx%22%7D%5D%7D" items="." single-item="" layout="fixed-height" height="100">
    <template type="amp-mustache">
        <div>List of Segments: {{segments}}</div>
    </template>
</amp-list>

Replace <PERSISTED_QUERY_ID> with the one that you are currently using to retrieve Segment Memberships. With the above code, the Segment Memberships will be placed in the segments variable which can be passed into an Ad request.

For the above to work you need to add two more additional JS libraries to the HTML <head> section.

<script async custom-element="amp-list" src="https://cdn.ampproject.org/v0/amp-list-0.1.js"></script>
<script async custom-template="amp-mustache" src="https://cdn.ampproject.org/v0/amp-mustache-0.2.js"></script>
Segment Members for Ad Targeting

Segment Memberships for Ad Targeting can be retrieved in the Real Time Config (RTC) format. First, you will need to create a new Persisted Request similar to the one used by getUserSegmentIds()

cx.py /persisted/create '{"path": "/profile/user/segment", "request": {"identities": [{"id": "0", "type": "cx"}], "siteGroupIds": [<LIST_OF_SITE_GROUP_IDS>], "format": "rtc"}, "mutable": {"identities": true}, "description": "for use with AMP Ad tag"}'

Replace <LIST_OF_SITE_GROUP_IDS> appropriately as per instructions in /profile/user/segment. This will return a new ID to be used on the AMP Ad Tag.

A sample Ad Tag is as below. You will need to set the appropriate options in the Ad Tag based on your Ad Partner.

<amp-ad
    width=<WIDTH>
    height=<HEIGHT>
    type="<AD_PARTNER>"
    data-slot="<AD_SLOT>"
    rtc-config='{
        "urls": [
            "https://api.cxense.com/profile/user/segment?persisted=<NEW_PERSISTED_ID>&json=%7B%22identities%22%3A%5B%7B%22id%22%3A%22CLIENT_ID(cX_P)%22%2C%22type%22%3A%22cx%22%7D%5D%7D"
        ],
        "timeoutMillis": 999
    }'
></amp-ad>

In the above sample, <NEW_PERSISTED_ID> is the ID returned by creating a new Persisted Request. As per this Pull Request to AMP, we are able to use the Visitors cX_P Cookie value.

AMP Ad requires the below JS libraries to the HTML <head> section.

<script async custom-element="amp-ad" src="https://cdn.ampproject.org/v0/amp-ad-0.1.js"></script>


Reference documentation for the Piano Insight AMP Analytics implementation

Examples

Live example

Full page example code

<!doctype html>
<html ⚡>
    <head>
        <meta charset="utf-8">
        <link rel="canonical" href="index.html">
        <meta name="viewport" content="width=device-width,minimum-scale=1,initial-scale=1">
        <style amp-boilerplate>body{-webkit-animation:-amp-start 8s steps(1,end) 0s 1 normal both;-moz-animation:-amp-start 8s steps(1,end) 0s 1 normal both;-ms-animation:-amp-start 8s steps(1,end) 0s 1 normal both;animation:-amp-start 8s steps(1,end) 0s 1 normal both}@-webkit-keyframes -amp-start{from{visibility:hidden}to{visibility:visible}}@-moz-keyframes -amp-start{from{visibility:hidden}to{visibility:visible}}@-ms-keyframes -amp-start{from{visibility:hidden}to{visibility:visible}}@-o-keyframes -amp-start{from{visibility:hidden}to{visibility:visible}}@keyframes -amp-start{from{visibility:hidden}to{visibility:visible}}</style><noscript><style amp-boilerplate>body{-webkit-animation:none;-moz-animation:none;-ms-animation:none;animation:none}</style></noscript>
        <script async src="https://cdn.ampproject.org/v0.js"></script>
        <script async custom-element="amp-analytics" src="https://cdn.ampproject.org/v0/amp-analytics-0.1.js"></script>
        <script async custom-element="amp-list" src="https://cdn.ampproject.org/v0/amp-list-0.1.js"></script>
        <script async custom-template="amp-mustache" src="https://cdn.ampproject.org/v0/amp-mustache-0.2.js"></script>
    </head>
    <body>
        <amp-analytics type="cxense">
            <script type="application/json">
            {
                "vars": {
                    "siteId": "1234567890"
                },
                "extraUrlParams": {
                    "cp_<CUSTOM_PARA_NAME>": "<CUSTOM_PARA_VALUE>",
                    "eit0": "<PREFIX>",
                    "eid0": "${clientId(<NAME_OF_COOKIE>)}"
                }
            }
            </script>
        </amp-analytics>

        <h1>Welcome to the mobile web</h1>

        <amp-list src="https://api.cxense.com/profile/user/segment?persisted=<PERSISTED_QUERY_ID>&amp;json=%7B%22identities%22%3A%5B%7B%22id%22%3A%22CLIENT_ID(cX_P)%22%2C%22type%22%3A%22cx%22%7D%5D%7D" items="." single-item="" layout="fixed-height" height="100">
            <template type="amp-mustache">
                <div>List of Segments: {{segments}}</div>
            </template>
        </amp-list>
    </body>
</html>


Advanced Configuration

A developer can build an advanced configuration using the example integration with parameters from this link:

https://www.ampproject.org/docs/reference/components/amp-analytics

If you provide services to EU/EEA users, there might be a requirement to request for consent. AMP provides a consent collection solution:

https://www.ampproject.org/docs/reference/components/amp-consent

The recommendation is to add an attribute to <amp-analytics> if consent is required:

<amp-analytics type="cxense" data-block-on-consent>
    <script type="application/json">
      {
        "vars": {
          "siteId": "9222347955542931880"
        }
      }
    </script>
</amp-analytics>


Last updated: