
Postman is a popular API development tool that helps developers design, test, document, and monitor APIs. It simplifies the process of making requests to an API by providing a user-friendly interface where you can:
-
Send and receive API requests: Easily construct and send HTTP requests (GET, POST, PUT, DELETE, etc.) to test API endpoints.
-
Manage environments: Store different sets of variables for different environments (like development, staging, production) to switch contexts easily.
-
Automate tests: Write and run tests for your API endpoints to ensure they behave as expected.
-
Document APIs: Generate dynamic documentation for your APIs directly from your Postman collections, making it easier for other developers or clients to understand and use your API.
-
Monitor performance: Set up monitors to automatically run collections, helping to track the health and performance of your APIs over time.
Postman supports collaboration through its cloud-sync feature, allowing teams to share collections, environments, and test scripts. Whether you're a developer, tester, or part of the API lifecycle management, Postman offers a comprehensive platform that caters to various stages of API development and maintenance.
In this document, we will guide you through the process of accessing Piano's APIs using Postman.
Let's dive in to see how you can leverage Postman for efficient and effective API interaction with Piano Audience.
Step 1: Setting Up Authentication
To interact with Piano's APIs, we need to set up authentication using an API Key. Here's how to do it in Postman:
-
Open Postman: Launch Postman on your computer.
-
Create or Select a Request:
-
If you're starting fresh, create a new request by clicking on the "+" button in the tab bar at the top.
-
If you already have a collection for Piano's APIs, select or create a new request within that collection.
-
-
Configure the Authentication Header:
-
Go to the Headers tab in your request setup.
-
Click on the Key field to add a new header:
-
Key: Enter
X-cXense-Authentication -
Value: For security and ease of management, we'll use a variable here. Type
{{cx-authentication}}into the Value field. This means Postman will look for an environment variable named cx-authentication to fill in the actual API key.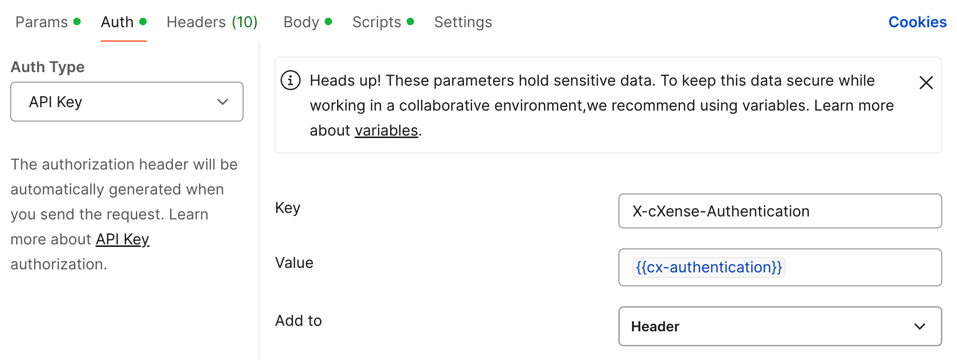
-
-
-
Set Up the Environment Variable:
-
Navigate to Environments on the left sidebar of Postman, then click on "Manage Environments" or the gear icon if you're using an older version.
-
Click "Add" to create a new environment or select an existing one where you want to store this variable.
-
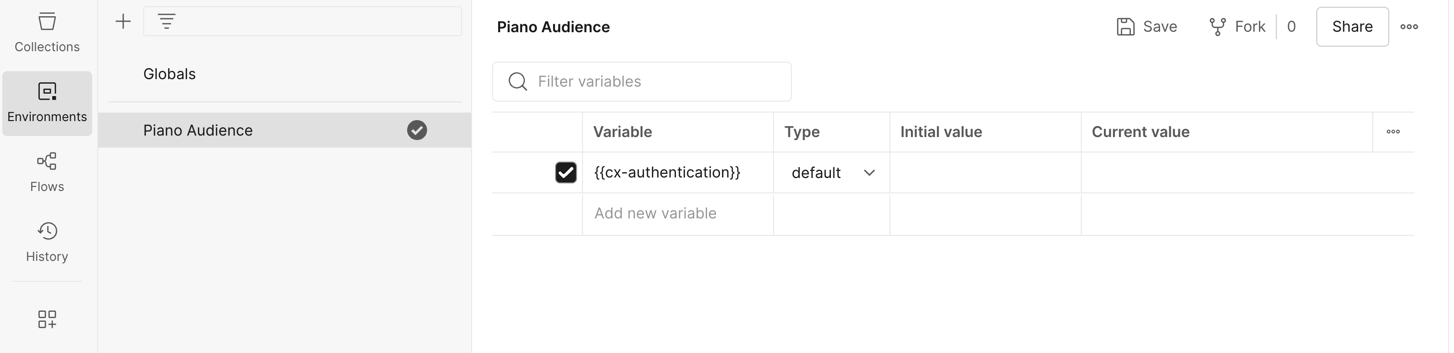
Name your environment (e.g., "Piano API Development") and add a new key-value pair:
-
Key:
<span class="r-bcqeeo r-1ttztb7 r-qvutc0 r-1sw30gj r-z2wwpe r-mtzec0 r-1471scf r-1aiqnjv r-1hq4qhi r-16dba41 r-ilng1c r-trst2h r-1noe1sz r-njp1lv">{{cx-authentication}}</span> -
Value: Here, you would enter your actual API key from Piano. Make sure this value is kept private; do not share or commit it to version control systems.
-
-
-
Save Your Settings:
-
After setting up the environment variable, make sure to save your changes in the environment settings.
-
Back in your request, ensure the environment you've just modified or created is selected from the dropdown in the top right corner of Postman.
-
-
Add a pre-request script
-
Make sure to add the following script to the request to be able to fetch your desired data:
// first look in the current Environment
var username = postman.getEnvironmentVariable('cx-username');
var apiKey  = postman.getEnvironmentVariable('cx-api-key');
if (!username) {
    // otherwise fallback to Globals
    username = postman.getGlobalVariable('cx-username');
    apiKey = postman.getGlobalVariable('cx-api-key');
}
// Sign the date with our api key
var date = new Date().toISOString();
var signature = CryptoJS.HmacSHA256(enc(date), enc(apiKey));
// Slap together the header value
var value = "username="+enc(username)+" date="+date+" hmac-sha256-base64="+CryptoJS.enc.Base64.stringify(signature);
// Put it in a global for later use
postman.setGlobalVariable('cx-authentication', value);
// UTF-8 encoding might be overkill but doesn't hurt
function enc(s) { return unescape(encodeURIComponent(s)); }
-
Now, every time you send a request to Piano's API, Postman will automatically include the X-cXense-Authentication header with the correct API key from your environment variable. This setup allows for easy switching between different environments (like development, staging, production) by simply changing the active environment in Postman.
Step 2: Making your first API request
With the authentication set up, you're now ready to send your first request to Piano's API. Here's how:
-
Select the HTTP Method:
-
In your new or existing request tab, choose POST from the dropdown menu next to where you type the URL. This is because we're sending data to the server.
-
-
Enter the API Endpoint:
-
In the URL field, enter the endpoint for the API call, let's try:
https://api.cxense.com/site/group
-
-
Configure the Request Body:
-
Switch to the Body tab.
-
Select the raw radio button.
-
From the dropdown next to raw, choose JSON as the type of data you're sending.
-
In the text area, paste your JSON payload and replace with your own
siteGroupId<span class="r-bcqeeo r-1ttztb7 r-qvutc0 r-1sw30gj r-z2wwpe r-mtzec0 r-1471scf r-1aiqnjv r-1hq4qhi r-16dba41 r-ilng1c r-trst2h r-1noe1sz r-njp1lv"></span>:<span class="token">{</span><span class="token">"siteGroupId"</span><span class="token">:</span><span class="token">"12345"</span><span class="token">}</span>
-
-
Send the Request:
-
Click the Send button to execute the request.
-
-
Handling Initial Failures:
-
Your first attempt might fail with a "Request expired" error due to Postman occasionally using headers from the last request. If this happens:
-
Simply click Send again. The second attempt should succeed if your authentication and request parameters are correct.
-
-
With this approach, you'll be able to interact with Piano's APIs, starting with basic requests and advancing to more complex interactions as needed. Remember, API requests can be sensitive to small errors in syntax or authentication, so attention to detail is key.