
Introduction
With a Piano user account and the corresponding secret API key, one can query almost anything via the Piano Insight API from a backend CGI script. However, the same approach cannot be used from a frontend web page. Anyone can access the web page's code and in that way obtain a user ID and a secret API key. It allows to do whatever the owner of that ID is authorized to do, including all types of malicious data manipulation.
For better security, we can register a particular API request with Piano Insight. Piano Insight will then provide a request ID that can then be used to access the registered functionality from within a web page. If someone now extracts a request ID from the open source code, it cannot be used to perform any action beyond what the registered API command can do. An API key gives us access to everything, including the ability to create a request, or a persisted query as we call it. However, unlike an API key, a persisted query ID only gives access to one specific functionality/operation.
The code examples here will be HTML/Javascript and Python 3.x. All examples can however be reproduced using the GUI instead of Python (check out the last section about how to create and administrate persisted queries via the Piano API GUI).
Creating a Persisted Query programmatically
The script below can be used to register any API command as a persisted query. The three vital parameters are command path (/some/command), request object ({ "param1":"value1", "param2", "value2", "param3":"value3" }), and list of mutable parameters that can be changed from the web page code ({ "param1":True, "param3", True }).
The script below will return a persisted query ID to be used in the web page to access registered functionality or operations.
# Access credentials
_username     = "<YOUR PIANO AUDIENCE USER NAME>"
_secret       = "<YOUR PIANO AUDIENCE API KEY>"

# The persisted query to be registered
_path         = "<THE API COMMAND PATH>"
_request      = {<THE REQUEST OBJECT OR NOTHING>}
_mutable      = {<MUTABLE PARAMETERS OR NOTHING>}

import json, datetime, hmac, hashlib, http.client

def cxApi(path, obj):
    date = datetime.datetime.utcnow().isoformat() + "Z"
    signature = hmac.new(_secret.encode('utf-8'), date.encode('utf-8'), digestmod=hashlib.sha256).hexdigest()
    headers = {"X-cXense-Authentication": "username=%s date=%s hmac-sha256-hex=%s" % (_username, date, signature)}
    connection = http.client.HTTPSConnection("api.cxense.com", 443)
    connection.request("POST", path, json.dumps(obj), headers)
    response = connection.getresponse()
    status = response.status
    responseObj = json.loads(response.read().decode('utf-8'))
    connection.close()
    return status, responseObj

def errorHandling(status, response, message):
    if status != 200:
        raise Exception("%s (http status = %s, error details: '%s')" % (message, status, response['error']))

def createPersitedQuery(path, request={}, mutable={}):
    status, response = cxApi('/persisted/create', {"path":path, "request":request, "mutable":mutable})
    errorHandling(status, response, "Unable to create persisted query")
    return response['id']

persistedQueryId = createPersitedQuery(_path, _request, _mutable)
print("Created persisted query id '%s'" % persistedQueryId)
We will be using the script above in the next few sections.
Using a Persisted Query ID from the web page
We will now run the script above with the persisted query configuration given below. In other words, we are requesting information for all the sites we have access to using the API function /site.
# The persisted query to be registered
_path         = "/site"
_request      = {}
_mutable      = {}
Running the script with the settings above will give us a persisted query ID, let's say bda7639f305555555c981f86ff46ab7e6014fb97.
We will now use this persisted query ID in a JSONP call to Piano Insight in to retrieve data for all the sites we have access to. The JSONP template looks like this:
<script src='https://api.cxense.com/COMMAND_PATH?persisted=PERSISTED_QUERY_ID&callback=CALLBACK_FUNCTION_NAME'></script>
We already know the API command path and the persisted query ID. In the web page code below, we call the callback function "listSites". We can try out the resulting JSONP call before implementing the page below by entering the URL in the browser. We will then see the JSON data that the code below will be receiving from Piano Insight.
<!DOCTYPE HTML>
<html>
    <body>
        <script>
            function listSites(data) {
                if (data.hasOwnProperty('httpStatus') && data['httpStatus'] == 200) {
                    var names = '';
                    var sites = data['response']['sites'];
                    for (var i in sites) {
                        names += sites[i]['name'] + '<br>';
                    }
                    document.getElementsByTagName('body')[0].innerHTML = names;
                } else {
                    alert('No or bad http status');
                }
            }
        </script>
        <script src='https://api.cxense.com/site?persisted=bda7639f305555555c981f86ff46ab7e6014fb97&callback=listSites'></script>
    </body>
</html>
What the callback function does is extract all the site names and list them on the web page. We ask for all sites to which we have access. If we want to limit the list to only one or a few sites, we can add the siteId or siteIds parameters to the request object as shown here:
# The persisted query to be registered
_path         = "/site"
_request      = {"siteId":"9222364973424511877"}
_mutable      = {}
Using the cX.jsonpRequest() function
A more convenient way to create a JSONP request is to use the cx.js library function cX.jsonpRequest() as shown below. It allows to use variables rather than fixed text strings.
<!DOCTYPE HTML>
<html>
    <body>
        <script type="text/javascript" src="http://cdn.cxense.com/cx.js"></script>
        <script>
            var path = '/site';
            var requestObj = {};
            var persistedQueryId = "bda7639f305555555c981f86ff46ab7e6014fb97";
            var apiUrl = 'https://api.cxense.com' + path + '?callback={{callback}}'
                                                         + '&persisted=' + encodeURIComponent(persistedQueryId)
                                                         + '&json=' + encodeURIComponent(cX.JSON.stringify(requestObj));

            cX.jsonpRequest(apiUrl, function(data) {
                if (data.hasOwnProperty('httpStatus') && data['httpStatus'] == 200) {
                    var names = '';
                    var sites = data['response']['sites'];
                    for (var i in sites) {
                        names += sites[i]['name'] + '<br>';
                    }
                    document.getElementsByTagName('body')[0].innerHTML = names;
                } else {
                    alert('No or bad http status');
                }
            });
        </script>
    </body>
</html>
This web page will show exactly the same output as the previous one. The only difference is that in this case we let the cX.jsonpRequest() function take care of all the details.
Allowing request object parameters to be set in the web page
In the examples so far, there has been no way for the web page (its user) to influence what is returned. The persisted query has been fixed and it was take or leave it. In the next example we will let the web page (its user) decide for which site we will obtain data. It will be about registering a new persisted query, but this time with site ID as a mutable parameter. So we are allowed to set it from the web page.
# The persisted query to be registered
_path         = "/site"
_request      = {}
_mutable      = {"siteId":True}
Running a Python script with new settings gives us a new persisted query ID, let's say 31caec61462f60555556107384ad246dfe00d127.
The JSONP template to provide additional parameters on the fly is :
<script src='https://api.cxense.com/COMMAND_PATH?persisted=PERSISTED_QUERY_ID&callback=CALLBACK_FUNCTION_NAME&json={"PARAM1"="VALUE1","PARAM2"="VALUE2"}'></script>
However, the JSON data has to be URL-encoded. Hence, the actual JSONP call in the web page will in our case (with a site ID of 9222302702321341959) will look like:
<script src='https://api.cxense.com/site?persisted=31caec61462f60555556107384ad246dfe00d127&callback=listSites&json=%7B"siteId":"9222302702321341959"%7D'></script>
Practical example of a web page
The examples so far have been a bare minimum to prove the point. In this, we will bring a bit more realism to it. On jqueryui.com, there is a query completion example being pretty close to an actual Piano Search frontend auto completion implementation as soon as we have added the right persisted query to the mix.
The essence of it is shown below. As we can see, we here use jQuery to take care of the plumbing.
function( request, response ) {
    $.ajax({
        url: "https://api.cxense.com/processing/dictionary/search",
        dataType: "jsonp",
        data: {
            persisted: 'aee984854ddfeecd16e074333f1d3bb0bd67f849',
            json: JSON.stringify({
                input: request.term
            })
        },
        success: function( data ) {
            data = $.map(data['response']['matches'], function(value, i) { return value['key'] + ' :: ' + value['value'].split('|')[0]; })
            response( data );
        }
    });
}
However, before this code can work we need to do two things:
-
A query completion dictionary has to be created and uploaded.
-
The dictionary lookup operation has to be turned into a persisted query.
The example contains a query completion dictionary (the file afi.json) with movie titles that can be uploaded according to the instructions given in Dictionary Management Tutorial (you will have to swap the customer prefix with one of your own). The persisted query configuration would be as shown below. The dictionary ID is obtained from the first step when we created the dictionary.
# The persisted query to be registered
_path         = "/processing/dictionary/search"
_request      = {"dictionaryId": 1234567890123456789}
_mutable      = {"input": True}
Special case: Audience segments
The extraction of segments from Piano Audience is a special case for which there is a bit more support than for other persisted queries. The creation process is the same, but the usage in the web page is supported with a cx.js library function called getUserSegtmentId().
This would be the query configuration:
# The persisted query to be registered
_siteGroupIds = [<COMMA SEPERATED LIST OF QUOTED SITE GROUP IDS>]
_path         = "/profile/user/segment"
_request      = {"identities":[{"id":"0","type":"cx"}],"siteGroupIds":_siteGroupIds}
_mutable      = {"identities":True}
Running the Python script with the new settings gives us a new persisted query ID, let's say 5d2c2ebfdbc41cc555551ae63fdd0b5516d812de.
<!DOCTYPE HTML>
<html>
    <body>
        <script type="text/javascript" src="http://cdn.cxense.com/cx.js"></script>
        <script>
            var segments = cX.getUserSegmentIds({persistedQueryId:'5d2c2ebfdbc41cc555551ae63fdd0b5516d812de'});
            alert("The user is member of the following segments: " + segments);
        </script>
    </body>
</html>
Special case: ID5
In case you would like to decrypt the respective ID5 IDs within the Audience, either for using it as PPID for Google Ad Manager or for decrypting it via API, you would need a persisted Query ID.
As this varies from the typical setup, let’s have a look at a dedicated example for this persisted query:
# The persisted query to be registered
_siteGroupId  = "12345"
_path         = "/id5-decrypt"
_request      = {"id":"0","siteGroupId":_siteGroupId}
_mutable      = {"id":true}
Running the Python script with the new settings gives us a new persisted query ID, let's say 5d2c2ebfdbc41cc555551ae63fdd0b5516d812de
pbjs.getUserIdsAsync().then(function (userIds) {
  if (userIds.id5id) {
    cX.decrypt(
      {
        persistedQueryId: "5d2c2ebfdbc41cc555551ae63fdd0b5516d812de",
        callback: function (decrypted) {
          googletag.pubads().setPublisherProvidedId(decrypted);
        },
      },
      {
        id: userIds.id5id.uid,
      }
    );
  }
});
Creating and administrating Persisted Queries via the Piano GUI
You can do everything we have done so far without writing/executing a line of Python code. The procedure is as follows.
-
Open the Accounts management UI.

2. In the Accounts management, open the Persisted queries tab and click Add persisted query.

3. In the New persisted query form.
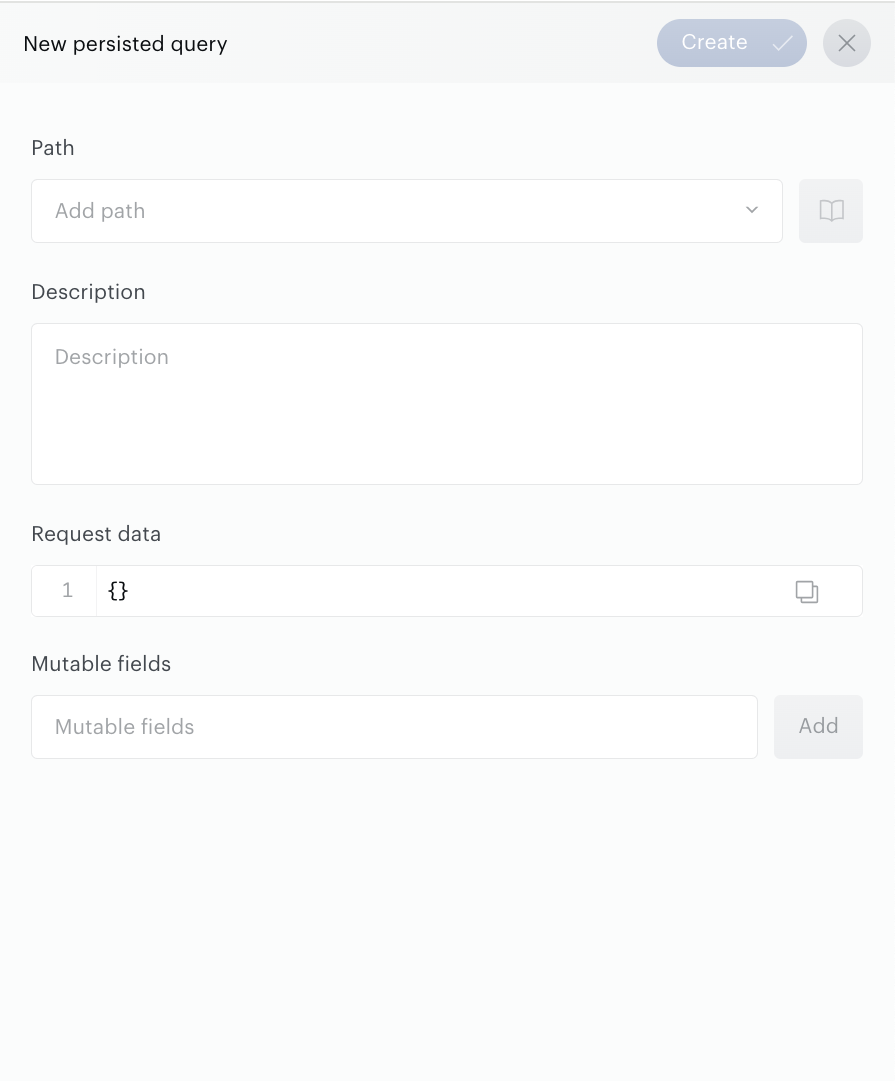
There, you want to enter the following parameters:
-
Path, call selected in the dropdown (click the Documentation link to learn more). The Path selector allows not only searching and selecting values from a predefined list but also adding values if they are missing.
-
Request data specifying your query.
-
Mutable fields
-
Description if you like.
4. When ready, Save changes.