
Introduction
This feature is currently in beta.
To help publishers better protect their subscription revenue and limit unwanted account sharing, the Device Restriction feature introduces the ability to restrict the number of active sessions per user account. Traditionally, users have been able to log in on multiple devices simultaneously, creating parallel sessions. This unrestricted access made it easy to share login credentials across users, enabling non-paying individuals to access paid content - often at the expense of potential subscriptions.
With the Device Restriction functionality, publishers can now define limits on how many active sessions a user may maintain at any given time in Composer experiences. Once the maximum number of sessions is reached, any new login attempt can trigger one of several scenarios depending on how the experience is configured. The user may be shown an informative, dismissible message notifying them that they’ve reached their session limit, or if a hard limit is enforced, they may be required to end an existing session before gaining access to the site. Alternatively, the experience can prompt them to upgrade to a subscription tier that supports additional concurrent sessions.
Please note that session limits cannot be configured as a global setting for the entire application. The limits are managed through Composer experiences and can be tailored for all users or specific segments. In Global Mode, Device Restriction remains fully supported, but session limits are enforced on a per-application basis, with each application maintaining its own independent session counter. This means a user can hold concurrent sessions across multiple applications according to the limit defined for each one. The Global Mode feature does not otherwise affect Device Restriction, and the functionality is fully compatible with Identity Management.
Example:
When a user logs into one application, a session is created specifically for that application. If the same user then accesses another application via single sign-on (SSO), a separate session is generated for the second application, with each application maintaining its own independent session counter. For example, in an environment with five applications configured in Global Mode and a device limit of four sessions per application, a single user could maintain up to twenty concurrent sessions in total (four per application across five applications).
Both Android and iOS SDKs are enhanced to support the session object parameters and display an appropriate experience when the session limit is hit.
Enablement
This feature is not enabled by default. To activate it on your application(s), please reach out to Piano Support at support@piano.io.
Enabling Device Restriction consists of the following key steps:
-
Implementing the ITP (Intelligent Tracking Prevention) solution and ensuring the Browser ID is passed when using any API-based solutions
-
Waiting for old sessions to expire or performing a one-time session cleanup
-
Completing the Device Restriction feature enablement
Each step is essential to ensure accurate session counting and proper device limit enforcement.
Step 1: ITP Solution
To ensure accurate session counting, you must implement the ITP (Intelligent Tracking Prevention) solution. Without it, browsers may automatically clear cookies, which can result in unintended additional sessions and prevent the defined session count thresholds in Composer experiences from working as expected.
Note: Clients currently using the ITP solution should verify that it also captures the browser ID.
For example, imagine a user with 5 active sessions:
-
2 are valid concurrent sessions created by logging in on different devices or browsers.
-
3 are extra sessions automatically created because the browser cleared cookies and generated new Browser IDs.
In this case, only the 2 concurrent sessions should count toward enforcing the device restriction. If the session limit is 2:
-
With ITP (including Browser ID): Composer correctly recognizes and counts only the 2 valid sessions, and the user can log in without issue.
-
Without ITP: Composer counts all 5 sessions, including the extra ones. The user exceeds the limit, cannot log in, and instead sees the session limit template.
Additionally, these automatically created sessions are not only counted incorrectly in Composer but also appear in the My Account section, potentially confusing end users.
If you are using the Piano SDKs for your mobile app(s), please make sure that you are using the latest version.
Due to unintended session handling behavior in browsers and additional session creation through APIs, users may accumulate a large number of sessions. These sessions are not counted as concurrent sessions and are not visible to end users. If the total number of sessions exceeds 100, older sessions will be automatically deleted. This threshold may be adjusted and lowered over time.
API Integration
To ensure accurate session counting and effective use of the Device Restriction feature, API-based integrations must include the browser ID in their requests. The below documentation outlines how to obtain and pass the browser ID correctly.
Why this matters:
The Device Restriction feature is designed to limit the number of concurrent sessions per user. Without the browser ID, API integrations may generate too many sessions, causing the session limits to be bypassed.
Implementation Steps
1. Obtaining the Browser ID
On pages where Piano's tinypass.min.js is loaded, retrieve the browser ID using:
var browserId = tp.util.getBrowserId();
This method is only available after the Piano JavaScript SDK has been initialized.
2. Client-Side API Implementation
For direct API calls from the browser, include the browser ID in your requests using the Browser-Id header.
HTTP Header Format
Browser-Id:
Example Client-Side Request
// Example: Adding Browser-Id header to token request
const browserId = tp.util.getBrowserId();

fetch('/id/api/v1/identity/token', {
    method: 'POST',
    headers: {
        'Browser-Id': browserId  // Key addition for device restriction
        // ... other headers
    },
    // ... rest of request
});
3. Server-Side Public API Implementation
For server-to-server API calls:
-
Capture the browser ID on the client side
-
Send it to your server
-
Include it in server-side API calls to Piano
Example Server-Side Public API Implementation
// Client-side: Get browser ID and send to your server
const browserId = tp.util.getBrowserId();
fetch('/your-server-endpoint', {
    method: 'POST',
    headers: { 'Content-Type': 'application/json' },
    body: JSON.stringify({
        browserId: browserId,
        email: 'user@example.com',
        password: 'password'
    })
});
// Server-side (Node.js example)
app.post('/your-server-endpoint', async (req, res) => {
    const { browserId, email, password } = req.body;
    // Make Piano Public API call with browser ID
    const response = await fetch('/id/api/v1/publisher/identity/login', {
        method: 'POST',
        headers: {
            'Authorization': 'YOUR_API_TOKEN',  // Publisher API token
            'Content-Type': 'application/json',
            'Browser-Id': browserId  // Pass the browser ID from client
        },
        body: JSON.stringify({
            aid: 'APP_AID',
            email: email,
            password: password,
            stay_logged_in: true
        })
    });
    const data = await response.json();
    res.json(data);
});
Affected APIs
Important: It is recommended to include the browser ID header in ALL Identity Management API calls to ensure proper session tracking. This includes any endpoints that create, validate, or manage user tokens/sessions.
Example of Specific API Endpoints Requiring Browser ID
-
POST
/id/api/v1/identity/token -
POST
/id/api/v1/identity/oauth/token -
POST
/id/api/v1/identity/oauth/mobile/token -
POST
/id/api/v1/identity/vxauth/token -
POST
/id/api/v1/publisher/identity/register -
POST
/id/api/v1/publisher/identity/login -
POST
/id/api/v1/publisher/token -
POST
/id/api/v1/publisher/token/refresh -
POST
/id/api/v1/publisher/token/verify
Note for Mobile Apps: The session_id field returned by /publisher/identity/session/list reflects the Browser-Id header you sent during login. You can use this to:
-
Verify your Browser-Id is being passed correctly
-
Parse product prefixes to identify which app created each session
-
Display meaningful session information to users (e.g., "News App on iPhone")
Connection with ITP Solution
The browser ID implementation is part of the Piano ITP (Intelligent Tracking Prevention) solution:
-
Browser ID is stored in first-party cookies (
_pcidand_pprv) -
When the
_pcidcookie is deleted, a new browser ID is generated -
First-party cookies extend browser ID persistence
-
This prevents excessive session creation in Safari and other browsers with tracking prevention
Consequences of Not Using Browser ID
Sessions created without a browser ID will not be counted in device restriction limits. Sessions bypass device limitation functionality, allowing unlimited concurrent sessions per user.
For Mobile Apps: This is particularly critical. If your mobile apps don't send Browser-Id headers, all app sessions will be treated as "bot sessions" and won't count toward device limits. This defeats the purpose of Device Restriction and allows unlimited concurrent app sessions.
Best Practices
-
Include the browser ID header in every API request
-
Store and reuse valid tokens until they expire instead of creating new ones for each request
-
When tokens expire, use the refresh token to obtain a new access token via the
/publisher/token/refreshendpoint
Step 2: Session Cleanup or Natural Expiration
Once ITP is live, old sessions created before ITP implementation must be resolved before Device Restriction is enabled. These old sessions lose their Browser ID when cookies expire, which can cause the same device to be counted multiple times. Only sessions with persistent Browser IDs (created after ITP implementation) are counted correctly.
There are two options to address this:
Option A: Wait for Natural Expiration
You can wait for old sessions (those created before ITP implementation) to naturally expire based on your token expiration period. This is the less disruptive approach, as it avoids unexpected user logouts.
Option B: Run the Cleanup Job
Alternatively, you can request a one-time session cleanup through Piano Support for immediate resolution. You will need to provide Piano Support with the cutoff timestamp, which represents the exact date ITP went live and Browser ID persistence began.
Support will then run the cleanup during an agreed window:
-
A small number of active sessions are preserved (recommended 2–3)
-
All other pre-ITP sessions (sessions without a valid Browser ID) are removed
-
Cleanup completion is confirmed by Support
Important: With the enhanced cleanup mechanism (implemented in March 2026), users will NOT be forced to re-authenticate. Old sessions will have their session IDs cleared but remain valid, and users will stay logged in. The next token verification will automatically backfill stable Browser IDs. This graceful handling minimizes user disruption.
The Device Restriction feature should only be enabled after old sessions have naturally expired or the cleanup job has been completed.
Step 3: Feature Enablement
After old sessions have naturally expired or the cleanup job has been completed, Piano Support will enable the Device Restriction feature.
Immediate effects upon enablement:
-
Device counting should work correctly using the persistent Browser ID
-
Client users will see sessions in the User Dashboard (Publisher Dashboard)
-
If the cleanup job was used, users will remain logged in thanks to the enhanced cleanup mechanism. Sessions are updated gracefully without forcing re-authentication.
-
Monitoring is recommended to ensure no access issues arise
Enabling the feature itself will have minimal immediate impact. End users will see their sessions in My Account once the My Account templates are adjusted (see Template Changes). Actual device restrictions will take effect only after Composer experiences are created and templates are configured.
Going forward, only valid sessions (with persistent Browser IDs) will be counted, ensuring Device Restriction operates as intended.
Configuration in Composer
Create a Composer Experience
The maximum number of active sessions can be configured per user segment within Composer. This setting can be combined with other segmentation criteria for tailored targeting. Specific user segments can be excluded from session limits as needed. Different session limits can also be assigned to different subscription terms (e.g., monthly vs. annual plans).
Supported Composer experience types for session-based targeting include:
-
Site Page View
-
Mobile Execution
-
API Interaction on Edge
-
Template Interaction Experience
-
API Interaction on Server
Create a User Segment
After creating a Composer Experience, create a User Segment using the “User Segment" card.
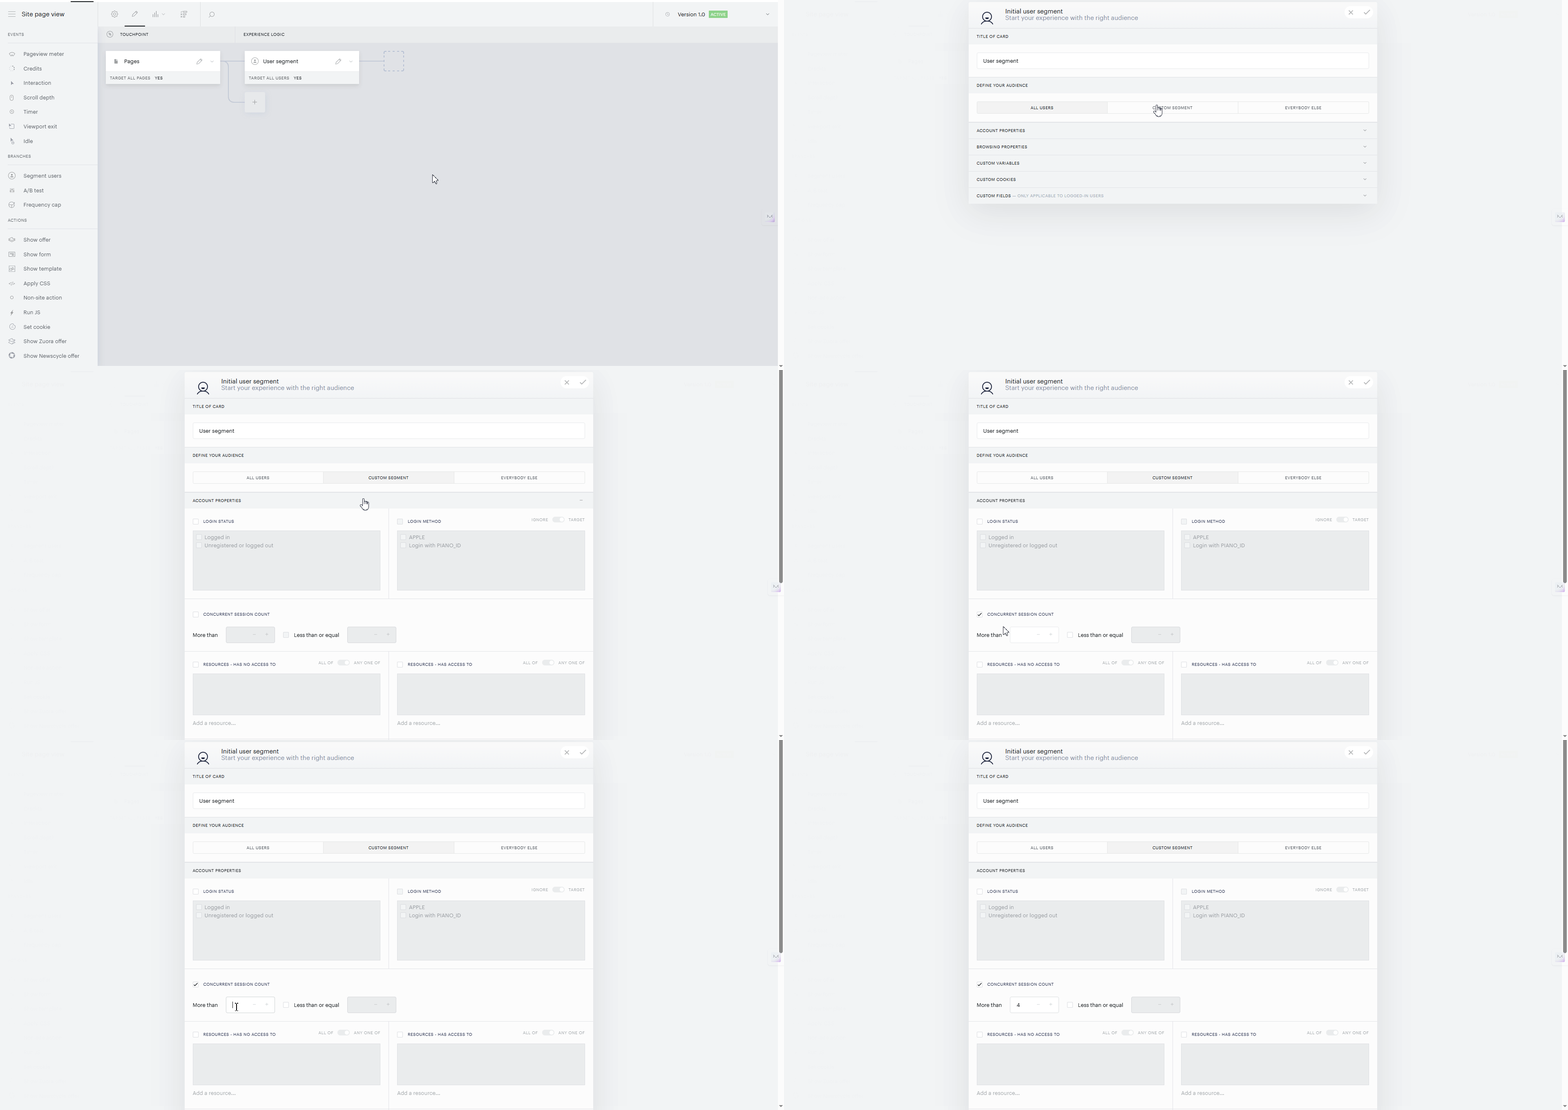
Set Concurrent Session Limits
-
Enable the “Concurrent session count” field in the User Segment card.

-
Use the “More than” condition to define the threshold for triggering restrictions.
-
Optionally, use “Less than or equal” to define nuanced segments for targeting based on session count.
NB: You can combine this rule with other segmenting options such as: “Resources – has/no access to” or “Terms – has/no access to”. This allows for precise control over targeting users for upselling, access restrictions, or presenting alerts.
Set Actions When Limits are Met
-
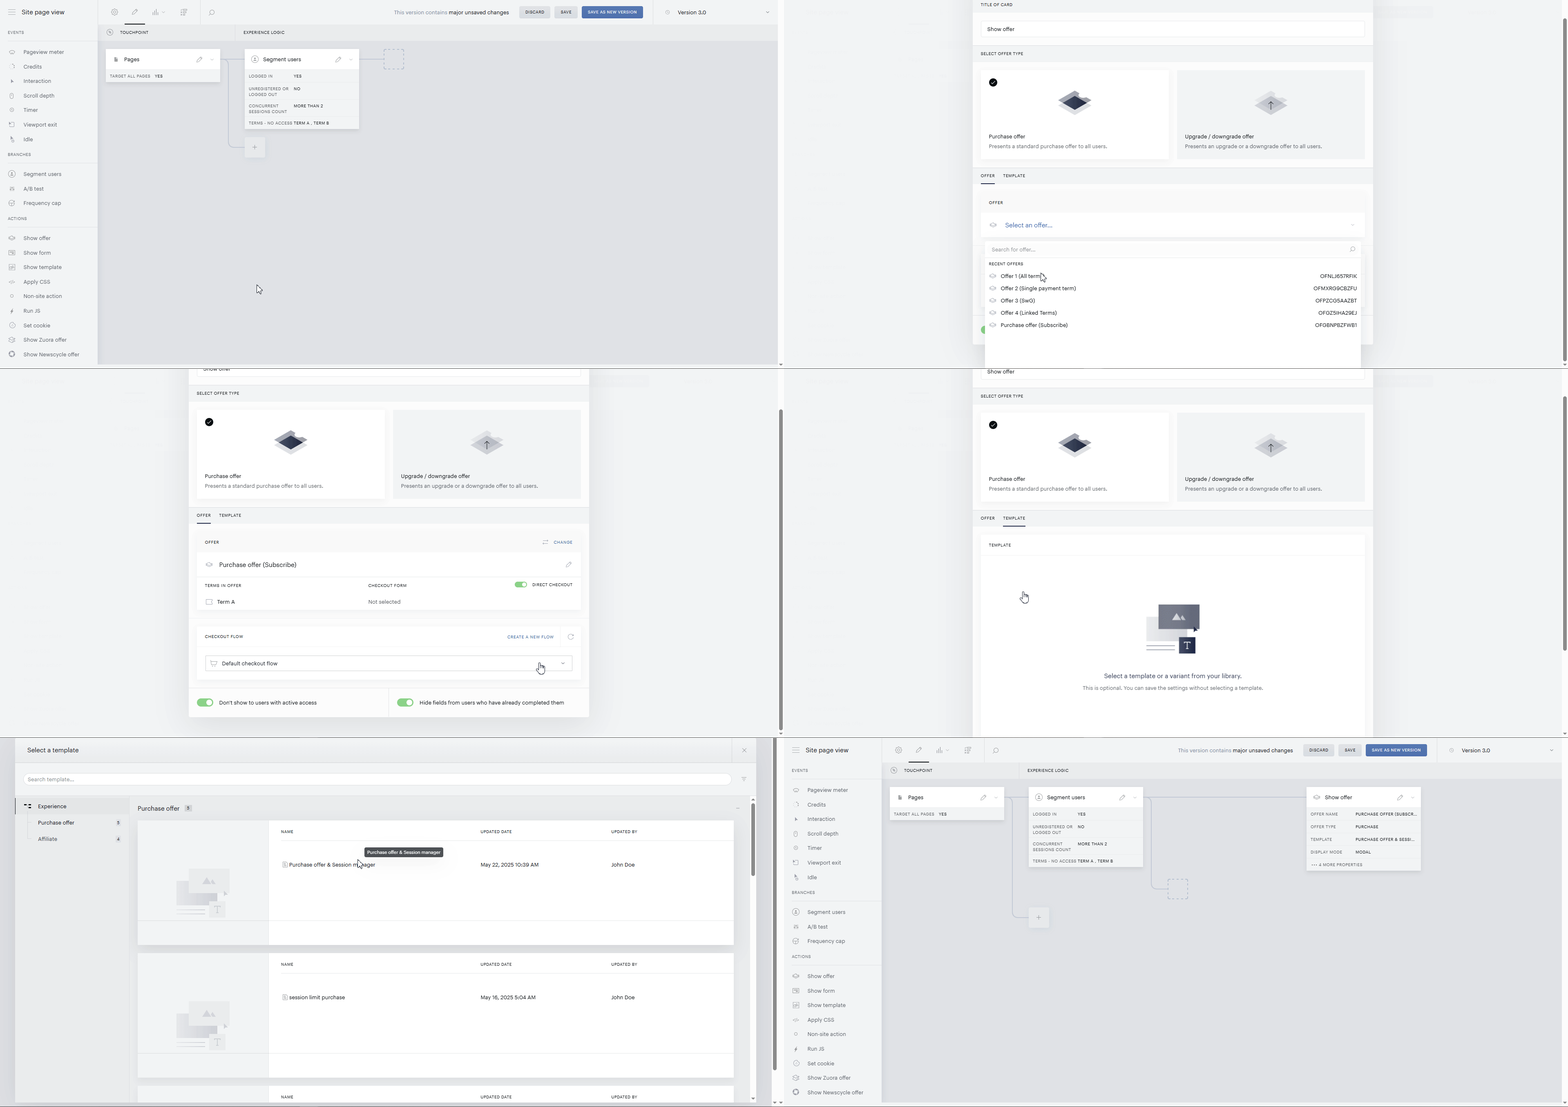
Show Offer: Utilize the "Session limit: Purchase offer" or "Session limit: Upgrade offer" template, incorporating a built-in sessions manager. Ensure you select the appropriate options within the Show Offer card and adjust settings like deactivating "Direct checkout".
-
Show Template: Apply the "Session limit" template with the Show Template card to effectively display session details and manage access restrictions.
Use Case: Increasing Conversion and Subscription Upgrades
The idea is to do two things: First, encourage users who have signed up but haven’t subscribed yet to become paying subscribers by showing them special offers once they’ve reached a certain level of sessions. Second, motivate current subscribers to upgrade to a shared plan by highlighting the benefits.
To implement this, you would define specific session limits for different user segments. For example, registered users without a subscription might be allowed up to 2 sessions. Once they exceed that limit, they would be prompted to subscribe to the standard plan (Term A). Subscribers on Term A - your standard plan - might be given a maximum of 4 sessions. When they go beyond that, you could promote an upgrade to Term B, a shared plan offering up to 10 sessions and multiple access tokens.
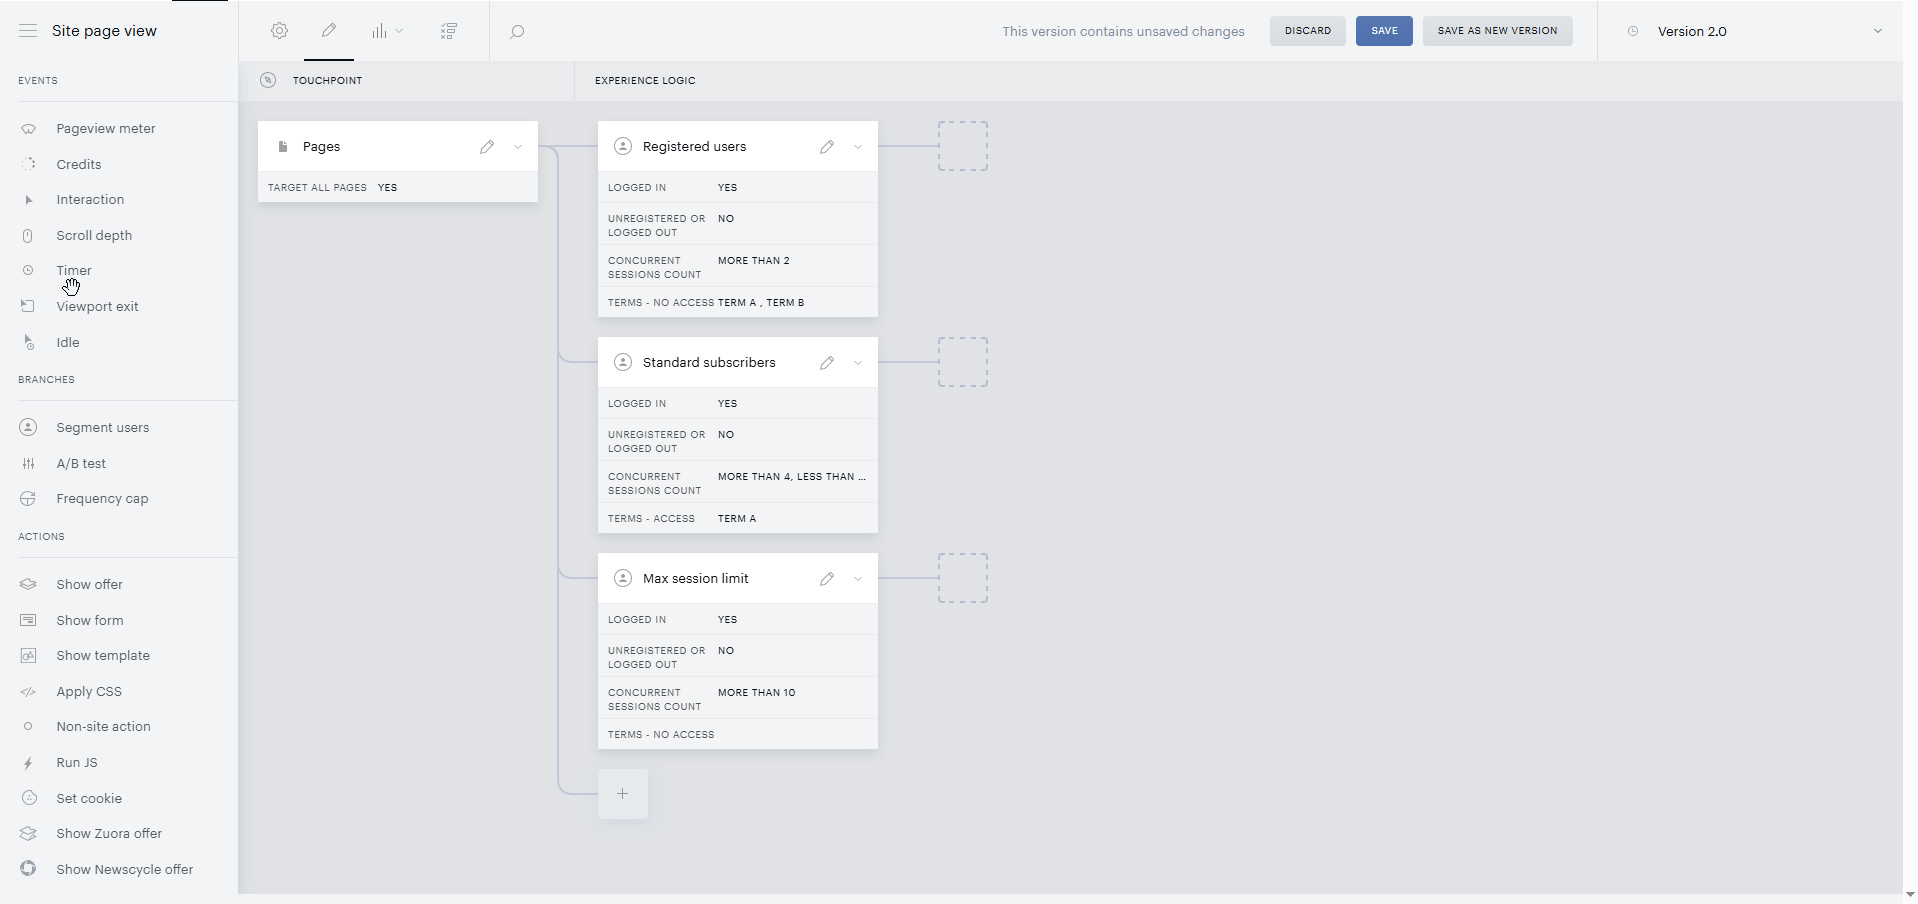
Keep in mind: users who are not logged in or registered should be shown a registration prompt, encouraging them to create an account or sign in before proceeding.
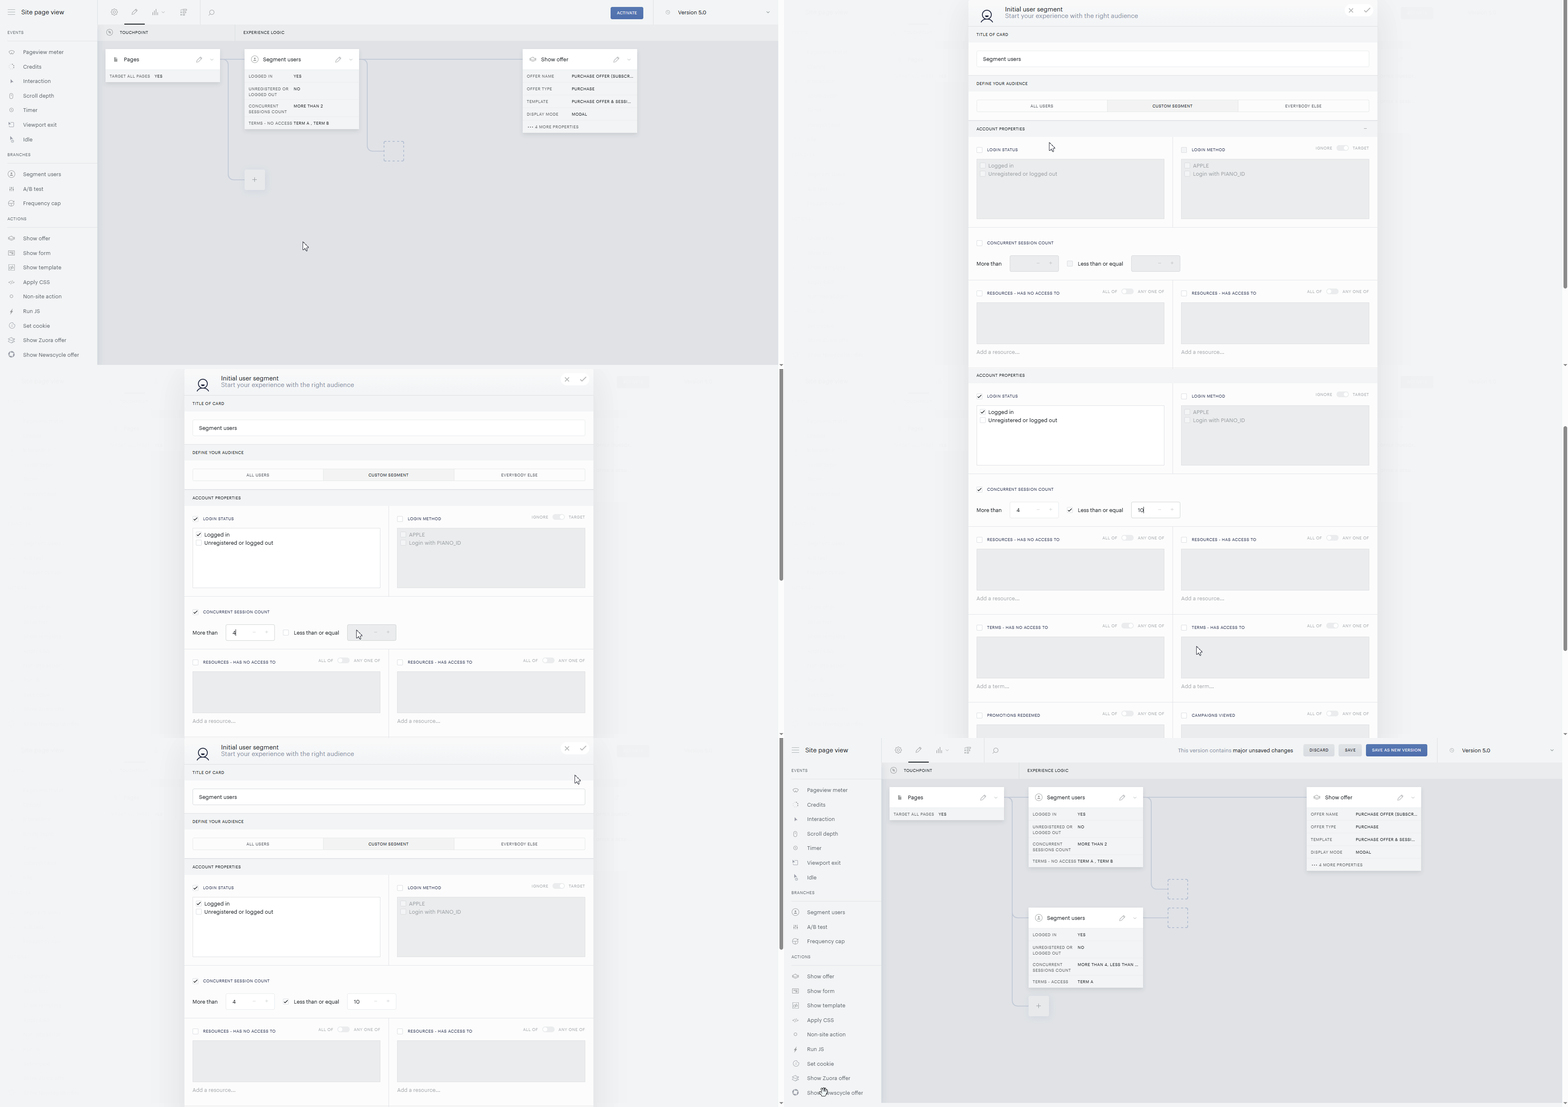
Implementation for Unsubscribed Users
To display a paywall to unsubscribed users who exceed the session limit:
-
In your Composer Experience, add a User Segment:
-
Set “Login status” to Logged in.
-
Set “Session count” to More than 2.
-
Set “Terms – has no access to” to include all existing terms (Term A, Term B) and apply the “All of“ operator to ensure the user has no access to any of them.
-
-
Choose an action:
-
Show Offer: Select “Purchase offer” as the type and use the “Session limit: Purchase offer” template with a built-in sessions manager under the Template tab.
-
Alternatively, you can use a Show Template card instead of an offer in combination with the "Session limit" template. As with the offer template, you’ll need to create it using a Piano boilerplate and save it before use.
Note, you need to create a template using one of our boilerplates first. To create your custom template, use one of Piano's boilerplates and customize it based on your needs. Save your template in the Templates library once your custom setup is complete.
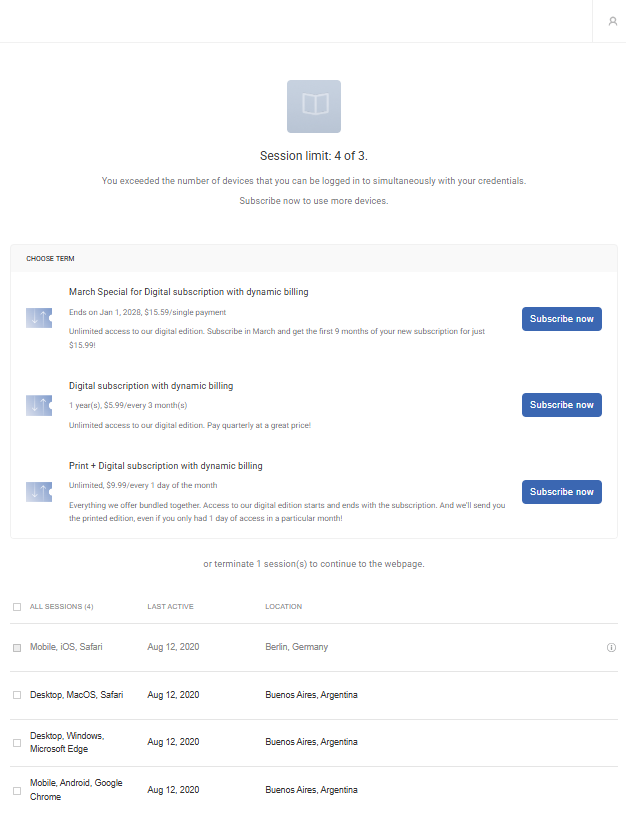
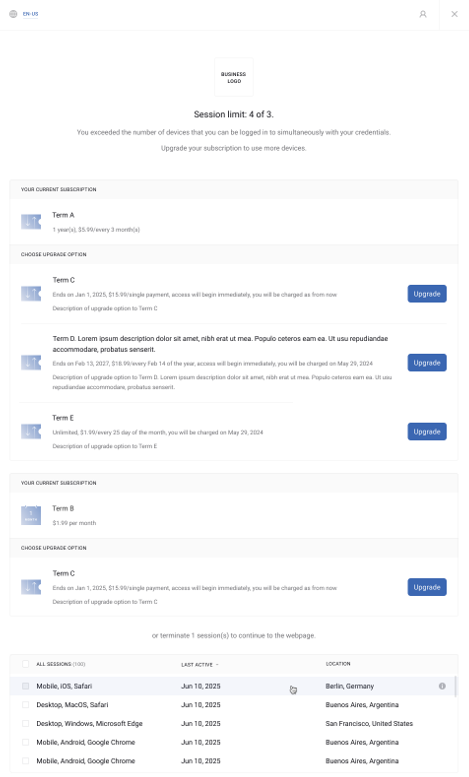
Here’s an example of how this offer may look to end users:
Implementation for Subscription Upgrades (Term A to Term B)
To target Term A subscribers who exceed their session limit and encourage them to upgrade:
-
-
Add another User Segment:
-
Set “Session count” to More than 4.
-
Set “Terms – has access to” = Term A.
-
Optionally, set "Session count – Less than or equal to 10" to help distinguish Term A users who should upgrade from those exhibiting potentially malicious behavior (i.e., those exceeding 10 sessions).
-
-
Choose an action:
-
Show Offer: Select “Upgrade offer” as the type and use the “Session limit: Upgrade offer” template that includes a sessions manager and Term B upgrade offer.
-
-
Alternatively, use a Show Template card with a "Session limit" template to display only the session manager to Term A users. As before, make sure it's created using a Piano boilerplate and saved for use in your Composer setup.
Note, you need to create a template using one of our boilerplates first. To create your custom template, use one of Piano's boilerplates and customize it based on your needs. Save your template in the Templates library once your custom setup is complete.
Here’s an example of how this offer may look to end users:
Implementation for Suspected Account Misuse
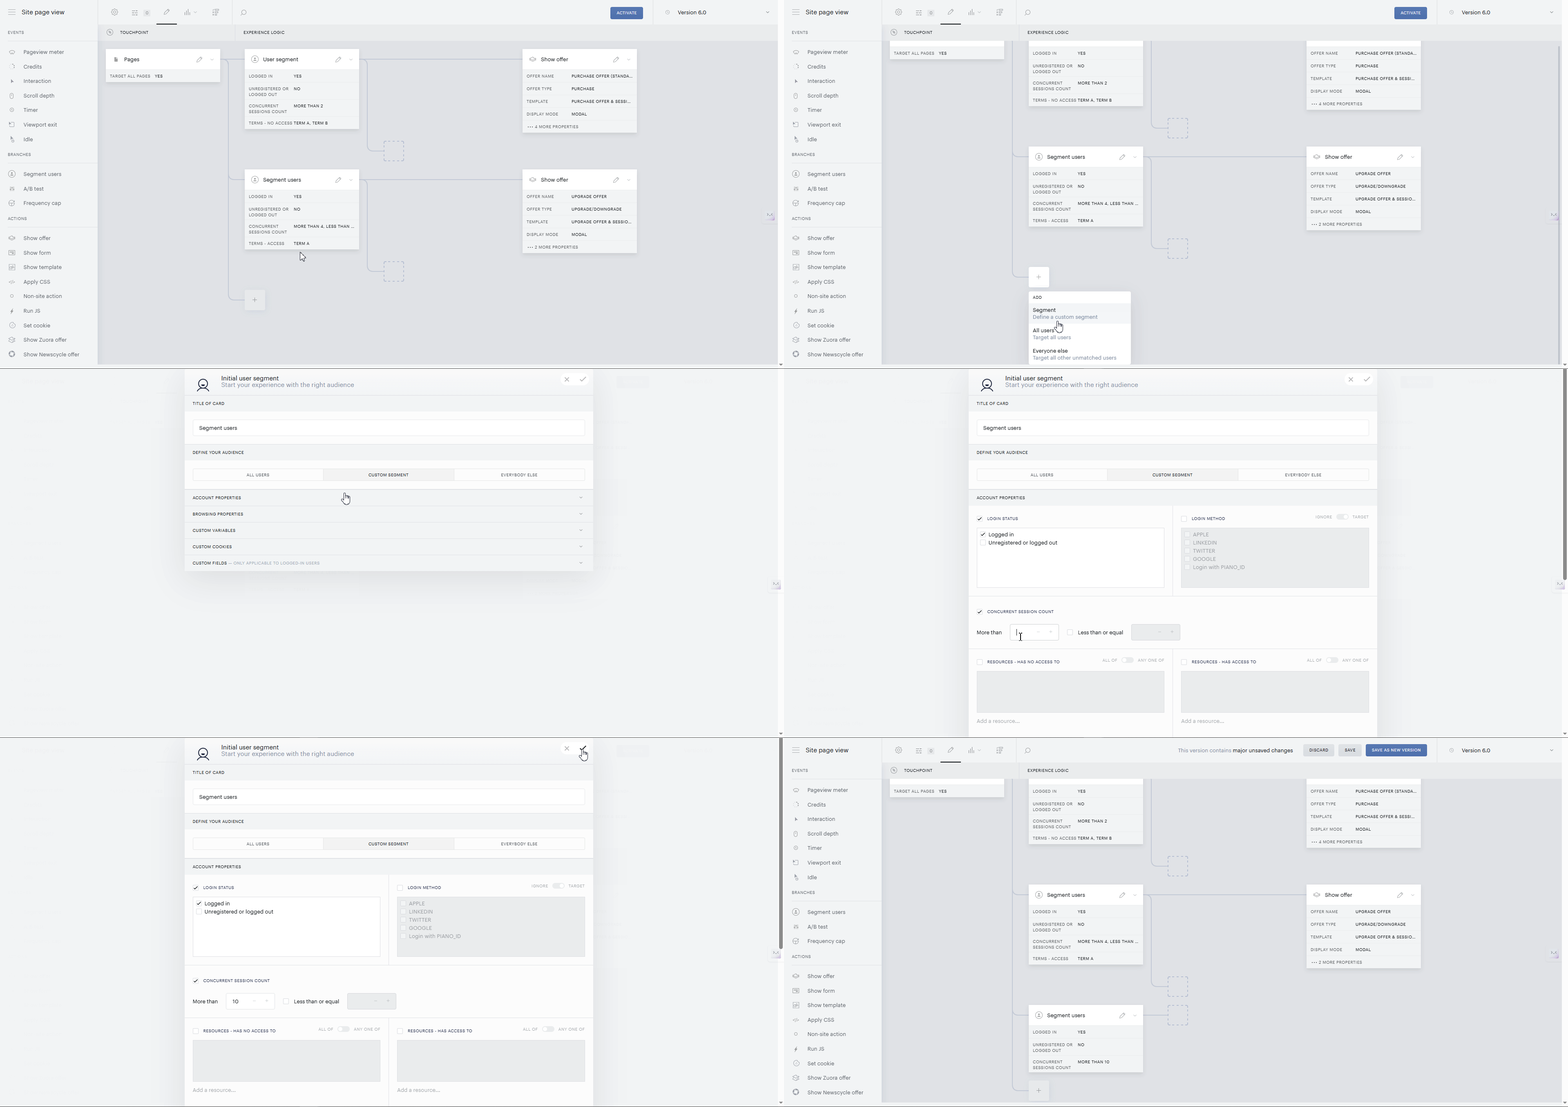
To help prevent account misuse or potential theft, create a User Segment that targets users with suspiciously high activity, specifically in our example, those with more than 10 sessions.
-
Create a User Segment with “Session count – More than 10”.
-
Choose a Show Template action.
-
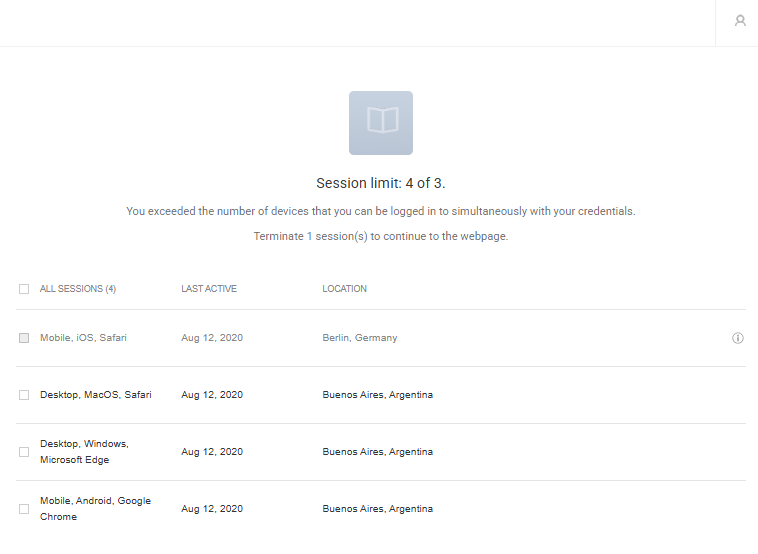
Use a “Session limit” template to display all active sessions and allow session termination.
Here’s an example of how this template may look to end users:
Template Changes
My Account Templates
My Account layout
Add a new line:
<my-account-pianoid-concurrent-sessions ng-if="current=='pianoid-concurrent-sessions'"></my-account-pianoid-concurrent-sessions>
In the following template part:
<my-account-transactions ng-if="current=='transactions'"></my-account-transactions>
 <my-account-pianoid-concurrent-sessions ng-if="current=='pianoid-concurrent-sessions'"></my-account-pianoid-concurrent-sessions>
 <my-account-wallet ng-if="current=='wallet'"></my-account-wallet>
My Account common components templates
Add a new line:
<li class="ma-navigation__tab" data-item="pianoid-concurrent-sessions"><a class="" href="#"><t>Concurrent sessions</t></a></li>
In the following template part:
<li class="ma-navigation__tab" data-item="transactions"><a class="" href="#"><t>Transactions</t></a></li>
<li class="ma-navigation__tab" data-item="pianoid-concurrent-sessions"><a class="" href="#"><t>Concurrent sessions</t></a></li>
<li class="ma-navigation__tab" data-item="payments"    ><a class="" href="#"><t>History</t></a></li>
My Account Library Components
The following new code can be added to the end of the template:
<script type="text/ng-template" id="/widget/myaccount/partials/library/terminate-pianoid-sessions-confirmation.shtml">
  <button type="button" ng-click="close()" class="tp-close" aria-label="{{'Close' | tc:'checkout.platform'}}"></button>
  <div class="ma-modal__content">
    <t context="checkout.platform">Are you sure you want to terminate the session(s)?</t>
  </div>
  <div class="ma-modal__footer ma-modal-footer">
    <a href="javascript:void(0)" class="ma-modal-footer__button ma-modal-footer__button--primary" ng-click="confirm()"><t context="checkout.platform">Terminate</t></a>
    <a href="javascript:void(0)" class="ma-modal-footer__button ma-modal-footer__button--secondary" ng-click="close()"><t context="checkout.platform">Cancel</t></a>
  </div>
</script>
My Account PianoId Components
The template has the following changes: new classes piano-id-tab, piano-id-tab__title, piano-id-tab__content, and new variable iframeTitle.
Before:
<script type="text/ng-template" id="/widget/myaccount/partials/pianoid/profile.shtml">
    <div class="profile-tab">
      <span class="section-text"><t context="piano.id">Profile</t></span>
      <div id="piano-id-container" class="scrollable-content">
          <iframe id="{{id}}" ng-src="{{url}}" style="width:100%;"></iframe>
      </div>
    </div>
</script>
After:
<script type="text/ng-template" id="/widget/myaccount/partials/pianoid/profile.shtml">
  <div class="profile-tab piano-id-tab">
    <span class="section-text piano-id-tab__title">{{iframeTitle}}</span>
    <div id="piano-id-container" class="scrollable-content piano-id-tab__content">
      <iframe id="{{id}}" ng-src="{{url}}" style="width:100%;"></iframe>
    </div>
  </div>
</script>
Checkout template
The following template should also be changed to see the confirmation of the termination session for the upgrade/purchase flow.
Checkout
This code:
<div view="terminateSessionConfirmation">
  <div account-header-component class="checkout-component-header"></div>
  <div piano-id-terminate-session-confirmation>
    <div class="sessions-confirmation__layout">
      <div class="sessions-confirmation__content">
        <p class="sessions-confirmation__content-header"><t>Terminate concurrent session(s)</t></p>
        <p class="sessions-confirmation__content-subheader"><t>Are you sure you want to terminate the session(s)?</t></p>
      </div>
      <div class="sessions-confirmation__footer">
        <button type="button" ng-disabled="disabledButton" class="btn" ng-click="cancelTerminateSessions()"><t>Cancel</t></button>
        <button type="button" ng-disabled="disabledButton" class="btn btn-primary" ng-click="terminateSessions()"><t>Terminate</t></button>
      </div>
    </div>
  </div>
</div>
Can be added right after the following code:
<div view="alreadyHasAccess">
    <div already-has-access-component></div>
</div>
<div view="auth">
    <div account-header-component></div>
    <div auth-component></div>
</div>
<div view="lockedPromoCode">
    <div account-header-component></div>
    <div promo-code-component></div>
</div>
<div view="externalVerification">
    <div account-header-component></div>
    <div external-verification-component></div>
</div>
<div view="printAddress">
    <div account-header-component></div>
    <div print-address-component></div>
</div>
<div view="confirmation">
    <div confirmation-component></div>
</div>
<div view="giftParams">
    <div account-header-component></div>
    <div gift-form-component></div>
</div>
<div view="redemption">
    <div redemption-component></div>
</div>
<div view="user-non-confirmed">
    <div account-header-component></div>
    <div email-confirmation-required></div>
</div>
<div view="bankSecure">
    <div bank-secure-component></div>
</div>
<div view="sharedSubscription">
    <div shared-subscription-component></div>
</div>
<div view="redeemSharedSubscription">
    <div redeem-shared-subscription-component></div>
</div>
<div view="continueThreeDSPurchase">
    <div continue-three-d-s-purchase-component></div>
</div>
<div view="upgradeSubscription">
    <div complete-upgrade-component></div>
</div>
<div view="upgradeSharedSubscription">
  <div upgrade-shared-subscription-component></div>
</div>
<div view="subscriptionReactivation">
  <div reactivate-subscription-component></div>
</div>
<div view="upgradeAuthentication">
  <div upgrade-authentication-component></div>
</div>
Boilerplates
There are 3 out-of-the-box boilerplate templates available:
-
Session limit: Purchase offer
-
Session limit: Upgrade offer
-
Session limit
It is recommended to use the dedicated boilerplates provided specifically for this purpose. However, the session limit directive can also be added to other custom templates or boilerplates if needed.
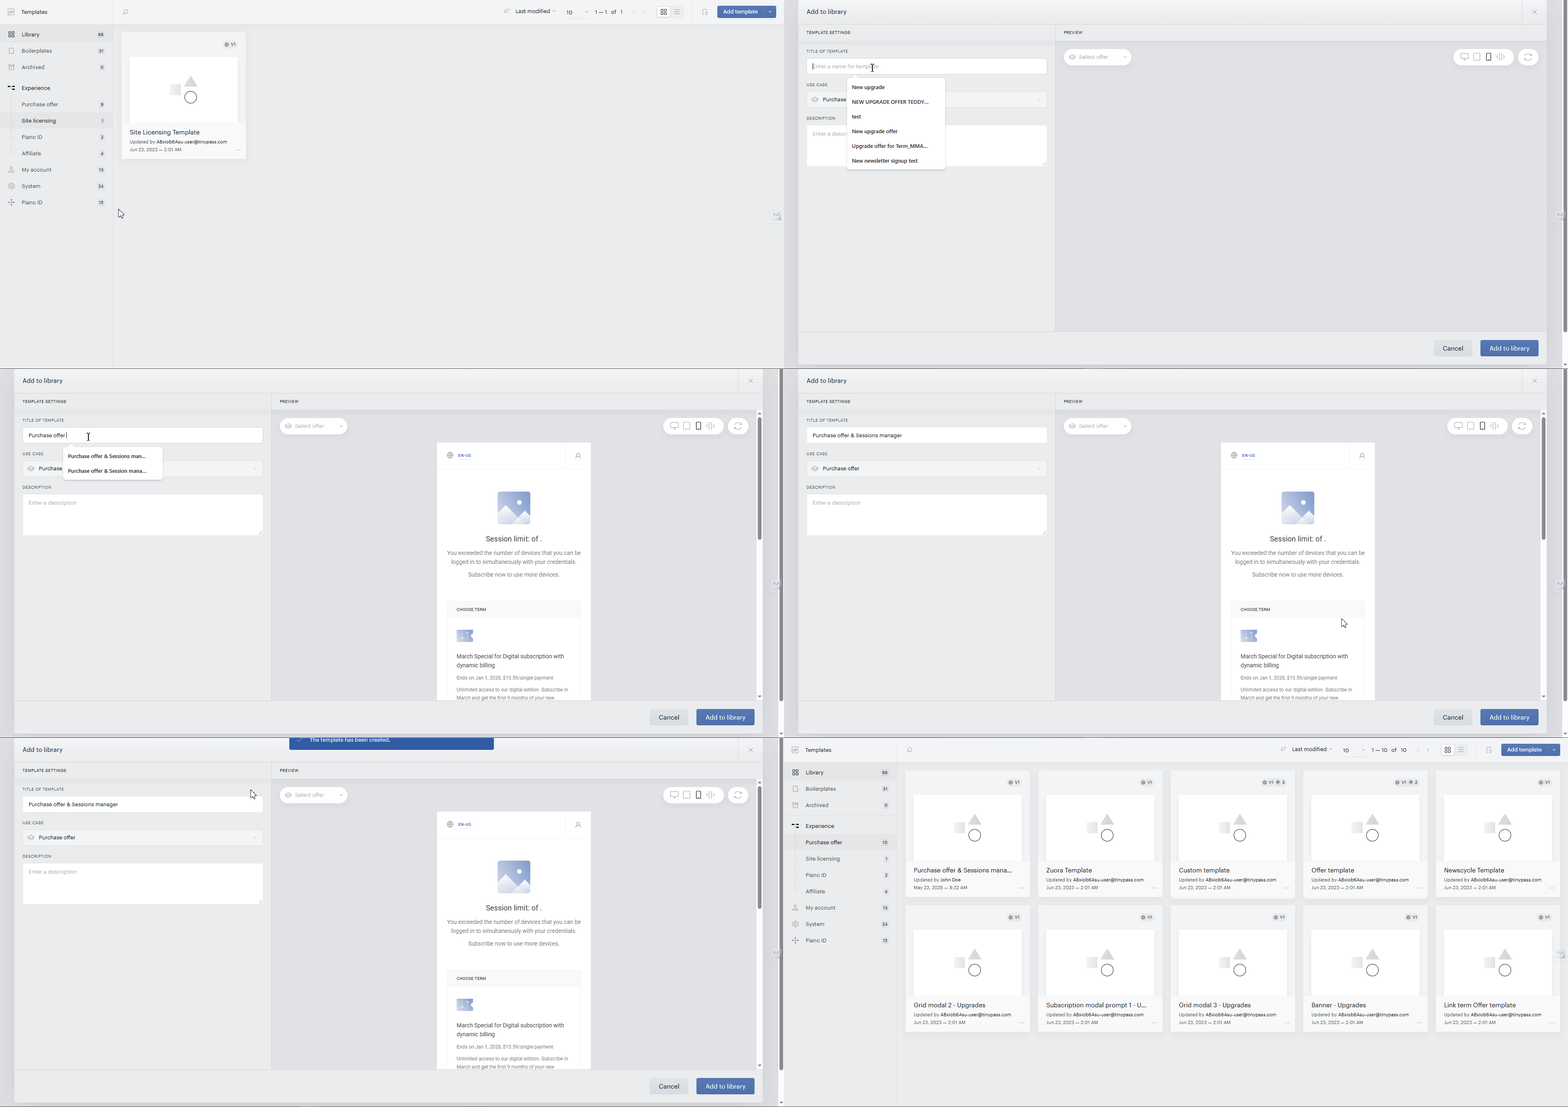
The directive used is piano-id-sessions and should be included as:
<div piano-id-sessions ng-if="sessions && sessions.hit_limit"></div>
Usage Examples
-
Session limit: Upgrade offer boilerplate
HTML<div piano-id-sessions id="sessions-list-container" class="pn-upgrade-offer__sessions-table" ng-if="sessions && sessions.hit_limit"></div> -
Session limit: Purchase offer boilerplate
HTML<div piano-id-sessions id="sessions-list-container" ng-if="sessions && sessions.hit_limit"></div>
Important: Misconfigurations may cause unexpected behavior or result in empty content being displayed. Common configuration issues include pairing a concurrent session user segment with a template that does not include the required session limit directive, or using a template that contains the session limit directive in combination with a user segment that is not based on concurrent sessions.
End User Experience
When a user exceeds the allowed number of sessions, Composer can display a template that restricts page access until the user ends an existing session or completes another required action, such as upgrading their subscription. This template can be configured via the "Show template" card to be either non-dismissible - blocking access - or dismissible, allowing the user to close it and continue. The template can also provide options to manage active sessions (e.g., terminate an existing session to proceed) or present upgrade opportunities, such as a shared subscription offer or other upsells.
User Session Management
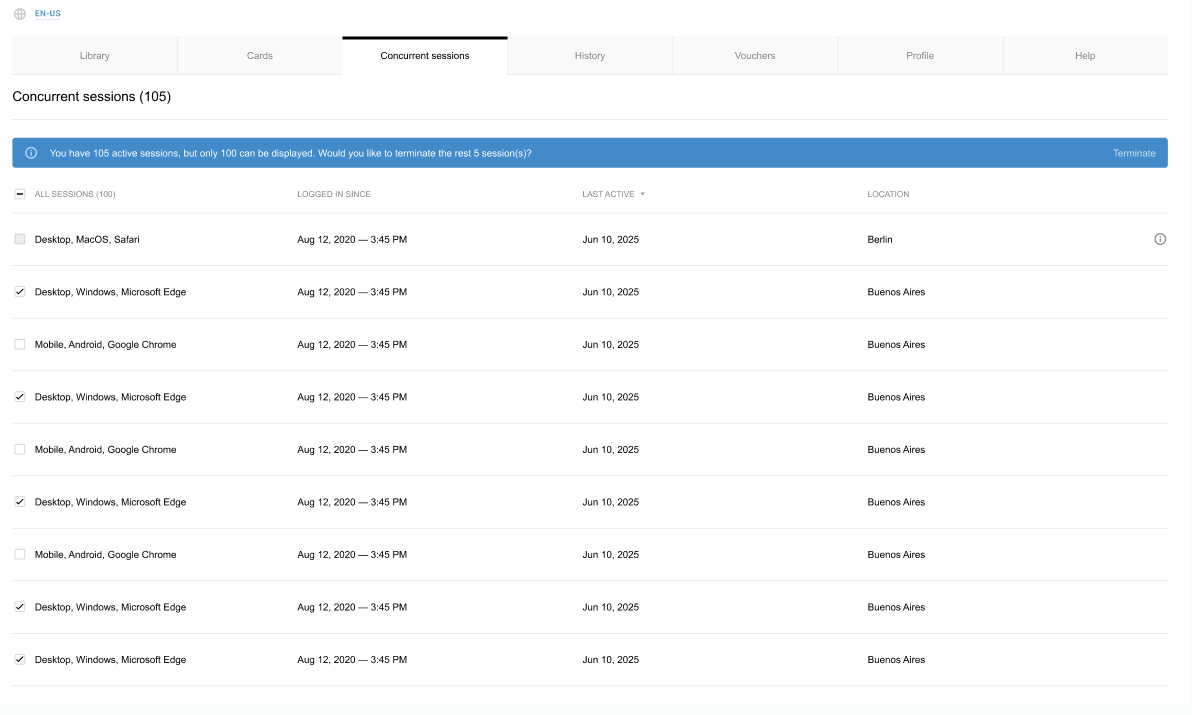
Users can also manage their sessions at any time through the My Account section, where they can view a list of active sessions - including device or operating system details - and choose to terminate one, multiple, or all sessions as needed. To avoid performance issues - and because very old sessions are generally irrelevant - only the 100 most recent sessions (sorted by last activity) will appear in the My Account section.
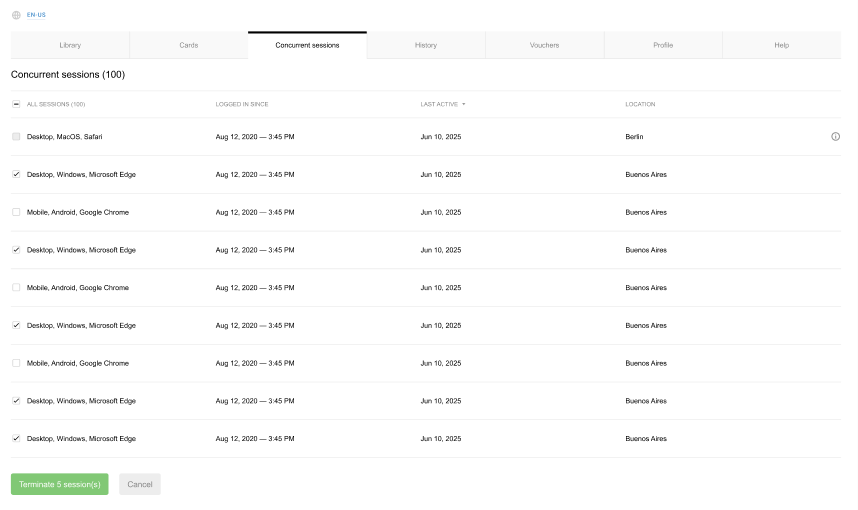
End users will see a warning and have the option to close older sessions that aren't included in the visible list.
Customer Service
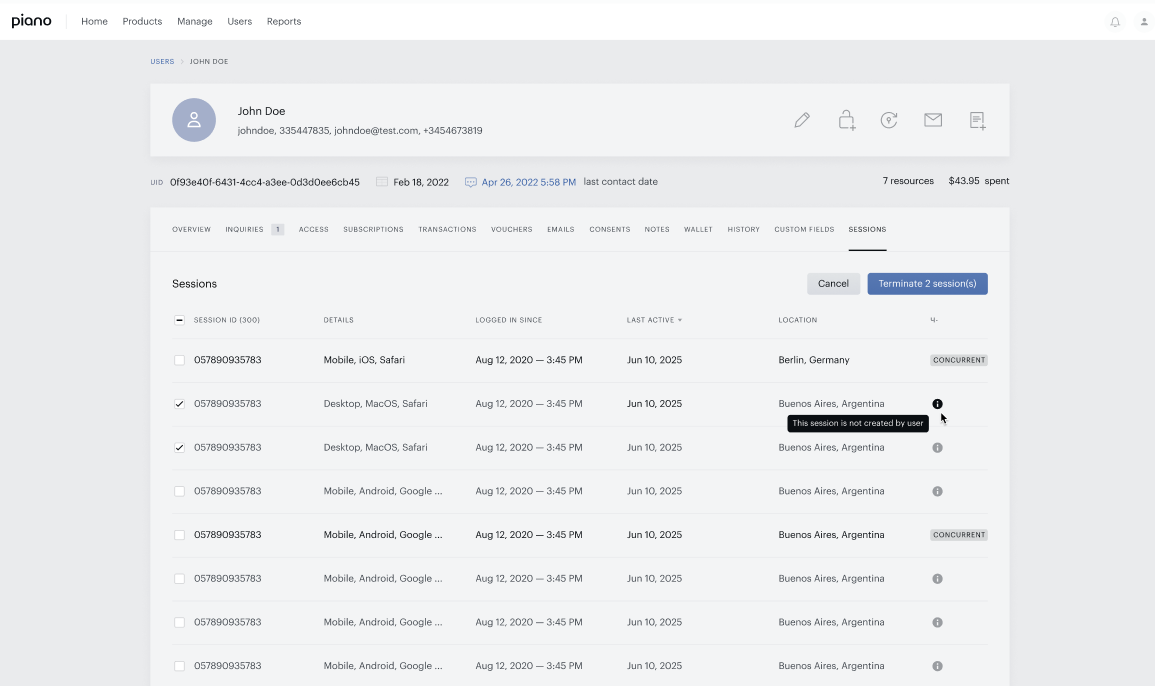
Customer support teams can access up to 100 user sessions through the Publisher Dashboard, including those not counted toward the active session limit (clearly marked for easy reference). They also have visibility into detailed session metadata such as device type, platform, and operating system, and can remotely terminate individual sessions or log the user out from all sessions.
Frequently Asked Questions
Q: Why doesn't the session limit template appear immediately after login?
A: In some cases, the session limit template may not display immediately after a user logs in. Instead, it only appears after the user navigates to another page, such as an article or the My Account section.
To ensure the session limit template appears immediately upon login, you should include the following handler in your website's code:
tp.push([
  "addHandler", "loginSuccess",
  () => {
    console.log("QA: Login Success");
    tp.experience.execute();
  }
]);
This callback is part of the standard implementation, but it’s important to double-check that it’s included in your integration. It ensures the execute() function is triggered immediately after login, allowing the session limit template or other relevant templates to display as expected. More details are available here.
Q: Why is tp.util.getBrowserId() returning undefined?
A: If tp.util.getBrowserId() returns undefined, try the following:
-
Make sure the
tinypass.min.jsscript is correctly loaded on the page -
Wait until the Piano SDK has fully initialized before calling the function
-
Check that cookies are enabled in the browser, as they are required for this function to work
Q: Why are there unusually high session counts in the Piano Dashboard?
A: If you’re seeing an unexpectedly high number of active sessions:
-
Confirm that the browser ID is being passed in the request headers
-
Ensure that your implementation correctly reuses the token instead of generating a new one for each session
-
If the issue persists, contact Piano Support and include examples of the affected requests for investigation