
The Google Ad Manager integration enables all Ad Manager's customers to apply any data to Piano Audience for segmentation and targeting. The integration needs Piano Audience setup completed (available siteGroupId(s) are required). The process includes setup in Google Ad Manager, setup in Piano Audience, and modification of the Ad tag.
Configuring Google Ad Manager
Grand Piano's service account access to the data. Read details here.
Configuring Piano Audience
Create a Google Ad Manager configuration
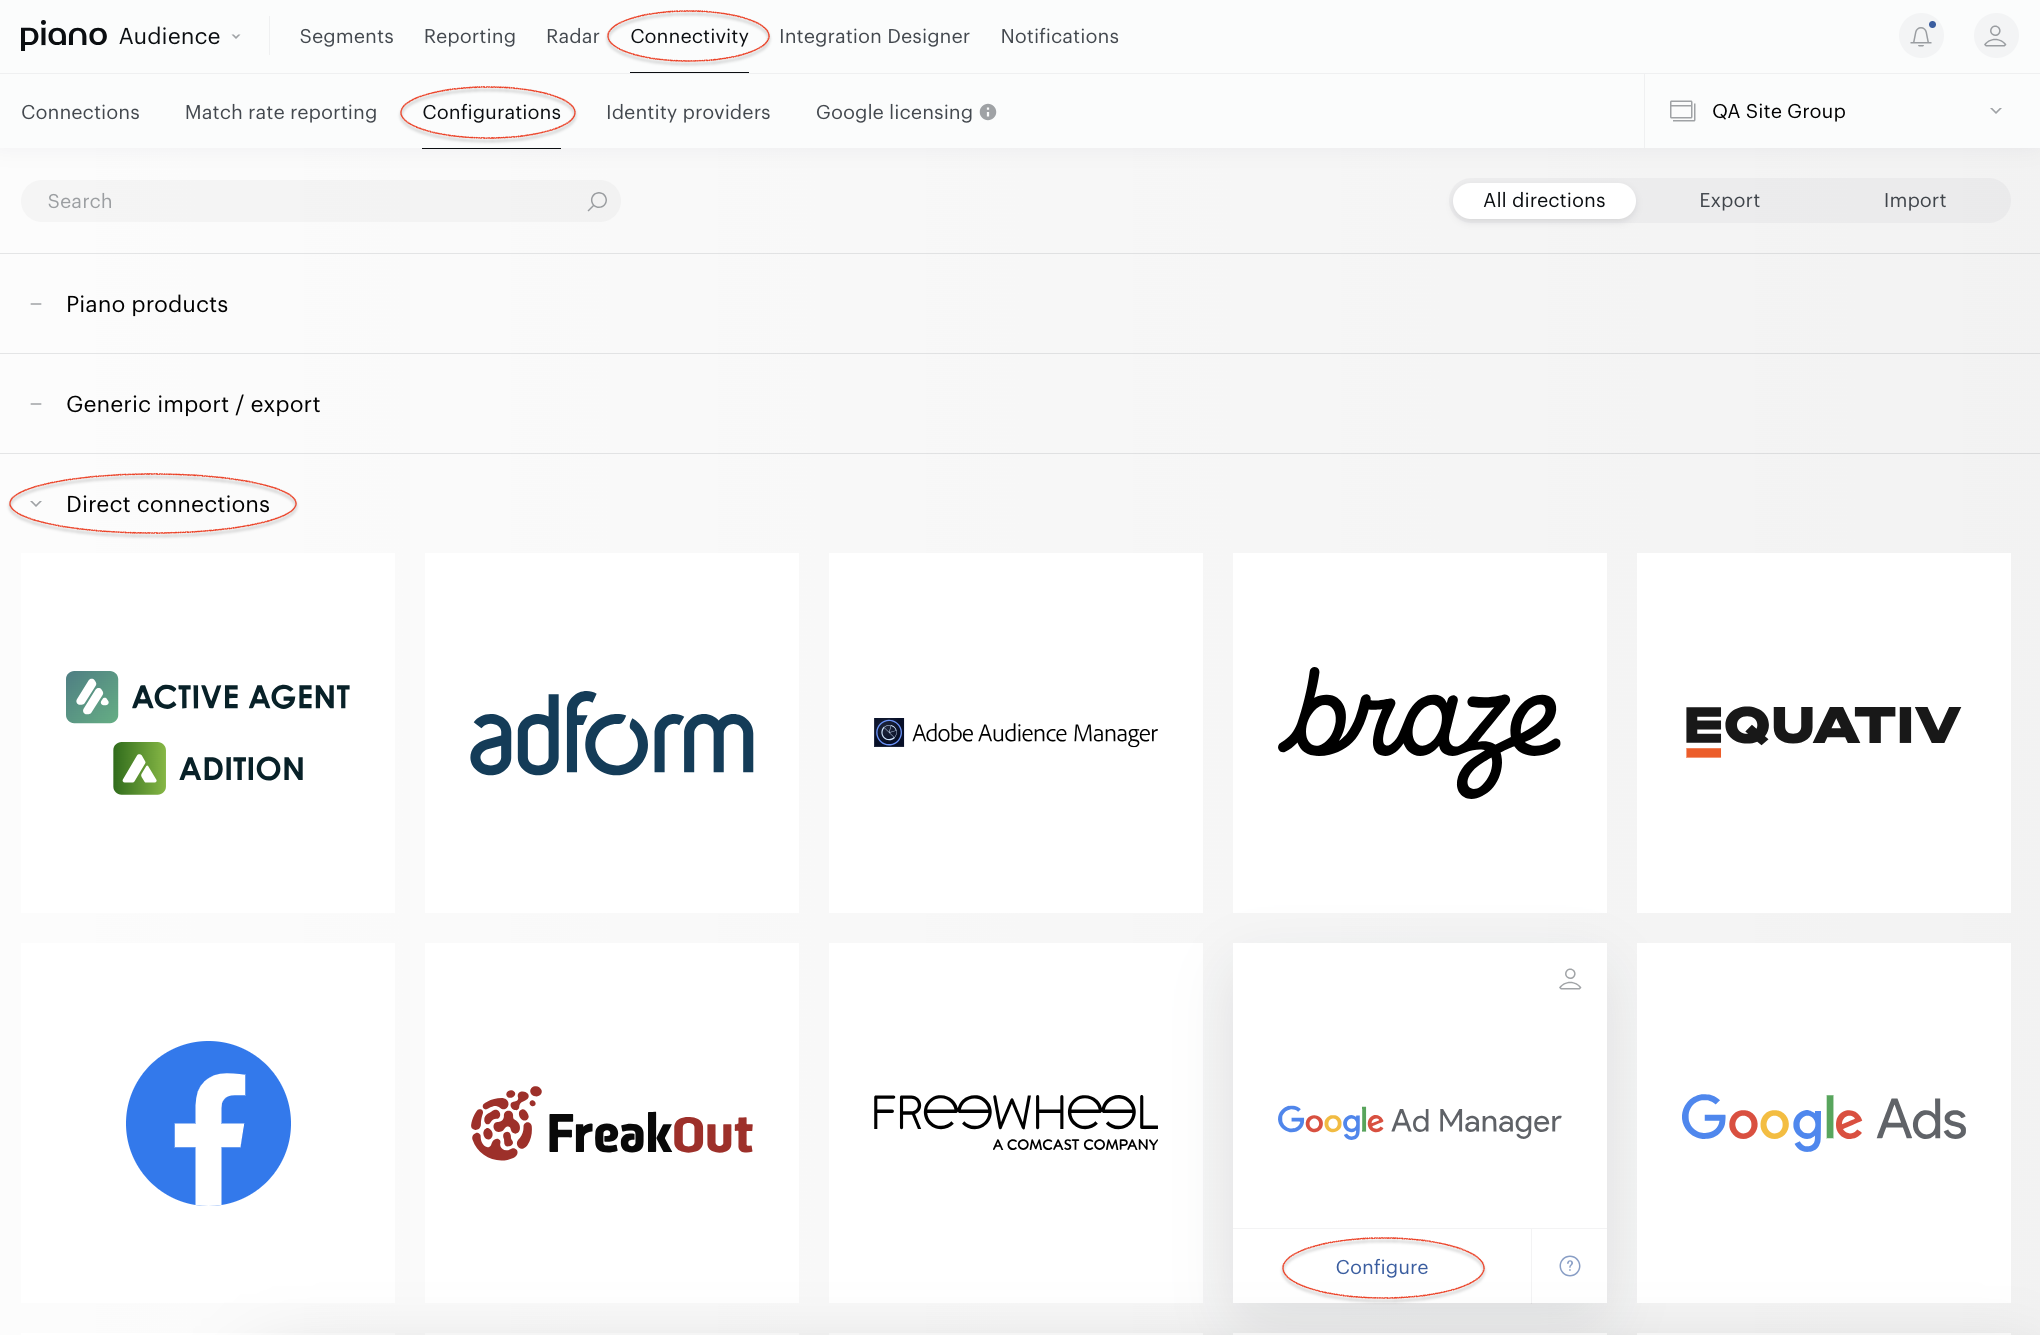
With your site group selected, from the Piano Audience home page, go to the Connectivity→Configurations→Google Ad Manager and click the Configure button.
Configure the connection
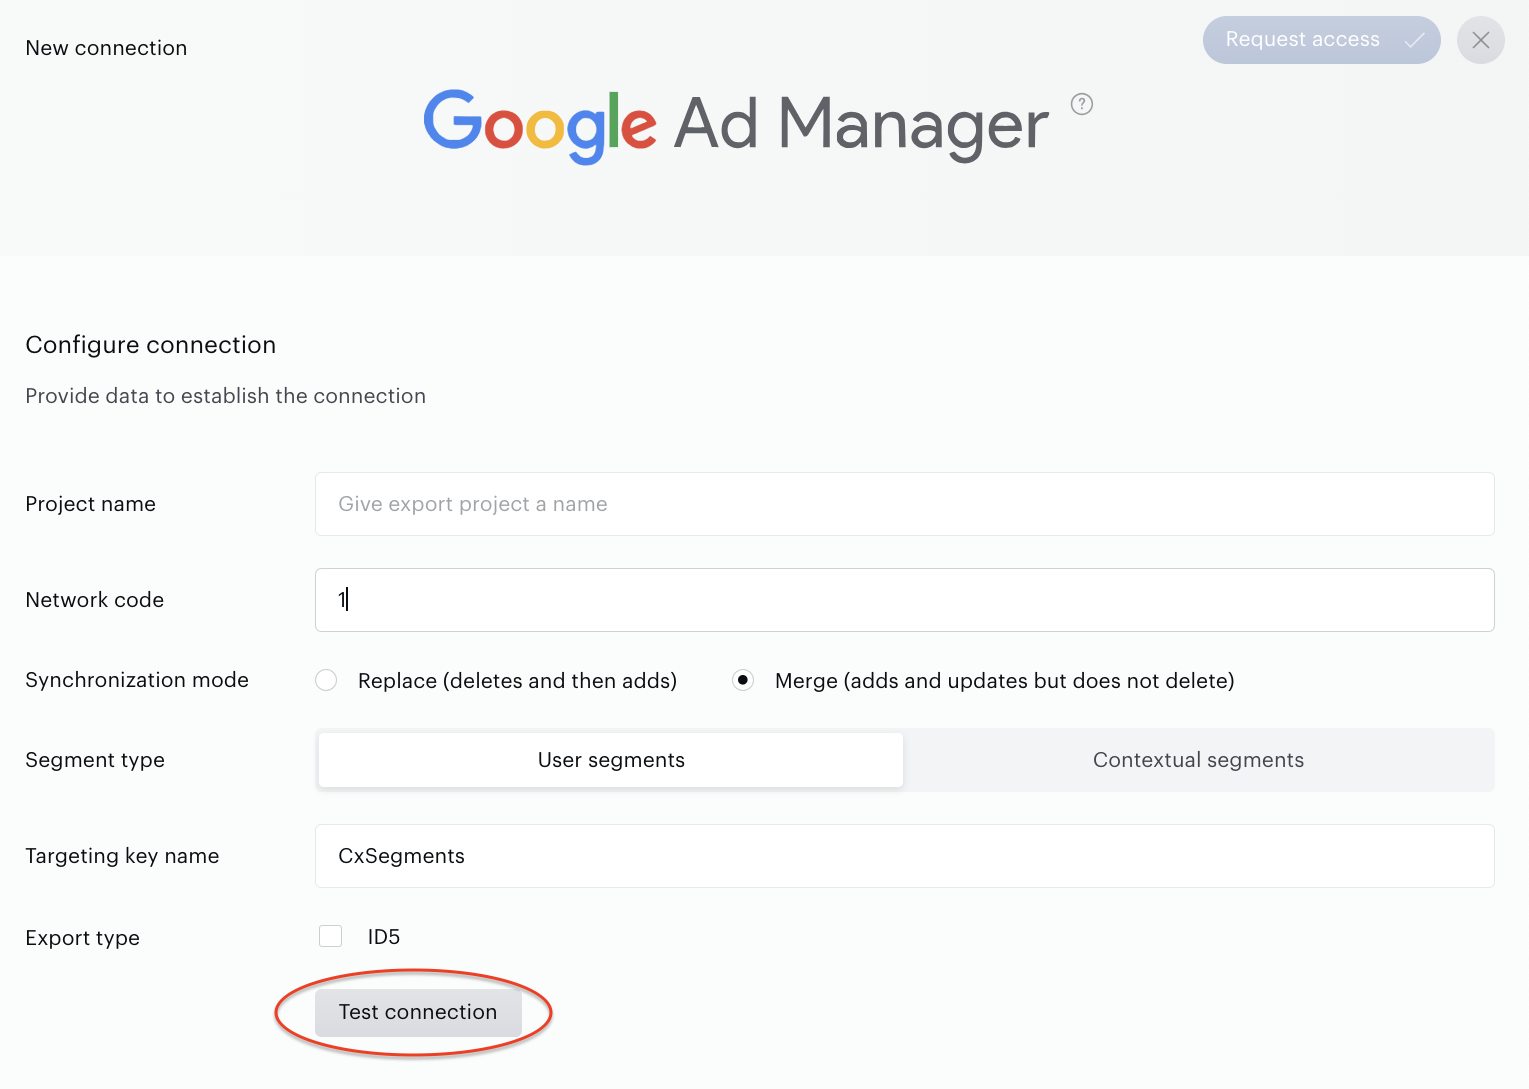
In the New Connection menu, you want to set:
-
Project name: to be shown in Piano Audience only, intended to simplify managing numerous integrations.
-
Network code: you have copied it in Google Ad Manager.
-
Synchronization mode: Merge (adds and updates but does not delete) or Replace (deletes and then adds).
Be careful with the Synchronization mode field. If you want to export segments from multiple site groups to one Google Ad Manager network, you should use the Merge mode for each site group to be exported. Otherwise, KV will be replaced by the last site group scheduled in the Replace mode.
-
Segment type: User segments or Contextual segments
-
User segments option is selected by default and allows you to export any User segments, such as Traffic, Lookalike, DMP, etc.
-
Contextual segments option allows you to export Contextual segments. Read details in the Export Contextual segments.
-
-
Targeting key name with the following default values:
-
CxSegments for the User segments.
-
CxContext for the Contextual segments.
-
Be aware that you cannot use the same value of the Targeting key name parameter when export User segments and Contextual segments.
-
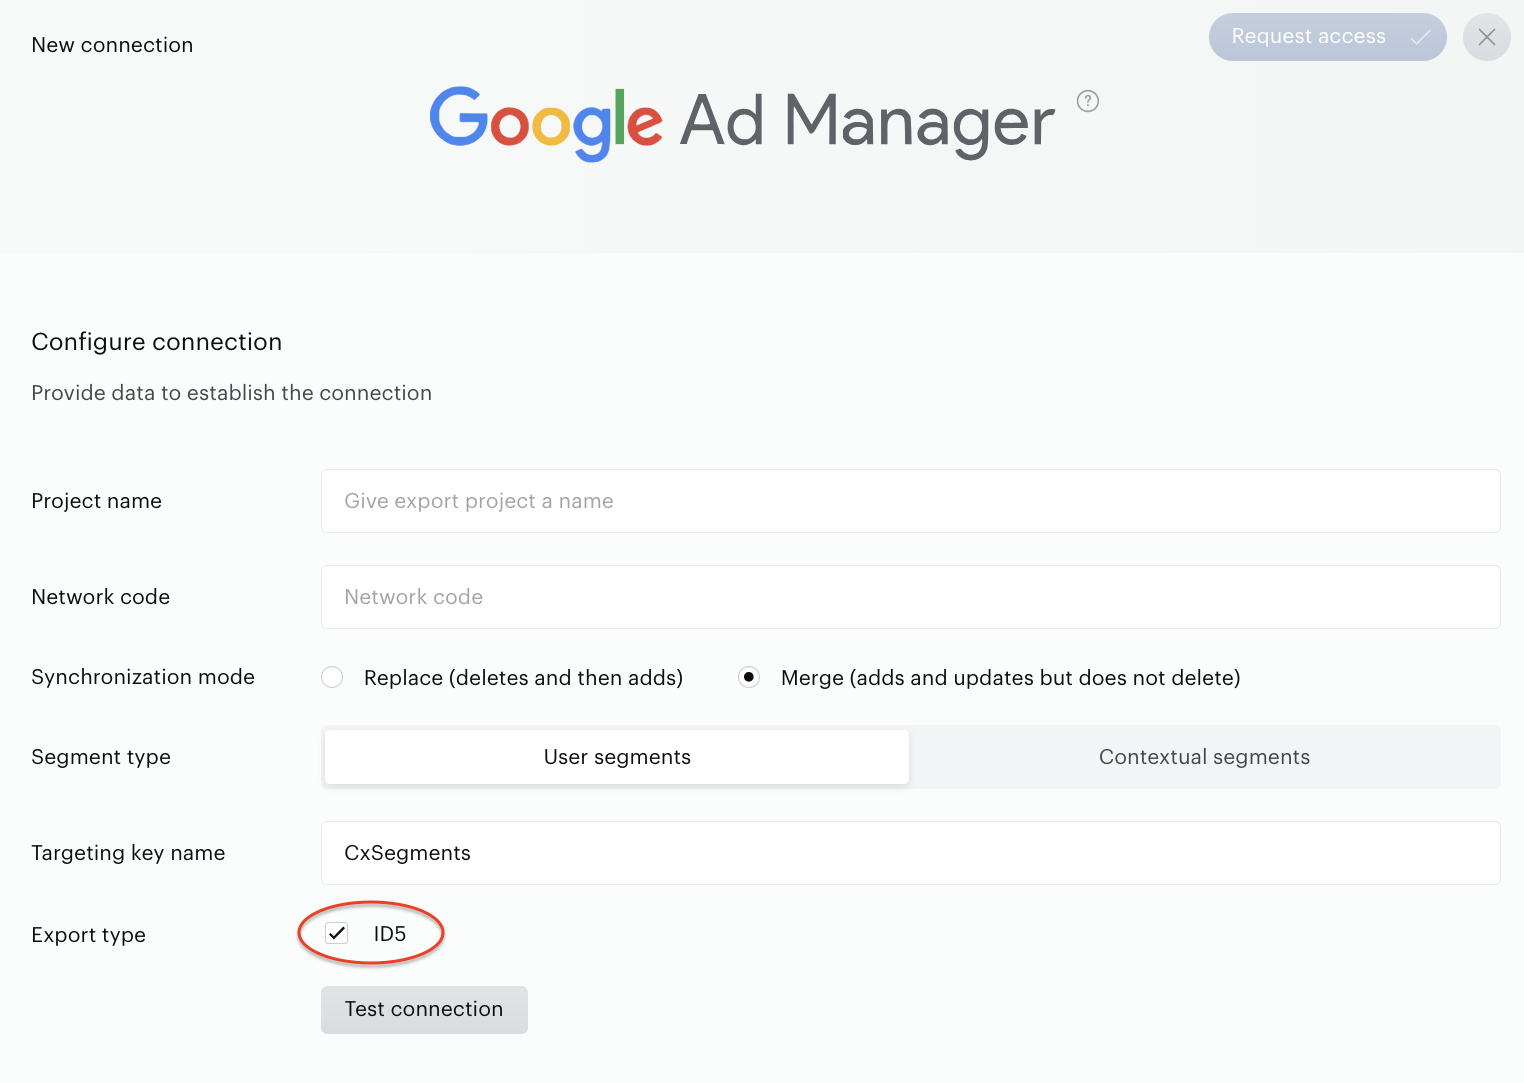
ID5 checkbox that should be tickled in case you want to work with ID5 user IDs. This parameter available if you want to export User segments. Read details in the Export ID5 universal IDs.
Set the parameters and click Test Connection. If the test connection is successful, the Request access button in the upper right corner will be activated. Click it.
An error message will be shown if your account is not authorized to work with the Network ID you have added. The exact error message is: "Wrong argument: Can't connect to dfp network id: <Network ID>". In this case, please address this issue with your Piano Account Manager.
Configure segments
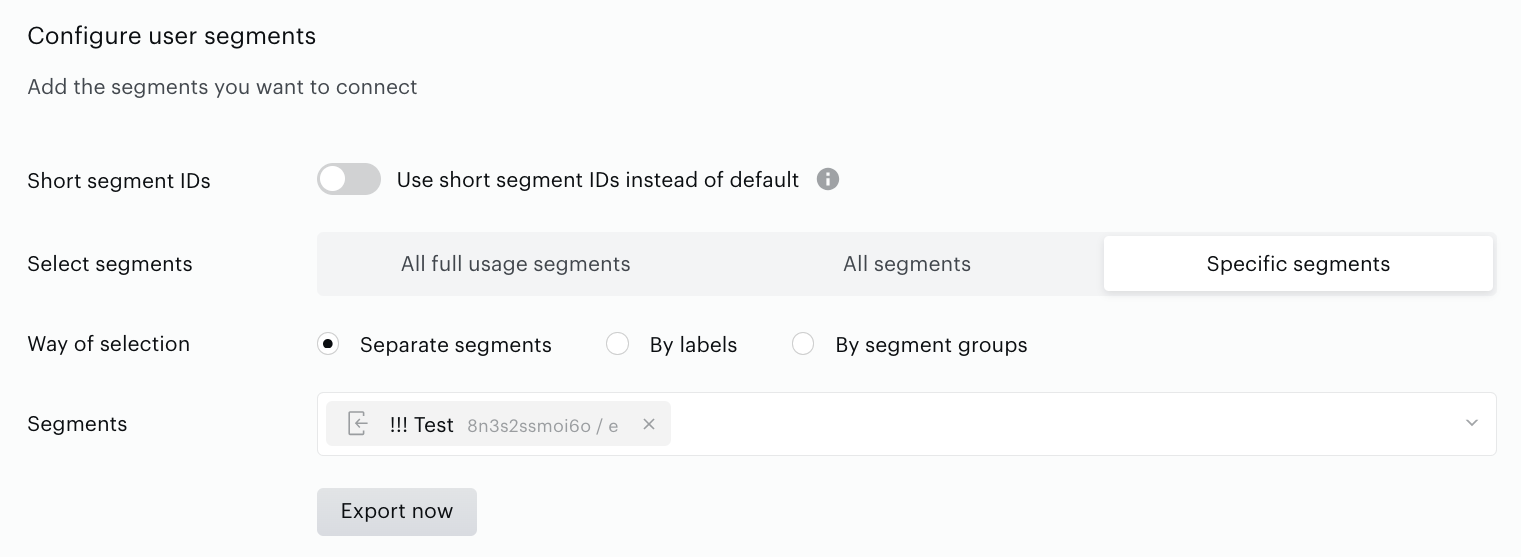
Successful test connection enables the Configure segments form where:
-
All full usage segments means that all Full usage (active) segments will be sent to Google Ad Manager; any newly created Full usage (active) segments will be added automatically.
-
All segments includes both types of usage segments: Full and Reporting only segments.
-
Specific segments allows you to select several specific segments. Newly created segments are not added automatically. Specific segments options allow you to choose how exactly Piano Audience should select segments for export:
-
Separate segments allows you to search and select segments one by one manually.
-
By labels allows you to select one or more labels (key-value pairs). Audience will find segments by the selected labels and export them.
-
By segment groups allows you to select one or more segment groups, and Audience will export segments within these specific segment groups. It is more suitable for those clients who prefer to organize their segments specifically.
-
-
Short segment IDs allows client-side integrations to replace DMP's regular segment IDs and thus evade Google Ad Manager's restrictions. It makes sense, for example, when your marketing purposes demand a lot of segments, and the same users belong to a lot of them simultaneously.
Set the parameter.
-
Export now
You can click Export now in the Configure segments section for almost immediate export of selected segments without waiting for the next scheduled data transfer. The other option is configuring scheduled data transfer in the Activate section below. There, you can either set up a daily data transfer by turning connection on or hold the created configuration without activation yet.
When ready, click Create or Save (if editing) in the top right corner of the page. You can create multiple integration records for the same or different Google Ad Manager Network ID.
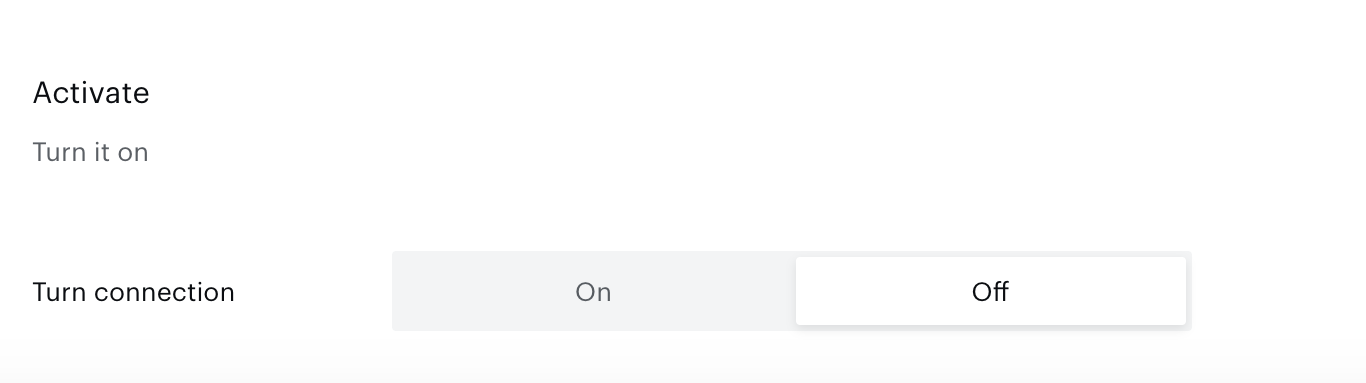
Do not forget to activate the connection in the Activate section:
Monitoring and updates
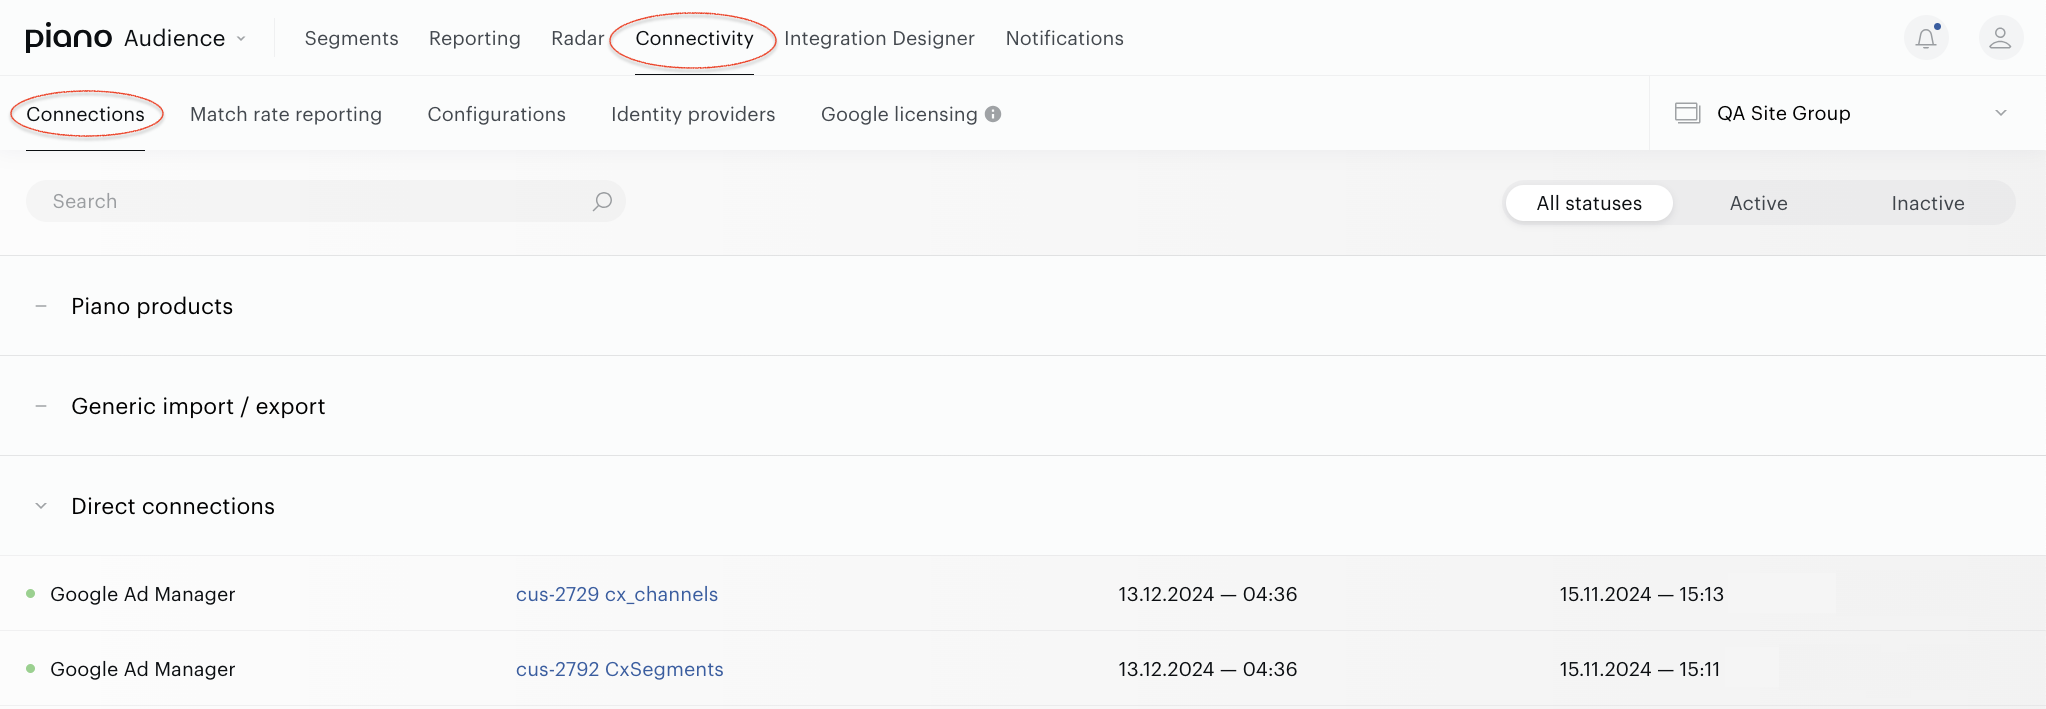
Configured connections are listed and can be edited in the Connections tab.
Troubleshooting of the Test Connection or Export Now stage
If you see an error message at the Test Connection or Export Now stage, you can try the below recommendations from Google's support website.
-
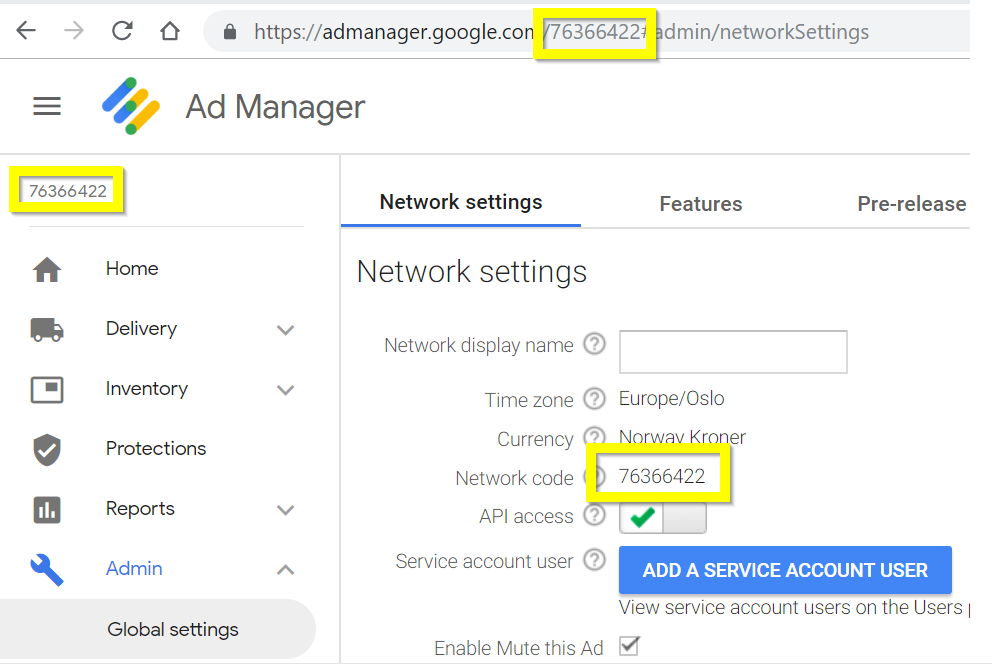
NETWORK_NOT_FOUND - you have inserted the wrong NetworkId (Network Code). You can find it in the URL, in the left-side navigation bar, or in the Network code field of Admin→Global settings>.
-
NO_NETWORKS_TO_ACCESS - you haven't enabled API access in your account. You can enable it in the API access field of Admin→Global settings.
-
NOT_WHITELISTED_FOR_API_ACCESS - you have not whitelisted our technical user. Add it to the whitelist by clicking ADD A SERVICE ACCOUNT USER in Admin→Global settings.
-
"The networkId already connected to other site group. Please contact support@piano.io to resolve this conflict."
Modifying the Ad tag
Here we describe how to read the Piano segments of the current client from Piano Audience and forward those segments as targeting with the Google Ad Manager tag.
To get the Piano Audience segment IDs of the current user, we use the cX.getUserSegmentIds(..) helper function.
To set the Google Ad Manager targeting, we use the Ad Manager's setTargeting(..) helper function.
2015-02-05 Update to the code, to wrap the " googletag.display() " calls with the " cX.callQueue.push() " as well, to avoid asynchronous race conditions. Please update to this version!
2016-05-11 Update to the code to showcase Googletag "slot-level" versus "page-level" targeting options (Google Publisher Tag reference)
2019-06-19 Update the code to make sure that setTargeting("CxSegments",...) will be called after Piano Audience segments have been obtained.
A typical Google Ad Manager tag looks like this:
(... removed the code that loads the google ad script ...)
<head>
<script type='text/javascript'>
  googletag.cmd.push(function() {
    googletag.defineSlot('/42072717/TestUnit', [400, 150], 'div-gpt-ad-10').addService(googletag.pubads()).setTargeting("pos","topright");
    googletag.enableServices();
  });
</script>

</head>

<body>

<!-- the code that places the ad -->
<div id='div-gpt-ad-10'>
    <script type='text/javascript'>
        googletag.cmd.push(function() { googletag.display('div-gpt-ad-10'); });
    </script>
</div>

</body>
(... removed the code that loads the google ad script ...)

TODO: If the Piano analytics script is not on the page where this tag runs, then a dummy analytics event has to be sent to link the user cross sites

<head>
<script type='text/javascript'>
  var cX = cX || {}; cX.callQueue = cX.callQueue || [];
  cX.callQueue.push(['invoke', function() {
    cX.getUserSegmentIds({persistedQueryId:'1234567890', callback:googleAdSetup});
  }]);
  function googleAdSetup(cXsegmentIds) {
    googletag.cmd.push(function() {
      // Here the "CxSegment" targeting will be applied on "slot-level"
      googletag.defineSlot('/42072717/TestUnit', [400, 150], 'div-gpt-ad-10')
          .addService(googletag.pubads())
          .setTargeting("CxSegments",cXsegmentIds);

      // OPTIONAL the "CxSegments" can be defined on "page-level" tool, when there are multiple slots defined
      // googletag.pubads().setTargeting("CxSegments", cXsegmentIds);
      googletag.enableServices();
    });
  }

  // Async load of cx.js
  (function(d,s,e,t){e=d.createElement(s);e.type='text/java'+s;e.async='async';
  e.src='http'+('https:'===location.protocol?'s://s':'://')+'cdn.cxense.com/cx.js';
  t=d.getElementsByTagName(s)[0];t.parentNode.insertBefore(e,t);})(document,'script');
</script>

</head>

<body>

<!-- the Piano integration needs to be added to EVERY Googletag code that places the ad -->
<div id='div-gpt-ad-10'>
    <script type='text/javascript'>
        cX.callQueue.push(['invoke', function() {
            googletag.cmd.push(function() { googletag.display('div-gpt-ad-10'); });
        }]);
    </script>
</div>

</body>
The final step: replace the persistedQueryId in the above. Find more instructions here.
For native mobile applications use Piano Audience & Content SDK function executePersistedQuery for loading segments:
val cxenseSdk = CxenseSdk.getInstance()
val identity = UserIdentity("cx", cxenseSdk.userId)
cxenseSdk.executePersistedQuery(
	ENDPOINT_USER_SEGMENTS,
	"1234567890",
 	UserSegmentRequest(listOf(identity), emptyList()),
	object : LoadCallback<SegmentsResponse> {
            	override fun onSuccess(data: SegmentsResponse) {
                	// use addCustomTargeting("CxSegments", data.ids) at your AdRequest
            	}

            	override fun onError(throwable: Throwable) {
                	// can’t load segments, use generic AdRequest
            	}
	}
)
Find the full Android example here.
Booking ads targeted to one or more Piano Audience segments
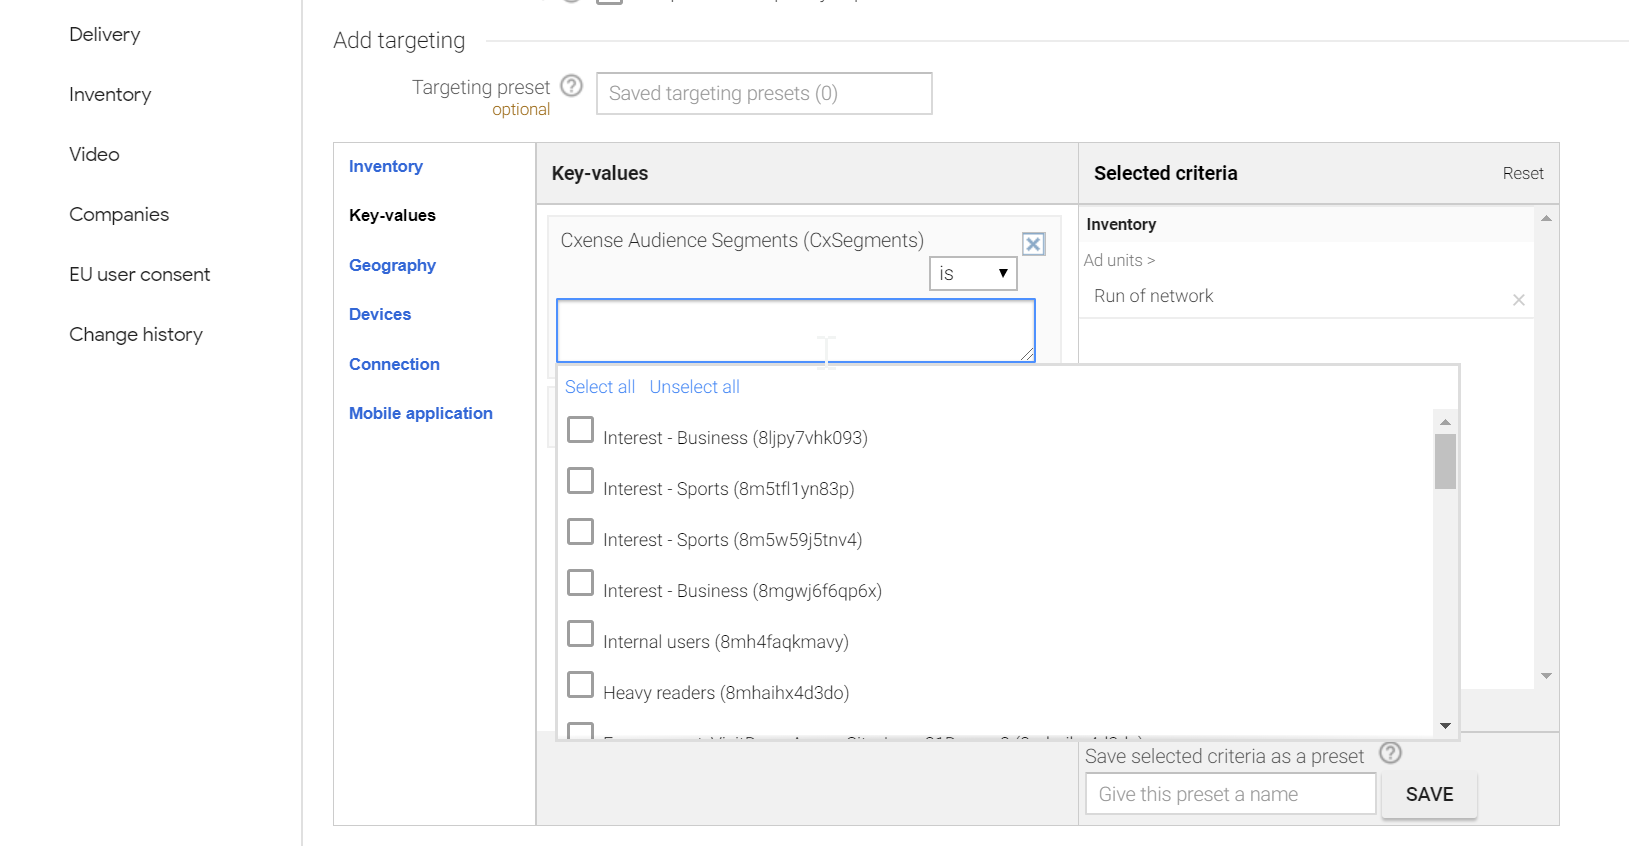
After the setup and export of the segments, ads can be booked against the Piano Audience segments in Google Ad Manager.
Running with less privileges
It is recommended to run the process with administrator privileges because it allows Piano to extend the integration functions (e.g. event reporting).
But if running with administrator privileges is not an option, this is how a role with fewer privileges can be created for the "Cxense DMP GW" user:
-
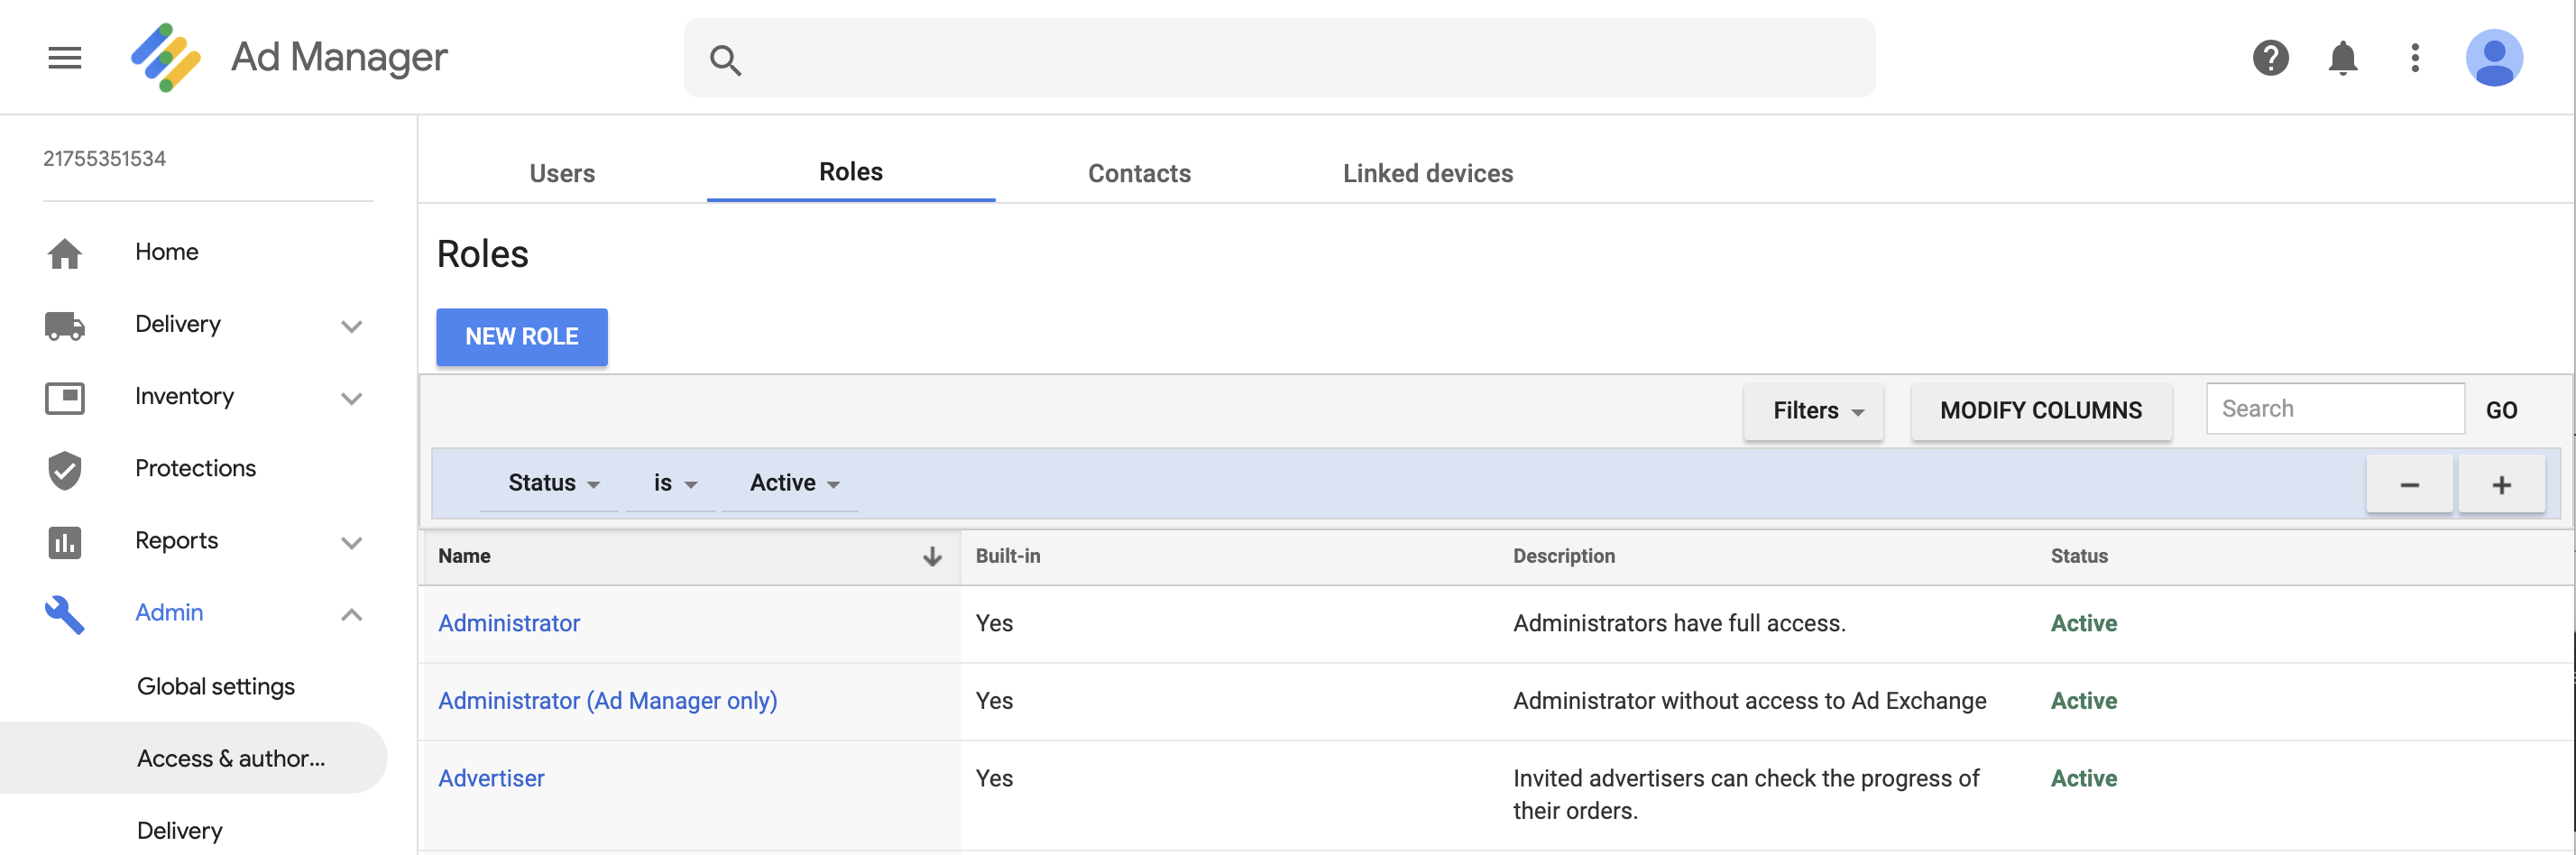
Click the Admin tab.
-
Click the Roles menu item on the left.
-
Click New Role.
-
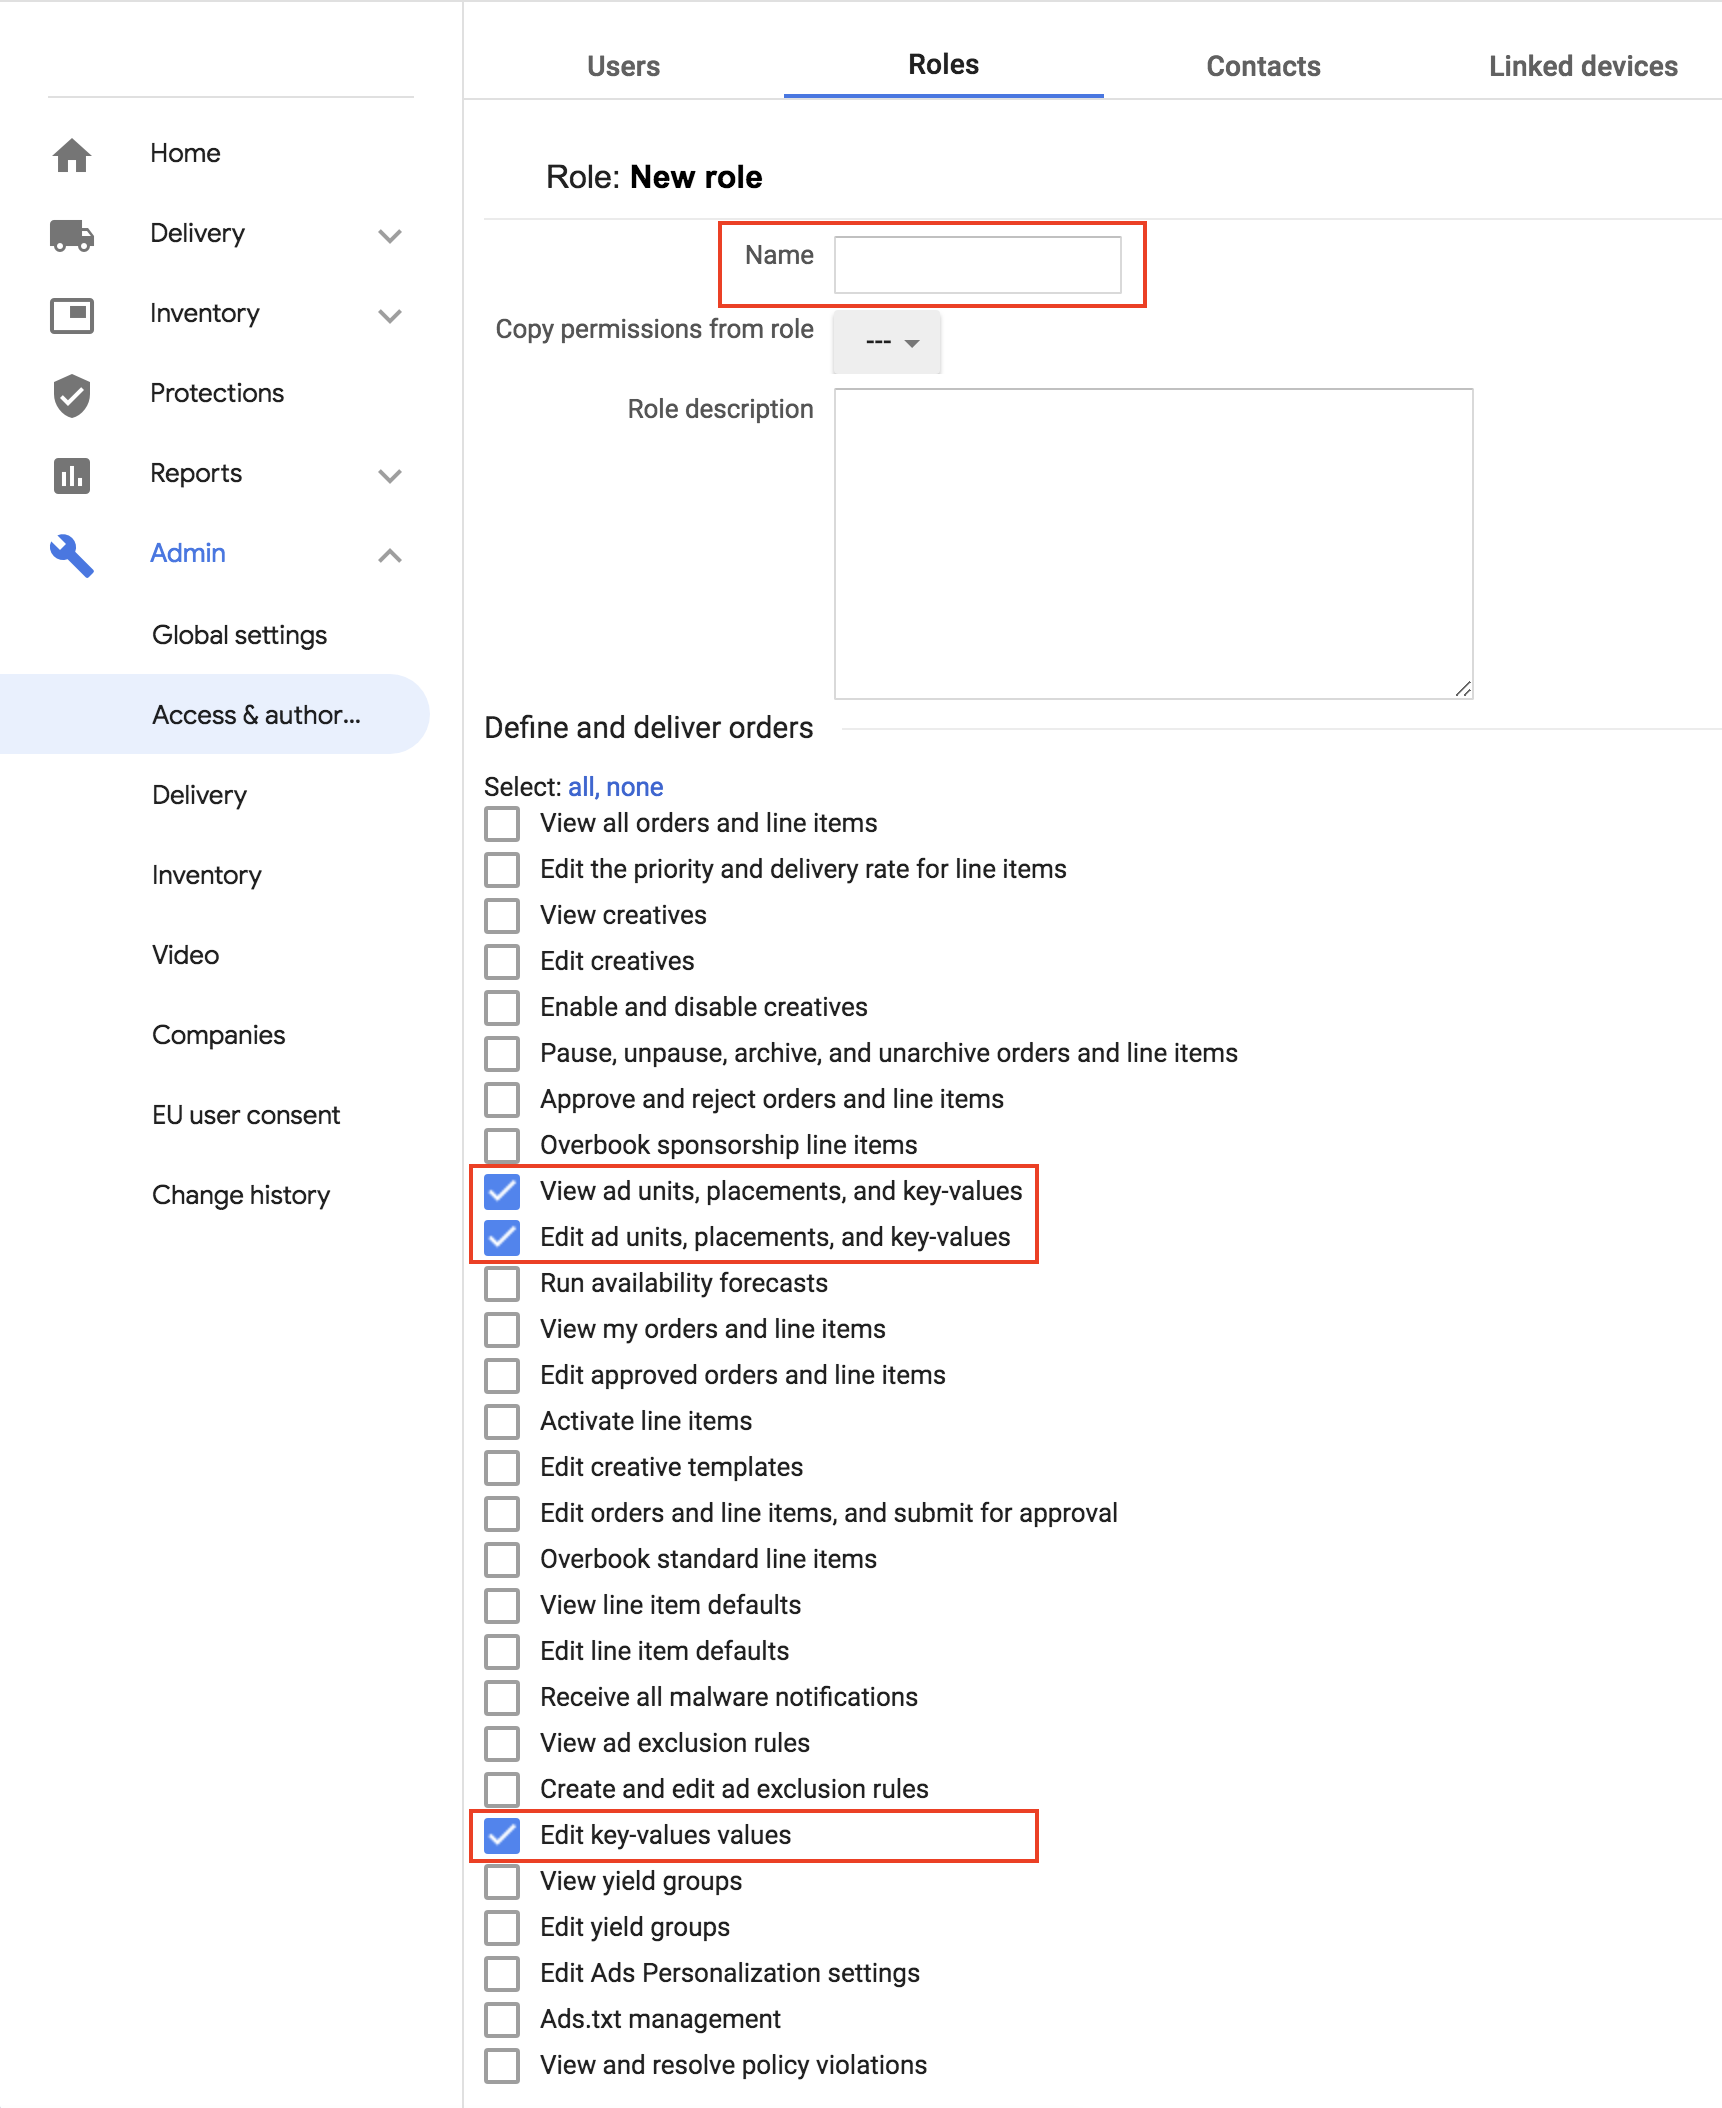
Enter the name new for the new role (e.g. "Piano DMP Role").
-
The minimal set of permissions to add are:
-
"View ad units, placements, and key-values"
-
"Edit ad units, placements, and key-values"
-
"Edit key-values values"
-
-
Click Save.
-
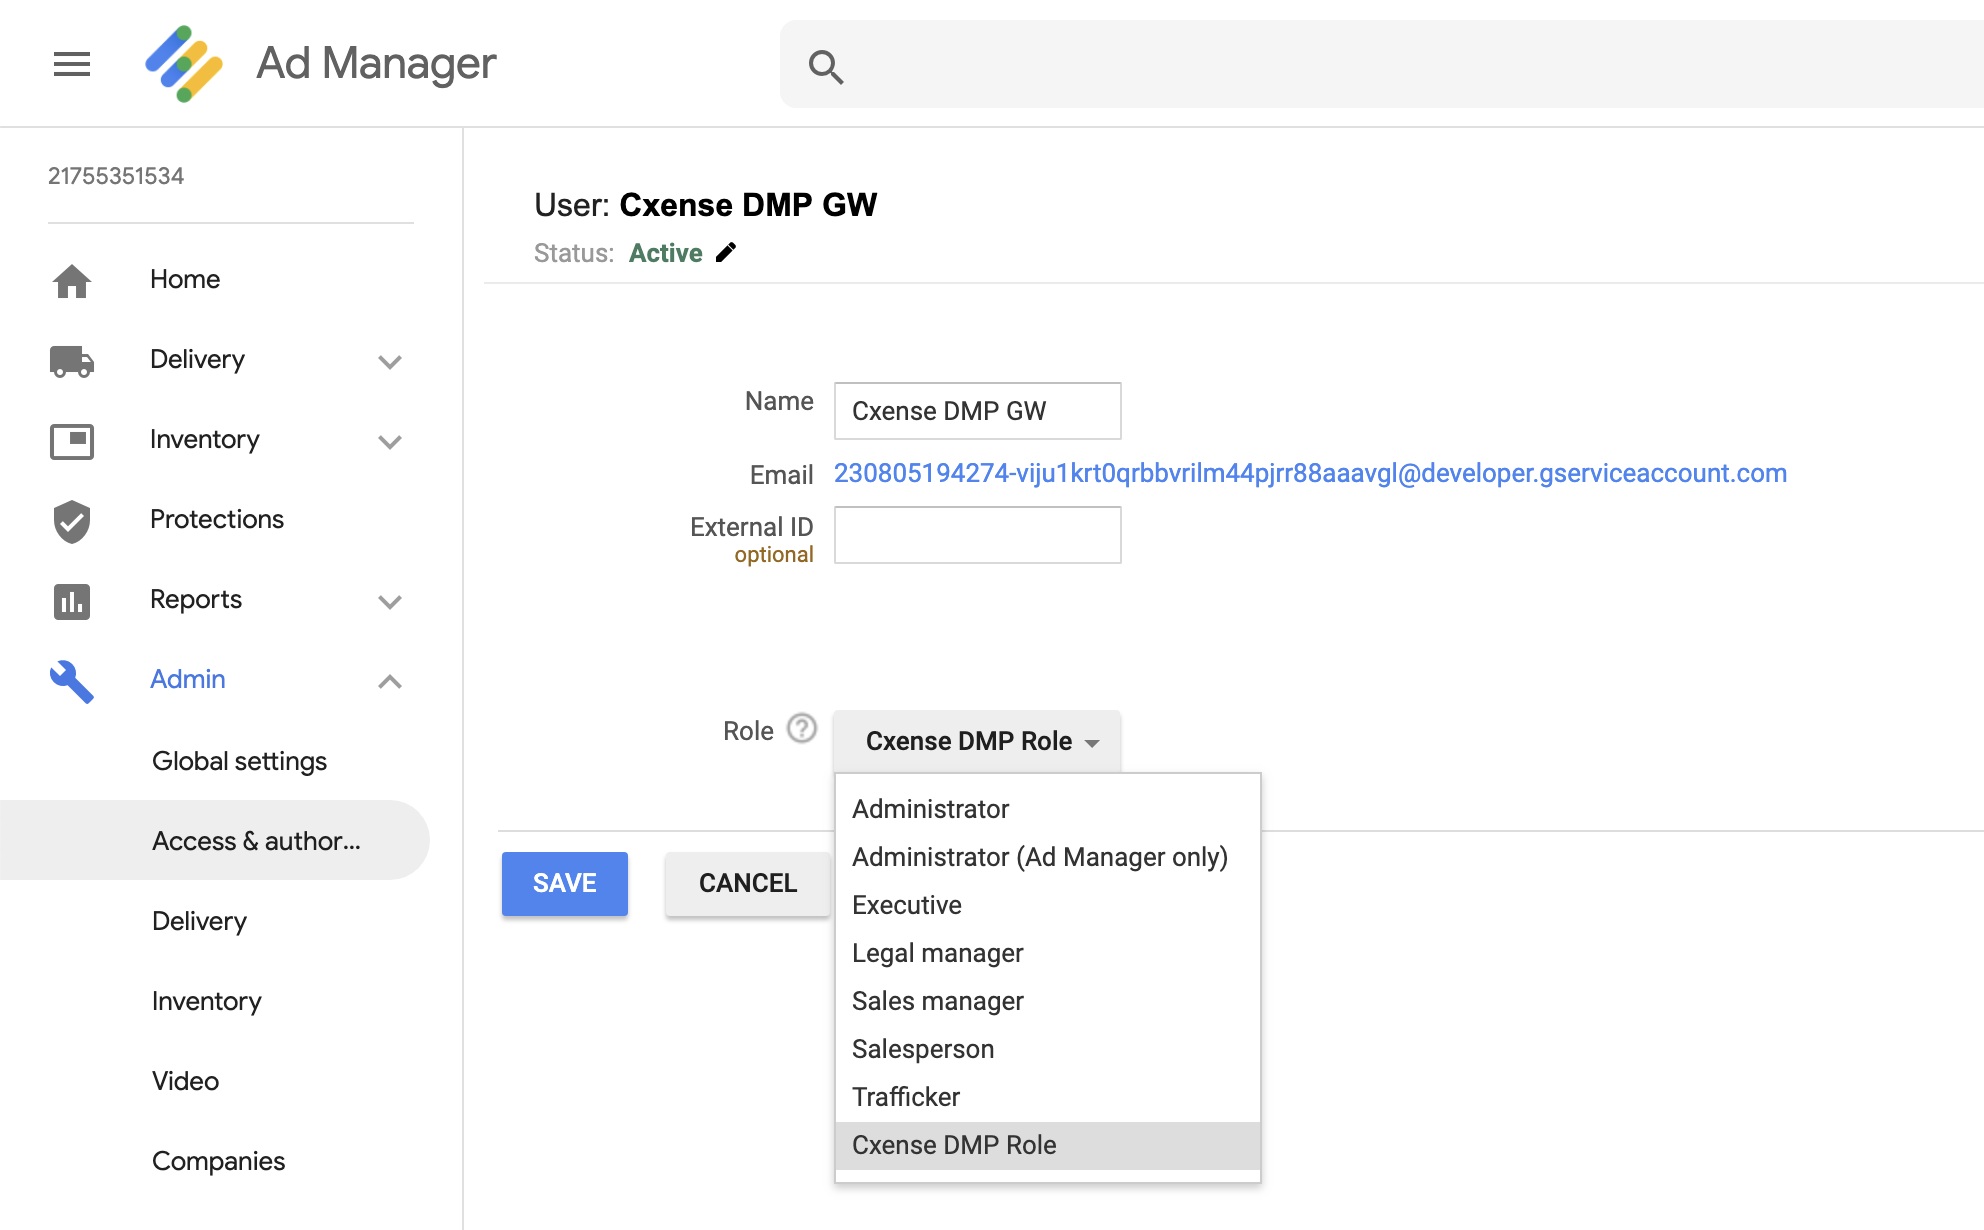
Click the Users menu item on the left.
-
Click the "Cxesne DMP GW" user.
-
Reassign the role of this user from "Administrator" to "Cxense DMP Role":
-
Click Save.
Alternative integrations
-
Synchronous Ad tag
<!DOCTYPE html>
<html>
<head>
    <title>Google Ad Manager sync tag</title>
    <!-- Load the Google script synchronously -->
    <script type="text/javascript">
        (function() {
            var useSSL = 'https:' == document.location.protocol;
            var src = (useSSL ? 'https:' : 'http:') + '//www.googletagservices.com/tag/js/gpt.js';
            document.write('<scr' + 'ipt src="' + src + '"></scr' + 'ipt>');
        })();
    </script>
    <!-- Load the Piano script synchronously -->
    <script type="text/javascript">
        document.write('<scr' + 'ipt type="text/javascript" src="http' +
           (location.protocol === 'https:' ? 's://s' : '://') + 'cdn.cxense.com/cx.js"></scr' + 'ipt>');
    </script>
    <!-- Setup the ad slots and targeting -->
    <script type="text/javascript">
        cX.getUserSegmentIds({persistedQueryId:'1234567890'}, callback:googleAdSetup);
        function googleAdSetup(cXsegmentIds) {
          // Here the "CxSegment" targeting will be applied on "slot-level"
          googletag.defineSlot('/42072217/TestUnit', [400, 150], 'div-gpt-ad-10')
             .addService(googletag.pubads())
             .setTargeting("pos","topright")
             .setTargeting("CxSegments",cXsegmentIds);

          // OPTIONAL the "CxSegments" can be defined on "page-level" tool, when there are multiple slots defined
          // googletag.pubads().setTargeting("CxSegments", cXsegmentIds);
          googletag.pubads().enableSingleRequest();
          googletag.pubads().enableSyncRendering();
          googletag.enableServices();
        }
    </script>
</head>
<body>
    <!-- The actual rendering of the ad -->
    <div id="div-gpt-ad-10" style="width: 400px; height: 150px">
        <script type="text/javascript">
            googletag.display("div-gpt-ad-10");
        </script>
    </div>
</body>
</html>
-
Tag with no dependency on cx.js
(... removed the code that loads the google ad script ...)

TODO: If the Piano analytics script is not on the page where this tag runs, then a dummy analytics event has to be sent to link the user cross sites

<head>
<script type='text/javascript'>
var cX = cX || {}; cX.callQueue = cX.callQueue || [];
cX.callQueue.push(['getUserSegmentIds', {persistedQueryId: "1234567890", callback: function(segments) {
  if(typeof window.localStorage === 'object' && typeof window.localStorage.getItem === 'function') {
    localStorage.setItem("cxSegments", segments.join(","));
  }
}}]);

function getUserSegmentIdsLocal() {
  var segments = [];
  if(typeof window.localStorage === 'object' && typeof window.localStorage.getItem === 'function' && localStorage.getItem("cxSegments") !== null && localStorage.getItem("cxSegments").length>0) {
    segments = localStorage.getItem("cxSegments").split(',');
  }
  return segments;
}

  googletag.cmd.push(function() {
    // Here the "CxSegment" targeting will be applied on "slot-level"
    googletag.defineSlot('/42072717/TestUnit', [400, 150], 'div-gpt-ad-10')
        .addService(googletag.pubads())
        .setTargeting("pos","topright")
        .setTargeting("CxSegments",getUserSegmentIdsLocal());

    // OPTIONAL the "CxSegments" can be defined on "page-level" tool, when there are multiple slots defined
    // googletag.pubads().setTargeting("CxSegments", getUserSegmentIdsLocal());
    googletag.enableServices();
  });

// Async load of cx.js
(function(d,s,e,t){e=d.createElement(s);e.type='text/java'+s;e.async='async';
e.src='http'+('https:'===location.protocol?'s://s':'://')+'cdn.cxense.com/cx.js';
t=d.getElementsByTagName(s)[0];t.parentNode.insertBefore(e,t);})(document,'script');
</script>

</head>
See the Google Ad Manager Help for more information.
Export ID5 universal IDs
ID5 user IDs export from Piano Audience to the GAM is ready for beta only.
Google Ad Manager supports PPID, or publisher provided identifiers, which can be used alongside other identifiers and needs to be set in your ad requests. PPID is a cross-device identifier and can also be used in circumstances where other identifiers are not available, such as during server-side requests or in desktop apps. Read more about this identifier type here.
Be aware that these identifiers are supported in the Google Ad Manager 360 only. PPID is a Google Ad Manager 360 feature that might not be enabled for your network. Contact your account manager to activate PPID.
Read how PPIDs work.
Preconditions
Customer’s websites have to be configured to work with ID5 in order to obtain ID5 universal IDs. Customers can select any option of working with ID5. In general publishers can retrieve the ID5 IDs in different ways. Find out more details about it on the ID5 support portal.
cx.js
The cx.js code examples below transfer ID5 IDs from the customer’s websites to the Google Ad Manager through the Piano Audience.
pbjs.getUserIdsAsync().then(function (userIds) {
  if (userIds.id5id) {
    cX.decrypt(
      {
        persistedQueryId: "123",
        callback: function (decrypted) {
          googletag.pubads().setPublisherProvidedId(decrypted);
        },
      },
      {
        id: userIds.id5id.uid,
      }
    );
  }
});
“123” should be replaced with the customer’s persistedQueryID.
Configuring Piano Audience for GAM
Read above the general information about how to configure connection, save changes, activate or deactivate connection.
If you want to export ID5 Universal IDs enable ID5 option for the Export type parameter in the Configure connection section.
Don’t forget to fill other obligatory fields, make Test connection and save changes.
Export Contextual segments
Contextual segments can be exported to the Google Ad Manager as well as regular User segments.
If you already have Google Ad Manager connection, to be able to export Contextual segments, do the following:
-
Update the cx.js code injected into the websites.
-
Create one more GAM connection; it should be configured to export Contextual segment type.
cx.js
Be aware that to be able to use the code examples below, it is obligatory to create a persistedQuery.
Code example:
var defaultSegments = [
  { id: "foo1", type: "traffic" },
  { id: "foo2", type: "traffic" },
];

cX.getSegments("persistedQueryId", function (segments) {
  console.log(segments);                      // 1. output cxTyped segments

  var segments = segments || defaultSegments; // 2. use defaultSegments if needed

  var ids = [];
  var onlyContextualIds = [];

  cX.Array.forEach(segments, function (cxTypedSegment, index) {
    if (cxTypedSegment.type === "contextual") {
      onlyContextualIds.push(cxTypedSegment.id);
    } else {
      ids.push(cxTypedSegment.id);
    }
  });

  console.log(onlyContextualIds);              // 3. output only contextual segments id
  console.log(ids);                            // 4. output other types segments id

  googletag.setTargeting("CxSegments", ids);
  googletag.setTargeting("CxContext", onlyContextualShortIds);

  syncWithAnotherAdServer2(shortIds);
});
Code example in case if you want to export Short IDs:
cX.getSegments('persistedQueryIdWithPredefinedShortIdParam', function(segments) {
    var shortIds = [];
    cX.Array.forEach(segments, function (cxTypedSegment, index) {
        shortIds.push(cxTypedSegment.shortId);
    });
    console.log(shortIds);
    googletag.setTargeting('CxSegments', shortIds);
});
/persisted/create example:
Be aware that both options above oblige to specify "mutable": {"identity": true, "context": true} when creating a persisted query.
./cx.py '/persisted/create' '{
  "path": "/segment/lookup",
  "request": {
    "shortIds": true,
    "identity": { "id": "0", "type": "cx" },
    "siteGroupIds": ["12345"],
    "context": {
      "siteId": "0",
      "url": ""
    }
  },
  "description": "persisted for cX.getSegments with short ids",
  "mutable": { "identity": true, "context": true }
}'
Configuring Piano Audience for GAM
Read above the general information about how to configure connection, save changes, activate or deactivate connection.
If you want to export Contextual segments do the following.
Being in the Configure connection section:
-
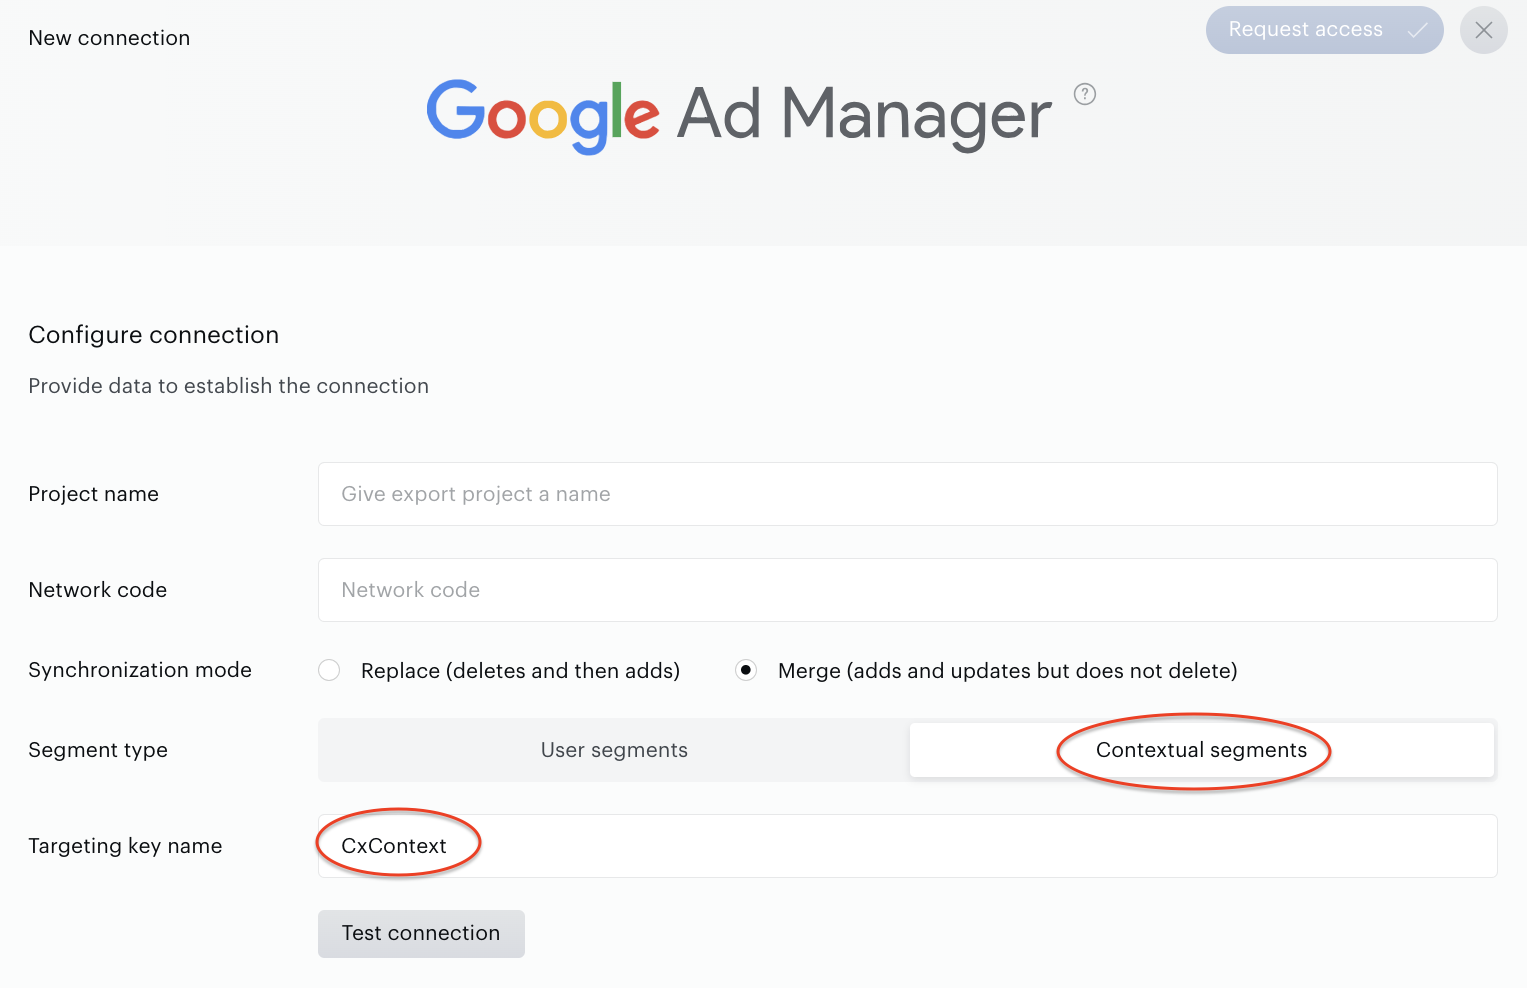
Select the Contextual segments option for the Segment type parameter.
-
Fill in the Targeting key name parameter. CxContext is the default value, should not be equal to the value of the same parameter for the User segments, can be changed if needed.
Being in the Configure contextual segments section select what exactly should be exported. All available selectors support Contextual segments only.
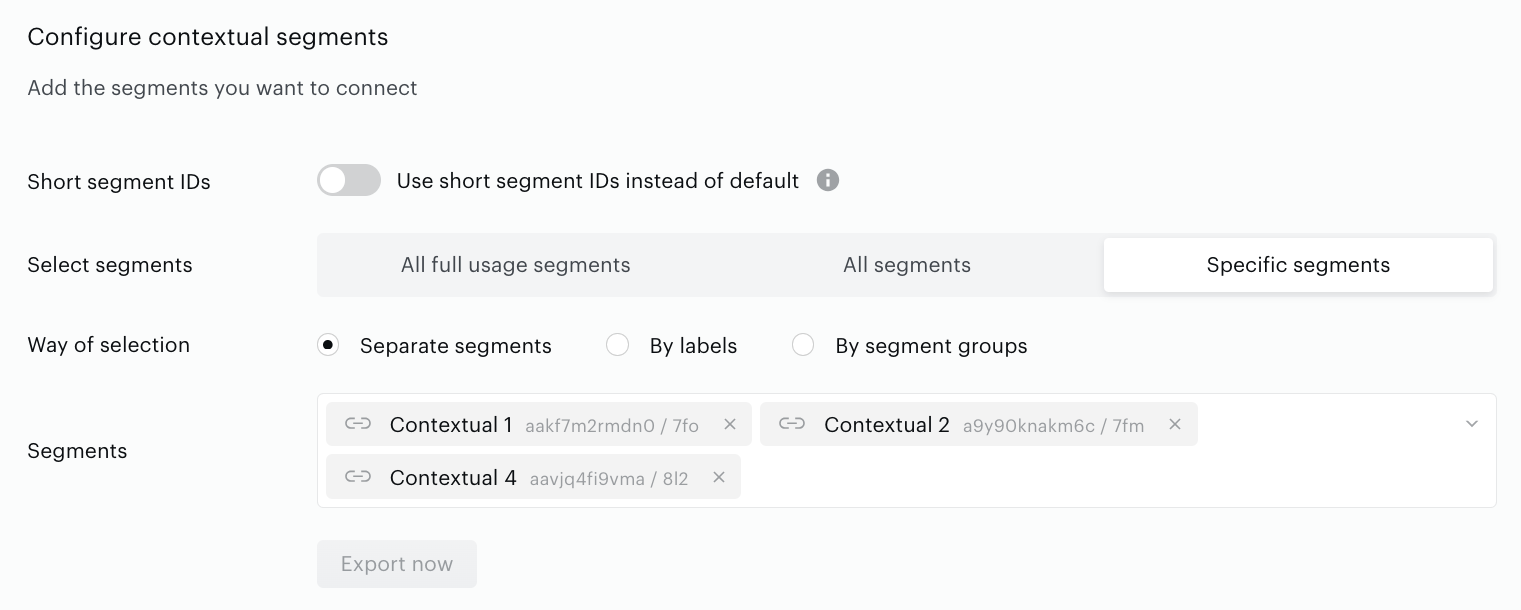
Save changes and activate the connection.
Export Combined segments
Combined segments can be exported to Google Ad Manager similar to Contextual segments.
To be able to export combined segments you would need to have a separate connector set up – Needed steps are:
-
Update the client-side script injected into the websites
-
Create one more GAM connection; it should be configured to export Combined segment type.
cx.js
Be aware that to be able to use the code examples below, it is obligatory to create a persistedQuery.
Code example
var defaultSegments = [

  { id: "foo1", type: "traffic" },
  { id: "foo2", type: "traffic" },

];


cX.getSegments("persistedQueryId", function (segments) {

  console.log(segments);                      // 1. output cxTyped segments

  var segments = segments || defaultSegments; // 2. use defaultSegments if needed
  var ids = [];
  var onlyContextualIds = [];
  var onlyCombinedIds = [];

  cX.Array.forEach(segments, function (cxTypedSegment) {

    if (cxTypedSegment.type === "contextual") {

      onlyContextualIds.push(cxTypedSegment.id);

    } else if (cxTypedSegment.type === "combined") {

      onlyCombinedIds.push(cxTypedSegment.id);

    } else {

      ids.push(cxTypedSegment.id);

    }

  });

  console.log(onlyContextualIds);              // 3. output only contextual segments id
  console.log(onlyCombinedIds);                // 4. output only combined segments id
  console.log(ids);                            // 5. output other types segments id

  googletag.setTargeting("CxSegments", ids);
  googletag.setTargeting("CxContext", onlyContextualShortIds);

  syncWithAnotherAdServer2(onlyCombinedIds);

});
Configuring Piano Audience for GAM
Read above the general information about how to configure connection, save changes, activate or deactivate connection.
If you want to export Combined segments do the following:
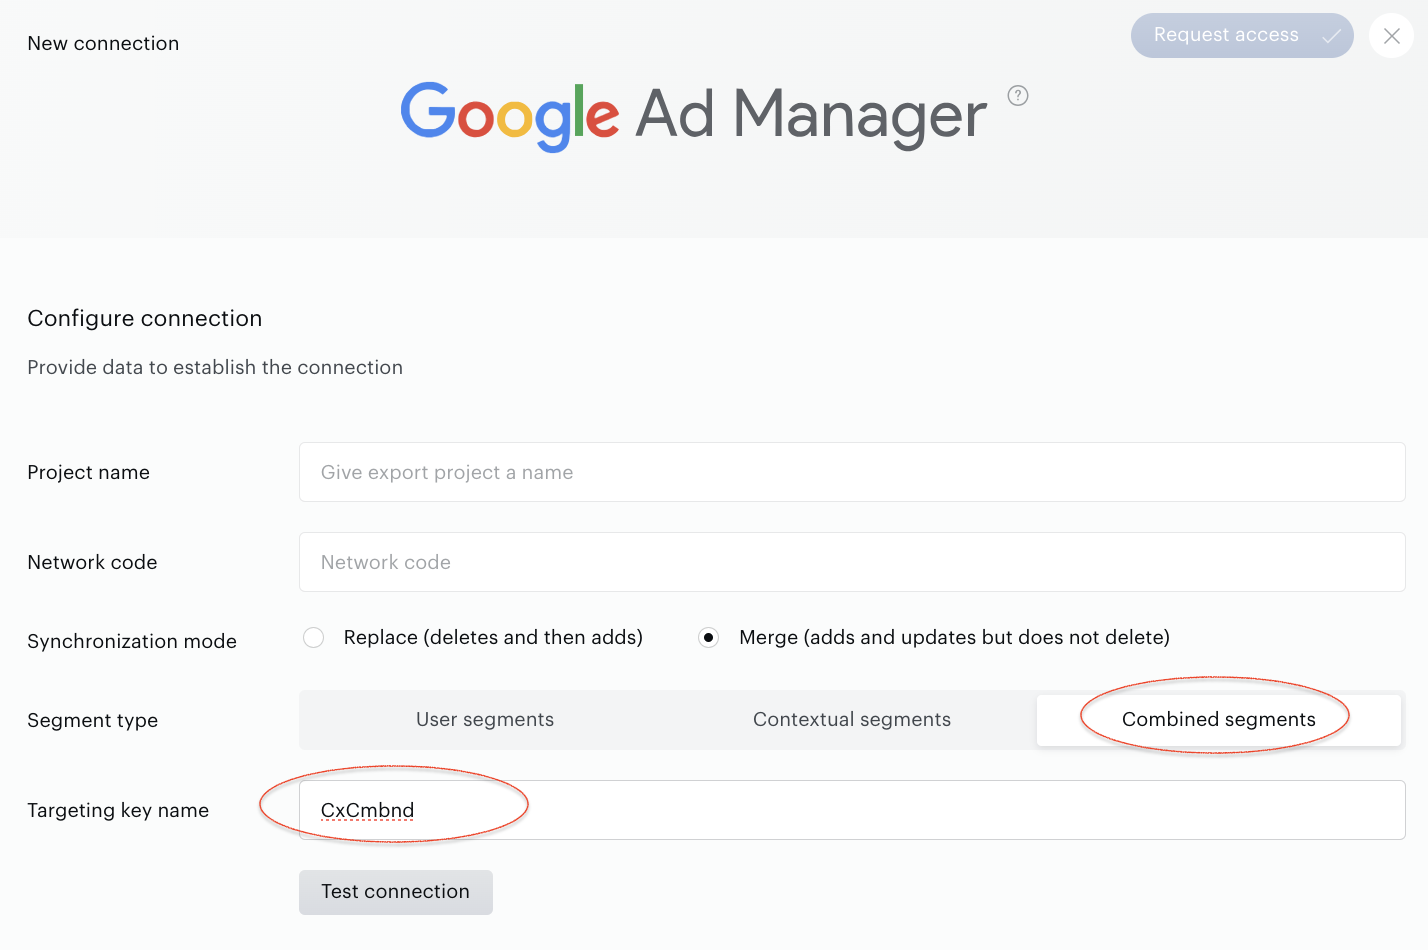
Within the Configure connection section -
-
Select the Combined segments option for the Segment type parameter.
-
Fill in the Targeting key name parameter. CxCmbnd is the default value, should not be equal to the value of the same parameter for the User or Contextual segments, can be changed if needed.
Within the Configure combined segments section select what exactly should be exported. All available selectors support Combined segments only.
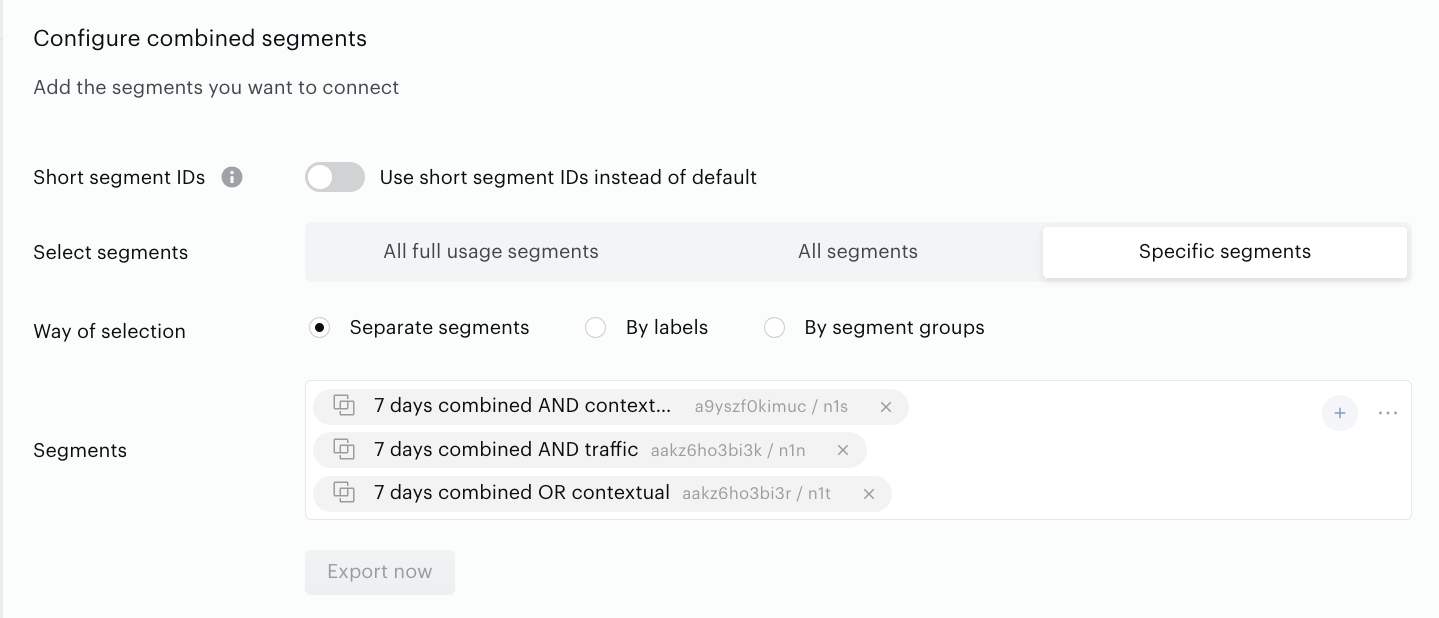
Save changes and activate the connection.