
Introduction
This article explains the concepts of, and dependencies among, the various Cxense components. It is well suited as a technical introduction for non-technical people as well as an overview document that technical resources will benefit from reading before starting on any of the more technical and detailed Tutorials, Procedures and Examples.
The article starts out with looking at the fundamentals, the underlaying data collection techniques used by any operatior in the field of user tracking. Then next we look at the Cxense cross proudct platform before we do a more detailed product walk throuh one product at the time.
The Fundamentals
How does Cxense and other companies manage to track visitors to online publications? The very short answer is that they do so by having the publication deploy an analytic script that uses cookies and pixels requests for tracking and reporting user and traffic data. If that explains it all, then you can proceed straight to the next section. The rest of us will remain in this section to learn about the fundamentals related to user tracking:
-
Cookies
-
Pixel requests
-
Analytic scripts
-
Page View Events
-
Cross Domain User Tracking
What is a Cookie?
A cookie is a small text file that your browser maintain on your machine. You may have zero, one or more cookies per site that you are visiting. The purpose of the cookie is to give the site that you have visited a way to leave information about you and/or your visit that it can then access the next time you get back to the site. Imagine you are doing a 40 pages long on-line test at some university. The test takes several days to complete and in between sessions you will be logged out while doing other things like sleeping or buying groceries. By having your browser maintain a cookie, the university can leave a note to themselves about what page in the test that you have reached and open the test on the right page when you return.
The cookie is a list of key value pairs. Your university exam cookie may have one key named 'page' with the value 21 to keep track on the page you are on and the key 'start' with value '2016-07-21 12:43:08' to keep track of when you started the test so that they know when the 5 days you had to complete the test are reached.
Many sites assign a very large random number to a cookie key referred to as the 'cookie id' or the 'user id'. The value is assigned the very first time when the cookie is created and will never be changed again after that. By means of this id value the site will recognize you from one visit to the next and they could, if they wanted to, track all your activities on that site over time and maybe even store that information in a database on their side. They could then also have business rule for how to interact with you based on your previous usage (previous purchases, previous articles you have read, etc)
What is a Pixel Request?
Let's just first remind ourselves what a pixel was again. A pixel is the smallest component of a picture. The size of a picture is often given by the number of pixels it holds. For instance a 250 x 200 pixel passport photo would contain 50.000 pixels, each holding a value that would represent the color (or gray-tone if it is black and white) of the point it represents within the overall image.
When companies like Microsoft and Google implement their browsers, they respect the rules defined by internet protocols and standards. One such rule is that a web page cannot mix in web content from other domains or do any other type of communication with an site external to the domain of the visited site. That is, if we are surfing the site http://www.ourSite.com (ourSite.com would be the domain) then the pages you download cannot have web content from http://www.theirSite.com (theirSite.com is another domain) If someone did that, the browser would stop executing the web page and flag a cross domain error. And that is good, because this is what protect us from phishing attacks when some other site try to take over a web session and pretend to be for instance our bank or credit card provider.
There are a few exceptions to this and one of these is that one can download images from other domains. So the web page http://ourSite.com/ourPage.html can include a reference to the image http://theirSite.com/theirImage.jpg without being stopped by the aforementioned error. What this actually means in the context of this article, is that we have now identified a way for a web page to communicate with two different web servers on two different domains. By adding parameters to the image request URL we can transfer information to a third party server, and to reduce the bandwidth when using this communication form, we can use an image of size 1x1 pixels. And it is from this that the technique has got its name pixel request. We are requesting a single pixel image that we have no interest of. However, the request itself allows us to sneak in data that we want to pass on to the server providing the useless single pixel image.
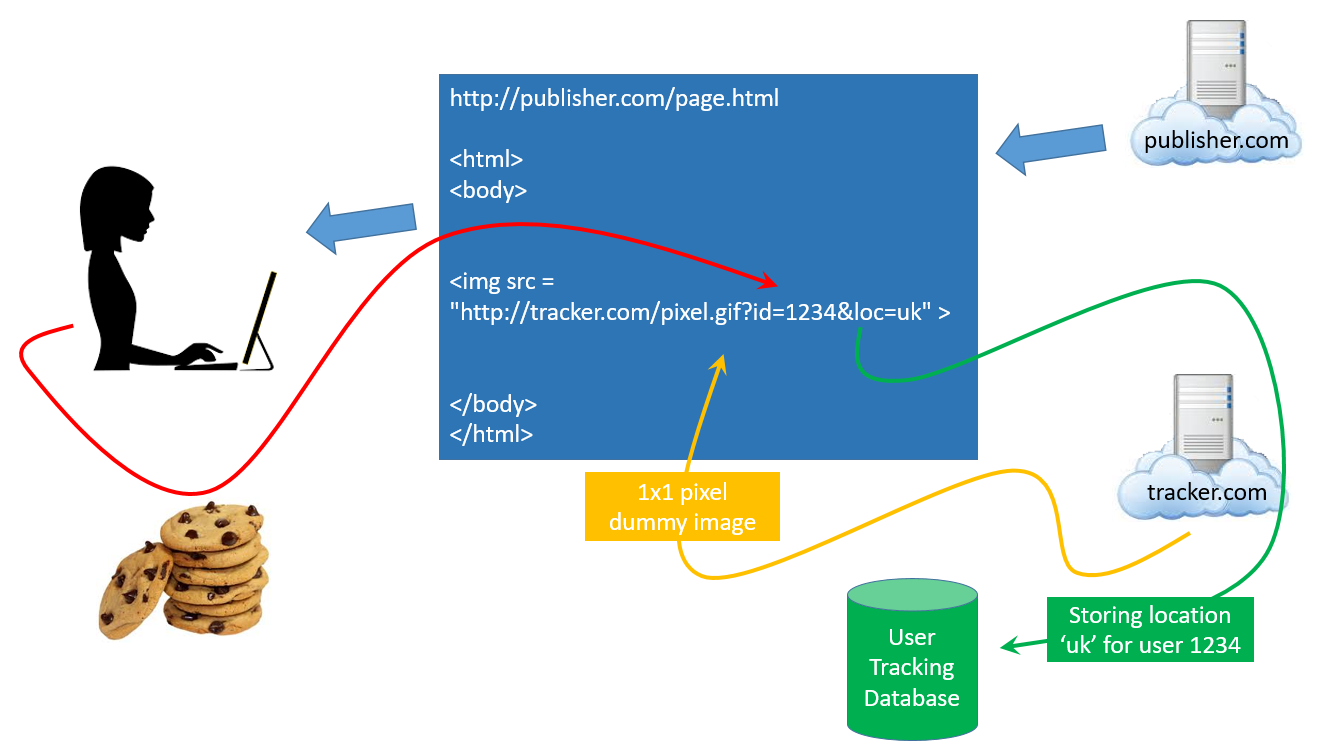
In the figure above we see two sites, publisher.com and tracker.com. The former is a publication just like most Cxense's customer. The latter is a company specialized in tracking users, just like Cxense. The user goes to one of the web pages at http://publisher.com and the browser downloads it. Within the page we see a pixel request looking like this:
<img src="http://tracker.com/pixel.gif?id=1234&loc=uk">
Notice how the parameters that have been added to the pixel request contain the user's id (the cookie id discussed above) and the physical location from where the user is accessing the page. The parameter is then picked up by tracker.com and stored in their user tracking database.
The technique of using a pixel request to report information about users is also referred to by other names. Some common alternatives are pixel tracking and web beacon.
What is an Analytic Script?
The page above had a tracking pixel hard coded into the HTML. The id and location parameters may have been added by some server side scripting language such as PHP. Anyway, by the time the HTML code line with the pixel request reaches the browser, it is static HTML. However, some of the information that we want to report may not be known until after the page has been downloaded. For instance, if one wants to report how far down on a web page the user scrolled, then that will not be known until after the web page has been rendered. In this case the information need to be added to the pixel request dynamically at some later time. For this reason (and some others) it is very common to use client side JavaScript code to obtain the desired information and create the pixel request.
A very simple version of pixel request generating JavaScript tag is shown below:
<script type="text/javascript">
	function sendPageViewEvent(userId, location) {
    	new Image().src = 'http://tracker.com/pixel.gif?id=' + userId + '&loc=' + location;
	}

	var id = readCookieIdValue('ourCookie')
    var location = getUserLocation();
    sendPageViewEvent(id, location)
</script>
Such a script is often referred to as an Analytics Script since it not only reports the information, but also gather and possibly process the information before reporting it. In Cxense we referred to our analytic script simply as the Cxense script, or alternatively as the Cxense tag (because, as we see from the example above, it is deployed using a JavaScript tag).
What is a Page View Event?
A page view event is a user visit to a web page that contains an analytic script and causes information about the user and user's visit to be uploaded to a tracking server via a pixel request. As will become clear over the next few sections, all Cxense products do in one way or another relay upon the gathering and processing of page view events to produce their output.
How does one track a User across Domains?
Before we start answering that question, let us remind ourselves what a domain is. The two servers www.ibm.com and www.usatoday.com are on the same top level domain .com, but on different domains: ibm.com and usatoday.com. If there was another server, let's say test.ibm.com, then that server would be on the same domain as www.ibm.com. The domain is normally what follows the first period in the web site address (for instance the domain of www.voegol.com.br is voegol.com.br).
Another thing we need to know before we can answer the question asked above is the difference between a first party and a third party cookie. If one visits the domain someDomain.com and the browser leaves a cookie with that exact domain name (the same as shown in the browser's address field), then that is a first-party cookie. If instead it leaves a cookie with some other domain name, then it is a third party cookie.
Below we see how a user ends up with 3 cookies after visiting two domains that is being tracked by both 1st and 3rd party cookie. The two independent 1st party cookies cannot be used to establish the fact that is the same user visiting the two sites. However, the 3rd party cookie is unique across both domains and can be used to track/recognize the user.
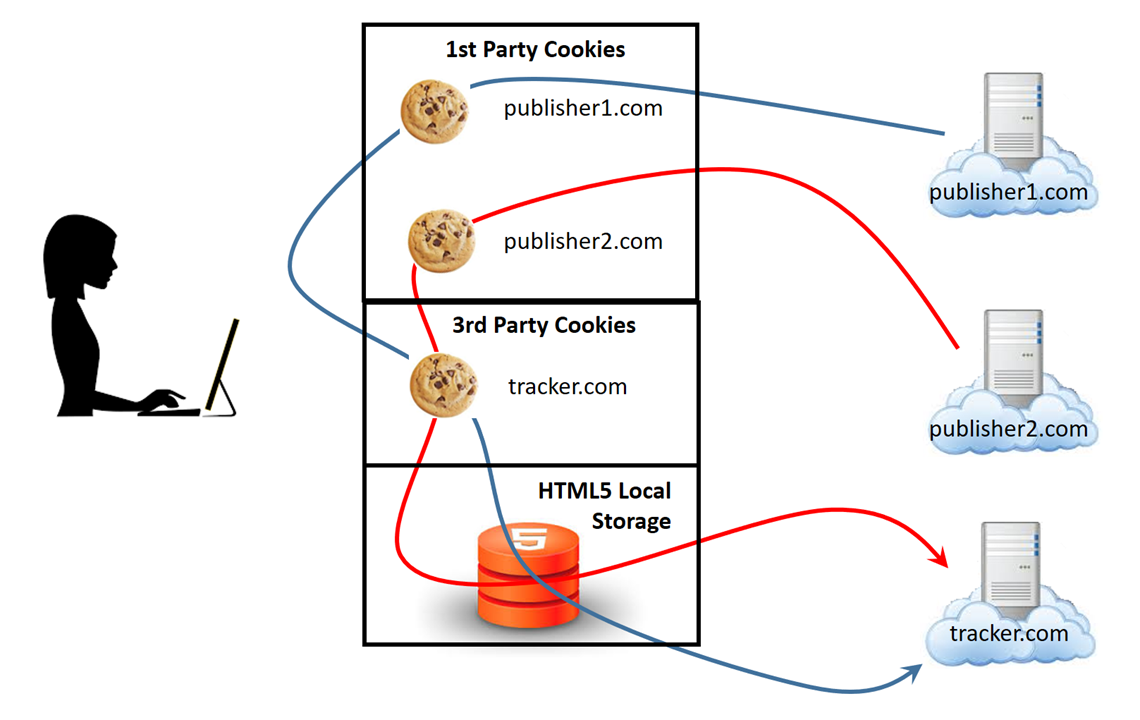
There is one problem though. Third party cookies are blocked by more and more users as well as by many anti-spyware programs. Unlike first-party cookies that are essential for being able to log in to many popular sites, the rejection of third party cookies has normally no negative effect on the surfing experience. While first party-cookie rejection is estimated to be below 5%, third-party cookie rejection is somewhere in the area 20-50%. Some browsers (for instance Safari) do not support third-party cookies at all.
Cxense has ways of overcoming the third-party cookie limitation, for instance if the site's pages are HTML5 then local browser storage can be used instead of 3rd party cookies. However, for Safari that has blocked that approach as well, one can deploy a script that redirects from the publisher's domain to the tracker's domain, once there a first party cookie is created (if not already in existence) and one is again redirected back to the original site. In this way one is able to bypass the restriction on third party cookie by creating it as if it was a first party cookie.
Architectural Overview
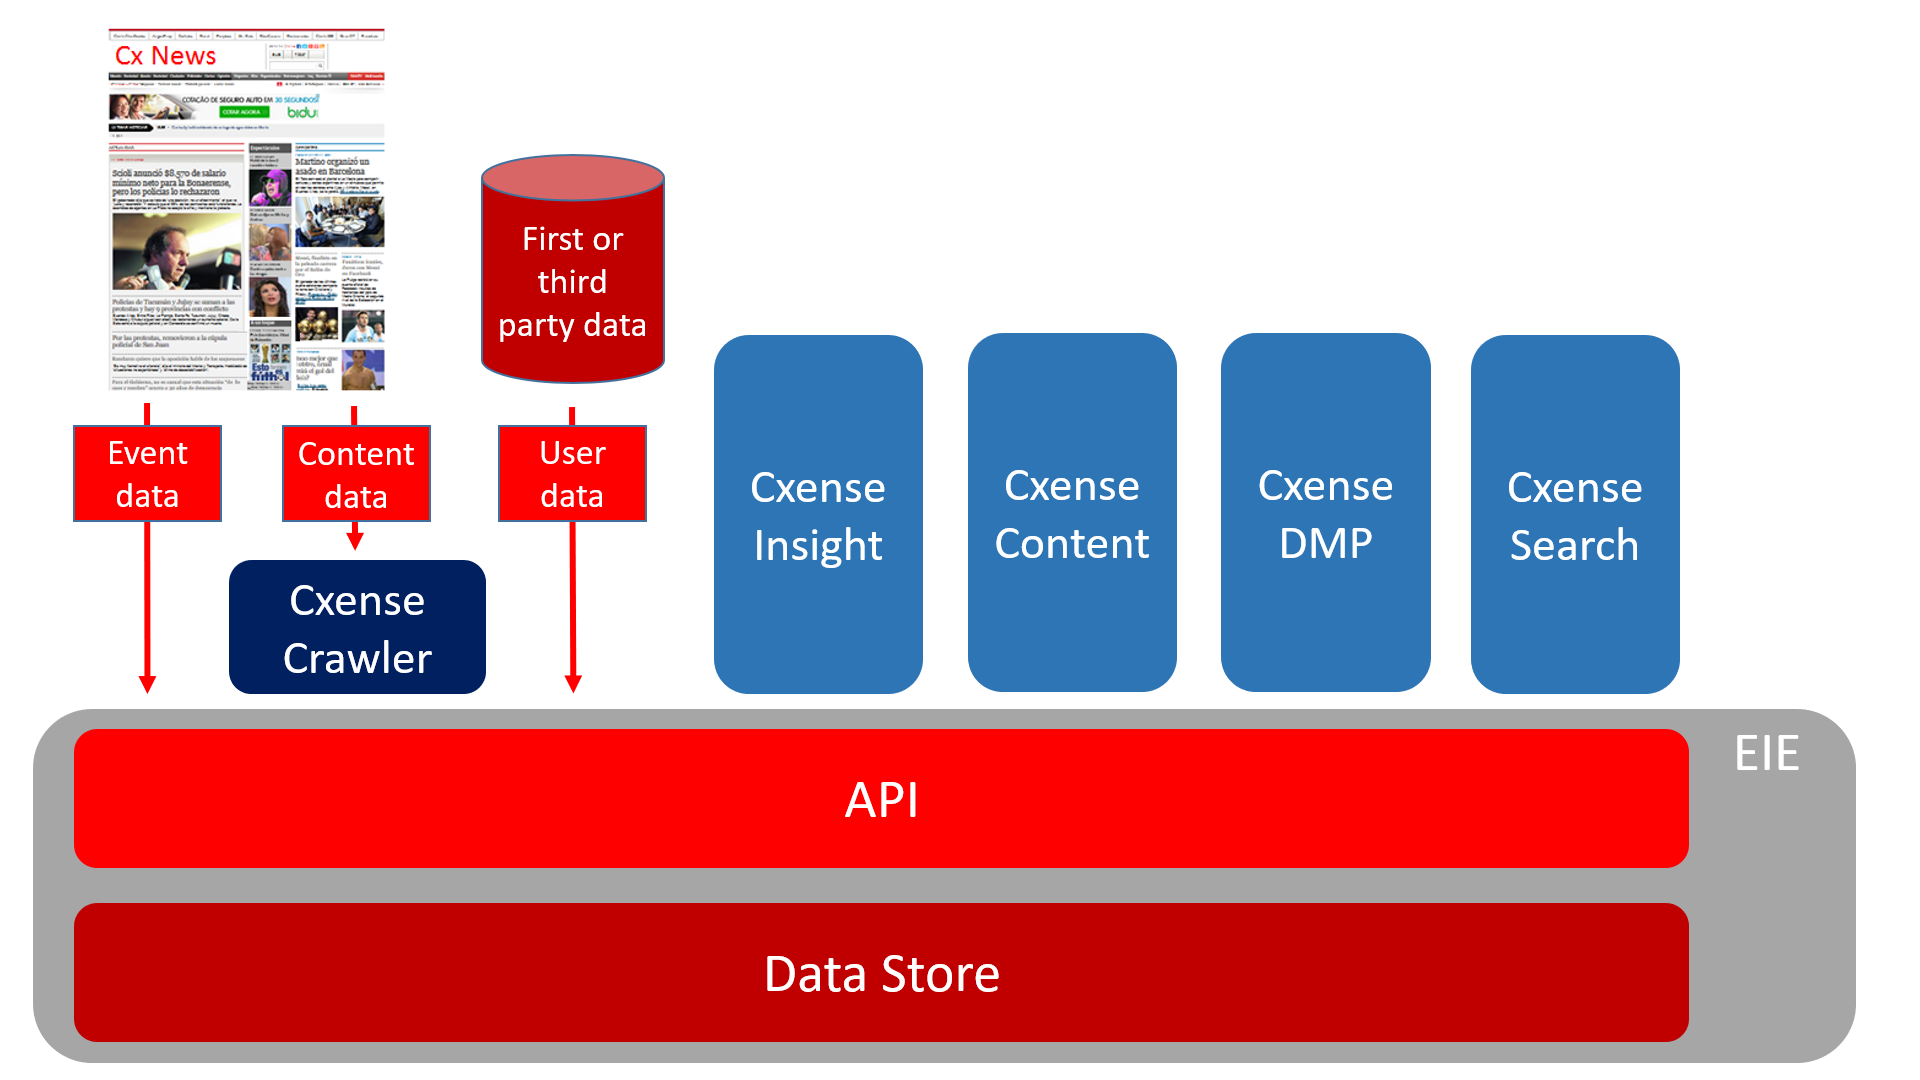
In the figure above we see the Cxense three layer product stack with data gathering and Cxense product offerings at the very top. The sources of the data gathering to the left are the traffic events (user visiting tracked web pages), content retrieval (the Cxense crawler extract visited pages), first party data (normally subscriber data from the customer's CRM system) as well as third party data (user data from third party data vendor companies). The blue boxes represent the four Cxense verticals: Cxense Insight, Cxense Content, Cxense DMP and Cxense Search. The underlying platform with the Data Store and the API to access the data included, we refer to as the Extraordinary Insight Engine (EIE).
All top level components relay on the Cxense API to push data to or extract data from the Data Store.
The Data Store
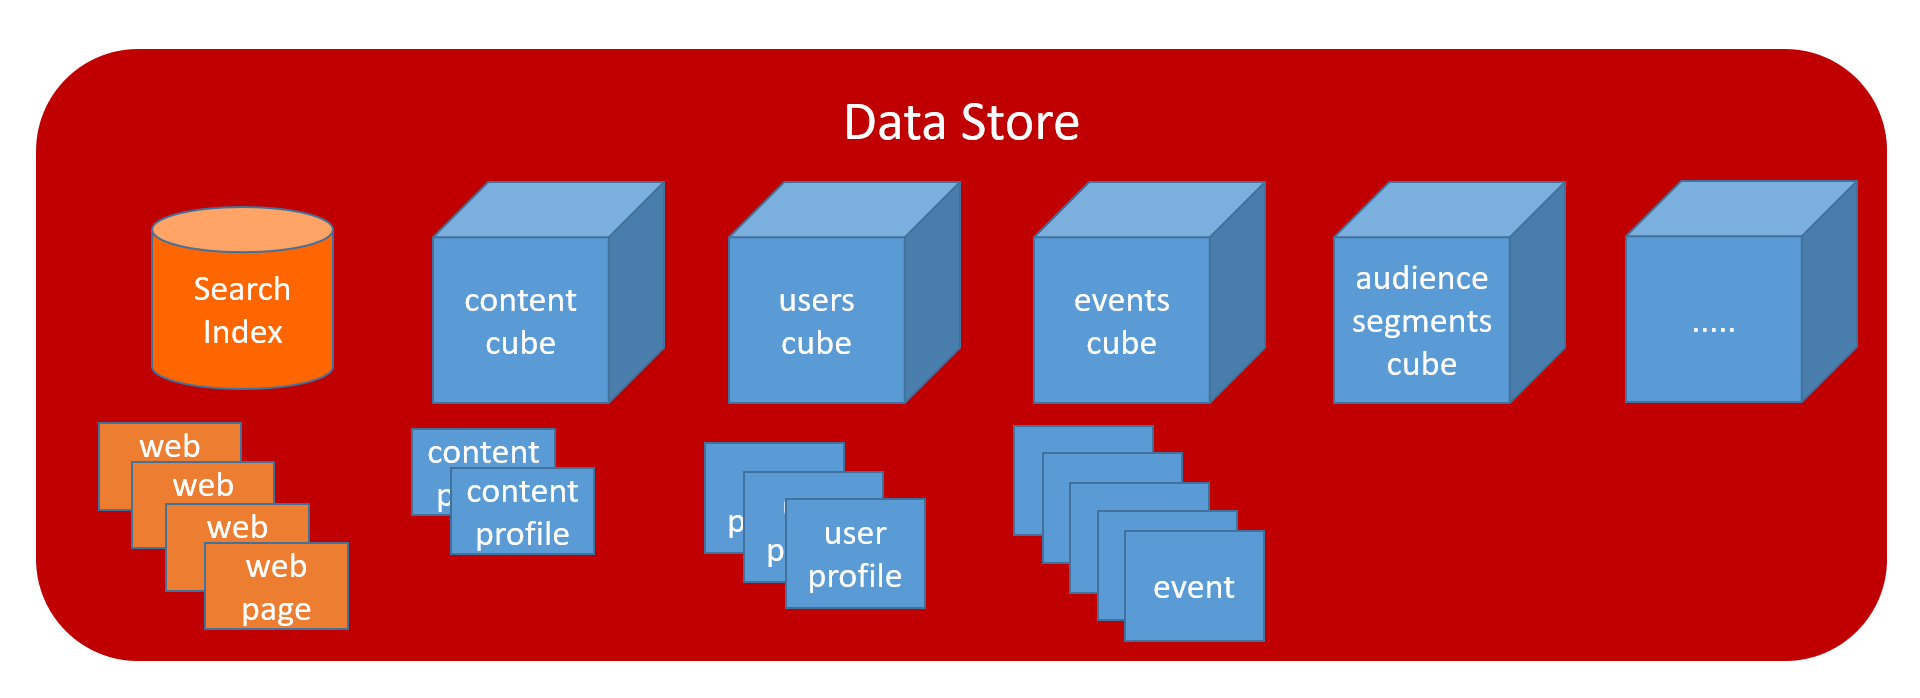
The figure below shows the inner structure of the Data Store. We see two types of storage, the search index to the very left and all the data cubes to the right of it.
The Cubes
For a speedy sorting, filtering and retrieval, the data storage is organized by columns. Variations of this approach is referred to as a column store index or as cubes. At Cxense we use the latter term when referring to our data storage.
Each cube corresponds to a database table (content table, users table, events table, etc) where each cell holds both the stored value as well the id of the record (row) it belongs to. As all values in a column will be of the same data type, very efficient array operations can be executed and the records ids of the result set can be very quickly obtained as they are stored together with the values.
LTS
To reduce the amount of data stored, most event data is deleted after 31 days. Customer that feel the need for keeping all their data for a longer period of time can purchase Long term storage (LTS) on a site by site basis for any set period of time.
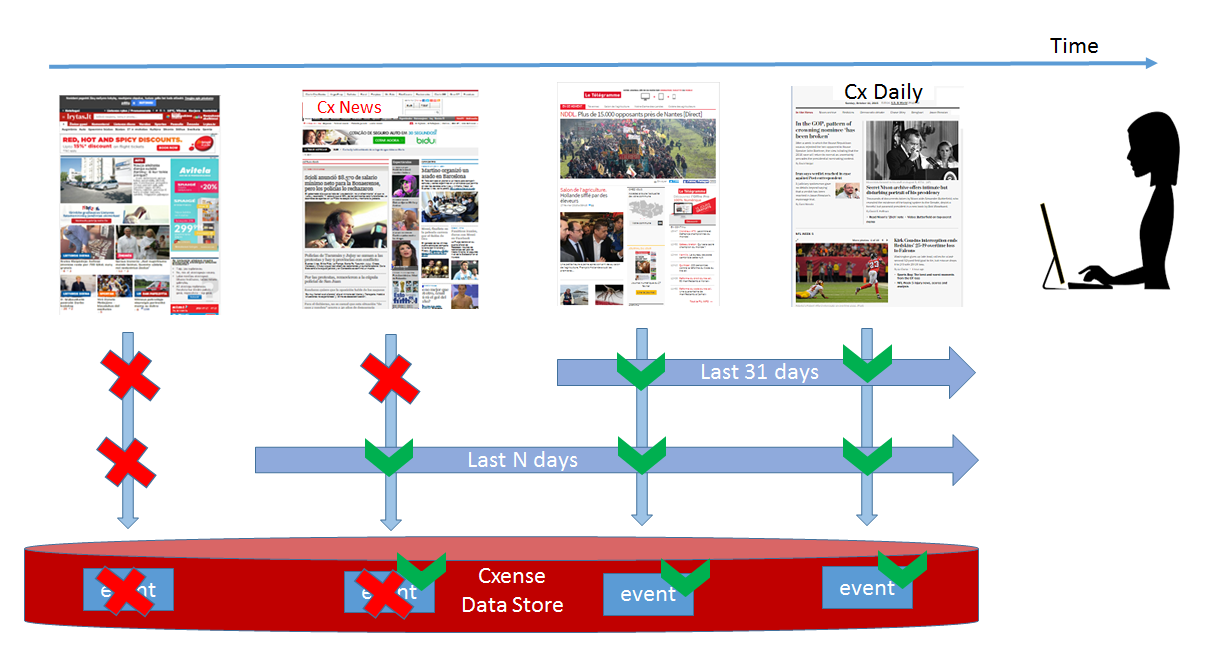
In the figure above we are trying to illustrate the default behavior that page view events older than 31 days are no longer stored in the Data Store (red crosses shows the data has been eliminated due to age) and that by purchasing LTS a customer can then extend the period that data is kept in the database.
A common misconception is that enabling LTS can bring back already expired data or extend the life of currently stored data. Enabling LTS will only have an effect on future events. It will not bring back already deleted data and all the currently stored events will be deleted as they reach the age of 31 days. If the figure above was from the same day LTS got enabled, then the second event from the left will remain lost and the two right most events would be deleted as they reach 31 days of age. Only future events (starting from the moment LTS got enabled) will benefit from the extended storage period.
As enabling LTS will have no effect on currently stored data, one should always try to enable LTS as early as possible and before the site has data that would represent a loss when deleted after 31 days.
The Search Index
The exception to the cubes approach is the search index with all the crawled (or customer pushed) content indexed. For this we use the Lucene based search engine Elasticsearch with additional Cxense feature wrapped around it.
Data Administration Constructs
The Customer Object
In the figure below we see some of the main data organization objects. Let start with the ones above the grayed area which are objects the customer cannot see or access. First and foremost we have the customer object for which we have one per customer. It holds references to the Cxense internal CRM system, Salesforce (the Salesforce id field). It also holds the pool of users that the customer can give access to any of their site groups as well as the pool of customer prefixes that can be assigned to any of the customer's site groups. (Customer prefixes are used to prefix the key of the customer's key-value pairs so that different customers and possibly also different site groups for the same customer do not mix their data. For instance, the key for the third party user data profession would thus be called something like ibm-profession for customer IBM and wsj-profession for customer Wall Street Journal. In this way IBM and Wall Street Journal data can be held separate something that would not have been possible if both used the key profession). The pool of users are those users in Cxense's system that are "Mapped to" the customer object. A user can be mapped to ONE and ONLY ONE customer.
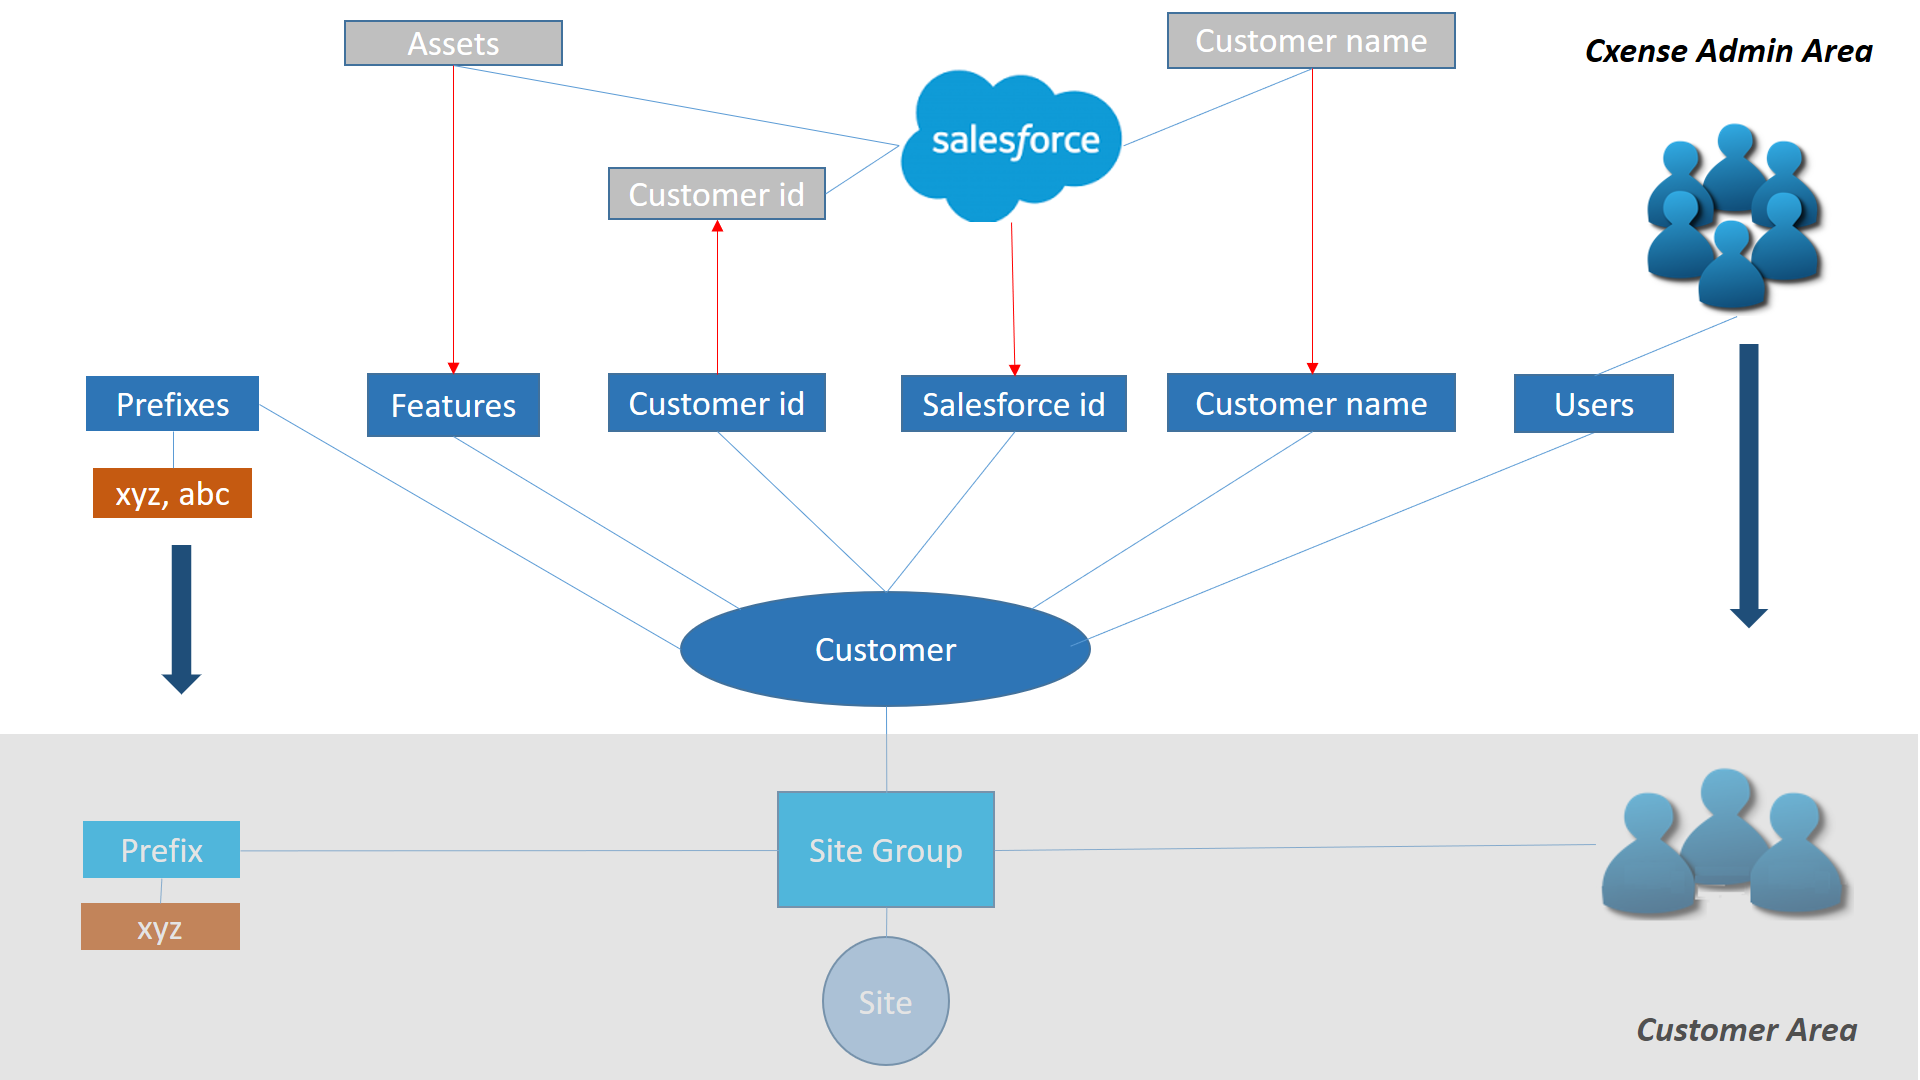
The red line indicates data that is copied from one system to the other. For instance, the customer name is copied from Salesforce into the customer object, whereas the customer id is copied in the opposite direction.
The Site Group Object
Then let us move into the grayed area part of the figure above where the customer (and not only Cxense) has access. The main object in that area is the site group. The customer adds sites and grant portal users access using the site groups.
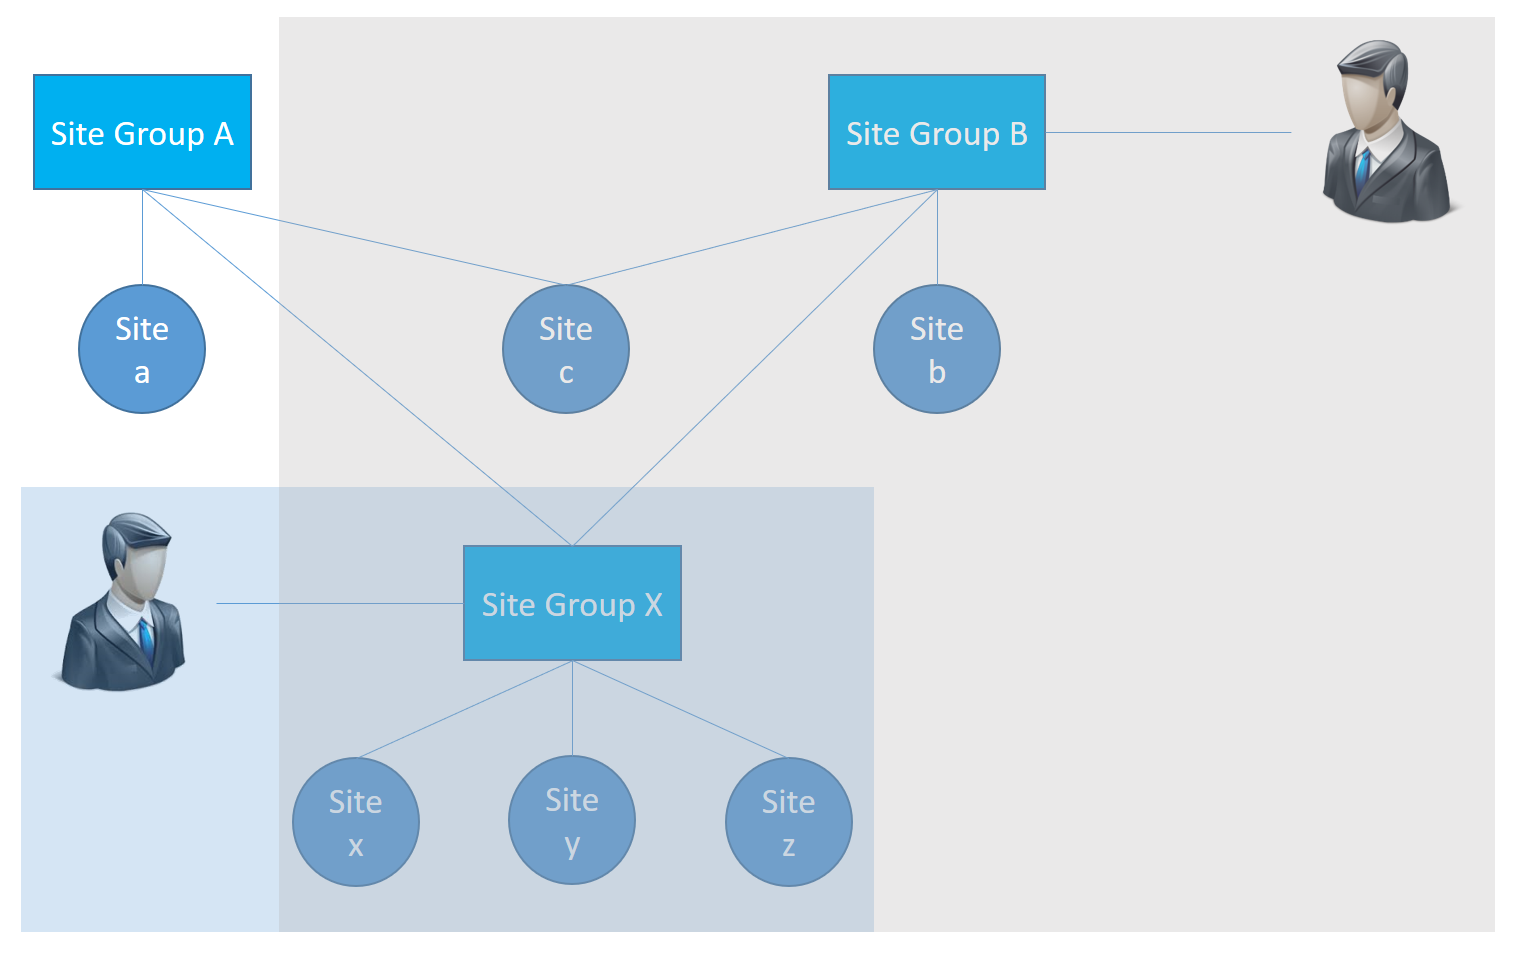
Access to sites are controlled via the site groups and site groups can also hold child site groups with more sites. The figure below shows how this can be used to control the users visibility to the data. The user with access to site group B have access to all sites except site a (because that portal user does not have access to site group A) whereas the portal user with access to site group X can only see the 3 sites member of that site group.
The Site Object
A site can be part of zero, one or more site groups and is the object that holds information about a real world web site. It typically contains data such as the web site url, site specific limitations (maximum number of users that can be tracked or number of pages that can be crawled), features that are enabled, as well as all the data that gets collected about the site and its users (page content, user profiles and traffic events).
The User Object
A user must be mapped to a customerId. The user object consists of the username (an email address), a set of features or versions of the a feature (for instance, beta and alpha) that the user can utilize and the user's role (being a regular user or an admin).
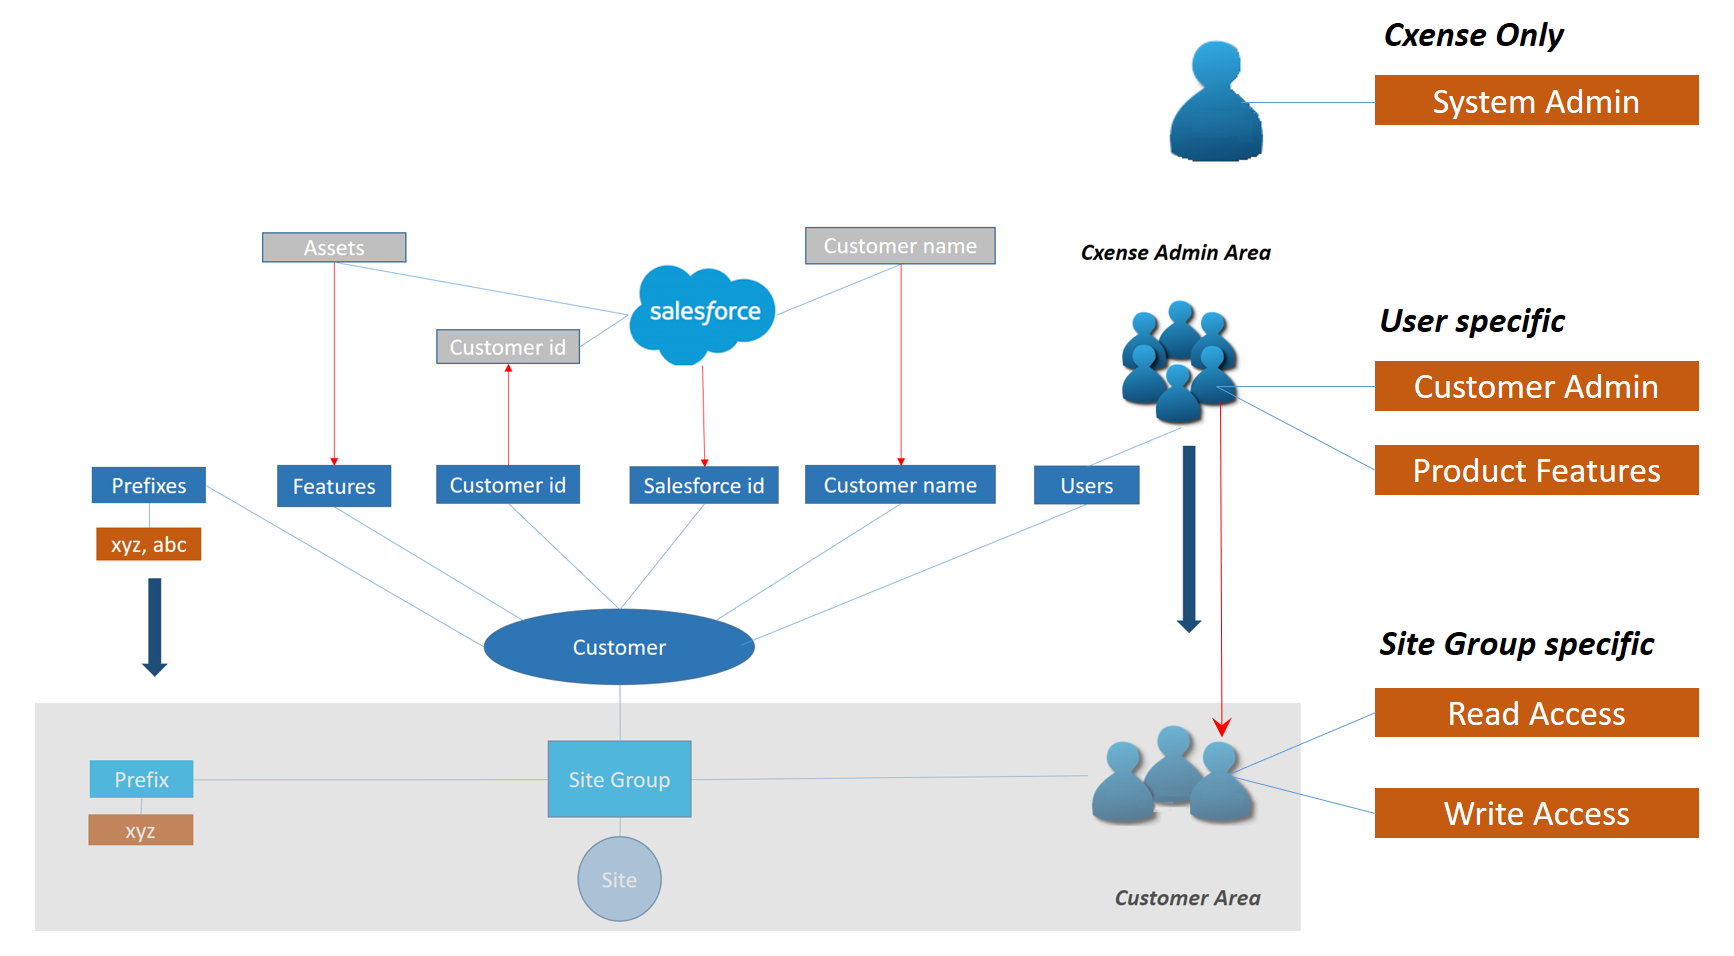
In addition to the user specific settings, at a site group level, the user may also have read and/or write access.
The Data and the Data Sources
Page View Events
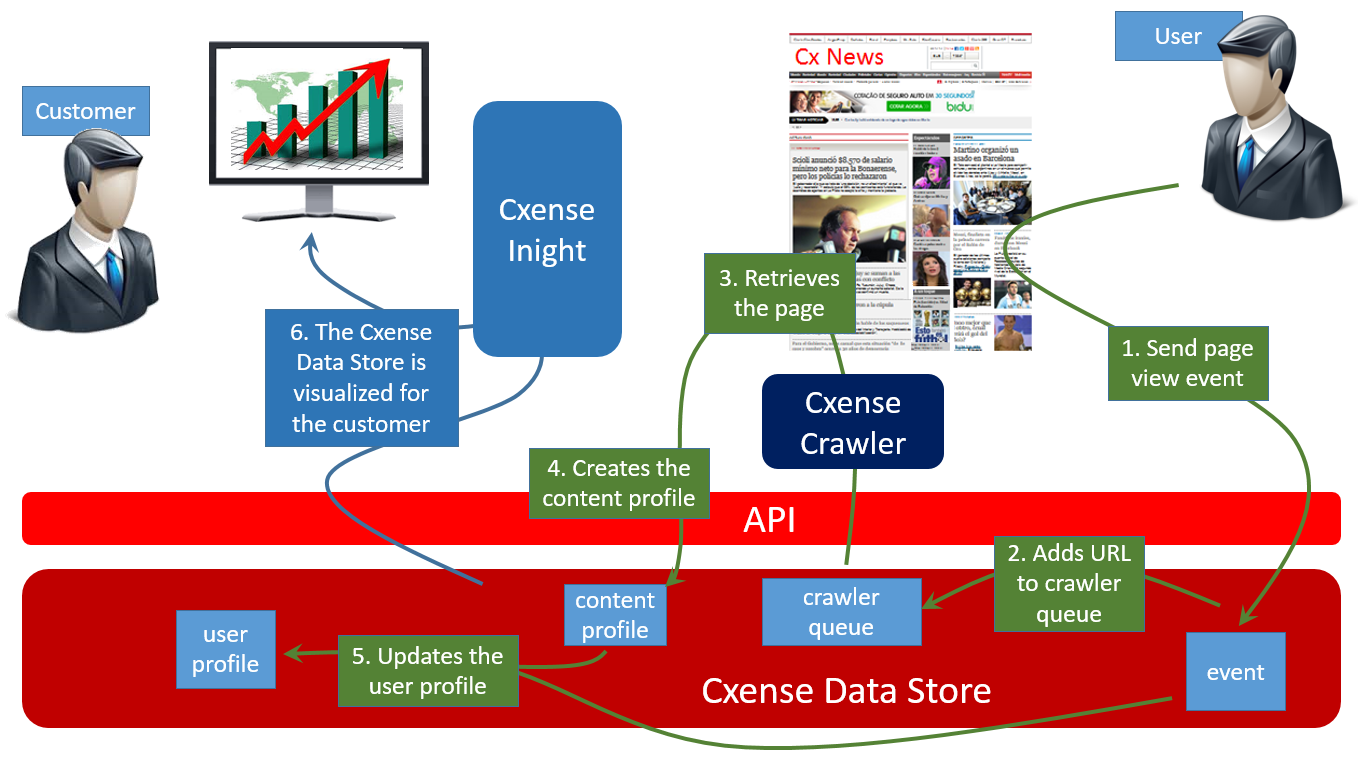
Page view events (a.k.a traffic events) are created by the execution of the Cxense Script (a.k.a the Cxense tag) that the customer deploys to all pages that they want to track. This is what is shown in green step 1 in the figure below, the send page view event box illustrates the execution of the function sendPageViewEvent() upon a user's visit to a page. The actual function call can be found on line 4 of the code further below. As can be seen in the figure, three sets of information end up being stored in the Data Store based on the sent event: the event itself, the derived user profile and, after the crawler has got around to pick up the page, the content profile.
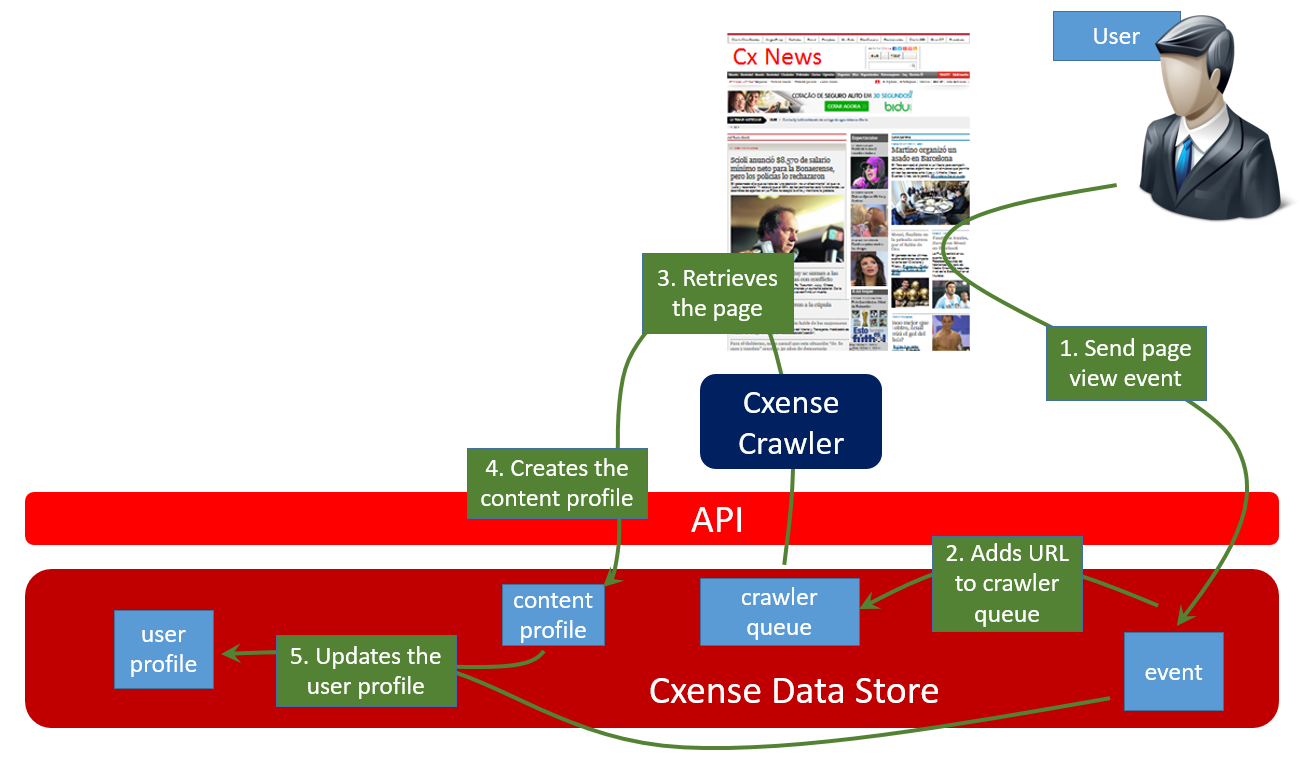
Below we see the script customers deploy to their pages. The only thing that differ from an actual script is the fake place holder site id that has been set to '9999999999999999999' in the example code below.
<script type="text/javascript">
    var cX = cX || {}; cX.callQueue = cX.callQueue || [];
    cX.callQueue.push(['setSiteId', '9999999999999999999']);
    cX.callQueue.push(['sendPageViewEvent']);
</script>

<script type="text/javascript">
    (function(d,s,e,t){e=d.createElement(s);e.type='text/java'+s;e.async='async';
    e.src='http'+('https:'===location.protocol?'s://s':'://')+'cdn.cxense.com/cx.js';
    t=d.getElementsByTagName(s)[0];t.parentNode.insertBefore(e,t);})(document,'script');
</script>
The script consists of two parts. Lines 7-11 import the Cxense cx.js library file required for accessing Cxense functionality from a web page. Lines 1-5 make use of the library file functionality to inform what the site's site Id is (line 3) and sends the page view event (line 4). As we can see on line 2, the function calls are pushed on to a queue so that they can be executed asynchronous whenever the Cxense library code has been loaded. The sendPageViewEvent() will round up all known information about the user and the user's visit to the page and pass it all together with the site id on to the Data Store. More details about event data and the script can be found here.
User/Cookie Ids
Without combining Cxense user data with customer CRM data regarding the same users, there is no way for Cxense to track human users. Instead we track their browser devices via browser cookies.
A cookie is a key-value pair linked to a domain name that is stored in a small text file maintained by browsers. Web sites leave these data files behind so that they have a way to recognize a user upon his or her next visit. Web sites uses the cookie to store information about the user and/or the users past visit(s). For instance, an university site could leave the page number where a student left off an on-line test for knowing exactly from where to continue the test upon the student's next visit.
Cxense uses a cookie to store a randomly generated number upon the first encounter with a user. This number is referred to as the user id or the cookie id. For all later visits, the user will be recognized via this number. Cookie ids are domain specific, as soon as the same users visit another site residing within another domain, the user will end up with an additional cookie id. Cxense operates with an internal global user id to which all domain specific cookie ids will be mapped (to the degree we discover that it is indeed the same user).
One of the values reported to Cxense via the page view event discussed above, is the cookie/user id.
Pixel Tracking
Information about user visits to customer web pages is sent to Cxense Insight using a technique called pixel tracking. This is true for the page view events discussed above as well as the DMP events to be discussed below. The technique allows one to send information to Cxense in spite of the security motivated cross domain restrictions imposed by all modern day browsers.
The information reported to Cxense in line 4 in the code above is added as parameters to a URL requesting an image from a Cxense server. However, since we have no interest in the image itself, but only uses it as a vehicle for sending information, we apply the smallest possible image for this. That is, we use an image the size of a single pixel (a 1x1 sized image). It is this that give the name to this technique as pixel tracking (we track user activities via a pixel).
Below we see how such a pixel request could be implemented in HTML and in JavaScript (in the cx,js library we use the latter approach):
<img src="http://comcluster.cxense.com/Repo/rep.gif?parameter1=value1¶meter2=value2" width="0" height="0">
function sendInfoViaPixelRequest(value1, value2) {
(new Image()).src = "http://comcluster.cxense.com/Repo/rep.gif?parameter1=" + value1 + "¶meter2=" + value2;
}
The Cxense server (comcluster.cxense.com) will extract all the parameter values (value1, value2,..) and store these before returning the dummy 1x1 image (rep.gif) which nobody will ever use for anything. An exact list of all the parameters sent in this way for each page view is found here.
DMP Events
The event type described above is referred to as page view events or traffic events. These are collection of data that describes the visit (time and length of visit; previous, current and next page URL; etc) and the visitor (browser, OS, location, IP address, etc). Another type of events is DMP events (a.k.a performance events). These are events describing what the user did while visiting the page. Examples of such could be ad and content recommendation impressions and clicks, the time a certain visual object is within the browser view, a confirmation of the user's participation in an on-line quiz, etc. The tracking of these events is often referred to as user engagement tracking.
As the figure below shows, there is a 1:N relationship between page view events and DMP events. This means that a DMP event will always be related to a page view event both in time and space. This facilitates interesting traffic queries such as "How many users did during time period such and such see our latest ad campaign in on-line newspaper such and such?".
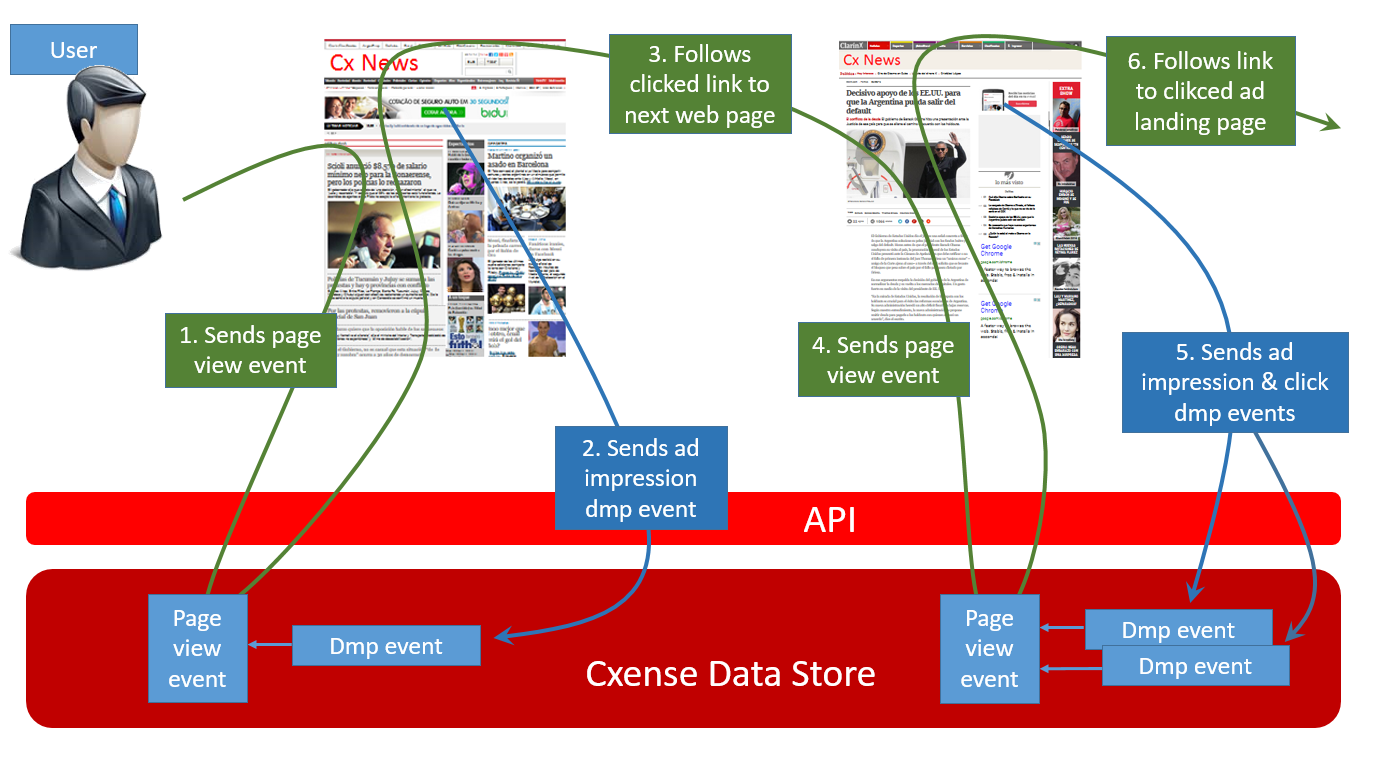
In the figure above, the green route shows the page view events as the user clicks his way from one web page to the next, and the blue steps show how DMP events are fired of to collect, in this case, ad impressions and clicks performance data. At the top of the first page an ad is being displayed, but the user does not act upon it (that is why blue step 2 is an impression type dmp event). On the second page he is shown another ad and this time the user actually clicks on it and is then taken to the ad's landing page (green step 6), but before he gets there two DMP events, an ad impression type event and an ad click type event, have been fired off (blue step 5).
Below we see the actual JavaScript implementation of blue step 2. For now, just ignore the 'xyz-' part and the persisted query parameter. The important take away here is that the origin of the event is labeled adcampaign and the type of the event is labeled impression. These are terms that will appear in the Cxense GUI and that can be used as filtering terms when later making API traffic queries.
cX.setEventAttributes({origin:'xyz-adcampaign', persistedQueryId:'1234567890abcdefghijklmnopqrstuvwxyz1234567890'});
cX.sendEvent('impression');
For further learning on DMP events, visit the User Engagement Tracking Tutorial.
Content and User Profiles
With the exception of API based feeding of 1st and 3rd party user data, the events are the source of all data that goes into the content and user profiles.
A content profile is created for each tracked web page. The URL of the page is obtained from the event and then passed on to the crawler for content retrieval. The content is then processed and key terms are stored with weights indicating their importance.
A user profile is created for each user (which in most cases corresponds to a unique browser). Some of the data in a user profile stems from content profiles of pages the user has visited. Other data comes directly from the events. Examples of the latter is user specific information such as geographic location, brand and version number of the user's browser or mobile device, etc.
The key terms passed on from the content profile to the user profile accumulate score based on importance and frequency. Unless refreshed by new visits to similar content the score of some of the key terms (depending on their type) will decay over time and in this way reflect the current interest level of the user.
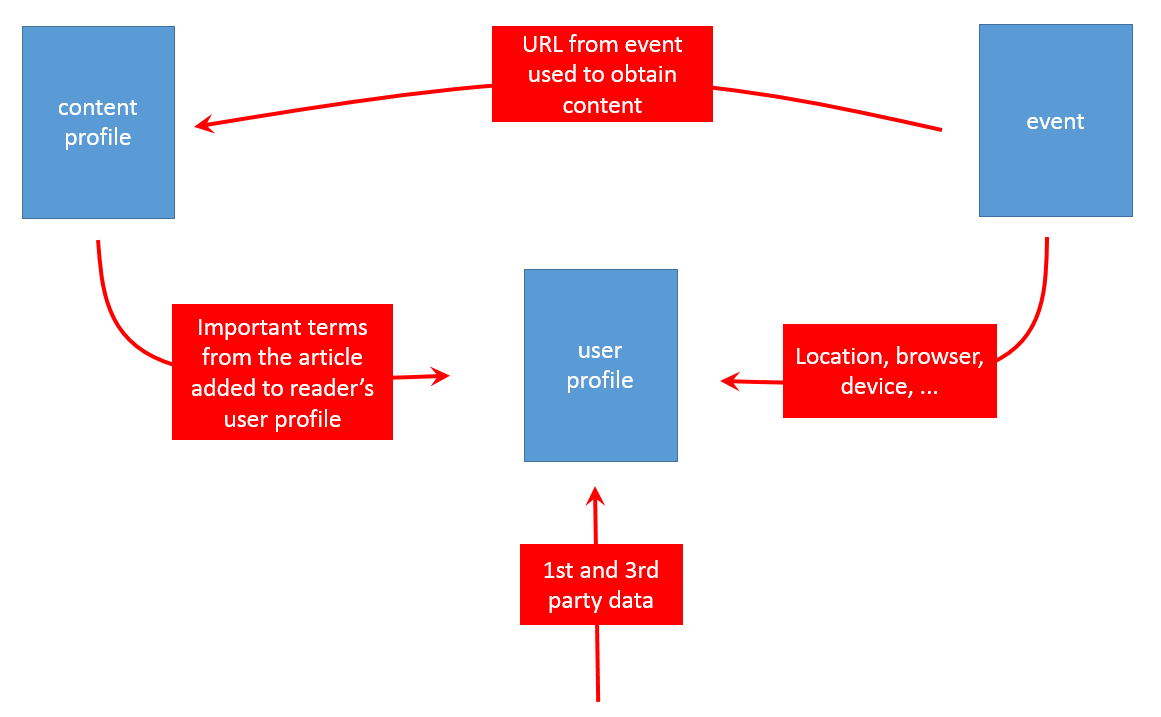
The figure above illustrates the described flow of data between the various data components of the Cxense ecosystem. The table below shows the exact same thing just this time with some concrete examples illustrating the points being made. For a complete list with detailed description of each item go to Content profiles and User profiles.
|
Content Profile |
User Profile |
Event |
|---|---|---|
|
category → company → concept → language → location → person → |
category company concept language location person user-city user-company (IP location: work place or ISP) user-coordinates user-country user-location user-region device-brand device-browser device-os search queries |
← city ← company ← coordinates ← country ← location ← region ← brand ← browser ← os ← search queries |
|
|
1st and/or 3rd Party data ↑ |
|
|
|
gender age subscription type education level profession etc. etc |
|
The Cxense Crawler and Document Processing
The page view events described above will contain the URL of the visited page. Those URLs will be added to the crawler queue and the page will at some point be retrieved by the crawler. For a page to be crawled initially it needs to have been visited a fixed minimum number of times within a given time span (3 times within 6 hours at the time of this writing). After that it will be re-crawled with an exponentially less and less frequency. Initial crawling or later re-crawling can also be forced by adding URLs to the crawler queue via the GUI (one by one) or by having Cxense do it via the API (en masse).
The crawler is not the only method for uploading documents to Cxense. As can be seen by the figure below, the customer can also upload documents using the API. This is especially useful when the customer wants to provide a search solution with data that is not crawled by Cxense, but rather produced by the customer for the purpose of their search solution.
After a document has been crawled or pushed it will then go through document processing. Below we have listed the most important processing operations. Be aware though that there is not the same coverage across all languages;
-
language detection - many of the later operations depend on the language having been detected
-
tokenization - language-specific word splitting, for instance "He said: 'Don't go!'" is split up as ["He", "said", "Don't", "go"] and the spaceless Japanese phrase "私は日本人です。" ("I am Japanese") is split up as [ "私", "は", "日本人", "です" ].
-
character normalization - language-specific character normalization such as English A to a and Å to a, Norwegian A to a and Å to å, German ß to ss, Spanish ñ to n, Japanese 國 to 国.
-
entity extraction - dictionary based extracting of names of people, locations and companies, and rule based extraction of acronyms, concepts (words with high number of occurrences not already extracted) and entities (capitalized words or word sequences not already extracted)
-
user interest categories extraction - dictionary based language dependent extraction of taxonomy paths that is only carried out if having been explicitly enabled. The extraction can be based on Cxense provided taxonomies (referred to as standard taxonomies - see blue step 1 in the figure below) and/or customer maintained taxonomies (referred to as custom taxonomies - see blue step 2).
-
lemmatization - used by the search feature only. Make it possible to search for across grammatical variations of certain parts of speech, for instance singular and plural forms of nouns. Hence, this enables searches for 'house' to also give hits for documents with the word 'houses'.
The document processing has two outputs, a searchable document structure passed on to the search engine, and a key-value pair-based content profile that is stored within the cubes. The content profile consists of two types of data, meta data extracted from html meta data tags, and different type of entities (names of persons, organizations, locations, concepts, etc) extracted from the title and body of the html page.
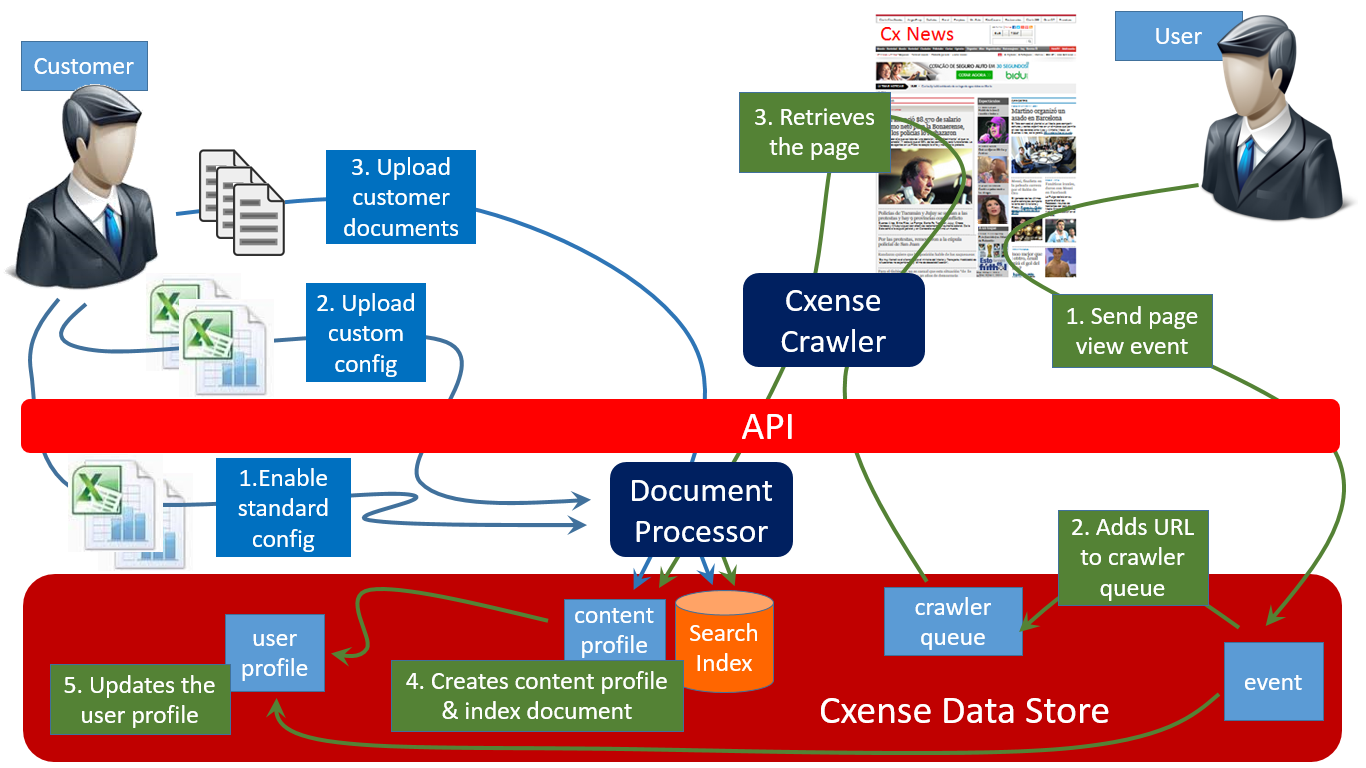
The figure above sums it all up. The green route is identical to the one shown in previous figures with the exception of green step 4) where we have added the fact that incoming documents are not only processed for the purpose of creating a content profile, but also for the purpose of making them searchable (see the dual data output, the content profile and the updated search index). The processing of incoming documents (regardless of source) can be configured in part by adding dictionaries supporting taxonomy tagging, entity extraction etc. This can be done by enabling default dictionaries or by adding custom dictionaries as shown in blue step 1 and blue step 2 respectively. Currently, for a given installation. it is only possible to either feed documents via the crawler or the via the push API; it is not possible to switch back and forth.
Sites can be whitelisted, blacklisted or graylisted. By default all sites start out graylisted. That means that the crawler will not crawl more than a fixed number of pages (1K) and in case of capacity issues, pages from graylisted sites will end up at the end of queue. Test sites and demo sites often remain graylisted forever, whereas production systems almost always end up being whitelisted (no capacity limitation and highest priority in the queue). Blacklisting is the same as blocking the crawler from accessing the site in question.
The Cxense Product Portfolio
Cxense Insight
Cxense Insight is just a very thin GUI layer on top of the Data Layer. Its sole purpose is to make the stored data accessible to a human observer. In addition to the standard default views (web pages with the data presented as numbers, lists and graphs), Cxense Insight allows the users to compose their own workspaces with tailor made widget showing exactly the data the user want in the way the user want it.
Cxense DMP
Cxense DMP provides the ability to organize users into audience segments reflecting their current and past behavior and characteristics. An example of such an audience segment could be "women above 40 with an interest for horse riding that speaks English and lives in São Paulo". Such an audience segment could then be used for targeted ads or e-mail campaigns.
The figure below shows you the full life cycle of a Cxense DMP audience segment, The cycle consist of three passes that have all been color coded. The green steps represent the data gathering part, the red steps the audience segment creation and exportation phase, and the blue steps the segment usage phase.
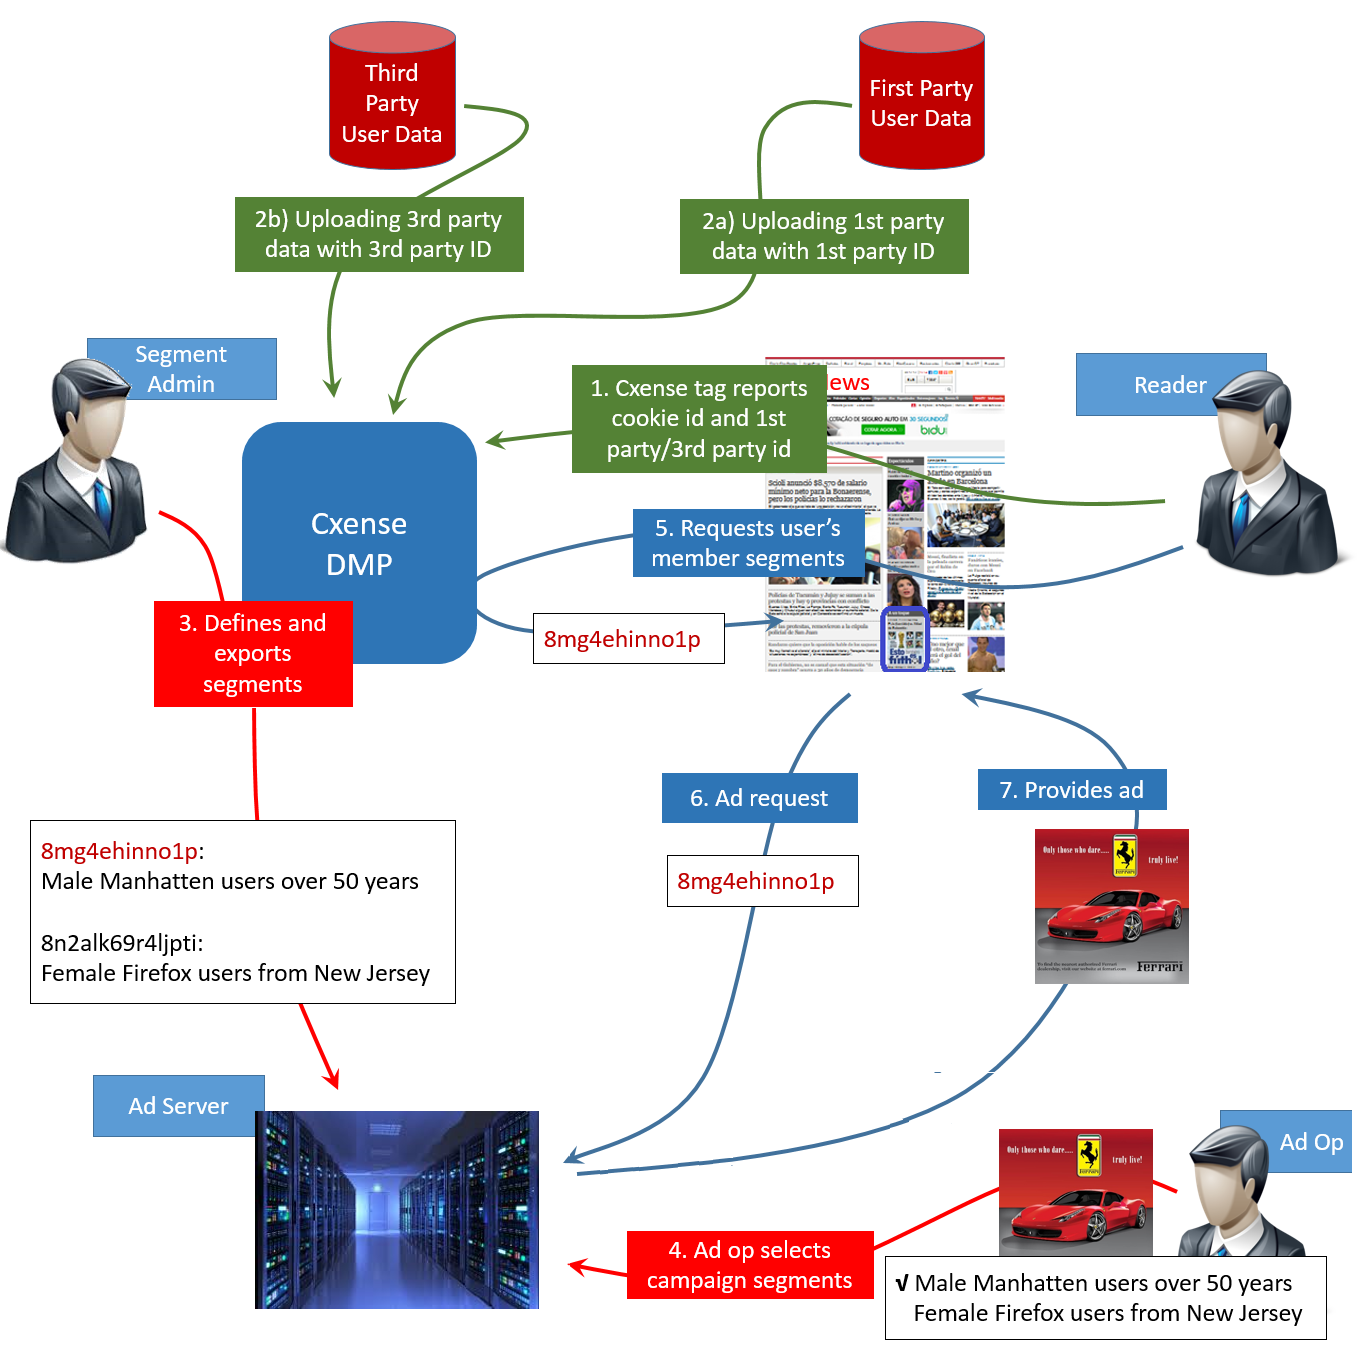
Green step 1 is the Cxense Script uploading the event data to Cxense. The only difference here is if 1st or 3rd party data is to be added. In that case an extra line of code will be added to sync the Cxense cookie based user id with the same user's id within the customer's database (for instance their subscription database). The purpose of the id syncing is so that Cxense DMP will be able to map the 1st and/or 3rd party user data uploaded in green steps 2 a) and b) to the corresponding user in the Data Store. The practical implementation of the syncing is that the external user id (the one used in the customer's system for the same user) is added to the event data before it is uploaded to Cxense.
Now that we have gathered the user data we can start on the red steps: the creation and exportation of the segments. In step 3 we use the Cxense GUI to create the audience segments. An audience segment is nothing but a set of filters combined with Boolean operators. For instance the filter "Young female mobile users from Rio de Janeiro that has showed interest for Rock in Rio (a yearly music festival) during the last 3 days" would be implemented along the lines of what is shown here:
age < 23 AND gender is 'female' AND device is 'mobile' AND location is 'rio de janeiro' AND HAVING(MINIMUM 10 page view AND category is 'rock in rio') AND start is 3 days ago AND stop is now
After segment creation we export them to the ad server being used by the customer.
In red step 4 we see an ad op creating an ad campaigns. Ad campaigns are more efficient when they are targeted towards groups of users more likely to be recipient to the message conveyed by the ad. And here is where the audience segments come to play. In the figure we see that the ad op is creating an ad campaign for Ferrari and target that campaign towards men above 50 from Manhattan (where for instance Wall Street is located and a small apartment cost the same as an average oil tanker). The goal is to reach men with money (and in their midlife crises?) as these are more likely to purchase a red Ferrari than the population at large, or so they say...
With that last red step everything is ready for start seeing the segments in action. Blue step 5 shows how the user upon opening a page causes a request to be sent to Cxense asking for a list of all the segments the user is member of. A list of segment ids is returned (in our example, only a list of one segment id). Then in blue step 6, from within the same javascript tag, a new request is sent, this time to the ad server requesting an ad that it can place on the page. The request is accompanied by the list of segment ids that was obtained in the previous step. In blue step 7, the ad server uses (among other things) the audience segment information to determine what the optimal ad would be and passes that ad back to the web page for being displayed.
For further learning on DMP visit the Segments Management.
Id Syncing and the Uploading of User Data
Above we touched upon id syncing and uploading of first and third party data. In the figure below we are looking at it again, but this time in more details.
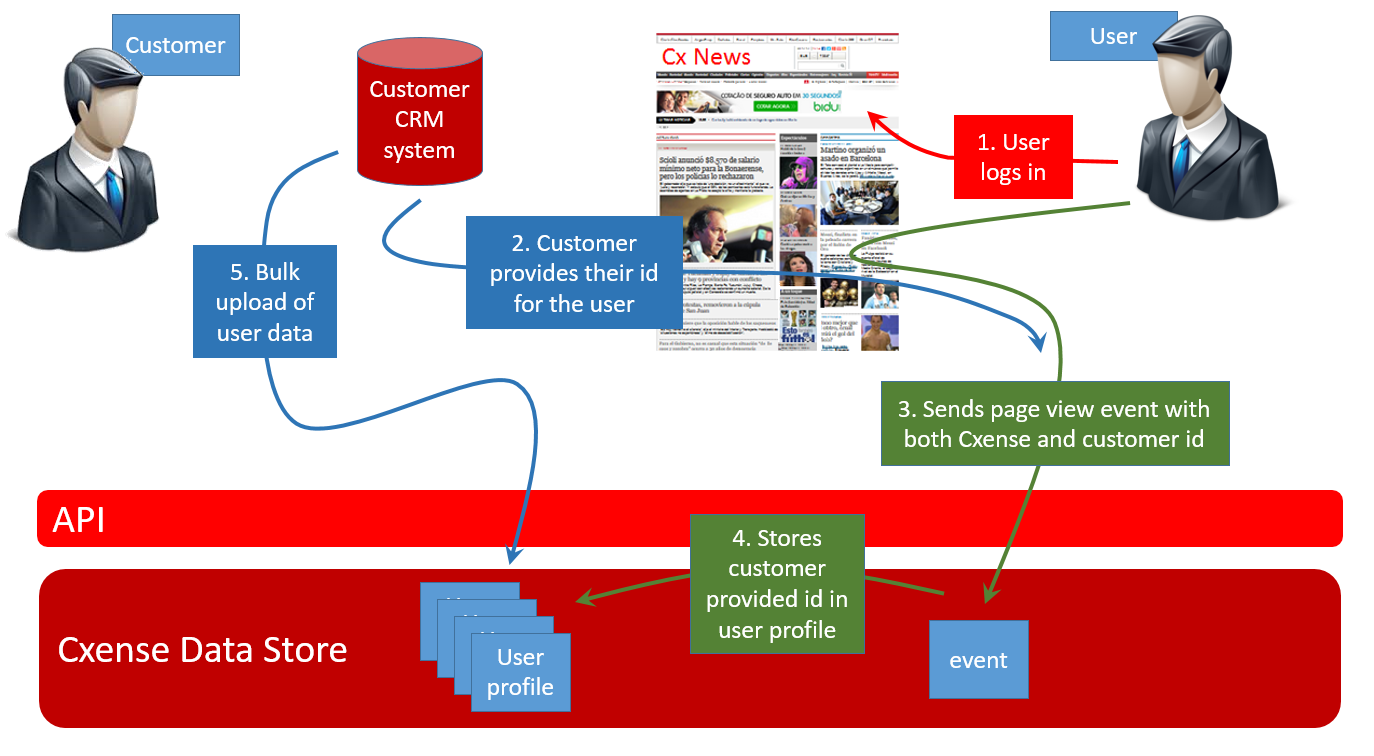
Red step 1 is the user logging into the site. At this point the user's identity both the Cxense and the customer system will be known in as illustrated in blue step 2 where the customer provides us with their user id (this is done via a line of code within the Cxense script deployed on the page). So when the Cxense tag is executed in green step 3, both the Cxense id (the browser cookie) and the customer id (their data base user id) will be among the data sent to Cxense. The external customer id will then be stored with each user's user profile (green step 4).
Later when the customer upload data from their CRM system, they are then free use their own set of user ids to identify their users as these ids will at this time be known to Cxense. The uploaded user data is stored in their respective user profiles.
Lookalike Modeling
Lookalike modeling is to create a new audience segment out of an existing audience segment with the objective of reaching a larger number of users with the same characteristics as those defined by the original segment. An example of such a lookalike segment would be a segment that includes users with similar characteristics to that of a segment consisting of users that have purchased a particular product. The lookalike segment can now be used to also include users that so far have not purchased the product, but that otherwise are very similar to users of the original segment. All this with the intention of using the segment to target those users that are most likely to want to buy the product in the future.
Technically, a lookalike segment is implemented as a filter that checks each user for the value of some attribute indicating segment membership or not.
Below we see the steps involved in creating and using a lookalike audience segment. First we do blue step 1, and that is to create the regular segment that is to serve as the base (represented by the red circle/set of users). Then, based on this base segment we enable lookalike modeling. The system creates a lookalike segment (orange circle) and starts a recurring model training job based on state-of-the-art AI/machine learning techniques. Within 24 hours the lookalike modeling has completed the initial run and the lookalike segments contains the requested percentage of the total audience. Lookalike modeling ranks all users in the audience based on how similar they are to the base segment and includes users from the top of the list until the requested percentage is reached. The quality of the new lookalike segment is therefore inversely proportional with the size of the segment, since requesting a bigger percentage of the audience means our backend has to include users that are less similar.
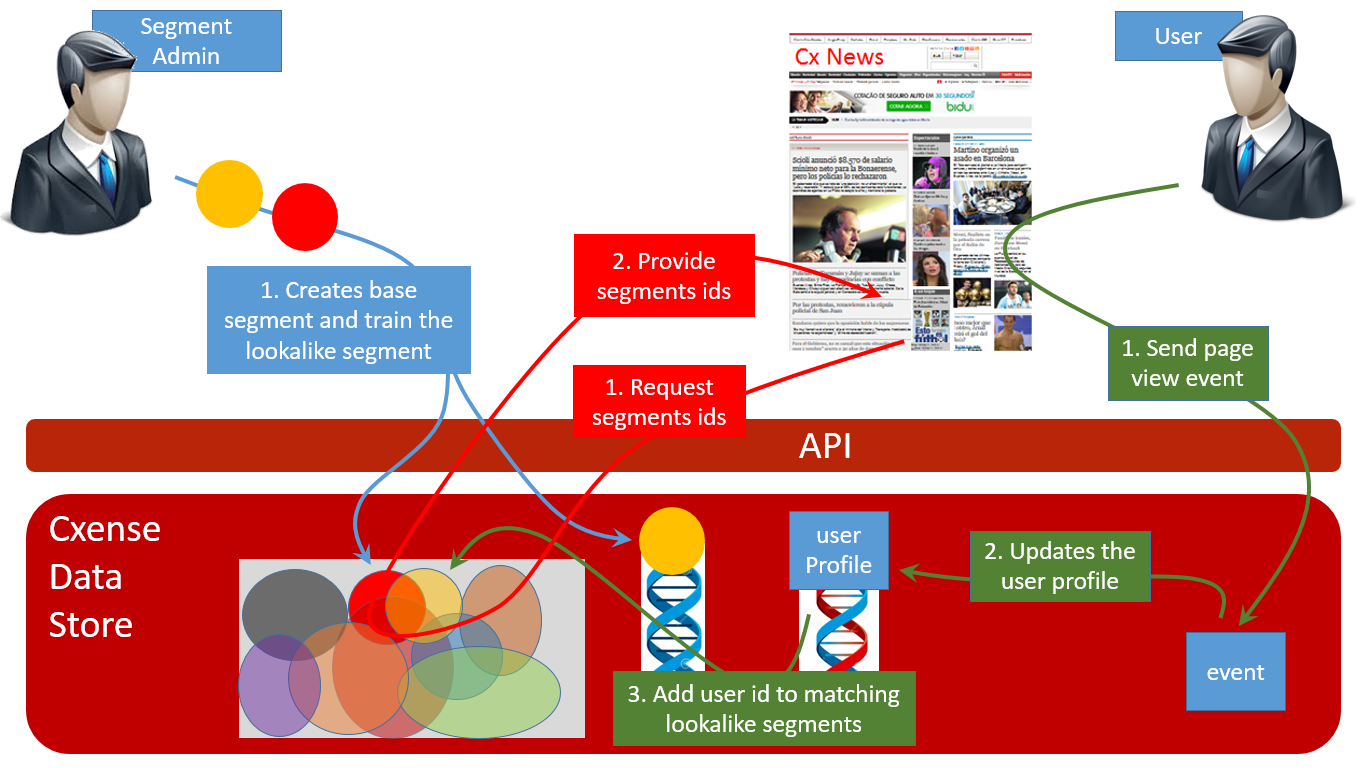
We are now ready to start using the segments (red route). Any audience segment-based ad or content recommendation on the page will request a list of segments that the user is member of (red step 1) and the list will be generated and returned (red step 2) and used to pick the right ad or content rec for the user in question.
The size of a lookalike segment is given as a percentage of all users and decides the proportion of incoming users that is to be added to the segment in green step 3. Inactive users and users that due to changing user profiles no longer are categorized as a match, will gradually be removed from the segment.
Funneling
When an ad is displayed on a web page, that is referred to as an impression. If someone clicks on the ad, then that is referred to as a click. The percentage of clicks relative to impressions is referred to as the click-through-rate (CTR). If a user clicks on an ad and then follows that up with some advertiser defined desired action (for instance a purchase), then that is referred to as a conversion. Sometimes there are several steps from the initial click on the ad until the conversion is complete. For instance, if the ad is for an university enrollment as shown in the figure below, then there might be several forms to fill out before one come to the final page where one upload the study application. Such a series of steps is called a conversion funnel. The name stems from the idea that for each step you are likely to loose a few users (just like a funnel gradually narrows).
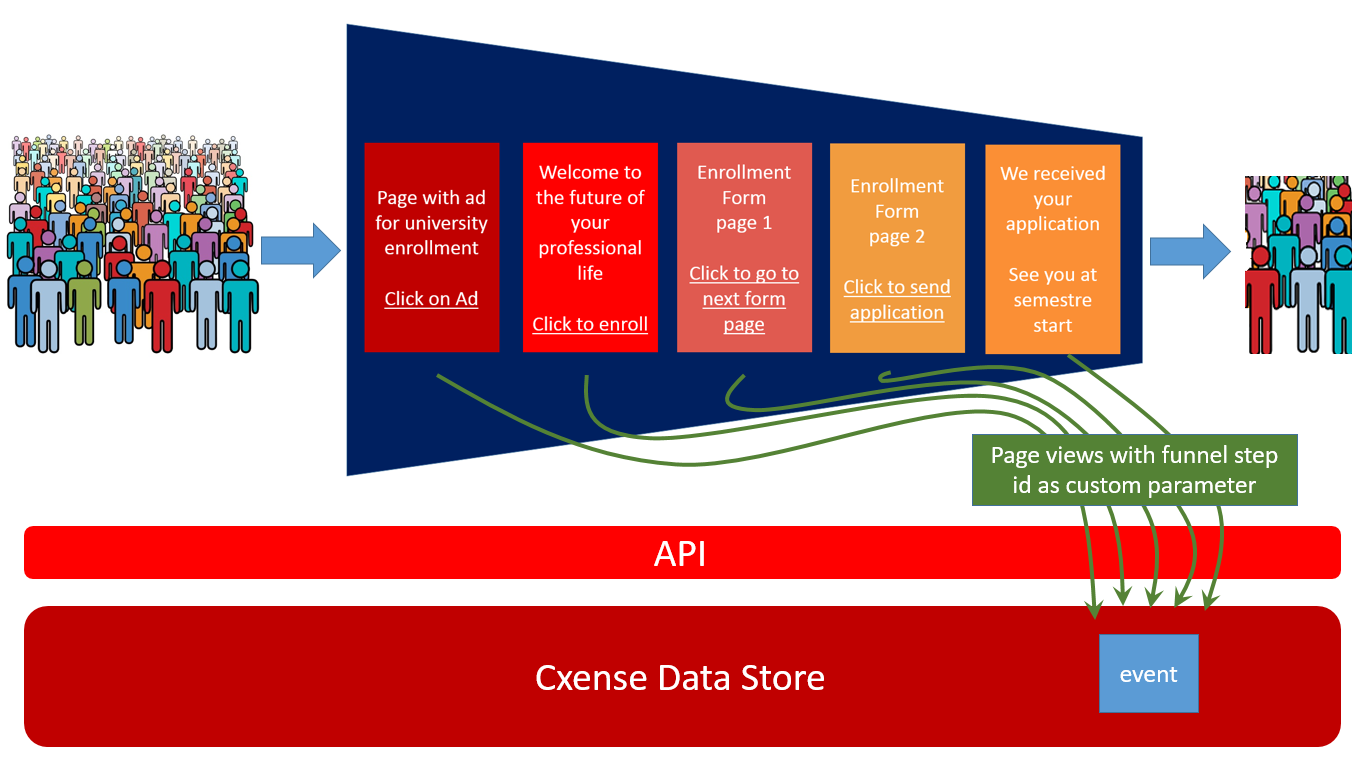
Cxense DMP includes a funneling feature with which one may tag web pages as part of a funnel for then having Cxense DMP display the performance statistics (CTR) on how well each web page / funnel step as well as the overall funnel, performs.
Cxense Search
Cxense Search is an API that gives access to the same search index that Cxense Content uses internally. The input (the query) and the output (the search result) format is JSON.
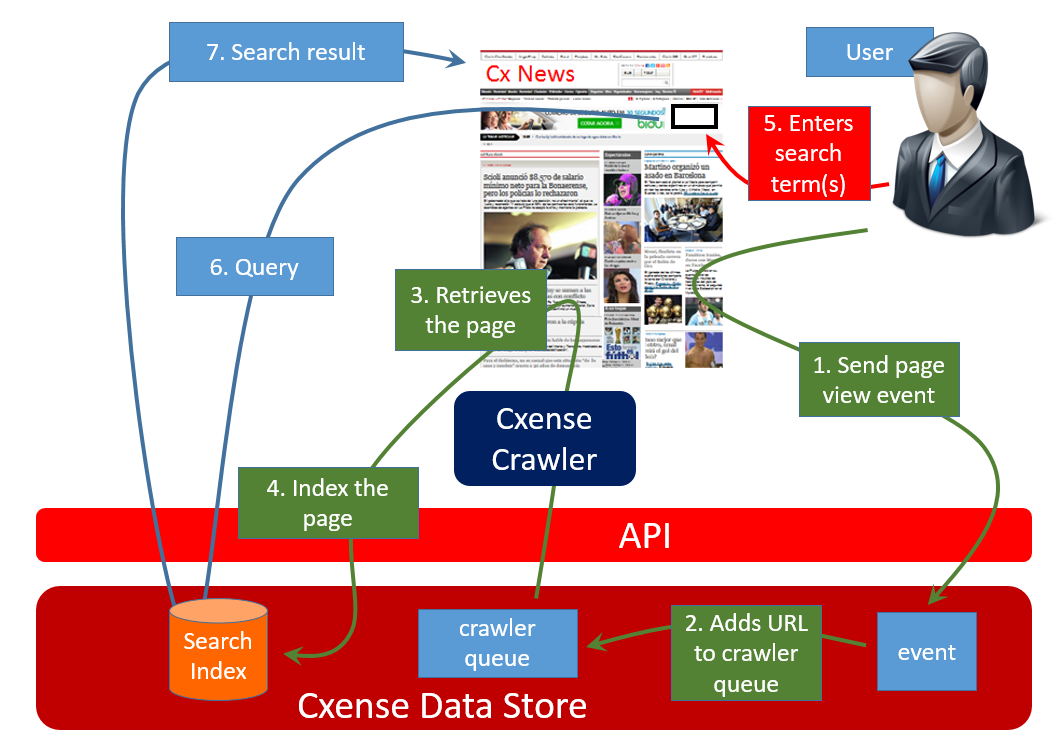
The figure above shows the Cxense actions with green arrows, end user actions with red arrows and customer actions with blue ones. The first thing we do is to collect the data to be made searchable. The user visits a page and a page view is sent to Cxense (green step 1). The page view contains the page url which is appended to the crawler queue (green step 2). At some point the crawler will retrieve the page (green step 3) and it will be processed and the page content is indexed (green step 4) and can now be searched by the user by he or she entering one or more search term (red step 5).
The next two steps is the part that is to be implemented by the customer. The search term(s) provided by the user will be wrapped in the Cxense Search API url and passed on to Cxense search (blue step 6). The query will be executed towards the index and the search result will be passed back to be presented to the user (blue step 7).
For further learning on Cxense Search visit the Cxense Search Query Side Tutorial.
Query Completion
As illustrated in the figure below Cxense also provide support for query preprocessing as the query is being written by the user. This assumes that the customer has uploaded a query completion dictionary as shown in green step 1. As soon as this is done, the web site back end can request query completion suggestions (blue step 3) upon the user have written the first few characters of his/her query term (red step 2). As soon as the user has excepted (or rejected) any of the query completion suggestions received in blue step 4, the actual query can be passed in (blue step 5).
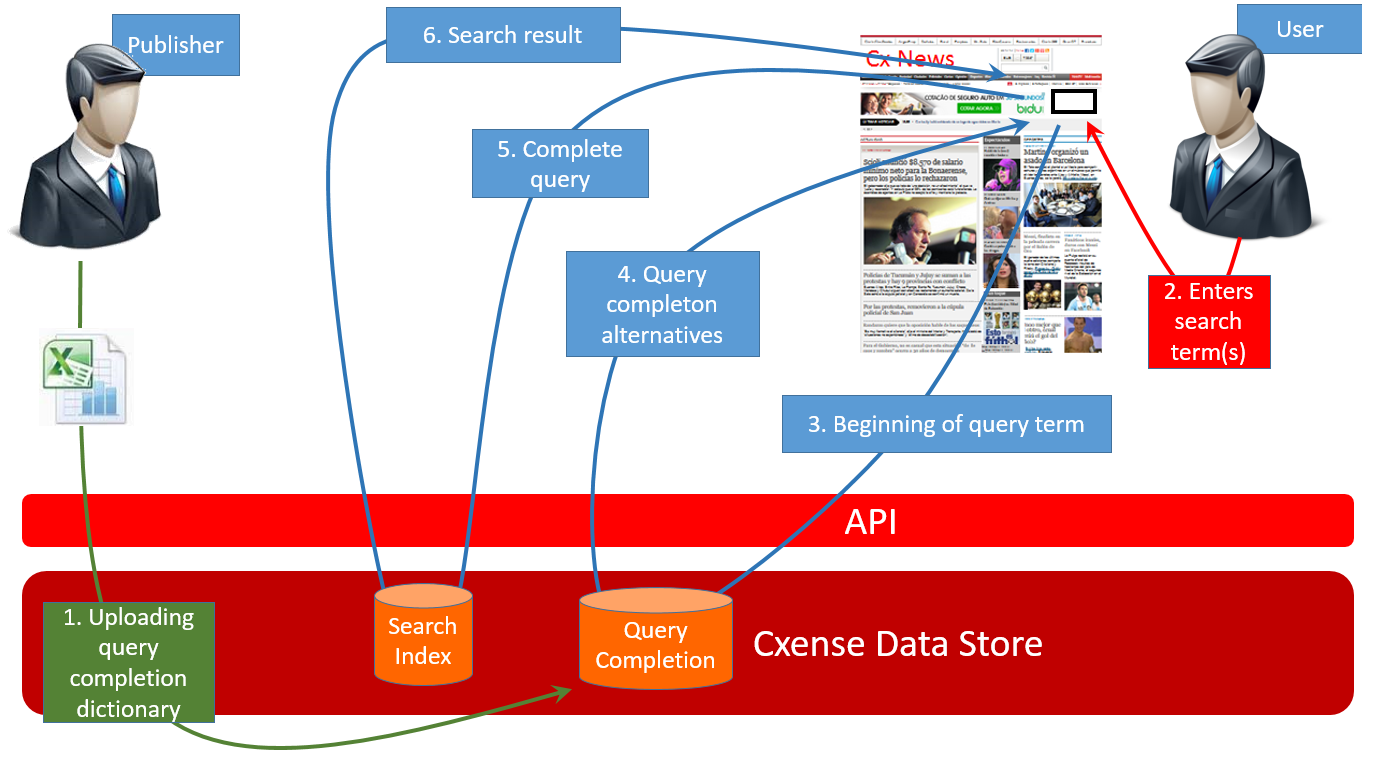
For further learning on Cxense Search linguistic dictionary usage, visit the Dictionary Management Tutorial.
Crawled vs. Customer Fed Data
Two figures up we saw how crawled web pages can be made searchable. As shown in the figure below, it is also possible to push non-crawled documents to the index and in this way construct a search indexed unrelated to any crawled content. For this to work, the crawler has to be disabled (blue step 2) before documents can be pushed to the index via the API (blue step 3).
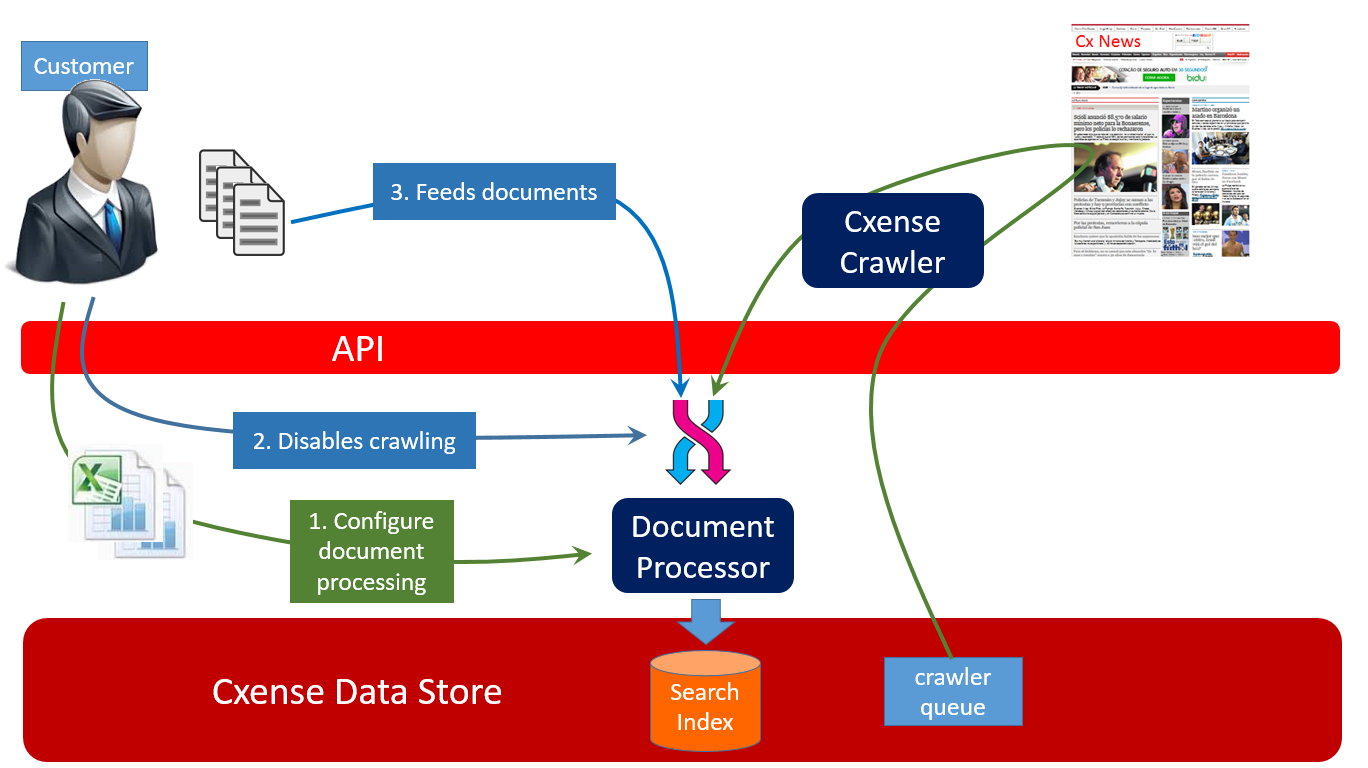
Green step 1 shows how the document processing (and search query processing that is not shown in the this figure) can be configured by the customer by enabling and/or uploading various dictionaries. These dictionaries can be linguistic ones (spell checking, query completion, etc) or taxonomies.
For further learning on customer fed data visit the Cxense Search Index Side Tutorial.
Cxense Content
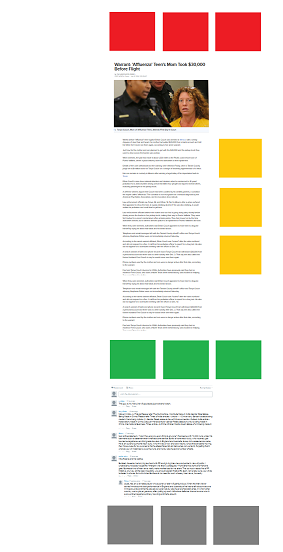
We use content recommendations to try to keep readers at the site for a longer period of time. To achieve this it is important to recommend something the reader is likely to want to read. What such a recommendation ought to be depends in part on where on the page the recommendation is positioned. In the figure to the right we have color coded some candidate locations.
The green recommendations will be seen by users that have read the whole article to the very end. Hence, based on this proved interest for the current article we can recommend more of the same (contextual). The yellow ones are more for those that early on start loosing interest for the current article and here we should recommend something different from the current article. This could be something in the news right now (trend) or what the user has shown interest for in the past (behavioral). Areas below the green recommendations, like the gray ones at the end of the user comments area, should be avoided as they are guarantied to result in a CTR close to zero (when where you down there the last time?). The red ones at the top can be used for distracting users that are likely to immediately bounce back (for instance single article readers from Facebook or Google Search), for all other users these should probably not be shown at all as they steal attention before the user has even laid eyes on the current article.
Blue step 1 in the figure below shows the work of developing and configuring a Cxense Content Recommendation. All of it takes place within the Cxense Portal. The output of this activity is a widget consisting of three components, the content config (what is to be recommended), the javascript template (code that unpack the data structure with the recommendations), and the CSS Styles sheet (defines the layout of the recommendations) that are stored within Cxense. In blue step 2 we obtain the widget code and insert it into the web page. The sole purpose of that widget is to hold the id of the widget and ask for that widget when it is to be displayed (green step 1)
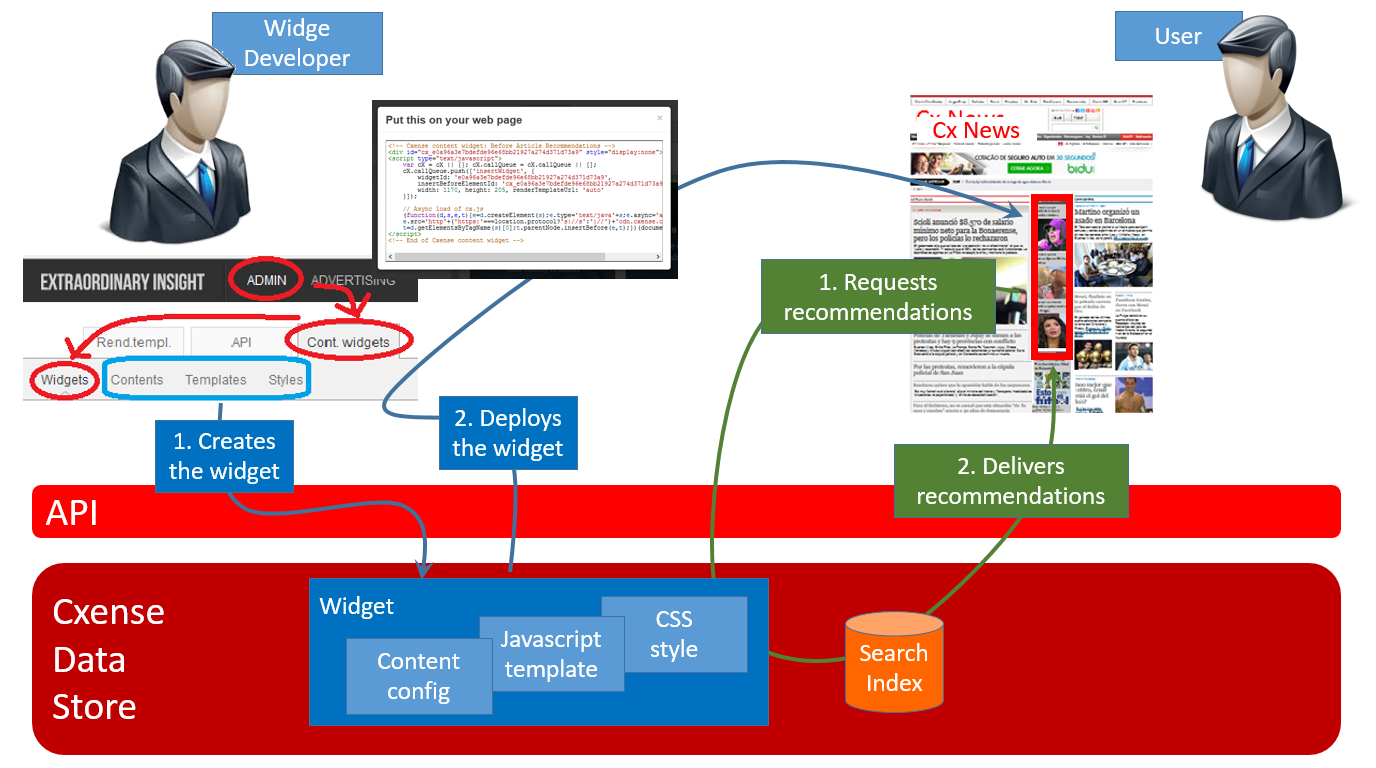
When the user access the page, the insertWidget() function of the cx.js library file will be called and the configured number of best ranked articles recommendations will be returned. The returned data in green step 2 will contain the content rec data structure, the template code for unpacking the data, and the CSS style sheet deciding the layout.
For further learning on Cxense Content visit the Piano Content Recommendation Tutorial.