
External User Management Systems
The User Ref token method is considered a legacy approach and is only supported for existing clients already running this integration. No new User Ref integrations will be configured moving forward.
For new implementations or clients not using Piano Registration + Login, we recommend utilizing Identity Linking.
If you have any questions or need assistance, please reach out to your Piano representative.
Integration Overview
The documentation below walks through how to handle login with any other user management provider. No matter how you're set up, this includes three basic steps:
-
A Piano offer template is displayed.
-
When a user clicks a link within that template, Piano hands off the process to your third-party registration system where the user inputs required registration/login information.
-
Upon a successful registration/login, the checkout process is handed back to Piano and users are able to complete any other steps necessary to finish checkout (such as inputting payment information).
At a high level, the process looks like this:
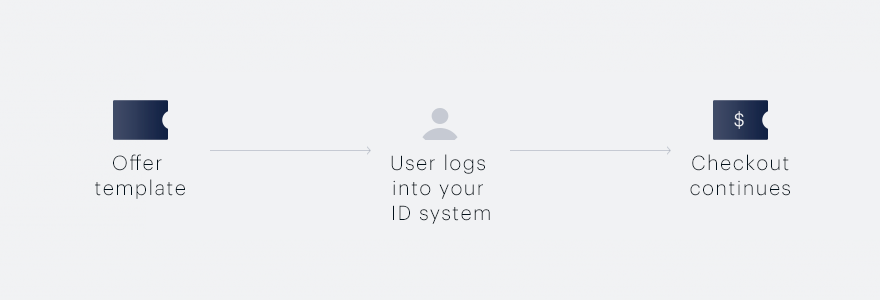
In order for this process to work seamlessly, there are some development tasks that are primarily related to user experience and some tasks that require sending data from point A to point B. You may want to divide this work between a front-end and a back-end developer.
Here's a more granular breakdown of the process:
-
Piano's modal or inline offer displays after a Composer experience or a
tp.offer.showfunction triggers it. -
When an anonymous user clicks on a term within a Piano offer template it triggers the
loginRequiredevent and registration/login begins (users already logged in will instead go directly to checkout). -
As part of the
loginRequiredevent, you'll need to capture Piano's params object, which contains important information about the template and user's state that we'll need later. -
Using whatever method you prefer, you place your own registration/login screen on top of or within Piano's Offer Template (you can close or hide Piano's template during this time using CSS or JQuery).
-
The user then inputs required registration/login information and you communicate that information to your user management system with an AJAX request. You should also validate that the user information has been successfully captured by your system.
-
When registration/login is complete, you can close or hide your registration/login screen and use our SDK to create and set a new userRef token (an encrypted token that keeps Piano in sync with your user management system).
-
You then execute the
tp.offer.startCheckout(params)function, the Piano checkout modal pops up, and the user completes checkout. By including theparamsobject, information about the user and the selected term is included when Piano restarts the checkout process.
The complete process looks something like this:
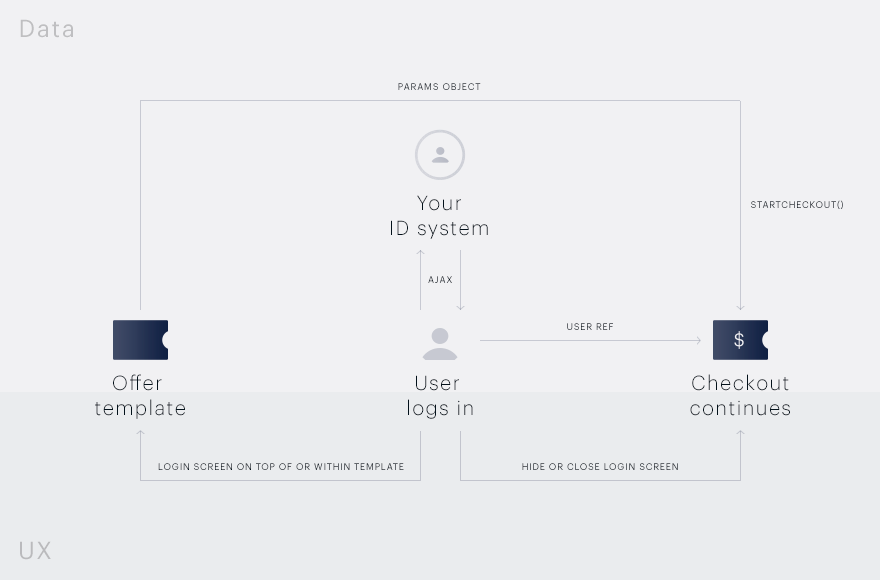
There are a variety of ways the process outlined above can be executed. Below we provide step-by-step guides for a few of the most popular implementation methods but you should feel free to customize this process using any methods you prefer.
The UserRef Token
Piano authenticates users through an encrypted userRef token. By properly configuring this token, user identities stored in your user management system will be verified within Piano (we only store email addresses and names locally). This userRef token allows Piano to validate after every page load whether a user should have access to particular resources.
Required and Optional UserRef Fields
|
Fields |
Description |
Required |
|---|---|---|
|
uid |
The |
Required |
|
|
The |
Required |
|
timestamp |
The |
Required |
|
create_date |
The |
Optional |
|
first_name |
The |
Optional |
|
last_name |
The |
Optional |
Generating and passing the UserRef Token
Using the Piano SDK for PHP (PHPClientlibrary.pdf), userRef tokens can be generated using the following syntax:
$userRef = TPUserRefBuilder::create( $userID, $userEmail )
                           ->setFirstName( $userFirstName )
                           ->setLastName( $userLastName )
                           ->setCreateDate( $userRegistrationDateTimestamp )
                           ->build( $pianoPrivateKey );
For security purposes, the data inside of the userRef is a JSON string, encrypted, and base-64 encoded. Note that userRef tokens can be generated even if the parameters supplied are invalid. When testing your userRef implementation, please double-check that each required parameter is being passed correctly by using these testing methods.
You can send the userRef generation method and pass the userRef value to our JavaScript library like this:
<script>
tp = window.tp || [];
tp.push(["setUserRef", <?php echo json_encode(
TPUserRefBuilder::create( $userId, $userEmail )
	->setFirstName( $userFirstName )
	->setLastName( $userLastName )
	->setCreateDate( $userRegistrationDateTimestamp )
	->build( $pianoPrivateKey )) ?> ]);
</script>
Other SDK libraries (Python and Java) are available under the following link. General information on how to decrypt the token data is available here.
User Creation Through UserRef
Users are not created in the Piano database through userRef except in certain situations. In these cases, users are created:
-
Purchase or subscription
-
Edit profile through the My Account page
-
API call endpoints (/anon/user/get)
Unless one of these conditions is present, users will not be added to the Piano Management + Billing database and will not be available for user mining.
User Management Integration Options
As the step-by-step guides below demonstrate, user registration and authentication can be done in a number of different ways. The method you choose is entirely at your discretion, but here are two popular options:
1) Redirecting users to a dedicated login/registration page
Redirecting users to a dedicated login/registration page is one of the most common solutions for user authentication. Let’s imagine that your login and registration page is located at http://example.com/login. Before redirecting a user, you'll need to use the params object to store the user’s current state (i.e. if the user clicked on a specific term, you'll want to let that user continue with the purchase of that selected term after authentication).
Below is an example of a handler to create a cookie (__pianoParams) that stores the user state information by taking that data from the params object. That way you'll have access to the user state information from the dedicated login/registration page when the login/registration process is complete and you're ready to hand the checkout process back to Piano.
tp = window.tp || [];
tp.push( [ "addHandler", "loginRequired", function ( params ) {
	// Sets the cookie with the current state of the user
	document.cookie = "__pianoParams=" + encodeURIComponent(JSON.stringify( params )) +
            "; expires=" + new Date(new Date().getTime() + 60 * 60 * 1000).toGMTString() +
            "; path=/; domain=.example.com";
	// Note that in order to be able to read this cookie,
	// the redirected page should be on the same domain
	location.href = "http://example.com/login";
}]);
Once the user has successfully been logged in/registered, you must generate the userRef token for that user. Please refer to the userRef token generation documentation for info on how to create and pass through a userRef token.
At this point, we’re ready to hand the checkout process back to Piano. To proceed, you'll need to pass the userRef token you generated above into our JavaScript library and execute the startCheckout function, which requires the Params object before proceeding:
tp = window.tp || [];
// Set the generated userRef token
tp.push(["setUserRef", <?php echo json_encode( $userRef ) ?>]);
tp.push(["init", function() {
    // If user is logged in
    if (tp.user.isUserValid()) {
        // Get the stored cookie value
        var paramsCookie = tp.util.findCookieByName('__pianoParams');
        var params;
        try {
            // Try to parse stored JSON data
            params = JSON.parse(paramsCookie);
            // Remove the old cookie
            document.cookie = "__pianoParams=null; expires=-1;" +
                " path=/; domain=.example.com";
        } catch (e) {
            params = false;
        }
        // If params object is valid - start checkout
        if (params) {
            tp.offer.startCheckout(params);
        }
    }
}]);
This code will check that the __pianoParams user state cookie was set previously. Provided it was, this code will parse the information from that cookie, remove the cookie from the user's browser, and re-open the Piano checkout modal so that the user can complete the checkout process.
Below is an example of how to use our callbacks to redirect a user after the checkout event has completed:
tp.push(["addHandler", "checkoutComplete", function(conversion){
window.location.href = "/confirm";
// you could also use the params object here to redirect a user to the referring page
// like this: window.location.href = params.url;
}]);
The params object stores the URL of the page the user was on when that user selected a term. This allows you to automatically send users back to the content they were viewing before the checkout process began.
2) Opening a login/registration modal on your site
From a user experience perspective, the best way of managing user login/registration is to handle everything on a single page without redirecting users so they can start and finish checkout on the same page. The script below shows how you might accomplish this using an AJAX call to a register/login API endpoint:
tp = window.tp || [];

function simpleLoginModalExample(successCallback) {
	var loginForm = $('form#simple-login-modal-form');
	loginForm.submit(function (e) {
		e.preventDefault();
		$.ajax({
			type: 'POST',
			dataType: 'json',
			url: '/ajax/login'
			data: loginForm.serializeArray(),
			success: function (data) {
				// After login/registration -
// you will need to generate a userRef token on the server
// and pass it into our JavaScript
				tp.push(['setUserRef', data.userRef]);
				successCallback();
			}
		})
	});
}


tp.push(["addHandler", "loginRequired", function (params) {
	simpleLoginModalExample(function () {
		// Proceed with checkout after successful login/registration
		tp.offer.startCheckout(params);
	});

	// Return false so user won't see an error screen
	return false;
}]);
The example function here called simpleLoginModalExample is intended to open a login/registration lightbox you've created on your page and send the user’s login credentials to your login/registration server. The server will have to generate a userRef token once the user has successfully logged in or registered. Once you have the userRef token, you can set it and proceed with checkout using tp.offer.startCheckout.
How to Test the UserRef
Because the userRef is an encrypted token, it can be hard to debug. For that reason, Piano provides two methods for you to test your userRef implementation:
1) Using Open Encoding
In Sandbox environments you can set the userRef using our open-encoding specification. This is formatted as a string that starts with {jox} and is followed by a JSON object that contains the uid, email, and timestamp fields. If you are generating this in JavaScript, you can use the JSON.stringify method.
// This is the easier way to test in Sandbox
// because you can see each value right in the console as opposed to reading an API response
tp.push(["setUserRef", "{jox}{'uid':'test','email':'user@test.com','timestamp':1234567890}"]);
2) Using REST Endpoint: /publisher/test/userRef
There is also a REST endpoint that you can use to test your integration. Here's an example request to that endpoint:
curl https://api.piano.io/api/v3/publisher/test/userRef
-d 'aid=YOURAID'
-d 'user_ref=aHR0cHM6Ly93d3cueW91dHViZS5jb20vd2F0Y2g/dj1kUXc0dzlXZ1hjUQ=='
This method will perform the following checks to ensure that the UserRef was created correctly:
-
Proper decryption using your application's private key
-
The JSON object has a valid email
-
The userRef token is not expired
-
The
uidhas a value
If you are getting an error, here are the API response codes so that you can see what's causing that error:
|
HTTP STATUS CODE |
ERROR |
|---|---|
|
2001 |
Invalid uid |
|
2002 |
Invalid email |
|
7004 |
Could not find user with uid and email |
|
7006 |
Type of encoding not allowed |
|
7007 |
The userRef is expired |
Be sure to test your set-up with this endpoint before going live because submitting a userRef token directly to Piano using tp.push(['setUserRef', userRef]); won’t create a response with an actionable error code.
Feature Comparison
For a detailed comparison chart of Registration + Login and Identity Linking see here.
For reference, the main features supported by UserRef are outlined below for comparison.
|
|
UserRef |
|
Custom fields and user mining |
|
|
Custom fields in custom forms |
✘ |
|
Import custom fields data from third parties |
✘ |
|
Progressive profiling (applying custom forms in Composer) |
✘ |
|
Targeting by custom field responses in Composer |
✘ |
|
User mining |
✔ |
|
Generate user report |
✔ |
|
|
|
|
Templates and emails |
|
|
Welcome email |
✘ |
|
Login/Register Confirm template |
✘ |
|
Reset password email and template |
✘ |
|
Profile in My Account |
✘ |
|
Double opt-in |
✘ |
|
Custom form |
✘ |
|
|
|
|
Security |
|
|
Use CAPTCHA |
✘ |
|
Selectively set CAPTCHA |
✘ |
|
Password control |
✘ |
|
Webhooks |
✔ |
|
Preconfigured roles |
✔ |
|
Customize permission |
✔ |
|
Support for web and mobile SDK |
✔ |
|
|
|
|
User Management |
|
|
Create a single user (via dashboard) |
✘ |
|
Bulk create users |
✘ |
|
Flexible user provider integrations |
✘ |
|
Grant access to single user |
✔ |
|
Bulk grant access |
✔ |
|
Delete users |
✔ |
|
Individual user profile |
✔ |
|
|
|
|
Sign on features |
|
|
Facebook social login |
✘ |
|
Google social login |
✘ |
|
Sign in with Apple |
✘ |
|
MSQA social login |
✘ |
|
Linkedin social login |
✘ |
|
Subscribe with Google |
✘ |
|
Sign in with email |
✘ |
|
Passwordless registration and checkout |
✘ |
|
Frictionless checkout |
✘ |
|
Facebook Instant Articles |
✔ |
|
|
|
|
Commonly asked |
|
|
Edge Experiences |
✘ |
|
Server-side metering |
✔ |
|
Site Licensing |
✔ |
|
AMP Experiences |
✔ |
|
Mobile Experiences |
✔ |