
Identity Management Identity Linking
Identity Management Identity Linking connects third-party authentication systems by ingesting ID tokens in JSON Web Token (JWT) format. This approach can be used with almost any authentication management system, such as Auth0 or Okta. Identity Management’s ingestion mechanism parses and validates ID tokens and creates Identity Management users from the token’s claims. After this ingestion, users have access to many Identity Management features, and are tracked within the Piano product suite.
Identity Management features offered
Integrating via Identity Linking expands user management capabilities in Identity Management while maintaining a separate authentication system. By integrating ID Tokens with Piano, the following Identity Management features will be available to you and your end users:
For you:
-
Ability to track user profile updates
-
User mining with custom fields and system fields
-
Disable users via dashboard
-
Bulk user creation and bulk access granting
-
Generate user reports
-
Progressive profiling and targeting by custom field responses in Composer
For end users:
-
Custom fields and custom forms
-
Consent fields
With this system, you will rely on a third-party system to handle authentication, authorization, and login/registration forms. Additionally, certain Identity Management features, such as support for password reset, social login (through Facebook, Twitter, and LinkedIn), reCAPTCHA or Cloudflare Turnstile are not available through Identity Linking.
Token claims
Identity Linking is only available for JWT tokens. These tokens contain user metadata, which is protected by your application’s secret key, and bundled in claims. Piano checks the received token, decrypts it, and then the claims data to create a user profile.
In Identity Linking, there is no specific configuration to set the encryption key or decryption key. The shared secret field serves a dual purpose for two distinct use cases: JWS (JWT without encryption) and JWE (JWT with encryption). In the first case, the shared secret is utilized as a signature to verify the token, while in the second case, it is employed for decryption and token verification. Notably, in JWE, there is no signature, and the determination of whether JWS or JWE is being used can only be ascertained upon token arrival, as this information resides in the token header. Hence, the same shared secret field is employed for both scenarios to accommodate the different requirements of token processing.
More information on how to create JWT tokens is available under this link.
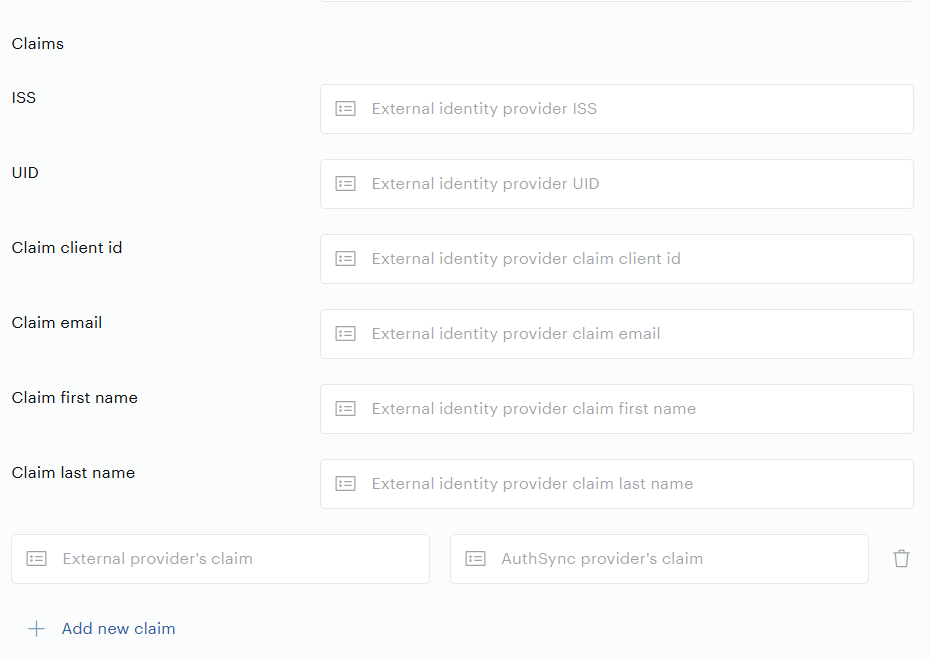
Token claims can be associated with their corresponding field in the Identity Management database. You can enter the claims from your external identity provider’s tokens into these fields. All of the fields in the modal are for token claims, except the client ID and shared secret, which are your application’s identifiers generated by the authentication provider. Standard claims in ID tokens, such as 'email', 'first name', 'last name' are provided in the modal. The ISS claim needs to be configured with a fixed value corresponding to your domain, and the other fields are mapping fields for the JWT payload. For more details about the client ID claim, see here. Any other claims in the token, such as a UID (a unique identifier for users) can be added using the Add a new claim button. After claims have been configured, Identity Management will be able to ingest user data and appropriately store it from any number of ID tokens.
Please ensure that fields do not contain any blank spaces, as this may cause login failures for end-users.
Identity Linking can work with more than one external identity provider (for example to replicate the keychain functionality), although this is wholly optional. To configure an additional identity provider, click the + Add external identity provider button. A new, blank identity provider modal will appear in the Identity Linking configuration. In these configurations, you would need to use an RSA public key as the secret key if you have selected an asymmetric algorithm like RS256. There are no different settings or configurations for multiple identity providers.
Fields
|
Description
|
|
External identity provider ClientID |
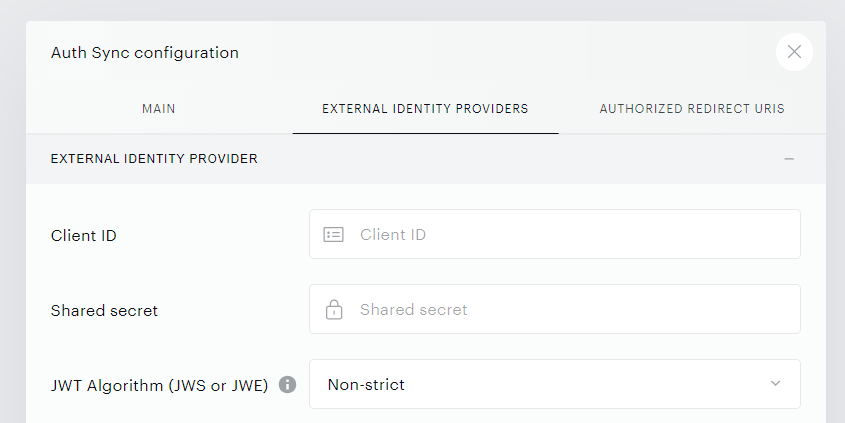
The Client ID is a unique string assigned to your application by your authentication system. This is typically an indicator for your application or the client. It would appear as |
|
JWKS Endpoint URL |
Enter the URL of your JSON Web Key Set (JWKS) endpoint. When enabled, Identity Linking will automatically retrieve the public keys needed to validate incoming tokens. For more information see here. |
|
External identity provider shared secret |
The shared secret is a unique string assigned to your application by your authentication system. This is a private or public key (based on the selected encryption algorithm) used to verify the ID token signature. When the HS256 algorithm is selected, the shared secret must be base64 encoded before it is added to the Identity Linking modal. For the RS256 algorithm, the shared secret should be plain text.
The Piano ID JWT Shared Secret visible in the Piano ID application settings (used by clients to verify tokens issued by Piano via |
|
JWT algorithm
|
JWT tokens can be signed with any standard JWS (JSON Web Signature) to be ingested by Identity Linking. Identity Linking accepts all standard algorithms, including HS256, RS256, and PS256. The full list of supported algorithms can be found here. Alternatively, the JWT payload can be encrypted using the algorithms A128KW or RSA_OAEP (both asymmetric). For asymmetric algorithms like RS256 or ES256 - you need to put the public key into the Identity Linking configuration for Piano to validate the signature. For symmetric algorithms like HS256 - you need to put the private/secret key into the Identity Linking configuration since it’s the only way to validate and sign. |
|
External identity provider ISS |
The ISS identifies the issuer of the JWT. This value can be a URL (domain or subdomain), a string, or an API key. It would appear as the |
|
External identity provider UID |
The UID claim refers to the unique user ID. Input the claim name for the unique user ID in your user provider. A common claim name for this field is |
|
External identity provider Client ID |
The Client ID claim field defines where Piano should look in the JWT to identify the application (Client ID) sending the token. By default, Piano uses the When processing a JWT, Piano first checks the configured Client ID claim field. If a value is found, it is used as the Client ID. If the claim is not present or is empty, Piano automatically falls back to the This ensures a clearer separation of responsibilities within the token, with The |
|
External identity provider email claim name |
This field maps users’ email addresses into the ID database. Fill it in with the value your user provider uses to provide email addresses in JWT, such as |
|
External identity provider first_name claim name |
This field should be a name of the claim that represents the user's first name. JWT standard for this field is |
|
External identity provider last_name claim name |
This field should be a name of the claim that represents the user's last name. JWT standard for this field is |
|
Expiration Time Claim |
The "exp" (expiration time) claim identifies the expiration time on or after which the JWT MUST NOT be accepted for processing. Currently, Identity Linking mandates the use of this claim even though RFC7519 states it is optional. |
|
sub |
This field should be a name of the claim that represents the unique identifier for the user’s unique identifier. JWT standard is |
|
Custom fields |
For custom fields that aren't JWT standards, the field ID in your system should be entered into Identity Linking with the corresponding field ID in Identity Management. As an example, if you'd like to pass a single-select list type custom field, you would need to use the following format for a JWT payload:
For a multiple-select list type custom fields, you would have to adhere to the following format:
Please note, that the values you are passing do actually need to be added to the items in the Custom list for each single-select or multiple-select list type custom field. |
* An existing first_name or last_name will not be removed, if the new JWT does not contain the first or last name. For example, if you want to remove the first_name, you need to send us this parameter like this in the JWT:
"first_name" : ""
This is an example of the Identity Linking interface with the External identity provider fields:
This is an example of the Identity Linking interface with the Token claim fields. Custom fields could also be added here (via the + Add a new claim button):
Using JWKS for Token Validation
Identity Linking supports the use of a JWKS (JSON Web Key Set) endpoint, an industry-standard approach that enhances both security and interoperability. When JWKS is enabled, Identity Linking automatically retrieves and applies the appropriate public keys for token validation. This removes the need for managing shared secrets manually and eliminates the requirement for clients to re-sign their JWTs.
When Use JWKS is enabled in the Identity Linking configuration:
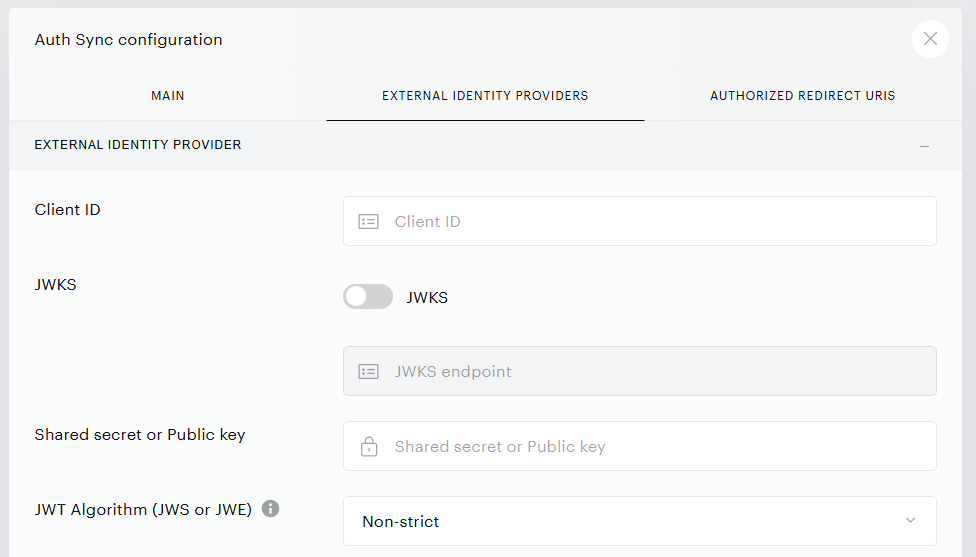
A new field appears to enter the JWKS endpoint URL:
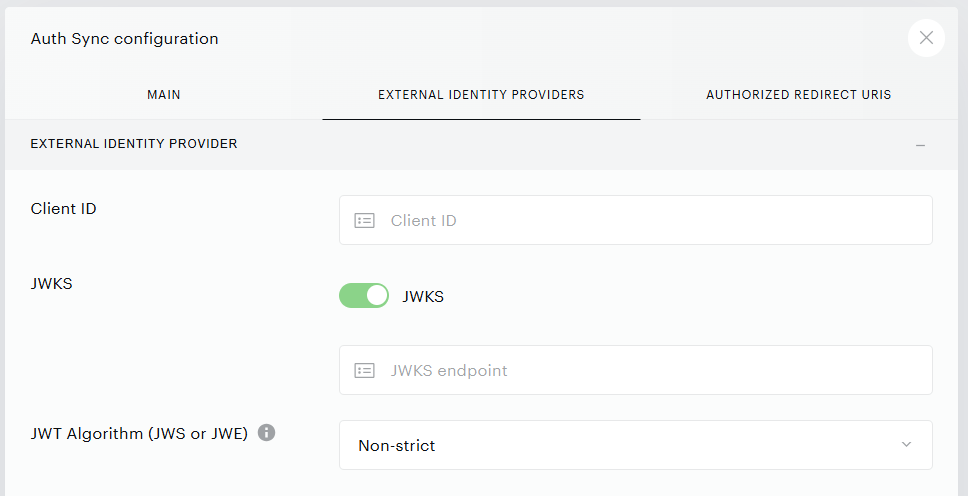
At the same time, the Shared Secret field is hidden and no longer required, as key retrieval is handled entirely through the JWKS endpoint.
JWKS Caching Behavior
Identity Linking maintains an internal JWKS cache to ensure reliable performance and secure key handling. To avoid issues during key rotations, please review the following important details:
-
Cache Refresh Interval: JWKS is automatically refreshed every 15 minutes.
-
Propagation Lag: There is a ~15-minute delay between a new key appearing at the publisher’s JWKS endpoint and its availability in our system.
-
New Token Validation: Tokens signed with a newly added key will validate only after the next JWKS refresh (up to 15 minutes).
Recommended Key Rotation Protocol
To prevent token validation failures, follow this timeline:
-
Day 0: Publisher adds new key to JWKS (old key remains).
-
Day 0 + 30 minutes: Publisher begins signing tokens with the new key.
-
Day 0 + token TTL + 30 minutes: Publisher removes the old key from JWKS.
This ensures:
-
The new key is available in Identity Linking before it is used.
-
All tokens signed with the old key remain valid until expiration.
We recommend that publishers wait 20–30 minutes after adding a new key to JWKS before using it to sign tokens, and keep the old key in place until all previously issued tokens have expired. If necessary, manual cache invalidation can be performed in urgent cases, please contact our Support team.
Implementation
These steps break down how Identity Linking works when implemented. The implementation code is below.
-
Piano's modal or inline offer displays after a Composer experience or a
tp.offer.showfunction call triggers it. -
When an anonymous user clicks on a term within a Piano offer template it triggers the
loginRequiredevent and registration/login begins. -
As part of the
loginRequiredevent, you'll need to capture data about the offer template that triggered the event, which contains important information about the template, offer, term, and composer’s state that we'll need later. -
Using whatever method you prefer, create a registration modal. The original modal offer template could be removed using
tp.offer.close()function call. For example, this function can be implemented in theloginRequiredcallback in the following point. -
The user then inputs required registration/login information and you communicate that information to your user management system. You should also validate that the user information has been successfully captured by your system. That system should also generate a valid user token that can be accepted by Identity Linking.
-
When registration/login is complete, you can close or hide your registration/login screen and set the generated user token (in JWT format) via
tp.push(["setExternalJWT", ""]);. It’s necessary to set the token on every page. Identity Management Identity Linking doesn’t save it anywhere and waits for it on every page load. -
Next, the checkout could be finally presented to the user by using
tp.offer.startCheckout(params)with the data object received in step 3. -
Since the user token was provided in step 6, and with the data object containing the term ID that the user originally selected, the checkout would immediately start on that term.
Enable Piano's JavaScript library and allow ingestion of user tokens
To use Identity Linking with a third-party user management system, custom scripts must be added to your integration page prior to Composer execution.
Add this script to enable Piano’s JavaScript library when Identity Linking is the user provider:
tp = window.tp || [];
tp.push(["setUseTinypassAccounts", false]);
tp.push(["setUsePianoIdUserProvider", false ]);
tp.push(["setUsePianoIdLiteUserProvider", true ]);
Add this script for any application located on the AP, AU, EU, US, or Sandbox dashboard:
tp.push(['setPianoIdUrl', '<Piano_ID_URL>'])
Replace with one of the values below:
AP dashboard - https://id-ap.piano.io/
AU dashboard - https://id-au.piano.io/
EU dashboard - https://id-eu.piano.io/
US dashboard - https://id.piano.io/
Sandbox dashboard - https://sandbox.tinypass.com/
Add this script to set ingestion of JWT tokens:
tp.push(["setExternalJWT", "<TOKEN>"]);
Important: The token must be set prior to the call for executing Experiences, otherwise the user will be considered anonymous. This is also important to remember if the mechanism to generate/retrieve JWT is asynchronous, e.g. implemented via the Ajax call. Encountering race conditions between setting the token and Experience execution will cause unexpected results.
Trigger login or registration flow
During the checkout flow, the anonymous user will be prompted to register or log in in order to continue. It will trigger a loginRequired event. This event has to be handled to present the authentication form, as well as record the step in the checkout process, and continue from that step once the user is authenticated.
Example code for handling the event:
tp = window.tp || [];
tp.push(["addHandler", "loginRequired", function (params) {
    // Prompting user to login
    externalSystem.login().then(function () {
        // Note that login as an asynchronous process,
        // The following code should be executed only after successful login
        // and successful token generation

        // Setting the new JWT token for authenticated user
        tp.push(["setExternalJWT", "<TOKEN>"]);

        // Continuing checkout
        tp.offer.startCheckout(params);
    });
    return false;
}]);
Retaining Referrer Information
When redirecting users to an authentication page, you may want to preserve referrer information for analytics or user experience purposes. To retain the referrer information, we suggest adding a URL parameter to your auth page. You can read the current referrer using JavaScript's document.referrer.
You can dynamically edit the redirect URL in the loginRequired callback. So instead of https://publisher.com/login, the user would be redirected to https://publisher.com/login?referrer=.
Important: The value named params in this example contains data required for continuing the checkout flow after user authentication. It could be stored as a local variable during runtime if the user never leaves the page during authentication. If the user has to be redirected to another page for authentication, then the step in the checkout, i.e. the params object, could be stored as a cookie.
The following example demonstrates this implementation:
tp = window.tp || [];
tp.push( [ "addHandler", "loginRequired", function ( params ) {
    // Sets the cookie with the current state of the user
    document.cookie = "__pianoParams=" + encodeURIComponent(JSON.stringify( params )) +
        "; expires=" + new Date(new Date().getTime() + 60 * 60 * 1000).toGMTString() +
        "; path=/; domain=.example.com";
    // Redirect user to login page
    location.href = "http://example.com/login";
}]);
// Assuming user is authenticated - the flow may continue
// First by setting the new token
tp.push(["setExternalJWT", "<TOKEN>"]);
// Then testing for the conditions of user being logged in,
// And the cookie with params present
tp.push(["init", function() {
    // If user is logged in
    if (tp.user.isUserValid()) {
        // Get the stored cookie value
        var paramsCookie = tp.util.findCookieByName('__pianoParams');
        var params;
        try {
            // Try to parse stored JSON data
            params = JSON.parse(paramsCookie);
            // Remove the old cookie
            document.cookie = "__pianoParams=null; expires=-1;" +
                " path=/; domain=.example.com";
        } catch (e) {
            params = false;
        }
        // If params object is valid - start checkout
        if (params) {
            tp.offer.startCheckout(params);
        }
    }
}]);
Tracking Identity Events in Piano Analytics
When using Identity Linking in a mobile app, the client may call the /identity/token/validation endpoint from a custom script. To ensure that identity.create events are associated with visitors in Piano Analytics, the Device-Id header must be included in the validation requests.
For iOS, the device ID can be retrieved using PianoConfiguration.shared.deviceId.
For Android, the following workaround is recommended, as there is currently no public API available. The device ID can be read directly from SharedPreferences:
val sharedPrefs = context.getSharedPreferences("io.piano.android.common", Context.MODE_PRIVATE)
val deviceId = sharedPrefs.getString("deviceId", null)
The retrieved value should then be added as the Device-Id header in the validation requests.
Please note that this Android approach relies on internal implementation details, meaning the preference name or key could change in the future. Additionally, if the Piano SDK has not been initialized, the device ID will not exist and the value will be null.
To ensure that events in Piano Analytics are enriched with browser_id and pageview_id and therefore correctly associated with a visitor or pageview, publishers must include the browser_id and page_view_id parameters in all relevant requests.
Subscribe with Google
More information about the provisional token verification for implicit login in Subscribe with Google for Identity Linking is available here.
General instructions are described under this link.
Identity Linking with HttpOnly Cookies
For enhanced security, Piano supports HttpOnly cookie-based authentication as an alternative to passing JWT tokens in JavaScript. This method prevents JWT exposure to front-end code, protecting against XSS attacks. Instead of calling setExternalJWT, you pass the name of an HttpOnly cookie to Piano, which validates authentication server-side on each API call.
Prerequisites
-
Your Piano implementation must run on your own white-labeled domain.
-
All pages must be served over HTTPS.
-
JavaScript origins must be configured in Identity Management Identity Linking settings.
-
The feature needs to be enabled on your application. If it is not already active, contact Piano Support at support@piano.io.
Implementation
-
Enable domain whitelabeling. Enable full white-label client domains for Management + Billing, Identity Management, and Composer. See full domain whitelabeling for instructions.
-
Configure JavaScript origins. Navigate to Edit Business → User Provider → Identity Linking for your application. In the JavaScript Origins section, add all domains where Piano JavaScript will execute (e.g.,
https://www.example.com), then save and authorize the list. -
Update your SDK initialization. Use
setExternalAuthCookieNameinstead ofsetExternalJWT, passing the name of the cookie your authentication system sets:tp.push(['setExternalAuthCookieName', 'your_cookie_name']); -
Initialize widgets after authentication resolves.
tp.pianoIdLite.init()performs asynchronous server-side validation. Initialize widgets only after it resolves:tp.pianoIdLite.init().then(() => { tp.myaccount.show(); tp.offer.show(); }); -
Set the HttpOnly cookie from your authentication domain. Set a cookie using the same name passed to
setExternalAuthCookieName. The value must be a valid JWT generated by your authentication system:your_cookie_name=eyJhbGciOiJIUzI1NiJ9.eyJp...; HttpOnly; Secure; SameSite=Lax; Domain=.example.com
Cookie requirements
Your authentication system must generate a cookie with the following attributes:
|
Attribute |
Value |
Description |
|---|---|---|
|
|
|
Cookie is inaccessible to JavaScript. |
|
|
|
Cookie is only sent over HTTPS. |
|
|
|
Cookie is sent with top-level navigation. |
|
|
|
Cookie is accessible across subdomains. |
|
|
Valid JWT token |
Generated by your authentication system. |
Once these above steps are completed, verify the following:
-
Piano widgets load correctly
-
tp.pianoIdLite.isUserValid()returns true for authenticated users -
No CORS errors appear in the browser console
-
Authentication persists across page navigation
Common Issues & Troubleshooting
Common CORS errors:
-
"Origin not allowed" errors after tp.pianoIdLite.init() indicate the domain is not listed in JavaScript Origins
-
Verify all domains where Piano JavaScript executes are added to Edit Business → User Provider → Identity Linking → JavaScript Origins
-
Include protocol (https://) and exact domain/subdomain
Cookie domain mismatch:
-
If authentication works on one subdomain but not others, verify the cookie Domain attribute matches your configuration
-
Ensure the cookie domain in your authentication system matches the domain used in whitelabeling setup
-
Check browser DevTools → Application → Cookies to verify cookie attributes
Widget initialization issues:
-
Ensure
tp.pianoIdLite.init()completes before calling widget methods -
Always use
.then()to wait for initialization:tp.pianoIdLite.init().then(() => { /* widgets here */ })
User data webhooks
To track user data additions, updates, or deletions, Identity Management uses webhooks. With the exception of password updates and linked social accounts, user data updated in Identity Management is ultimately transferred back to your user management system via webhook. Webhook data should be handled at the endpoint URL. From here, it should be sent to the third-party user management system, so it can reflect the latest user data.
User Event Webhooks for ID Token Ingestion
The following user event webhooks can be used with ID token ingestion:
-
User created
-
User data updated
-
User disabled
-
User email confirmed (for double opt-in)
-
User updates custom field
More information about user data webhooks, and Piano's full webhooks library, can be found on our dedicated webhooks page.
User data webhooks can be used with Identity Management token ingestion if needed. Webhooks can be enabled within your Piano dashboard, under the Manage > Webhooks tab, and sent to a configurable endpoint. See our webhooks documentation for more information.
UID creation strategy
In order to enable the functionality of certain ID features, Piano’s Identity Linking solution needs to be able to create users without direct registration in the external system. It is essential that unique identifiers (UIDs) for the users created with these features are the same between the Piano’s system and the external user database. To enable this synchronization, Piano has developed several UID creation strategies. To use Identity Linking with features that rely on creating users outside of the external system, the External UID connector strategy should be selected.
Important: Every user must be associated with a single email address and a single UID with a maximum length of 80 characters. If you have unlinked accounts where users have multiple IDs, please work with your external authentication provider to provide a single UID in the JWT to ensure that access is available for those users under all conditions.
These features require user creation:
-
Subscribe With Google integration.
-
Creating users from the publisher dashboard.
-
Granting access in bulk via uploading the list of email addresses.
The external UID creation strategy, specifically designed for user creation, is not intended for bulk operations like imports. Consequently, relying on this approach for creating users in 3rd-party systems may lead to inconsistencies in UID matching between Piano and the external system.
External UID connector strategy
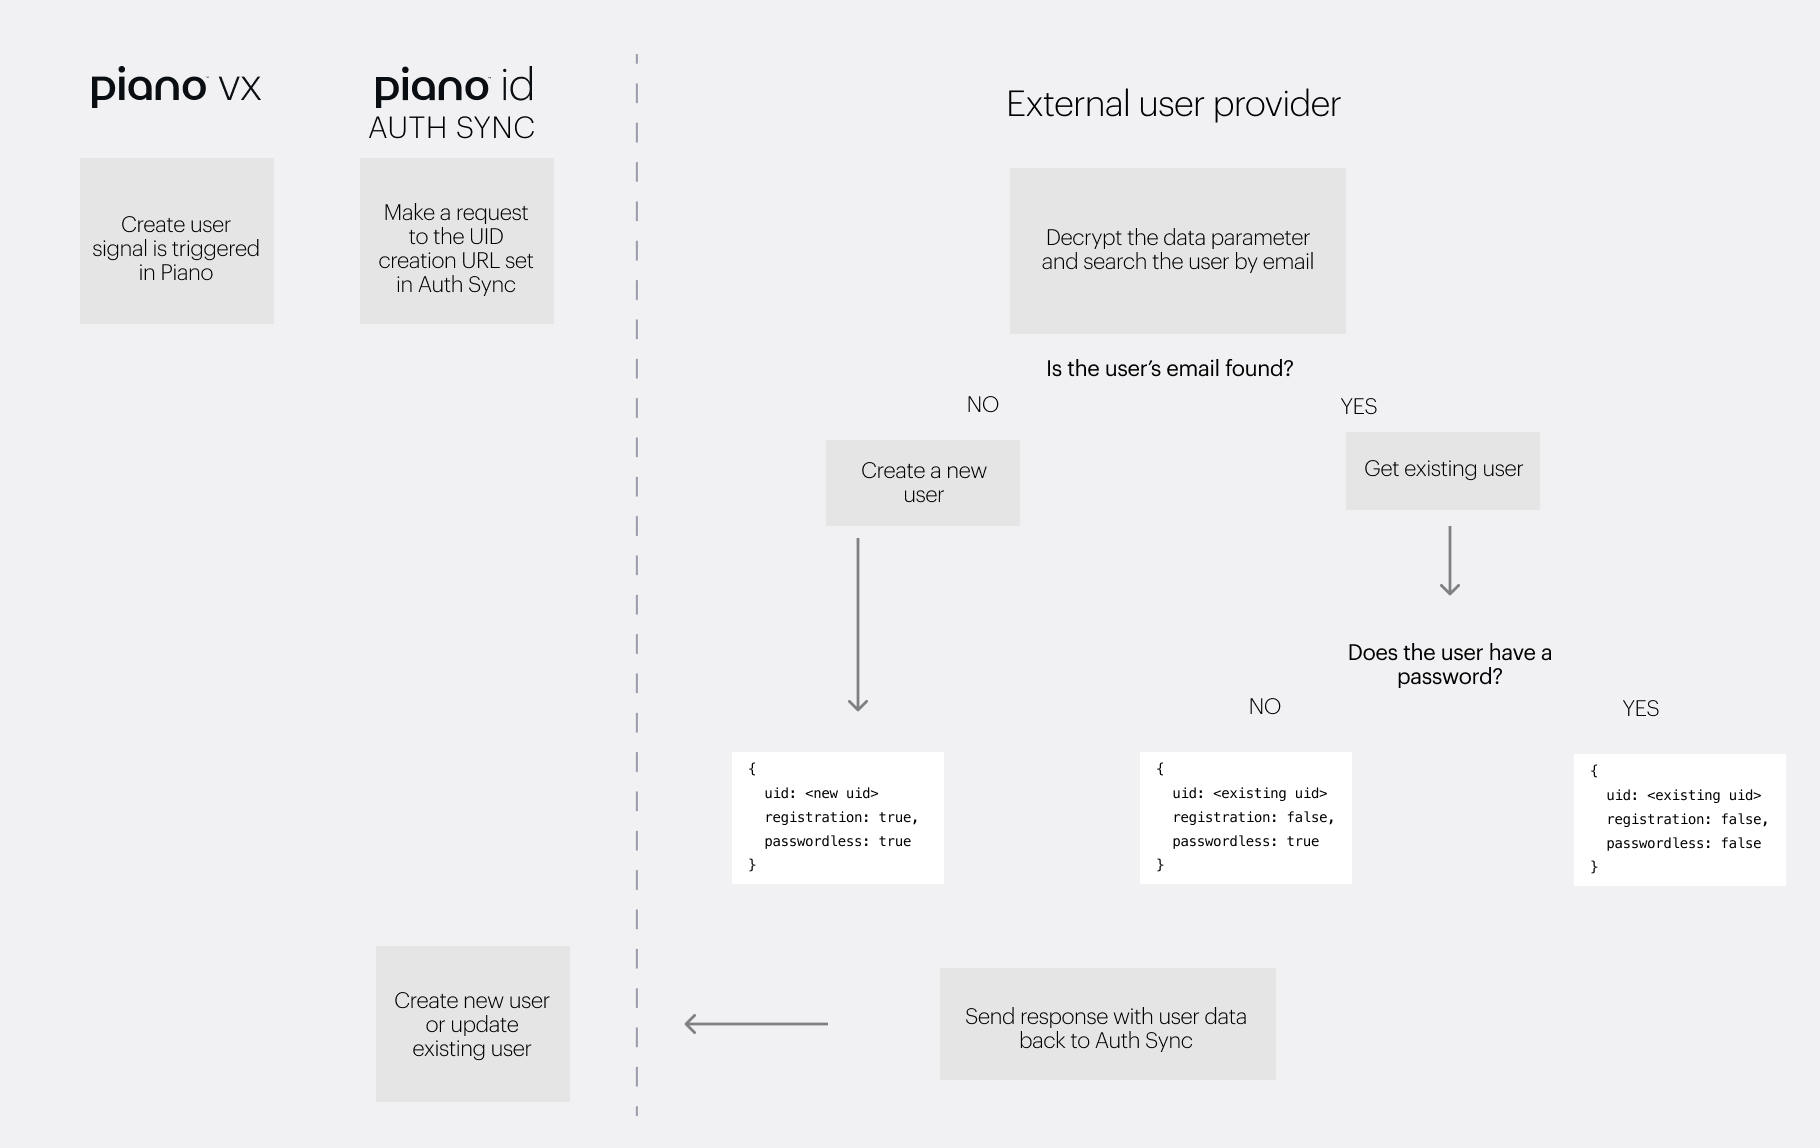
This strategy relies on making a network request from Piano to the URL configured in the dashboard, prior to creating the user in Piano, in order to either generate the UID or retrieve the UID of an existing user from the external user provider. This diagram demonstrates the request and response cycle between Piano and the external user system:
The URL for this request is configured in the Identity Linking settings, when "External UID connector API" is selected as the Identity UID creation strategy.
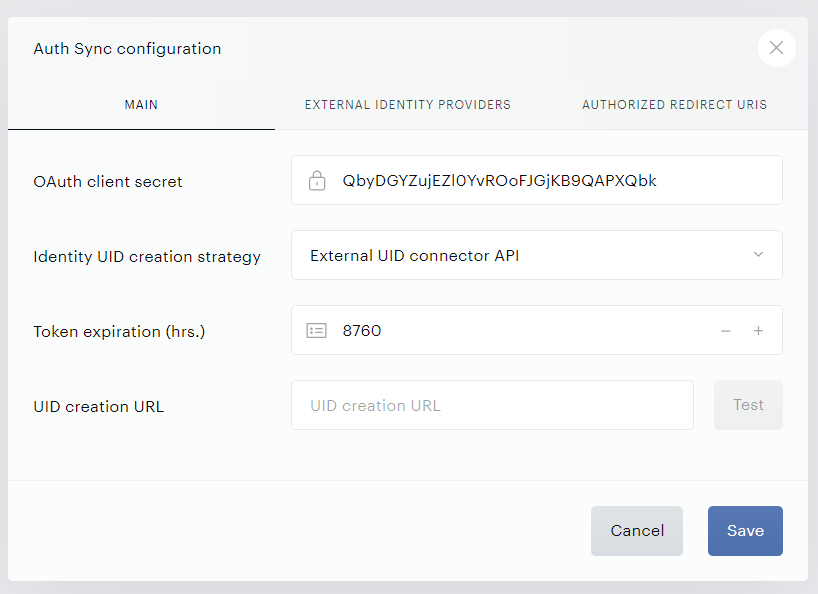
The endpoint for creating UIDs in the external system should be entered into the UID creation URL field.
This URL must be an endpoint that can handle a GET request from Piano and decrypt its payload, or route it to a different endpoint that can decrypt it.
The response to Piano should be as quick as possible, with no additional activities other than creating a UID on the endpoint. The Piano platform will wait and, if there is no response, time out after 20 seconds (10 seconds in Sandbox) to keep the normal functioning of registration. A rate limit of a maximum of 5 calls per second is applied.
External UID connector request
When Piano receives a signal to create a user from Management + Billing, Identity Linking will make a GET request to the external user provider. This signal will be triggered by Subscribe with Google’s purchase and deferred account flows, and creating or granting access to users via the Piano dashboard or API.
When Piano creates a user, Identity Linking will make the network GET request to the preconfigured URL with the “data” parameter, e.g:
http://example.com/endpoint/?data=LoGOLGoI0dPIm1KgbeOHsHva4kyLqLEAFsJrntwLK3Nk8-VK7NP5CmD41BqTG3yiobUFQMtJTi2rE5WxRtyAFZaXbru_AVgYagrGfJ3Ha5oGxCsxGU_AYOnjb1Z1mCOy~~~1-AwgxmDd8Z0wPreTbfyH4LYjQoBIRthJgVjqpIALWM
The “data” parameter in this request is an encrypted payload of JSON data containing the information about the user that needs to be created. This decrypted data contains these fields:
|
Field |
Description |
|---|---|
|
|
One of the following: |
|
|
The email address of the user. This value needs to be used when creating a user, but also to find an already existing user in the external system. |
|
|
When available, the first name of the user. |
|
|
When available, the last name of the user. |
|
|
Populated in case when a user needs to be created with a pre-linked social account, e.g. during the Subscribe with Google “buy” flow. In the case when it’s populated - it will contain the following fields:
|
Example of a request payload:
{
  "reason": "SWG",
  "email": "john.doe@example.com",
  "first_name": "John",
  "last_name": "Doe",
  "social_linking":  {
    "type": "GOOGLE",
    "id": 31415926535
    }
}
External UID connector response
When the data is received, it should be processed in the following way:
-
The encrypted value must be retrieved from the "data" url parameter.
-
The encrypted data must be decrypted using the SecurityUtils class provided with Piano SDK. This process utilizes a private key and follows the same steps outlined for webhook decryption, detailed here
-
Using the email found in decrypted data, execute a search in the external user management system.
-
If the user is not found, the user must be created in the external system. The response should contain the UID of the user that was just created. It should also indicate if the user was registered without a password, such as:
{ "uid":"6b84c36c-32e8-11eb-adc1-0242ac120002", "registration": true, "passwordless": true } -
If the user was found, and already has the password, then the response should contain the UID of that already existing user, as well as an indication that the user was not just registered and that the user is not “passwordless”, such as:
{ "uid":"6b84c36c-32e8-11eb-adc1-0242ac120002", "registration": false, "passwordless": false } -
If the user was found and has no password - then the response should contain the UID of that already existing user, as well as indicate that the user was not just registered, and that the user has no password, such as:
{
"uid":"6b84c36c-32e8-11eb-adc1-0242ac120002",
"registration": false,
"passwordless": true
}
-
-
The response should be formatted as JSON text.
-
The response HTTP status should be 200, otherwise, the request will be considered failed.
-
The response to Piano should be as quick as possible with no additional activities other than the creation of the UID taking place on the endpoint. The Piano platform is waiting for a response and will timeout after 20 seconds if a response is not received in order not to prevent the normal functioning of registration. A rate limit of a maximum of 5 calls per second applies
UUID strategy
Using this strategy, new UIDs will be generated in the UUID format version 4. This strategy is useful when the external system also uses the UUID format, and it allows setting the UID explicitly via the API. Using this approach requires the implementation of user data webhooks.
The process of creating the user with this strategy is as follows:
-
Identity Linking generates a user through Identity Management.
-
Identity Management generates the
user_createdwebhook. -
Webhook is received by the external system.
-
The external system decrypts the webhook data.
-
The external system creates the user with the UID and email provided in the webhook data.
UID strategy
This strategy is almost the same as the UUID strategy, with the exception that it uses the legacy 15-character UUID format, always prefixed with “PNI”.
JTI Lookup
By enabling the optional JTI lookup, all JTI claims for each user will be stored. If the current JTI claim is not present in the saved set, Piano will trigger a profile update in case the values in the JWT are different from what’s currently stored for this user. If the JTI claim is present, the token is treated as “already processed”, and as such, the profile update is not triggered. Otherwise, Identity Linking updates the user profile on each pageview regardless if user data was actually altered in the intervening time.
This feature is optional but recommended for the most stable Identity Linking performance. JTI checks are faster than standard token validation, and decreasing the amount of user record updates lowers the chance of old tokens overriding the most recent changes made in the user’s profile.
JTI Enablement
JTI lookup is an optional feature that can be enabled by a Piano admin with the Enable JTI exclusivity toggle. Once enabled, the third-party user provider is responsible for adding unique JTI claims on the JWT token passed to Identity Linking. If the JTI is not provided, its value will be calculated as an md5 hash of the token value, but the recommendation is to issue a JTI on the user provider’s side. The JTI should be unique per token, i.e. every time a user logs in or anything else has triggered the token generation, it should be supplied with a new JTI.
JTI Behavior
One user may have many stored JTIs. If the user has concurrent sessions in different browsers/devices, the same user will have JTIs that are alternately used.
On each page load, the user’s JWT claim will be checked against the saved claims. If the JWT has a match on the ID side, the user data will not be updated.
Frequently Asked Questions
My Piano Identity Management shared secret no longer works — how do I fix it?
Piano ID now issues shared secrets in base64url format. If your integration expects the older base64 format, JWT signing or verification may fail until you update your code.
What clients with the old format need to do
Update your integration to handle base64url-encoded secrets. You have two options:
Option 1 — Convert base64url to base64 in your code. Replace each - with + and each _ with /, then add = padding so the string length is a multiple of four. Decode the result as standard base64.
Option 2 — Update your JWT library to accept base64url natively. Most modern JWT libraries decode base64url directly, so you don’t need to convert the secret manually.
Both approaches produce the same signing key — use the one that fits your setup.