
This page is to help customers set up integration between Audience and Facebook in order to achieve their business goals.
Overview
The Piano Audience - Facebook integration will enable:
-
linking Facebook user IDs with Piano user IDs, to be used for creating audiences, ad campaigns, and targeting, etc.
-
saving Facebook likes in Piano Audience and creating segments based on the collected data
To work with Piano segments on Facebook, you, as a customer, should do the following:
1. Install Facebook Pixel and use the ID-linking code on your websites to be able to populate custom audiences with users. Read Pixel setup instructions by Facebook. Find out more about user ID linking.
This step is very important because the Piano Audience - Facebook connection in the Connectivity Hub is a client-side connection, which means that Piano Audience doesn’t send segment memberships; only a segment name and segment IDs are used for creating a custom audience on Facebook.
2. Create custom audiences in the Facebook Business Manager account. It can be done manually or automatically by using the Audience - Facebook client-side connection in the Connectivity Hub. Find out more details below.
3. Create and run campaigns with the custom audiences.
To enable saving Facebook likes in Audience, use the code examples from the “Likes” paragraph of this article.
Creating custom audiences manually
Prerequisites
1. Create a Facebook pixel. Make sure it is active.
The Facebook pixel is a piece of code that you should place on your website. It collects data that helps you track conversions from Facebook ads, optimize ads, build targeted audiences for future ads, and remarket to people who have already taken some kind of action on your website.
2. Add the Facebook pixel to the customer website.
Once your pixel is installed, you can go to the next step - setting up custom audiences.
"123456789" in the code below should be replaced with the customer Pixel ID.
<!-- Facebook Pixel Code -->
   <script>
       !function (f, b, e, v, n, t, s) {
           if (f.fbq) return; n = f.fbq = function () {
               n.callMethod ?
               n.callMethod.apply(n, arguments) : n.queue.push(arguments)
           };
           if (!f._fbq) f._fbq = n; n.push = n; n.loaded = !0; n.version = '2.0';
           n.queue = []; t = b.createElement(e); t.async = !0;
           t.src = v; s = b.getElementsByTagName(e)[0];
           s.parentNode.insertBefore(t, s)
       }(window, document, 'script',
           'https://connect.facebook.net/en_US/fbevents.js');
       fbq('init', '123456789');
//<span style="font-weight: 400;"> "123456789" should be replaced with the customer Pixel ID.</span>
       fbq('track', 'PageView');
   </script>
   <noscript><img height="1" width="1" style="display:none"
           src="https://www.facebook.com/tr?id=123456789&ev=PageView&noscript=1" /></noscript>
   <!-- End Facebook Pixel Code -->
Setting up a custom audience and configuring Facebook
To create and manage a custom audience, you have to use the Audiences tool. Being in the Meta Business Suite, in the top-left menu select All tools and select the Audiences menu item:
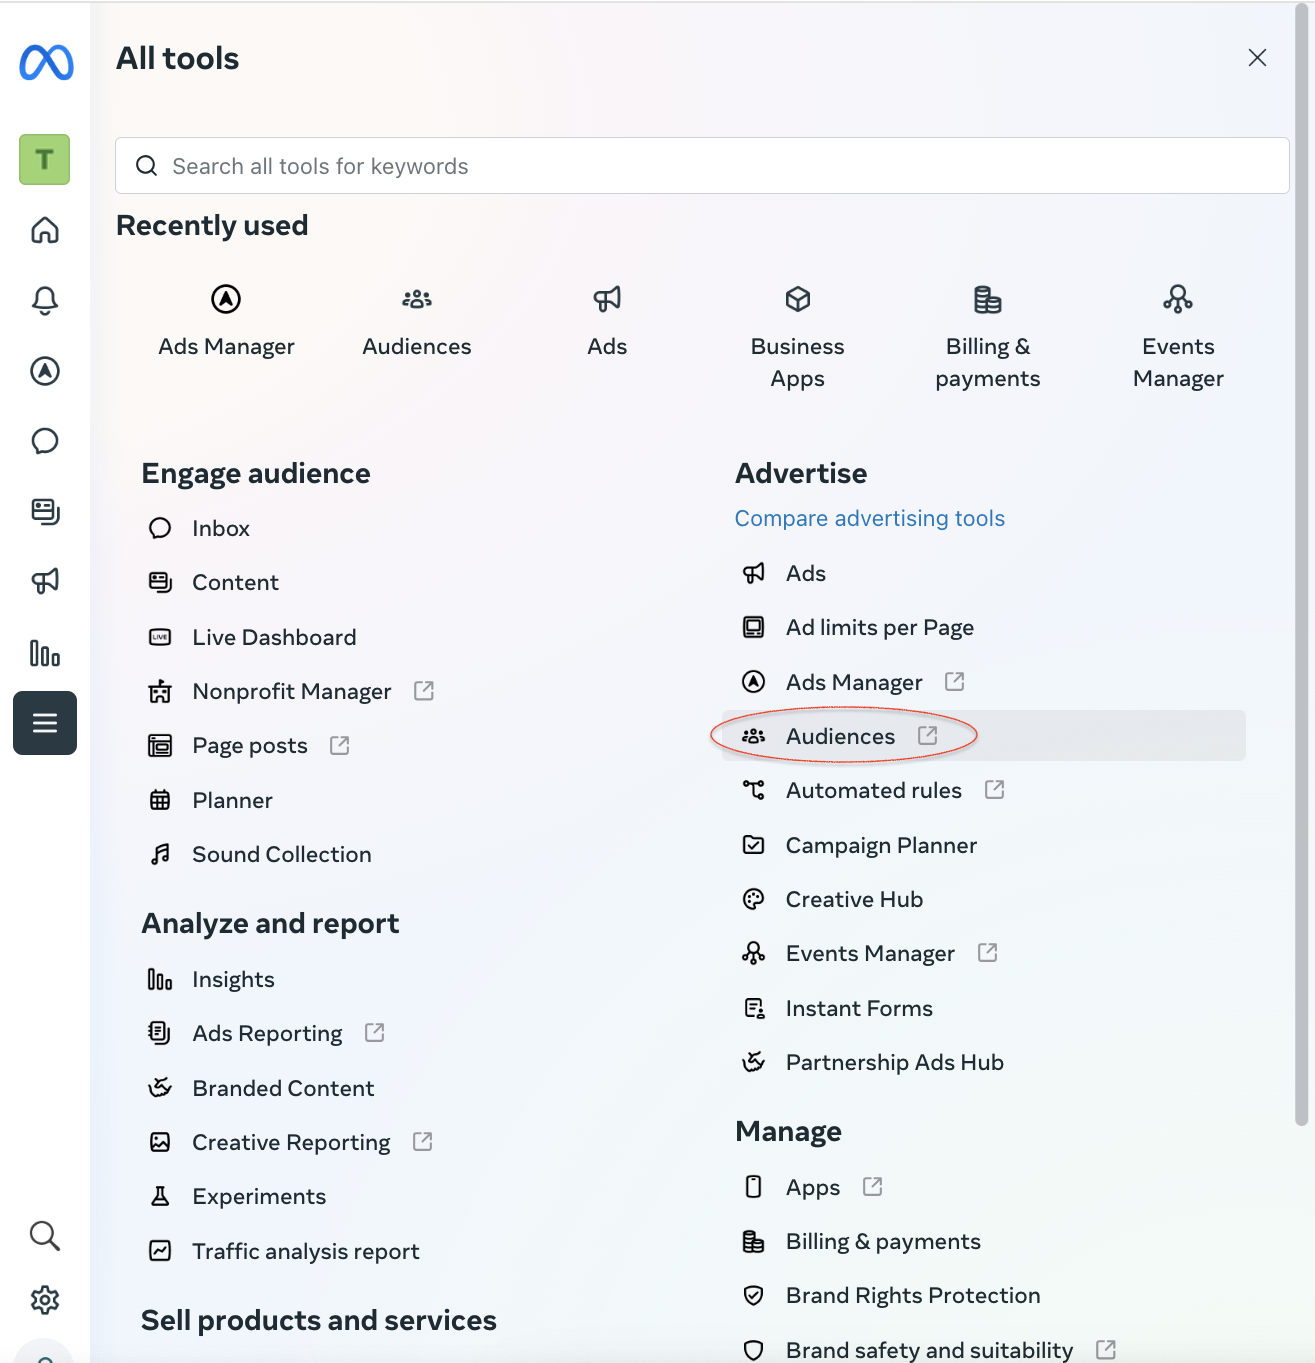
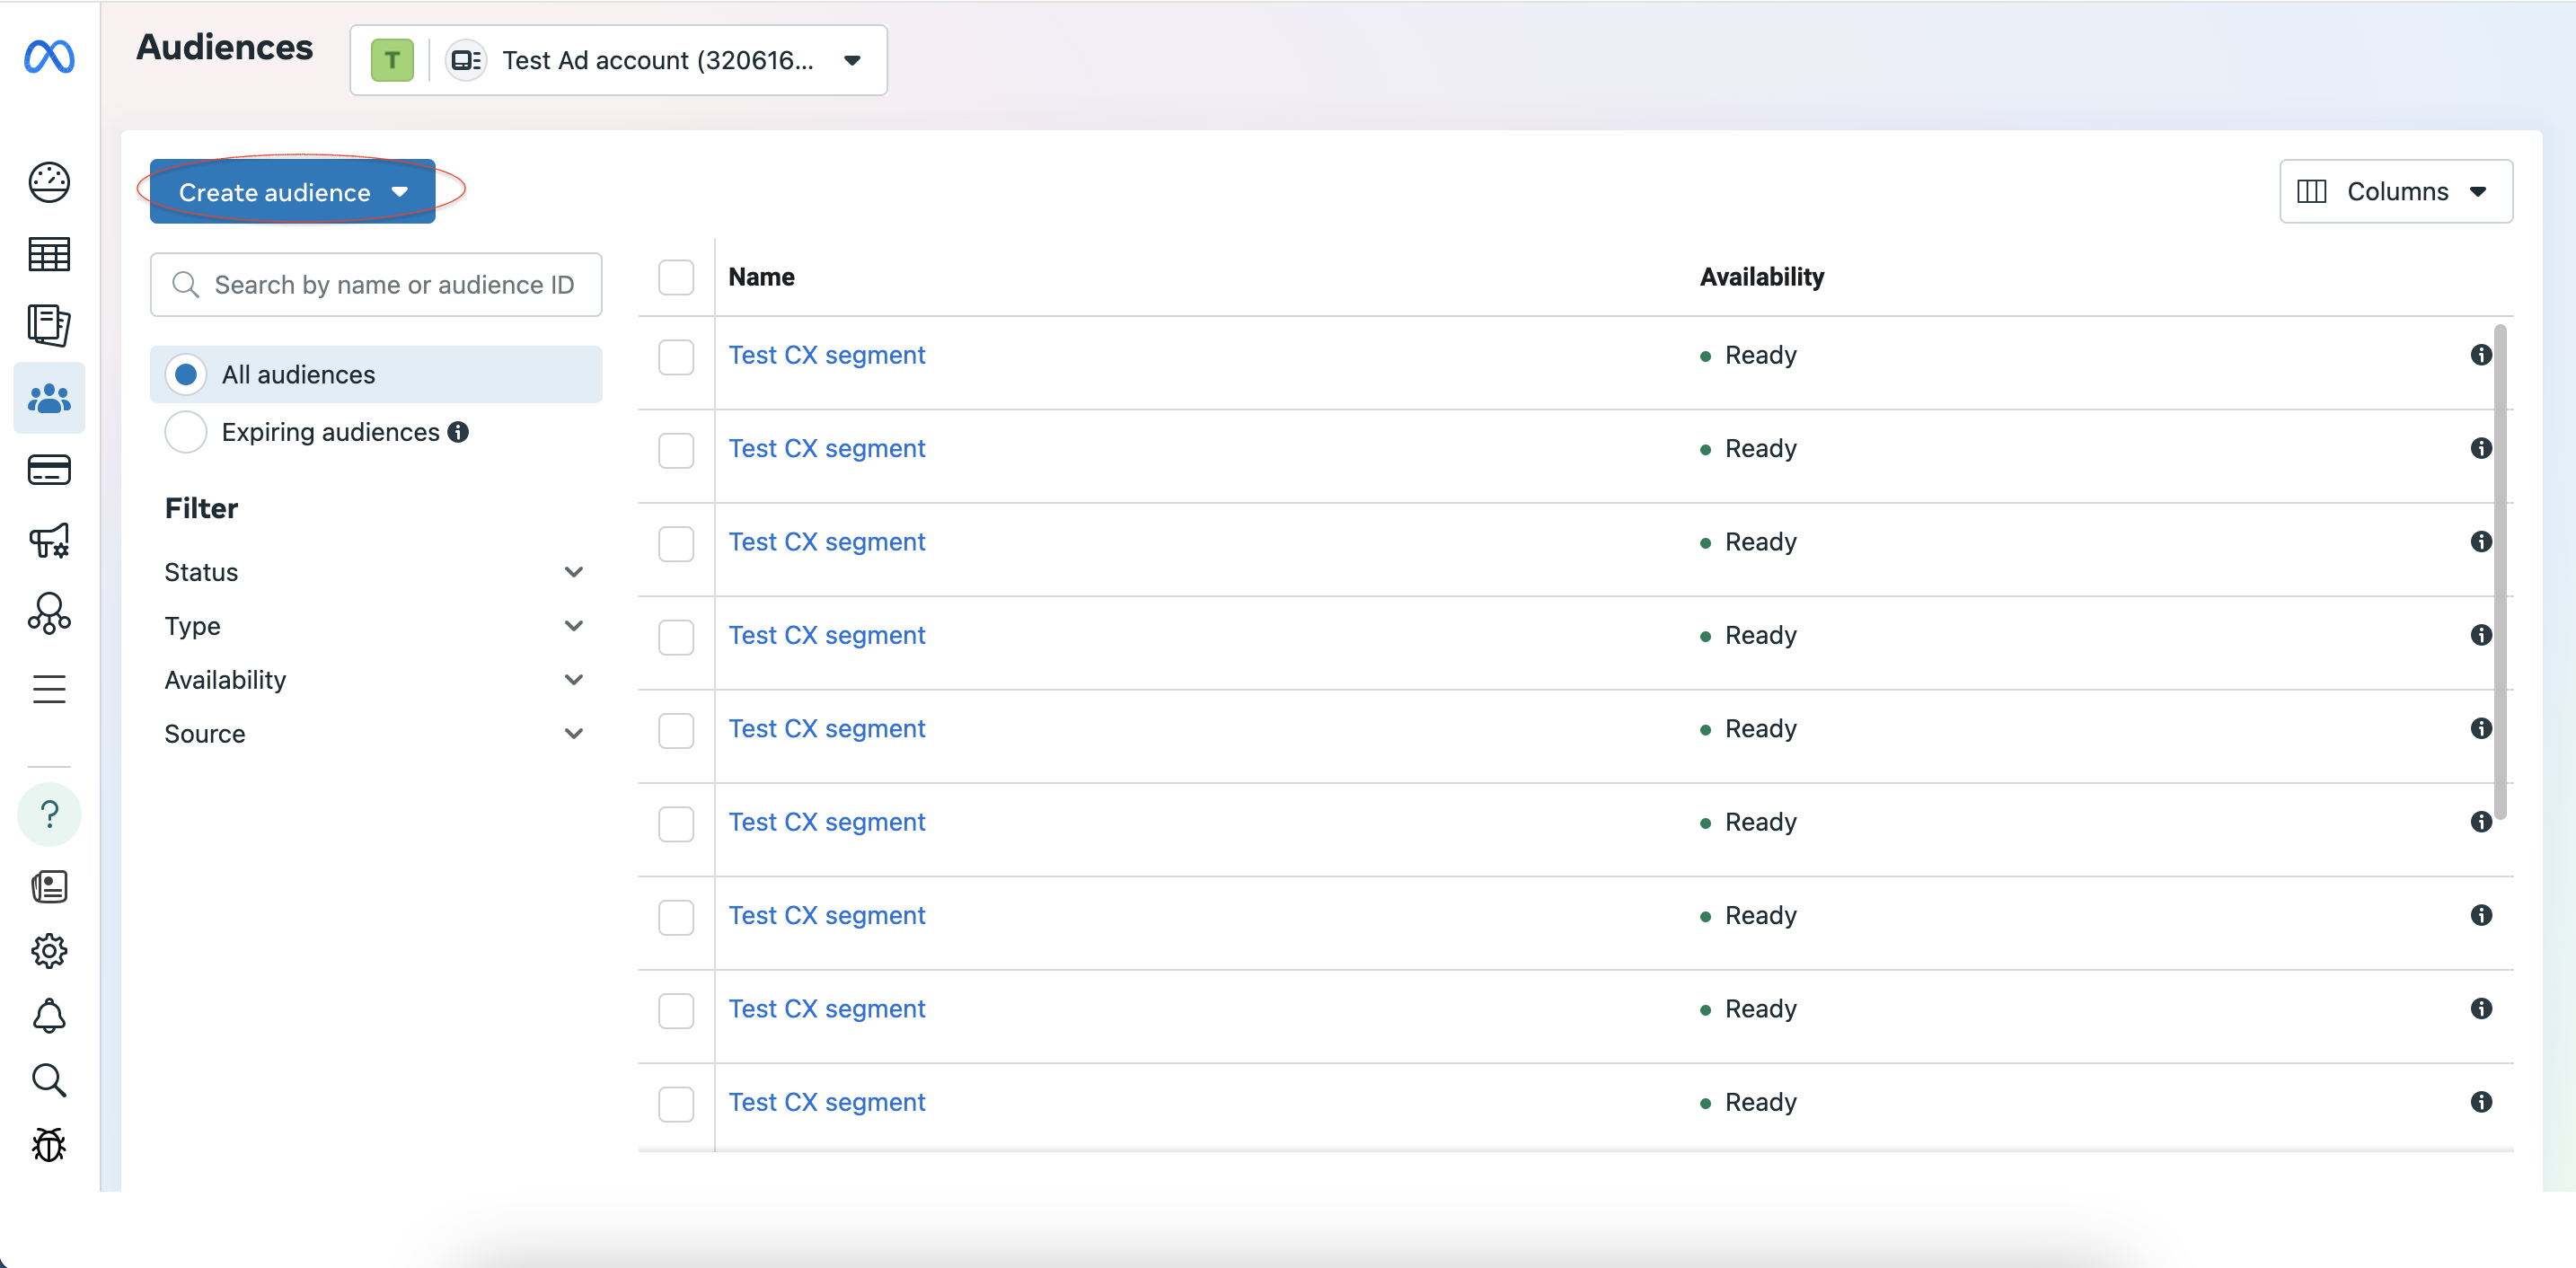
On the Audiences page, you can see all saved Facebook audiences, as well as create new ones.
Click the Create Audience dropdown and select Custom Audience to start creating an audience.
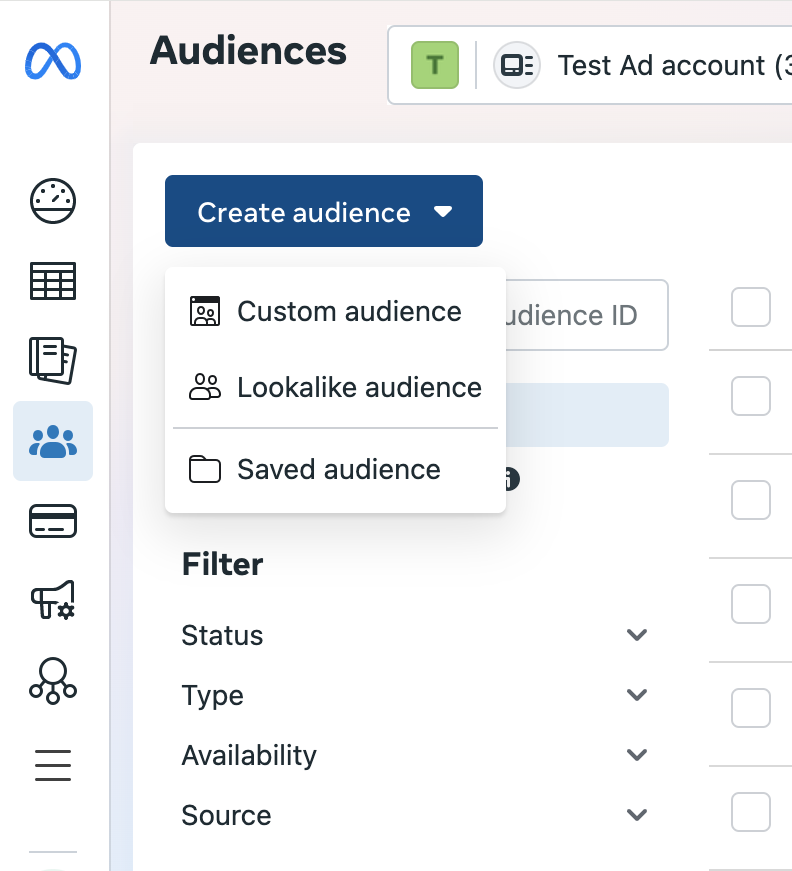
Facebook has three primary audience types, and each of them gives plenty of additional options for creating a target audience for Facebook campaigns.
-
Saved audience
-
Custom audience
-
Lookalike audience
To enable work with Piano Audience segments, choose the Custom audience option.
Facebook Custom audiences are probably your most high-value target audiences, as they allow you to retarget past website visitors and people who have engaged with your content or app.
Website traffic-based Facebook audiences allow you to create remarketing campaigns for people who have engaged with your website. These are high-value audiences as the users watching your ads have already shown some interest in it.
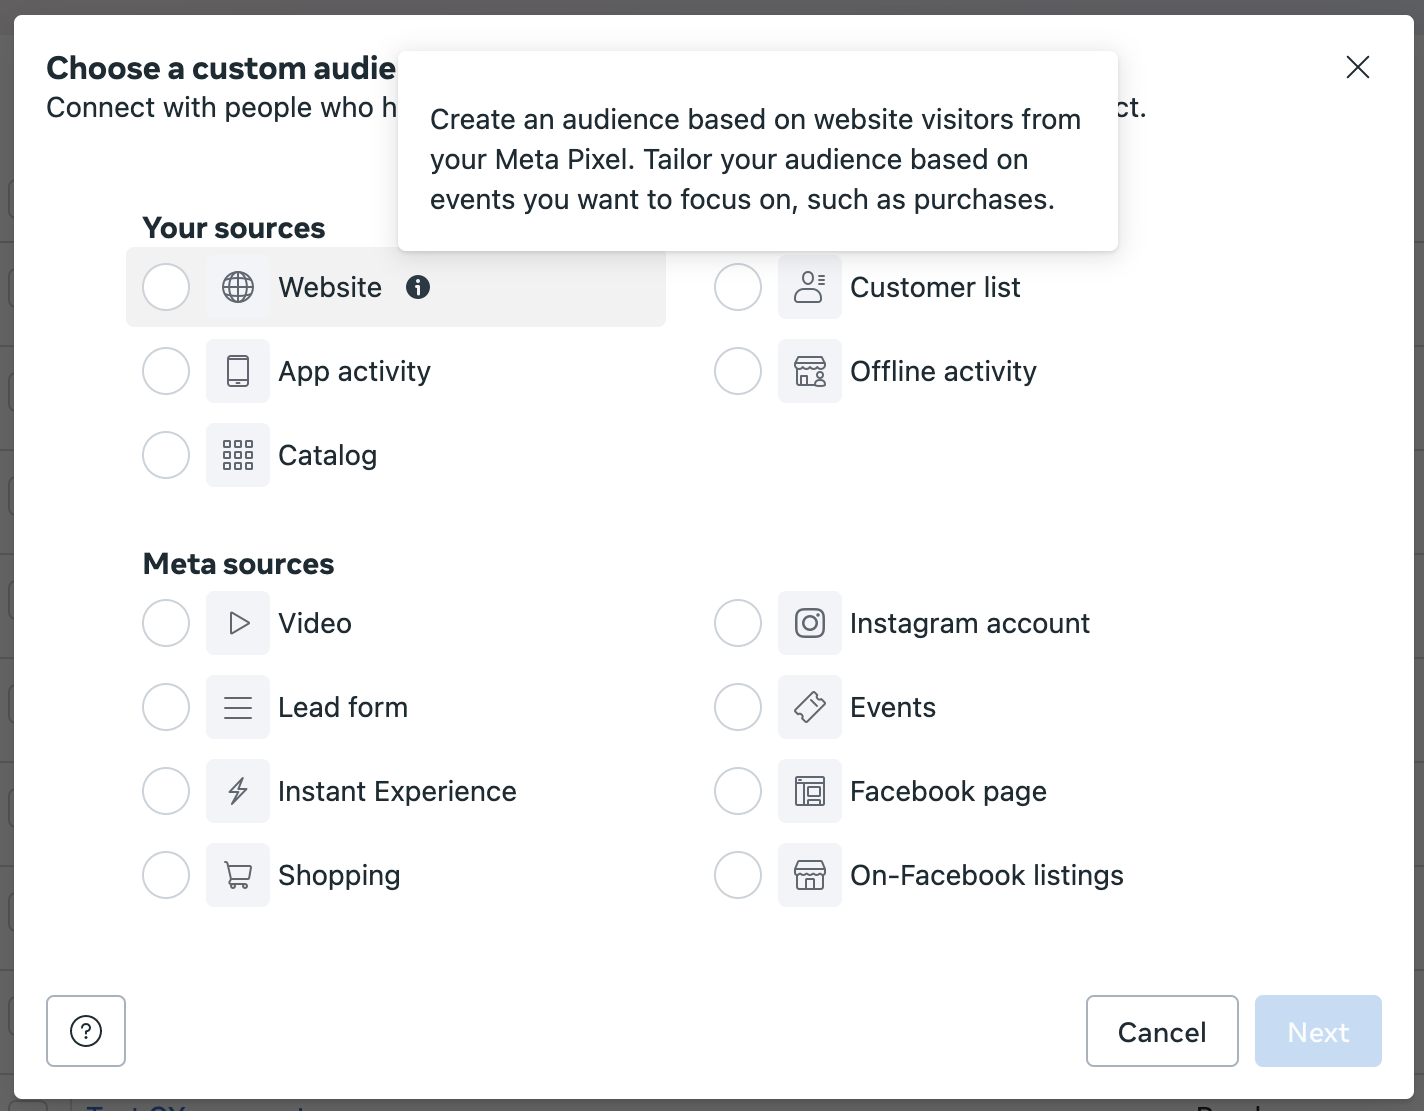
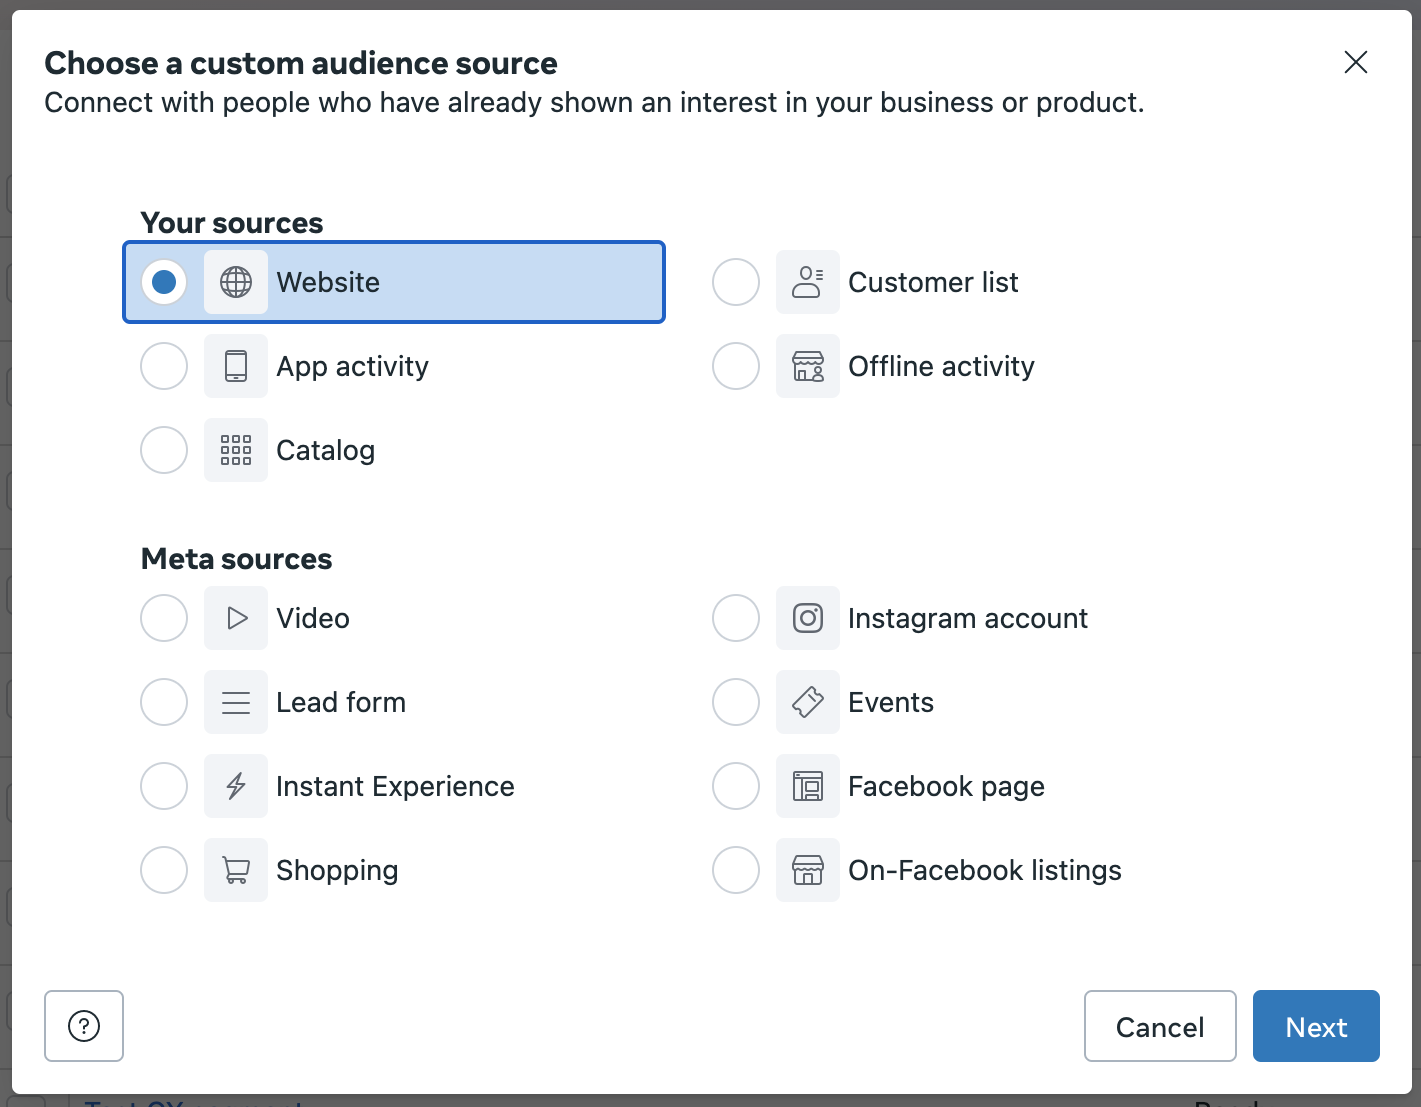
Choose the Website option and click Next.
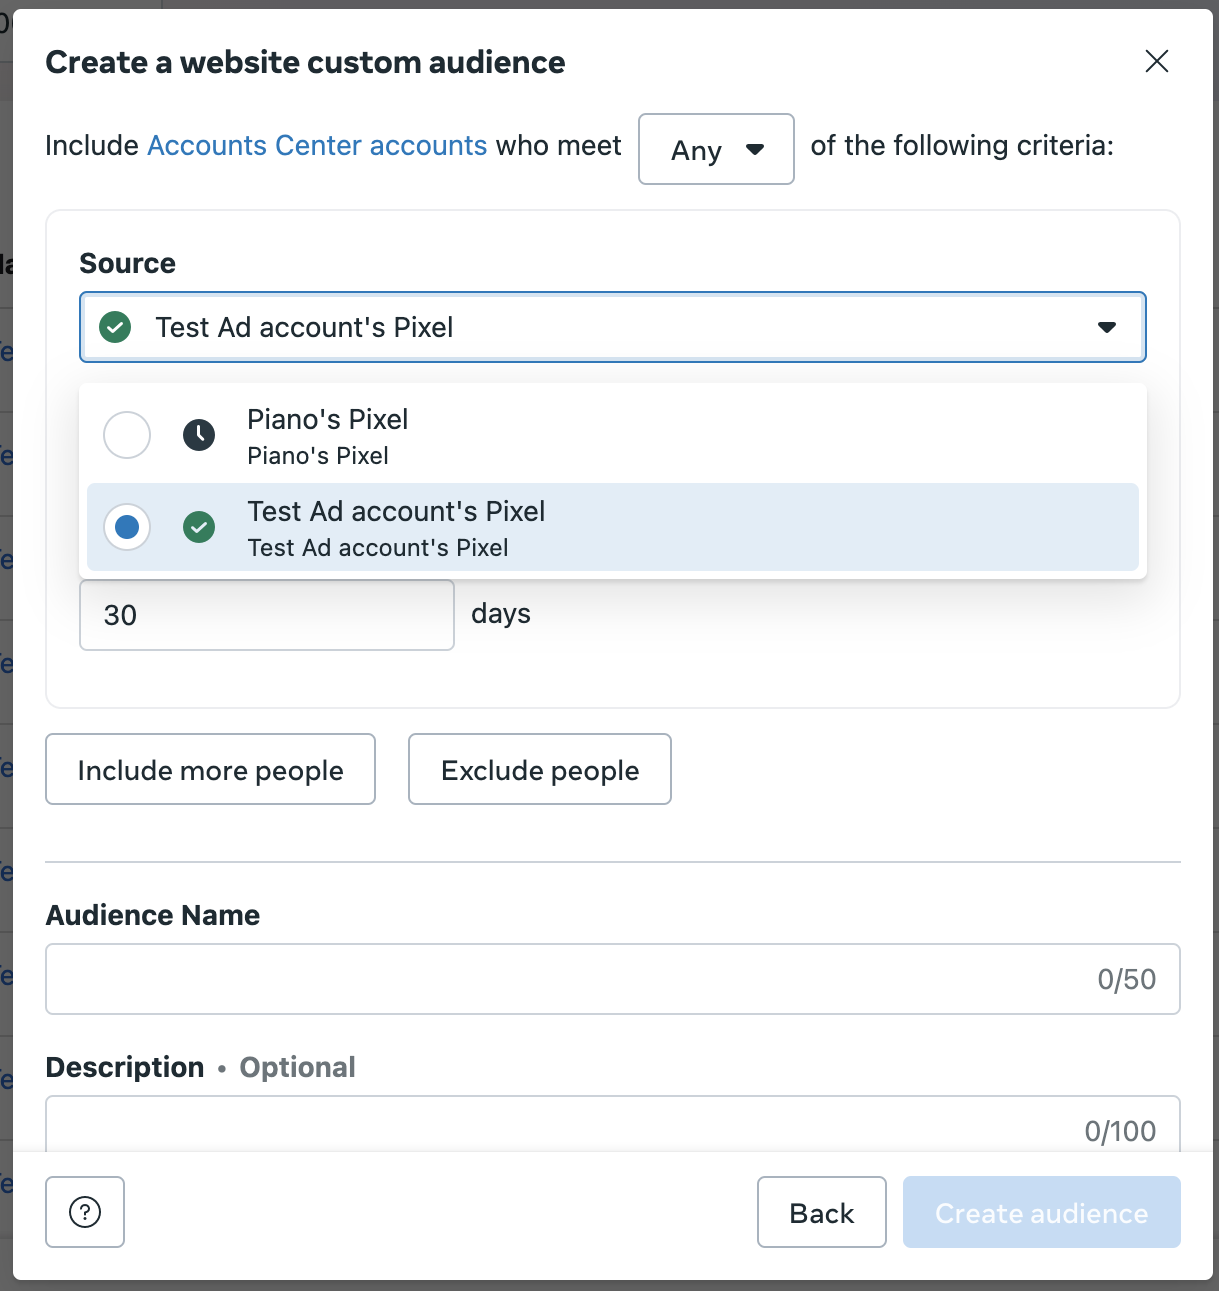
Select your pixel as a Source. It has to be active! (a green icon indicates an active pixel).
At this step, you choose which website visitors Facebook will include in your Custom Audience from.
Click the Events drop-down menu.
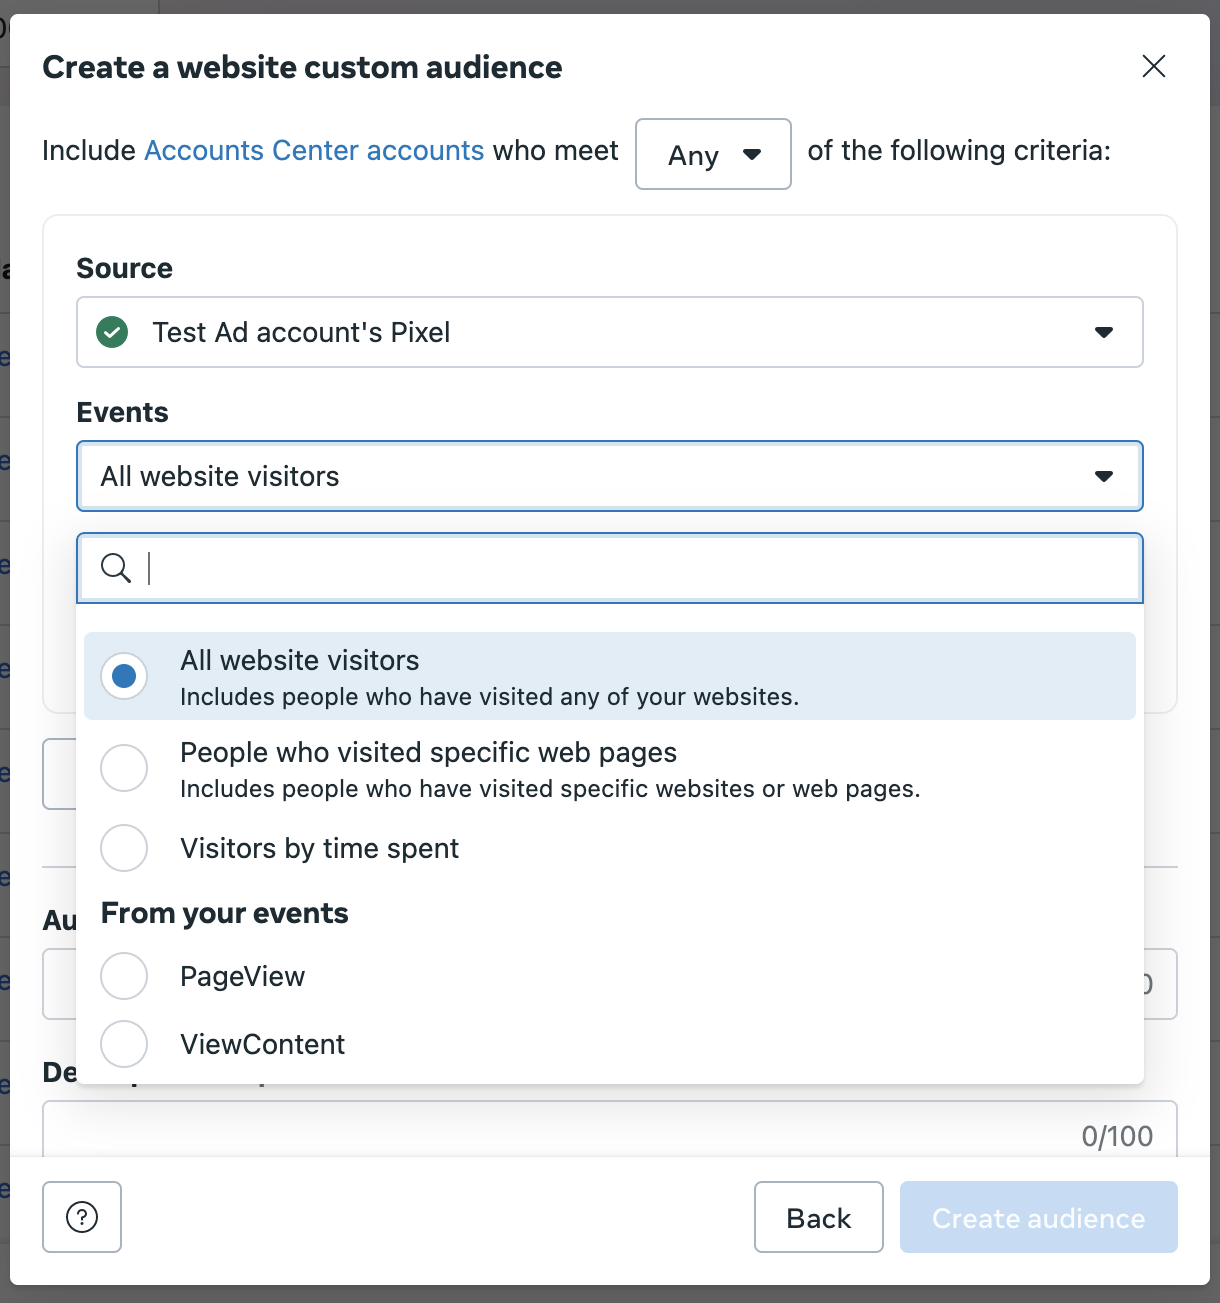
The options include:
-
All website visitors: Anyone who has visited your website(s).
-
People who visited specific web pages: This allows filtering based on URLs, either including or excluding certain keywords or entire URLs.
-
Visitors by time spent: Select the top 5%, 10%, or 25% of website visitors based on the time they spend on your site.
-
From your events: Pick a pixel event to build an audience from. For instance, use the purchase event to build a list of recent customers. This option may not be available if you have not set up any pixel events yet.
Choose the option From your events. The item you need to select must match the value of the Targeting key name parameter in your Facebook connection in Audience→ Connectivity. The default value is CxSegments.
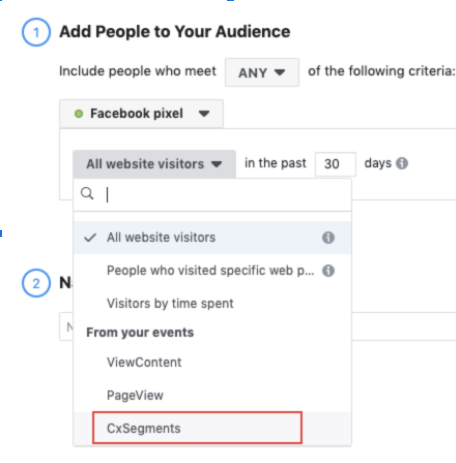
Managing From your events:
-
Select the CxSegments option.
-
Set up URL/Parameter → Contains → Segment ID. Use Piano Audience segment IDs as values.

Give the custom audience a name (use segment names) and click the Create Audience button.
That’s it. You can start using custom audiences properly.
Creating custom audiences automatically
The connection between Piano Audience and Facebook allows customers to push segment names and segment IDs from Audience via the Facebook API and create custom audiences on Facebook automatically (by schedule). It makes sense if you have a lot of segments and don’t want to manage them manually.
Prerequisites
1. Create a Facebook pixel. Make sure it is active.
2. Add the Facebook pixel and the user ID linking code to your website.
3. Create a long-lived token on developers.facebook.com.
An access token is an opaque string that identifies a user, app, or page and can be used by the app to make Graph API calls. When someone connects with an app using Facebook Login and approves a request for permissions, the app obtains an access token that provides temporary secure access to Facebook APIs.
On Facebook, user access tokens come in two forms: short-lived tokens and long-lived tokens. Short-lived tokens usually have a lifetime of about an hour or two, while long-lived tokens usually last for about 60 days. You should not depend on these lifetimes remaining the same; the lifetime may change without a warning or expire early.
The default user token and the page access tokens are short-lived, expiring in hours; however, you can exchange a short-lived token for a long-lived token.
This token is refreshed once per day, when a person using your app makes a request to Facebook's servers. If no request is made, the token will expire after about 60 days, and the person will have to go through the login flow again to get a new token.
See a short overview of long-lived token generation below.
Once the Facebook pixel is installed and a long-lived token is generated, you can go to the next step - creating an Audience - Facebook connection via the Connectivity Hub.
Sending segments to Facebook and configuring Piano Audience
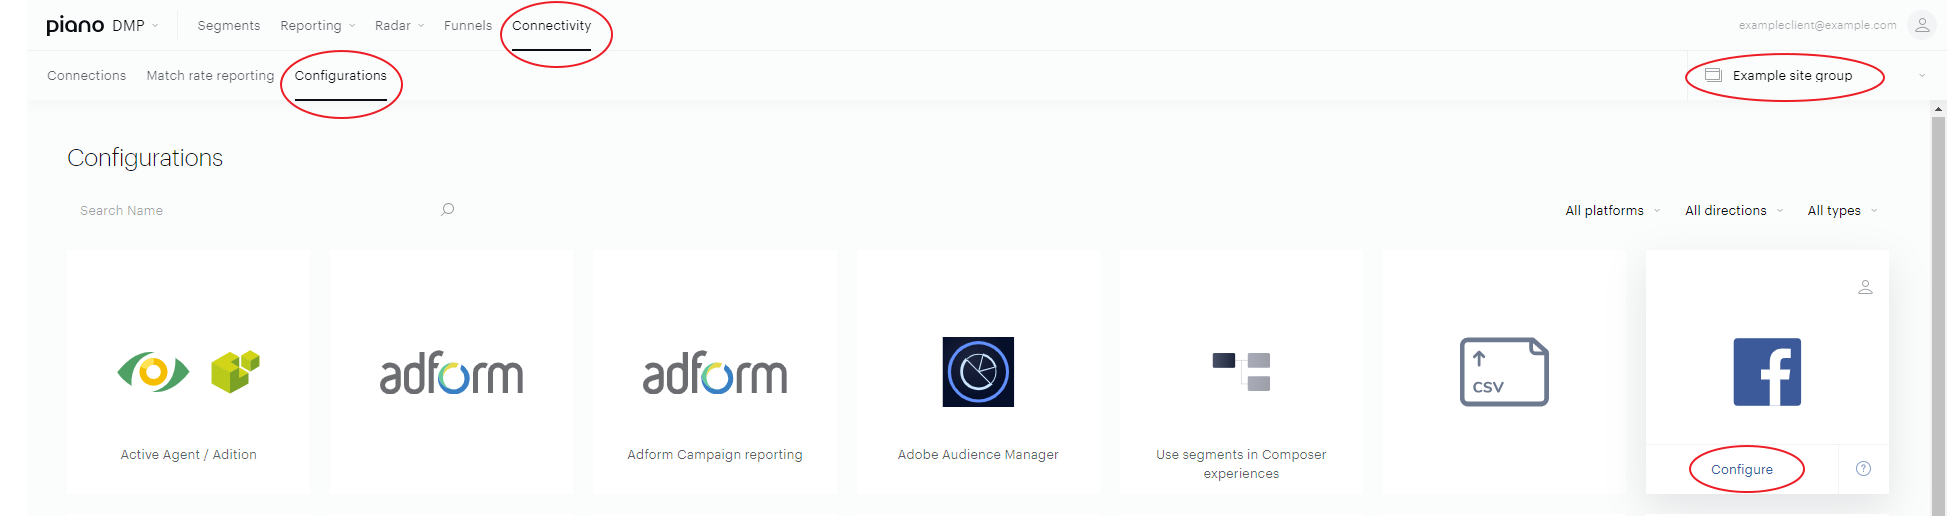
From the Piano Audience home page, go to the Connectivity tab → the Configurations tab →the Facebook icon and click the Configure button. Make sure that the correct site group is selected.
Configure the connection
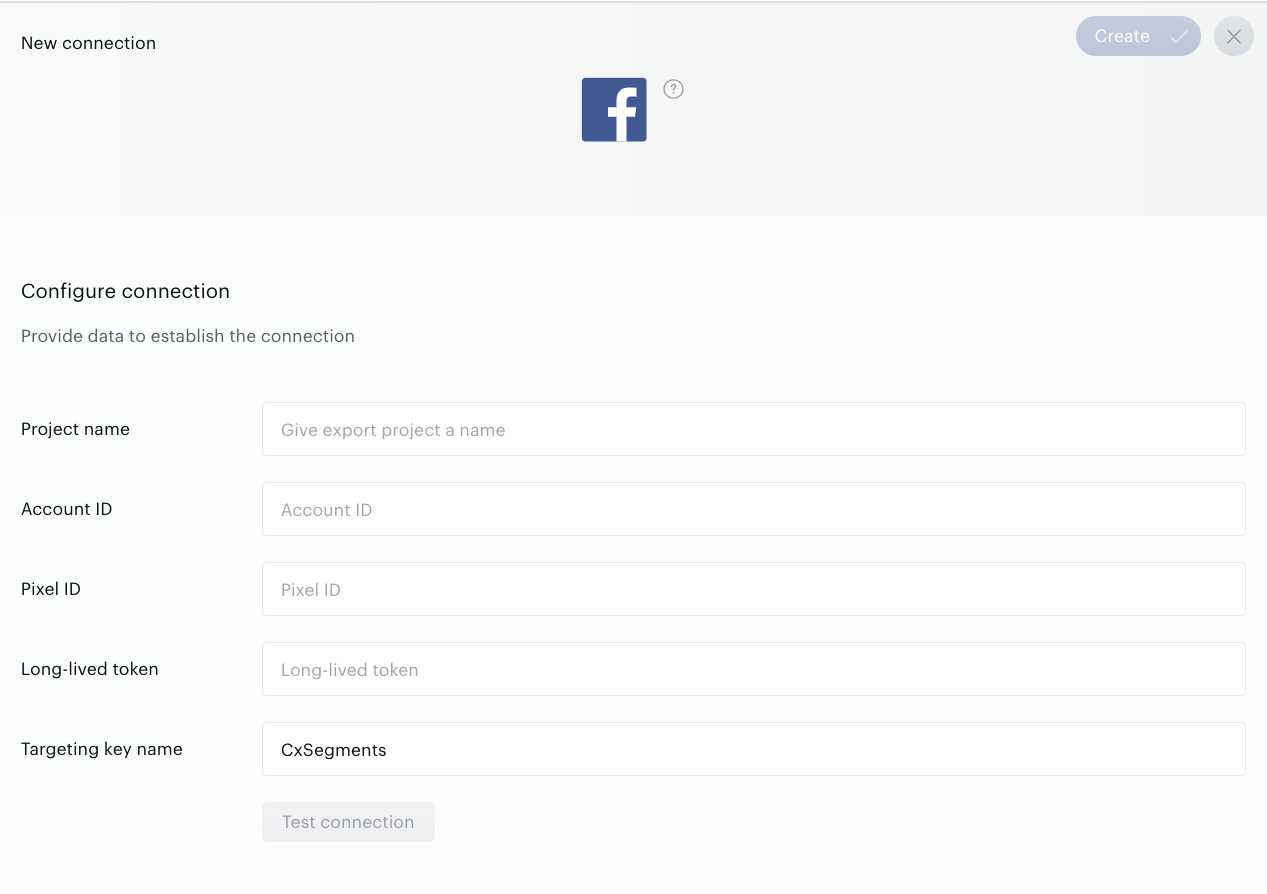
In the New connection menu, you need to set:
-
Project name: to be shown in Piano Audience only, intended to simplify managing numerous integrations.
-
Account ID: read more.
-
Pixel ID: read more.
-
Long-lived token: read more.
-
Targeting key name: a parameter responsible for the event source; used in the process of adding people to the audiences on Facebook. This parameter supports only letters and numbers. The default value is
CxSegments.
Set the parameters and click Test connection.
A successful test connection activates new configuration sections and the Create button at the top right of the window. Click it before you go on. The button will turn to Save, which you can use to save any further changes in your connection. In case of any problems, you will see a message. If you don't know how to fix your problem, please contact our support or professional services team.
Configure segments
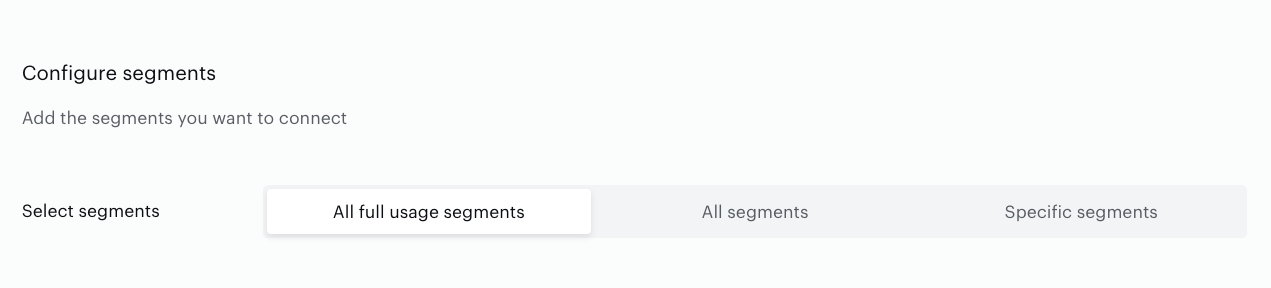
A successful test connection enables the Configure segments form where:
-
All full usage segments means that all active full usage segments will be sent to Facebook; any newly created "Full usage" segment will be added automatically.
-
All segments includes both types of usage segments: "Full usage" and "Reporting only" segments.
-
Specific segments allow you to send some part of active segments and to check if a needed segment is active (Full usage) now. If a needed segment is inactive (Reporting only), you can activate it on the Segments tab. To select a segment, click its name. Multiple selection is supported.
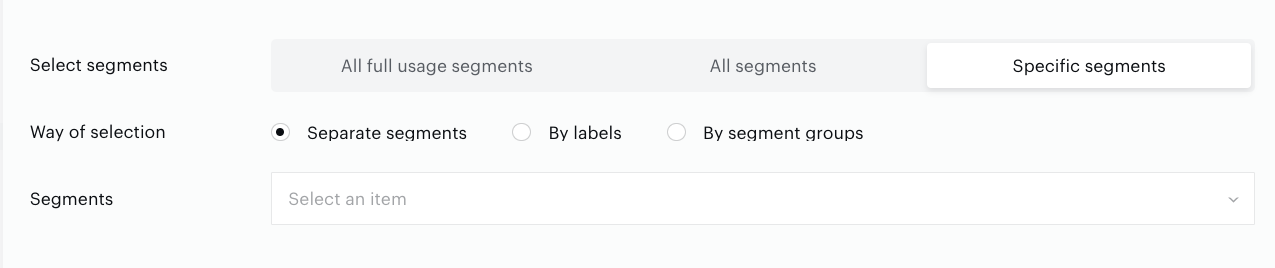
Specific segment options allow you to choose how exactly Audience should select segments for export:
-
Separate segments option allows you to search and select segments one by one manually.
-
By labels option allows you to select one or more labels (key-value pairs). Audience will find segments by the selected labels and export them.
-
By segment groups option allows you to select one or more segment groups, and Audience will export segments within these specific segment groups. It is more suitable for those customers who prefer to organize their segments specifically.
Export segments
You can click Export now in the Configure segments section for almost immediate export of selected segments without waiting for the next scheduled data transfer.
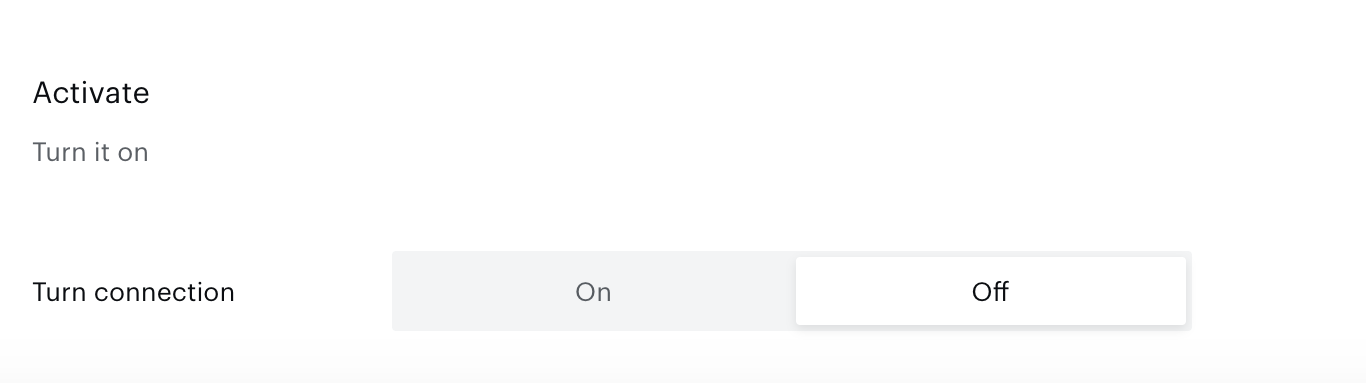
The other option is configuring scheduled data transfer in the Activate section below. There, you can either set up a daily data transfer by turning the connection on, or hold the created configuration without activation yet. When ready, click Create or Save (if editing) in the top right corner of the page.
Specific segments options allow you to choose how exactly Audience should select segments for export:
-
Separate segments allow search and select segments one by one manually.
-
By labels allows the customer to select one or more labels (key-value pairs). Audience will find segments by the labels you selected and export them.
-
By segment groups allows customers to select one or more segment groups, and Audience will export segments within these specific segment groups. It is more suitable for those customers who prefer to organize their segments specifically.
Set the parameter.
This connection is a client-side one, which means that Audience doesn’t send segment memberships; only segment name and segment IDs are used for the custom audience creation on Facebook.
Monitoring and update
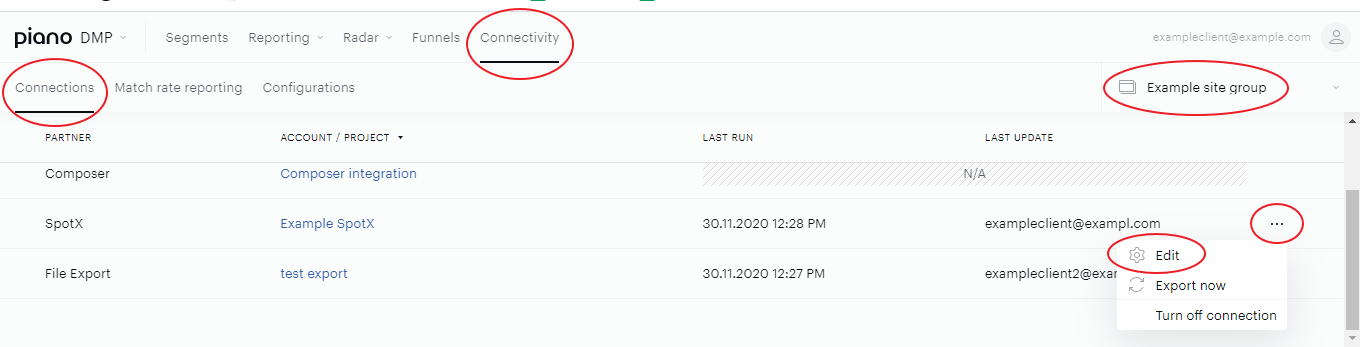
Configured connections can be viewed and edited in the Connections tab.
Data is normally exported once a day. The Export now button allows export segments (not membership data) almost immediately.
User linking
-
For you to get the Facebook user ID of the current user, this user must be logged in to Facebook on the current page. This only needs to happen once. (see here for more info: https://developers.facebook.com/docs/facebook-login/web).
-
Create a prefix to link the Facebook ID to, e.g. 'fbk' (more info).
-
Create a persisted query for /profile/user/external/link/update where you lock down the "type" to be your prefix and make "id" and "cxid" mutable (persisted queries).
-
(Optionally) The Facebook ID can be one-way hashed to remove the possibility of later getting the Facebook user from a Piano user ID.
-
Add this tag anywhere on the page (preferably earlier in the file to make sure that it is loaded before the user navigates somewhere else).
<<!-- Cx FB user linking script begin -->
<script type="text/javascript">
   window.cX = window.cX || {}; cX.callQueue = cX.callQueue || [];
   cX.callQueue.push(['invoke', function() {
       function checkFBLogin() {
           if (window.FB && typeof FB.getLoginStatus === 'function') {
               FB.getLoginStatus(function(response) {
                   if (response.status === 'connected') {

                       // Read the FaceBook user ID
                       var fbUserId = response.authResponse.userID;


                       // Map the Facebook user ID to the Piano Audience user ID
                       var persistedQueryId = '<PERSISTED-QUERY-ID>'; // <-- TODO: Insert persisted query id here
                       var apiUrl = 'https://api.cxense.com/profile/user/external/link/update?callback={{callback}}'
                           + '&persisted=' + encodeURIComponent(persistedQueryId)
                           + '&json=' + encodeURIComponent(cX.JSON.stringify({ id: fbUserId, cxid: cX.getUserId() }));
                       cX.jsonpRequest(apiUrl, function (data) { /* If wanted, verify success here*/ });
                   } else {
                       setTimeout(checkFBLogin, 1000);
                   }
               });
           } else {
               setTimeout(checkFBLogin, 1000);
           }
       }
       checkFBLogin();
   }]);
   // Async load cx.js
   (function(d,s,e,t){e=d.createElement(s);e.type='text/java'+s;e.async='async';
       e.src='http'+('https:'===location.protocol?'s://s':'://')+'cdn.cxense.com/cx.js';
       t=d.getElementsByTagName(s)[0];t.parentNode.insertBefore(e,t);})(document,'script');
</script>
<!-- Cx FB user linking script end -->
Facebook Ad Campaigns using Piano Audience segments
Piano Audience - Facebook connection in the Connectivity Hub enables the use of Piano Audience segments on Facebook for audience targeting.
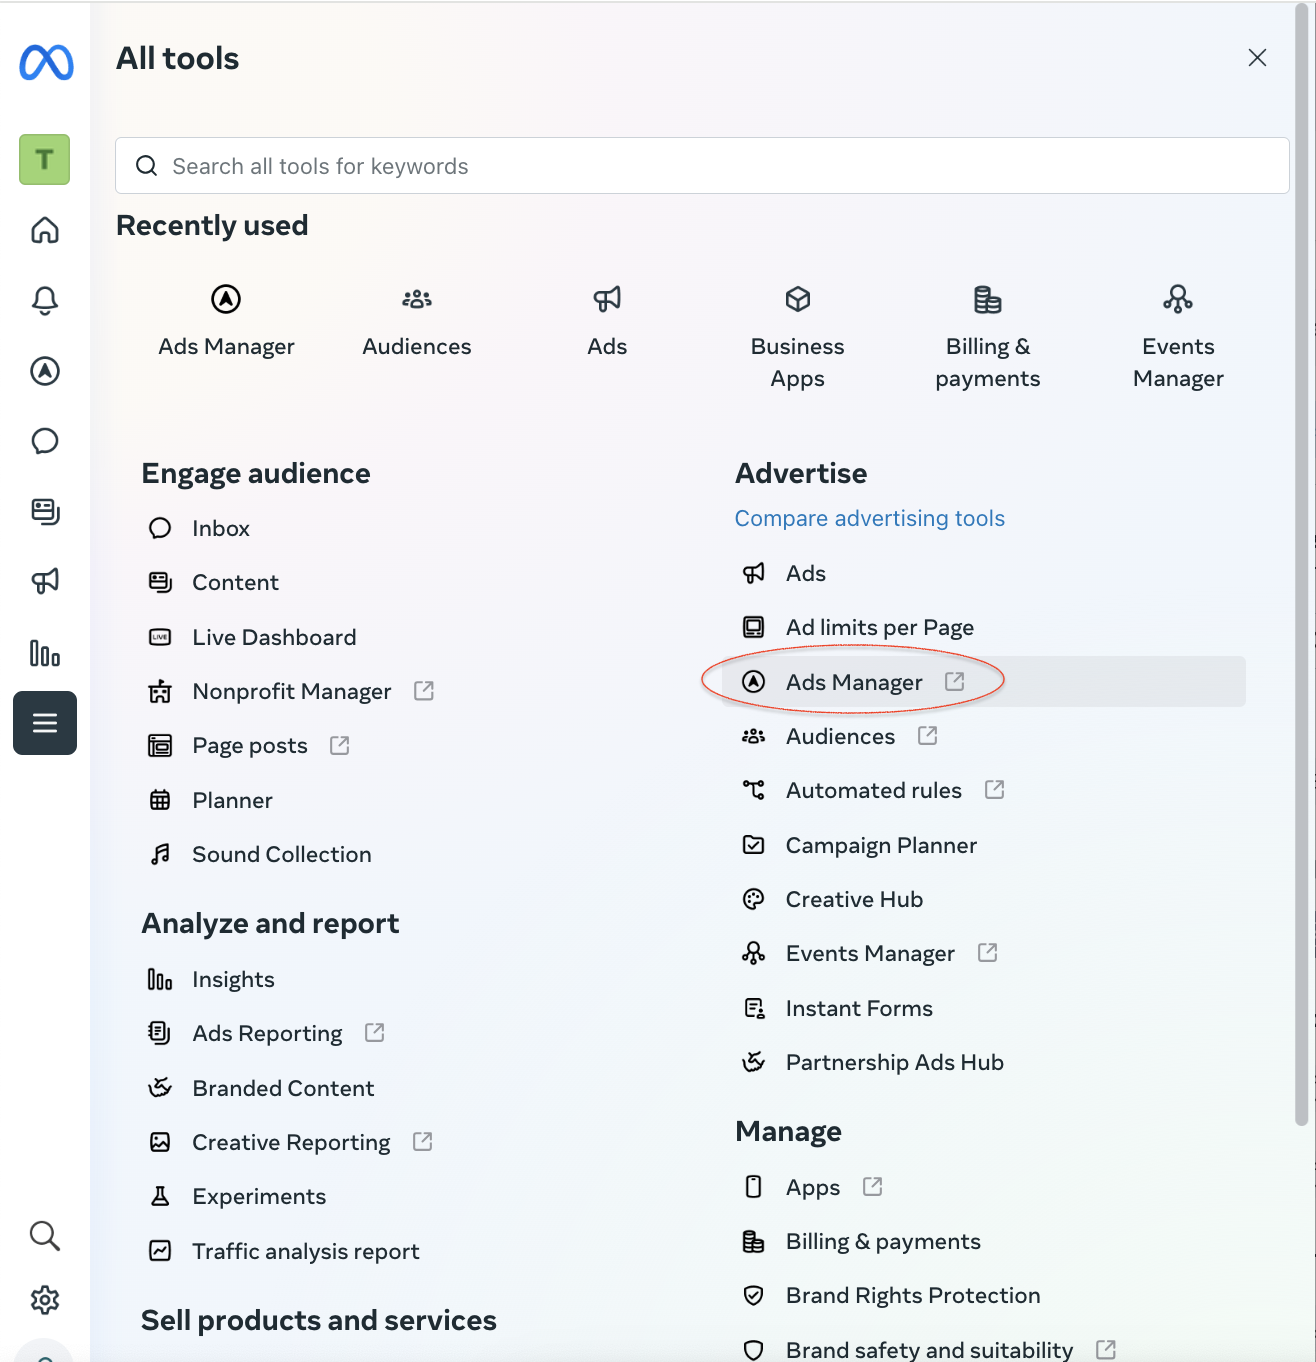
Campaigns on Facebook can be created in the Ads Manager tool. Go to the Meta Business Suite, click the top-left menu, and select the All tools→Ads Manager menu item:
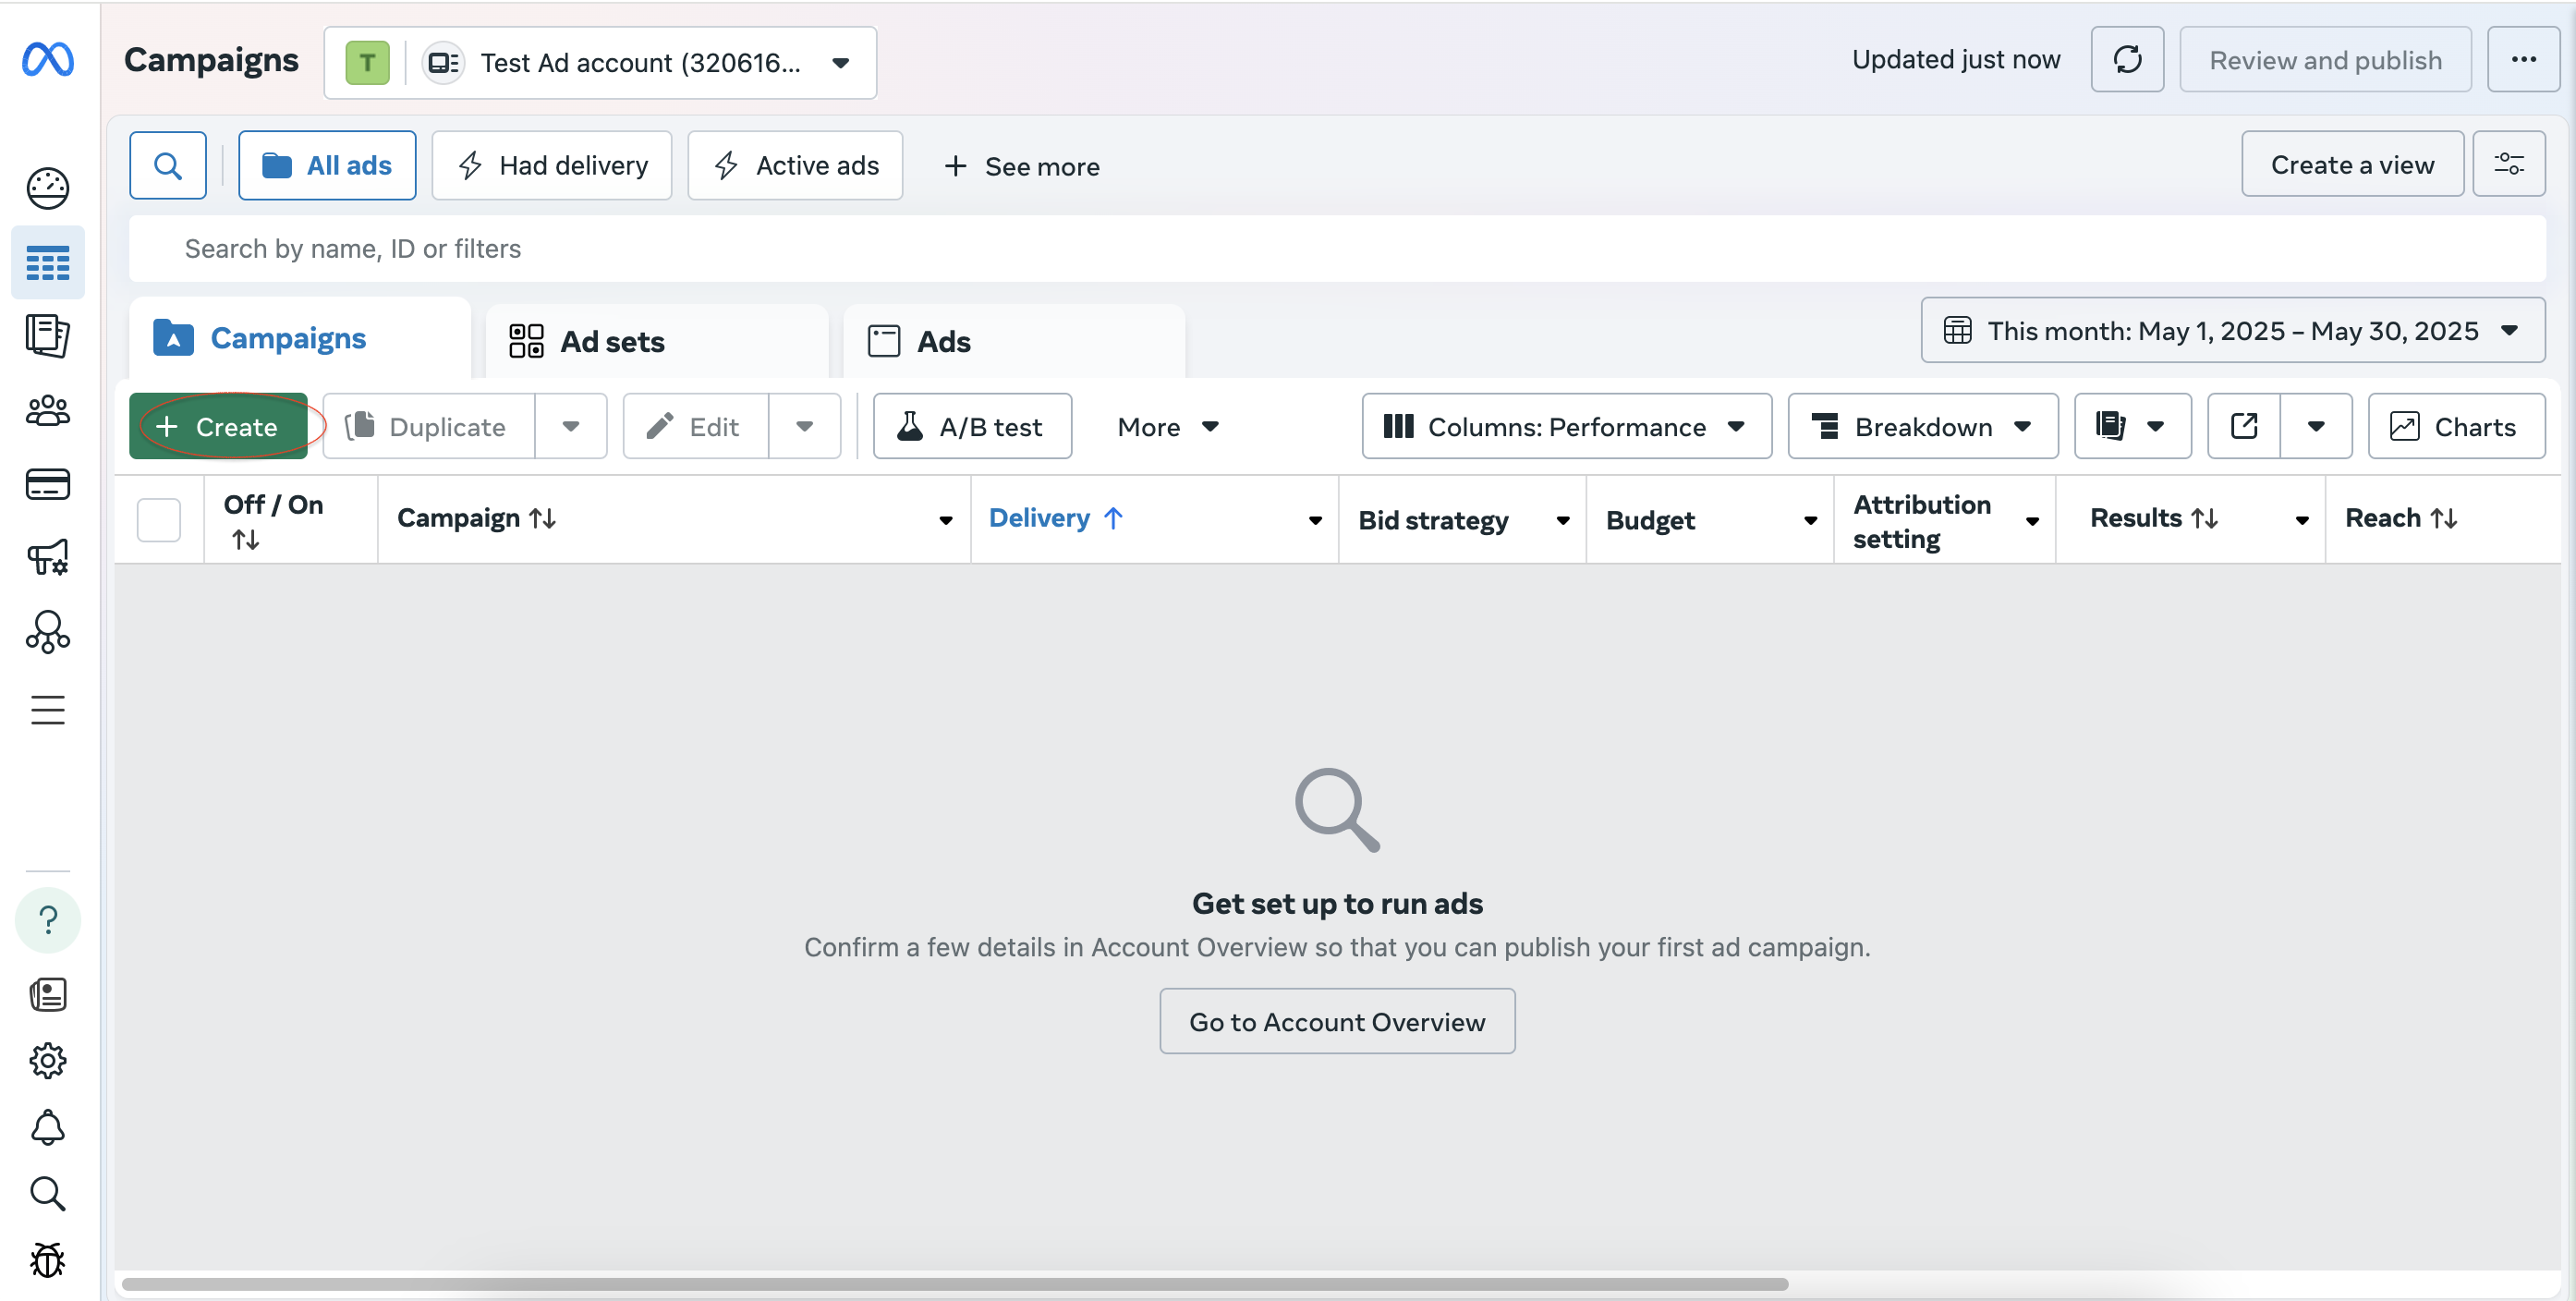
On this page, you can create your marketing campaign. Start creation by pressing the Create button:
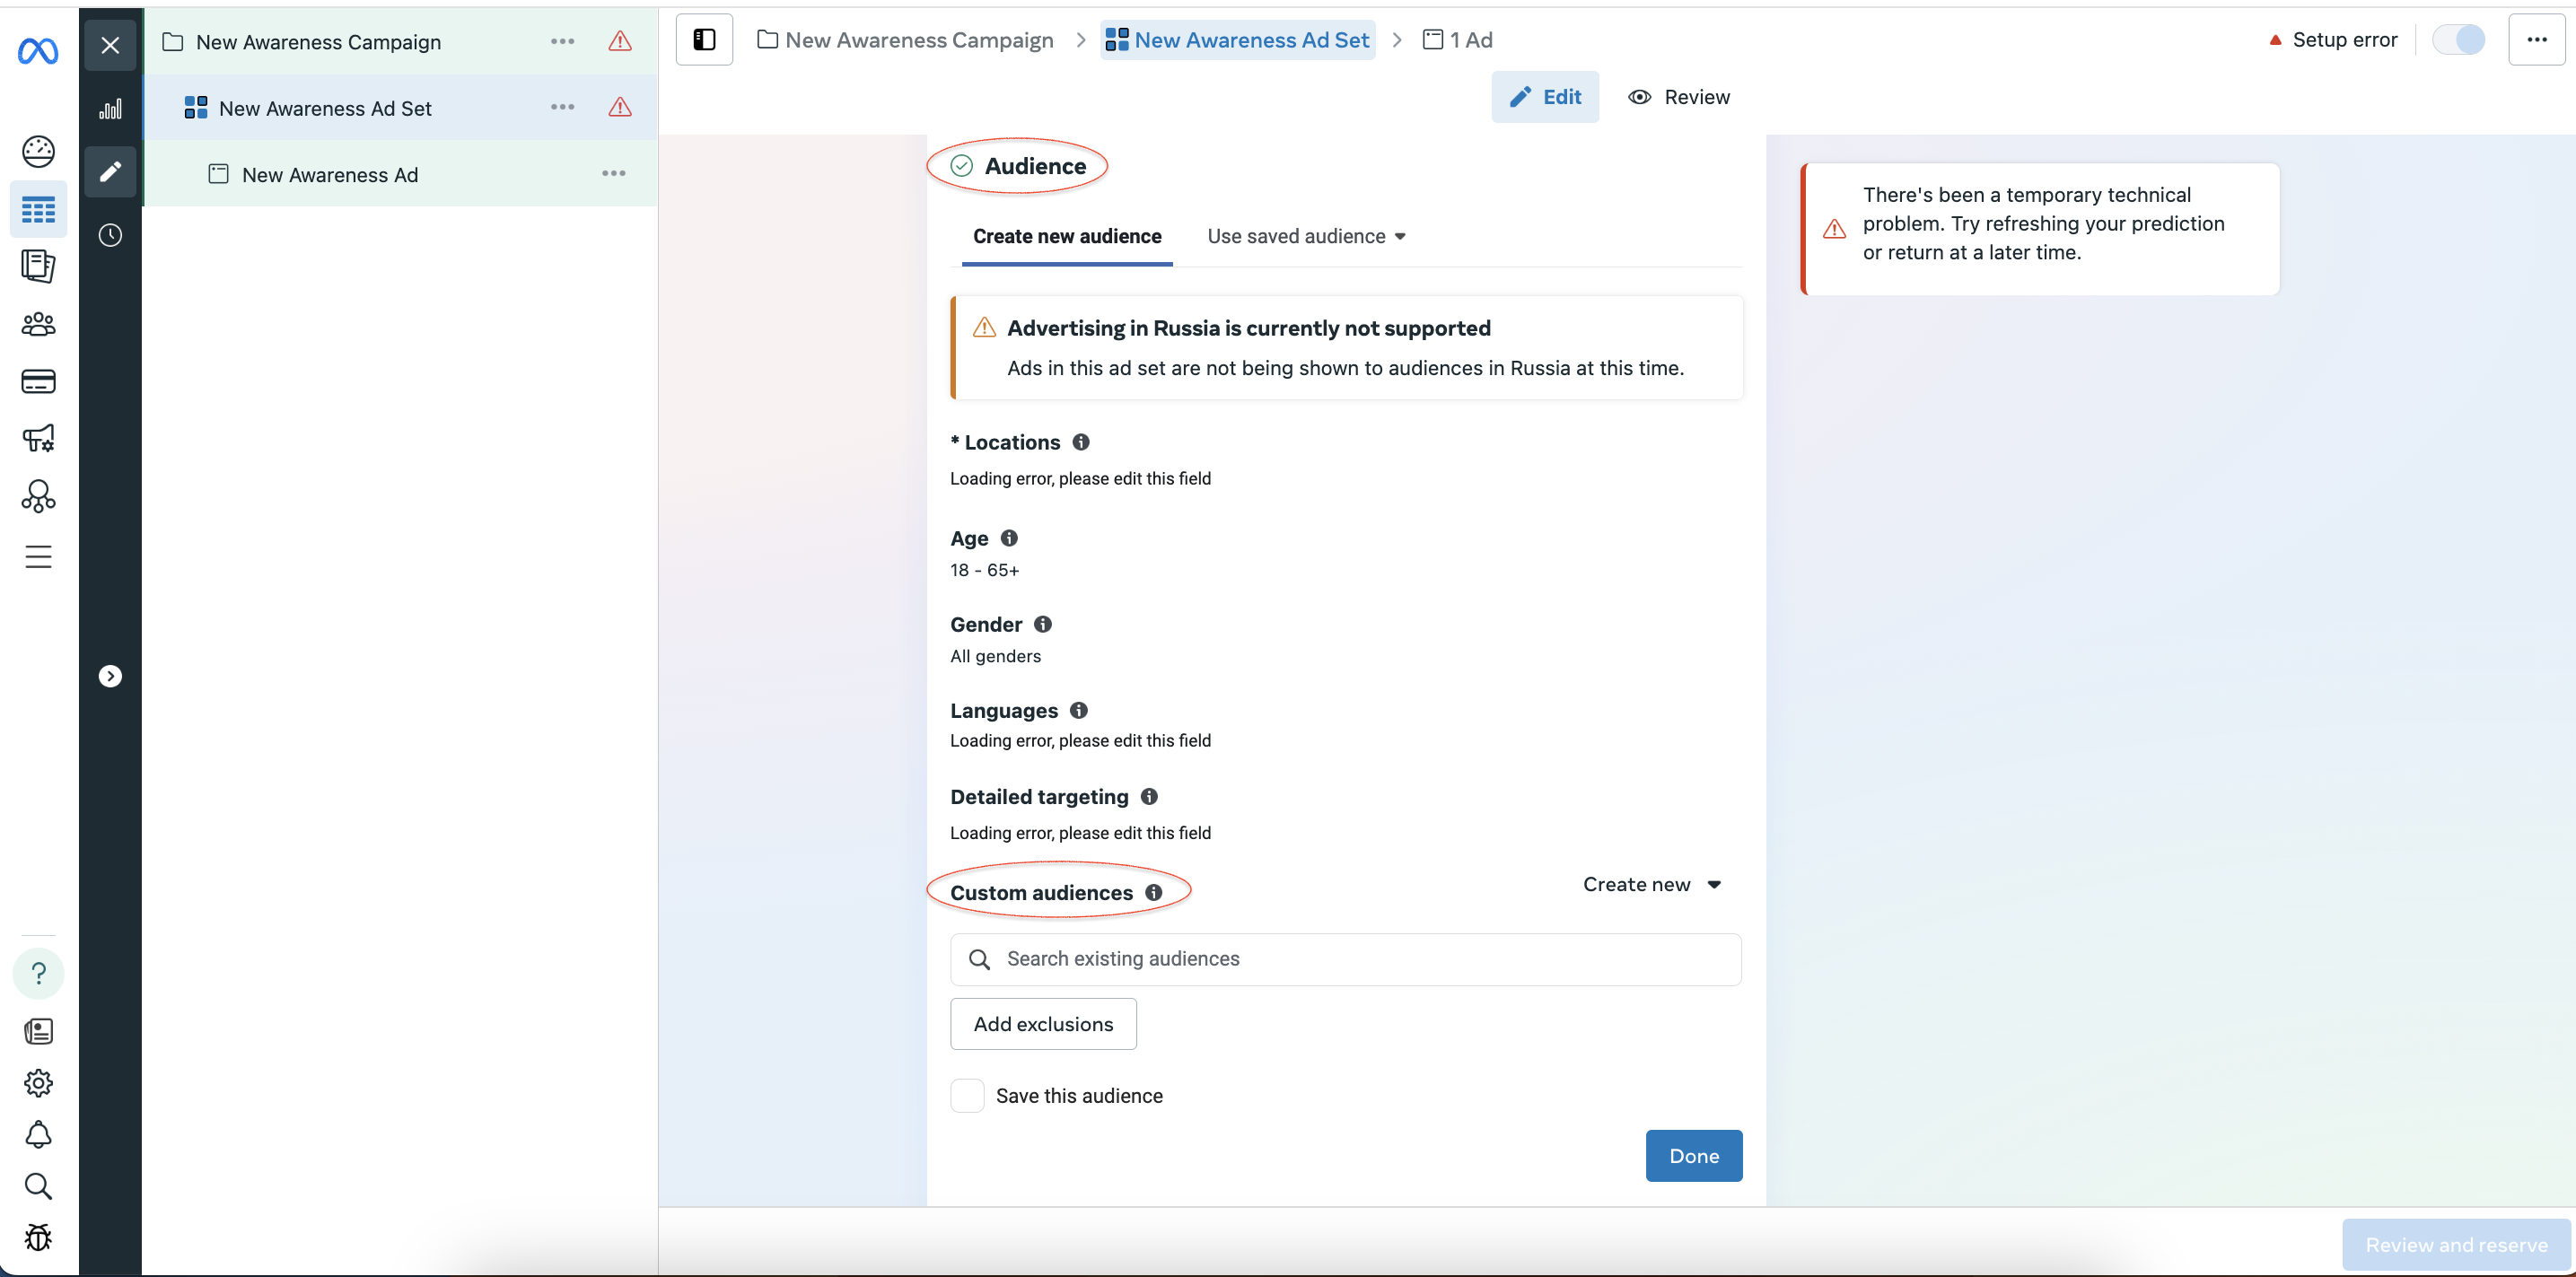
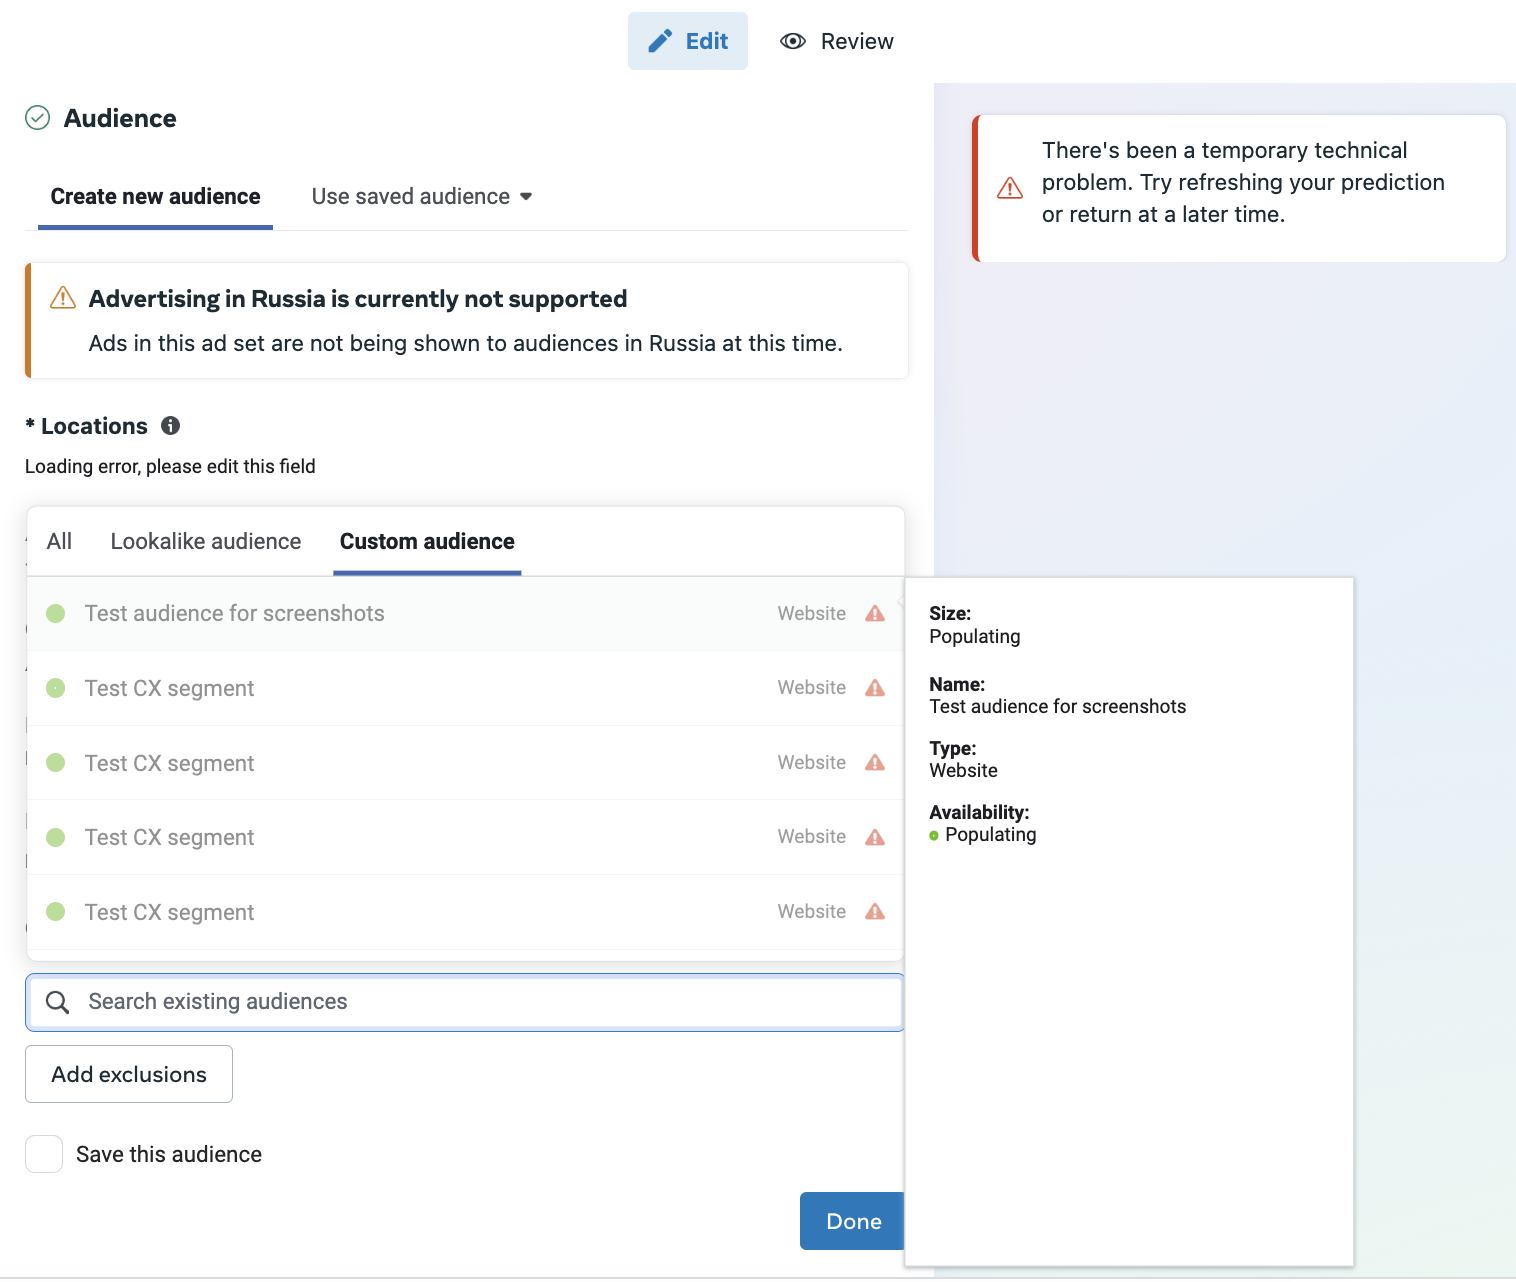
Use previously created custom audiences as campaign Audiences:
Read more details about campaign creation on Facebook Help Portal.
Avoid assigning Piano Audience segments and immediately sending them to Facebook. A short delay (a few seconds) is required for the user’s segment to appear in Audience. If your account lacks real-time segments, assignment can take about an hour. Have the user visit the page with the installed code again to send an event to Facebook.
-
Create a pixel on Facebook Business Manager and then add the pixel code within the tag on your site.
-
Create a persisted query for /profile/user/segment (read more).
-
Add the code below to your web pages in
<body>tag (the lower the better):
<script>
 cX.callQueue.push([
   "invoke",
   function invoke() {
   cX.getUserSegmentIds({
     persistedQueryId: "76b094c3e68cd0b28451d2d65331e4582ff215d1",
     callback: function callback(segmentIds) {
     if (document.readyState === "complete") {
       fbq("trackCustom", "CxSegments", { segmentIds: segmentIds });
     } else {
       var earlyOnReadyStateChange = document.onreadystatechange;
       document.onreadystatechange = function onReadyStateChange() {
       if (earlyOnReadyStateChange) {
         earlyOnReadyStateChange();
       }
       if (document.readyState === "complete") {
         fbq("trackCustom", "CxSegments", { segmentIds: segmentIds });
       }
       };
     }
     }
   });
   }
 ]);
</script>
-
In Facebook Business Manager, create a custom audience from a custom event.
Choose "CxSegments" as Event.
Add "segmentIds" as a parameter and add Piano Audience segment IDs; make sure to choose "contains" as an operator.
Warning: Your audience should be big enough for you to use it for targeting (see troubleshooting).
In this article, you can find detailed information about how to push segments from Piano Audience into Facebook automatically or how custom audiences can be created manually.
Long-lived token
There are at least three options to get a long-lived token:
-
using a system user account (see details below). We recommend using this option rather than others.
-
using the Facebook API.
Creating a token through a system user account
On Facebook, the settings that were previously located under All tools → Business Settings are now accessible through Meta Business Suite or Business Manager. However, since Facebook is gradually migrating everything to Meta Business Suite, the location of certain options may vary depending on the interface.
-
To access Business Settings, go to: https://business.facebook.com/settings
-
To access settings via Meta Business Suite, go to: https://business.facebook.com
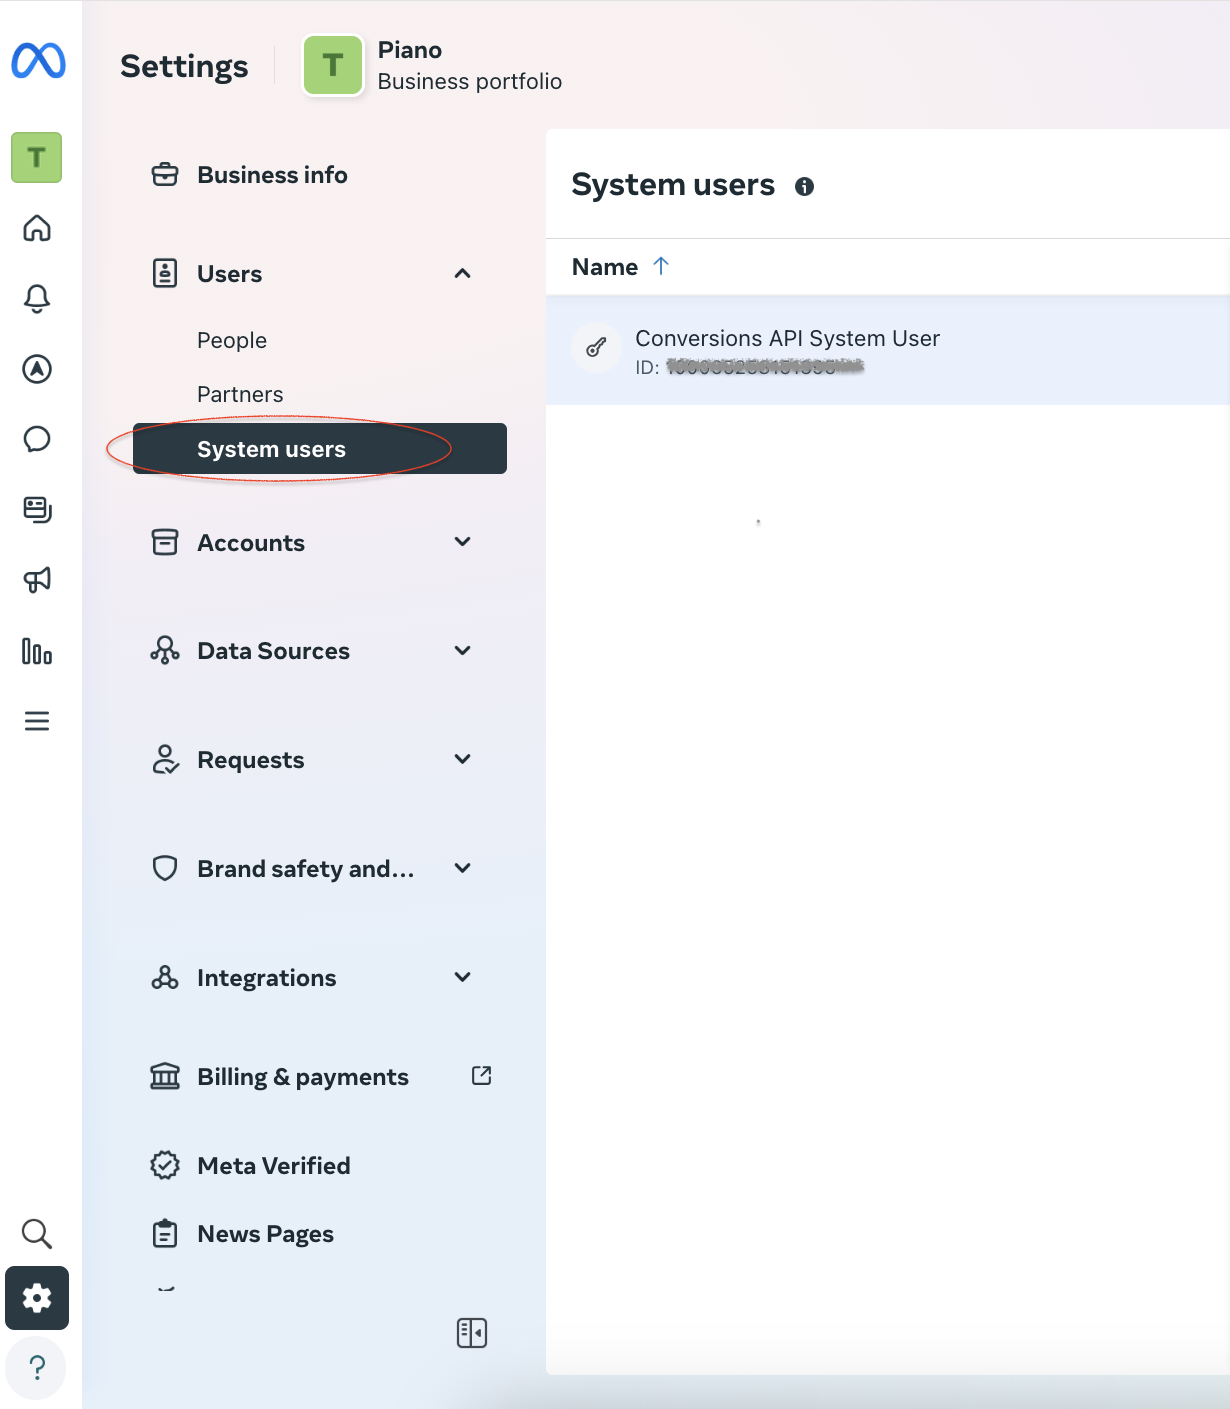
To generate a token, you need to create and configure a system user account. Working in Meta Business Suite, select Business Portfolio, then navigate to Users → System Users.
-
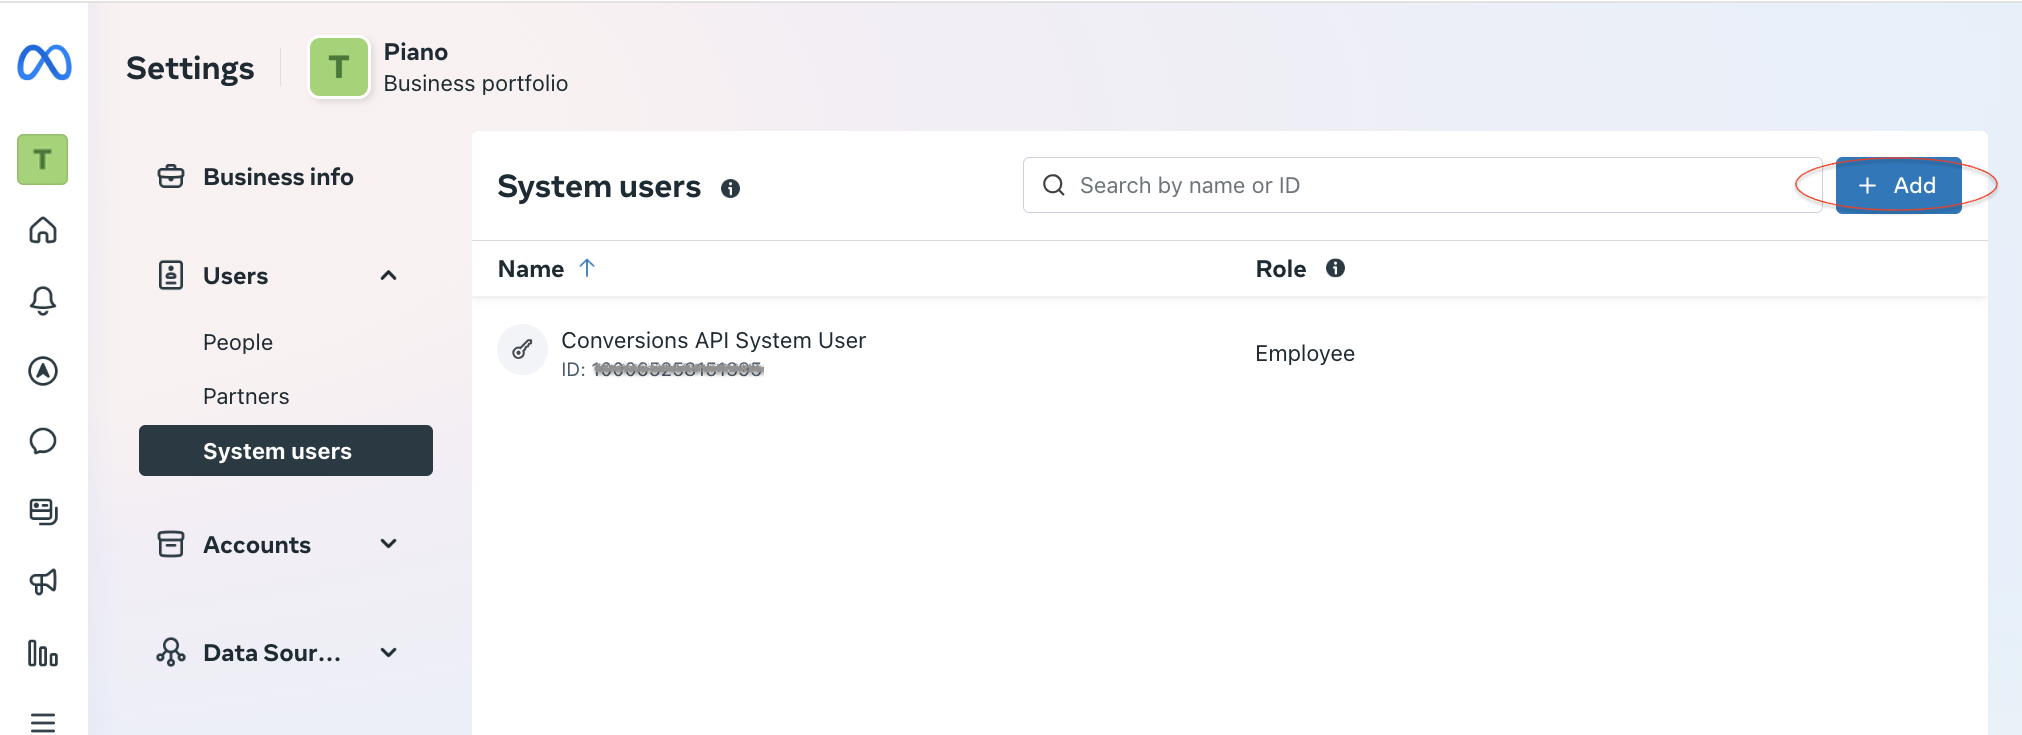
To create a system user, press the Add button.
-
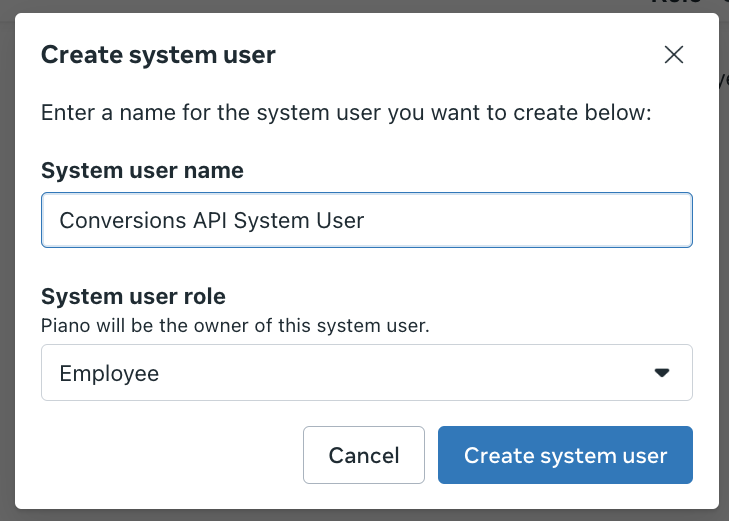
Fill in the name and create a system user. Feel free to create a system user name as you want.
-
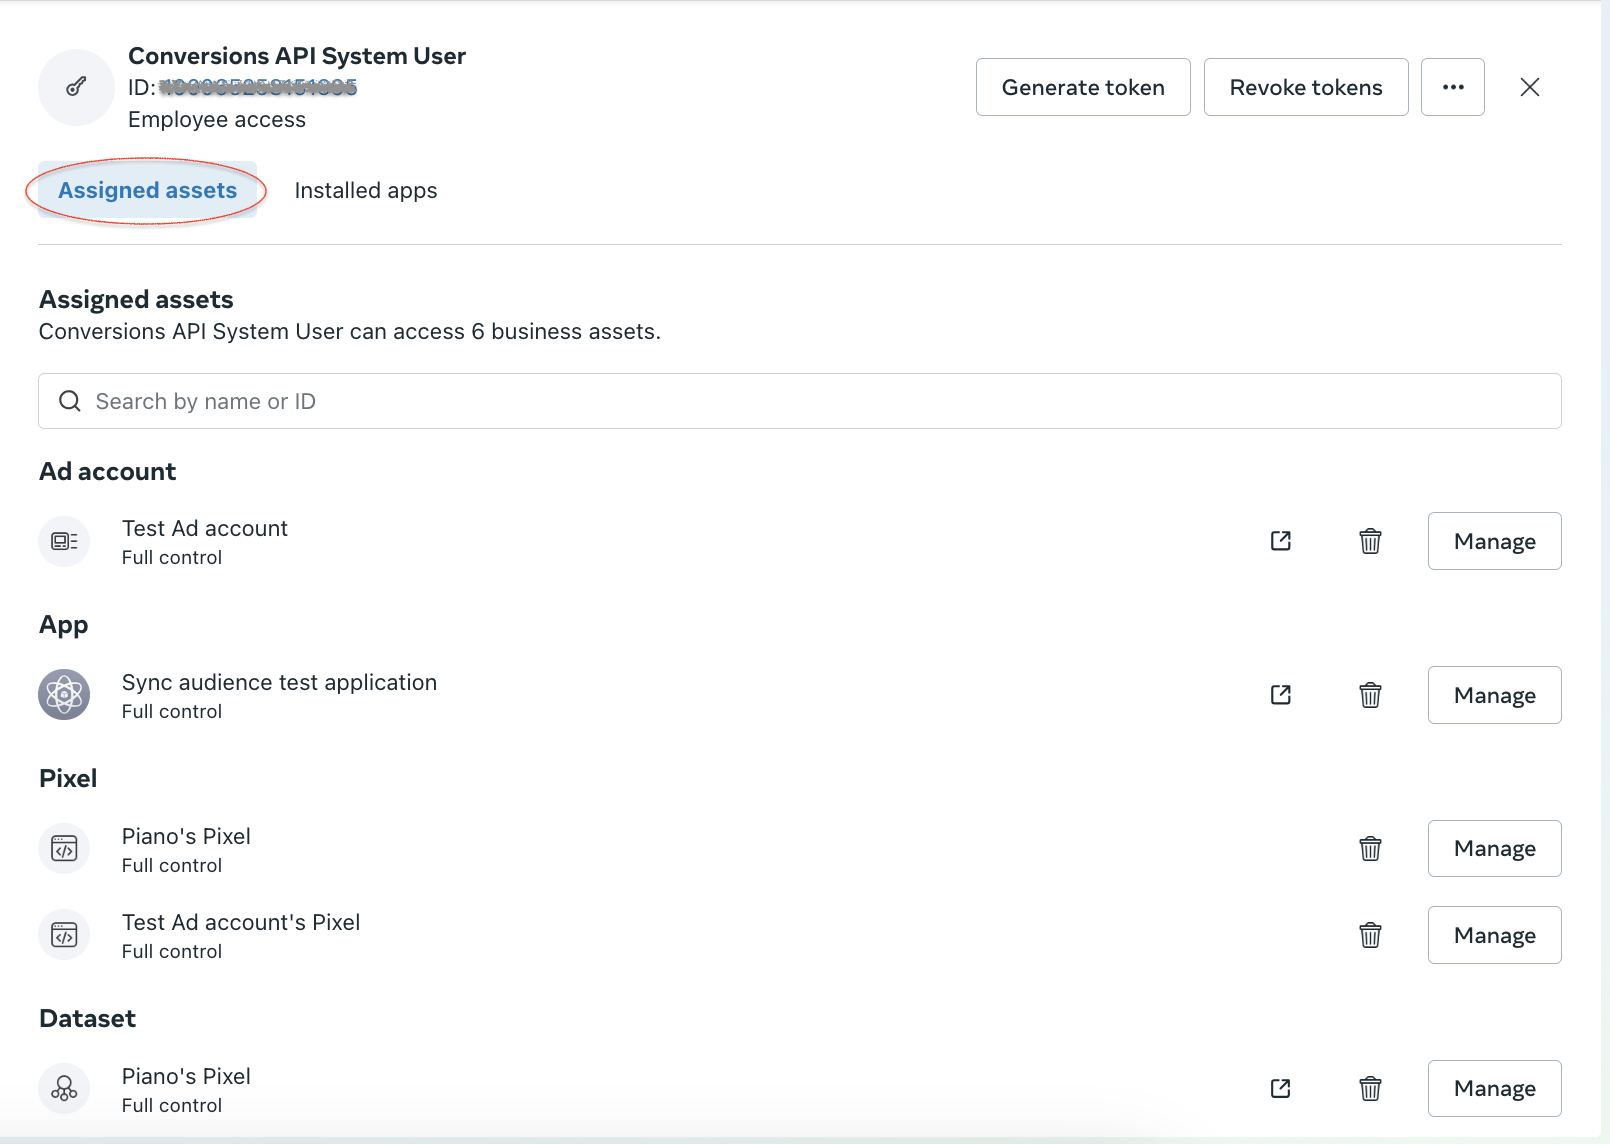
Select Assigned assets for the new user.
-
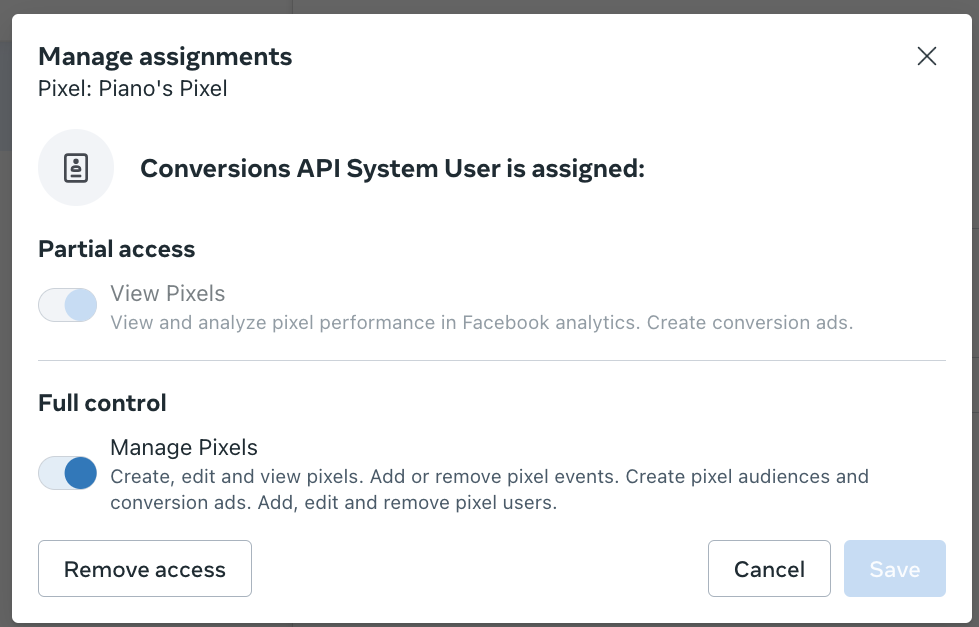
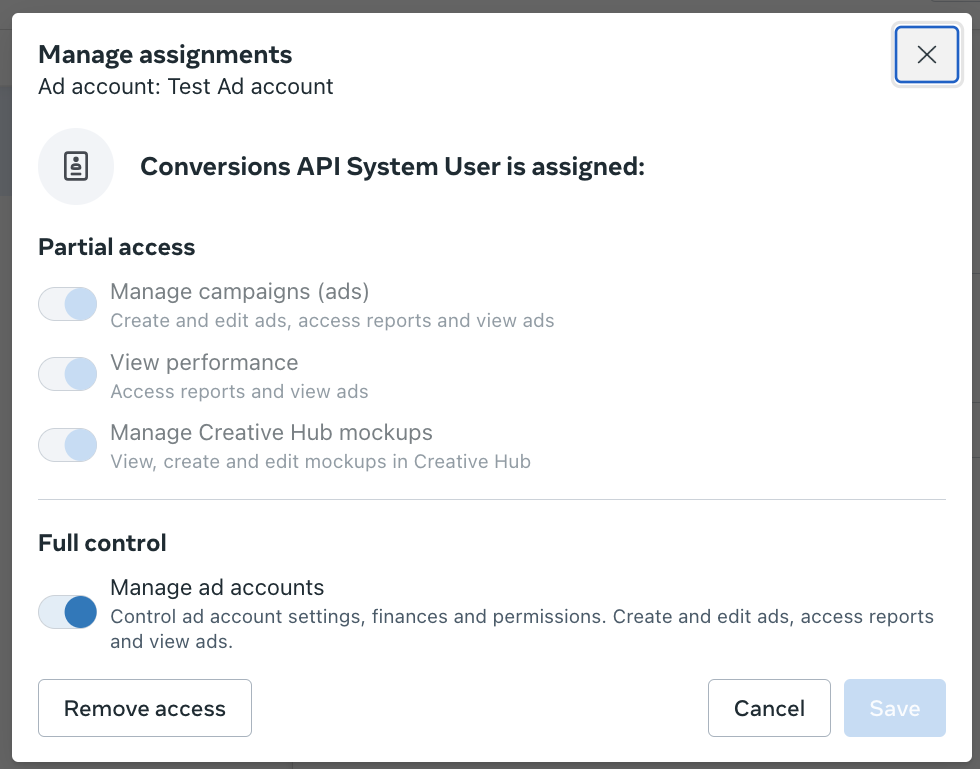
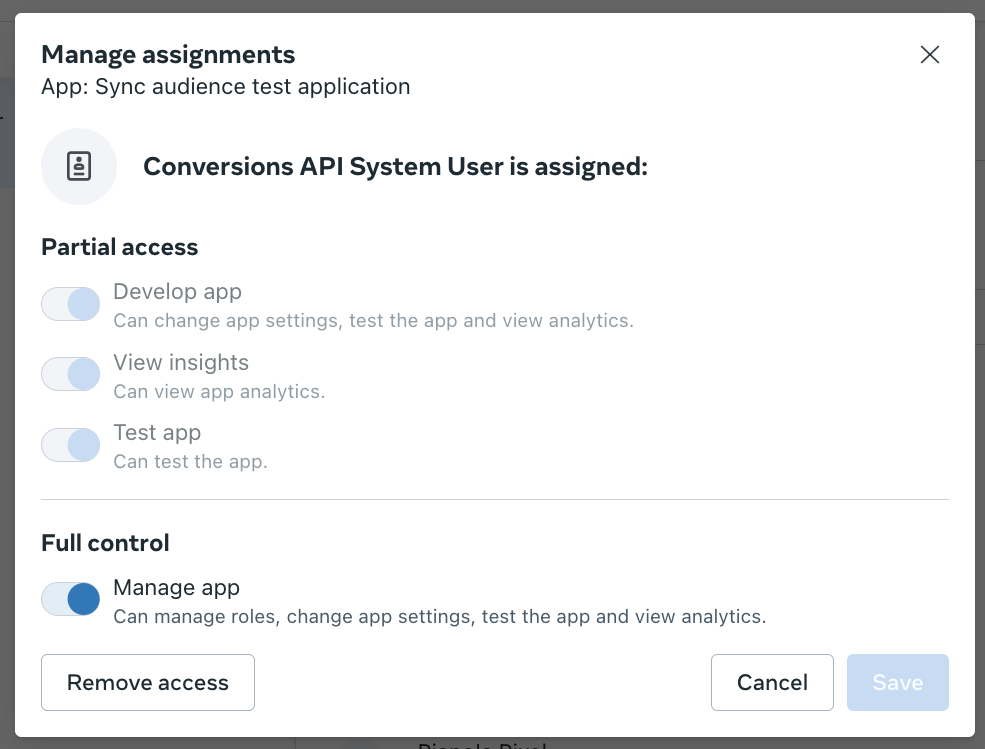
In the Assign assets menu, configure pixel, apps, and ad accounts. For each parameter, click the toggle to enable pixel / app / add account management. When done, save changes to return to the system user details.
-
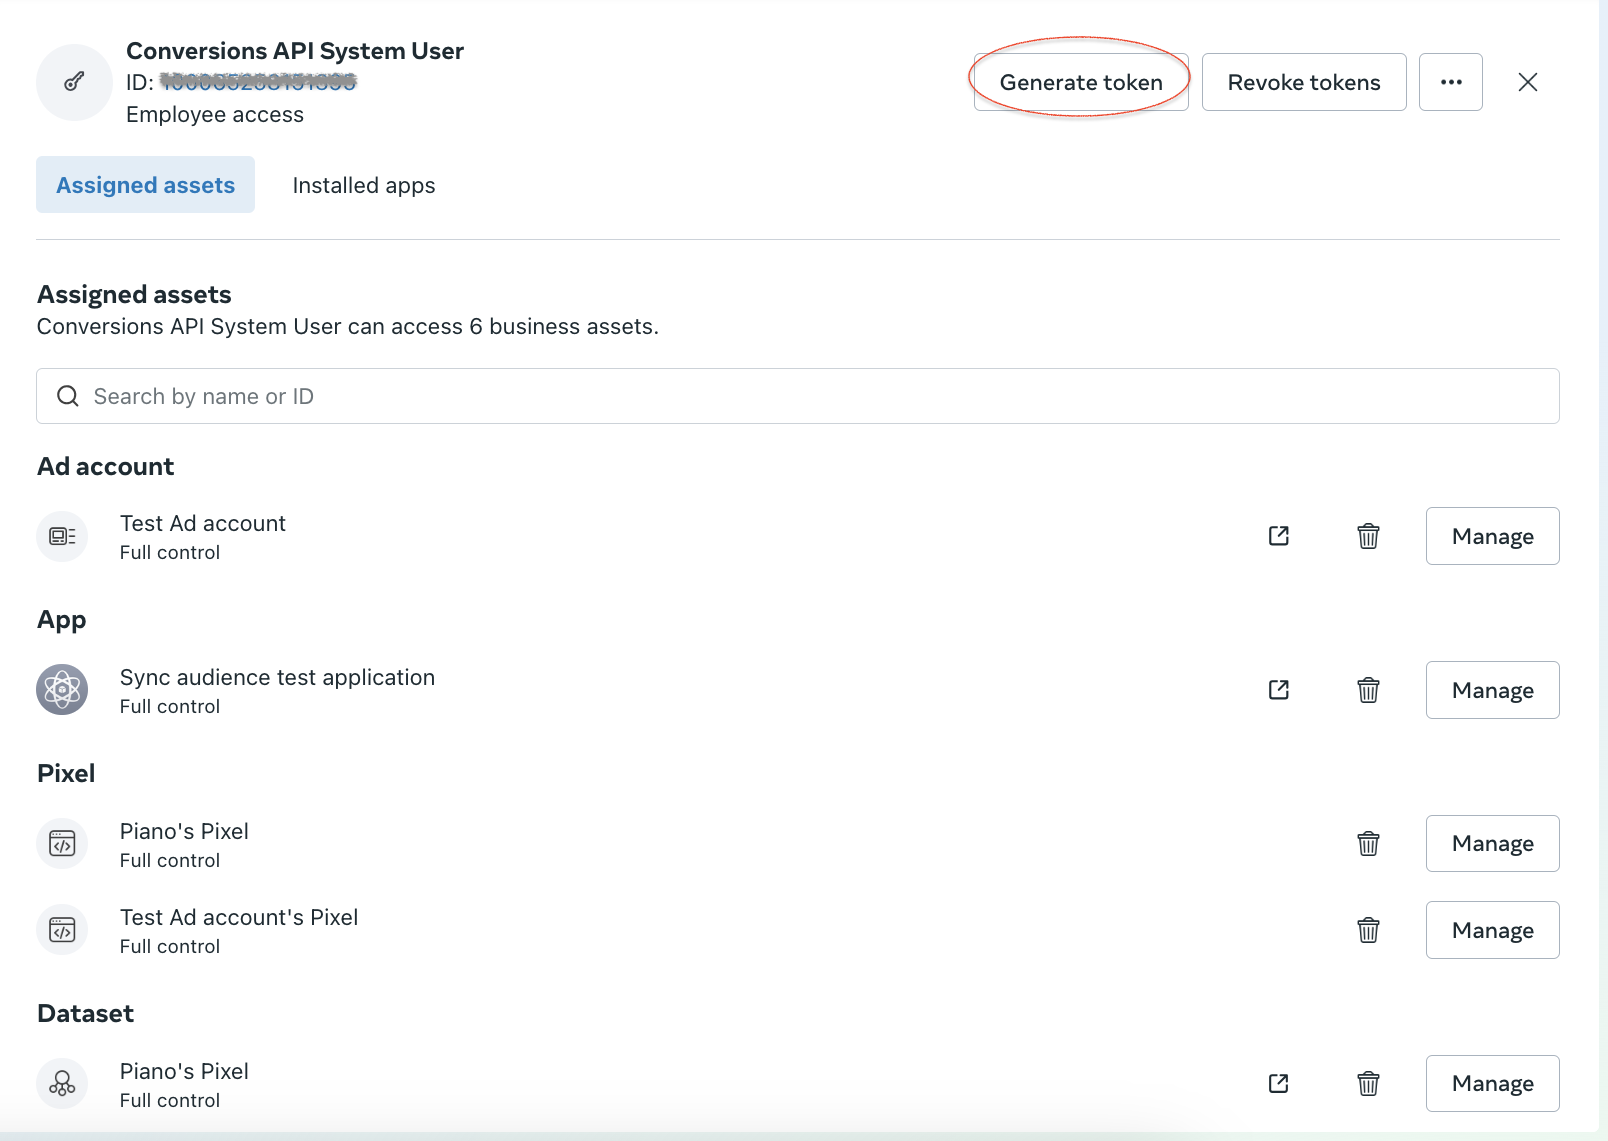
Press the Generate token button to create a token.
-
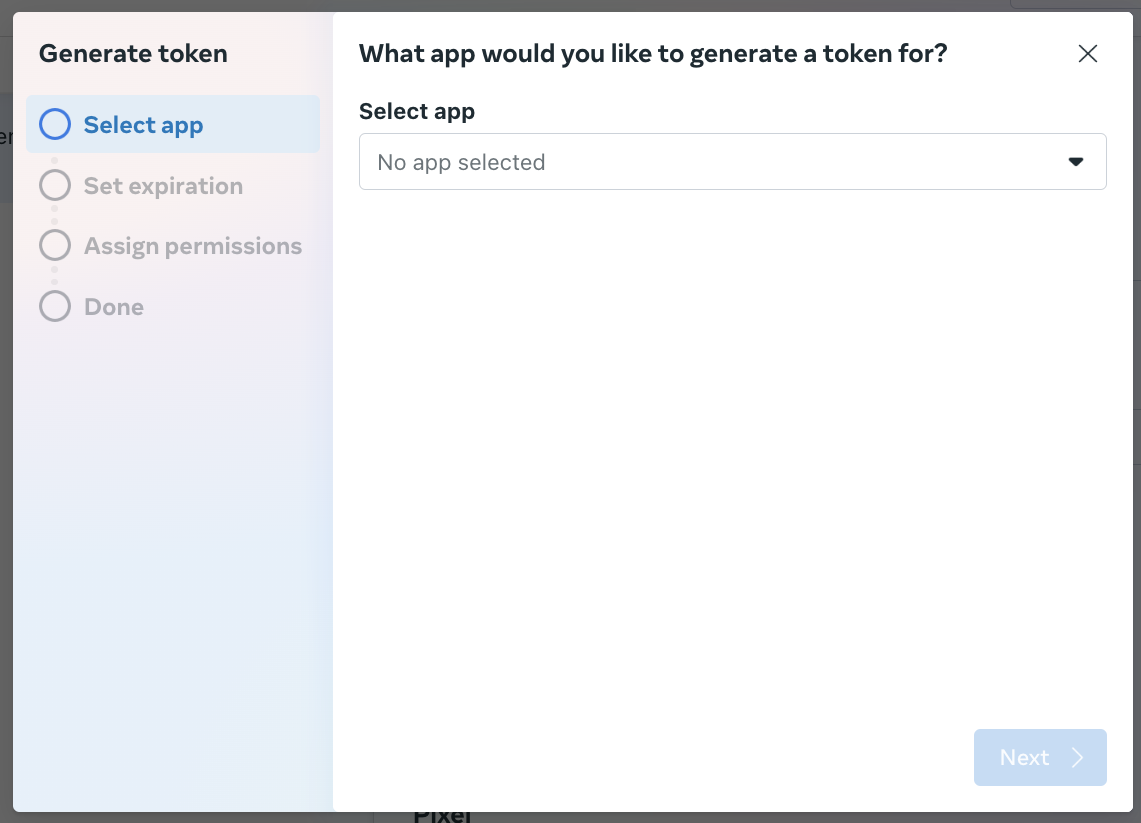
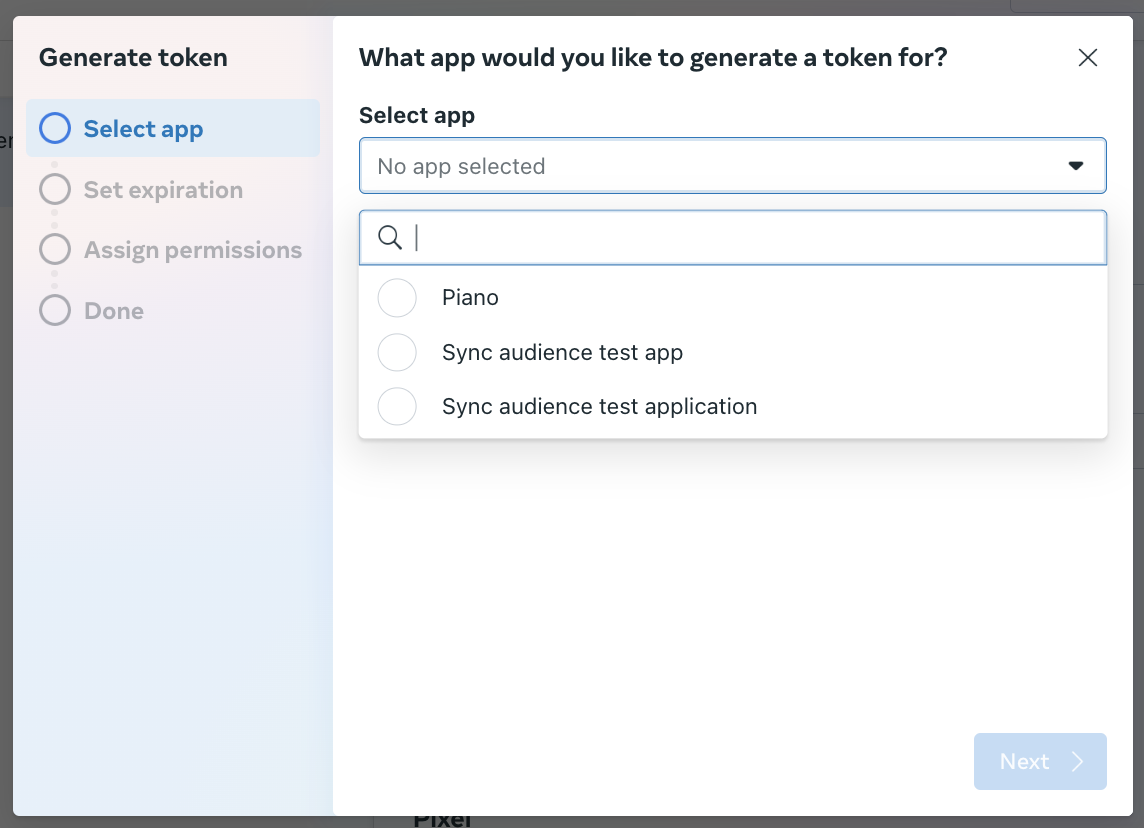
Select the previously added App in the Select app dropdown menu.
-
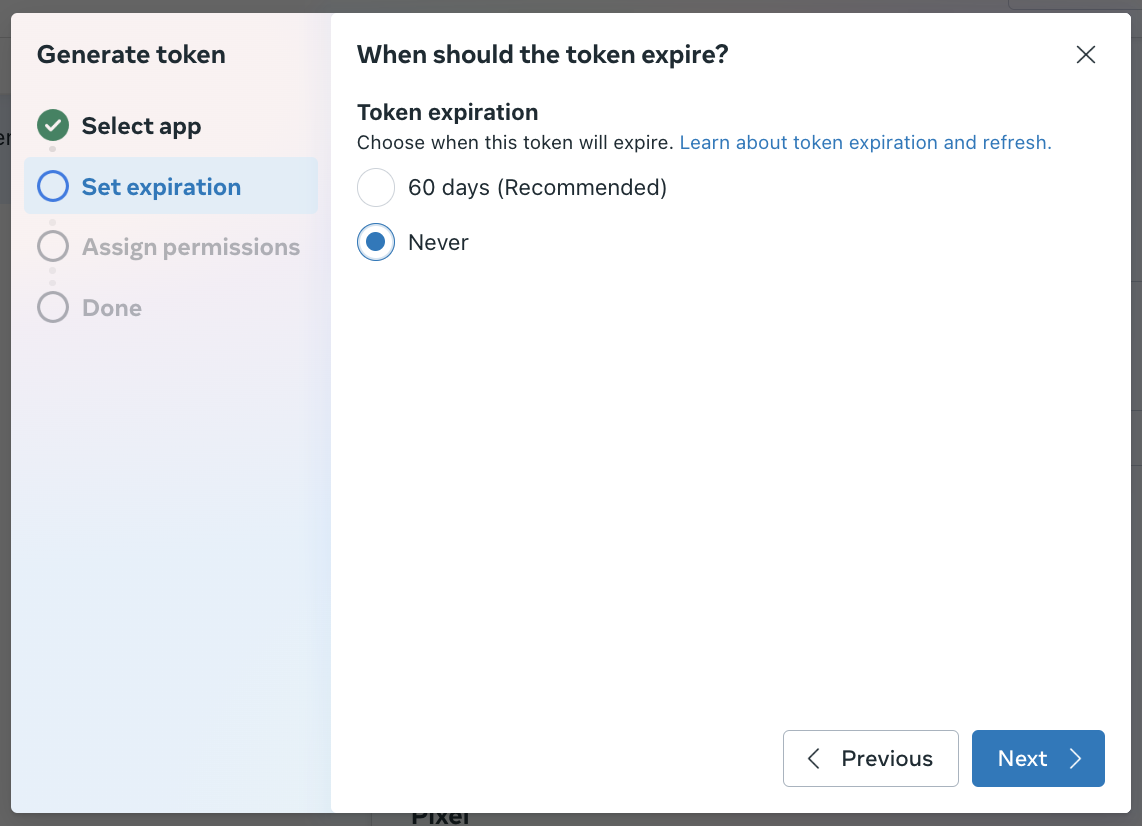
Set expiration; choose the Never option.
-
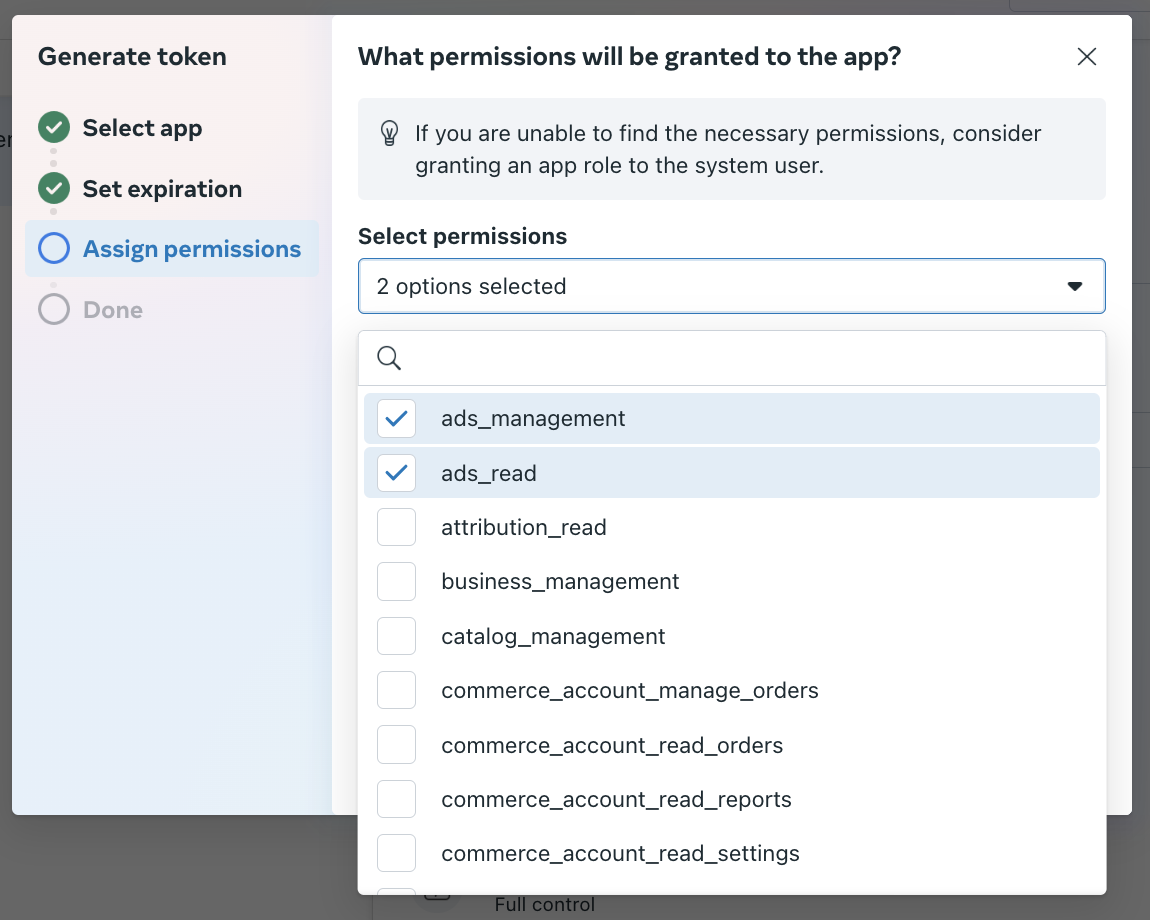
Assign permissions. Make sure that at least two obligatory permissions are selected and generate the token:
ads_readandads_management. Click Generate token.
-
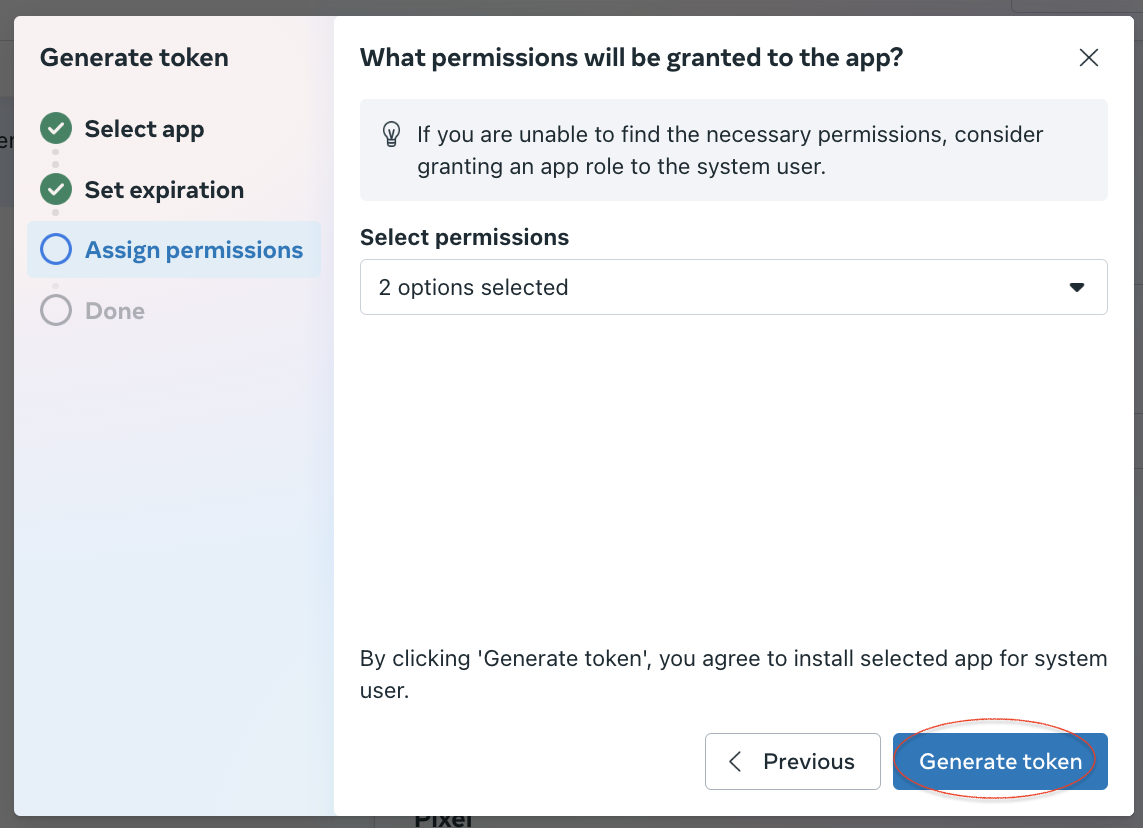
Press the Generate token button.
-
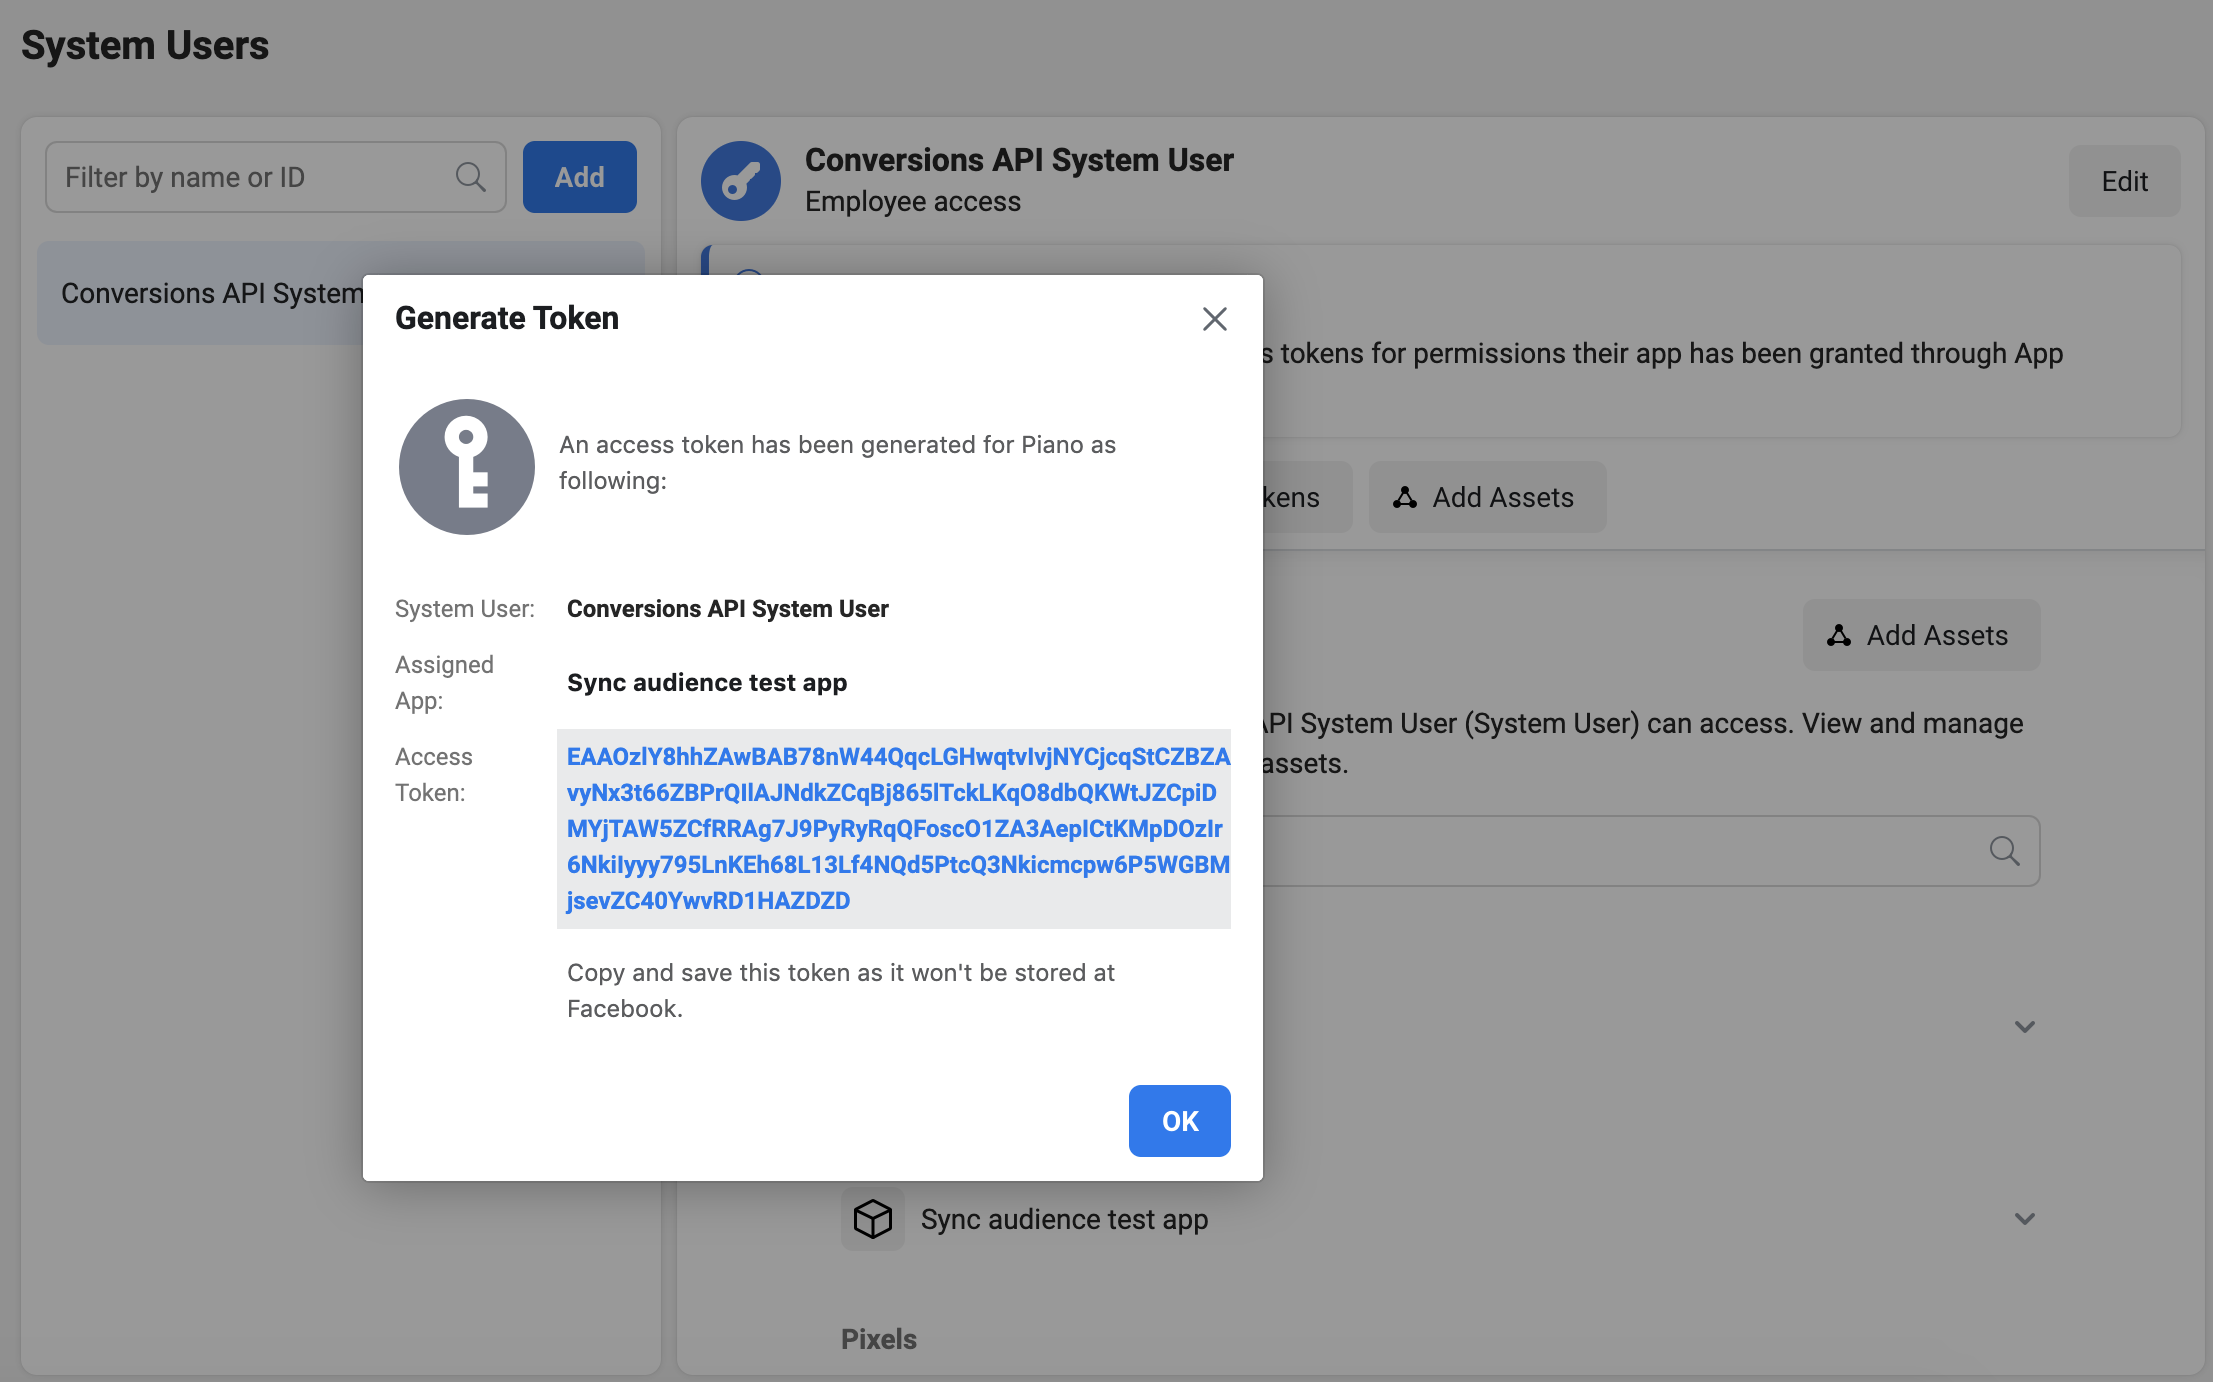
In the Generate token window, copy the access token to use it in the Audience connection form. Click Ok when ready.
Creating a long-lived token using Graph API explorer [Deprecated]
This token creation option is not optimal, and we do not recommend using this approach. This section will be removed in the near future. Please use the token creation method described in the section above.
-
Go to Facebook for Developers.
We recommend using the latest version of Facebook's API.
-
Fill the fields of the Facebook App (which can be created through Business Management → App Dashboard → Add a new App), User or Page, and Permissions, and click the blue Information icon next to the access token.
Permissions. Don't forget to select all needed permissions. These settings are obligatory because Facebook requires you to confirm that your Facebook application uses the data in intended ways and safeguards user privacy. Read more about it here.
To manage audiences on Facebook through the Facebook API, select the following permissions: ads_management and ads_read. Other permissions depend on your Business Manager account usage and can vary.
-
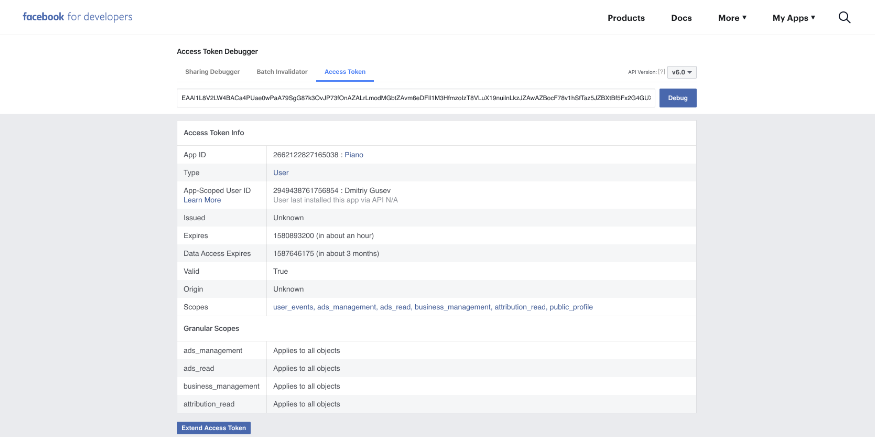
Click Open in the access token tool.
-
Then click Extend access token.
-
You will see the additional field. To copy the long-lived token, click Debug.
Likes
To hook into an event fired from a Facebook-like-button click, an event handler has to be added.
The event handler sends the event to Piano Audience as a performance event, using the cX.sendEvent(..) helper function.
If you want to get any other type of Facebook data into Audience (like gender, age, liked URLs, friends list, etc), see this Facebook developer page on how to read that data.
<!DOCTYPE html>
<html lang="en" xmlns="http://www.w3.org/1999/xhtml">
<head>
   <meta charset="utf-8" />
   <title></title>
</head>
<body>
   <script type="text/javascript" src="http://cdn.cxense.com/cx.js"></script>
   <script type="text/javascript">
       // The normal pageView event:
       cX.setSiteId('1234'); // <-- TODO: Insert your siteId here!
       cX.sendPageViewEvent();
   </script>

   <div>
       <img src="http://i.stack.imgur.com/aWl0G.png">
   </div>

   <div id="fb-root"></div>
   <script>
       window.fbAsyncInit = function() {
           FB.init({
               appId      : '123456789', // TODO: Insert your app id here!
               xfbml      : true,
               version    : 'v2.3'
           });

           FB.Event.subscribe('edge.create', function(href, widget) {
               cX.setEventAttributes({ origin: 'xyz-website', persistedQueryId: '1234' }); // TODO: Insert your origin and persisted query id here!
               cX.sendEvent('Social', { action: 'liked_facebook' });
           });
       };

       (function(d, s, id){
           var js, fjs = d.getElementsByTagName(s)[0];
           if (d.getElementById(id)) {return;}
           js = d.createElement(s); js.id = id;
           js.src = "//connect.facebook.net/en_US/sdk.js";
           fjs.parentNode.insertBefore(js, fjs);
       }(document, 'script', 'facebook-jssdk'));


   </script>
   <div class="fb-like" data-href="http://www.cxense.com" data-layout="button" data-action="like" data-show-faces="true" data-share="true"></div>

</body>
</html>
Troubleshooting
My ad is not exported
1. Make sure your audience is big enough. Go to Audiences and check the Availability column - you should see "Ready".

If you see the error "Audience is too small", wait until you reach 20 unique Facebook users (they should be logged in to FB when a FB CxSegments event is being sent). You may find some details about audiences here.
2. Check Facebook help. The most common reason could be too little time since the campaign started (It takes the ad delivery system 24 hours to adjust the performance level for the ad).
3. Check your persisted query created during the previous step - pay attention that the identities field should be mutable.
4. Try to debug your site with Developer tools.
a) Execute "cX.getUserSegmentIds({ persistedQueryId: '' })" in the Console and check that you receive all segments you expect.
b) In FB, go to Analytics → Activity → Event debugging and check that the CxSegments event is tracked in FB. Otherwise, investigate what's wrong.

5. If it doesn't work, please contact the Piano Support team.