
This page describes using 3rd Party Applications. Please take care when installing 3rd party tools - Cxense does not take any responsibility for any issues regarding 3rd party software. When you are not using these tools, you can disable or uninstall them to reduce the likelyhood of any problems.
It can be difficult to test geographic targeting due to needing to be in specific locations in the world for 'real world' tests. The good news is you won't need a passport nor up-to-date travel insurance - there are many tools that can help solve this problem from right where you are!
Geolocation & the Internet
To see the same results as someone in a given region, you can use stand alone Applications. or browser plugins / addons to recreate a request as though you are anywhere in the world. This process requires you to mimic different locations using temporary IP (Internet Prototcol) addresses which are mapped to physical locations (wikipedia).
In some instances, you may need very specific IP Addresses, which you will need to identify yourself, however for Country-based targeting, You can use example IP Addresses as listed on NIrsoft website.
Here's some example Country wide IP Addresses:
|
Country |
IP Address |
|---|---|
|
France |
2.15.255.255 |
|
Norway |
2.151.255.255 |
|
Spain |
2.143.255.255 |
|
Finland |
31.7.31.255 |
|
Germany |
2.175.255.255 |
|
USA |
3.255.255.255 |
|
Argentina |
24.232.255.255 |
|
Chile |
146.83.255.255 |
|
Peru |
161.132.255.255 |
and some more specific examples. Be aware that many geo targeting issues are internal to the country of the broker. You may need addresses inside and outside of the capital of the country:
|
Location |
IP Address |
|---|---|
|
Norway, Oslo, Oslo |
195.88.55.16 |
|
Spain, Pais Vasco, Zamudio |
194.30.58.211 |
|
Sweden, Västmanlands län, Vasteras |
212.28.194.170 |
|
Switzerland, Zürich, Zürich |
195.141.85.90 |
|
Peru, Lima |
200.4.199.12 |
|
Peru, Callao |
190.235.49.19 |
|
Peru, Arequipa |
200.106.65.11 |
Adding these IP addresses as request header parameters enables your Browser to 'pretend' to be the location of interest.
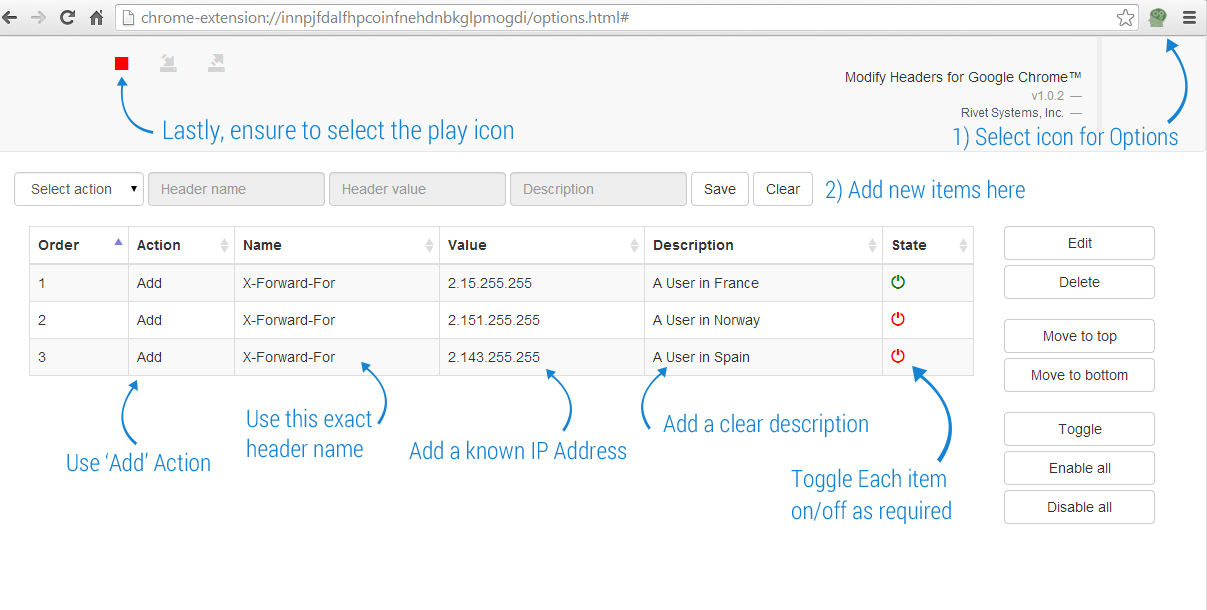
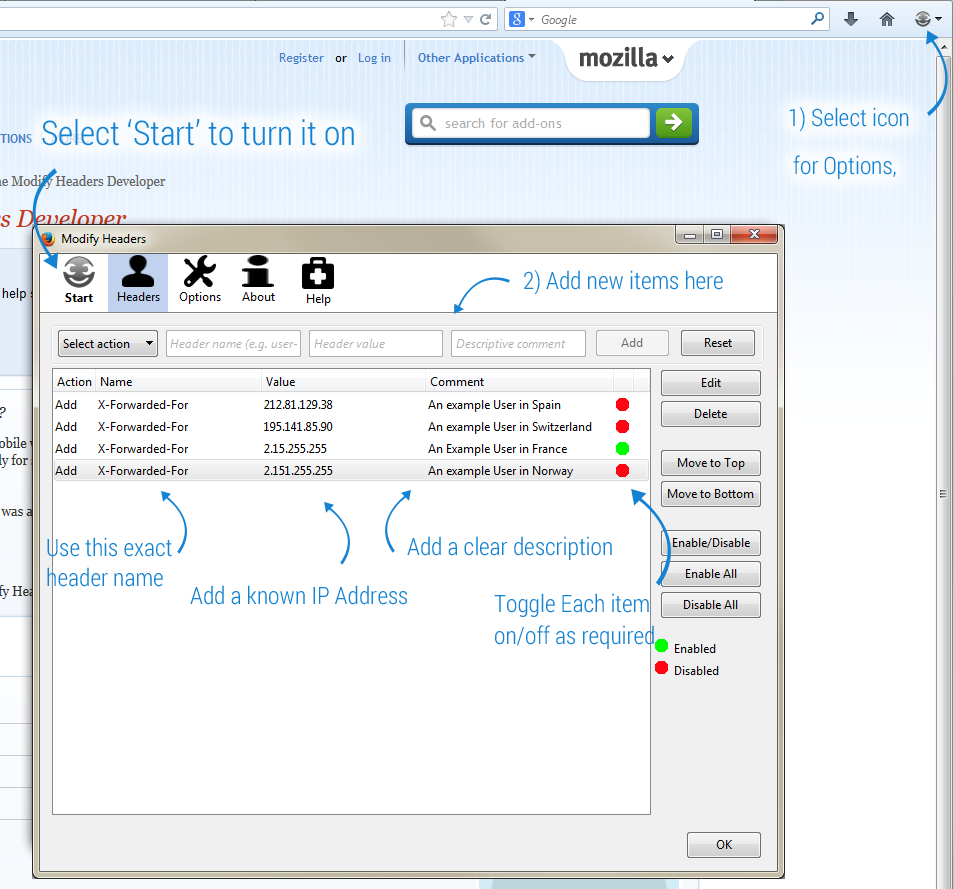
Adding IP Addresses as new Request Headers
There are many free tools to simplify request header modification. Whilst all slightly different tools, the required process is much the same.
-
Select 'New request header'
-
Choose 'Add'
-
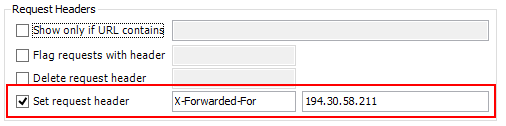
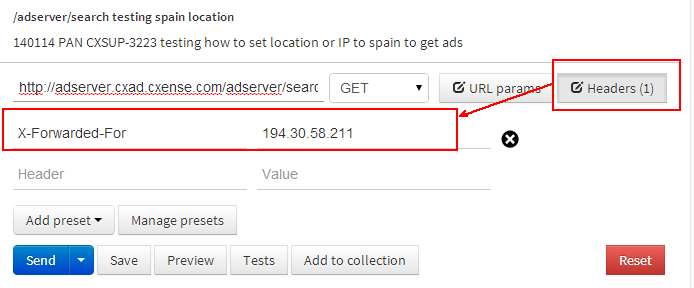
Set the "X-Forwarded-For" header known to be in the desired (targeted) location.
-
Add a name
-
Save
You can choose any one of the following example tools (you don't need more than one).
This page describes using 3rd Party Applications. Please take care when installing 3rd party tools - Cxense does not take any responsibility for any issues regarding 3rd party software. When you are not using these tools, you can disable or uninstall them to reduce the likelyhood of any problems.
Browser-based tools:
Modify Headers Plugin for Chrome
Modify Headers Add On for Firefox
Windows Applications
Fiddler2
Under the "Filters" tab, select the following:
Postman
Additional information could be found on http://www.getpostman.com/ .
OK, It's installed, now what ?
Once you have correctly configured your request headers, you are ready to start testing / troubleshooting Geo Targeted Campaigns !
Your next steps are dependant on what you are testing, though here's a few suggestions:
-
Copy-Paste an AdSpace tag into a text file, saving as *.html, and open in a browser - your browser will act as though it is in your targeted location, and you will see the targetd Ads appear - note, as this is a live test, you will be generating impressions and clicks.
-
Browse to a Publisher's website containing an AdSpace. The returned ads will be those targeted to the location you have setup within the steps above.