
We’ve migrated our documentation to a new site, which means some URLs have changed.
Audience

Piano Insight API チュートリアル

概要

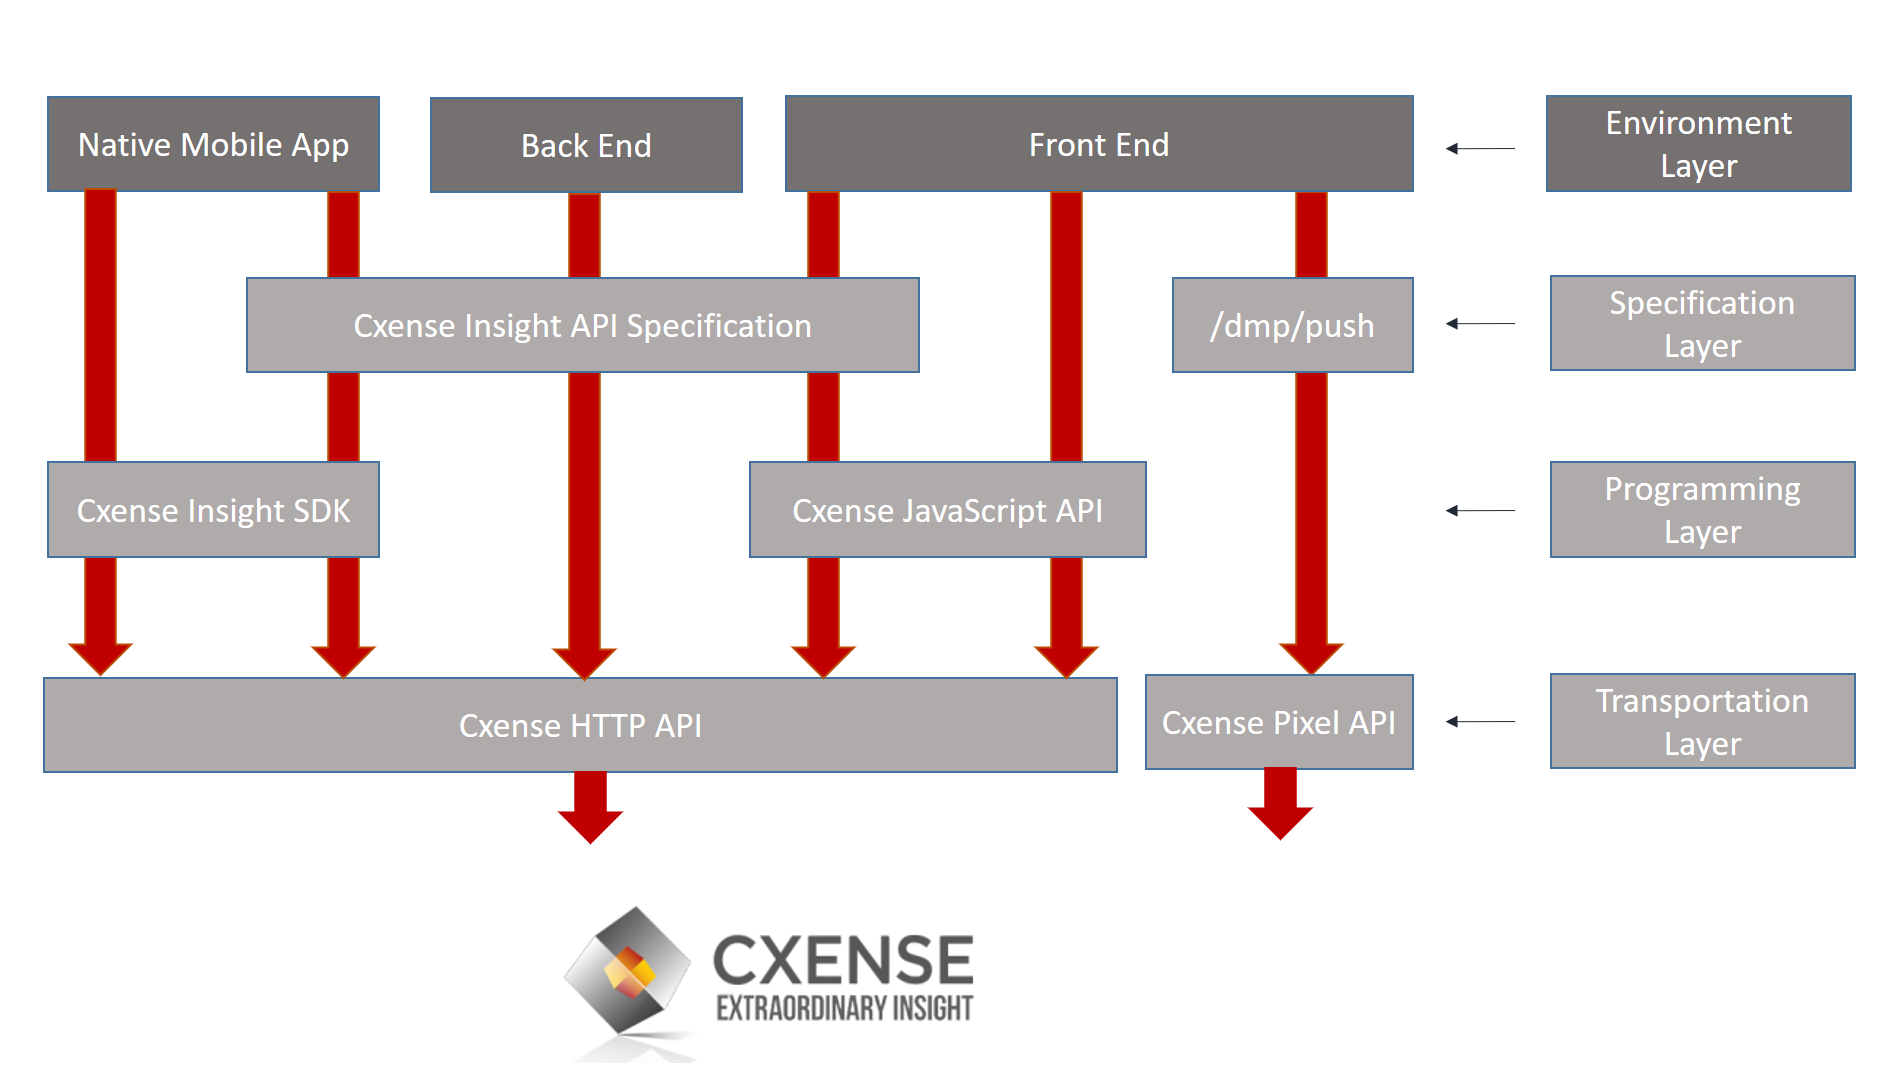
Piano Insightには多種多様なAPIが用意されています。 スタックの最下部にはCxense HTTP APIがあります。このAPIは輸送車両であると考えることができます。APIはPiano Insightにデータを引き渡す為の関数名(URL path)とパラメータリストを送信するために必要な機能が装備されています。HTTP APIの上にはJavaScript APIがあり、同じように汎用トランスポート機能を持っています。この場合、JSONP関数を介して関数名(path)とパラメータ(リクエストオブジェクト)をPiano Insightに送信します。一般的なパススルー機能に加えて独自の機能もいくつかあります。(「JavaScript API 関数」 のセクションを参照ください。) 
Piano Insight API の仕様 ではPiano Insightに転送できる機能とパラメータについて、その下にある2つのレイヤのいずれかの転送機能を使用して説明しています。ネイティブモバイルアプリ(HTMLをレンダリングしたり、ソースとしてHTMLを使用しない)では、モバイルSDK(AndroidとiOSのみ)として提供される別のAPIが用意されています。
api layers.png


今まで説明したのは図の左側部分についてです。 右側はPiano Insight APIの特定のレイヤー(/dmp/push関数はpixel gifとして送信することができます。これはHTTP APIの特殊な発展型です。)についてです。

このチュートリアルでは、まずGUI上にてAPIリクエストを作成し、cx.pyを使用してコードを作成します。
Webページのコードは、Python 3.xを使用してJavaScriptとバックエンドコードを使用して記述されます。

Piano Insight API の簡易例

簡単なPiano Insight APIの例から始めましょう。
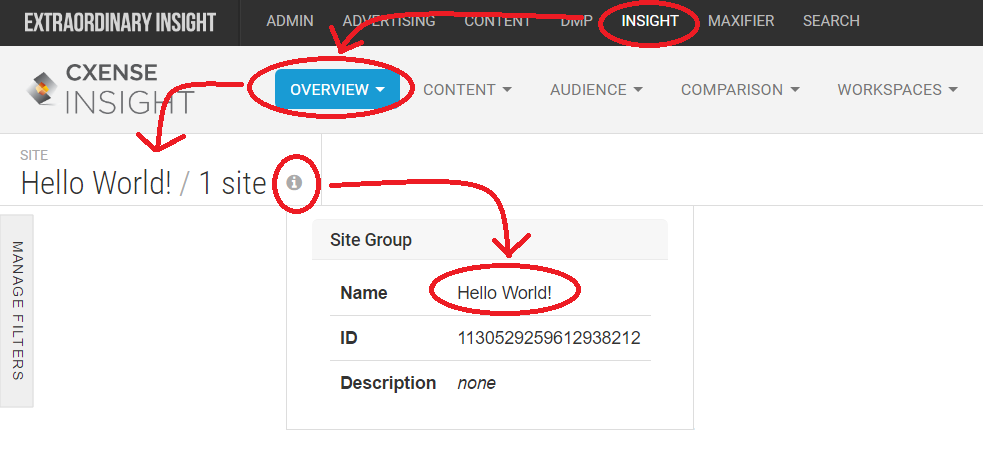
GUIを操作して次の図の通り、Hello Worldという名前のサイトグループを見ることができます。
以降のいくつかの例では、サイトグループ情報の一部としてそのサイトグループ名を取得します。
site group name.png

GUIを介したAPI関数の実行

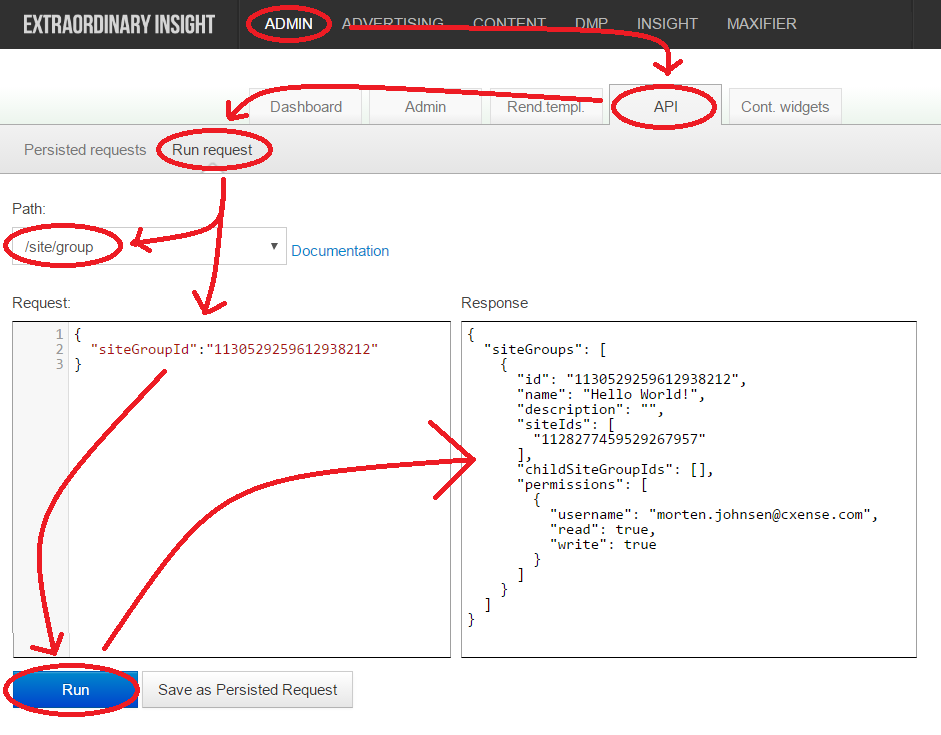
サイトグループの情報を取得するには、API /site/groupを実行します。
最もシンプルな方法は、以下の図のようにGUIから関数を実行することです。
読み取り権限を持つサイトグループについては、サイトグループIDを知っていれば、サイトグループに紐づく情報を取得可能です。
runFunction.png

cx.pyツールを使用したAPIの実行

Piano Insight は、Pythonベースのコマンドラインツールを用意しています。このツールはcx.pyツールのインストールの手順に従って利用できます。コマンドラインの構文はOSによって異なります。
下記は上記のGUIで実行したのと同じ機能のunIx / MacバージョンとWindows版のコマンドラインバージョンです。

unix/Mac: $ python cx.py /site/group '{"siteGroupId":"1130529259612938212"}'
Windows:  > python cx.py /site/group "{\"siteGroupId\":\"1130529259612938212\"}"


Python 3.xスクリプトからAPIの実行

GUIまたはcx.pyツールを使用して/site/group関数を実行した場合では、認証処理は必要はありませんでした。これはPiano Insightにログインした時、またはcx.pyツールの利用に必要な.cxrcファイルに資格情報を保存する事で予め処理されていました。 しかし、独自のスクリプトを作成する際には認証処理を含める必要があります。

下記はサイトグループ(id 1130529259612938212)を取得するためのPython 3.xコードです。

_username     = "<YOUR PIANO INSIGHT USER ID>"
_secret       = "<YOUR PIANO INSIGHT API KEY>"
_siteGroupId  = "<YOUR SITE GROUP ID>"
 
import json, datetime, hmac, hashlib, http.client
    
def cxApi(path, obj):
    date = datetime.datetime.utcnow().isoformat() + "Z"
    signature = hmac.new(_secret.encode('utf-8'), date.encode('utf-8'), digestmod=hashlib.sha256).hexdigest()
    headers = {"X-cXense-Authentication": "username=%s date=%s hmac-sha256-hex=%s" % (_username, date, signature)}
    connection = http.client.HTTPSConnection("api.cxense.com", 443)
    connection.request("POST", path, json.dumps(obj), headers)
    response = connection.getresponse()
    status = response.status
    responseObj = json.loads(response.read().decode('utf-8'))
    connection.close()
    return status, responseObj
  
def errorHandling(status, response, message):
    if status != 200:
        raise Exception("%s (http status = %s, error details: '%s')" % (message, status, response['error']))
 
def getSiteGroup(siteGroupId):
    status, response = cxApi('/site/group', {"siteGroupId":siteGroupId})
    errorHandling(status, response, "Failed to retrieve site group data")
    return response

print(json.dumps(getSiteGroup(_siteGroupId), indent=4)) 


以下の項目について注目します。

  • 8行目から10行目は、HMACベースのCxense固有認証HTTPヘッダーフィールド:X-cXense-Authenticationに利用されています。

    headers = {"X-cXense-Authentication": "username=<username> date=<date> hmac-sha256-<encoding>=<signature>"}
    

    認証処理に使用される9行目のスタンドアロンと10行目の署名の一部内の時刻が、Piano Insightサーバーで使用されている時間と同期している必要があります。認証不要のAPI /public/dateを使用すると、コンピュータ時計が正しい時刻を取得できない場合に、Piano Insight サーバーが使用する時刻を取得できます。
     

  • requestのデータ(12行目)と受信データ(15行目)の形式はJSONです。

  • 2つの結果が入った変数が返されます(17行目)、HTTPステータスコード(14行目の変数ステータス)、および結果データ(13行目の可変パラメータ)

  • 200以外のステータスコードはエラーになります(20行目)

cx.pyツールが使用するのと同じ.cxrcファイルから資格情報を取得する場合は、この機能をスクリプト内に追加します。

import os
 
def getCredentials():
	username = None
	secret = None
	rc = os.path.join(os.path.expanduser('~'), '.cxrc')
	if os.path.exists(rc):
	    for line in open(rc):
	        fields = line.split()
	        if fields[0] == 'authentication' and len(fields) == 3:
	            username = fields[1]
	            secret = fields[2]
	return username, secret

他プログラミング言語を利用する場合

上記の例では、Python 3.xをプログラミング言語として使用しました。 しかし、APIがHTTPプロトコルに基づいているので他のプログラミング言語を利用することも勿論可能です。他の言語(Pythonの2.xバージョンを含む)での上記サンプルコードと同じ例を以降紹介します。 ここで扱われていない言語については、API の認証方法を参照してください。

_username     = "<YOUR PIANO INSIGHT USER ID>"
_secret       = "<YOUR PIANO INSIGHT API KEY>"
_siteGroupId  = "<YOUR SITE GROUP ID>"
 
import import datetime, hashlib, hmac, httplib, json
 
def cx_api(path, obj):
    body = json.dumps(obj)
    date = datetime.datetime.utcnow().isoformat() + "Z"
    signature = hmac.new(_secret, date, digestmod=hashlib.sha256).hexdigest()
    headers = {"X-cXense-Authentication": "username=%s date=%s hmac-sha256-hex=%s" % (_username, date, signature)}
    connection = httplib.HTTPSConnection("api.cxense.com", 443)
    connection.request("POST", path, json.dumps(obj), headers)
    response = connection.getresponse()
    return response.status, json.load(response)
  
def errorHandling(status, response, message):
    if status != 200:
        raise Exception("%s (http status = %s, error details: '%s')" % (message, status, response['error']))
 
def getSiteGroup(siteGroupId):
    status, response = cxApi('/site/group', {"siteGroupId":siteGroupId})
    errorHandling(status, response, "Failed to retrieve site group data")
    return response

print json.dumps(getSiteGroup(_siteGroupId), indent=4)


import java.io.BufferedReader;
import java.io.InputStreamReader;
import java.net.URL;
import java.net.URLConnection;
import java.util.Formatter;
import javax.crypto.Mac;
import javax.crypto.spec.SecretKeySpec;

//External imports
import org.joda.time.DateTime;
import org.joda.time.DateTimeZone;
import org.joda.time.format.ISODateTimeFormat;

public class cx {
	
	private static String username = "<YOUR PIANO INSIGHT USER ID>";
	private static String secret = "<YOUR PIANO INSIGHT API KEY>";
	private static String siteGroupId = "<YOUR SITE GROUP ID>";
	
	public static String cxApi(String path, String obj) throws Exception{
        Mac mac = Mac.getInstance("HmacSHA256");
        mac.init(new SecretKeySpec(secret.getBytes("UTF-8"), "HmacSHA256"));
        String date = ISODateTimeFormat.dateTime().print(new DateTime(DateTimeZone.UTC));
        mac.update(date.getBytes("UTF-8"));
        byte[] signature = mac.doFinal();
        Formatter hex = new Formatter();
        for (byte b : signature) {
            hex.format("%02X", b);
        }
        URLConnection connection = new URL("https://api.cxense.com"+path+"?json="+obj).openConnection();
        connection.setRequestProperty("X-cXense-Authentication", "username=" + username + " date=" + date + " hmac-sha256-hex=" + hex);
        connection.connect();
        BufferedReader reader = new BufferedReader(new InputStreamReader(connection.getInputStream()));
        hex.close();
        return reader.readLine();
	}
	
	public static String getSiteGroup(String siteGroupId) throws Exception{
		return cxApi("/site/group","{\"siteGroupId\":"+siteGroupId+"}");
	}
	
	public static void main(String args[]) throws Exception{
		System.out.println(getSiteGroup(siteGroupId));
	}
}


<?php

$_username    = '<YOUR PIANO INSIGHT USER ID>';
$_secret      = '<YOUR PIANO INSIGHT API KEY>';
$_siteGroupId = '<YOUR SITE GROUP ID>';

function cxApi($path, $obj) {
    $date = date('Y-m-d\TH:i:s.000O');
    $signature = hash_hmac("sha256", $date, $GLOBALS['_secret']);
    $url = 'https://api.cxense.com'.$path;
    $options = array(
        'http' => array(
            'header'  => 'Content-Type: application/json; charset=UTF-8'.chr(13).chr(10).
                         'X-cXense-Authentication: username='.$GLOBALS['_username'].' date='.$date.' hmac-sha256-hex='.$signature.chr(13).chr(10),
            'method'  => 'POST',
            'content' => $obj,
        ),
    );
    $context = stream_context_create($options);
    return file_get_contents($url, false, $context);
}

function errorHandling($response) {
    if ($response === false) {
        $error = error_get_last()['message'];
        throw new Exception(substr($error, strpos($error, 'stream:') + 8));
    }
}

function getSiteGroup($siteGroupId) {
    $response = cxApi('/site/group', '{"siteGroupId":'.$siteGroupId.'}');
    errorHandling($response);
    return $response;
}

var_dump(getSiteGroup($_siteGroupId));
 
?>

PHPのコードをXAMPPを使ってWindowsマシン上のローカルで簡易にテストする方法を How to Test PHP Code Locally で紹介しています。   

PHPの関数file_get_contents()がエラーを送出しないようにするには、allow-url-fopenの設定をphp.iniファイル内で1に設定する必要があります。 これはデフォルト値ですが、一部のホスティングプロバイダではそれを変更します。直前に説明した Windows の XAMPPツールの場合、ファイルは xampp\php\php.ini に格納されます。

バッチモード

複数の情報を取得したい場合、毎回APIリクエストを実行するのは非効率的です。Piano Insight APIの一部では一度のリクエストに100個までオブジェクトを含めることが可能です。最初の例でsiteGroupId一つだけのリクエストだったコードが配列(Pythonでは'リスト'と呼ばれます)になっています。

unix/Mac: $ python cx.py /site/group '[{"siteGroupId":"1130529259612938212"},{"siteGroupId":"9999999999999999999"}]'
Windows:  > python cx.py /site/group "[{\"siteGroupId\":\"1130529259612938212\"},{\"siteGroupId\":\"9999999999999999999\"}]"

サイトグループ"1130529259612938212"に対してはアクセス権を持ち、サイトグループ "9999999999999999999" に対してはアクセス権が無い場合は次のような応答が返されます。1つのリクエストオブジェクトを送り1つの結果が返ってきた時とは違い、今度はそれぞれの情報の配列が返されます。

[
    {
        "siteGroups": [
            {
                "permissions": [
                    {
                        "write": true,
                        "username": "morten.johnsen@cxense.com",
                        "read": true
                    }
                ],
                "name": "Hello World!",
                "childSiteGroupIds": [],
                "siteIds": [
                    "1128277459529267957"
                ],
                "id": "1130529259612938212",
                "description": ""
            }
        ]
    },
    {
        "error": "Invalid request: Invalid siteGroupId '9999999999999999999'"
    }
]


以下では、Pythonバージョンのバッチスクリプトを見ていきます。 個々の結果とバッチの両方を処理できるように、エラー処理をどのように変更したかご確認ください。

_siteGroupIds = ["1130529259612938212", "9999999999999999999"] 
 
def errorHandling(status, response, message):
    if status != 200:
        errorMsg = None
        if type(response) is dict:
            if 'error' in response:
                errorMsg = response['error']
        elif type(response) is list:
            errorMsgs = [item['error'] for item in response if 'error' in item]
			errorMsg = errorMsgs[0]
            if len(errorMsgs) > 1:
                errorMsg = str(errorMsgs)
        if not errorMsg:
            errorMsg = str(response)    
        raise Exception("%s (http status = %s, error details: '%s')" % (message, status, errorMsg))
 
def getSiteGroup(siteGroupIds):
    status, response = cxApi('/site/group', [{"siteGroupId":siteGroupId} for siteGroupId in _siteGroupIds])
    errorHandling(status, response, "Failed to retrieve site group data")
    return response

print(json.dumps(getSiteGroup(_siteGroupIds), indent=4)) 

エラー処理と再試行

これまでの処理ではエラーが発生した場合処理を中断するか、その結果を出すのみでした。しかし、多くの場合、エラーに対処しながら処理を続ける必要があります。これには発生したエラーの分類に応じて再試行することも含まれます。 以下では、再試行をやめるまでの回数とコードを見ています。

import time, socket

def pauseAndContinue(exceptionType, tries, e):
    sleepTime = tries * tries * 10
    print("Error of type '%s': %s. Trying again in %s seconds" % (exceptionType, e, sleepTime))
    time.sleep(sleepTime)
    
def execute(path, requestObj, errorMsg, maxTries):
    response = None
    tries = 0
    while (tries < maxTries):
        tries += 1
        try:
            status, response = cxApi(path, requestObj)
        except socket.gaierror as e:
            pauseAndContinue('socket.gaierror', tries, e)
            continue
        except TimeoutError as e:
            pauseAndContinue('TimeoutError', tries, e)
            continue
        except ConnectionAbortedError as e:
            pauseAndContinue('ConnectionAbortedError', tries, e)
            continue
        except ConnectionResetError as e:
            pauseAndContinue('ConnectionResetError', tries, e)
            continue
        except ResourceWarning as e:
            pauseAndContinue('ResourceWarning', tries, e)
            continue
        except Exception as e:
            raise Exception('Unhandled connection error: "%s"' % str(e))
        
        try:
            errorHandling(status, response, errorMsg)
            break
        except Exception as e:
            errorText = None
            if status == 401:
                errorText = 'Request expired'
            elif status == 500:
                errorText = 'Error while processing request'    
            elif status == 503:
                errorText = 'Service Unavailable' 
            if errorText and errorText in str(e):
                pauseAndContinue(errorText, tries, e)
                continue
            raise Exception(str(e))
    if not response:
        raise Exception(errorMsg)
    return response

def getSiteGroups(siteGroupIds):
    return execute('/site/group', [{"siteGroupId":siteGroupId} for siteGroupId in _siteGroupIds], "Failed to retrieve site group data", 3)

上記コードで3種類のエラーがあることに注目してください:

  • Piano Insight とスクリプト独自の問題(socket.gaierrorのような典型的な接続の問題)
    Piano Insight のサーバーエラー (HTTP error 503, Service Unavailableなど)
    使用方法のエラー (存在しないサイトグループIDを用いてリクエストを行なった場合など)

エラーハンドリングや再試行のテストを行いたい場合には、ネット接続を切った状態でスクリプトを実行すれば可能です。下記はその際の出力です。 各再試行ごとに、再試行回数を減らしたり減らしたりする方法に注意してください。

Error of type 'socket.gaierror': [Errno 11001] getaddrinfo failed. Trying again in 10 seconds
Error of type 'socket.gaierror': [Errno 11001] getaddrinfo failed. Trying again in 40 seconds
Error of type 'socket.gaierror': [Errno 11001] getaddrinfo failed. Trying again in 90 seconds
Traceback (most recent call last):
                 :
Exception: Failed to retrieve site group data

Web Pageから実行するAPI

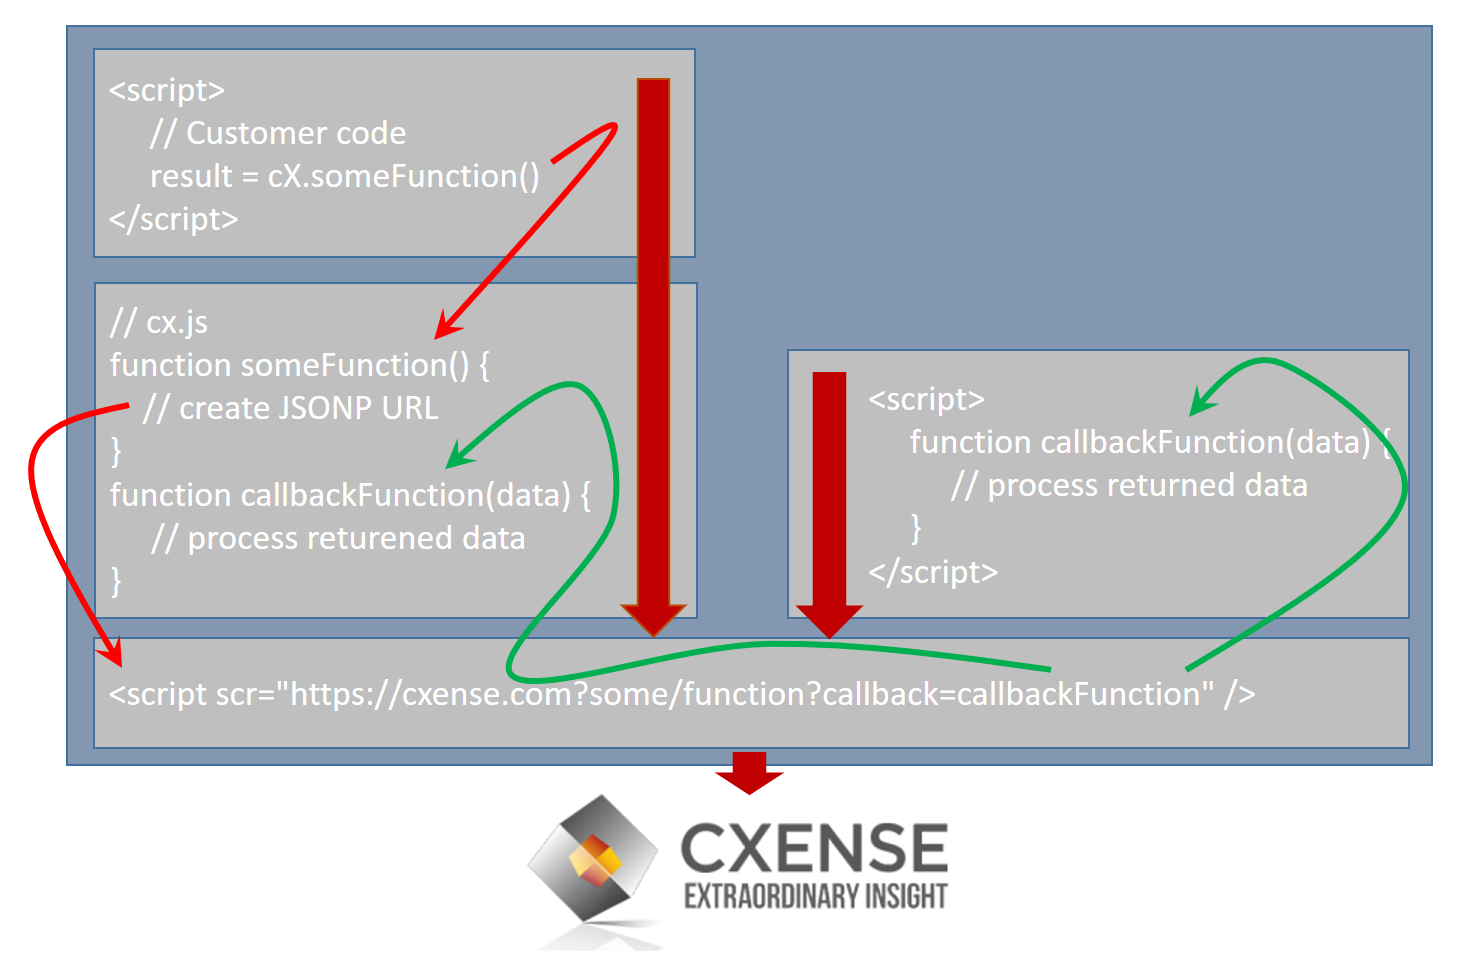
Piano Insight APIをWebページから実行するには次の二つの方法があります。望ましい方法はcx.jsで提供されているCxense JavaScript APIを使用することです(cx_plain.jsでは整型されて読みやすくなっています)。しかし、JavaScriptが何らかの理由で使用できない場合、もう一つの方法であるCxense HTTP APIを代わりに利用することが出来ます。下の図の左側は、Javascript APIがHTTP APIの上にどのように配置されているかを示しています。一方、右側はHTTP APIを直接使用する方法を示しています。
jsonp.png


両者の原理は同じです。何らかの方法でURLパスに関数名が格納されているURLを作成します(上の図の/some/function)次に関数パラメータ(上の例には示されていません)とコールバック関数(callback=callbackFunction)を使用したURLクエリが続きます。コールバック関数は、JSONPメカニズムが返す結果を入力パラメータとして呼び出す関数の名前です。

JavaScript APIの実行

Webページ内からPiano Insight API機能を使用する際の問題は、エンドユーザが閲覧・実行可能なJavaScriptコードにユーザー名やapiキーを置くことが出来ず、認証をどのように設定するかです。その解決策としてPersisted Queryを使用します。 Persisted QueryはPiano Insight APIに特定のキーを与えてWebページからアクセスす可能にする機能です。詳細については、Persisted Queryチュートリアルを参照してください。

下記のサンプルでは、API site/group {"siteGroupId":"1130529259612938212"}のPersistedQueryを作成する方法を解説します。
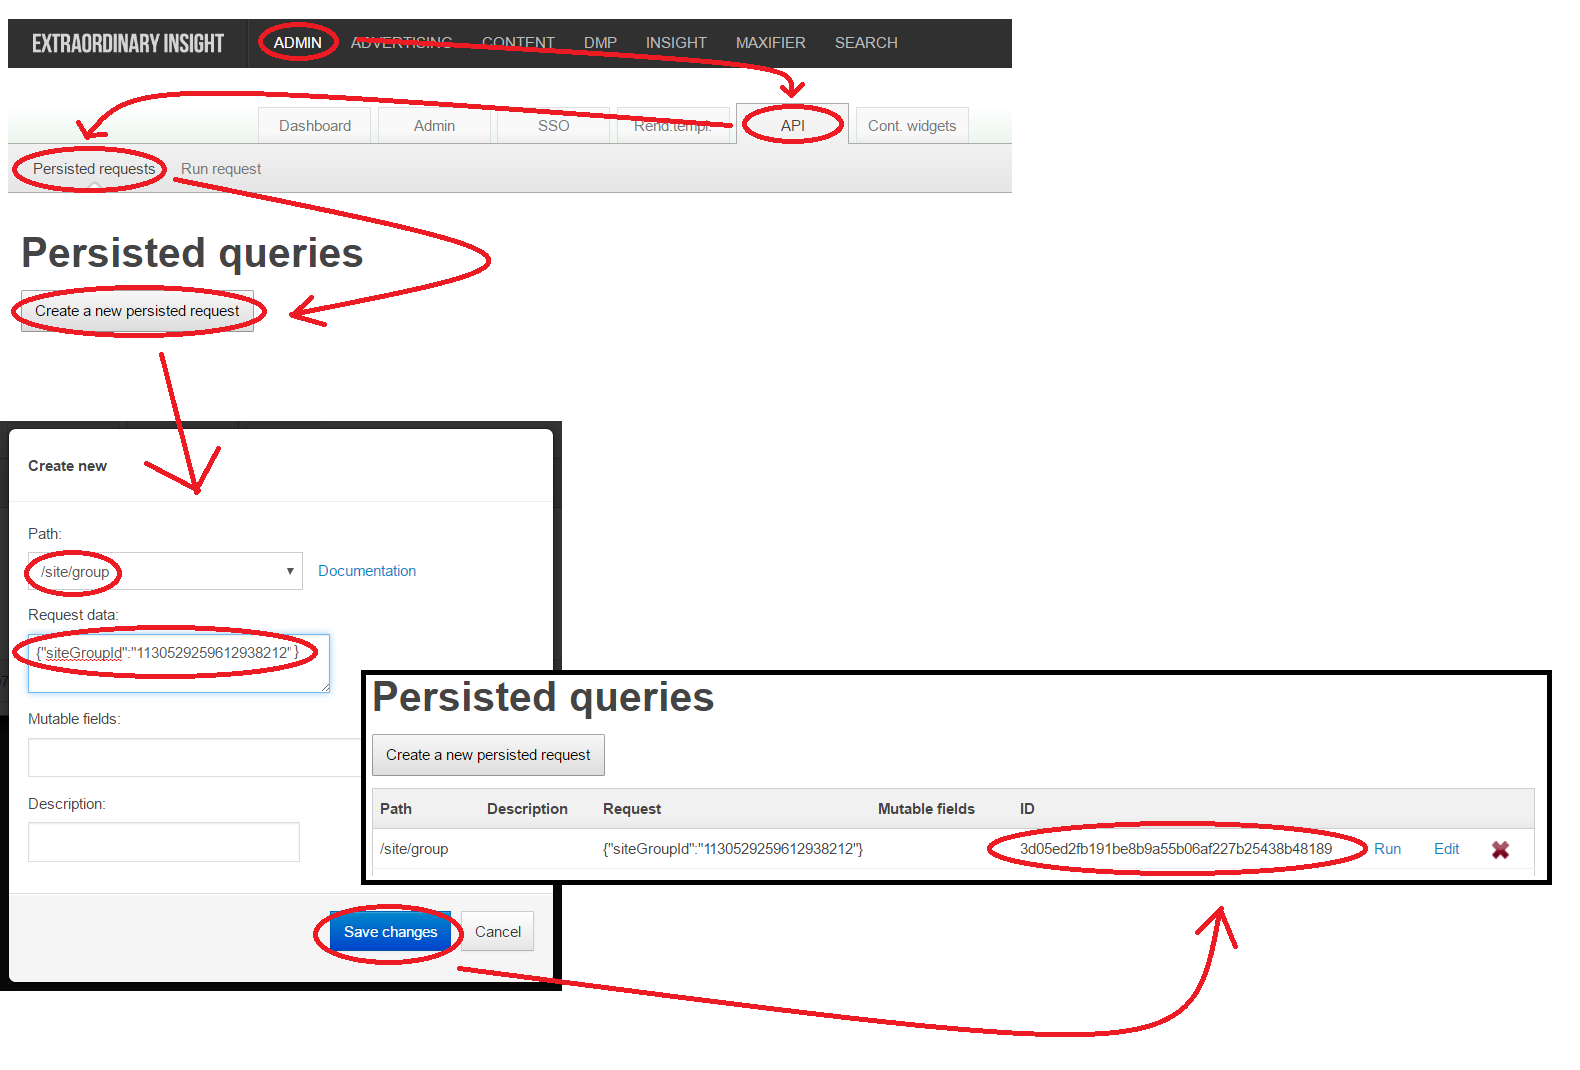
persistedQuery.png

ここではJavascriptのコードを使用しています。 htmlページを開くとわかるように、このチュートリアルの最初の例にあったGUI内で見たものと同じ出力が行われます。

<!DOCTYPE html>
<html>
	<body>
		<pre id="output"></pre>
		
		<script type="text/javascript" src="https://cdn.cxense.com/cx.js"></script>
		
		<script type="text/javascript">
			var persistedQueryId = "3d05ed2fb191be8b9a55b06af227b25438b48189";
			
		    var apiUrl = 'https://api.cxense.com/site/group?callback={{callback}}'
	            + '&persisted=' + encodeURIComponent(persistedQueryId)
		    cX.jsonpRequest(apiUrl, function(data) {
				document.getElementById("output").appendChild(document.createTextNode(JSON.stringify(data, null, 4)));
		    });
		</script>
		
	</body>
</html>

以下のHTMLページを開いた時にみられるように、アウトプットはこのチュートリアルの最初の例ではGUI内でみたものと同じものです。
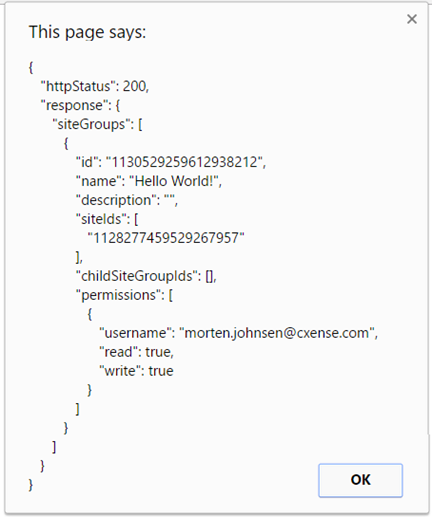
image2017-6-9 15 6 45.png

Persisted Queryを作成時にサイトグループIDを指定したので、上記のコードでは記述しませんでした。 次のセクションではWebページ内からサイトグループIDを変更可能な方法についても解説していきます。
入力ボックスやドロップダウンから選択したサイトIDを設定できるとします。 次の例は、WebページにサイトグループIDが設定されています。

<!DOCTYPE html>
<html>
	<body>
		<pre id="output"></pre>
		
		<script type="text/javascript" src="http://cdn.cxense.com/cx.js"></script>
		
		<script type="text/javascript">
		    var siteGroupId      = "1130529259612938212";
			var persistedQueryId = "3d05ed2fb191be8b9a55b06af227b25438b48189";
			
		    var apiUrl = 'https://api.cxense.com/site/group?callback={{callback}}'
	            + '&persisted=' + encodeURIComponent(persistedQueryId)
	            + '&json=' + encodeURIComponent(cX.JSON.stringify({"siteGroupId":siteGroupId}));
		    cX.jsonpRequest(apiUrl, function(data) {
				document.getElementById("output").appendChild(document.createTextNode(JSON.stringify(data, null, 4)));
		    });
		</script>
		
	</body>
</html>

しかし、ページを開くとサイトグループ情報ではなく、以下のエラーメッセージが表示されます。

{"httpStatus":400,"response":{"error":"Invalid request: Persisted request does not allow changes to field 'siteGroupId'"}}

これを回避するには、Persisted Queryの編集画面へ戻り、以下のようにWebページからリクエストに含めるパラメータを明示的に設定する必要があります。(Mutable Fields)
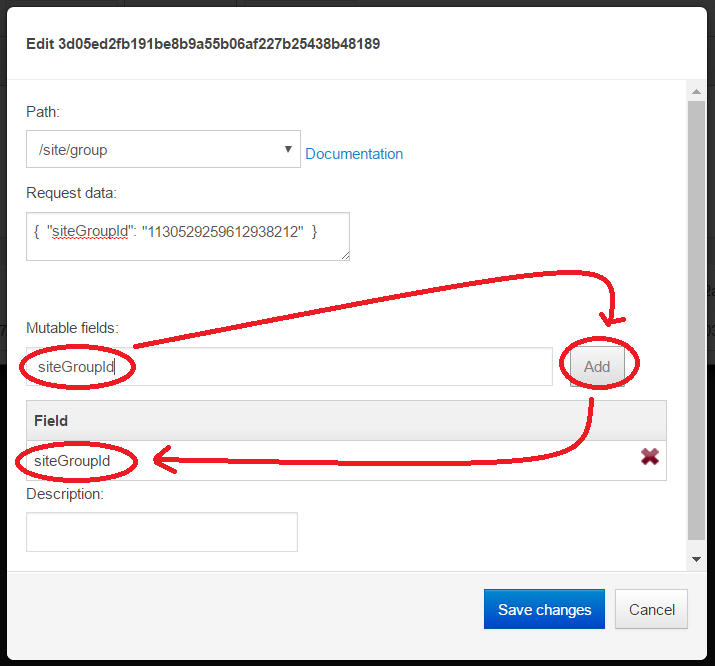
persistedQuery2.png

この後、Webページは前と同じ結果を表示するだけでなく、コード内のアクセス可能なサイトグループIDを(PersistedQuery作成者の権限に依存します。)自由に変更することが出来、返却される情報も設定したサイトグループIDに応じて返されるようになります。

HTTP APIの実行

JavaScript API経由で間接的ではなく、直接HTTP APIを使用することもできます。ブラウザの開発者ツール(ネットワーク)の前項のJSONP GETリクエストを参照します。 そうすると、次のようなリクエストを見つけられます。

https://api.cxense.com/site/group?callback=cXJsonpCBixa75cstfh59sdwv&persisted=3d05ed2fb191be8b9a55b06af227b25438b48189&json=%7B%22siteGroupId%22%3A%221130529259612938212%22%7D

読みやすくする為、リクエストURLをデコードします。

https://api.cxense.com/site/group?callback=cXJsonpCBixa75cstfh59sdwv&persisted=3d05ed2fb191be8b9a55b06af227b25438b48189&json={"siteGroupId":"1130529259612938212"}

Piano Insight サーバーとの通信に使用されるURLのコンポーネントは以下のとおりです。

Component/Parameter

Value

server

api.cxense.com

path

site/group

callback

cXJsonpCBixa75cstfh59sdwv

persisted

3d05ed2fb191be8b9a55b06af227b25438b48189

json request object

{"siteGroupId":"1130529259612938212"}

上記の通り、コールバック関数名は、cXJsonp +<ランダムな文字列>として動的に作成されています。
次にJavaScript APIを使用する時はコールバック関数には新しい名前が付けられます。 自分で実装した場合には下記の例のように関数名をmyCallbackFunctionと指定することができます。

<!DOCTYPE html>
<html>
<body>
   <script> function myCallbackFunction(data) { alert(JSON.stringify(data)) }</script>
   <script src="https://api.cxense.com/site/group?callback=myCallbackFunction&persisted=3d05ed2fb191be8b9a55b06af227b25438b48189&json=%7B%22siteGroupId%22%3A%221130529259612938212%22%7D"></script>
</body>
</html>

前述のコードと同じ出力が生成されます(これまでの例と同じサイトグループ情報)。

Pixel APIの実行

上記ではCxense HTTP APIを直接使用して、JavaScript APIの制限を回避する方法を学びました。
しかし、Piano InsightではHTTP APIを使用してアクセスする方法をお勧めしない機能があります。その1つがCxense Pixel APIのJavaScriptを使用しないDMPパフォーマンスイベント追跡機能です。

<!DOCTYPE html>
<html>
     <body>
          <div id="someAdSpace">
               <!-- DMP performance event reporting that the ad has been shown (impression) -->
               <img src="http://comcluster.cxense.com/dmp/push.gif?persisted=146dbdff2122683f0f4a7b8cab3144cf970bee64&siteId=1141842609373398487&type=impression&origin=dha-pixelDemo&userIds%2Ftype%3Adha%2Fid=whatever" width="0" height="0">

               <!-- The Cxense logo does the job of illustrating the ad -->
               <img src="https://www.cxense.com/sites/all/themes/tp_theme/favicon.ico" width="100" />
          </div> 
     </body>
</html>

上記では、Cxenseのロゴが実際の広告のプレースホルダーとしての役割を果たしている様子を見ています。 Pixelリクエストの目的は、特定の場所またはコンテキスト(origin = dha-pixelDemo)で広告にインプレッションが発生した(type = impression)ことを送信します。
'dha'はカスタマープリフィックスです。 Persistedクエリは、以前の/site/groupの例で使用したものとは異なります。 これは、/dmp/push 関数を使用できるよう作成されています。
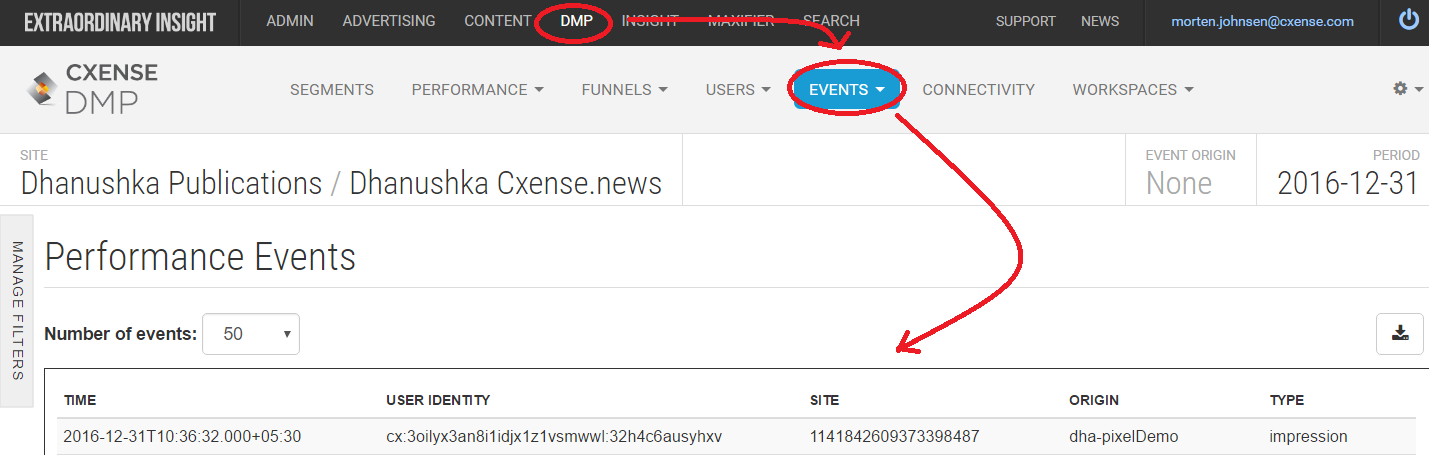
pixelEvent.png


JavaScript API 関数

これまでの例でPixel APIを使用して/dmp/push関数を呼び出すことを除いたJavaScriptの例では/site/group APIが使用されています。
後者では専用のJavaScript関数で直接サポートされていないため、汎用のJavaScript API関数cX.jsonpRequest()を使用しました。
Cxense Insight API の機能はこの様に実行する必要があります。ただしこれにはいくつかの例外があり、Cxense Insight APIでカバーされていないJavaScript APIの専用機能を持つ関数もあります。

下の表にいくつかの関数を記載します。 関数名をクリックすると詳細情報やサンプルコードにアクセスできます。

Function

Description

initializePage()

同一ページで新しいページビューイベントを発生させるために使われます。

setSiteId(siteId)

PageView Even()を送信するために必須です。 ページビューを登録するサイトを指定します。

sendPageViewEvent(args, callback)

取得した訪問ユーザの情報をPixelリクエスト をCxense Insightに送信します。

getUserId(createIfMissing

訪問ユーザのCxense CookieベースのユーザーIDを取得します。 例:alert(cX.getUserId())

addExternalId(params)

訪問ユーザのCxenseIDを、顧客orサードパーティが使用している外部IDと同期させます。

setCustomParameters(parameters, prefix)

追加のカスタムパラメータをページビューデータに追加します。

invoke(func)

主に同期コードを非同期で呼び出すために使用されます。

jsonpRequest()

任意の Cxense API とそのパラメータを渡すために使用される汎用関数。

sendEvent(type, customParameters, providedArgs)

Cxense InsightやDMPパフォーマンスイベント/ユーザーに付与されるデータの送信に使用します。

insertWidget(args, requestObject)

Cxense ContentのレコメンドウィジェットをWebページに設置する際に利用します。

getUserSegmentIds(requestObject)

ユーザが所属している全てのDMPセグメントのIDリストを取得する際に利用します。

JavaScript APIに関して何がどのように読み込まれるかについては、イベントデータを参照ください。

同期 or 非同期のJavaScript API

cx.jsファイルは、同期方式と非同期方式でロードできます。 まず同期させる方法を紹介します。

<script type="text/javascript">
    document.write('<scr'+'ipt type="text/javascript" src="http'+(location.protocol==='https:'?'s://s':'://')+'cdn.cxense.com/cx.js"></scr'+'ipt>');
    // The line above, produces one of the script tags below, depending on the protocol used (http or https). 
    // If one instead is hard coding the URLs, then notice that two different server names are being used depending on the protocol (cdn vs.scdn)
	// <script type="text/javascript" src="http://cdn.cxense.com/cx.js"></script>
	// <script type="text/javascript" src="https://scdn.cxense.com/cx.js"></script>
</script>
 
<script>
    cX.setSiteId('9999999999999999999');
    cX.sendPageViewEvent();
</script>

ファイル内の関数を使用する前に、まずcx.jsファイルをどのようにロードするのかを確認します。

cx.jsファイルと関数の呼び出す順番は決まりがありません。これは、すべての関数がcx.jsファイルが完全にロードされるまでキューに追加され、呼び出し処理が行われないためです。 以下の例ではcx.jsがロードされる前に関数を呼び出していますが、ロードが完了するまで、コードの実行(キューの処理)は停止します。

<script>
    var cX = cX || {};
    cX.callQueue = cX.callQueue || [];
    cX.callQueue.push(['setSiteId', '9999999999999999999']);
    cX.callQueue.push(['sendPageViewEvent']);
</script>
 
<script type="text/javascript">
	(function(d,s,e,t){e=d.createElement(s);e.type='text/java'+s;e.async='async';
	e.src='http'+('https:'===location.protocol?'s://s':'://')+'cdn.cxense.com/cx.js';
	t=d.getElementsByTagName(s)[0];t.parentNode.insertBefore(e,t);})(document,'script');
</script>

次の方法はcx.jsを非同期的にロードすることです。(ほとんどの)コードを同期して実行します。 これは、以下に示すようにcx.jsの呼び出し関数を介して行われます。

<script type="text/javascript">
    var cX = cX || {};
    cX.callQueue = cX.callQueue || [];
    cX.callQueue.push(['invoke', function() {
        cX.setSiteId('9999999999999999999');
        cX.sendPageViewEvent();
    }]);
</script>
 
<script type="text/javascript">
	(function(d,s,e,t){e=d.createElement(s);e.type='text/java'+s;e.async='async';
	e.src='http'+('https:'===location.protocol?'s://s':'://')+'cdn.cxense.com/cx.js';
	t=d.getElementsByTagName(s)[0];t.parentNode.insertBefore(e,t);})(document,'script');
</script>

このケースでは、invokeの呼び出しは非同期です(呼び出し後はキューに入れられます)。 呼び出しが処理されると、invoke内の関数は同期して実行されます(キューには入れられませんが、そのあとで実行されます)。

シングルページアプリケーション

AngularJS、EmberJS や MeteorJS などのようなSPAフレームワークの利用の増加に伴って、
SPA(シングルページアプリケーション)はますます一般的になってきています。Piano Insight のような分析ツールにとっての課題はユーザーが同じページに何度も訪問し続けることです。ユーザーにとっては視覚的に他のページに訪問しているかのように表示されますが、Piano Insight のようにページの識別子にURLを使うと、全てのページビューが1つの同じページに加算されてしまいます。これを克服するためには、視覚的なユーザー体験がレポートされるように調整するために現在のロケーションURLとそのリファラーURLをプログラム的に上書きする必要があります。

以下ではそのために必要となるビルディングブロックをもつページのサンプルをご覧いただけます。

<!DOCTYPE html>
<html>
<head>
    <title>Single Page Application with Piano Insight tracking</title>
</head>
<body>
 
	<div id="pageContent">
		// ここがプログラムやフレームワークを実際にページコンテンツに配置できる場所です
	</div>
 
	<script>
		// これは実際のページを生成するコード用に非常に単純化されたプレースホルダです
		var virtualLocationURL = "http://domain.com/news/ufoStory.html";
		var virtualReferrerURL = "http://domain.com/news/previousPageTheUserVisitedBeforeThisOne.html";
		document.getElementById("pageContent").innerHTML = "Breaking News - UFO landed on the White house lawn";
		singlePageApplicationPageViewEvent(virtualLocationURL, virtualReferrerURL)
	</script>
 
	<script>
		function singlePageApplicationPageViewEvent(locationURL, referrerURL) {
    		if (locationURL === referrerURL) {
				return;
			}
    		window.cX = window.cX || {}; cX.callQueue = cX.callQueue || [];
    		cX.callQueue.push(['initializePage']);
    		cX.callQueue.push(['setSiteId', '<YOUR SITE ID>']);
    		cX.callQueue.push(['sendPageViewEvent', { 'location': locationURL, 'referrer':referrerURL}]);
		}
    </script>
 
	<script type="text/javascript">
		(function(d,s,e,t){e=d.createElement(s);e.type='text/java'+s;e.async='async';
		e.src='http'+('https:'===location.protocol?'s://s':'://')+'cdn.cxense.com/cx.js';
		t=d.getElementsByTagName(s)[0];t.parentNode.insertBefore(e,t);})(document,'script');
	</script>
 
</body>
</html> 

前述のトラッキングスクリプトの例とこちらの主な違いは  initializePage() 関数を呼び出していることと
location と referrer が sendPageViewEvent() 関数の呼び出しに追加されていること、
singlePageApplicationPageViewEvent() という関数で全てをラップしていることです。

  • Cxense Insight では通常、同じページ訪問中に同じURLに対してレポートされる全てのページビューイベントを無視します。initialPage() 関数の目的は Cxense Insight に対して、この場合は新規ページビューは無視すべきではないということを伝えることです。

  • location パラメータは現在の仮想ページを表すようなURLをセットし、同じように referrer パラメータはユーザーがやってくる前の仮想ページのURLをセットします。

  • singlePageApplicationPageViewEvent() 関数でトラッキングコードをラップすることはプログラムがページのレンダリングコードが意味をなさない場所から新しいページビューをレポートする手軽な方法をもたらします。

無限スクロールページ

もう一つ共通ページタイプとして増えてきているのが、無限スクロールページです。1つのニュースページからスクロールすると次のニュースページが表示されます。ここでは前のセクションで説明したシングルページアプリケーションと同じような問題が発生します。つまり、あるページから物理的なページにスクロールダウンする時に、1つの仮想ページから次のページに移動するために、1つの同じ物理的なURLに対して様々の論理URLを操作しなければなりません。以下では3つのニュース記事を掲載する場合の例を確認いただけます。


<!DOCTYPE html>
<html>
<head>
    <title>Tracking Page Views on Infinite Scroll Pages</title>
</head>
<body>
    <script>
        var cX = cX || {}; cX.callQueue = cX.callQueue || [];
     
        function getTrackElementParams(subPageId){
            return {
                elementId: subPageId,
                trigger: {
                    on: function(state) { return state.visibility.timeHalf >= 0.5; },
                    callback: function(state) { infiniteScrollPageViewEvent(subPageId); }
                }
            }
        }
        function infiniteScrollPageViewEvent(subPageId) {
            window.cX = window.cX || {}; cX.callQueue = cX.callQueue || [];
            cX.callQueue.push(['initializePage']);
            cX.callQueue.push(['setSiteId', '<YOUR SITE ID>']);
            cX.callQueue.push(['sendPageViewEvent', { 'location': document.location + '/' + subPageId, 'referrer':document.location}]);
        }
    </script>
  
    <div id="page1" style="height:700px">
        <script> cX.callQueue.push(['trackElement', getTrackElementParams("page1")]); </script>
        This is the content of page 1 (a lot of white space follows)
    </div>
  
    <div id="page2" style="height:700px">
        <script> cX.callQueue.push(['trackElement', getTrackElementParams("page2")]); </script>
        This is the content of page 2 (a lot of white space follows)
    </div>
     
    <div id="page3" style="height:700px">
        <script> cX.callQueue.push(['trackElement', getTrackElementParams("page3")]); </script>
        This is the content of page 3 (a lot of white space follows)
    </div>
     
    <script type="text/javascript">
        (function(d,s,e,t){e=d.createElement(s);e.type='text/java'+s;e.async='async';
        e.src='http'+('https:'===location.protocol?'s://s':'://')+'cdn.cxense.com/cx.js';
        t=d.getElementsByTagName(s)[0];t.parentNode.insertBefore(e,t);})(document,'script');
    </script>
   
</body>
</html>


実装方法がシングルページアプリケーションの例を拡張したものであることにお気づきでしょうか?主な違いは新しいページにアクセスした際の検出の仕方にあります。シングルページアプリケーションは通常、ユーザーがリンクやボタンをクリックしたことが基準になるのに対して、無限スクロールでは次のページに入った時に検出しなければなりません。上の例では cx.js ライブラリの関数である trackElement() を利用してこれを行います。

モバイル端末

最後のいくつかのセクションで見られるように、Piano Insightはトラッキング対象となる全てのページにサイト所有者がPiano Insightスクリプトを実装することによって、ユーザーのトラフィックを追跡しています。デフォルトの実装では1つのサイトの実装から複数のサイトの実装まで実装されたスクリプトの唯一の違いはサイトIDです。このアプローチには2つのものが必要です。

  • JavaScriptを実行できるWebページを持っていること

  • Piano Insightの機能を持つ cx.js というCxenseのライブラリファイルが利用可能であること

通常のWebサイトでは、こうしたことは決して問題にはなりません。しかし携帯端末ではちょっとややこしいことがあります。Piano Insight とユーザートラッキングの文脈では、モバイルアプリケーションには3つのカテゴリがあります。

  • Webアプリ

  • ネイティブアプリ

  • ハイブリッドアプリ

Webアプリはデスクトップブラウザと同じようにWebブラウザを介してWebコンテンツを提供しますが、
より小さなスクリーンサイズで調整するために、寸法やサイズの問題(レスポンシブとも言われます)にできる限り注意を払う必要があります。デスクトップとモバイル端末の場合の両方に、HTML/CSS/JavaScriptの3つのコアテクノロジーがあります。一方で、ネイティブアプリはOS固有のアプリを介してコンテンツを提供し、消費されたインターネットコンテンツはコンテンツソース固有のAPI(多くの場合、SDKで提供されます)を使って、情報取得をする必要があります。

クロスプラットフォームであるWebアプリの長所はその開発とメンテナンスのコストが低いことです。短所は端末固有のリソースが使えないことや様々なモバイルプラットフォーム上のブラウザの品質にばらつきがあることです。

ハイブリッドアプリはHTML/CSS/JavaScriptを読み込み、理解し、必要に応じて実行できるネイティブアプリですが、ブラウザのようにこの情報を表示しません。代わりに単なる情報としてコンテンツ扱ったり、それをルックアンドフィールやユーザー操作/インタラクションにそれを配置したりします。もっと重要なことはネイティブアプリのように、ハイブリッドアプリは全ての端末のリソースにフルアクセスでき、
プラットフォームに関係なくWebアプリができない方法で情報を表示することができます。

モバイルSDK

ユーザーをトラッキングするために、デスクトップやタブレットですでに必要とされているもの以上に
Webアプリやハイブリッドアプリで追加で必要となる要求事項はありません。Piano Insight スクリプトはそのまま動作します。しかし、ネイティブアプリの場合には Piano Insightスクリプトは動作しません。
そのため、Mobile SDK を提供しています。ハイブリッドアプリについても単純なユーザートラッキング以上のもっと高度な機能を提供しているとも言えます。

モバイルSDKは以下の製品をサポートしており、それぞれのチュートリアルが付属しています。

  • Piano Insight

  • Piano Content

  • Piano DMP

  • Cxense Advertising

モバイルウェブページアクセラレータ

ウェブアクセラレータはウェブサイトへのアクセス時間を減らすプロキシサーバーです。通常のPiano Insight スクリプトで使うことはできないため、Google Accelerated Mobile Pages (AMP) と Facebook Instant Articles(FIA)の2つのモバイルウェブページアクセラレータ用に特別なユーザートラッキングスクリプトを提供しています。

タグマネージャを使ってCxenseスクリプトを実装する

Piano Insight スクリプトはほとんどのタグマネージャでそのまま動作します。しかしながら、タグマネージャに独自の関数を配置するような場合(例えばOptimizely)には、どこであってもcXがグローバル変数に残るよう確認して最初の行を以下のように変更する必要があります(var cXwindow.cX にしています)。 

<script>
    // var cX = cX || {}; を置き換えたコード
    window.cX = window.cX || {};
    cX.callQueue = cX.callQueue || [];
    cX.callQueue.push(['setSiteId', '9999999999999999999']);
    cX.callQueue.push(['sendPageViewEvent']);
</script>
 
<script type="text/javascript">
	(function(d,s,e,t){e=d.createElement(s);e.type='text/java'+s;e.async='async';
	e.src='http'+('https:'===location.protocol?'s://s':'://')+'cdn.cxense.com/cx.js';
	t=d.getElementsByTagName(s)[0];t.parentNode.insertBefore(e,t);})(document,'script');
</script>

トラブルシューティング

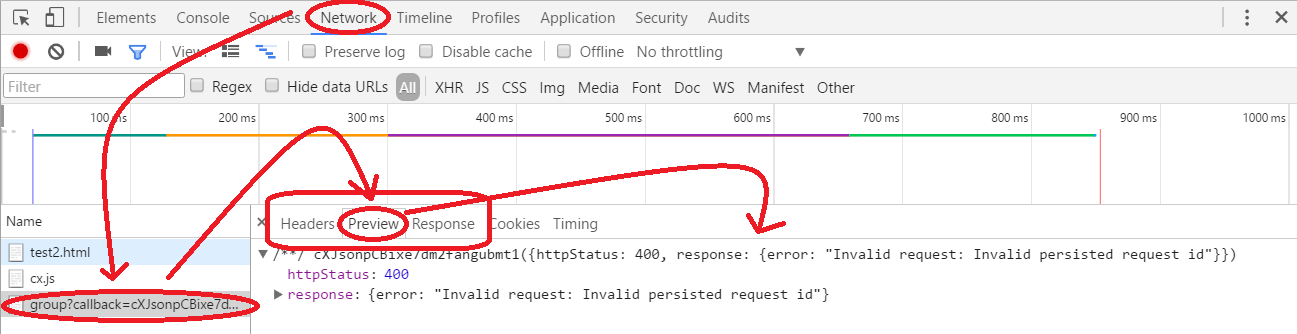
すべてのAPIは、HTTP API(先に呼び出されたトランスポートレイヤー)で情報が送られます。そのトラフィックを見れば「何かが失敗したのか、何がうまくいかなかったか」答えが見えてきます。

<!DOCTYPE html>
<html>
<body>
   <script> function myCallbackFunction(data) { alert(JSON.stringify(data)) }</script>
   <script src="https://api.cxense.com/site/group?callback=myCallbackFunction&persisted=XXXXXXXXXXXX&json=%7B%22siteGroupId%22%3A%221130529259612938212%22%7D"></script>
</body>
</html>

上記のサンプルコードにはこれまでに出てきたコードに対して意図的にエラーを加えています。persisted idが無効な文字列に変更されていることに注意してください。APIはwebページから実行されます。この時、ブラウザの開発者ツールのNetworkタブ内でトラフィックを確認する事が出来ます。トラフィックのレスポンスにあるエラーメッセージは無効なpersistedリクエストidを指摘する"Invalid persisted request id"です。
troubleshooting.png


Last updated: