
Integrations
Integrations are responsible for tracking user behavior as well as showing opt-in widgets. To create a new integration, click Add integration. You can also create an integration by going to Setup → Integrations. If you have Composer, you will need to copy/paste the integration code into the Composer integration code (detailed instructions below).
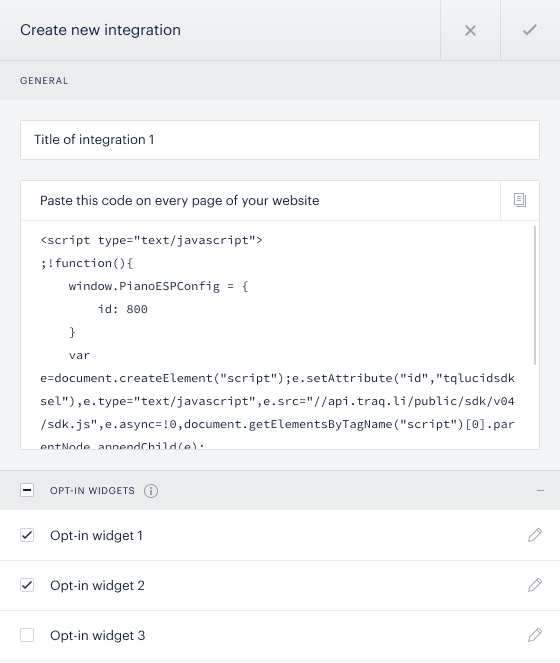
Enter a name, and select relevant opt-in widgets.
The Track anonymous visitors checkbox, when unchecked, allows you to disable user behavior tracking of non-identified users in case that is required by your personal data protection policy.
Once you have successfully added your integration, toggle the status to On.
Once you are finished, click Done.
Configuring your integration
Composer clients
If you have Composer, copy the “window.PianoESPConfig = { ... }” part of the integration code. Then open up Composer and click the Integrate button, then click Edit source. Paste the “window.PianoESPConfig = {...}” part of the source code under the <script> tag inside the function.
Like this, for example (containing your respective ESP Integration ID from the ESP dashboard under Setup > Integrations):
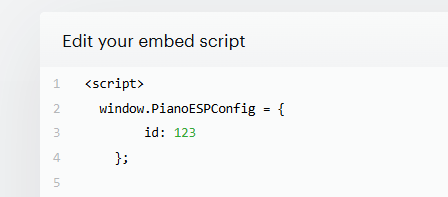
Then click Publish.
If you are using the Piano Composer script on all of your pages, it’s enough to add the ESP code snippet (incl. the relevant ESP integration ID) to it so that this will be loaded upon each pageview.
ESP-only clients
If you are a Piano ESP-only client, copy the integration code within your integration settings and then paste this code to every page on your site.
Sources
To create a source, go to Setup → Sources and then click Create sources. From here, enter in the URL of your RSS/Atom feed.
Piano ESP uses RSS feeds to incorporate the latest content into newsletters. This is the typical structure of the RSS feed:
<?xml version="1.0" encoding="UTF-8" ?>
<rss version="2.0">
<channel>
<guid></guid>
<title></title>
<link></link>
<description></description>
<item>
<title></title>
<link></link>
<date></date>
<pubDate></pubDate>
<enclosure url="" type="image/png"/>
</item>
</channel>
</rss>
Make sure your code contains the following tags to successfully work with ESP:
<item>
<guid> - unique identificator of the article
<title> - title of the article
<category> - use this tag to inform the content category
<link> - link to the article
<description> - short summary or full text of the article, depending on your needs
<pubdate> - date of publication: examples of formats that system currently supports -
2016-09-26T00:00:00.000Z (in the format: YYYY-MM-DDTHH:MM:SS.MSZ), and RFC822 format (Wed, 04 Sep 2020 0:00:01 GMT)
<date> - when the article was added to the RSS feed
<enclosure> - description of the object, which is attached to the article (usually includes image link).
</item>
Merge fields
Merge fields management allows you to create custom fields for your users, including fields such as first and last name, title, and company. To create a merge field go to Setup → Merge Fields and then click Create Merge Field, then enter the following data:
-
Name: name of your field
-
Type:
-
String:
-
Minimum length: minimum amount of characters that must make up the string
-
Maximum length: maximum amount of characters that must make up the string
-
-
Text (searchable field): Text is searchable, meaning you can find this merge field by the value or substring
-
Minimum length: minimum amount of characters that must make up the text
-
Maximum length: maximum amount of characters that must make up the text
-
-
Number: integer
-
Minimum value: minimum value of the number
-
Maximum value: maximum value of the number
-
-
Date:
-
Minimum value: minimum date entry
-
Maximum value: maximum date entry
-
-
List:
-
Unique items: all the list options, can do up to 16 options
-
Minimum selected items: the minimum amount of items that an end user can select
-
Maximum selected items: the maximum amount of items that an end user can select
-
-
Decimal:
-
Minimum value: minimum value allowed
-
Maximum value: maximum
-
Digits after the comma to display: how many digits to display after the period
-
-
Boolean: answer to a closed question, such as a checkbox or one of two options
-
-
Description: optional description for your field
Once your merge field has been created, its status is automatically set to Active, meaning that you can start using it to collect data. To change your merge fields status, click on the field and select one of the available options, including:
-
Read only: the current value of the merge field will be displayed but you cannot set new values for the merge field
-
Publisher sends values via API, which cannot be changed in the future
-
-
Write only: the merge field will not be displayed but you can gather and keep its values
-
Nobody’s going to see it, but it can be changed
-
-
Disabled: the merge field is unactivated and will not be displayed. The current value within it is saved but cannot be changed.
To input merge fields into your email campaign, go to your campaign’s template and select a visual editor block. From there, click on the Merge fields dropdown and select the merge field you would like to use.
You can transfer data into a user merge field using the Merge Fields Manipulation API:
This method allows to set values of up to 16 different custom user merge fields for up to 16 users at a time (therefore, up to 256 objects can be passed).
HTTP [POST] to:
http(s)://api-esp.piano.io/userdata/umfval/pub/<site_id>/set?
api_key=<api_key>
with the following JSON body:
{
  "user": <user_id> | "user_email",
  "umf": <umf_id> | "umf_name",
  "value": <umf_value>
}, { ...
}
will return HTTP code 200 upon success and the corresponding error code and message otherwise.
API accepts users as user IDs, user EMAILs, and user merge fields as user merge field IDs and user merge field NAMEs interchangeably.
Therefore, this method allows you to set the user merge field <value>(s) for a referenced user(s).
<site_id> (also known as <publisher_id>) should be queried from ESP Support. This value uniquely represents a site within the ESP dashboard.
All ESP Base URLs are listed here.
Fonts
This section describes an option that allows you to add a custom font to the ESP dashboard. After that, you can use a new font in newsletters and opt-in forms.
To add some particular font to the ESP you should go to the Setup → Fonts → Create font.
Then, you should specify the font name, font link, and fallback font:
Font name - the name of the font family you are adding.
External link - the link to the web font (e.g. Google fonts). The link should lead to the CSS file, the correct font-face properties, and not directly to the font file.
Fallback font - the font that will be used in case the custom font is not supported by email clients.
After the new font is added you can use it in the template builder for newsletters and opt-in forms.
User deactivation
The User Deactivation feature lets publishers automatically deactivate unengaged users, so you stop sending to people who never react. A user is treated as unengaged when, over a defined check period, they were sent messages but never interacted: for email, never opened or clicked; for push, never clicked a notification. These users are deactivated (unsubscribed) with the reason Unengaged, and messaging to them stops. This reduces inactive users and spam traps, helping you keep a clean, engaged list and protect your deliverability and sender reputation.
Deactivation is configured under Setup → User Deactivation, which has two tabs:
-
Email — deactivates users who have not opened or clicked emails within the period.
-
Push — deactivates users who have not clicked push notifications within the period.
Each tab is configured independently and runs on its own schedule.
Feature enablement
By default, the User Deactivation feature is turned off. To activate it, navigate to Setup → User Deactivation, open the Email or Push tab, switch it on, and click Save.
Note: Configure your conditions first: set the mode, exclusions, non-engagement period, and message count; and only then switch deactivation on and click Save. The run is scheduled from the settings saved at that moment, so enabling and saving before your conditions are in place can trigger a run with the wrong criteria.
Deactivation applies only to users with an active status and considers all campaigns sent by the publisher, with the option to exclude certain lists.
Mode
Each tab can run in one of two modes. By default, the system identifies and deactivates unengaged users across all lists; switch to Identify only to preview the impact without deactivating anyone.
|
Mode |
What it does |
|---|---|
|
Identify only |
Finds and counts the users that would be deactivated under the current settings, but deactivates no one. Use it to preview the impact before turning deactivation on. The result appears in the Settings used block (see below). |
|
Identify & deactivate |
Finds the unengaged users and deactivates them. |
Settings
Publishers can customize the following settings on each tab:
|
Setting |
What it does |
|---|---|
|
Deactivation enabled / disabled |
Master toggle for the tab. While disabled, no runs are scheduled. |
|
Mode |
Identify only, or Identify & deactivate (see above). |
|
Exclusion from deactivation |
Select specific mailing lists or push lists to exclude. Subscribers of an excluded list are never deactivated, even if unengaged. This keeps certain lists active while others remain subject to the deactivation criteria. |
|
Non-engagement period |
The inactivity period. A user must have had no interaction (no email open or click, or no push click) for at least this long to count as unengaged. The default is 3 months, and it can be customized (for example, 15 days, 1 month, or 3 months). |
|
Message count |
A minimum-volume guard. A user is deactivated only if at least this many messages were sent in the period with no interaction, so users who simply were not sent anything are not deactivated. By default the system requires at least 3 emails or push notifications; this can be adjusted between 1 and 100. |
|
Resubscription via Opt-in form (Email only) |
Controls whether a deactivated user can re-subscribe through an opt-in form. See Resubscription options below. |
Once the deactivation rule is activated and saved:
-
The system periodically checks for unengaged users based on the defined criteria.
-
Users identified as unengaged have their status changed to "Unengaged" across all associated lists, and messaging to them stops. However, unengaged users are NOT removed from the list(s).
Settings used (previous-run summary)
Below the controls on both tabs is a status block that reports the last run and, importantly, the exact settings that were in effect at the time of that run; not the values currently in the form. So if you change the form after a run, this block still shows what actually executed.
-
Next deactivation — when the next run is scheduled. Shows Not scheduled when disabled, or Will be performed shortly right after enabling.
-
Previous deactivation — the date of the last run and how many unengaged users it identified or deactivated.
-
Settings used — the snapshot of that run: the mode, the excluded mailing or push lists, the inactivity period, and the minimum number of messages sent without any interaction (shown as Emails without interaction or Notifications without interaction).
This is what makes Identify only useful: run it once, then read the Settings used block to see how many users would be deactivated under those exact settings. If the number looks right, switch the mode to Identify & deactivate.
Resubscription options
Unengaged users can reactivate their subscriptions via the My Subscriptions page or by filling out an opt-in form.
In the User Deactivation settings (Email tab), publishers can define the opt-in form resubscription process:
-
Allow deactivated user resubscription via Opt-in form with DOI campaign confirmation (Default and Recommended): Deactivated users must confirm their intention to resubscribe via a Double-Opt-In (DOI) campaign.
-
Allow deactivated user resubscription via Opt-in form without any additional confirmations: Deactivated users can resubscribe without any further confirmation.
-
Do not allow deactivated user resubscription via Opt-in form: Deactivated users are not allowed to resubscribe via the opt-in form.
Analytics and reporting
The Unengaged metric is available under the Unsubscribe details tab in the Analytics → Email Performance → Mailing List Activity page.