Campaigns
To create an email campaign, go to Email → Campaigns.
Click the Create campaign button in the upper right-hand corner, and you will be shown the following modal window.
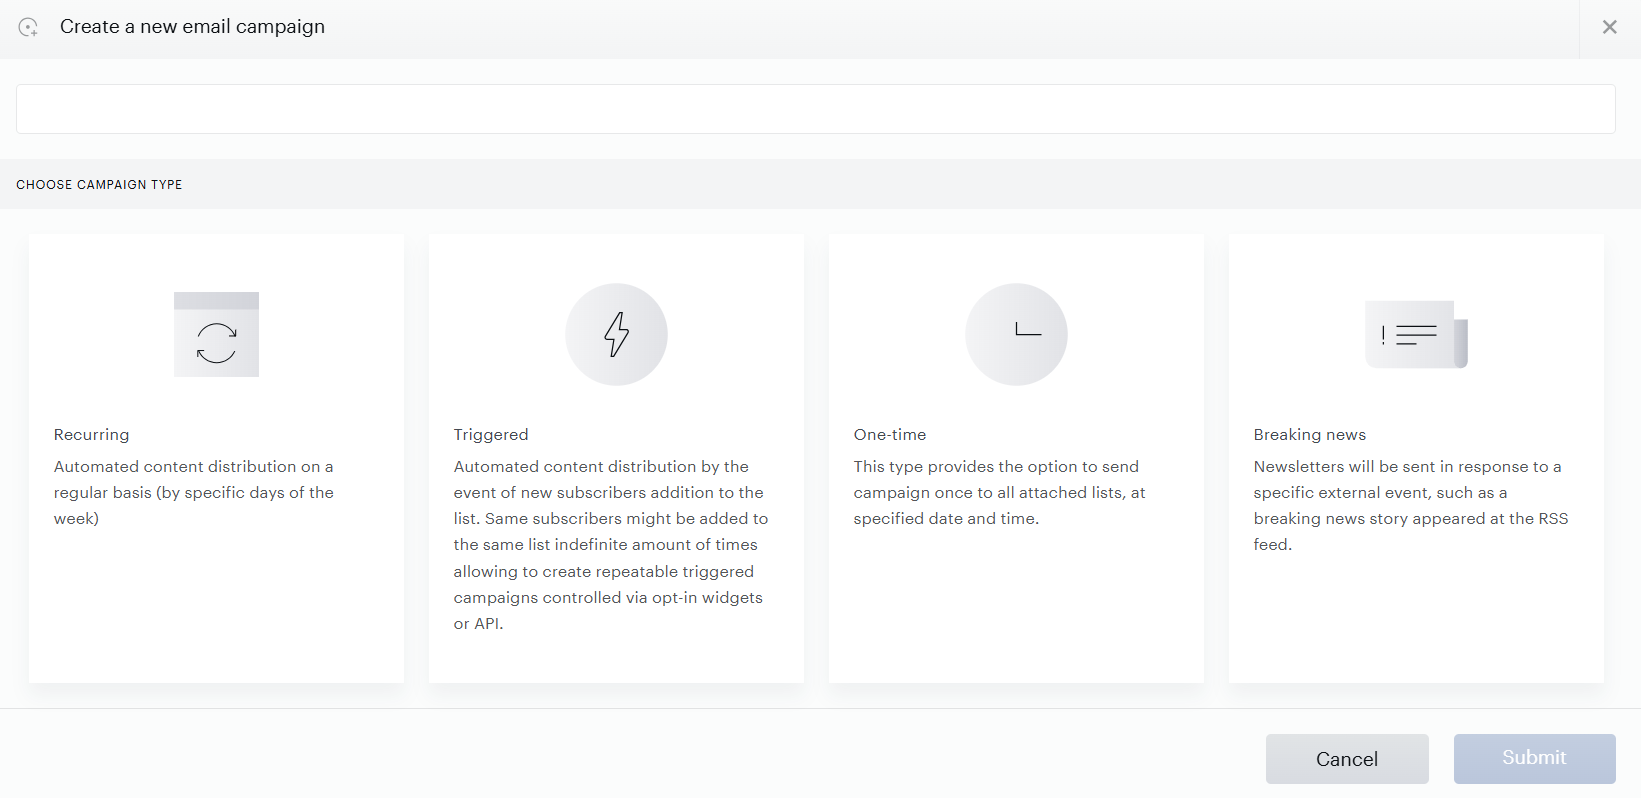
Enter a campaign name (internal use only) and select a campaign type: recurring, triggered, one-time, or breaking news, and then click Submit. This will open the email campaign creation wizard, which guides you through six steps, each in its own tab: General, Content Sources, Template & Style, Mailing Lists, Schedule, and Integrations. We'll go over each of these steps in more detail later, starting with this section.
Email campaign curation
Once your email campaign is created, it will appear on the Campaigns page, where you can manage it - activate or disable it, view statistics, edit, move it to the archive, or delete it.
Keep in mind that all archived campaigns are moved to the Archive category. However, you can still access their performance data on the Analytics page, and even restore and reuse them if needed.
Activating and disabling are the two actions you'll perform most often on the Campaigns page. Both have a standard path and an override path so you can respond to real-time conditions, such as pending background tasks or an in-flight send.
Activate a campaign
Activating a campaign moves it from a draft or disabled state into the active state, so it starts sending according to its schedule. To activate a campaign, open it from the Campaigns page and click Activate. If the campaign has no pending background tasks, it becomes active immediately.
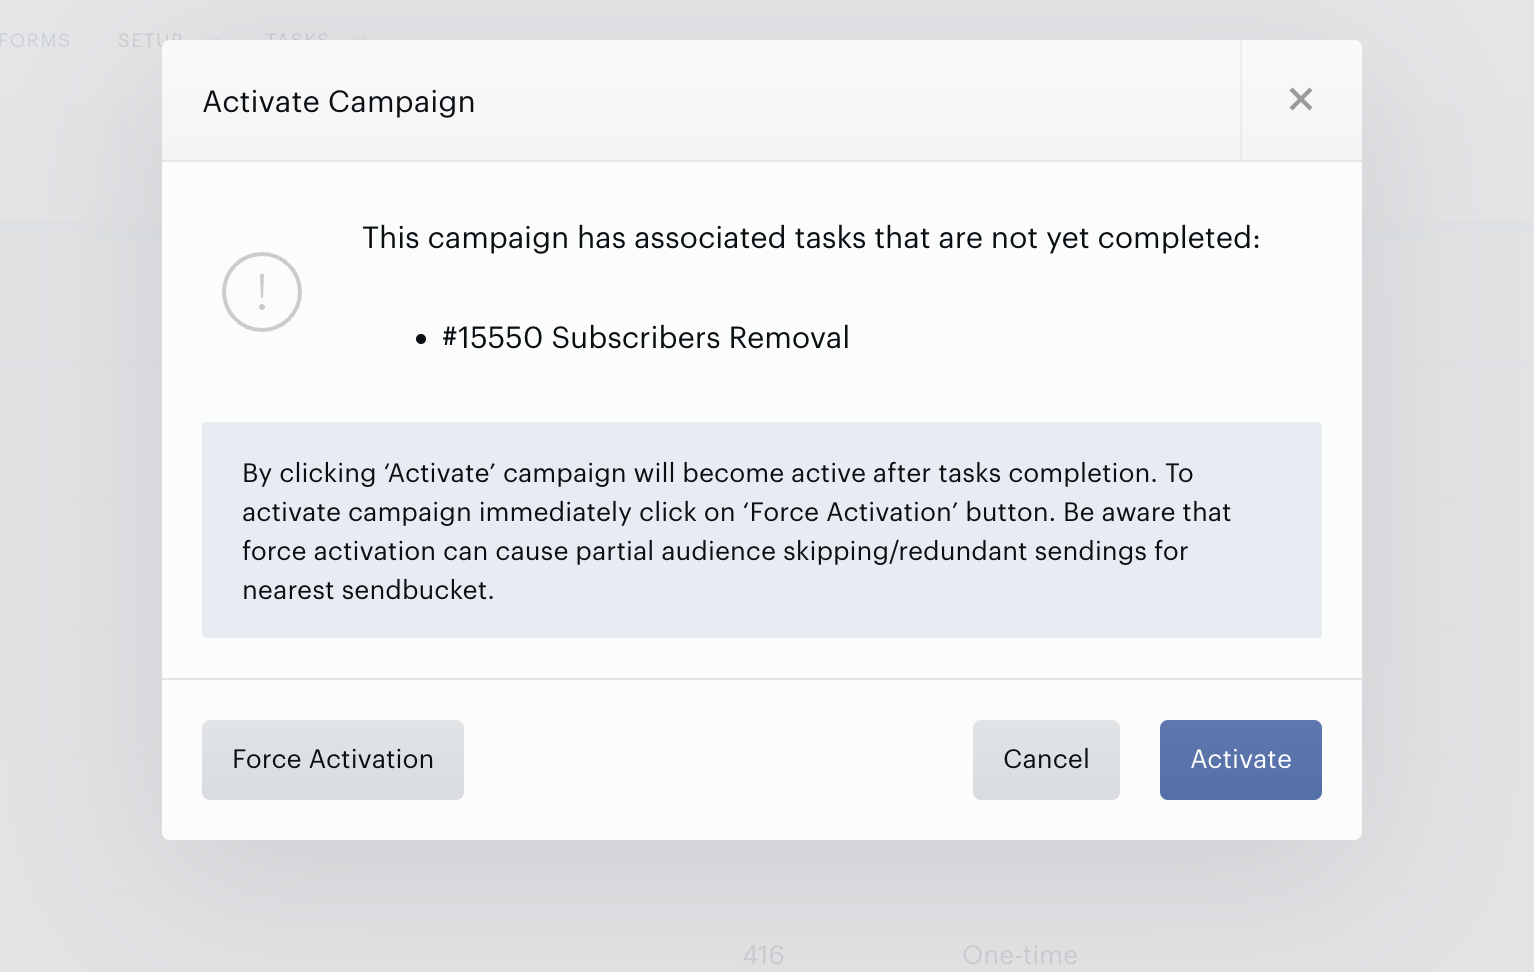
If the campaign has associated tasks that are still in progress, for example, a subscriber import or a subscriber removal task triggered by a mailing list change, the Activate Campaign dialog lists the pending tasks and offers two options.
|
Button |
What it does |
When to use it |
|
Activate |
Activates the campaign once all associated background tasks finish. The campaign becomes active after task completion. |
You want a clean send and can wait for background tasks (such as audience updates) to complete first. |
|
Force Activation |
Activates the campaign immediately, bypassing any pending background tasks. |
You need the campaign to start sending now and are willing to accept the trade-offs described below. |
Important: Force Activation can cause partial audience skipping or redundant sendings for the nearest send bucket, because the campaign starts before audience-changing tasks have finished. Use it when timeliness matters more than perfect audience accuracy for that send.
The Force Activation button only appears in the Activate Campaign dialog when the campaign has at least one associated task that is not yet complete. If there are no pending tasks, the standard Activate action runs immediately and no override is shown.
Deactivate a campaign
Deactivating a campaign stops it from sending further messages. To deactivate, open the campaign and click Deactivate. If the campaign is not currently sending, it is deactivated immediately.
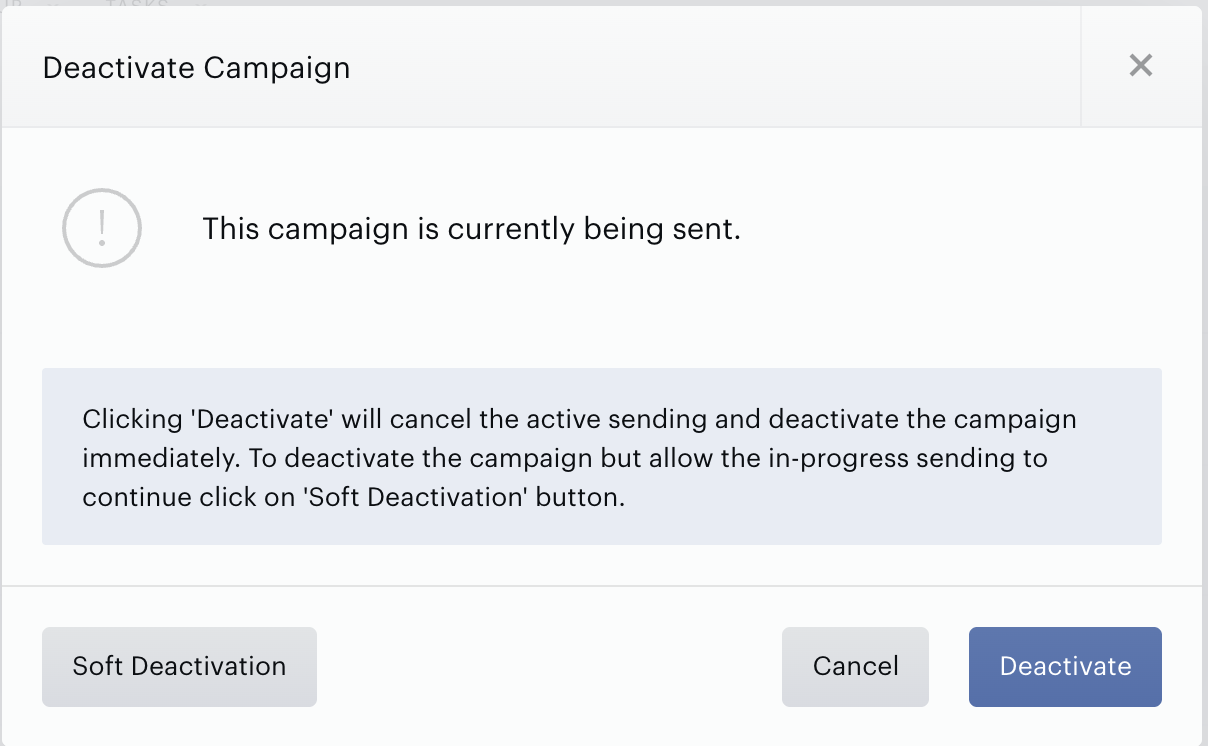
If the campaign is currently being sent, the Deactivate Campaign dialog offers two options so you can choose how to handle the in-flight send.
|
Button |
What it does |
When to use it |
|
Deactivate |
Cancels the active sending and deactivates the campaign immediately. Recipients who have not yet been sent to in the current batch are skipped. |
You need to stop everything right away, for example, a content issue was just discovered. |
|
Soft Deactivation |
Deactivates the campaign but allows the in-progress send to finish naturally. No new sends are triggered after the current batch completes. |
You want to end the campaign but don't want to interrupt subscribers already mid-batch. |
The Soft Deactivation button only appears in the Deactivate Campaign dialog when the campaign is in the Sending state. If the campaign is scheduled, active but idle, or already finished, deactivation happens immediately and no override is shown.
Note: After deactivation, the recurring campaign remains on the Campaigns page in the Disabled state and can be reactivated later. Its analytics and performance data are preserved, and the same applies to archived campaigns you later restore.
Types of Campaigns
There are two types of campaigns available:
-
Default: recurring, triggered, one-time, or breaking news
-
Service: DOI (Double Opt-In)
You can use the filter function to quickly find specific campaign types, including drafts or archived ones.
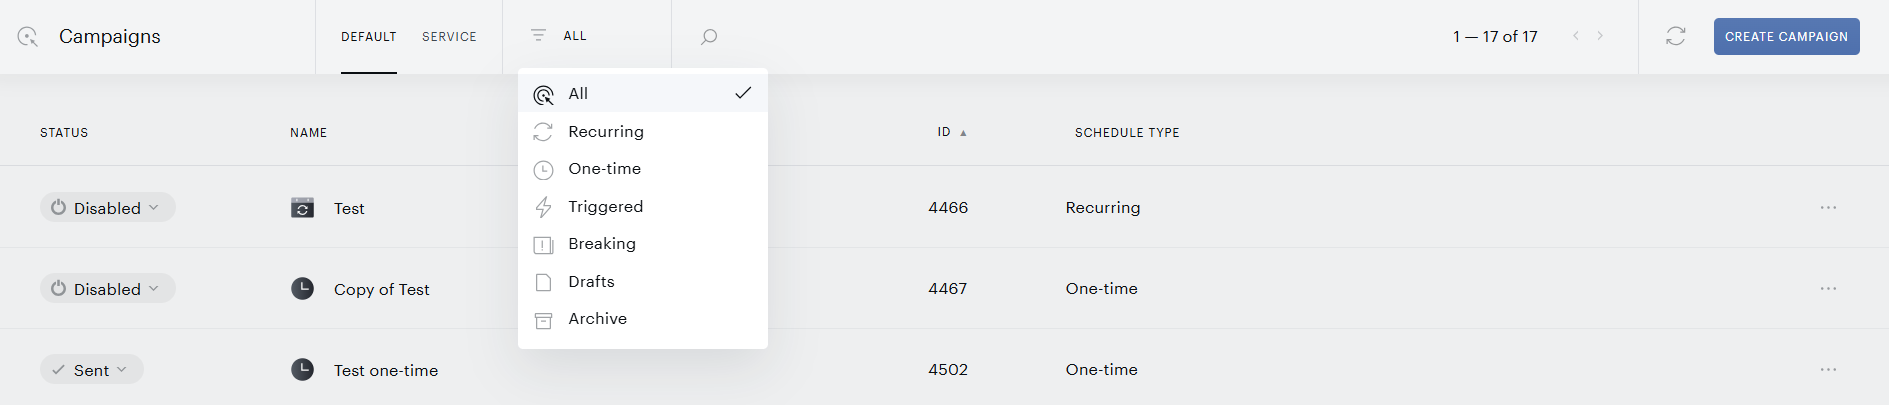
Please note that this page displays the current status of each campaign based on its stage in the delivery process, such as Sending, Scheduled, Active, Disabled, Sent, Initialization, or Canceled.
You’ll also see a progress bar that shows, in real time, how many emails have already been sent. This updates automatically every 2 minutes.

It's important to take into account that while the system performs any background tasks (for example, importing users from a mailing list linked to a campaign), any campaign sending can be delayed until all background tasks have been completed.
This is shown in the status tooltip, which appears when the email campaign is in the "Initialization" phase:

Each campaign also includes additional actions accessible through the ellipsis menu (⋯), where you can rename, duplicate, archive, or delete the campaign.
When you hover over a campaign, you'll see extra shortcut icons appear on the left-hand side. These provide quick access to key interfaces:
-
View reports
-
Edit general settings
-
Edit email templates
-
Edit schedule
-
Manage mailing lists
Now, let’s move on from the campaign overview screen and walk through the individual steps required to set up a new campaign.
General
This tab contains general settings, including:
|
Setting |
Description |
||||||||||
|---|---|---|---|---|---|---|---|---|---|---|---|
|
From name |
The name of your campaign which will be used in the email header. |
||||||||||
|
From email |
Email address in the 'from' section of the email. We recommend keeping the publisher-news.com domain, as it is a trusted email domain and is known to common mailbox providers as an approved and vetted sender. In case you'd like to update the sending email domain to your own custom one, please reach out to support@piano.io |
||||||||||
|
Subject |
Use dynamic variables, static text, or a mix of the two in any of these fields. Dynamic Variable Options
You can use all dynamic variables except %TITLE% even without an RSS feed. Personalized subject lines using these variables can improve open rates by making emails feel more relevant to the recipient. Email providers (such as Gmail and Yahoo) often treat personalized emails as more trustworthy, which can improve both deliverability and your campaign's sender reputation. |
||||||||||
|
Reply-to-email |
The email address where user replies are sent to. We recommend using an email address specifically created for newsletter replies, such as pianodaily@publisher-news.com. |
||||||||||
|
UTM tags |
|
Save, and hit Next in the top right.
Content sources
The Content sources tab manages how we connect to your content management system, typically in the form of an RSS feed. This is the content that populates the newsletter.
Click the Add a new source button located in the top-right section of the screen, enter a valid link to the RSS/Atom feed, define a content resource name if needed, and click the "Add" button to add this source. You can add as many RSS feeds as you like. For example, if you’d like to send out a Science and Tech newsletter, add the RSS feed for both sources.
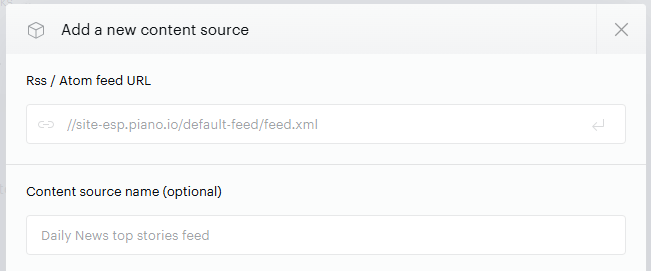
Once your RSS/Atom feed has been successfully added and selected, click Save and then Next in the top right.
RSS stands for Rich Site Summary and uses a family of standard web feed formats to publish frequently updated information: blog entries, news headlines, audio, and video. An RSS document (called "feed", "web feed") includes full or summarized text, and metadata, like publishing date and author's name.
Piano ESP uses RSS feeds to get notifications of new content publications for further inclusion in newsletters. This is the typical structure of the RSS feed:
<?xml version="1.0" encoding="UTF-8" ?>
 <rss version="2.0">
  <channel>
   <title></title>
   <link></link>
   <description></description>
   <item>
    <guid></guid>
    <title></title>
    <category></category>
    <link></link>
    <date></date>
    <description></description>
    <pubDate></pubDate>
    <enclosure url="" type="image/png"/>
   </item>
  </channel>
</rss>
Essential RSS Feed Tags for Piano ESP
Here are the most necessary tags for RSS feeds to work with Piano ESP:
|
Tag |
Description |
Example/Format |
|---|---|---|
|
<item> |
Container for a single article |
|
|
<guid> |
Unique identifier of the article |
|
|
<title> |
Title of the article |
|
|
<category> |
Informs about the category of content |
|
|
<link> |
Link to the article |
|
|
<description> |
Short summary or full text of the article, depending on your needs |
|
|
<pubdate> |
Date of content publication |
Example: 2016-09-26T00:00:00.000Z, in the format: YYYY-MM-DDTHH:MM:SS:MSZ |
|
<date> |
When the article was added to the RSS feed |
|
|
<enclosure> |
Description of the object, which is attached to the article (usually includes a link to the image) |
|
If you make any changes to your existing article, you need to update the <guid> tag, so these changes are reflected the next time the source is fetched via the ESP dashboard.
Note: The RSS feed language should be the same as the site language that was selected during the ESP site's set-up process.
Source settings
In addition to the RSS or Atom feed URI, you are also able to define multiple settings for each Source.
Content source name (optional)
Here you can enter the name of the source, which will be displayed in the Source's UI in the ESP dashboard.
Article image search order
Piano ESP makes several attempts to find a proper image for each article (to satisfy minimum image dimensions) using several search methods, which are applied in the configured order:
-
Feed & Article page
-
Fallback image (upload a file)
You can drag and drop these 2 items to switch their order so that the fallback image added takes priority over any image found in the RSS feed or the article's webpage.
Minimum image dimensions
Piano ESP will accept images only if both image dimensions (width and height) are equal to or greater than the configured values.
The default minimum image dimensions are 250px x 250px.
Blacklist images
Any images uploaded here will never be picked by Piano ESP (even if found within a feed or article). Useful in case your articles or feed contents include image links that do not represent actual content.
Feed update mode
This setting allows you to set the source update mode for your RSS feed. Available options:
-
Mirrored
-
Incremental
If a source is working in the “Mirrored” update mode, articles that are absent in the RSS feed will be deleted from the ESP servers.
If a source is working in the “Incremental” update mode, the content that is removed from the RSS feed still remains in Piano ESP.
Extract full text from article page
When you disable this checkbox, we will not extract full-text content from the article page. This checkbox is checked by default.
Template and style
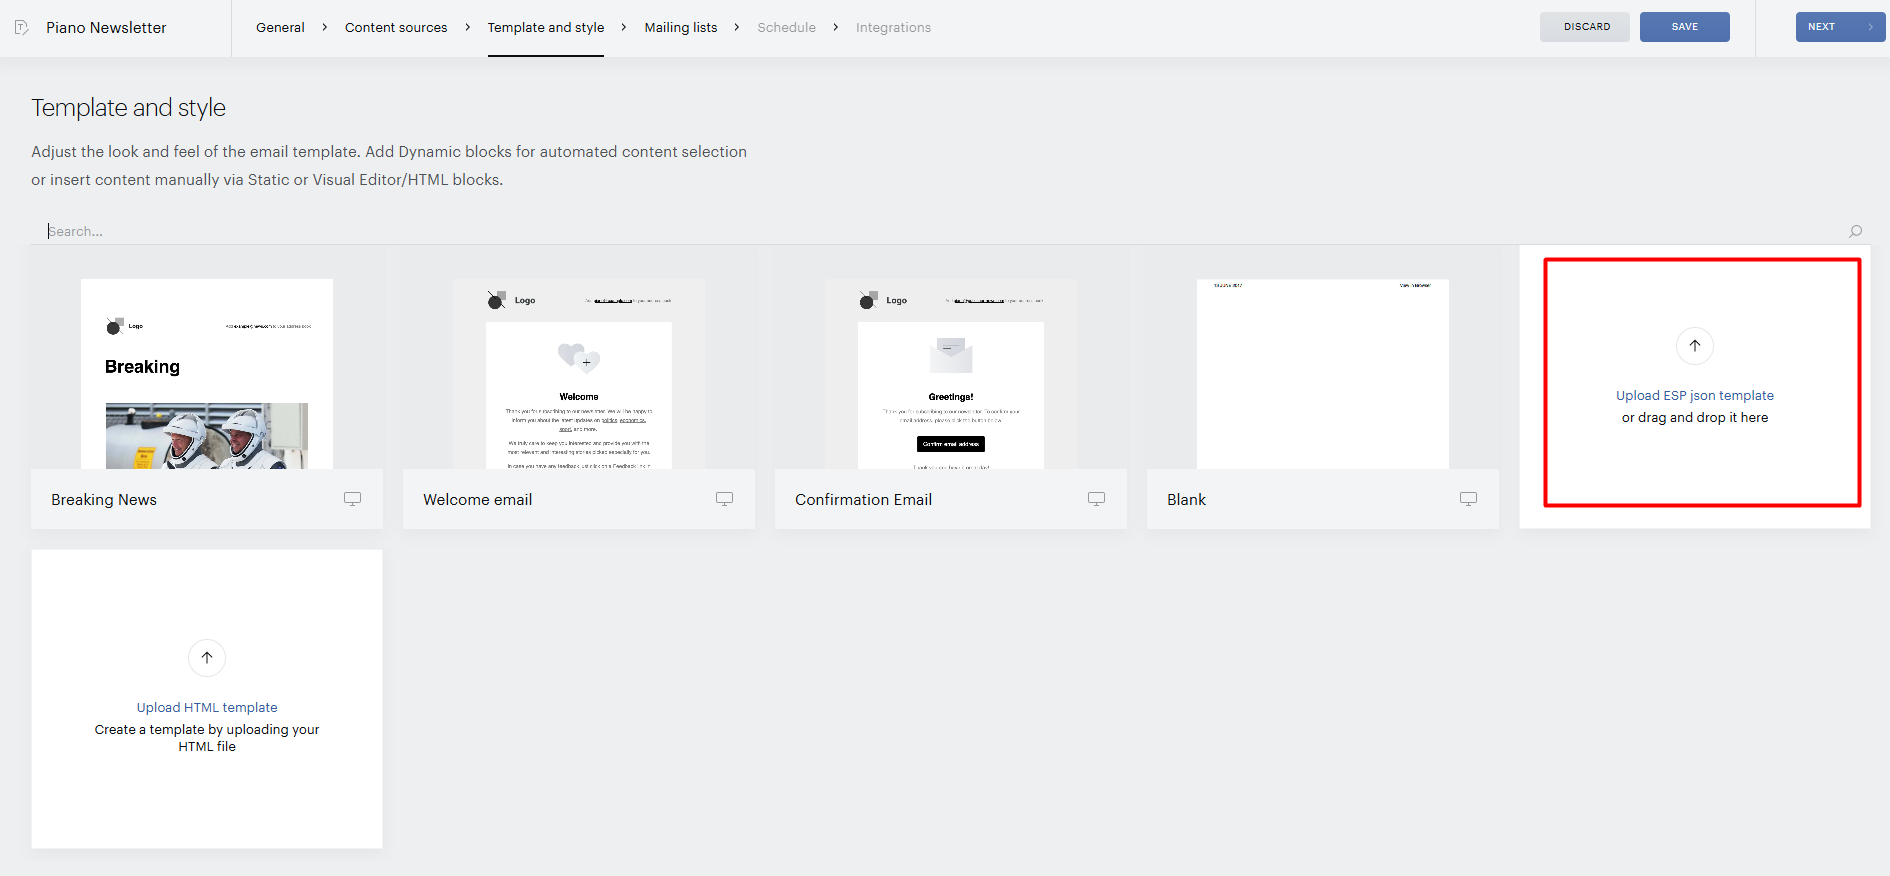
From this screen, you can choose a template from a list of pre-designed options or start with a blank one to build your own from scratch. If you already have an ESP JSON template from another campaign or site, you can upload it here. Alternatively, you can upload a custom HTML template for your email campaign.
To select a template, click on your preferred option to view a larger preview. Then, click the checkmark in the upper-right corner of the modal to apply it to your campaign.
You will be brought to the template editor, which consists of two tabs: Content and Settings, and a large preview window where you can see the changes you make by clicking Save and then Preview Changes.
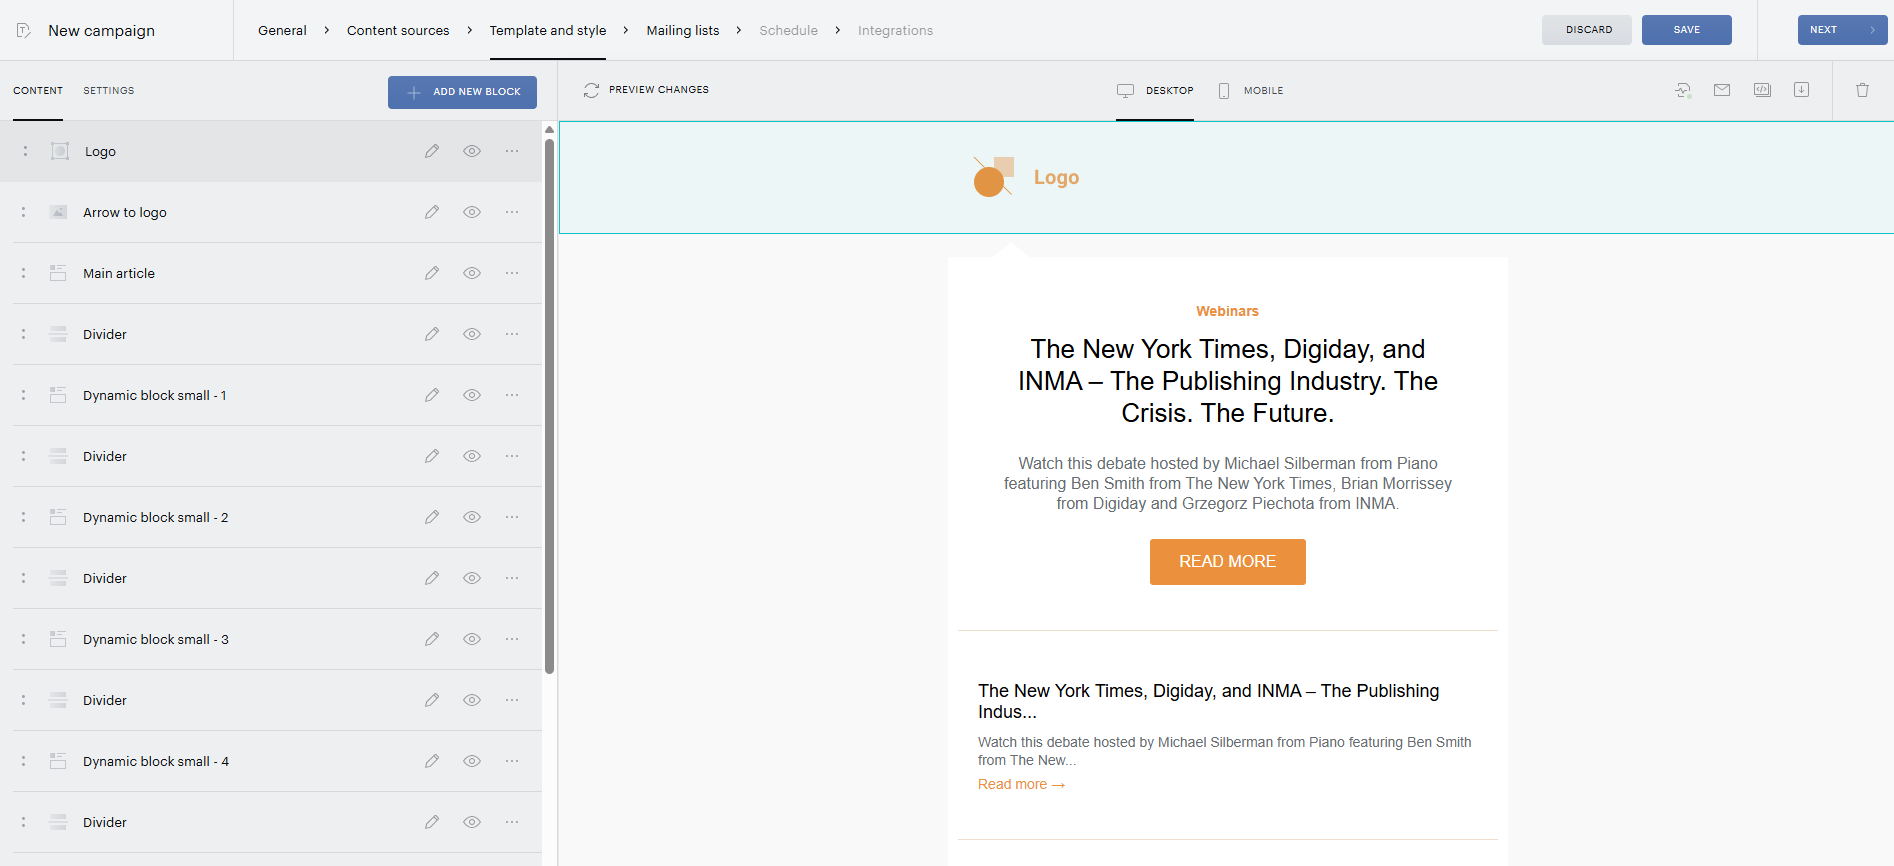
Please note that Gmail will, by default, crop all emails that are larger than 102kb.
Most email clients currently don't support iframe tags, so it's not possible to embed posts from other platforms (for example, from Facebook or any other social media) into a newsletter. Piano ESP also does not currently support X's "Revue" platform.
Please have a look at this article for HTML restrictions.
Also, you can download the created template and reuse it for other email campaigns. To download an already created template, click on the Download as template button:
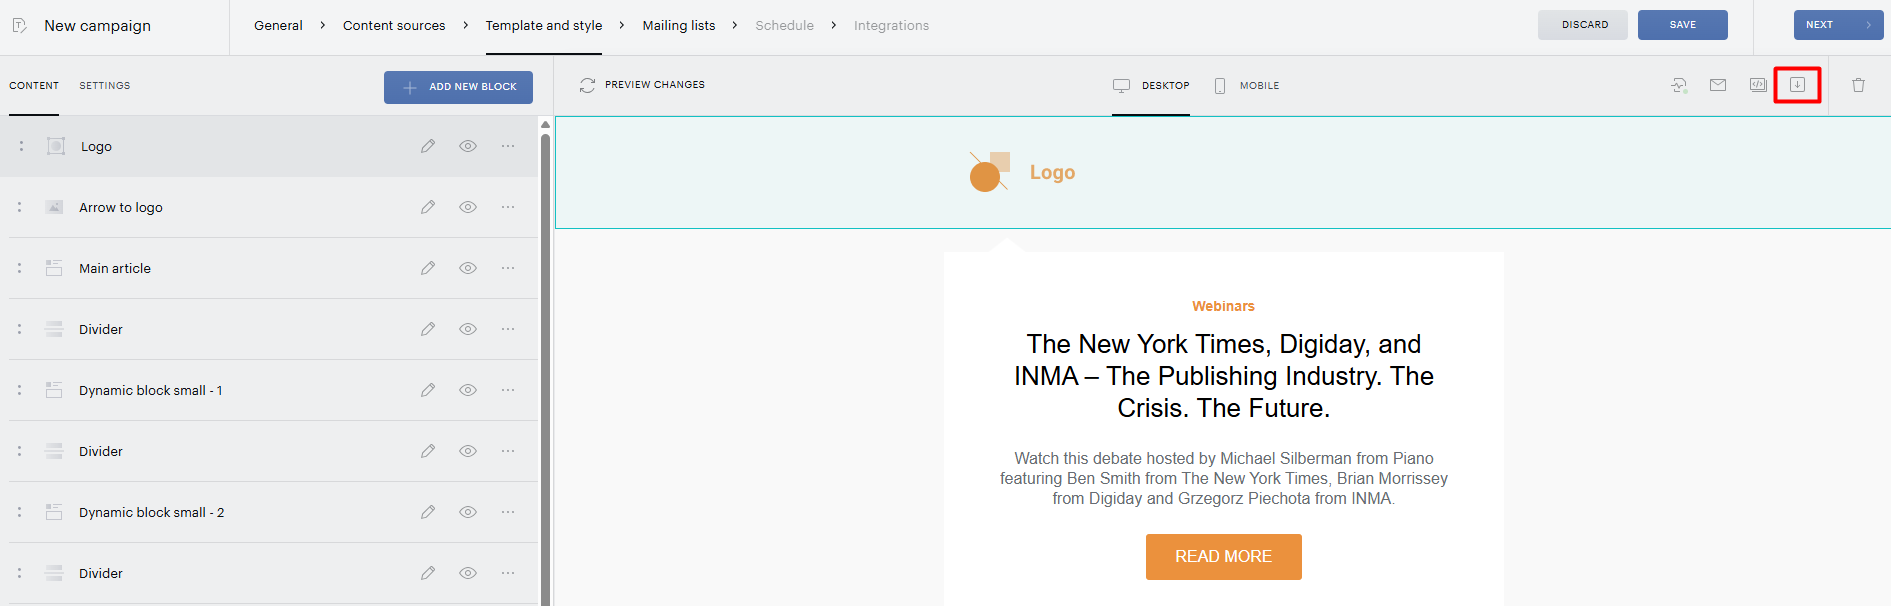
Once the email template is downloaded, you can reuse it for the new email campaign: on the Template and style section, scroll down the page and select the Upload ESP json template option:
Content
The Content tab contains a list of email template blocks, each of which can be customized individually. Click on the pencil icon next to a particular block to edit it. Click on the eye icon to jump to that block within the template preview.
The ellipsis menu allows you to duplicate the block or remove it entirely from the campaign template.
Blocks
To add a new block, click the Add new block button, choose a block type from the list, enter a name with a minimum of 4 characters, and click Submit.
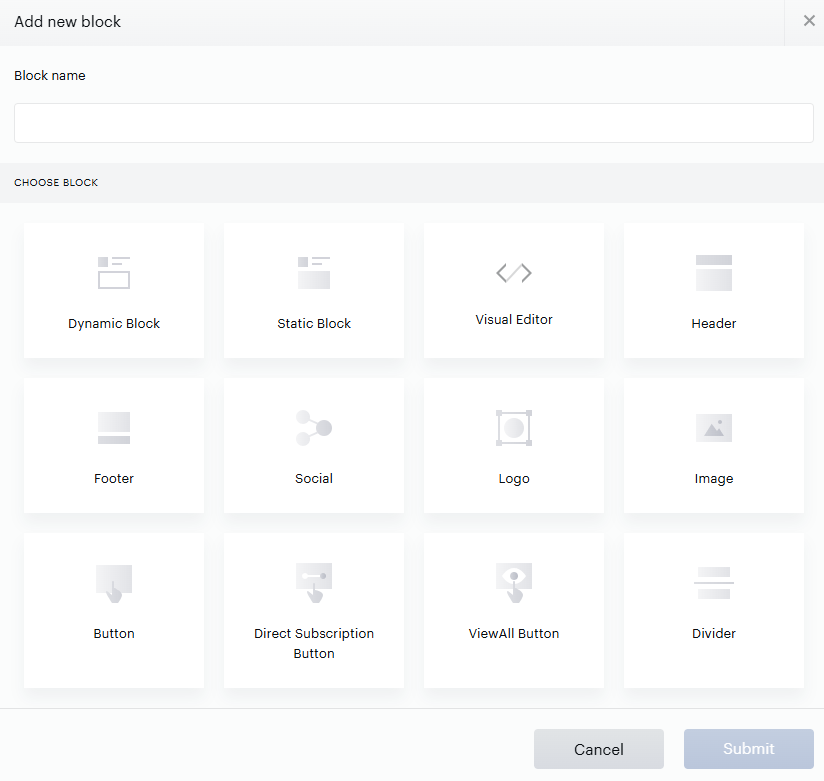
Dynamic Block
The Dynamic block is based on the content coming in from external data sources (i.e, RSS feeds) that are selected and automatically updated based on the content selection type.
Please note that if the newsletter does not contain any relevant stories (for all dynamic blocks), the email will not be rendered and sent from the server.
A reasonable number of dynamic blocks in the campaign template is <10. Otherwise, the campaign will be sent more slowly.
This block has four sections:
|
Section |
Description |
|---|---|
|
Sources |
Contains the RSS feeds that you can choose to integrate into your dynamic block. You can define the type of the Source at this point: Regular or Promo. While clicks on Regular sources will be tracked as regular clicks, all clicks that are made on articles from the Promo source will be marked as Promo clicks in the Analytics section of the ESP dashboard. |
|
Block |
Allows you to adjust the block layout and style
|
|
Item |
Allows you to customize the individual items within the block:
|
|
Settings |
Content selection type, advanced campaign settings and checkboxes which allow hiding the dynamic block on desktop and/or on mobile.
|
Static Block
The Static block is almost identical to the Dynamic block with regard to settings. The only difference between static and dynamic blocks is that content should be added manually and will be the same for all subscribers. For this reason, within the Content tab, click Add a new story and then enter the Title, Category, Summary, article Link, an Image, and your URL.
Visual Editor
In the Visual Editor, you can add text, pictures, and custom items just as you would in any other text editor under the Content tab. Additionally, you can insert HTML right into the template.
Header
The Header allows you to add a "View in browser" link and a date.
-
View in browser: customize the text that opens the email campaign in a browser format
-
Style: customize the styling of this block
-
Setting: customize the block name and padding
Footer
The Footer block allows you to adjust the relevant links and text contained in the footer of the email campaign.
Social
The Social block allows you to configure links to social networks. Click Add a new social icon within the Content tab and enter a Title (this title will be shown to the user), select a social network Type, customize the Color, and add a Link.
Logo
The Logo block allows you to customize your newsletter’s logo. You can upload an image or provide an image URL, and you can also set the destination link that opens when the logo is clicked.
Image
The Image block enables you to upload a static image file or import the image from a URL, and adjust the relevant style settings.
Button
With the Button block, you can add a button and customize the text and link.
Direct Subscription Button
The Direct Subscription button allows users to subscribe to other mailing lists. Under the Content tab, you can select the copy, custom landing page (if applicable), and the target mailing lists the user will be subscribed to.
ViewAll Button
The ViewAll button enables users to open links within the email in a new browser tab. The text is the call to action that encourages users to view all content.
Divider
The Divider block allows you to divide content within the email with a line. From here, you have the power to customize the lines’ width, type, and color.
Breaking News Block

The Breaking News block is a unique type of dynamic block designed specifically for Breaking News email campaigns. It's automatically included when you create this type of campaign. This block ensures fast sending and reliable content selection by automatically pulling in newly added stories from the connected sources (feeds).
A Breaking News campaign is triggered only when a new story is detected within the Breaking News block - regular dynamic blocks in these campaigns do not initiate sending. When multiple new stories are detected during a single RSS feed check across the attached sources, only one email is sent for that batch. The content selection works as follows: if 1 new story is added in any of the attached feeds, that story is sent; if between 2 and 20 new stories are found, all are sent and displayed in descending order by publication date; if 21 or more are added, only the first 20 (sorted by publication date, newest first) are included.
The template preview for a Breaking News block will always display just one story - the most recent one based on publication date across all connected sources. The final email layout adjusts dynamically, ranging from 1 story in 1 column to 20 stories in 1 column, depending on how many new stories are found. Content exclusions and additional filtering checks are disabled, ensuring a fast and straightforward selection process.
Best practices for using a Breaking News block include placing the block at the very top of the email template to ensure visibility and priority. The sources assigned to the Breaking News block should be exclusive to it and not shared with other dynamic blocks within the same template. Additionally, stories should be added to the associated content source one at a time to ensure accurate triggering and proper delivery of breaking news updates.
Settings
The Settings tab contains fields that allow you to customize the body width, background color, typography, and other options.
Global
This tab allows you to set your email's body width in pixels. If you want your template to resize depending on the size of the user’s device, toggle on Responsive layout.
The toggle Use base CSS reset styles, client-specific styles, default styles for blocks, if you have your own HTML and CSS.
You can also customize the overall appearance of the campaign by setting a background color or background image, and choosing the typography style.
Date format allows you to change the format of the date in the Header block. In addition, you can change the preheader text, the text that follows the subject line when the email is viewed in the user’s inbox.
If the setting Send newsletter without dynamic content in the Newsletter Delivery section is enabled, the campaign can be sent even if no stories are found for the dynamic blocks. This setting is designed for campaigns that primarily include static content, with dynamic content serving as an optional enhancement. In such cases, story titles cannot be used as the email subject, and the default subject line ("Your favourite stories") will be applied. To have the title dynamically populated based on the dynamic content block, please disable this setting for the campaign.

If you want to see what your email will look like in an inbox, click Send test email using the envelope icon on the top right of the screen. It’s important to note that this test email will not contain any personalization, nor will it filter duplicates between different blocks within your email. We will simply fill the content with a list of the latest stories from your RSS feed to effectively showcase the layout of your email.
Click Save to save your edits. The Discard button will reset all the changes you made since the last time you hit Save.
Custom CSS
This section describes how you can customize your email templates:
-
via Custom CSS
-
adding your own HTML in the visual editor block
-
using HTML in the dynamic block for specific element arrangement
Custom CSS in email templates
Each ESP email template consists of blocks that you can customize.
To configure a custom email template, you should go to Email → General → Content sources → Template and style → Settings tab → Custom CSS tab and add CSS selectors that you want to customize.
1. Article title customization
.title span {
    color: green!important;
}
.title span - this CSS selector allows you to customize the article title for all static/dynamic content blocks
The HTML viewers in email clients are not standardized, and most of them do not allow <style> tags. In order to unify the display of templates across all email clients, we use inline styles for HTML email. For this reason, use important rules in a style declaration for most CSS selector properties.
2. Article summary customization
.summary span {
    font-style: italic!important;
    text-shadow: 4px 3px 0px #fff, 9px 8px 0px rgba(0,0,0,0.15);
}
.summary span - this CSS selector allows you to customize the article summary at all static/dynamic content blocks
3. Article category customization
.tag a {
    font-style: italic!important;
    text-shadow: 4px 3px 0px #fff, 9px 8px 0px rgba(0,0,0,0.15);
}
.tag a - this CSS selector allows you to customize the article category for all static/dynamic content blocks
4. Article image customization
.img-100 img {
    border-radius: 50%;
    width: 250px!important;
    height: 250px!important;
}
.img-100 img - this CSS selector allows you to customize article images at all static/dynamic content blocks
5. Button customization
.button > table {
    background: grey!important;
}
.button > table - this CSS selector allows you to customize buttons at all template blocks
6. Button link customization
.button a {
     text-shadow: 4px 3px 0px #fff, 9px 8px 0px rgba(0,0,0,0.15);
}
.button a - this CSS selector allows you to customize button links at all template blocks
7. Links customization
a {
    color: red!important;
}
.a - with this tag, you can customize all links presented in the newsletter template
The newsletter template may consist of several blocks of the same type (for example, several dynamic content blocks). If you want to customize elements at a certain block, you need to indicate the block number selector. To determine the block number, you need to hover over it and then apply it in the Custom CSS tab.
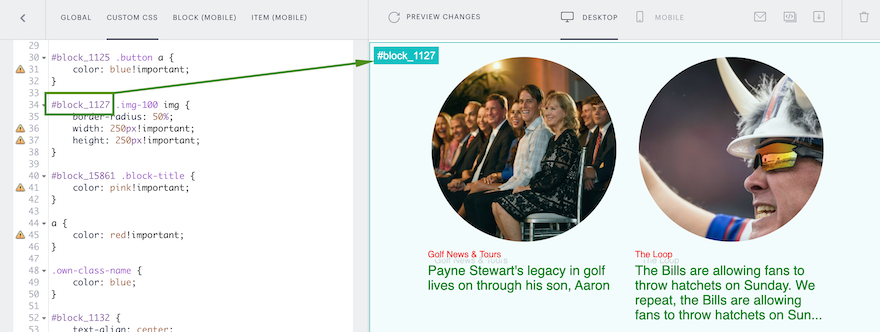
In order to customize an article element only for a certain block with a particular number #block_XXXX, the CSS selector should look like:
#block_XXXX .css_selector {
    key: value;
}
#block_XXXX - block number selector, which you can find hovering on the block
.css_selector - CSS selector for the HTML element you want to style
key: value - declaration block with property name and value
Custom CSS in the visual editor block
You can customize your own block from scratch via HTML. For this, you should add a visual editor block and insert code in the HTML tab.
Also, HTML from a visual block may refer to your own class created at the Custom CSS tab.
.own-class-name {
    color: blue;
}
Dynamic block customization via HTML
You can arrange elements in the dynamic block at your discretion. You need to add a dynamic block, go to the Item tab, and enable the toggle Use custom HTML for item.
Elements that you can customize in the dynamic block are:
|
Placeholder |
Description |
|---|---|
|
%ITEM_TITLE% |
The title of the story |
|
%ITEM_IMAGE% |
The image of the story |
|
%ITEM_CATEGORY% |
The category of the story |
|
%ITEM_LINK% |
The link of the story |
|
%ITEM_SUMMARY% |
The summary of the story |
|
%ITEM_INDEX% |
The index (number) of the story |
|
%ITEM_CONTENT% |
Insert full HTML from the RSS feed content tag into the email template |
Also, in the article summary, you can use HTML formatting and tags provided at the RSS feed. For this, you should go to the Templates and style step at the email campaign wizard → Item tab → for the enabled Summary, you should turn off Strip HTML from text toggle, and indicate the text length. As well, the summary could be presented as a link to the article or as plain text/HTML. To configure this option, you should enable/disable the Link to article toggle.
Merge fields in the email template
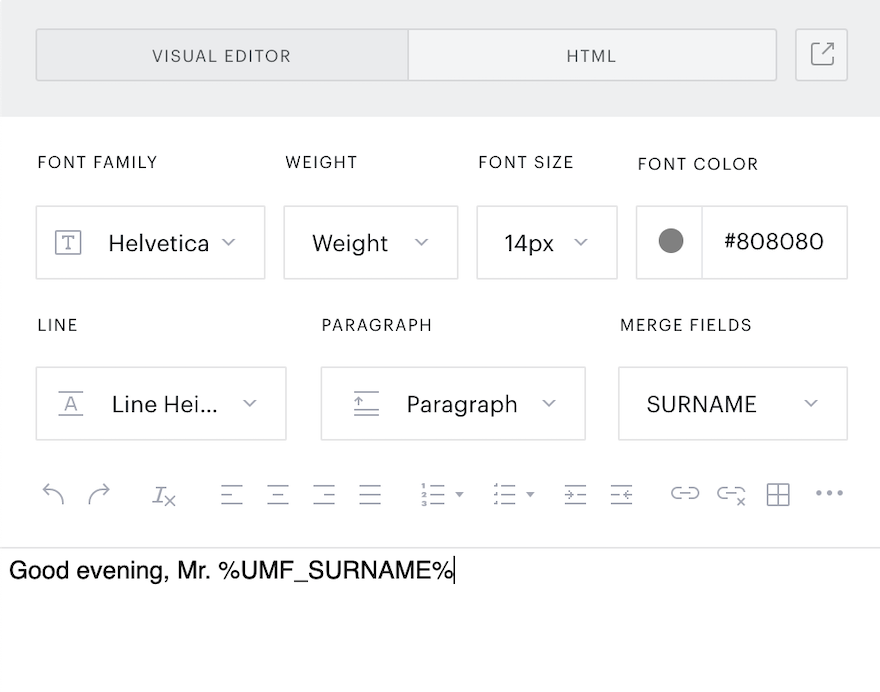
The email template can contain personalized content fields for each subscriber individually. To add such fields, you just need to add a necessary merge field into the email template. Thereafter, corresponding data will be dynamically pulled up to each merge field included in the sent newsletter. Learn more here on how to add merge fields.
The following table indicates all static merge fields that can be used in the email template:
|
Merge Field |
Description |
|---|---|
|
%FEEDBACKLINK% |
"Feedback" link |
|
%FROMNAME% |
"From" name |
|
%MANAGESUBSLINK% |
Click here to manage your subscriptions |
|
%REPLYTOEMAIL% |
Reply-to-email (the email address that replies are sent to) |
|
%DATE% |
Send date |
|
%TIMESTAMP% |
Exact time (in milliseconds) identifying when the newsletter was sent |
|
%UNSUBSCRIBE% |
"Unsubscribe" link |
|
%EMAIL% |
User’s email |
|
%VIEWINBROWSERLINK% |
"View in Browser" link |
|
%VIEWALLLINK% |
"View all" button |
Besides the default merge fields, you can create your own custom merge fields (such as first name, last name, city, etc), and upload corresponding user data. After that, the newly created merge field would be listed in the visual editor block, and you can easily add it to your template.
Upload a send-ready HTML to the ESP template builder
To upload a send-ready HTML template to the ESP dashboard, you should create a new email campaign and select the option Upload HTML template on the Template and style section.
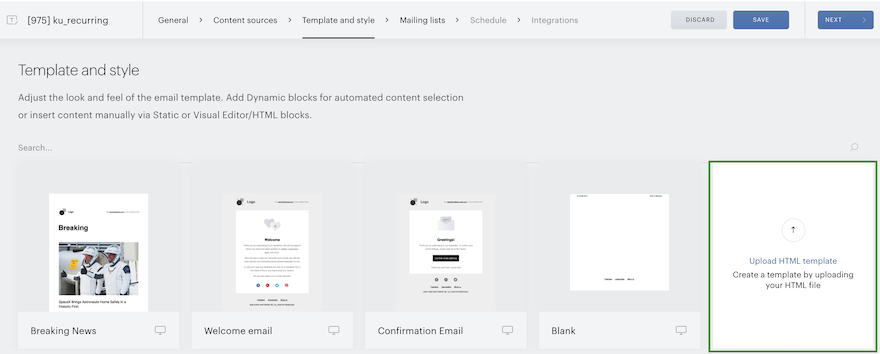
The uploaded template will be rendered as originally intended, but you can still make changes directly in the HTML editor block. As usual, you can preview how the template looks in the Preview window.
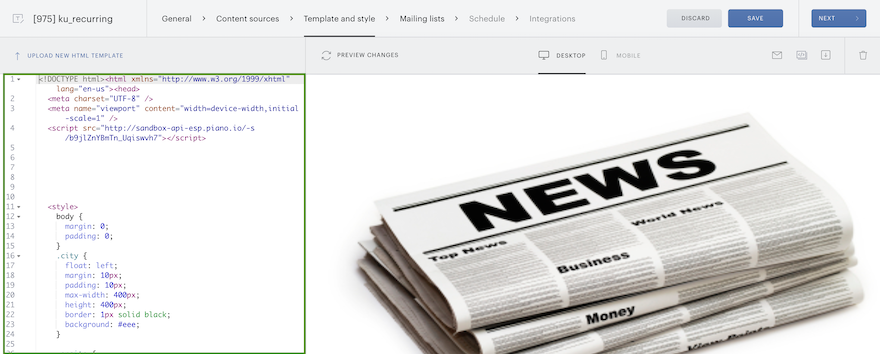
Please note that, in order to track email opens properly, a send-ready HTML template should contain a <body> tag.
You can learn more about different kinds of email template restrictions here.
An uploaded HTML template is treated as a single, send-ready block. It cannot be broken down into UI-manageable static or dynamic blocks (e.g., Static Block, Dynamic Block, Social, Logo, etc.) so any further edits must be made directly in the HTML editor. If you need a template with individually editable blocks that can be managed through the ESP UI, build it natively in ESP or use the JSON template format instead (see How to download and upload an ESP Campaign's template).
There is no limitation on how long the links in the newsletters will remain valid, as long as the linked page is still available.
Mailing lists
The Mailing lists tab allows you to manage the list of subscribers who receive your email campaigns. You can also create a mailing list by going to Email → Mailing Lists.
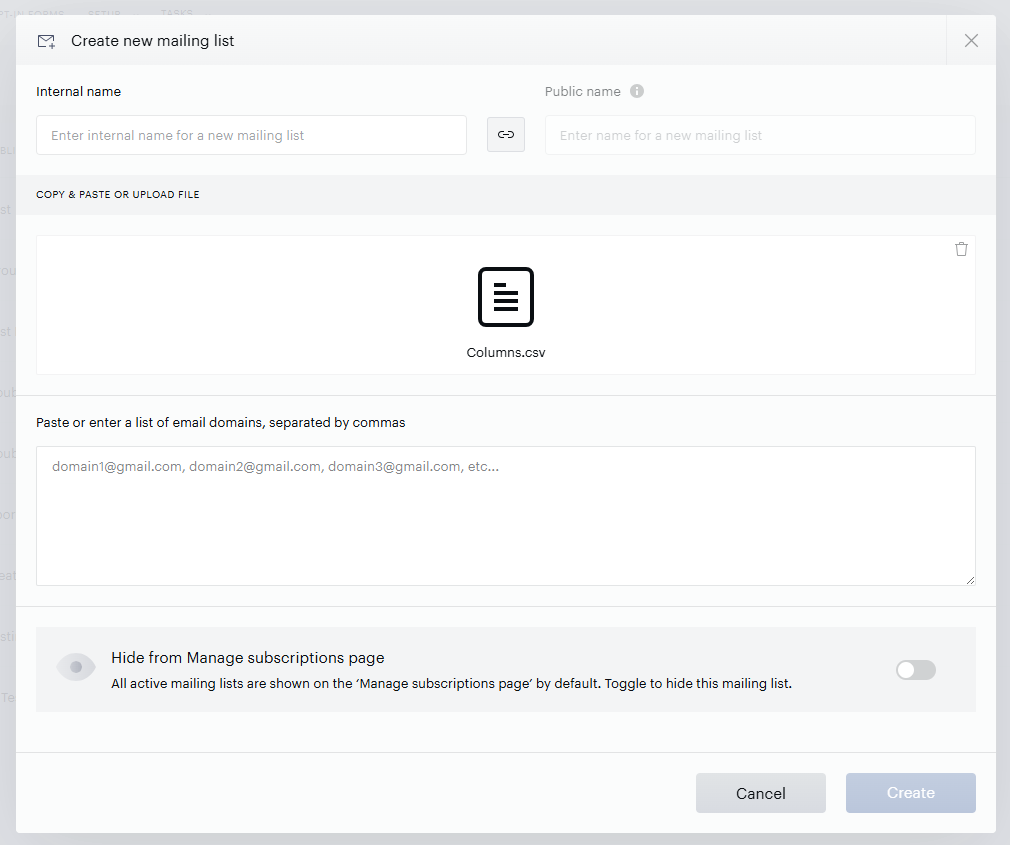
To add a new mailing list, click Add mailing list. Enter a name for your list and then either upload a CSV of emails or enter individual email addresses manually, then click the Create button.
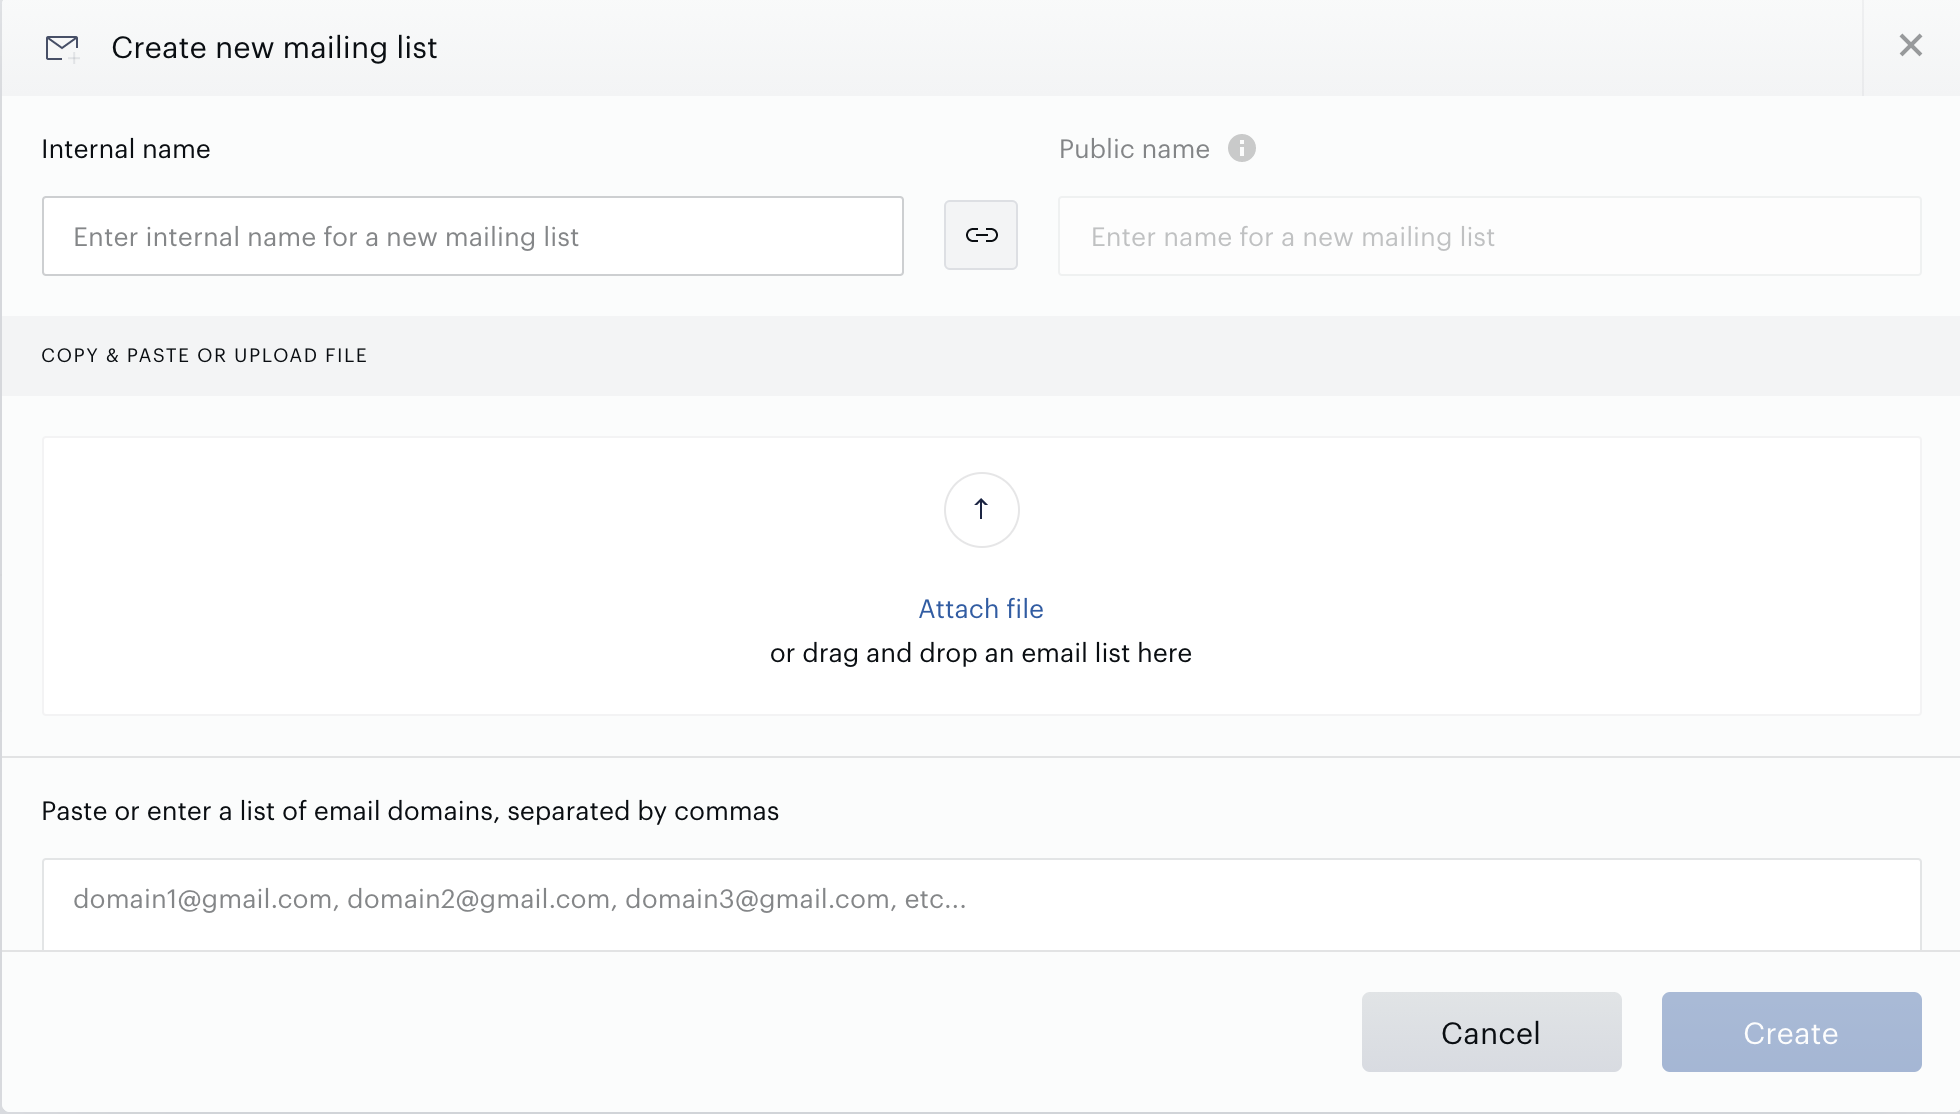
Please note that each mailing list contains a Public name and an Internal name.
The Public name would be shown to the end user on the Manage subscription page. Here, we recommend you enter a user-friendly title that will be clear to your subscribers.
For the Internal name, you can indicate a specific name that you prefer to see in the ESP dashboard. By default, the Internal name is the same as the Public name.
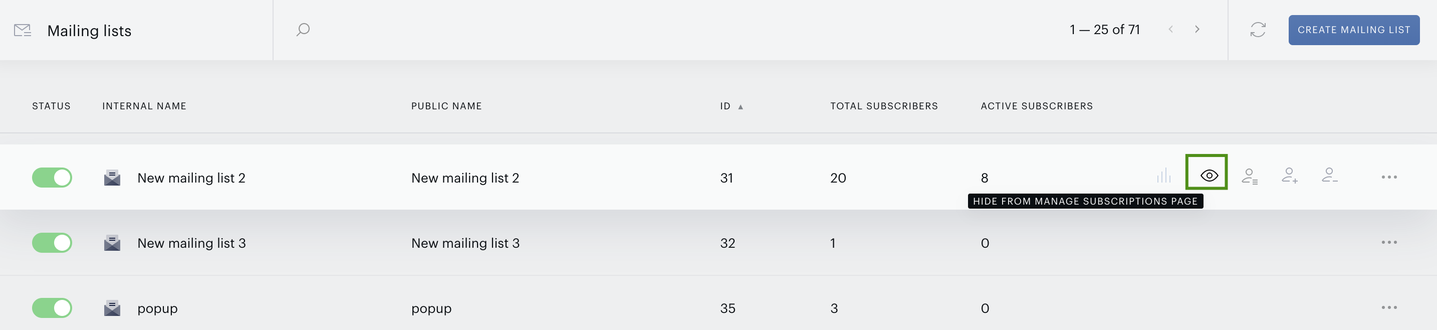
You can find the Hide from Manage subscriptions page option in the Create new mailing list modal window. By default, it is disabled, which means that the active mailing lists are shown on the Manage subscriptions page for your subscribers. But if you have any kind of technical mailing list (e.g., a transitional mailing list a double opt-in Triggered campaign), you can toggle the switch to hide this mailing list from the Manage subscriptions page.
Also, you can hide already existing active mailing lists directly from the Mailing lists page:
Once the mailing list is created, the users that you have entered (either manually or via the uploaded file) will be added to it.
If the user exists already, nothing will happen to their subscriber status and no new user record will be added - the existing one will be kept the same as it was before.
To remove users in bulk, you would need to go to Email > Mailing lists, and select the "Unsubscribe" option for the individual mailing list:

In the new window, you can then either attach a file with users that should be removed or enter a list of emails separated by commas, and confirm in the top right corner.
When utilizing Piano ESP for email campaigns with multiple mailing lists attached to a single campaign, it's important to note that the system has built-in mechanisms to address duplicate email addresses. Specifically, if the same email address is included in multiple lists associated with a campaign, Piano ESP will automatically recognize the duplication and prevent the sending of the same email multiple times to the recipient. This ensures a streamlined and non-redundant email experience for the end user.
There is no need for any additional actions or special configurations on your part to manage this process. The system autonomously handles the deduplication of email addresses, guaranteeing that recipients will receive only one instance of the email associated with the campaign.
Schedule
Specify the schedule type and time zone.
You can specify the time zone and time frame (in hourly intervals) of your email campaign. Piano recommends a wider time frame, as our system can detect the best delivery times for users, so more options help us set better, more specified delivery times. For example, if you enter from 9 to 23, our system will use historical data to determine the best time to send the newsletter to a particular user within the specified time frame.
Piano ESP personalizes the delivery time for each user based on the user's activity data, specifically based on typical timeframes of interactions with the content (e.g. click time, visit time).
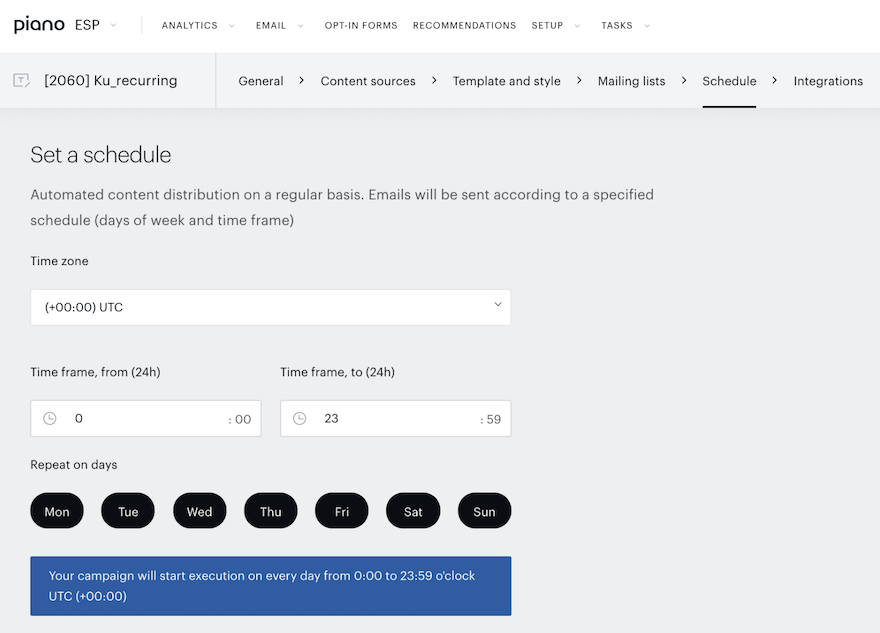
Recurring campaign type implies an automated content distribution on a regular basis. For this campaign type, emails will be sent according to a specified schedule (days of the week and time frame).
Triggered campaign type implies automated content distribution based on the event of subscribers being added to the mailing list. When a mailing list is attached to a triggered campaign, the campaign is sent to all eligible subscribers who have not received it before. For new subscribers, the newsletter is sent as soon as they are added to the relevant mailing list.
One-time campaign type provides the option to send the campaign once to all attached lists, at a specified date and time, or to send it out immediately (right after campaign activation).
Please note, if you select the Schedule option for a One-time campaign type, you can specify the exact minute to initiate sending of the campaign, e.g. start sending at 7:15 AM.
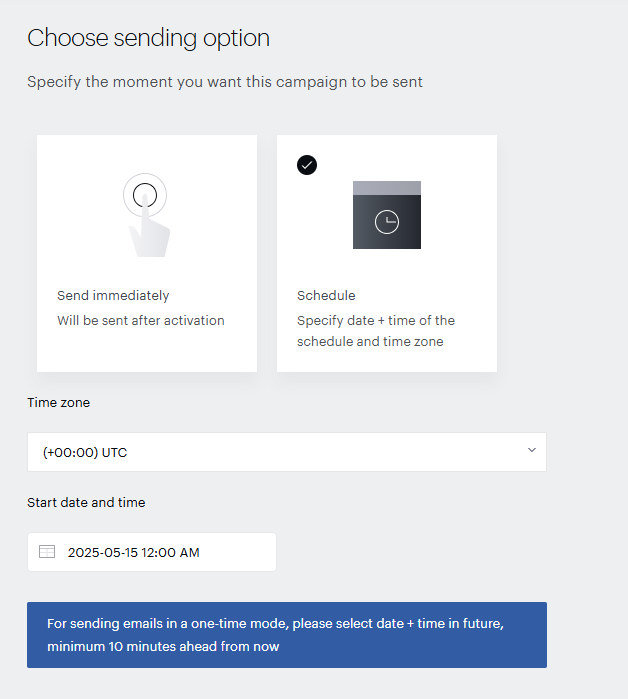
But please, keep in mind that once a One-time campaign has been sent, it will be automatically deactivated. If you want to send it out again, you can use the Resend option.

For the Breaking news campaign type, newsletters will be sent in response to a specific external event, such as a breaking news story. We recommend using this on emails that contain only one story, so you can message your users about a specific breaking news story. You can also indicate Delay, which allows you to set a waiting time, in seconds, from the moment the article is published in the RSS feed. You can use this time to make the necessary changes in the email campaign settings before the breaking news email is sent.
Note that a story that was previously added to the feed can't be sent as breaking news in the future. If you want to send the same story (with updated content) again, you need to change the GUID of the article.
More information about how edits to templates or any settings are reflected during a campaign's active schedule can be found under the following link.
Integrations
Integrations are responsible for tracking user behavior as well as showing opt-in widgets. To create a new integration, click Add integration. You can also create an integration by going to Setup → Integrations. If you have Composer, you will need to copy/paste the integration code into the Composer integration code (detailed instructions below).
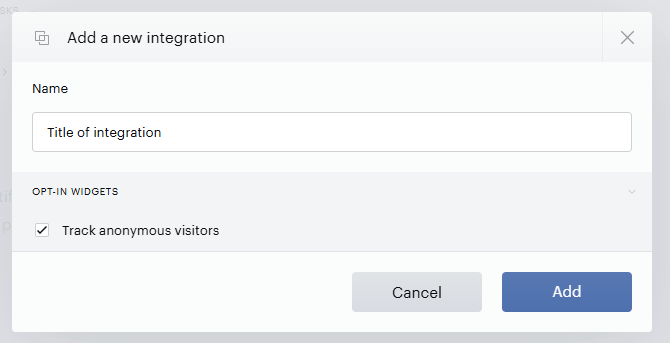
Enter a name, and select relevant opt-in widgets (if applicable).
The Track anonymous visitors checkbox, when unchecked, allows you to disable user behavior tracking of non-identified users in case that is required by your personal data protection policy.
Once you have successfully added your integration, toggle the status to On.
Once you are finished, click Done.
Please note that your campaign will remain in Draft mode unless the setup is fully completed by clicking on the button "Done" after selecting an ESP integration.
Configuring your integration
Composer clients
If you have Composer, copy the “window. PianoESPConfig = { ... }" part of the integration code. Then open up Composer and click the Integrate button, then click Edit source. Paste the “window.PianoESPConfig = {...}” part of the source code right under <script>.
For example like this:
<script>
    window.PianoESPConfig = {

        id: 123

    };

  (function () {
    tp = window["tp"] || [];
//...

</script>
Then click Publish.
ESP-only clients
If you are a Piano ESP-only client, copy the integration code within your integration settings and then paste this code into every page on your site.
Audience
Manage your audience by going to Email → Audience.
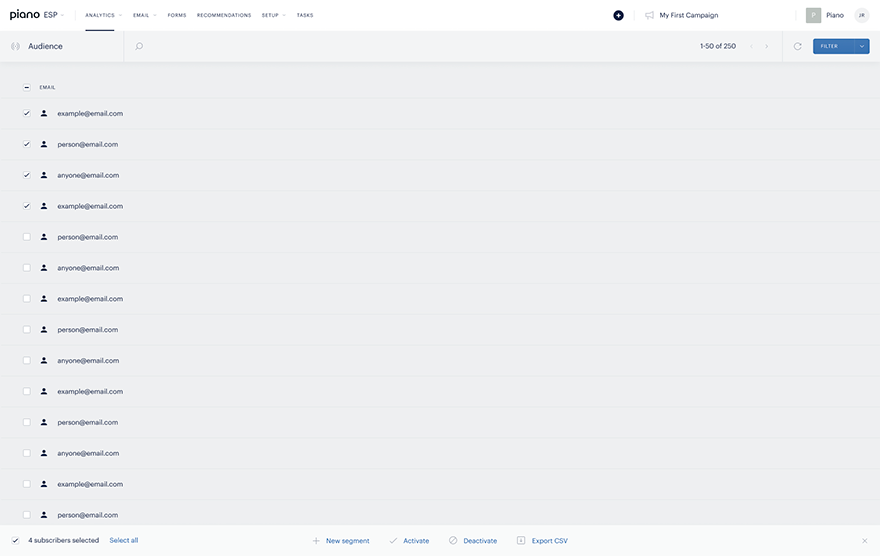
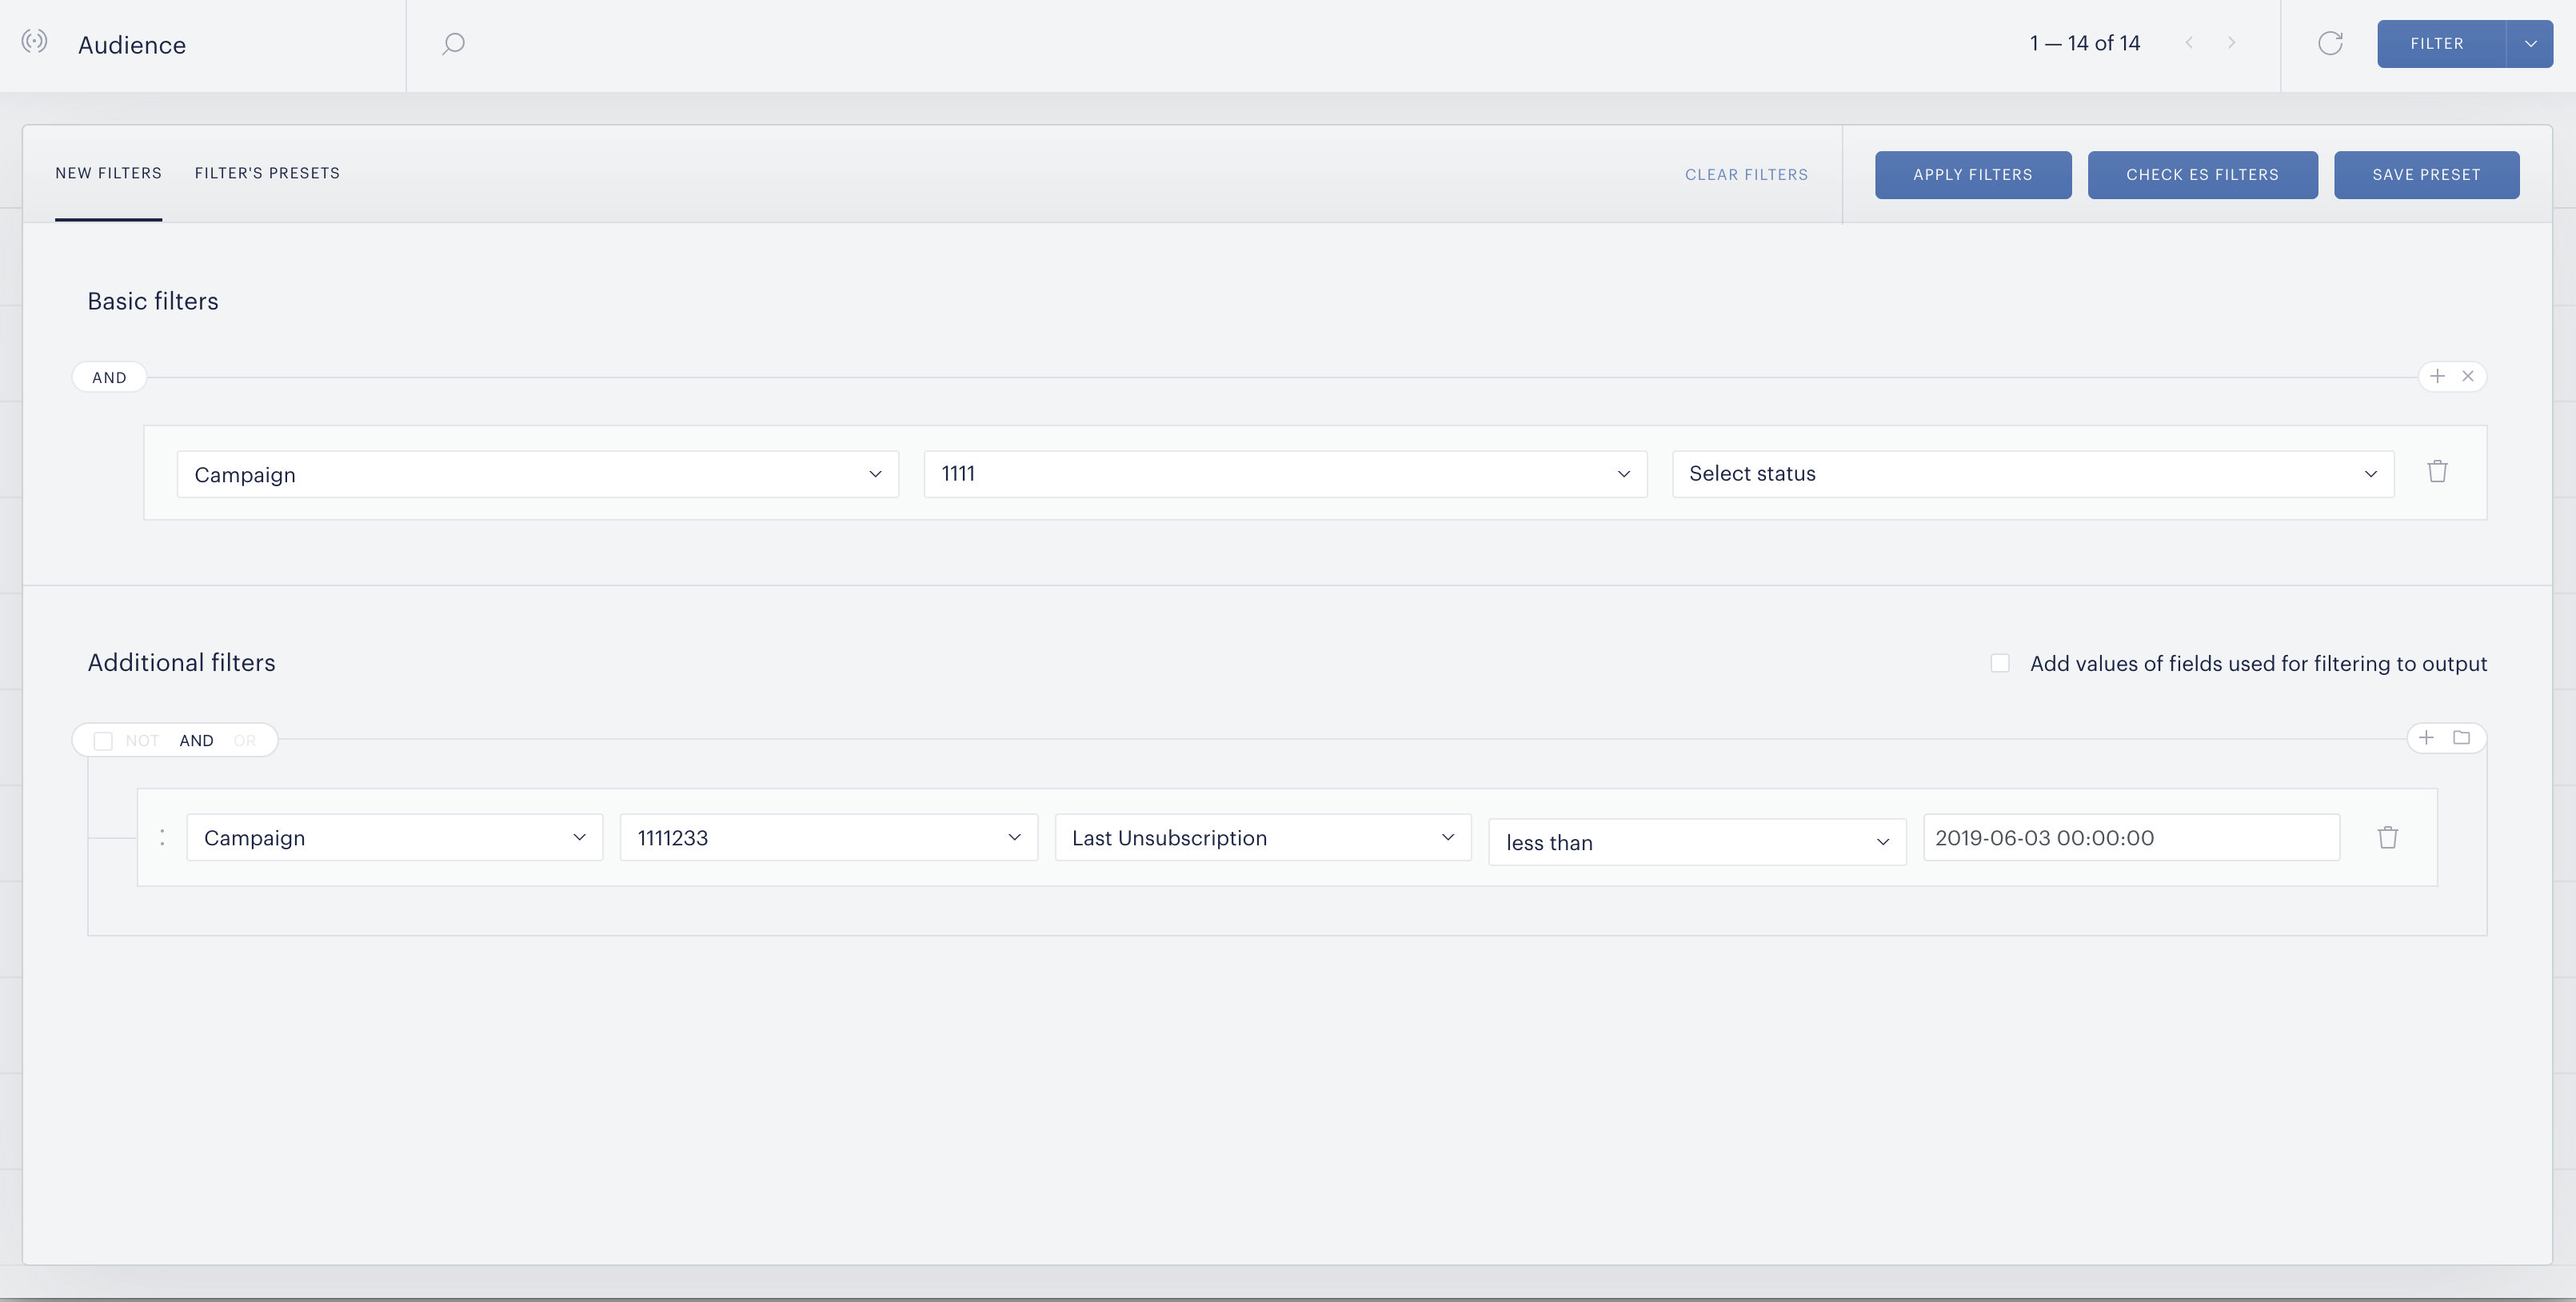
To specify an audience segment, click Filter and filter users based on various actions.
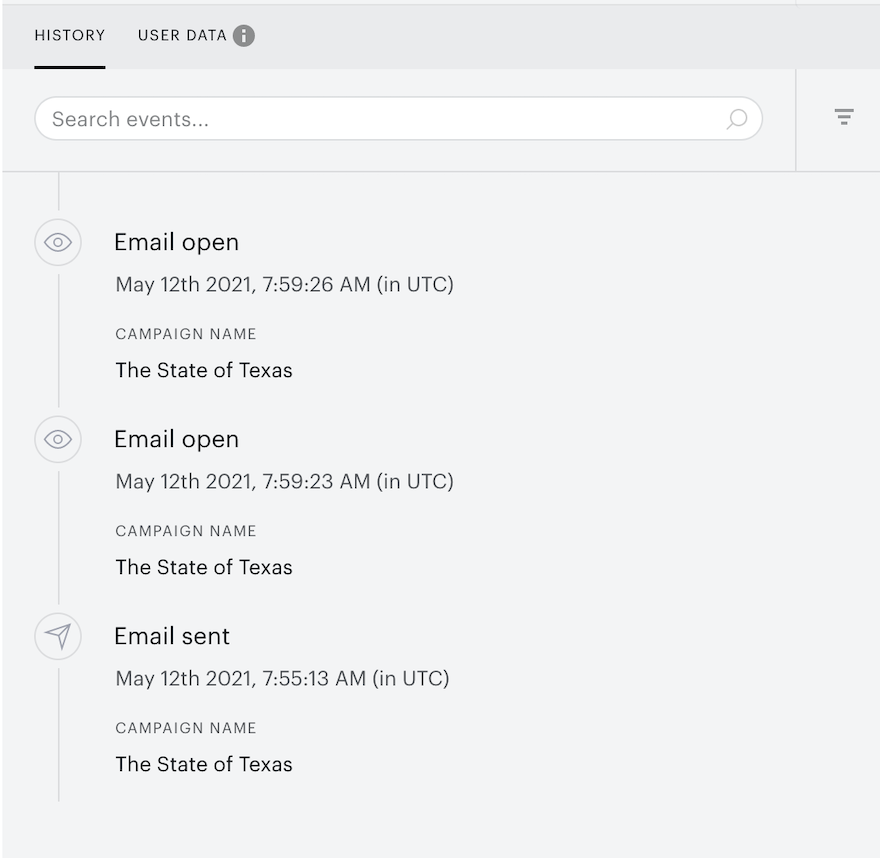
You can view the history of an individual user’s actions by clicking on their email address. All events associated with the user can be found under the History tab:
-
Subscribed to mailing list
-
Unsubscribed from mailing list
-
Email sent
-
Email open
-
Email click
-
Soft bounce
-
Hard bounce
-
Spam complaint
The User data tab contains merge field values that were uploaded for this specific user.
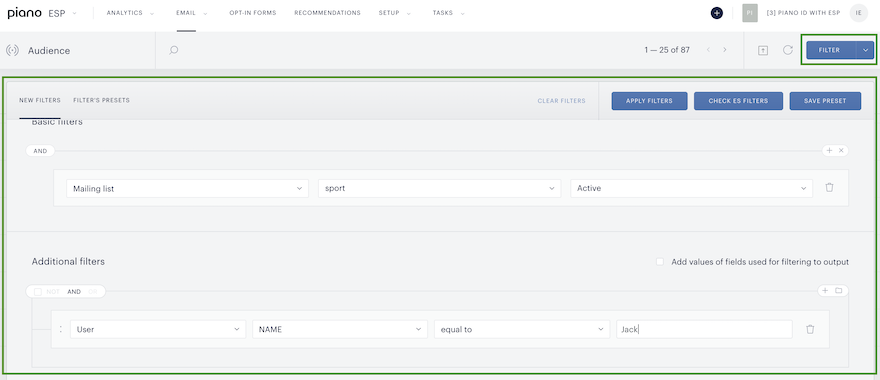
For more in-depth user mining-like capabilities, click on Filter in the upper-right-hand corner. From here, you can mine for users based on different attributes, including basic and advanced filters.
Basic filters allow you to filter subscribers based on their presence in particular mailing lists. You can also filter your audience by email address (for example, all users with a @gmail.com email address).
Additional filters allow you to view more specific, individualized data. You can set the following parameters:
-
For Campaigns:
-
Last sent email: date of the most recently sent email campaign
-
Last email open: most recent time a user opened the email campaign
-
Last email click: date when a user made their last click in the email campaign(s)
-
Sent emails: number of sent emails to the user
-
Email opens: number of emails that a user has opened
-
Email clicks: number of clicks that a user has made in the email campaign
-
-
For Mailing list:
-
First subscription: the date a user first joined a mailing list
-
Last unsubscription: the date a user was removed from a mailing list
-
-
For User:
-
First visit: date when the user first visits the publisher’s site
-
Last visit: date when the user most recently visited the publisher’s site
-
Visits: total number of visits to the publisher’s site
-
Geo (country): all users with the appropriate country
-
Geo (countries by region): all users with the appropriate geographic region
-
By default, if you use multiple additional filters, they will follow ‘and’ logic. You can change the logic to ‘not or ‘or in the upper left-hand corner. And will return users who fit all the criteria you set. Not will return users who do not match the filters you set. Finally, or will return users who fit at least one of the filters you set.
You can also create a group within additional filters to further specify your search. Click on the icon to create a group. You can set different statuses between these groups (‘Not’, ‘And’, or ‘Or’) and filter on specific actions.
If you would like to see numeric values for the actions you filter on, select the Add values of fields used for filtering to output checkbox.
If you would like to view numerical data about how many times a user did a particular action, select Add values of fields used for filtering to output.
You can save your filters as a preset by clicking Save preset.
Upload user data (Merge fields)
You can use merge fields to upload user data and then create segments by certain filters on the Audience page. This segmentation can be applied as a mailing list in your campaigns.
-
Create Merge fields in the Setup section. More detailed info on how to create Merge fields and use them in an email template here
-
Import a CSV file with user data on the Audience page

We can apply the imported data only to users who were already added to mailing lists. So, if you want to upload data for users whose emails are unknown to ESP, you should first add the emails of these users to the ESP mailing lists.
3. Select the mapping field
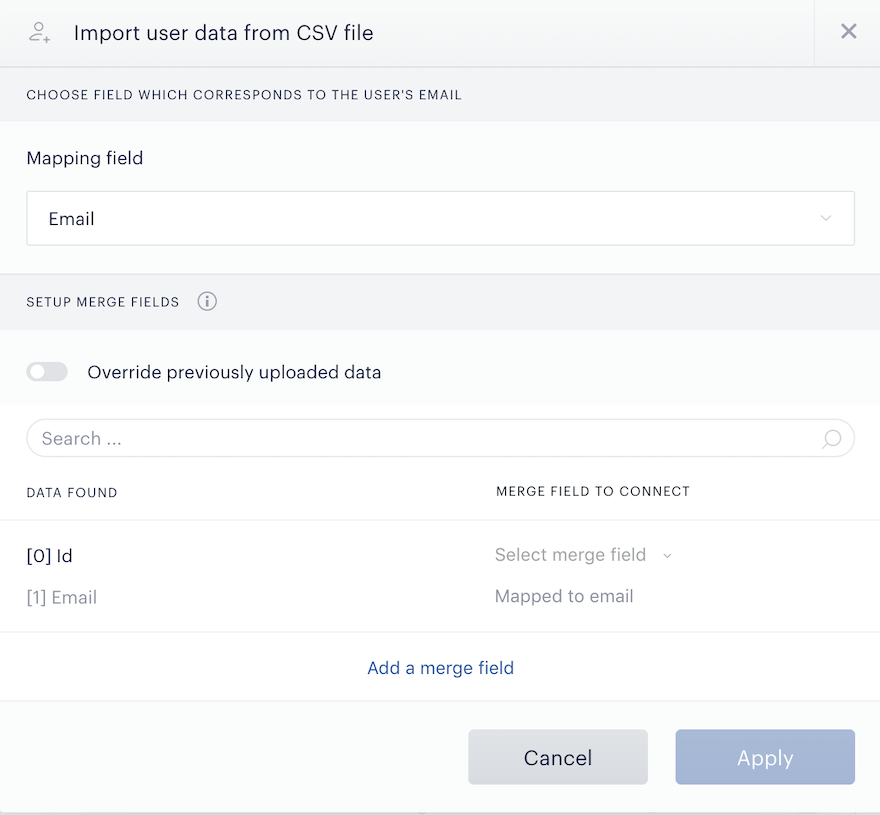
Mapping field - it is a field by which we can determine that the data refers to a specific user.
4. Select at least one data found field and connect it with a specific merge field.
For instance, you need to upload the user data “Name”. You should create this merge field as described in step 1. And then you could match data found from your CSV file with the previously created merge field.
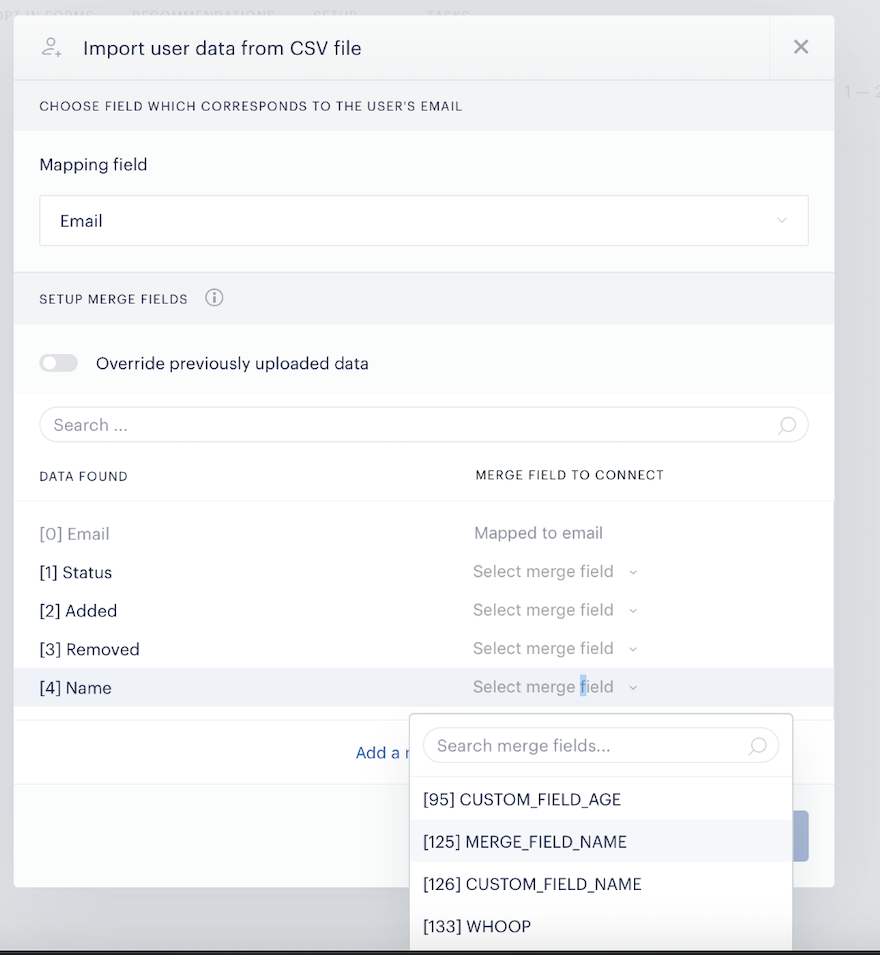
Data found - data parsed from uploaded CSV file
5. When the task is completed, you can find the uploaded data associated with the specific user on the Audience page. For this, just go to the Email → Audience → click on the particular subscriber's email and you will find a list of merge fields with values related to this specific user.
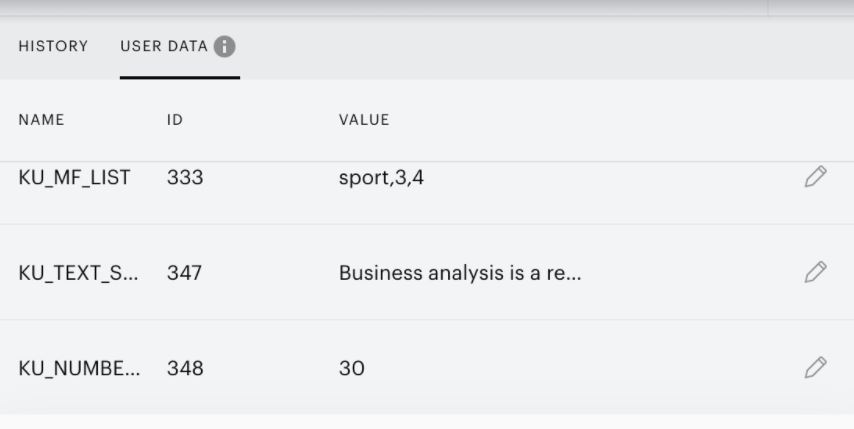
Please note that each merge field value related to the user can be edited directly in this list, as well as via the following API method or via CSV user data upload.
Also, uploaded data can be used as a filter on the Audience page, or you can use this data in email templates; more details are available here.
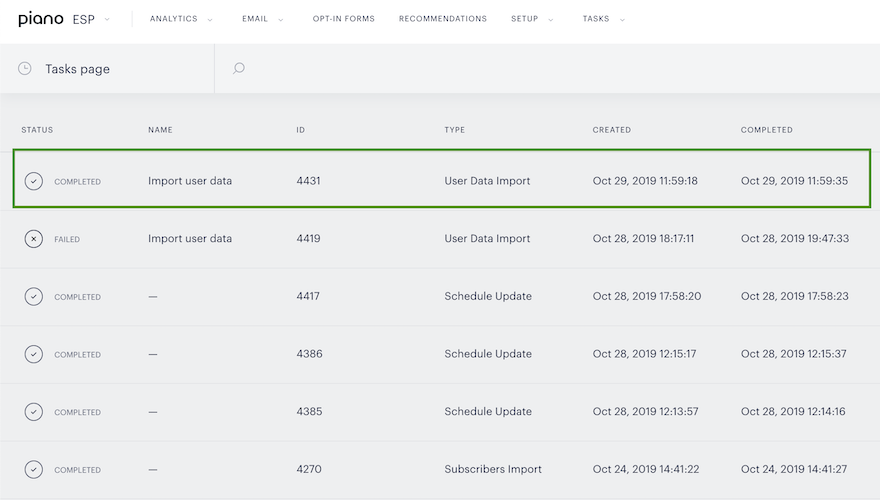
The task status can be found in the section Tasks.
Then you can set certain filtering conditions for the found data and download a new CSV file with a list of users.
6. After that, you can import this new CSV file with the users list in the Mailing list section and create a new Mailing list.
This filter can only be applied to users who were already added to some mailing lists before importing user data.