
Introduction
Generating and using a content recommendation widget involves two main phases: creating the widget components and deploying the widget on a publication. First, an operator uses the Piano Dashboard to create a widget consisting of three components: a Content config, a JavaScript Template, and a CSS Style sheet. The practical steps for using the Piano Dashboard to create and manage these components are described in the Piano Content Recommendation Tutorial, which is recommended reading before starting this tutorial.
After the widget is created, the script tag is obtained from the portal and deployed on the publication where the recommendations will appear. When a user opens the page, the deployed JavaScript tag runs and sends a request for recommendations. The response returns an iframe containing content assembled from the three widget components: the content config, template, and style sheet.
This tutorial focuses on one part of the content recommendation widget construction process: writing the content config. The content config determines which types of recommendations are displayed to a specific user.
All settings covered in this tutorial can be found in the reference guide Content settings object.
The "Hello World!" Content Config
We will start out simple. Here is the "Hello World!" content config:
|
Below we see what the content recommendation will look like if we were to deploy the config above in combination with the default template and the default style (ref figure above).
These are the settings we used:
-
comment - can be used to place comments anywhere within a configuration, will be ignored by the framework
-
type - we have set the type to fixed. By that we are telling the system that we have hard coded the recommendation.
-
items - we have provided a list (of one) recommendations to be displayed.
-
title - we have hard coded the title to "Hello World!"
-
url - we have given the Piano company home page as the recommended article to be visited if the recommendation is clicked
-
dominantthumbnail - we have put a test URL format here
-
dominantthumbnaildimensions - we give the dimensions of the image to be displayed as part of the recommendation
Simplest Content Config with an Actual Recommendation
The "Hello World!" config is not useful for much other thing than just displaying the "Hello World!" greeting. In this next example we will start recommending real articles. Below we see the simplest possible configuration that will give real results.
|
The config above is so simple that Piano Dashboard adds several default elements when it is saved. Below is the minimum real config after storage:
|
The visual result appears as shown below. Note the small image icon in the upper-left corner: an image is expected but does not appear. The default JavaScript template attempts to unpack and insert an image, but none is retrieved because the resultFields attribute does not reference an image; only url and title.

So, these were the new settings this time around:
-
type - we changed the type from fixed to recs. By that we are telling the system that we want it rather than us to provide the recommendations.
-
siteIds - we have provided a "list of one" site to be the source for recommendation articles
-
matchingMode - we have instructed that our recommendations are to be the most popular articles (matchingMode was set to trend by default)
-
weight - this one was also added by default and is only a formality for now as it has no effect when there is only one matching mode.
-
resultFields - list of the fields that need to be returned with the search result (notice that no image is requested and how that affect the resulting recommendation shown above that uses the default javascript template for unpacking the data)
-
maxAge - maximum age of articles to consider given in minutes
So let's fix the image issue by adding the two pieces of information that the default template requires for displaying the image correctly:
|
And voilà, after having adding dominantthumbnail and dominantthumbnaildimensions to the list of result fields we can now see the visual proof of our first real and complete content recommendation:
Result Fields
In the last version of the content config we listed 4 result fields. A couple of those names (title and url) we could maybe have guessed, but the rest we had no way of knowing what we potentially could or could not include. The way to see what field one can include is to do a search and look at an actual search result. The API function below can be executed with the cx.py tool to obtain a single search result and by that access to the list of result fields one can use.
Unix/Linux/macOS
|
Windows
|
If one are working with the legacy search solution, the one can use this url instead:
|
The search result below shows how the result fields get visualized.
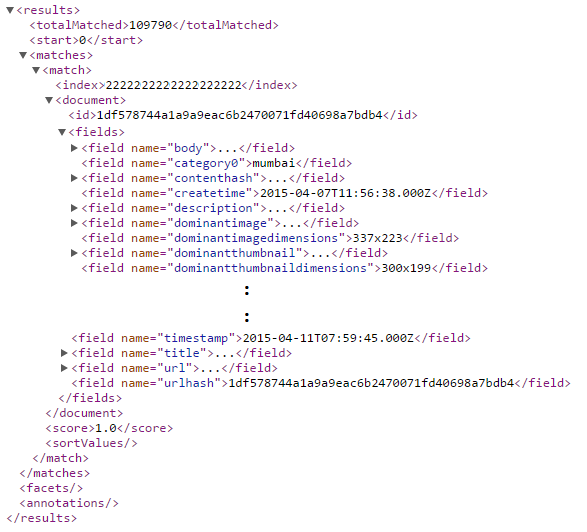
The result field list given in the content config above is already quite lean and there is nothing to remove since we need all the 4 fields for our recommendations. However, when coming across result field not being used by the template composing the recommendation, then these fields should be removed, especially if they are large fields such as for instance the body. Leaving them in there will make the display of the recommendation slower as more data has to be uploaded for each recommendation. Since the recommendation is one of the last things to be populated, the delay can become very noticeable.
So, how do we know if a field is to be used or not be used by a particular recommendation widget? The way to find out is to take a look at the javascript template code. Below we see the default out of the box content recommendation render template. Notice on line 2 how all the result fields end up being stored in the variable items. Then on line 7, 11, and 14 we access the member fields click_url, url, dominantthumbnail, dominantthumbnaildimensions and title. All these fields need to be included in the result field list for the widget to behave as intended, any other fields can and should be removed.
|
Matching Modes
So far we have only used one matching mode, trend. We will now have a look at all the 5+1 supported matching modes:
-
trend - articles with the highest number of unique users within the last N seconds (the sub-attribute period is used for setting N)
-
contextual - articles similar to the article.on the page where the recommendation is to be placed
-
behavioral - articles similar to those the user has read in the past
-
collabctx - articles read by other that has also read the article next to where the recommendation is to be placed
-
collabusr - articles read by other users with similar interests as the current user
In addition to the matching modes listed above, there is also one non-matching mode:
-
search - No matching, articles picked based on query, filter and rank definition
As well as new, AI embeddings-based matching modes, that provide much better quality and performance than their non-AI counterparts:
-
aiTrendBehavioral - articles popular right now, ranked by the user past interests
-
aiContextual - articles similar to the article the user is currently reading
-
aiContextualBehavioral - articles similar to the article the user is currently reading, ranked by the user past interests
-
aiBehavioral - articles similar to the user past interests
Below we see an example of a typical matching mode configuration to be put in the proximity of where the first couple of paragraphs ends. This recommendation is aimed at catching the eyes of readers that very quickly find out that the article they are currently reading is of no interest to them and start looking around fro something else. Since we know they did not like the article they were reading, we are not going to use contextual (which would be presenting them to more of the same stuff they did not like). Instead we will present a mix of trending (limited to articles most popular in the last hour / 3600 seconds) and behavioral (types of articles we know they have read a lot in the past) with twice the emphases on behavioral (weight = 10) than trending (weight = 5):
|
Avoiding Articles without an Image or with a Logo as the Image
The technique for detecting logos and other unsuited images described in this section relays on being able to do a facet search across image fields, something that is not possible with the new and current search solution. Hence, this will at some point be updated. However, the rest of what is discussed applies to the new search solution as well.
Unless one is showing text only recommendations, a content recommendation should look something like the one down to the left. What we want to avoid is recommendations that do not have an image (middle example) or shows the publication's logo (right most example). Statistics have shown that recommendations like the two to the right receive far less clicks than the left one.

To ensure we always end up with a recommendation like the one to the left, we can do the following:
-
Change the query to only return articles with an decent size image
-
Exclude any image that is a logo or any other type of image unfit for use in a recommendation
Below we are limiting the candidate articles to those that contain a dominant image (a decent size image). This will ensure we do not end up as in the middle example above.
|
Some articles have more than one picture. How can we pick the best one. Many sites uses Facebook OpenGraph tagging on their web pages to indicate what would be the best image to use when promoting the article in other medias. Hence, one alternative would be to use the query shown below which will only pick articles with an og-image tag:
|
But how will one know that there are enough articles with the image type one want to apply? For that we will use the search engine. Below we see 3 search engine queries that will return total number of indexed pages, pages with a sizeable image and pages tagged with an og-image respectively:
|
We have color-tagged/color circled the queries and the search results. We see that 99.9% (112.283/112.433) of the documents have a sizeable image, and that 99.3% (111.590/112.433) have an og-image. One always want to use og-images unless the number is significant lower than that of dominantimage (this of course assumes that the tagging has been done correctly). In this case, there is no doubt that we should use the og-images.

Another thing we can use the search engine for is to identify which mages that are not regular news article image, but logos or other frequently used images without any informational value. We identify these images by looking at their frequency. Logos typical occur in many more of the pages than what any regular news article images.
|
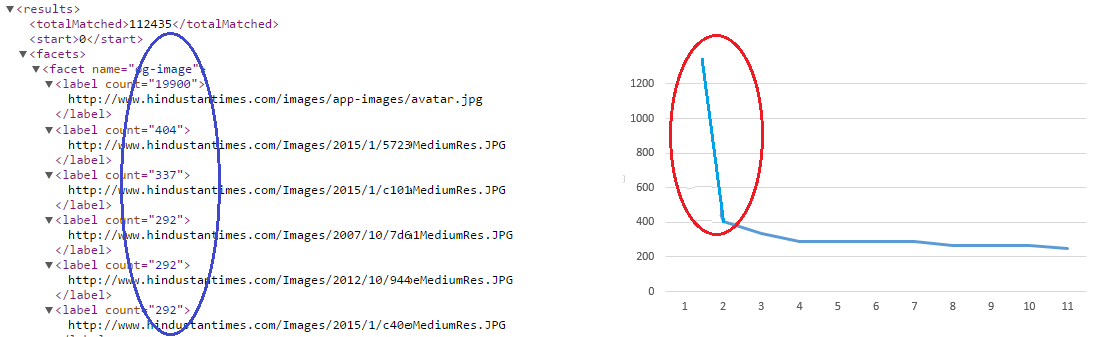
Using the query above we get the frequency of all og-images. We notice that the first og-image for sure (19.900 pages), and with a lesser degree of certainty the second one (404 pages), have a relative frequency that indicate that they are not regular new story images. We confirm this by visually inspecting the image links and then exclude the images we find unfit to be used in recommendations. Below we see the query to use in the content config if both images were to be found unfit.
|
It is important to note that what is described here in this section rests on the assumption that the web pages have been sufficiently marked-up.
Conditional Branching
It is possible to make the settings conditional. Below we see a pseudo code structure of a conditional configuration with two conditions and a final default option to catch anything not caught by the first two. Notice how the structure resembles a switch statement in any programming language.
|
-
placeholder typeOfCondition - can be time, user, userSegment, context, referrer, and, or, not
-
placeholder someCriteria - what kind of criteria depends on the type of condition, in the example below the condition type is referrer and the criteria is socialNetworks with the criteria value set to Facebook
The reference article Content settings conditions gives details on each of the condition types.
The first condition in the next example shows a real world example. Users that comes from Facebook and other social media are often flyby-users that read a single article and then bounce back to wherever they came from. It can thus pay of to address these users as one group. Below we see how one isolate users coming directly from Facebook from the rest:
|
The first (and only) condition isolates users coming from Facebook, all other users end up in the second condition free default branch.
One thing we notice above is that with the exception of the matching modes, almost everything in the second branch is a repeat of what is in the first branch. We can shorten and streamline the configuration by moving all the common data out of the branches and into a common section before the branching starts as we have done in the next example where the type defaults is used to indicate that the common settings apply to everything included within the attribute innerSettings further below.
|
In order to track the CTR and number of users that come in via the facebook or via the default branch we have added the attribute tag to each branch. The tag value can be maximum 10 lowercase alphanumeric characters. We have used the tag values faceb and notfaceb to for the two branches. After having deployed the recommendation, we can then go into the Piano Dashboard and look at the performance statistics of the two branches.
Here is a summary of the attributes introduced in this section:
-
type - defaults and conditional for common settings and conditional branching respectively
-
condition - a case condition in a switch statement for using a program language analogy
-
innerSettings - used a little bit differently depending on type. In the case of type being defaults, it defines all the branches that share the common settings
-
tag - used for labeling branches and in that way facilitate performance monitoring across the various branches
Comparative Performance Branching (A/B Testing)
Another motivation for branching is comparative performance testing or socalled A/B testing. One may currently be using one config, but want to experiment with another one by performance testing it on a limited number of users. This is exactly what we have done below. We have swapped the conditional branching from above with random branching with weights. In this case we give the current config 99% of the traffic and the experimental config 1%.
|