
Composer allows you to schedule an experience for any time in the future. Rather than making an experience live immediately after creation, you can select a start and stop time down to the minute, define multiple schedules per experience, run experiences overnight across two calendar days, and configure multiple time periods inside a single schedule.
Common uses
Scheduling lets you create experiences that run:
-
Every weekend (for a weekend special).
-
Mornings or evenings (for example, to wish your customers good morning or goodnight).
-
A few weeks or months in a row (such as a holiday season or summer special).
-
Just for a few days (such as Memorial Day weekend).
-
Overnight, from evening through to the next morning (for example, 22:00 Monday to 06:00 Tuesday).
-
Across multiple non-contiguous windows in a single experience (for example, weekday mornings and weekend evenings).
Key concepts
|
Term |
Meaning |
|---|---|
|
Schedule |
A named container that holds a date range (start date, optional end date) and one or more periods. An experience can have up to 7 schedules. |
|
Period |
A day-and-time window inside a schedule that specifies when the experience runs. A schedule can contain up to 24 periods. |
|
Overnight window |
A period that spans midnight by selecting two consecutive days and a start/end time that crosses 00:00. |
How to Schedule an Experience
Start by selecting Products → Composer at the top right of your screen. This populates the screen with existing experiences you have created.
Open the Schedule Modal
-
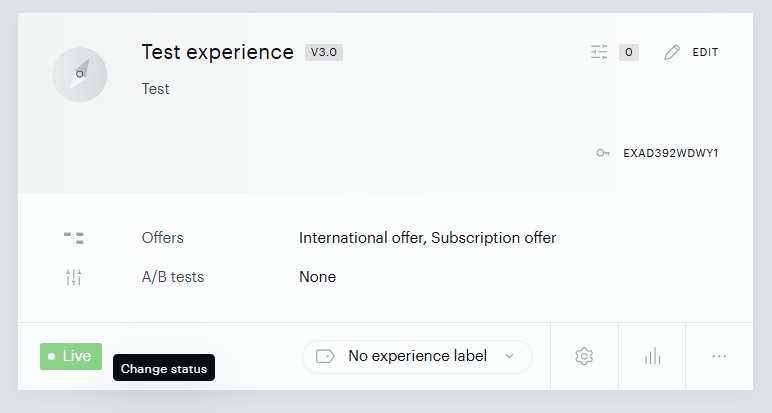
Locate the experience you want to schedule. In the lower left-hand corner of its card, click the green Live status pill.
-
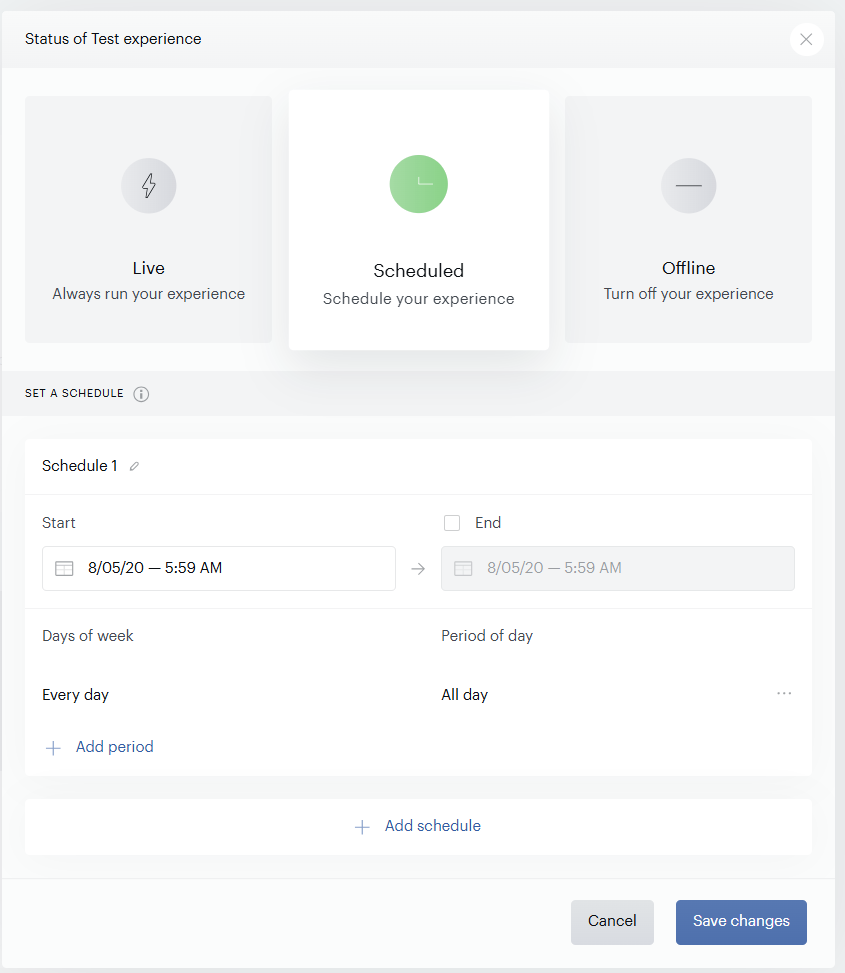
The Status of [experience name] modal opens. At the top you'll see three tiles: Live, Scheduled, and Offline. Click the Scheduled tile (it highlights with a green clock icon).
-
The SET A SCHEDULE section appears below, populated with a default Schedule 1 entry.
Name Your Schedule
Click the pencil icon next to the schedule name to rename it. A meaningful name (for example, "Summer weekday mornings") makes the schedule easier to identify if you later add additional schedules to the same experience.
Set the Start and End Dates
-
Click the date field under Start. A calendar opens with a Set time row at the bottom (hours, minutes, AM/PM).
-
Pick the date and time you want the schedule to begin, then click Apply.
-
To set an end date, tick the End checkbox. The end date field becomes active. Pick the date and time the schedule should stop, then click Apply.
-
Leave the End checkbox unticked to run the schedule indefinitely.
Add Periods to the Schedule
Each schedule contains one or more periods. A period defines which days of the week and which hours of the day the experience runs.
-
Click the Days of week or Period of day row (or click + Add period for additional periods). An inline period editor opens.

-
Select the day(s) of the week by clicking the day buttons (Mon, Tue, Wed, Thu, Fri, Sat, Sun). Selected days appear in black. Alternatively, tick Every day to select all seven days.
-
Set the start and end times using the hour, minute, and AM/PM fields. Alternatively, tick All day to run the experience throughout the 24-hour day.
-
Click the Save check on the right-hand side of the period editor. The period collapses into a summary row showing the day(s) and time range.
-
To add another period, click + Add period below the existing period and repeat the steps above.
Save the Schedule
Click Save changes at the bottom of the modal. The modal closes, and the experience moves to Scheduled on the dashboard. The right-hand sidebar shows a summary of the saved schedule, including the start and end dates, days of the week, and period of day.
Setting Up an Overnight Experience
An overnight experience runs continuously across midnight, for example, from 22:00 on one day through to 06:00 the next. Composer executes the experience as a single, uninterrupted block from the start time on Day 1 through to the end time on Day 2, with no interruption at midnight.
To configure an overnight window, you create two paired periods within the same schedule: one that runs up to 11:59 PM on Day 1, and one that begins at 12:00 AM on Day 2. Composer treats these as a single continuous block.
Option A: Overnight on a Specific Weekday
Use this when you want the overnight window to occur on a particular night each week — for example, every Monday night into Tuesday morning.
-
Open the Set a Schedule modal and click + Add period.
-
Select Mon (or your chosen evening day) in the day buttons. Set the time range to your evening start time → 11:59 PM (for example, 10:00 PM → 11:59 PM). Click Save.
-
Click + Add period again to add the second half of the overnight window.
-
Select Tue (or the day immediately following). Set the time range to 12:00 AM → your morning end time (for example, 12:00 AM → 06:00 AM). Click Save.
-
Click Save changes. The experience now runs continuously from Monday 10:00 PM through to Tuesday 06:00 AM every week.
Option B: Overnight Every Day of the Week
Use this when you want the overnight window to repeat every night — for example, from 23:00 each night until 05:00 the following morning, seven days a week.
-
Open the Set a Schedule modal and click + Add period.
-
Tick the Every day checkbox to select all seven days. Set the evening start time → 11:59 PM. Click Save.
-
Click + Add period to add the morning half. Tick Every day again. Set the time range to 12:00 AM → your morning end time. Click Save.
-
Click Save changes. The experience now runs overnight across every day of the week.
Note: When your configured end time extends past midnight and the following day is not explicitly included in the schedule, Composer displays an informational notice that the execution will spill into the next day. This is informational only, it does not block you from saving your configuration.
Using Multiple Schedules
A single experience can contain up to 7 schedules. Use this when different execution windows apply to different date ranges, for example, a weekday schedule for one month and a weekend-only schedule for another.
Adding a Schedule
-
Inside the Set a Schedule modal, scroll to the bottom and click + Add schedule.
-
A new schedule block appears below the existing one(s), each with its own delete icon (trash can) on the right-hand side of its header.
-
Click the pencil icon next to the new schedule's name to rename it.
-
Configure the start date, optional end date, and one or more periods, following the same steps as the first schedule.
-
Click Save changes to save all schedules together.
Schedule Rules
-
Each schedule has its own start date and optional end date.
-
Each schedule must have a unique name. If you enter a duplicate, Composer displays an inline error and prevents you from saving.
-
Schedules are allowed to overlap. When two schedules overlap, the experience executes during all configured windows. No warning is shown.
-
To remove a schedule, click the delete icon in its header.
Using Multiple Periods Inside a Schedule
Within each schedule, you can define up to 24 periods. This allows granular execution patterns, for example:
-
Different windows on different days of the week.
-
Multiple non-contiguous windows on the same day (for example, 09:00–12:00 and 18:00–21:00 on weekdays).
-
A mix of standard and overnight windows in the same schedule.
To add a period, click + Add period inside the schedule. To edit a saved period, click its summary row and the inline editor reopens. To remove a period, click Delete inside the period editor.
Overlapping periods inside a schedule are permitted. The experience executes during every time window that is active. No warning is shown for overlapping periods.
Scheduling a Global Experience
The same scheduling capabilities, including overnight windows, multiple schedules, and multiple periods, are also available for Global experiences. The interface is laid out as a side panel rather than a modal, but the underlying controls behave the same way.
Open the Global Experience Scheduler
-
Navigate to Manage → Global library → Experiences.
-
Open the Global experience you want to schedule.
-
Trigger the status change. A side panel titled Change experience status slides in from the right of the screen, showing the app identifier (for example, "Sandbox App") at the top.
Configure the Schedule
-
Click the Scheduled tile (between Live and Offline). The Schedule section appears below with the helper text "Add one or multiple schedules for this experience."
-
Add and name your schedule, set start and end dates, and add periods using the same steps described in How to schedule an experience.
-
In the Global experience side panel, the period editor is laid out vertically: the Days of week row sits above the Period of day row, with day buttons and time fields stacked one above the other. Functionality is identical to the modal version.
-
Click + Add schedule to add additional schedules (up to 7), or + Add period inside any schedule to add additional periods (up to 24 per schedule).
-
Click the check icon at the top right of the side panel to save all changes, or the X to discard them.
Frequently Asked Questions
How many schedules can I add to one experience?
Up to 7 schedules per experience.
How many periods can I add to one schedule?
Up to 24 periods per schedule.
What happens if two schedules overlap?
Overlapping schedules are allowed. The experience executes during all configured windows. No warning is shown.
Can overlapping periods cause issues?
Overlapping periods within a schedule are permitted. The experience executes during all time windows that are active. No error or warning is shown.
What happens if two schedules have the same name?
Composer displays an inline error and prevents you from saving until the duplicate name is resolved. Each schedule must have a unique name within the modal.
What is the overnight spillover notification?
If a period's end time crosses midnight but the following day is not explicitly included in the schedule, Composer shows an informational message so you are aware of the spillover. You can dismiss it and save — it does not block your configuration.
Can I add more than one time period to a single schedule?
Yes. Each schedule supports up to 24 periods, and you can mix and match days and time ranges freely.
Why is the scheduling interface a side panel for Global experiences but a modal for standard experiences?
Standard Composer experiences are scheduled from the experiences dashboard, where a centred modal is used. Global experiences are scheduled from the Global library (Manage → Global library → Experiences), which uses a slide-in side panel for status changes. The scheduling controls are functionally identical between the two surfaces.