
With the Segment Pages Card, you can define multiple segments within the same experience when different treatments are needed for different page groups.
Supported Experience Types
The Segment pages card can be used to define the targeted content when creating the following experience types:
-
Site Page view. Target based on website page views.
-
Mobile Execution. Define rules for mobile-based interactions.
-
API Interaction on Server. Set up segment-based behavior via server-side API interactions.
-
API Interaction on Edge. Configure page segmentation for interactions occurring at the edge level.
The Segment Pages Card is available for selection when:
-
Creating a new Composer experience.
-
Editing an existing Composer experience to modify or add new page segments.
Creating a New Experience
Let's take an example and say that you create a new "Site pageview" experience. To create a new "Site page view" experience, take the following steps:
-
Access the Experience Cards Manager.
-
Click the Compose button.
-
Select the desired experience type (from Site Pageview, Mobile Execution, API Interaction on Edge, or API Interaction on Server).
-
Provide the required experience details in the following input fields:
-
Title
-
Description
-
-
Click Create to enter the experience editor (canvas).
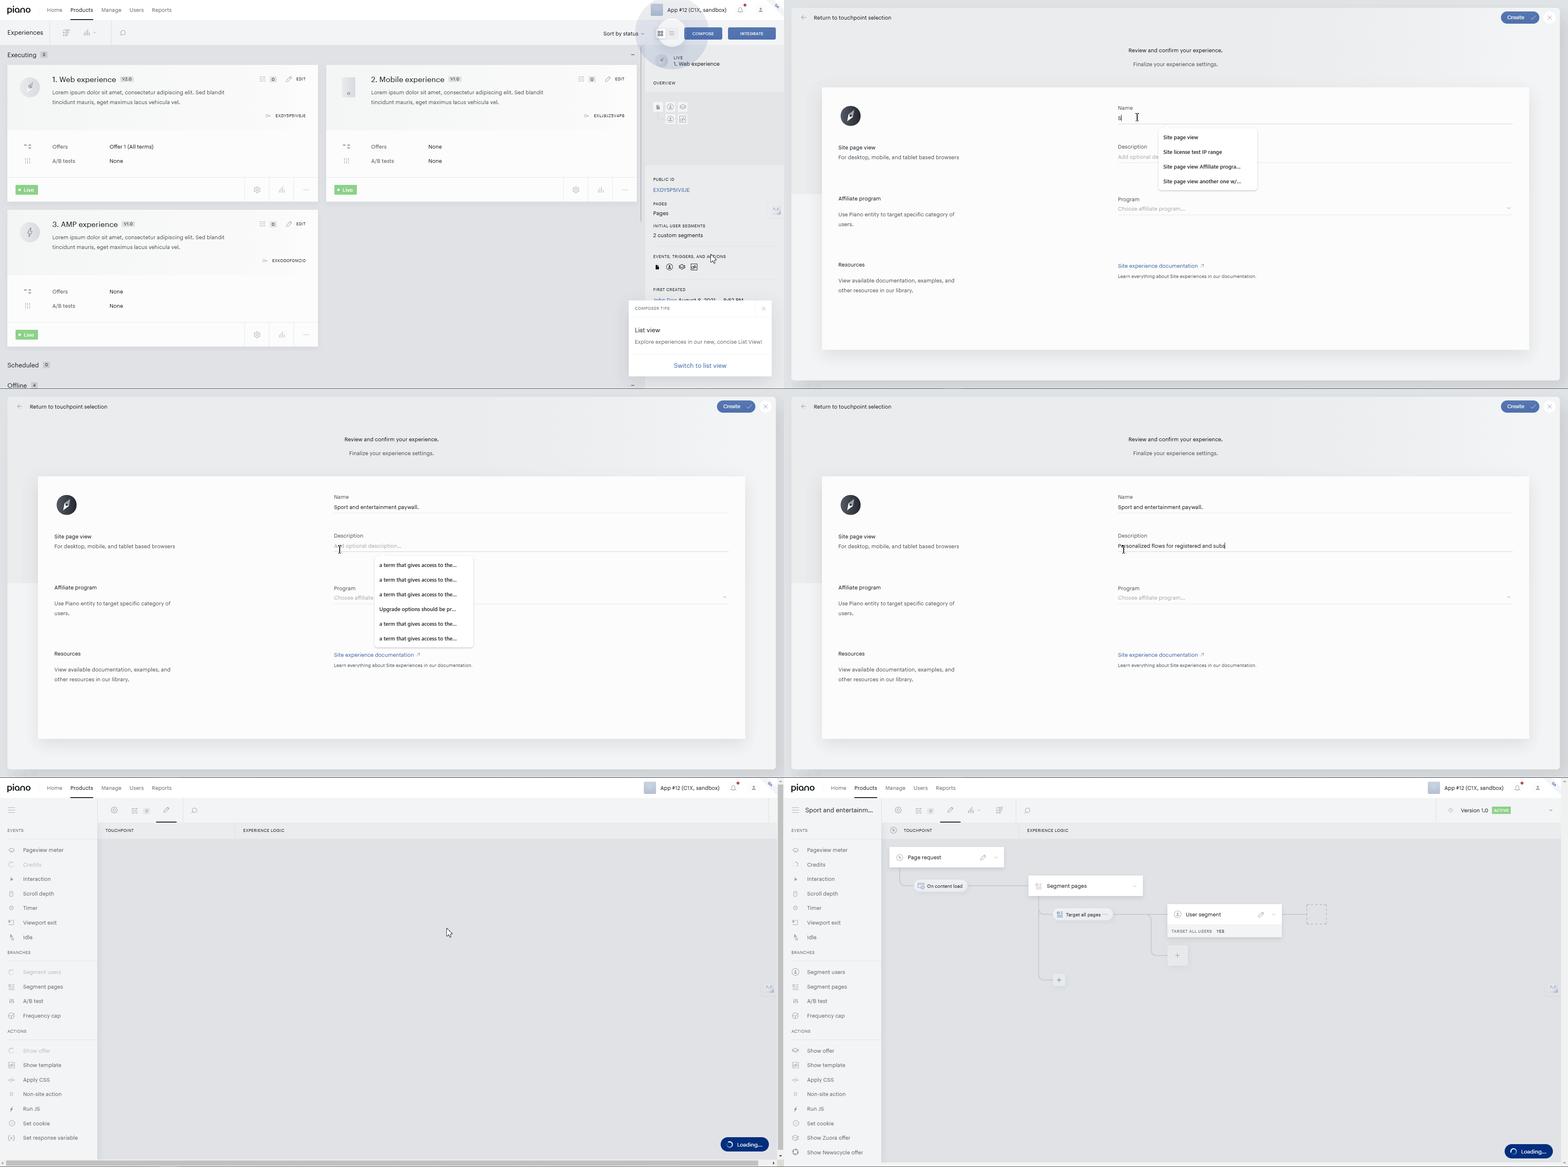
Once the experience creation process is completed, you will be redirected to the Experience editor (Canvas).
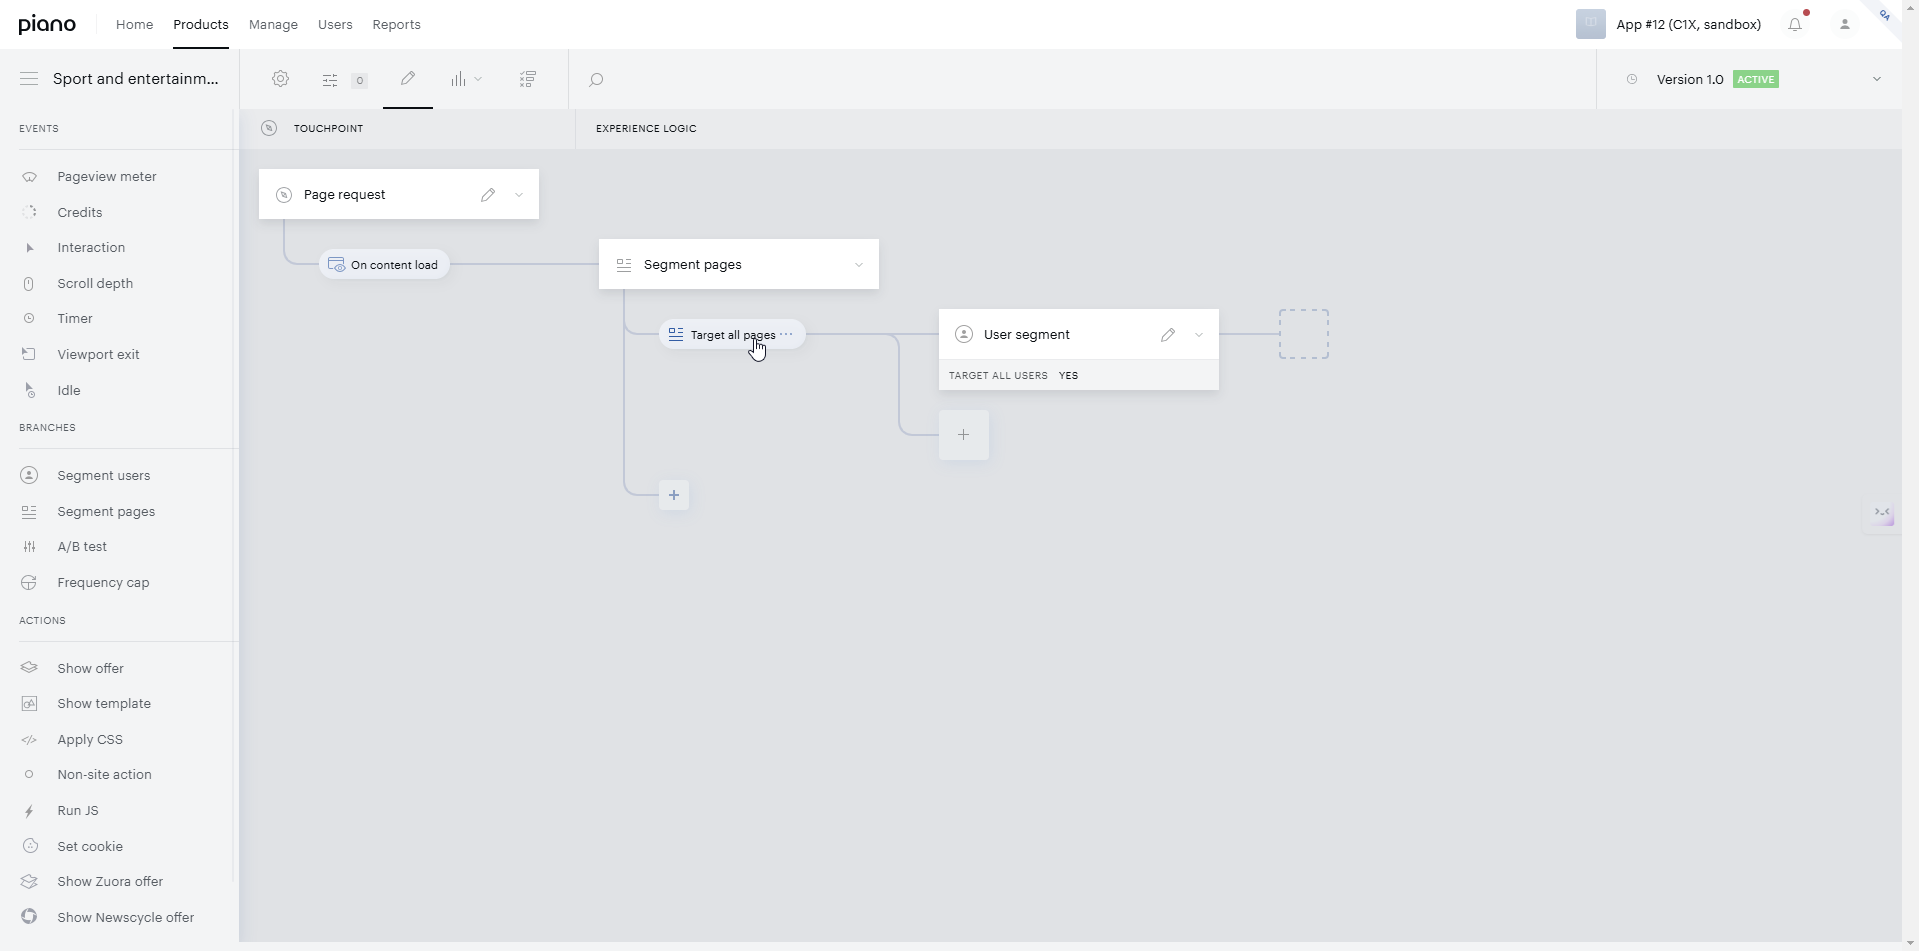
By default, the following predefined elements are displayed in the experience editor:
-
Page request: Serves as a touchpoint that initiates the experience execution.
-
On content load: An informational prompt highlighting the moment an experience is executed.
-
Segment pages card: Contains the following elements:
-
Target all pages: a child card.
-
"+" Icon: allows you to add page segments.
-
-
User segment card: Contains the following element:
-
"+" Icon: allows you to add user segments.
-
Note: These preset elements help structure the experience editor by maintaining a minimum configuration required before defining events and actions.
-
Segment pages
-
Segment users
Both cards are essential, as experience requires both audience targeting and content definition.
Reordering Page and User Segments
In the experience editor, you have the flexibility to choose what you want to define first depending on your targeting strategy: Page segments or User segments. If you prefer to define your audience before specifying content, follow these steps to reorder the preset elements within the experience editor:
-
Step 1: Deleting the preset elements
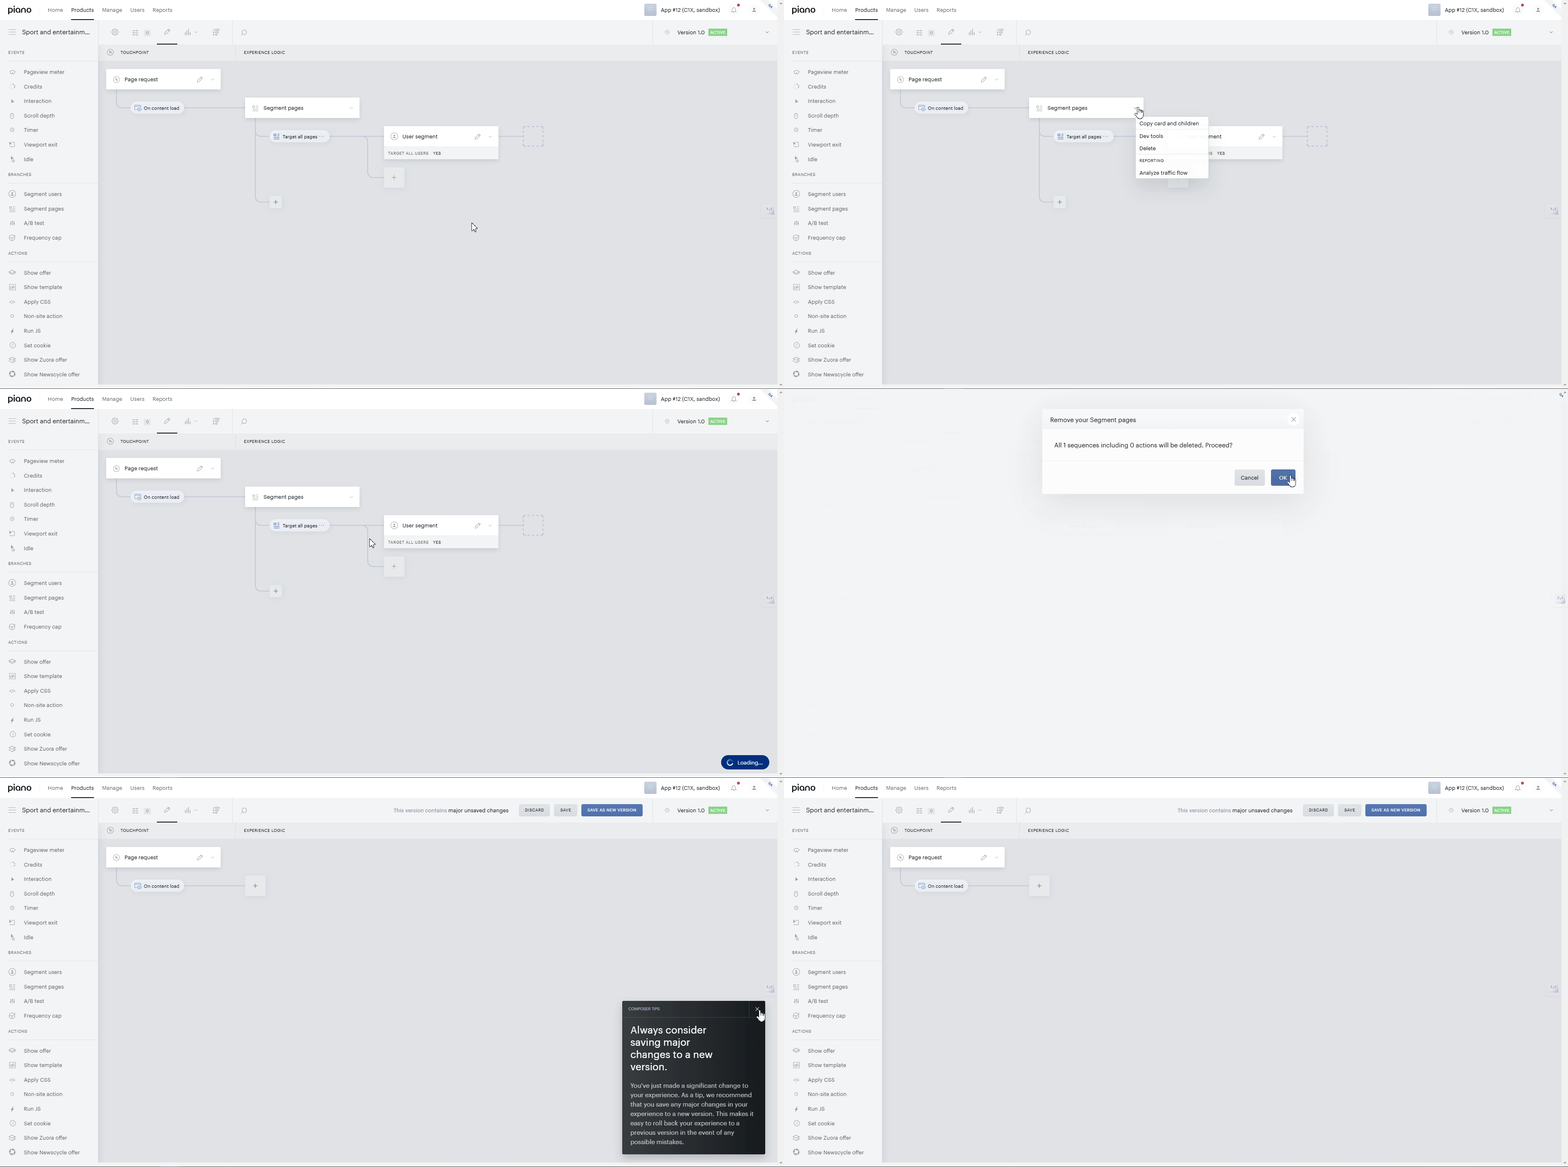
-
Locate the Segment pages card in the editor.
-
Click the chevron icon on Segment pages.
-
Open the drop-down menu.
-
Select Delete. Note: This action will remove both the Segment pages and User segment from the editor.
-
-
Step 2: Define user targeting
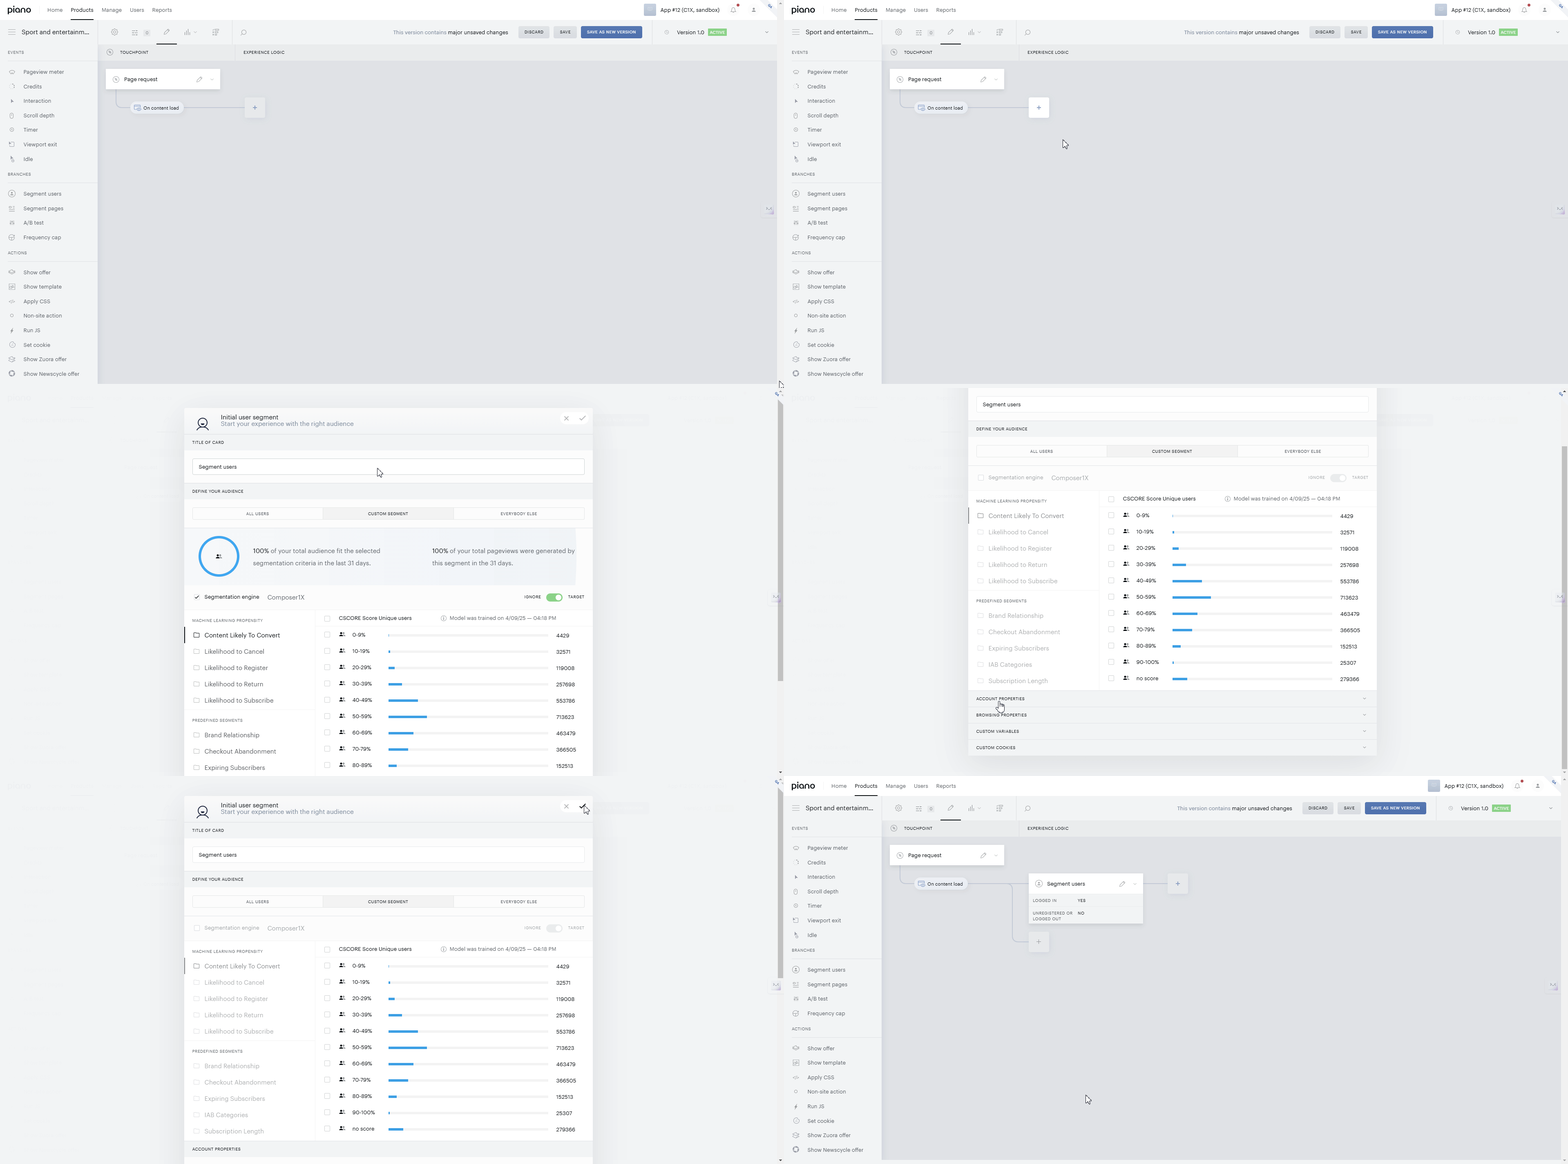
-
Find and click the "+" button in the experience editor.
-
Find the following options upon clicking:
-
Segment users - Defines user groups that are targeted by the experience.
-
Segment pages - Defines the all or cohort of pages that will be included in the experience.
-
-
Choose Segment users from the drop-down menu.
-
A Settings Panel will appear, prompting you to define the initial user segment.
-
In the Define Your Audience section, choose one of the following options:
-
"All users"
-
"Custom segment"
-
"Everybody else"
-
-
If Custom Segment is selected, specify parameters within Account Properties, Browsing Properties, Custom Variables, Custom Cookies, and Custom Fields.
-
-
After completing your user targeting rules, hit the Save button at the top of the settings panel and return to the experience editor.
-
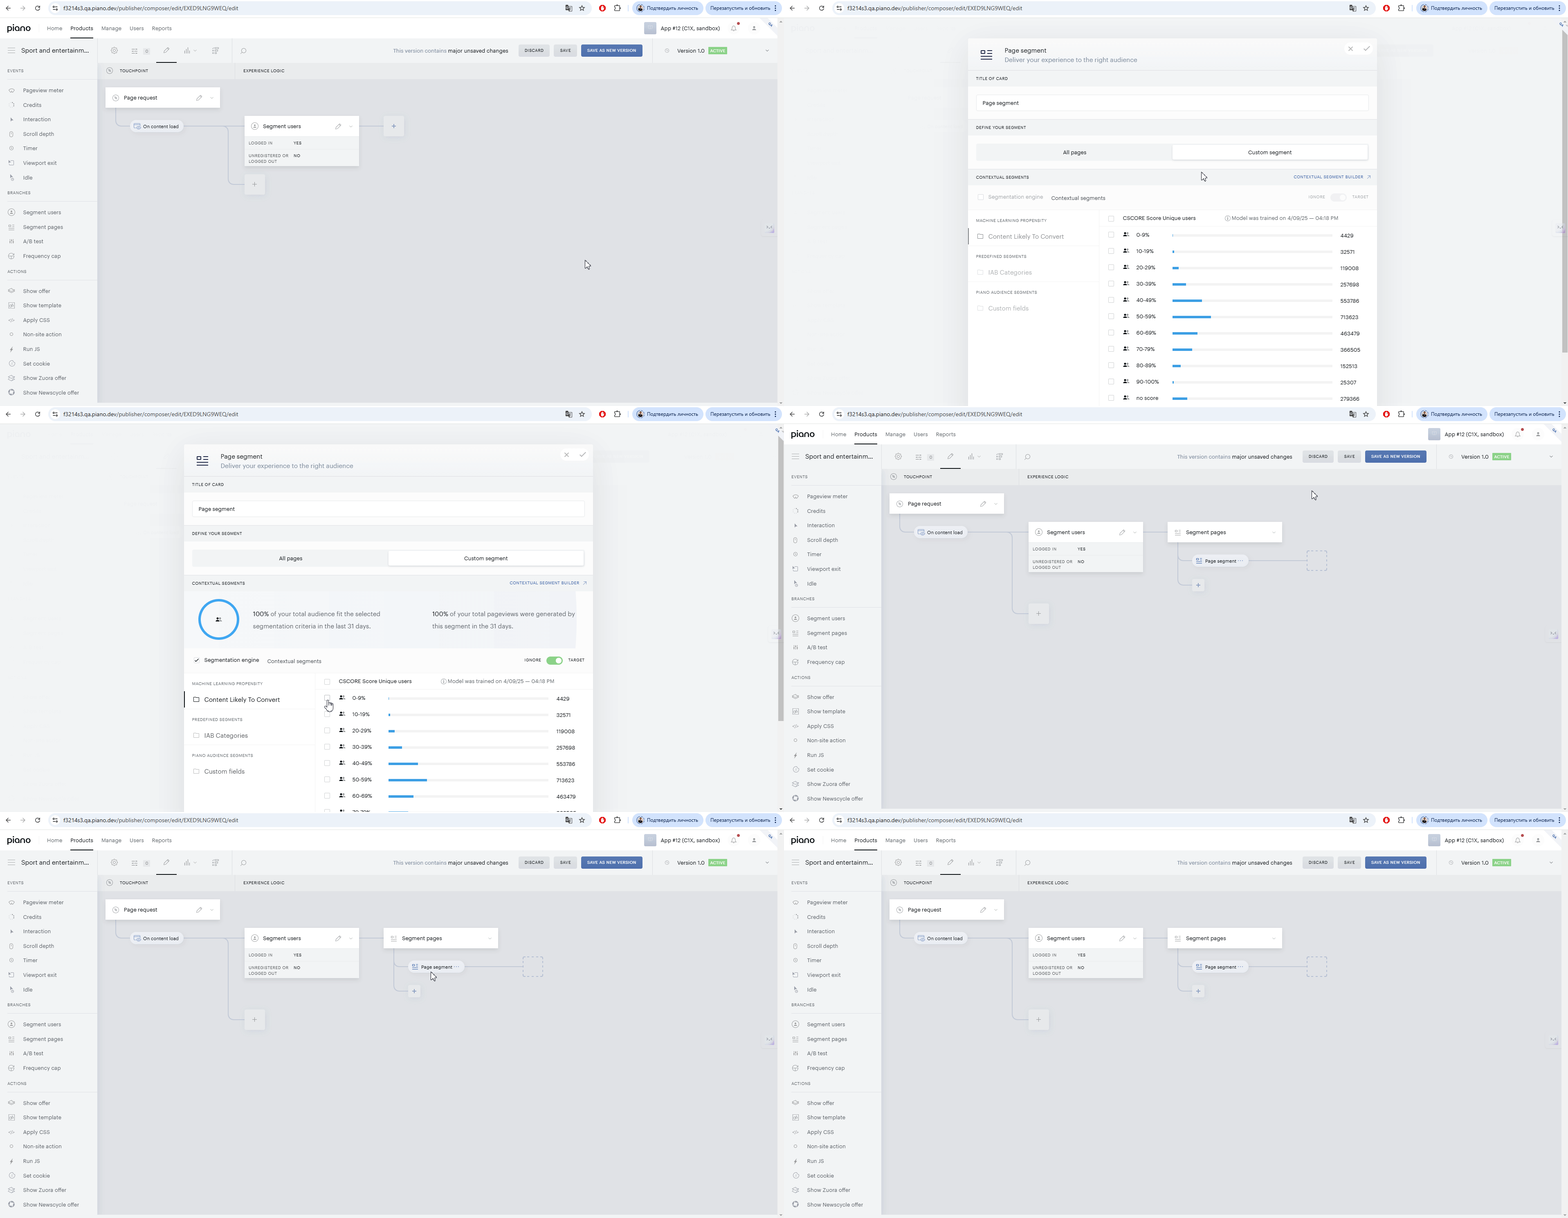
Step 3: Configuring the page targeting criteria after specifying the audience.
-
Click the "+" button to the right of the "Segment users" card.
-
Find the drop-down menu displaying the following options:
-
Segment users
-
Segment pages
-
-
Select the Segment pages from the drop-down menu.
-
The card Settings Panel will appear.
-
Define the page targeting rules using the following sections:
-
"Contextual segments"
-
"Content and URL parameters"
-
"Publish time"
-
-
Hit the Save button at the top of the card Settings Panel, after configuring the targeting rules.
-
By following these steps, you can successfully reorder segments in the experience editor to prioritize audience targeting before content. For more information on the rules and input sections within the Segment Pages card, please refer to our detailed explanation here.
Using Predefined Elements in the Experience Editor
If you wish to utilize the predefined order of cards in the experience editor without altering their sequence, you can proceed to configure your page and user targeting criteria directly. This guide will walk you through the process of using the preset order for cards to set up your content targeting strategy.
Instructions for Configuring a Custom Segment of Pages
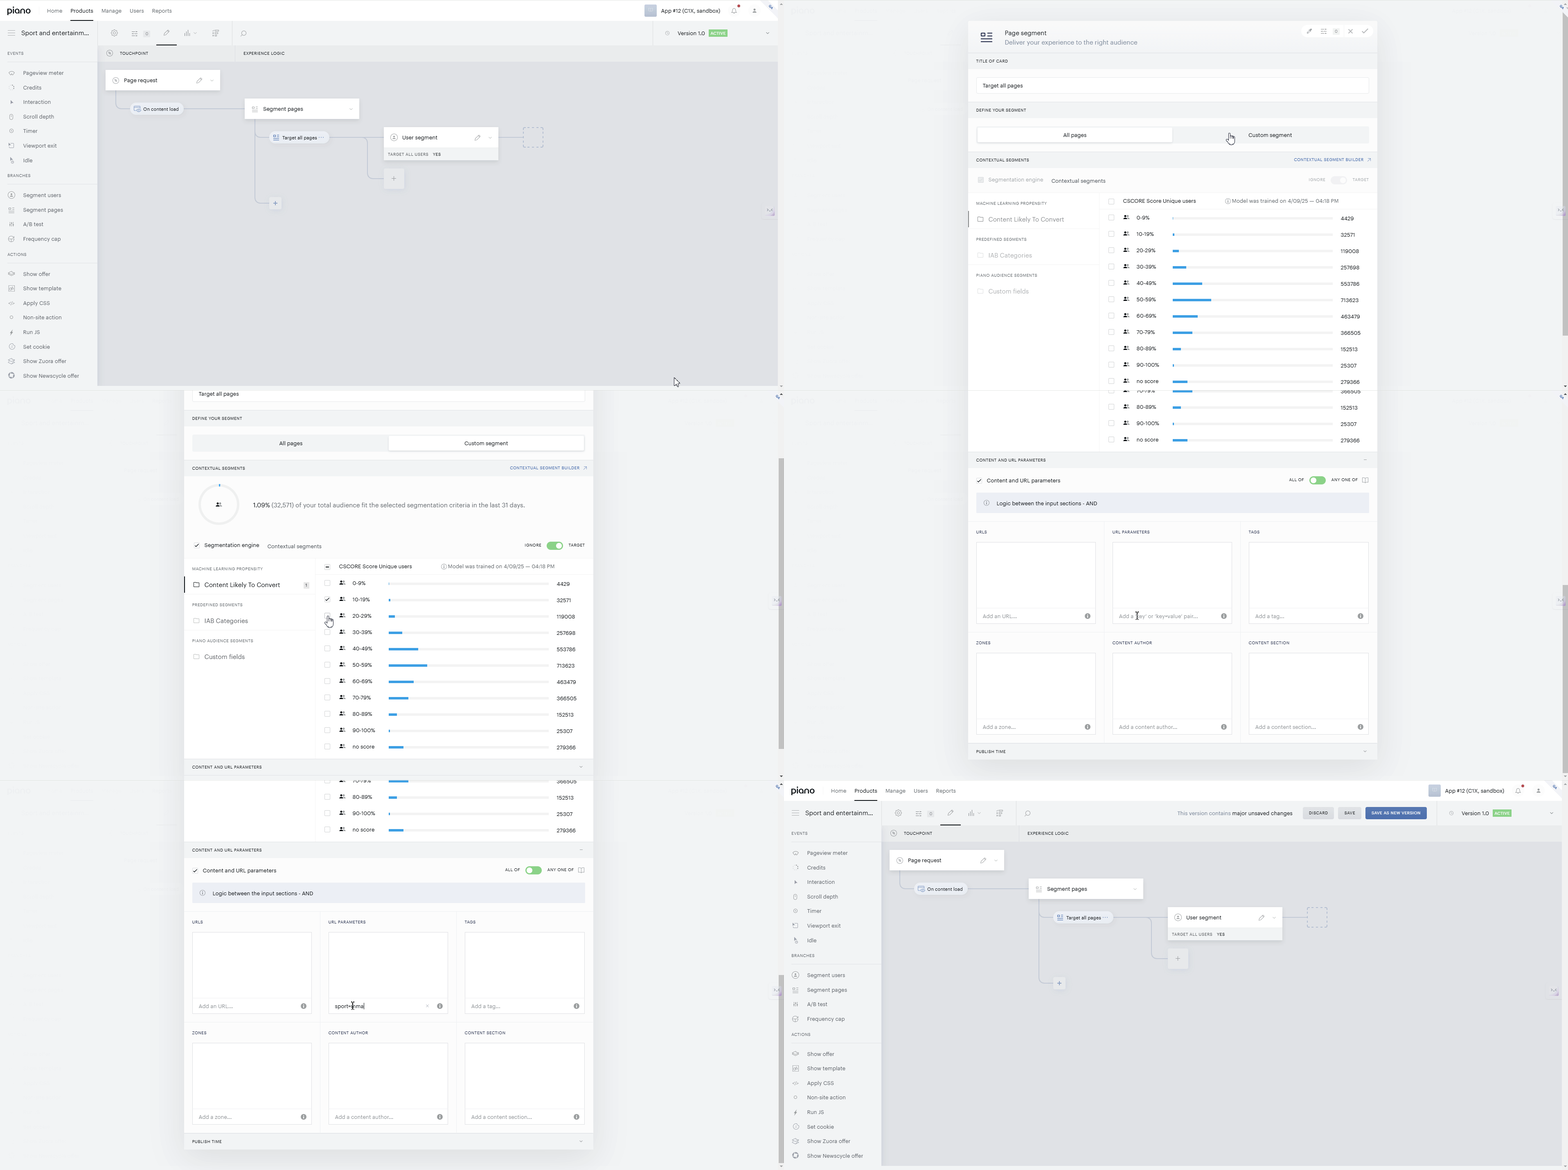
In the experience editor, navigate to the preset Segment pages card. If you want to define a custom segment of pages that should be part of your experience, take the following steps:
-
Locate the Target All Pages child card: Find this card positioned below the Segment Pages card in the experience editor.
-
Interact with the child card: Hover over the Target All Pages card to reveal the tooltip labeled Edit.
-
Access the card settings: Click on Target all pages to open the card Settings panel.
-
Settings panel overview: Observe the Settings panel consisting of the following sections: Contextual segments, Content and URL parameters, and Publish time.
-
Define your segment: Identify the first section titled Define your segment. Select the Custom segment option to customize your targeting rules.
-
Customize segment rules: Hone your targeting criteria for custom segments using the additional sections within the settings panel: Contextual segments, Content and URL parameters, and Publish time.
-
For detailed instructions on configuring the custom segment rules, please refer to the description provided below.
Configuring Custom Segment Rules
The configuration process consists of three main steps:
Step 1: Select the Page Targeting Scope
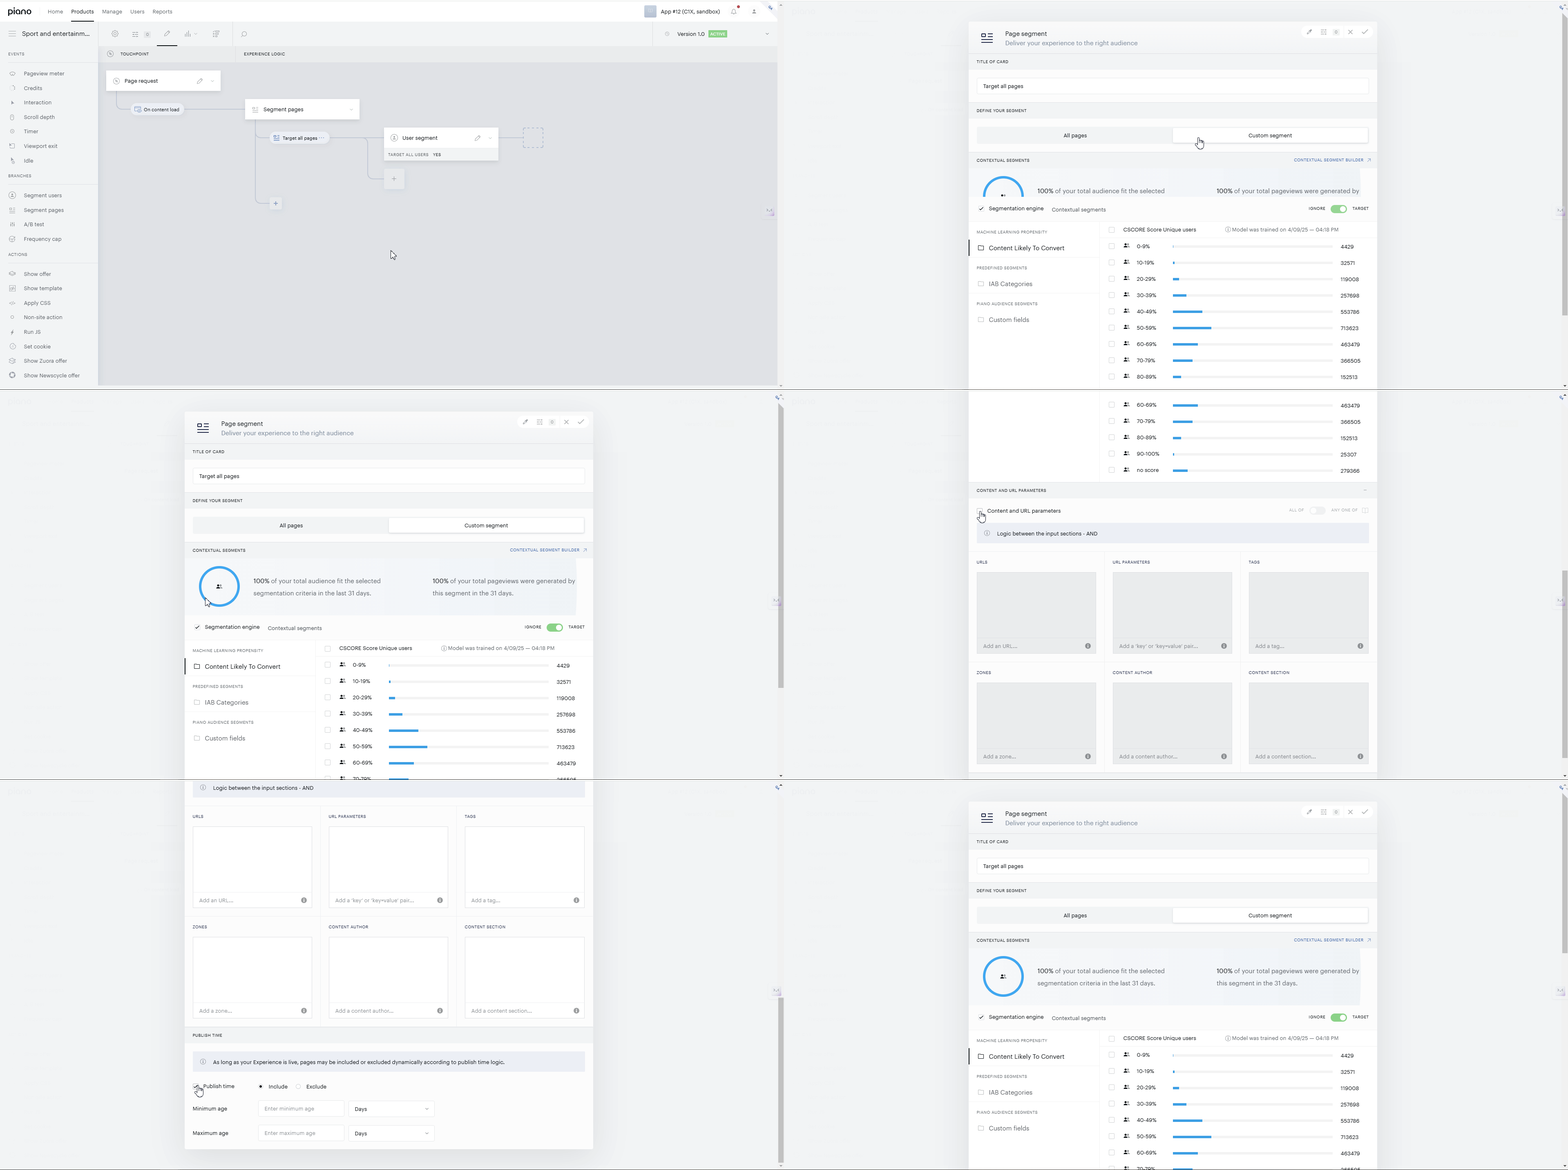
The first step involves determining whether you want to target all pages or define a specific segment of pages. This is configured using the Define Your Segment section:
-
Choose one of the following options using the toggle switch:
-
All Pages – Targets all pages within the experience.
-
Custom Segment – Enables specific page targeting based on defined rules.
-
-
When selecting Custom Segment, proceed to define specific rules for page inclusion.
Step 2: Configure Page Targeting Rules
If you select the Custom Segment option, additional configuration is required to define the exact criteria for page targeting. This is done via the Content and URL Parameters section, which offers multiple filtering options, i.e. input sections:
-
URL(s) – Specify individual page URLs.
-
URL Parameters – Define rules based on URL query parameters.
-
Tags – Filter pages using assigned tags.
-
Zones – Target pages that belong to specific content zones.
-
Content Author – Filter based on the author of the content.
-
Content Section – Apply segmentation based on content categorization.
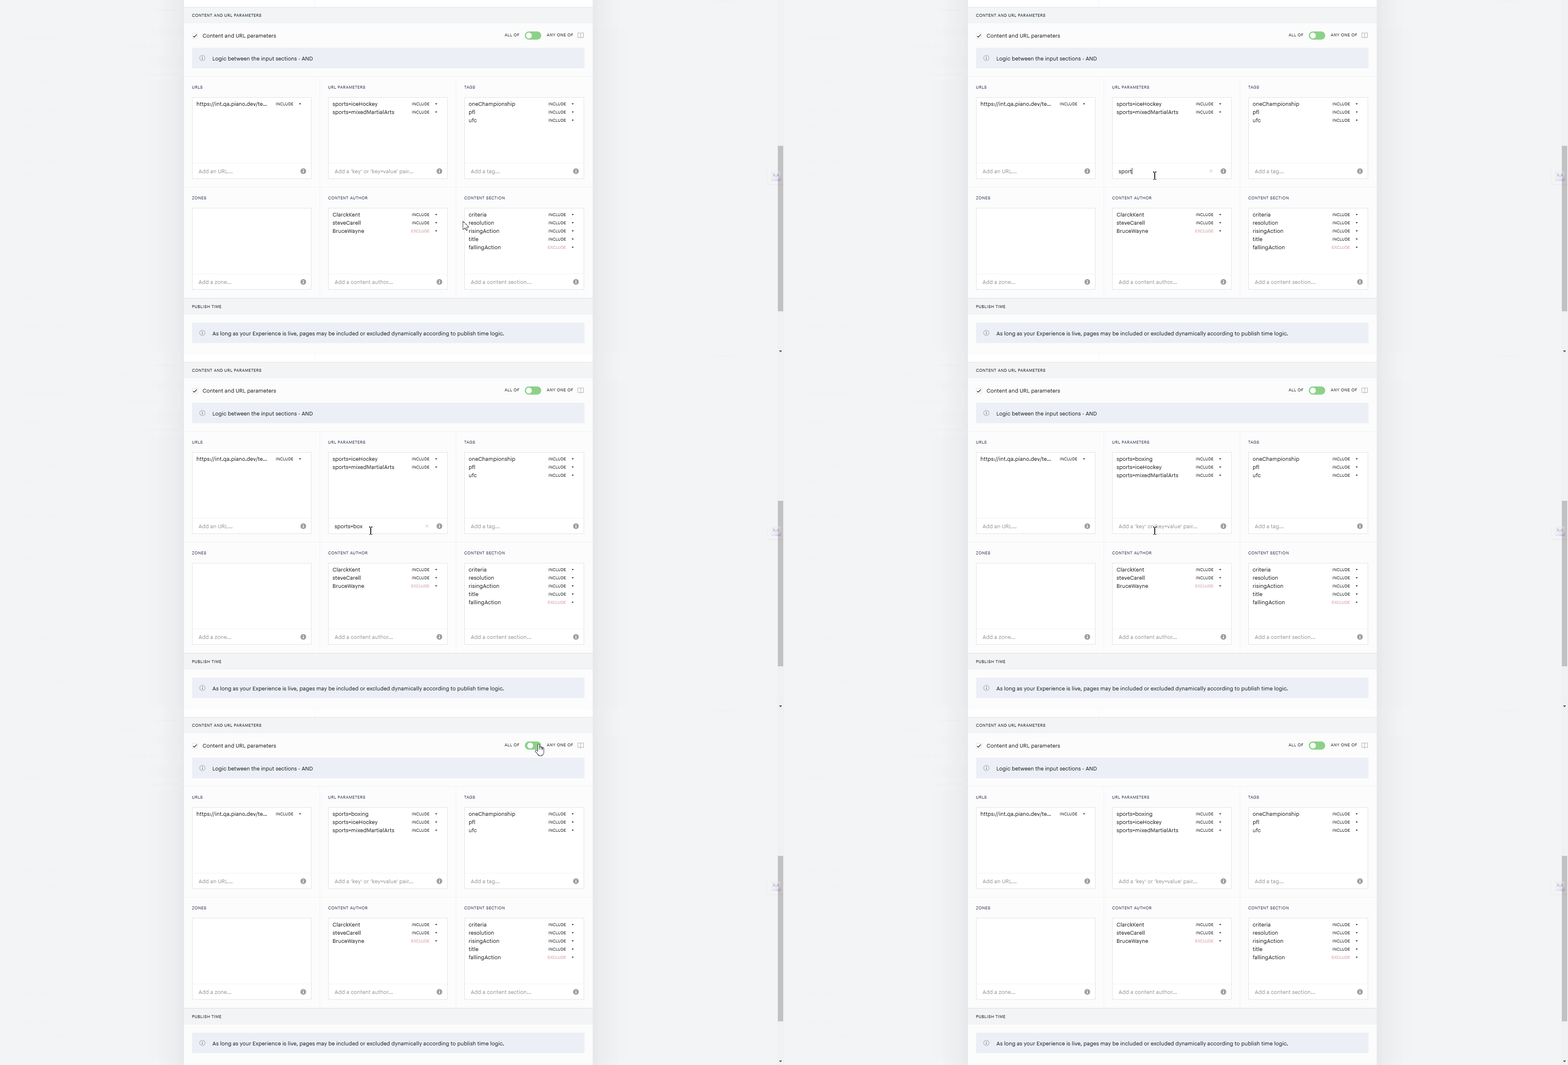
You may define one or multiple rules of page targeting inside each of the input sections mentioned above.
Setting up Logic for Multiple Input Sections
When setting up the targeting rules inside multiple input sections (e.g., URL(s), URL Parameters Content Author, Tags), you can control how they interact by choosing between AND and OR operation logic:
-
"All of" (AND logic) – The page must meet all targeting rules defined within ALL input sections. URL(s) and URL Parameters and Tags and Zones and Content Author.
-
"Anyone of" (OR logic) – The page must meet all rules from at least ONE input section. URL(s) or URL Parameters or Tags or Zones or Content Author.
-
You can toggle between these logical operators within the Content and URL Parameters section.
Handling Multiple Values Within an Input Section
When specifying multiple values within any section (URL(s), URL Parameters, Content Author, etc), the following logic applies:
-
Include operator with multiple values – Uses OR logic (Any page matching at least one value will be included).
-
Exclude operator with multiple values – Uses OR logic (Any page matching at least one value will be excluded).
-
Combining Include and Exclude – Uses AND logic between the two groups. One group of values with Include, and the other group of values with Exclude (Pages must match the inclusion criteria AND must not match the exclusion criteria).
For more information about operators and operation logic applicable between the input sections and defined values, please access our documentation.
Step 3: Refining Targeting with Publish Time Rules
For more precise page targeting, you can apply Publish Time filters to define the age of content included in the segment.
-
Specify either or both of the following parameters:
-
Minimum Age – Target content that is at least a certain number of days old.
-
Maximum Age – Target content that is no older than a certain number of days.
-
-
Choose between Include and Exclude operators to determine whether pages meeting the age criteria should be included or ignored.
Step 4: Saving the Page Segment Configuration
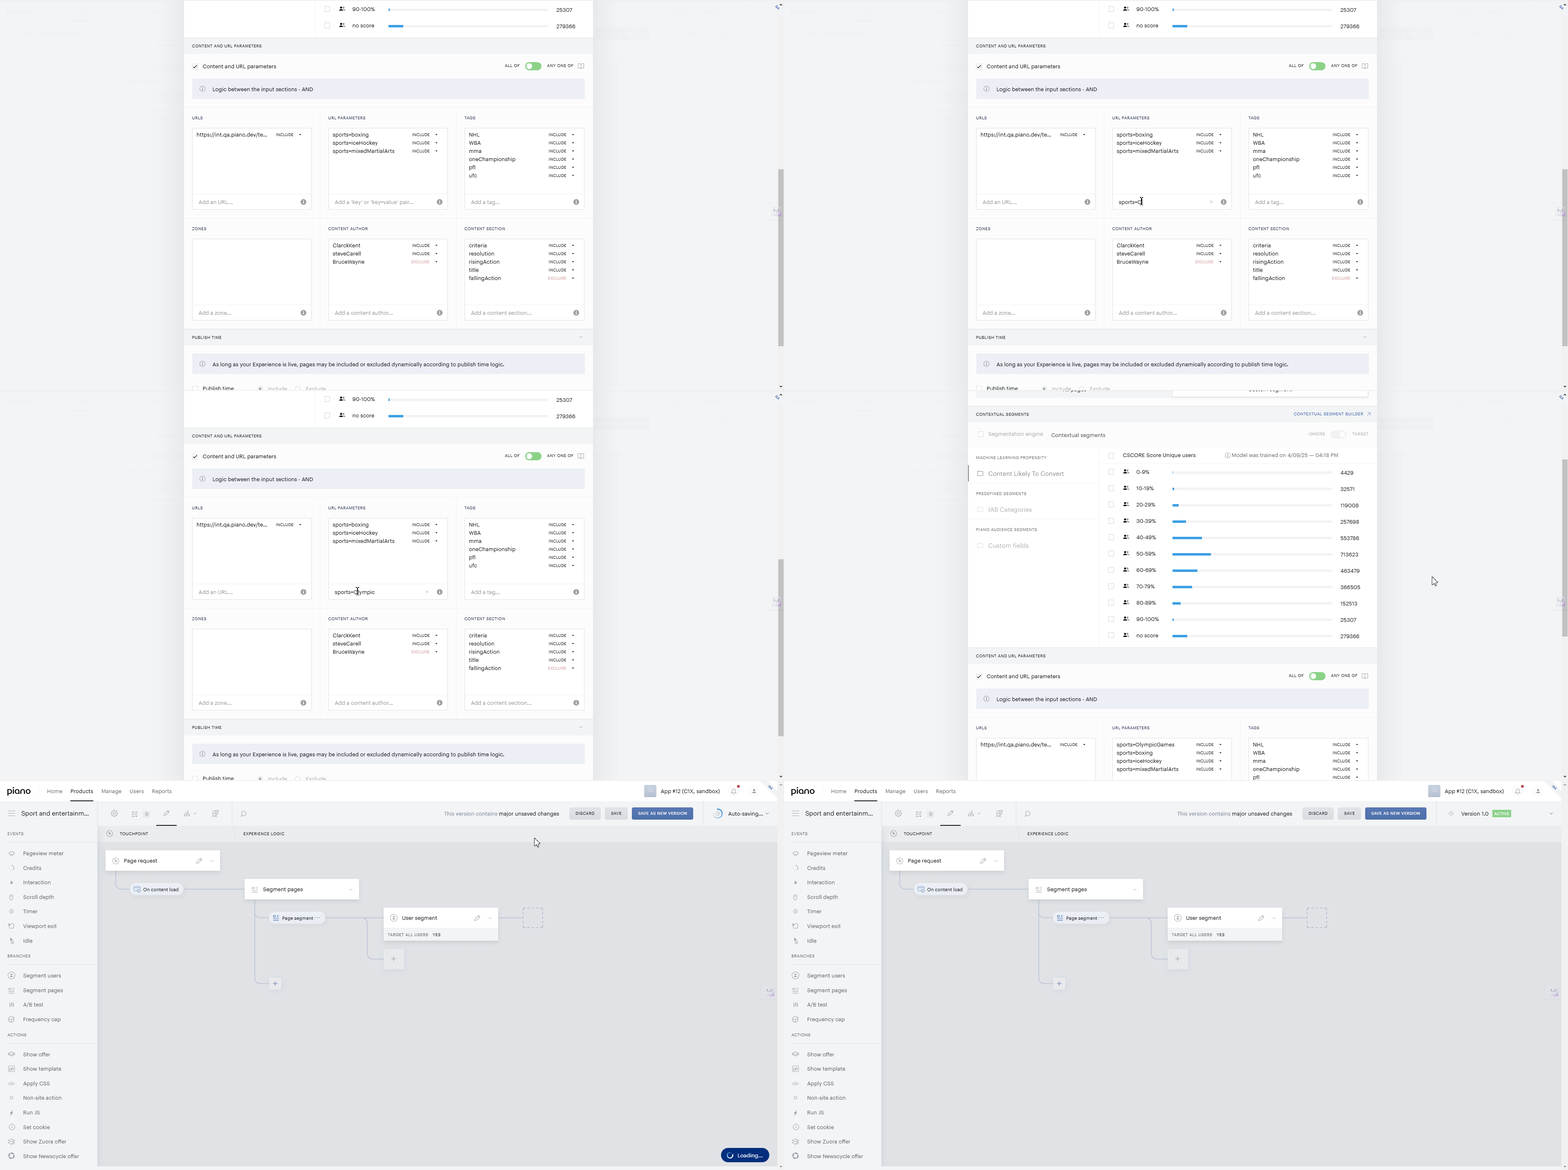
Once you have finalized the targeting rules, complete the setup as follows:
-
Click the Save button in the top-right corner of the settings window to confirm the configuration.
-
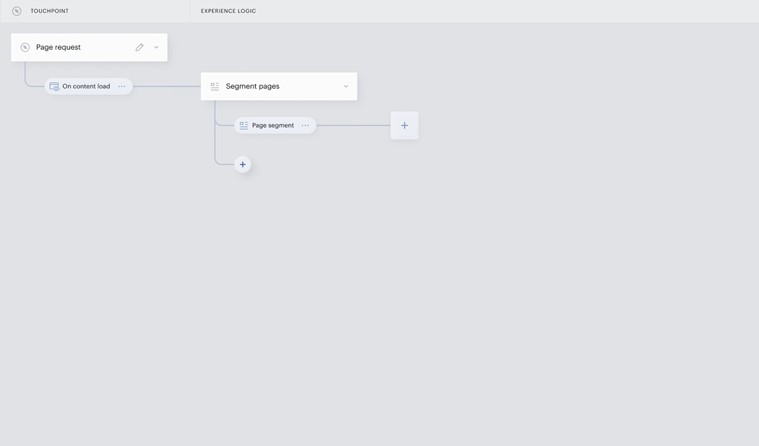
After saving, you will be returned to the experience editor, where your configuration will be reflected as one of the following child cards displayed below Segment pages:
-
Target All Pages – If targeting all pages.
-
Page Segment – If targeting a custom segment of pages.
-
-
The targeting rules you define will determine how pages card appear on the experience editor.
Step 5: Adding Additional Page Segments (Optional)
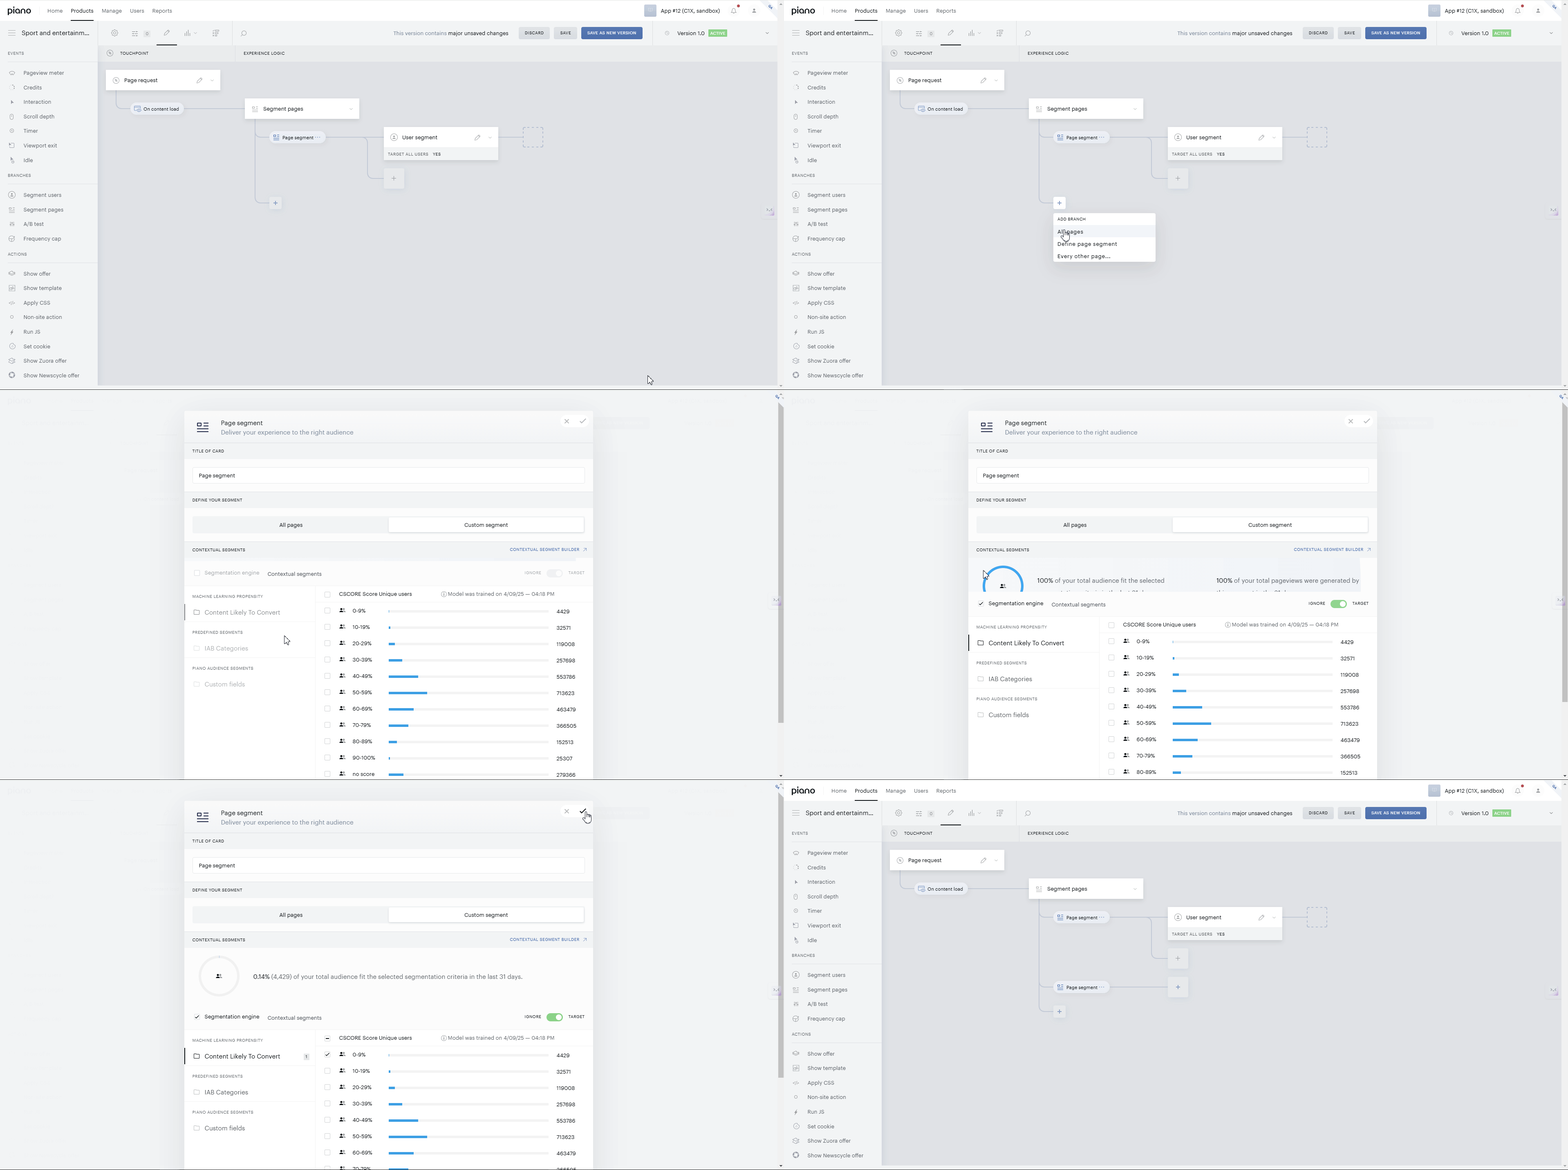
If you need to create multiple page segments within the same experience, follow these steps:
-
Locate the Segment pages card within the experience editor.
-
Find the "+" button positioned below the Segment pages card as a child node.
-
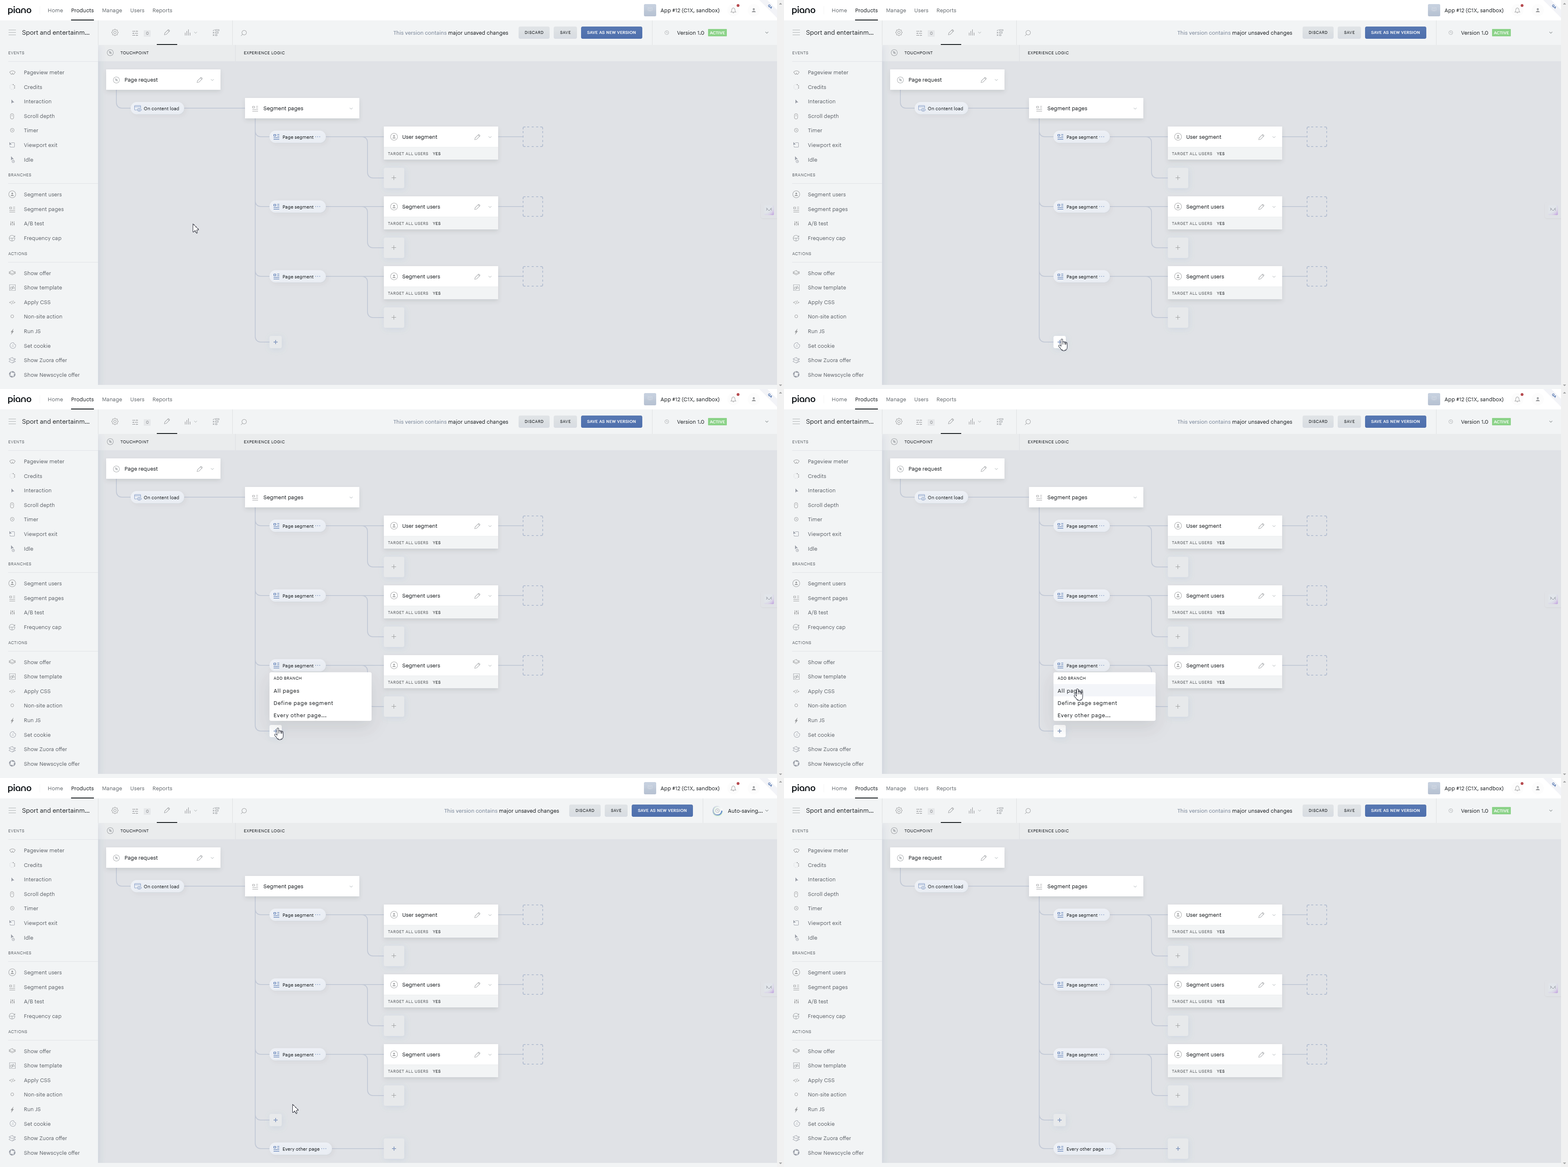
Click on the "+" button to open the drop-down menu:
-
All pages
-
Define page segment
-
Every other page
-
-
Select Define Page Segment to create another custom segment.
-
Find the Settings panel appearing on the screen: Observe the Settings panel consisting of the following sections: Contextual segments, Content and URL parameters, Publish time.
-
Customize segment rules using the following input sections within the Settings panel:
-
Contextual segments
-
Content and URL Parameters
-
Publish time
-
-
Once the custom page segment is configured, click the Save button. The newly created segment will now appear as an additional page segment on the canvas.
-
You can create multiple page segments within a single experience as needed. Each segment will allow you to apply specific rules and actions independently.
Step 6: Configuring Actions for Remaining Pages (optional)
After defining the final custom page segment, set up a separate branch with an appropriate action for the remaining pages. These are the pages that have not been included in your custom segments.
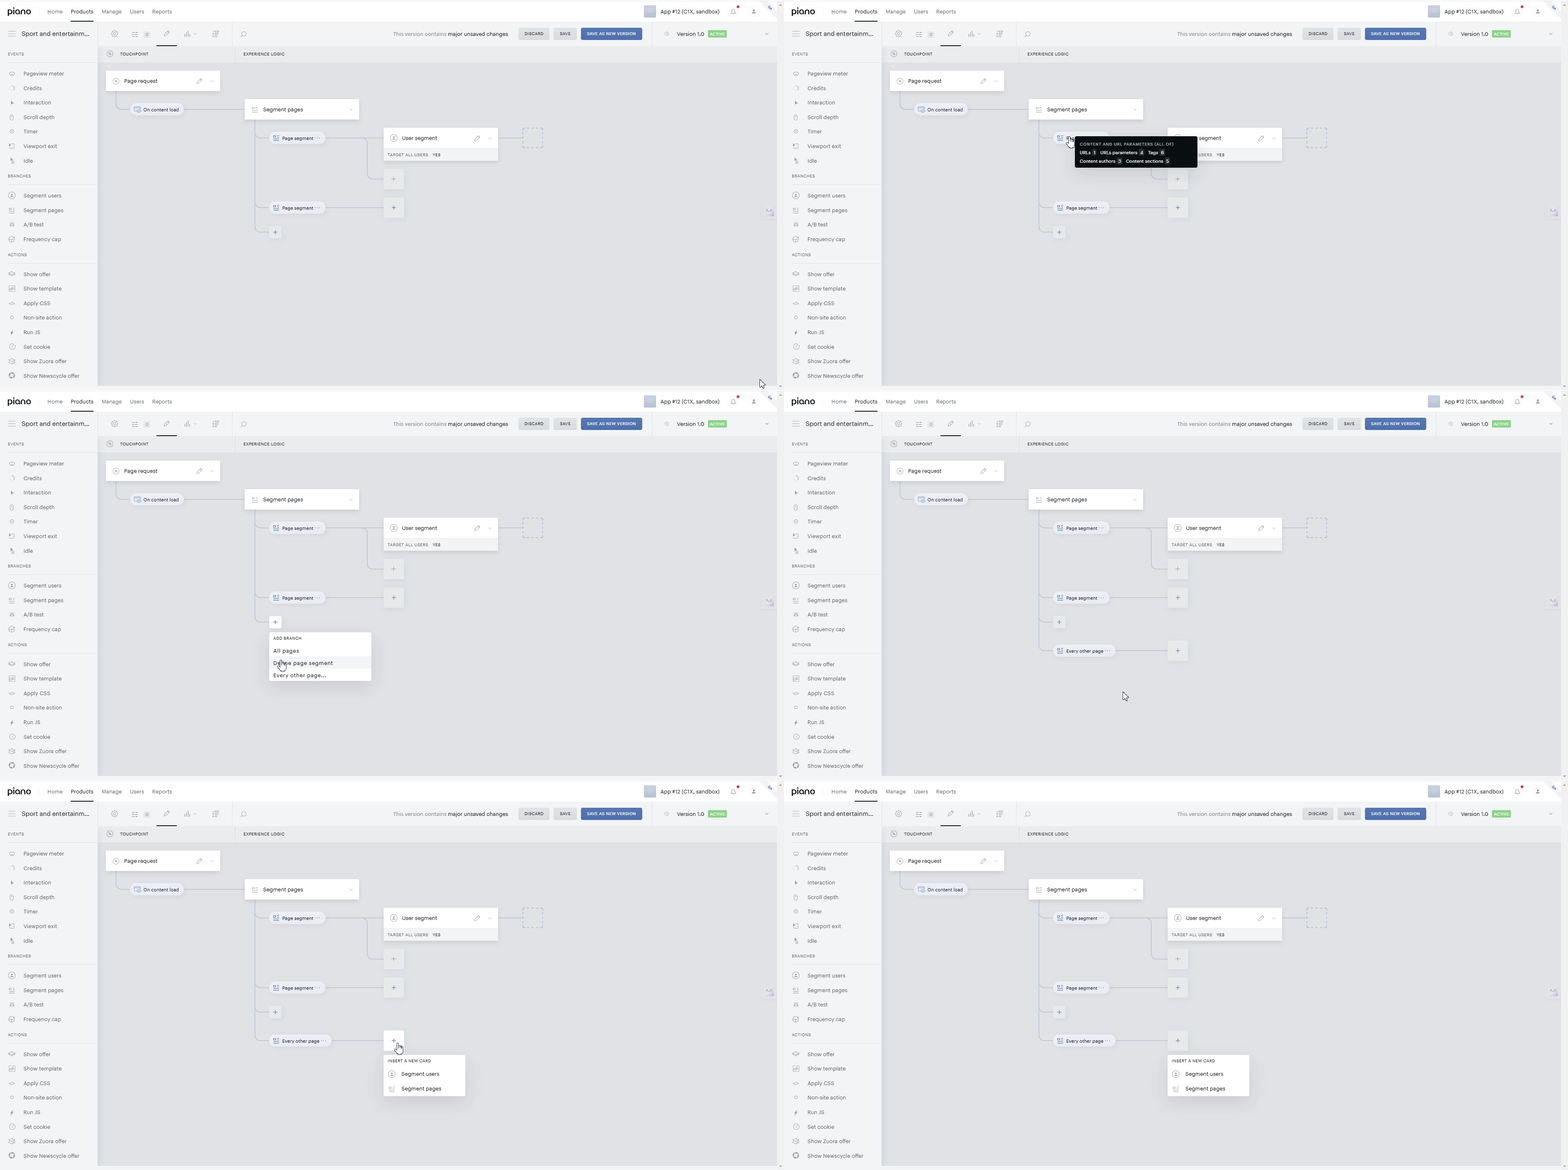
To define an action for pages outside your specified page segments, take the following steps:
-
Locate the Segment pages card on the editor.
-
Click on "+" as a child button of the "Segment pages" card.
-
The drop-down menu will appear upon clicking. Find the following options:
-
All pages
-
Define page segment
-
Every other page
-
-
Click on Every other page to define the behavior for the remaining pages that are not included in any page segment.
-
Find the "+" button to the right of Every other page within the experience editor.
-
Click on the "+" button to open the drop-down menu.
-
Choose from the given list of options:
-
Segment users - Define user segments that will be displayed templates.
-
Segment pages - Define subsegments within the remaining pages to configure an action for every subsegment of pages (optional).
-
Once you configure rules for page and user targeting, proceed with configuring your events, branches, and actions.
Step 7: Understanding the Drop-down Menu Options
Note: The options in the drop-down menu may vary depending on the configuration you define when you open the Segment pages card for the first time.
-
If you configure the Custom segment within the Settings panel, then the drop-down menu will display the following options:
-
All pages
-
Define page segment
-
Every other page
-
-
If your Segment pages card is set to target All pages, then the drop-down menu will display only the following option:
-
Define page segment
-
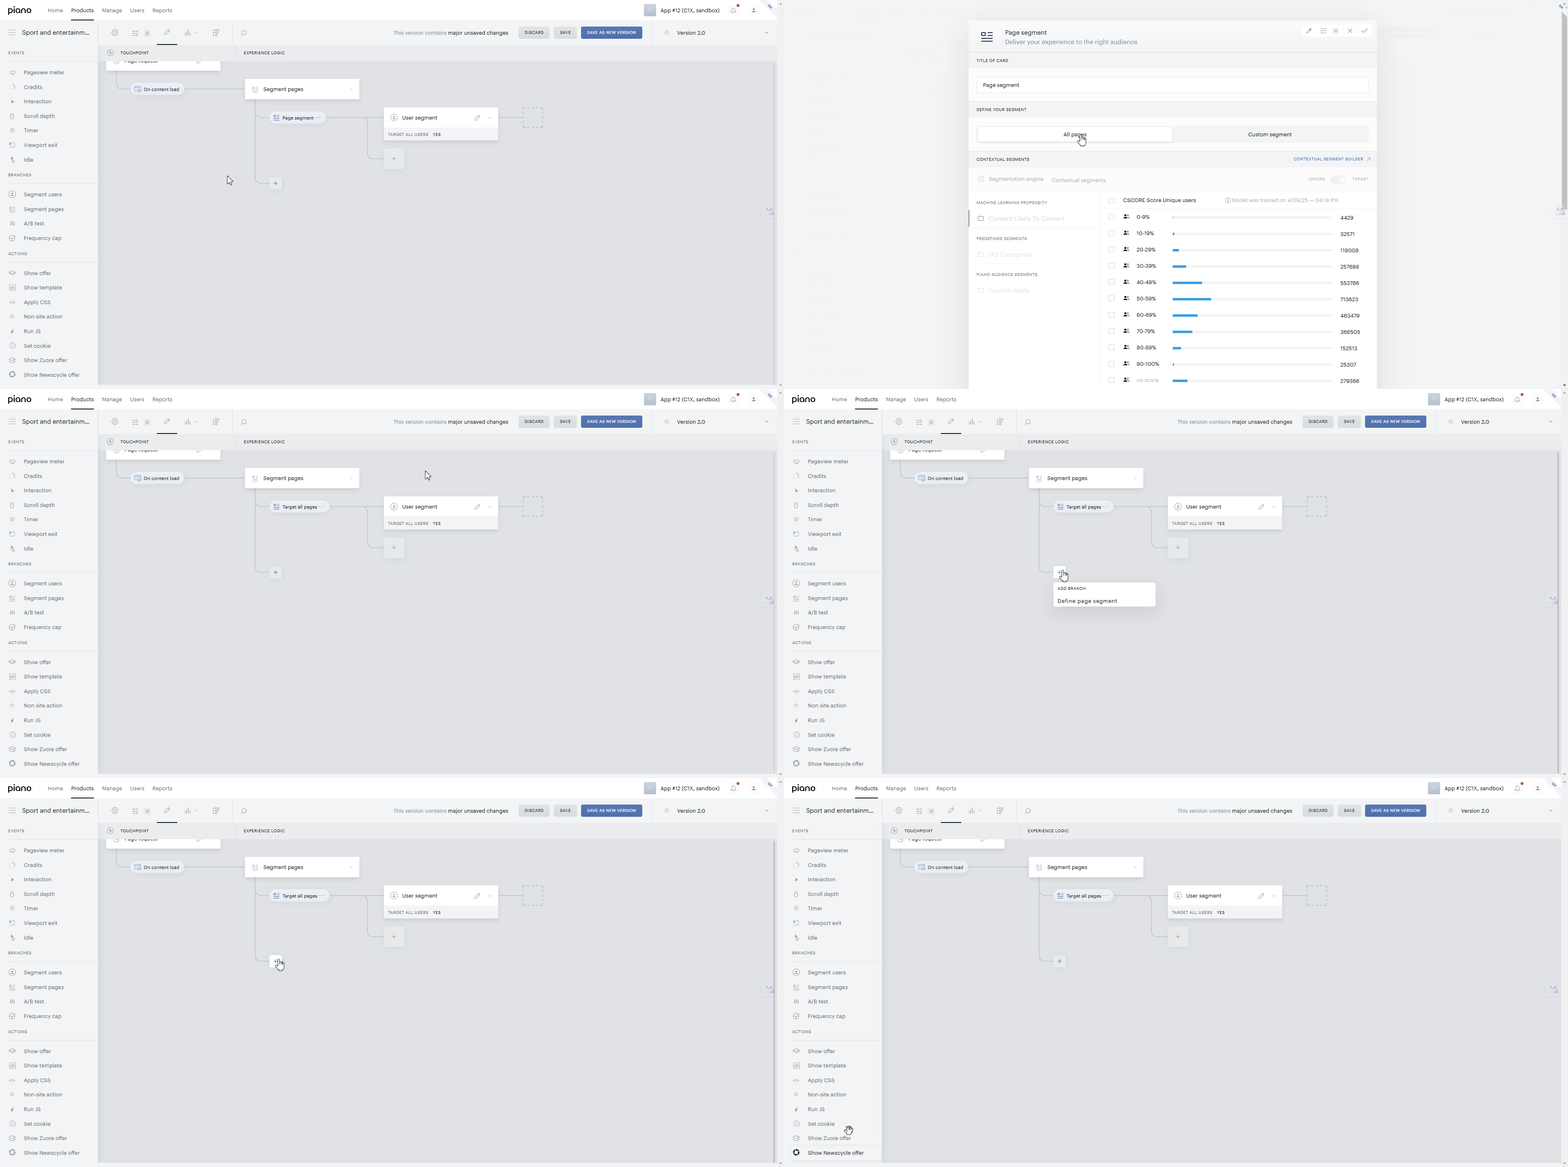
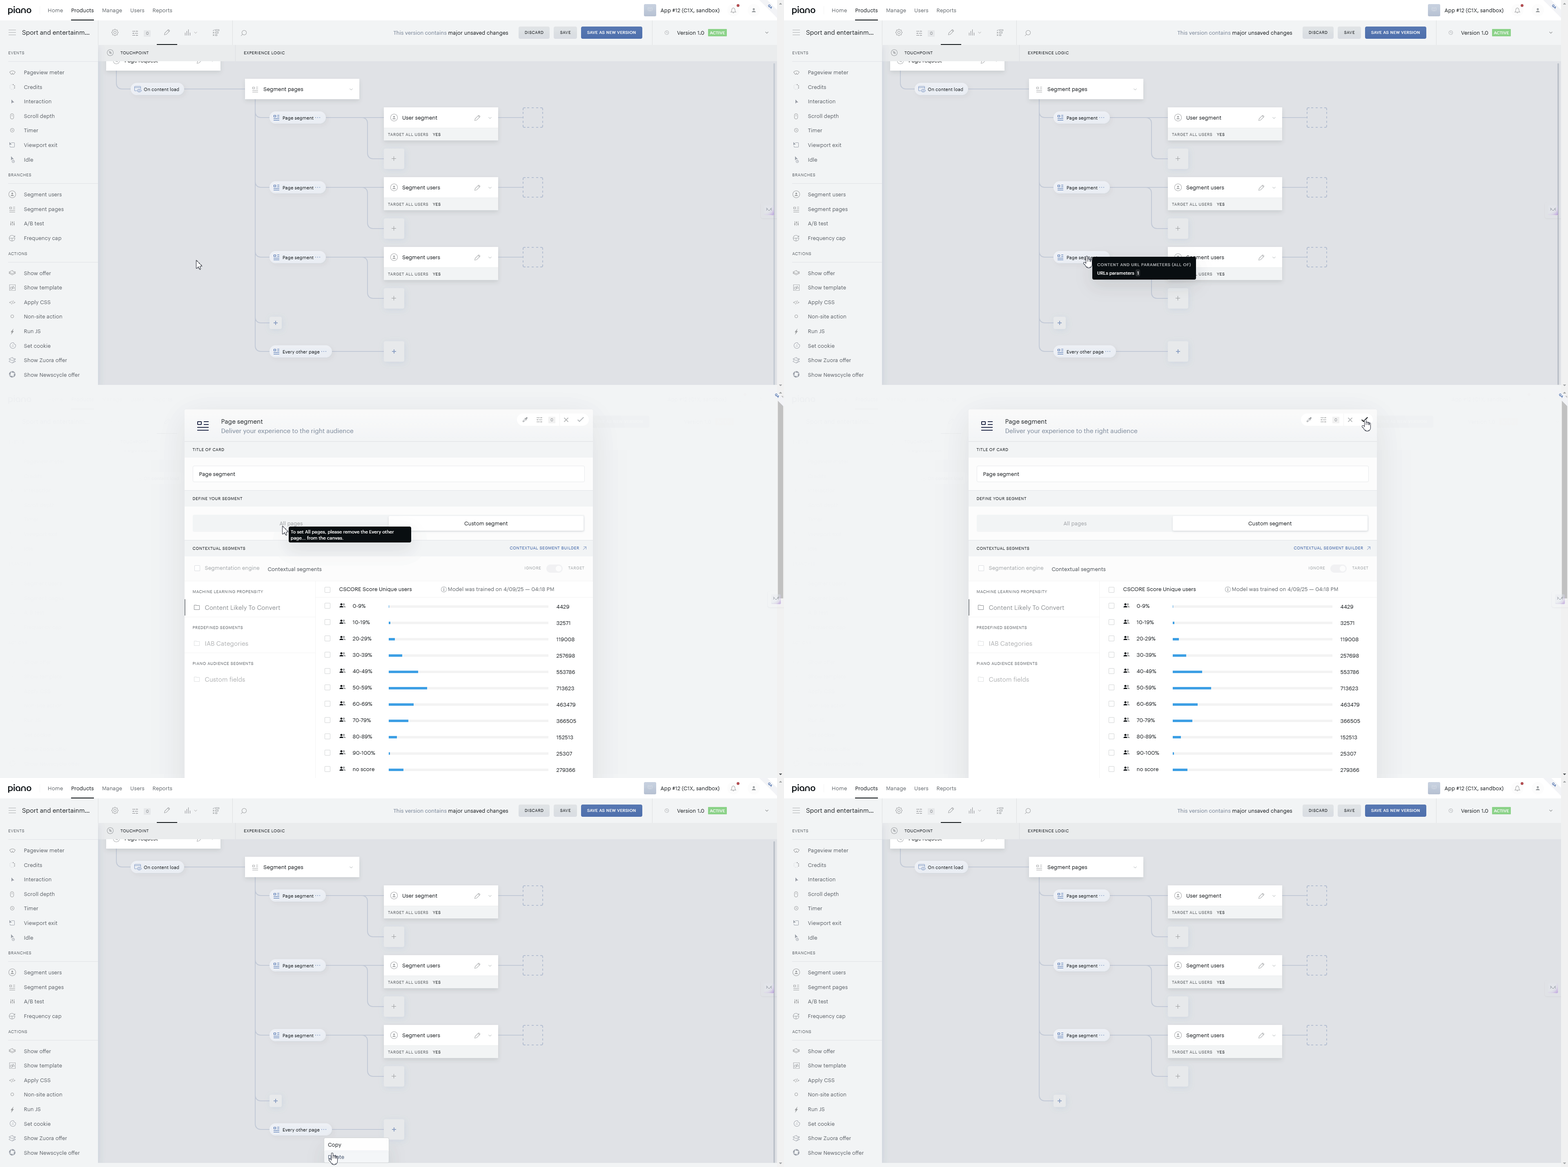
Important: The options All pages and Every other page are mutually exclusive. If All pages is selected, the Every other page option will be unavailable and vice versa.
After setting an experience configuration, hit the Save or Save as new version button.
Modifying an Existing Experience
When editing an existing personalization experience, you can use the Segment Pages card to refine your page targeting or define multiple page segments. Follow the steps below to add and configure the Segment Pages card within the experience editor (the canvas).
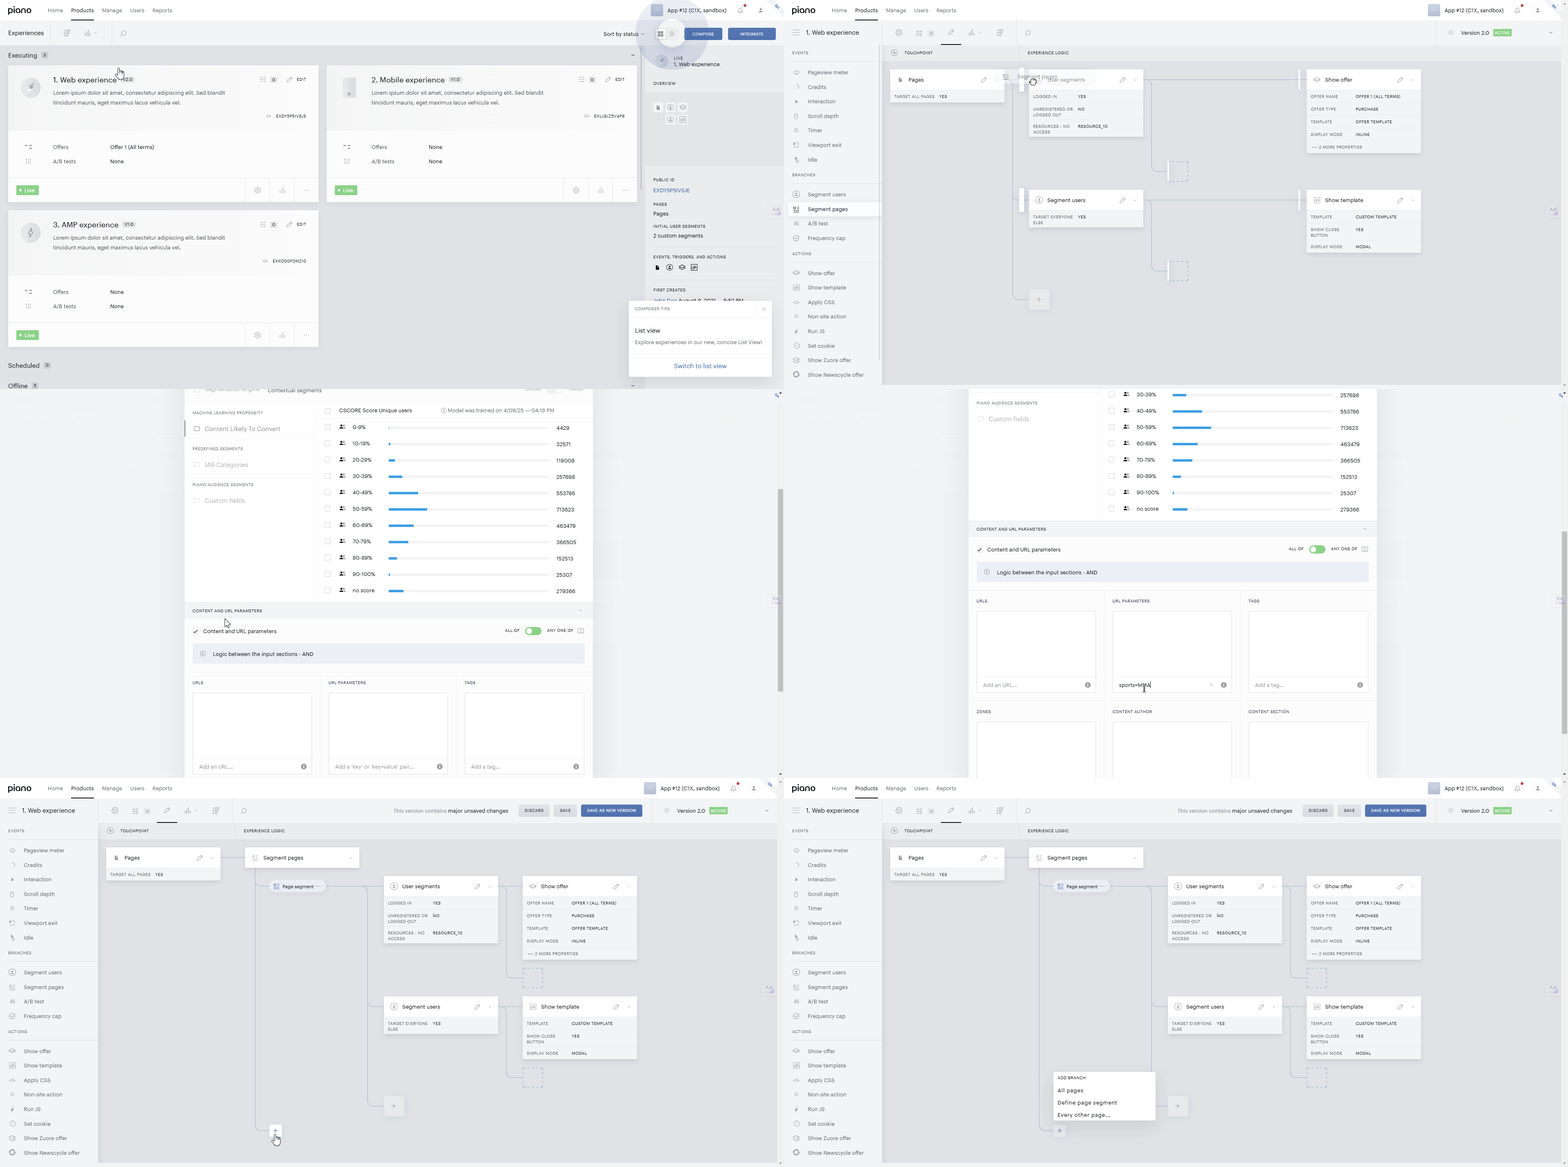
Step 1: Open the Experience Editor
Navigate to your list of experiences and open the one you wish to edit.
-
Go to the experience cards manager.
-
Select an experience that you would like to edit.
Step 2: Locate the Segment Pages Card
In the sidebar menu, find the Segment Pages card available among other options.
Step 3: Add the Segment Pages Card to the Canvas
-
Click and drag the Segment Pages card from the sidebar.
-
Move the card onto the canvas, where designated markers indicate valid placement areas.
-
Release the card once it is positioned in one of the highlighted spots.
Step 4: Configure Page Targeting Settings
-
After placing the card on the canvas, a settings panel will appear.
-
Define your targeting rules according to your personalization requirements.
Once configured, your updated experience will apply the new segmentation rules accordingly.
Experience Termination Behavior
On the Composer canvas for any Experience type, an additional setting for the Segment page's card offers you an option to define the Experience termination behavior.
You can access this section by clicking on the drop-down arrow next to the Segment page's card and selecting Termination behavior:
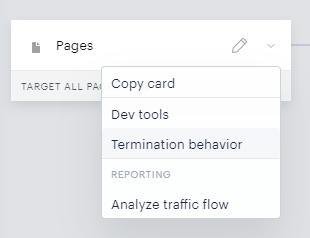
Let's say, you have an Experience set up with the following cards:
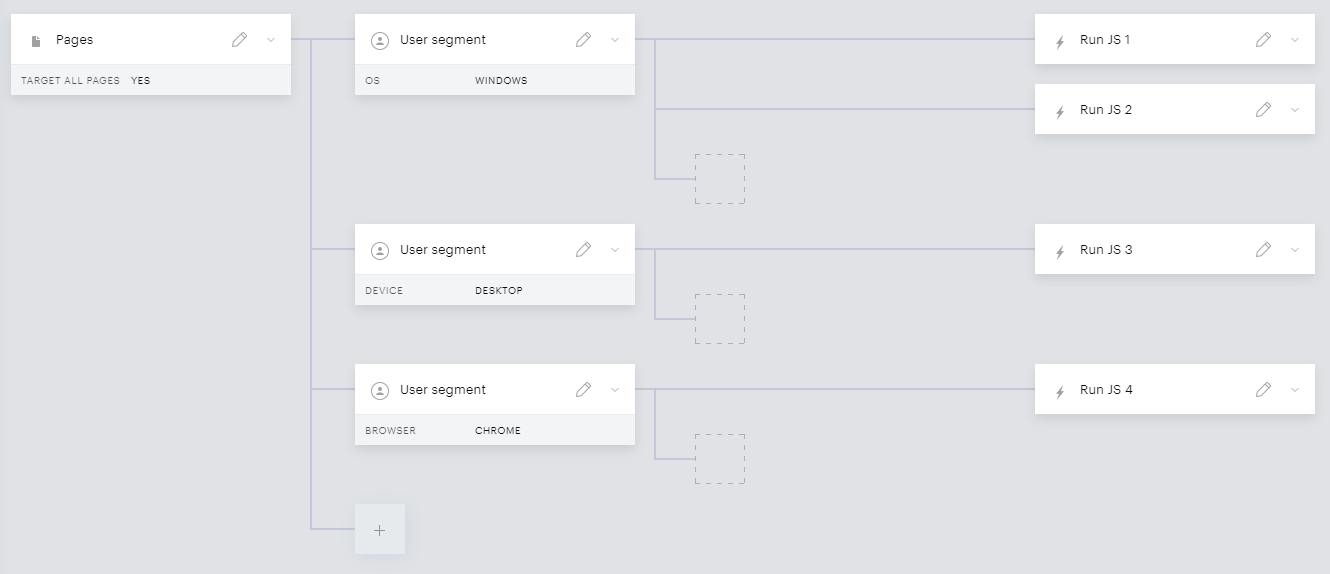
Once you click on the drop-down menu next to the Segment page's card and select Termination behavior, you can choose between two values:
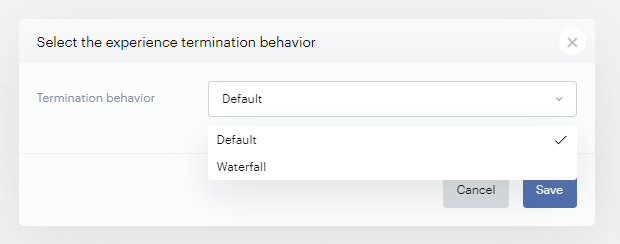
Default
Default is the pre-defined setting, where by default based on our example Experience setup above if a user visits your site from a desktop device with a Windows OS using a Google Chrome browser, all 4 Action cards will be executed: "Run JS 1", "Run JS 2", "Run JS 3" as well as "Run JS 4".
Waterfall
If Waterfall is selected, only the "Run JS 1" Action card will be executed. That's because with such a termination behavior Composer executes each branch only until any action is executed. In our case "Run JS 1" will be executed first, and it means:
-
Skipping all other cards in this branch (in our example "Run JS 2")
-
Skipping other branches ("Desktop" and "Chrome" User segment cards)
On the other hand, if a user opens the page from a device with Mac OS using Google Chrome:
-
"Windows" segmentation is skipped
-
"Desktop" segmentation is passed - the "Run JS 3" Action card is executed
-
"Chrome" segmentation is skipped, since "Run JS 3" has been executed
If an Action card has an Event trigger configured before it, e.g. an Interaction card, or it has some inner delay configured ("Show offer" and "Show template" cards can have a Timer configured, for example of 5s), Composer will consider this Action card as possible to execute, so it will prevent other Action cards and branches from being executed.
Examples
Below is a table that outlines a few cases for how the Segment pages card might be configured, and the results that set up would have on a page with the given properties.
|
Card setup |
Page properties |
Toggle state |
Result and explanation |
|---|---|---|---|
|
URLs: *://demo.piano.io/* [include]; Tags: breaking-news [exclude] |
URL: https://demo.piano.io/breaking/; Tags: breaking-news |
Any one of |
This page will execute the experience following this card, because while the tag does not meet the rules, the URL does. The toggle is set to "Any one of," so the experience runs. |
|
All of |
This page will not execute the experience following this card, because while the URL meets the rules, the tag does comply. The toggle is set to "All of," so the experience does not run. |
||
|
URLs: *://demo.piano.io/* [include]; Tags: breaking-news [exclude] |
URL: https://example.piano.io/; Tags: None |
Any one of |
This page will execute the experience following this card, because while the URL does not meet the rules, the tag does not violate any rule. The toggle is set to "Any one of," so the experience runs. |
|
All of |
This page will not execute the experience following this card, because the URL does not meet the rules, even though the tag does comply. The toggle is set to "All of," so the experience does not run. |
||
|
URLs: *://demo.piano.io/* [exclude]; Tags: breaking-news [exclude] |
URL: https://demo.piano.io/; Tags: breaking-news |
Any one of / All of |
This page will not execute the experience following this card regardless of the toggle state because neither the URL nor the tag meets the rules. |
Specifying URLs
Included/Excluded URLs
All of your pages are included in an experience by default. But, if you're restricting access with your experience, you may want to exempt pages like the masthead, contact page, subscription page, homepage, section fronts, or the sections of your site that command the highest ad rates. Similarly, if you've designed an experience asking ad blocking users to whitelist your site, you'll likely want to exclude a page on your site containing instructions on how to disable adblockers (otherwise users with ad blockers on won't be able to read about how to turn them off).
If you instead decide to specify which pages to include, only those included pages will be targeted by the experience. Including select pages allows you to run an experience on just one page (commonly used when constructing a subscription landing page) or to limit an experience to a particular section of your site (for instance, prompting users to sign up for a sports newsletter only when they visit an article posted to your sports vertical).
When you type in a URL, it will be marked as "include" by default. To exclude a URL, you can add a hyphen in front of that URL when entering it (ex: "-yourdomain.com/homepage") and that URL will automatically be marked as excluded. You can also click the "include" or "exclude" text next to an inputted URL to change whether it is included or excluded from an experience.
Note, that it's necessary to URL encode the special characters contained in the URL.
For a detailed explanation of how the AND/OR logic works between the URLs you define and other elements such as tags or sections, please refer to the article available here. It provides comprehensive insights into how these conditions interact and can be configured to suit your needs.
Include/Exclude Rules for URL Fragments
When defining include or exclude rules for URLs in Composer, it's important to understand how URL fragments (everything following the # symbol) are processed and matched.
Key Behaviors and Guidelines:
-
URL Encoding: Piano retrieves the URL from
window.location.hrefand encodes all characters, including those in the fragment, to ensure consistency. Clients need to provide URL fragments in their encoded form when defining include/exclude rules. For example:/subscription#/should be encoded as/subscription#%2f -
Fragment Matching: The fragment (
#) is treated as a regular part of the URL according to RFC 3986. For matching purposes:-
Relative paths like
/subscription*will match URLs such as https://www.website.com/subscription#/ -
If special characters (e.g.
/, ?) are present in the fragment, they must be encoded to ensure proper matching
-
-
Include and Exclude Rules Priority:
-
Exclude rules take precedence over include rules. If a URL matches both an exclude and an include rule, the exclude rule will prevent the experience from being executed
-
For precise exclusion, ensure the fragment is encoded and matches exactly. For example: To exclude https://www.website.com/subscription#/, define the rule as
/subscription#%2fwith the exclude operator
-
-
Wildcard Usage (*): The
*character in a relative URL targets all paths under a specified base. For example:/subscription*will match https://www.website.com/subscription#one and https://www.website.com/subscription#two
How does Piano process URLs?
Piano standardizes the URL by always encoding it before processing. Clients should define rules based on the encoded format to ensure compatibility across browsers.
Practical Examples:
-
Include Rule:
/subscription*(Targets all URLs under/subscription). -
Exclude Rule:
/subscription#%2f(Excludes URLs with encoded fragments).
URL Wildcards Overview
All URLs added to the Pages card run off your site's URL, so there's no need to enter "http://www.yourdomain.com/sports" to specify that URL. Rather, you can just enter "/sports" into the URL field.
If you do not include a forward slash (/), Piano will treat that entry as an absolute URL and analyze the entire URL string. An absolute URL is an address of the web resource that consists of attributes which define where a website page can be found. These attributes create the following URL structure: scheme://server/path/resource
Piano will also treat an entry as an absolute URL if you include a URL scheme (http or https). For example, if you entered the full "https://www.yourdomain.com/sports" URL, Piano would treat that as an absolute URL because of the "https". For absolute URLs entered without a URL scheme, Piano will automatically include "*://" before the entry in order to include all possible URL schemes.
If you include a forward slash when you enter a URL, Piano will treat that entry as a relative URL and will analyze just the URL path. A relative URL is a truncated address of the web resource that contains fewer attributes in the URL structure. The path is permanent to the relative URL though sometimes it also includes resources.
Say you have a URL like "https://www.yourdomain.com/sports/article-name?page=10" on your site. The absolute URL is "https://www.yourdomain.com/sports/article-name?page=10" whereas "/sports/article-name?page=10" is the relative URL.
Piano also supports special wildcard characters that make it easy to include or exclude from an experience many URLs at once:
*: matches any number of characters of any type
?: matches one character of any type
If you want to use * and ? as regular symbols (not wildcards), you are able to do so by using an escape character, the backslash (\). So "\*" or "\?" would allow those characters to be treated as regular symbols.
URL Wildcards Rules
The table below provides examples of how Piano's wildcards can be used:
|
URL Patterns For Publisher Pages |
Description |
Matches |
Does not match |
|---|---|---|---|
|
/ |
Matches relative URLs without additional values. This rule would include your home page and the home pages of any subdomains |
www.yourdomain.com/ www.host.yourdomain.com/ |
www.yourdomain.com/sports |
|
/* |
Matches all relative URLs with or without additional values. This rule would include your homepage, the home pages of any subdomains, and all URLs on your site that contain additional values. Using this rule would effectively be the same as targeting "all pages" |
www.host.yourdomain.com/ www.yourdomain.com/sports www.host.yourdomain.com/news?=1233 |
www.yourdomain.com/ |
|
/sports |
Matches relative URLs with the path "/sports" |
www.yourdomain.com/sports www.host.yourdomain.com/sports |
www.yourdomain.com/ www.yourdomain.com/sports/mets |
|
/sports* |
Matches all relative URLs beginning with the "/sports" formulation |
www.yourdomain.com/sports www.host.yourdomain.com/sports www.yourdomain.com/sports/mets www.host.yourdomain.com/sports/yankees |
www.yourdomain.com/ www.yourdomain.com/business |
|
*sports.* |
Matches all absolute URLs containing "sports." anywhere in the URL string. When you enter this value it will automatically be changed to *://*sports.* in Piano. |
www.sports.yourdomain.com/ |
www.yourdomain.com/sports www.yourdomain.com/ www.yourdomain.com/baseball/sports-report.html |
|
*sports* |
Matches all absolute URLs containing "sports" anywhere in the URL string. When you enter this value it will automatically be changed to *://*sports* in Piano. |
www.sports.yourdomain.com/ www.yourdomain.com/sports www.yourdomain.com/baseball/sports-report.html |
www.yourdomain.com/business www.yourdomain.com/ |
|
/*mets |
Matches all relative URLs that end with the word "mets" |
www.yourdomain.com/mets www.yourdomain.com/sports/mets |
www.yourdomain.com www.mets.yourdomain.com www.yourdomain.com/yankees www.yourdomain.com/mets-win.html www.yourdomain.com/the-mets-new-exhibit.html |
|
/*mets* |
Matches all relative URLs that contain the word "mets" anywhere in the URL path |
www.yourdomain.com/mets www.yourdomain.com/sports/mets www.yourdomain.com/mets-win.html www.yourdomain.com/the-mets-new-exhibit.html www.mets.yourdomain.com |
www.yourdomain.com/yankees |
|
/sports*mets |
Matches all relative URLs that begin "sports" and end with "mets" |
www.yourdomain.com/sports/mets www.yourdomain.com/sports.asp?cat=mets |
www.yourdomain.com/article?cat=mets www.yourdomain.com/sports |
|
/*yankees*mets* |
Matches all relative URLs that contain the words "yankees" and then "mets" |
www.yourdomain.com/sports/yankees-beat-mets.html www.yourdomain.com/yankees-mets-line-ups.html |
www.yourdomain.com/mets www.yourdomain.com/sports/mets-beat-yankees.html |
|
/? |
Matches all relative URLs that include one extra character of any type |
www.yourdomain.com/1 www.yourdomain.com/s |
www.yourdomain.com/1234 www.yourdomain.com/sports |
|
/????-??-??-* |
Matches all relative URLs with characters of any type in the place of the question mark symbols. Other specified characters, in this case, hyphens, would need to match exactly. |
www.yourdomain.com/2017-01-01-developing-story |
www.yourdomain.com/2017/01/01/developing-story |
Wildcards work the same way when targeting by referrer in the User Segmentation card or setting referrer inclusions and exclusions in the Pageview Meter card. You'll just need to include the base URL(s) for the referrer when adding wildcards. For example, to include or exclude all pages from Facebook, you'd want to use formulations like these: *facebook.* and *fb.* because Facebook uses two distinct domains.
See here for more information on how to target common referrers from search and social media.
URL Parameters
You can define rules for content targeting using parameters that are included in the URL address. To define one or multiple URL parameters, you can use one of the following options:
-
Insert a "key=value" pair;
-
Insert a "key" without "value";
If you choose the first option to insert a URL parameter using a "key=value" pair, you can use wildcard characters "?" and "*" in the part that comes after the equals "=" sign, i.e. wildcards are supported only in the "value" part.
URL parameters as a category of rules support the following wildcard characters:
-
?: is used to define one character; -
*: is used to define any number of characters used (*);
If you submit the following URL parameter param=?_abc_* using the "Include" operator, then the following web address will be a part of experience targeting:
https://pub.com/page?param=1_abc_qwe
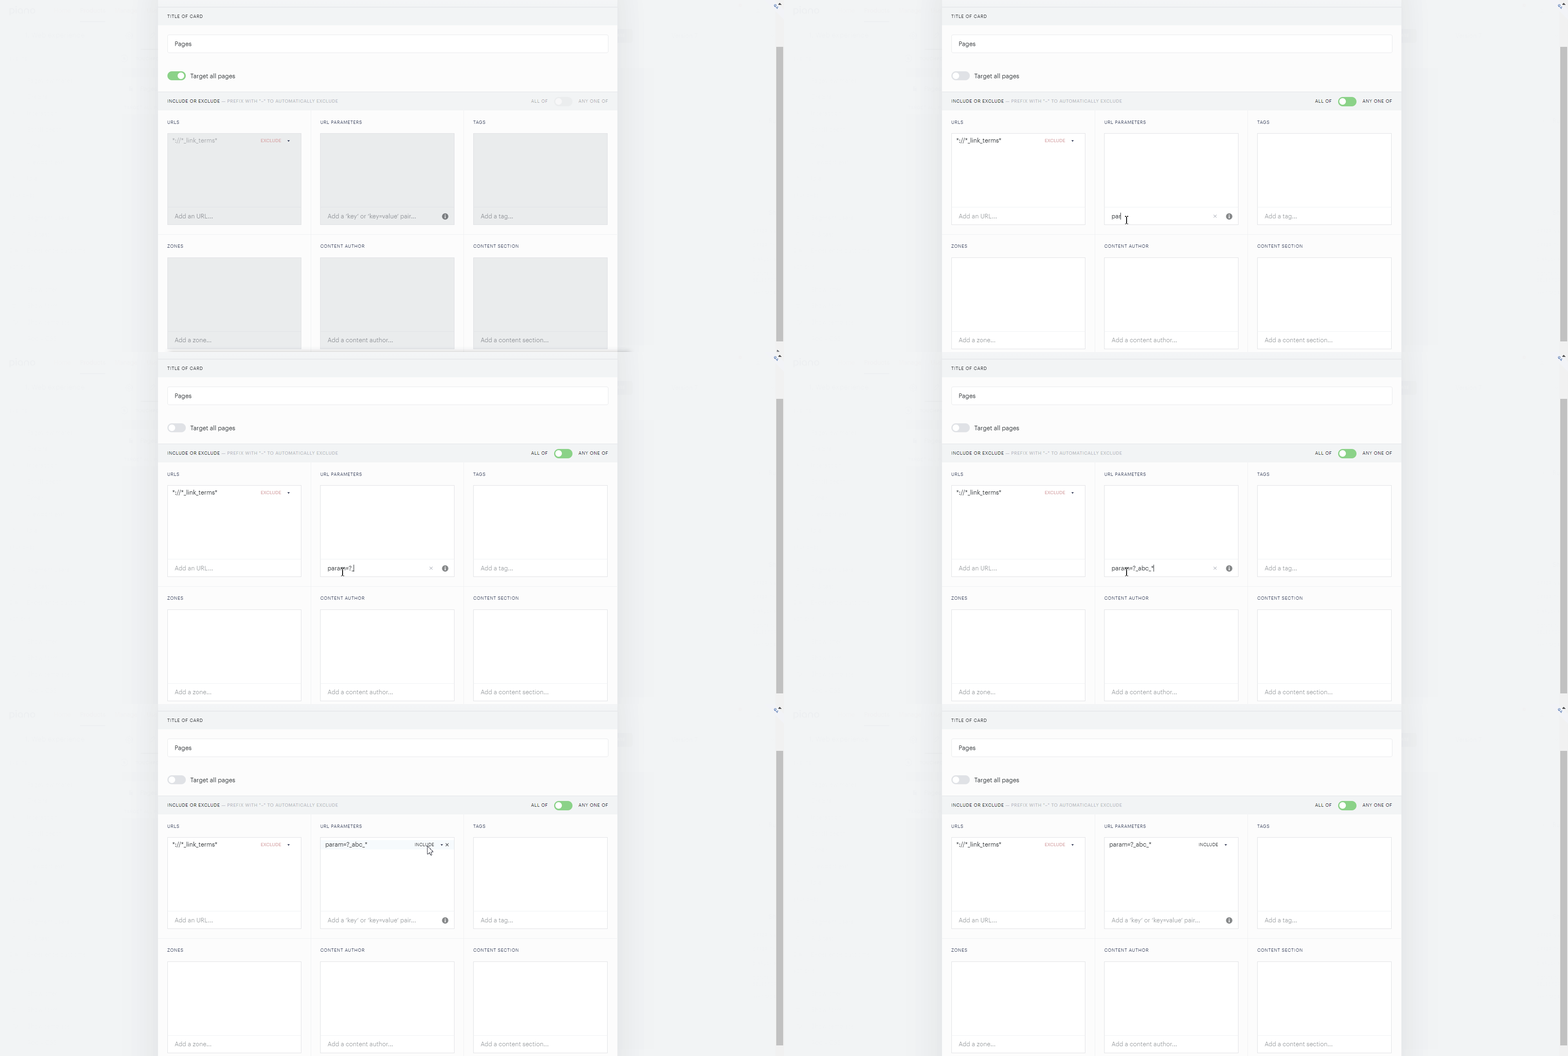
If you want to target by any value of the URL parameter, please, use the "*" wildcard after the equals "=" sign, as demonstrated in the example below:
effectivePages=*
You can also submit URL parameters using "key", i.e. name of the URL parameter. When you insert a URL parameter using only its key, your experience will target or exclude URLs that contain only the key of the URL parameter.
For example, if you insert "effectivePages" as a key without adding a value and use "Include" as an operator, then the following URL will not be targeted by the experience:
https://docs.piano.io/effectivePages=composer
Please, keep in mind, that if you insert a URL parameter using only a "key" and the equals "=" sign without adding "value", then the equals "=" sign will be removed automatically upon submission.
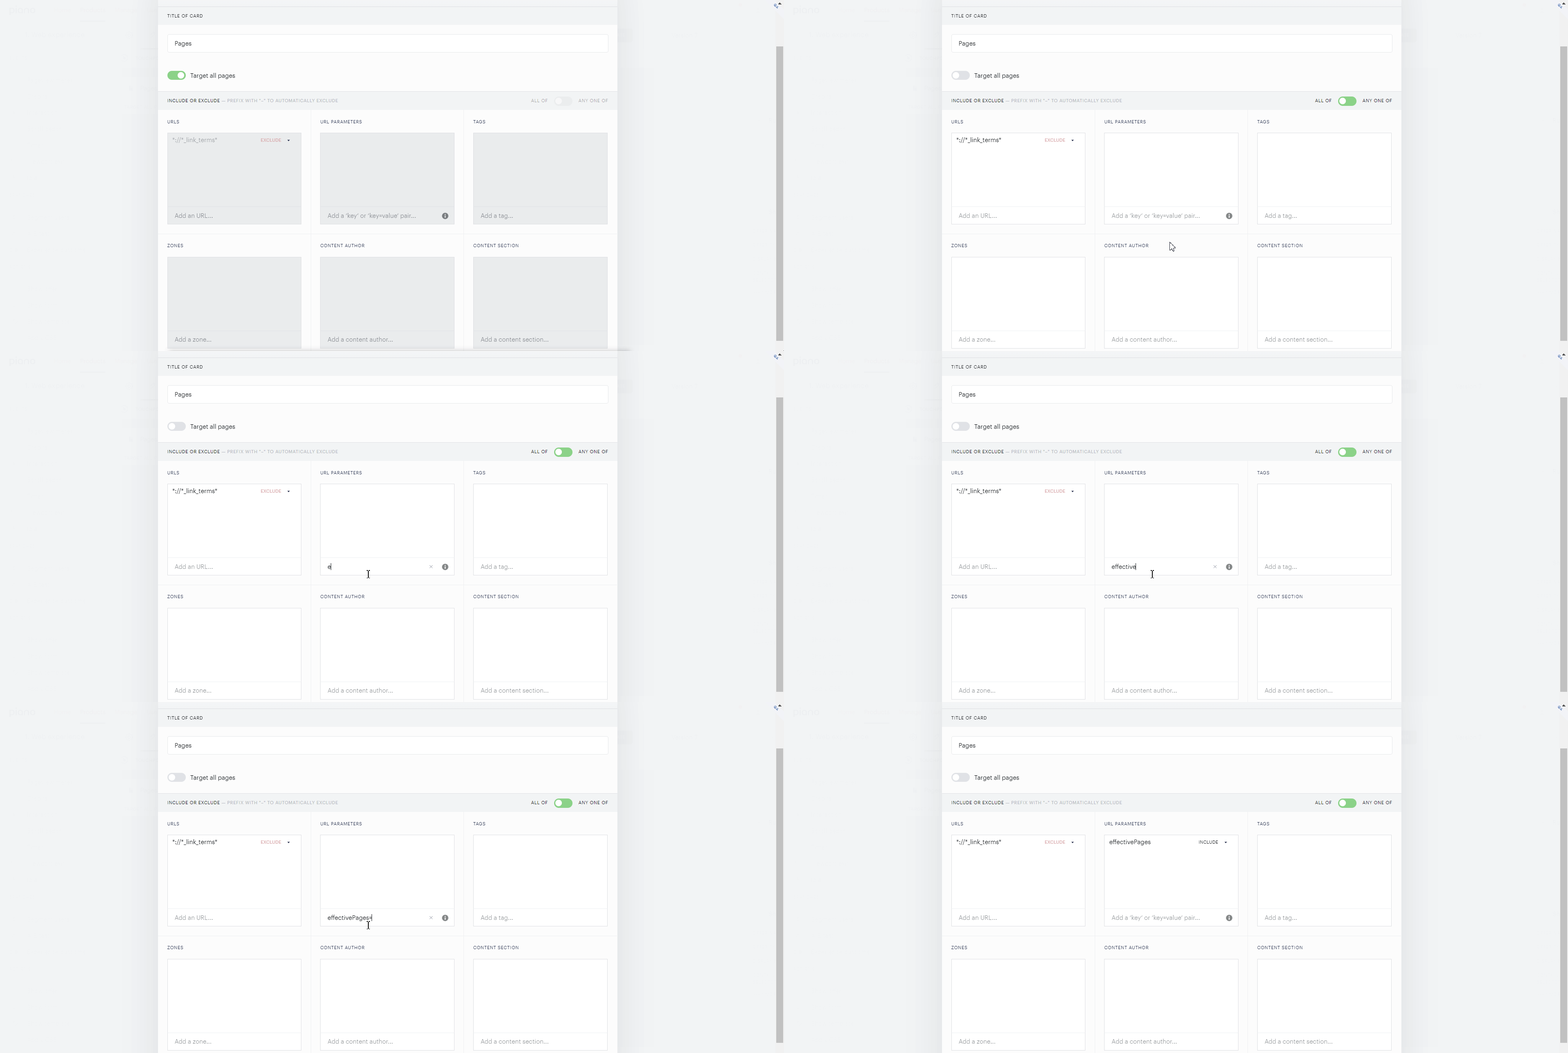
If your URL address contains a URL parameter such as "effectivePages=", then such a URL parameter will be treated by Composer execution as a parameter without "value". Such a parameter like "effectivePages=" will be recognized as "effectivePages", i.e. without equals "=" sign.
To include or exclude URLs (pages) in experience targeting using URL parameters, please use the following shortcuts in the input field before inserting the URL parameter itself:
-
"
+" to include URLs in the experience targeting if any of them contains any URL parameter that has been submitted in the URL parameter category with "include" operator; -
"
-" to exclude URLs from the experience targeting if any of them contains any URL parameter from the list that has been defined in the URL parameters category;
Multiple URL parameters will operate on OR logic if they use the "Include" operator. This means that a particular URL address will match criteria set via URL parameters if it contains any one of the URL parameters from the configured category. Multiple URL parameters will operate on AND logic if they use the "Exclude" operator. This means that your experience will not fire if a URL address contains any one of the URL parameters from the configured category.
If you submit multiple URL parameters using both "'Include" and "Exclude" operators, to match the criteria, a particular URL address should not contain any URL parameter that uses the "Exclude" operator AND contain any URL parameter that uses "Include" logic.
Tags
By passing Piano information about your tagging conventions, you're able to include or exclude pages based on those tags. Many Piano clients choose to create "premium" or "subscriber-only" tags in order to gate content on a case-by-case basis using those tags. Piano's partners in the news business who use paywalls frequently create a "breaking-news" tag in order to make news of national significance freely accessible while keeping their paywalls intact on the rest of their sites. Though section-specific and topic-specific content can typically be defined with URLs, clients often find it more convenient to use section and topic tags when creating experiences for content verticals.
Set tags by following this documentation. Once you've set tags, you will be able to target based on those tags and have the related data automatically collected by Piano's AI product.
AAM Zones
For Management + Billing customers who are members of the Alliance for Audited Media (AAM), Zones are used to generate reports about how their print customers are engaging with their online offerings. These reports make it easy for publishers to verify their overall circulation numbers with the AAM, which helps these publishers maintain and increase ad rates (both online and off).
These Zones are specified on a page-by-page basis according to the JavaScript on a given page. Zone names, which are case-sensitive, are freely defined by publishers and can be set by integrating a line of code on the web pages included in a particular Zone. By nature, Zones are mutually exclusive and the same page cannot belong to multiple Zones. However, distinct versions of a page can each include separate Zones. Say a publisher had two Zones, "desktop web" and "mobile web." In such a case, you could set two distinct Zones on the same page by adding Zone-related JavaScript to the HTML and/or CSS specific to the mobile and desktop versions of that page. Though desktop users and mobile users would be viewing the same content, the page code (and the associated Zone information) would be distinct to their device.
Within Composer, the Zone fields are used to target or exclude from experiences pages that you've set as belonging to particular Zones. Say you have three Zones: Zone 1, Zone 2, and Zone 3. In Composer, if Zone 1 was included in an experience and Zone 2 was excluded, Zone 3 would be excluded as well because you've specified to include only Zone 1 pages. Any pages not belonging to any Zone would also be excluded in this instance. On the other hand, if Zone 1 pages were excluded and no Zone was included in the experience, all pages without a Zone specified and all Zones except Zone 1 would be included.
AAM report information is populated based upon the resources (and associated terms) that belong to users who visit Zone pages. When a logged-in user with access to a resource visits a Zone page, that user's information will be captured in the part of the AAM report related to that Zone. However, if the same user were to access that page more than once in a given day, the AAM report would only record that user's information once. See here for more information on Zone reporting.
Content Author
By passing Piano information about your authors, you can include or exclude pages based on the byline. You might use this functionality to gate the content of authors with passionate followings. Or you could present a personalized newsletter offer that only appears on stories written by the newsletter's author.
Set authors information by following this documentation. Once you've set authors, you will be able to target content produced by them.
Content Section
By passing Piano information about your website sections, you can include or exclude pages based on those sections. You might use this functionality to present a politics offer only to users visiting politics pages. Or you might choose to exclude those sections of your website commanding the highest ad rates from a paywall experience. Sections are freely-definable. They do not necessarily have to match the section names on your website.
Set sections by following this documentation. Once you've set sections, you will be able to target those sections.
Publish Time
Publish time allows you to include or exclude article pages based on publish time. You can configure a minimum and/or maximum content age as well as define whether you would like to include or exclude content if it meets configured age criteria.
Content age is passed to Piano in UTC format via piano.js. Age ranges can be defined by:
-
Days
-
Hours
-
Minutes
Please see this article for more information about setting the Publish date/time.
You have the ability to select different units of measurement for minimum and maximum age. However, if configuring both a minimum and maximum threshold, please ensure minimum age is chronologically earlier than maximum age.
Please note that as long as your Experience is live, article pages may be included or excluded dynamically according to publish time logic.