
Introduction
The User Profile Data Import (Managed Uploads) feature in Piano Audience enables you to upload user profile attributes from external storage directly into the platform. This is the recommended approach for onboarding first-party data. Once imported, these attributes are available for building audience segments in the Segment Builder and activating them across channels, including Composer integrations.
Prerequisites
Access Requirements
Before beginning setup, confirm the following access conditions are met:
-
You have access to Audience → Connectivity → Configurations → User Profile Data Import.
-
You have administrative access to Account Management → Data Sources in order to create a Data Source.
-
All user profile attributes you intend to import have been created in advance via Integration Designer. Imports will silently skip any attributes that do not already exist in the system.
-
Your external storage solution Amazon S3 has granted Piano the necessary read permissions, and write permissions if post-processing options (move, delete, rename) will be used.
-
The User ID prefixes stored in your files match the prefix configuration in Piano Audience.
File Format Requirements
-
Supported formats: CSV or TSV
-
Encoding: UTF-8 (required)
-
Files may optionally be compressed.
-
Files must include a User ID column that matches the prefix type configured in the connection.
-
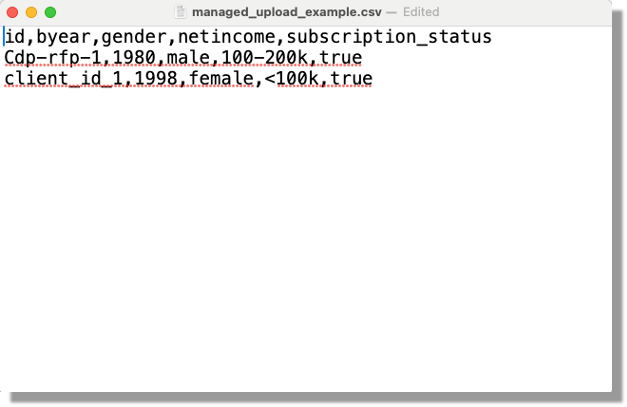
Column headers must match the property names defined in the linked Data Source.
Example:
File & Folder Naming Restrictions
-
Maximum name length: 250 characters for both files and folders.
-
Prohibited characters:
# % & { } \ < > * ? / $ ! ' " @ + ` | = -
Allowed delimiters in dynamic name structures:
_,-,:,<space>,.
Step 1: Review & Create Attributes in Integration Designer
All attributes you intend to import must exist in Piano Audience before the import runs. Attributes are created and managed in the Integration Designer.
-
Navigate to Integration Designer within Piano Audience.
-
Review the list of existing attributes to identify which ones are already available.
-
For any attribute not yet created, create it now with the correct data type and label.
-
Note the exact attribute names, you will need them when mapping properties in the Data Sources.
Skipping this step is the most common cause of failed or incomplete imports. Attributes referenced in your file that do not exist in Audience will be silently discarded.
Step 2: Create a Data Source
A Data Source defines the structure of your import file and maps each column to the corresponding User Profile attribute in Piano Audience. Data Sources act as the meta layer connecting your external file schema to internal attributes.
-
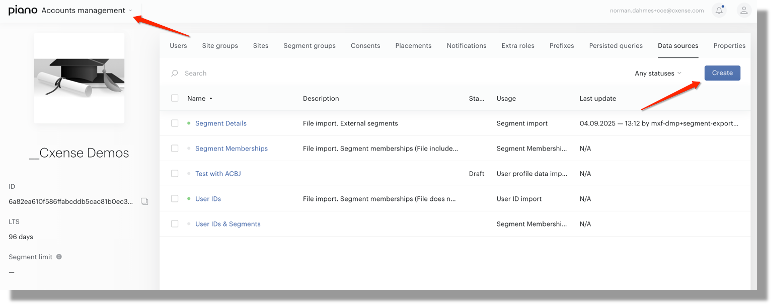
Navigate to Account Management → Data Sources (administrator access required).
-
Click Create.
-
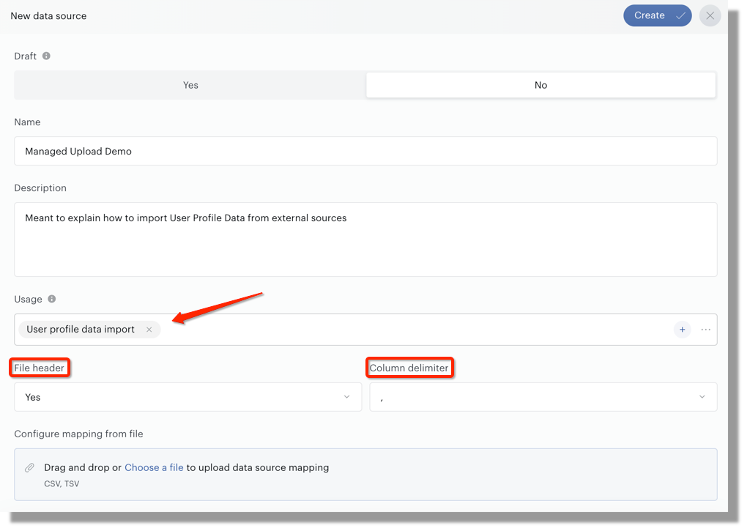
Set the Usage parameter to User profile data import. This is required for the Data Source to appear as a linkable option in the import connection.
Configure File Header & Delimiter
-
Indicate whether your file includes a header row (recommended: Yes).
-
Select the appropriate delimiter — comma for CSV, tab for TSV.
Map Properties to User Profile Attributes
Properties are the intermediary objects that bridge your file's columns to existing User Profile attributes in Audience.
-
Use drag-and-drop auto-mapping where column names match attribute names exactly. Manually link any remaining columns using the Mapped to selector.
-
For the column containing the User ID, switch the mapping to the internal property User ID.
-
Ensure every column you wish to import is mapped. Unmapped columns will be ignored during import.
Only attributes that already exist in Piano Audience will appear in the "Mapped to" dropdown. If an attribute is missing, return to Integration Designer (Step 1) to create it before proceeding.
Step 3: Create the Import Connection
The import connection defines where Piano Audience retrieves your files, how to find them, and when to run the import.
-
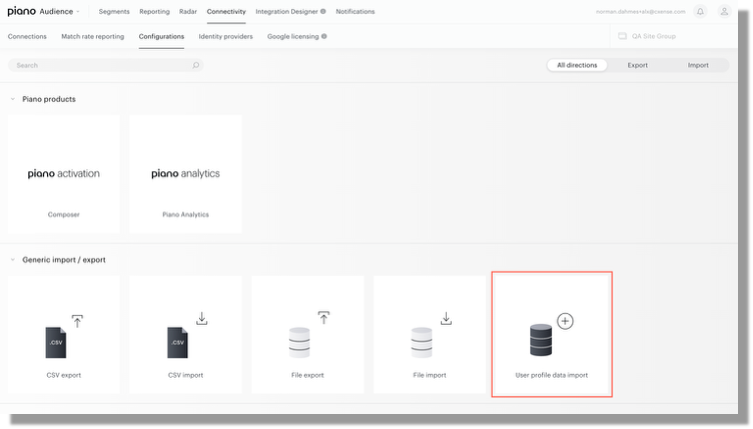
Navigate to Audience → Connectivity → Configurations → User Profile Data Import.
-
Click Configure.
-
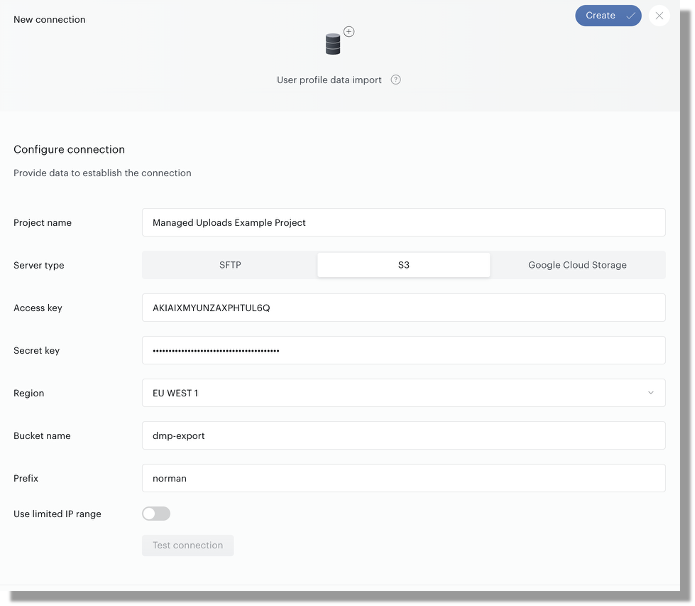
Select S3 as your storage type and provide the required credentials. Example:
-
Click Test connection and wait for a positive result before proceeding.
Configure Import Folder
-
Use Name if your folder has a fixed, static path.
-
Use Name structure if the folder name is dynamically generated — for example, based on a date or customer name. Configure name structures using static text components, customizable elements (such as date tokens), and the allowed delimiters listed in Section 2.3.
Configure Import File Name
-
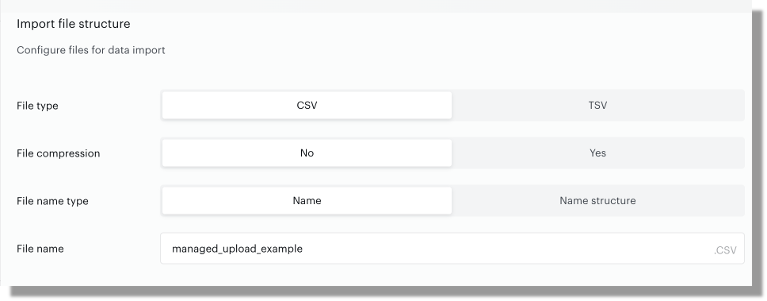
Select the File type: CSV or TSV.
-
Indicate whether the file is compressed.
-
Use Name for a static file name, or Name structure for a dynamically named file.
Link Data Source & User ID Type
-
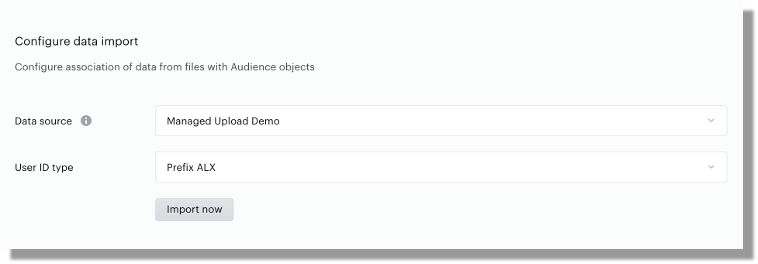
Select the Data Source created in Step 2. This tells the import connection how to parse and map columns from your file.
-
Select the User ID type (prefix). This prefix will be matched against the User ID values already stored in Piano Audience for that prefix type. Ensure it matches what is present in your import file.
Configure Post-Processing
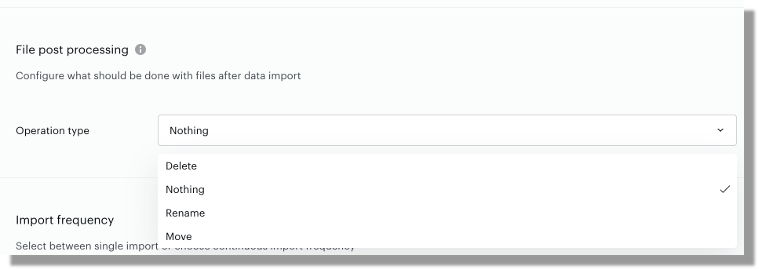
Post-processing controls what happens to your import files after they have been successfully processed. This helps prevent duplicate imports and keeps your storage organized.
|
Option |
Description |
Permission Required |
|---|---|---|
|
Do nothing (default) |
No action is taken after import. The file remains in its original location. |
None |
|
Delete |
Removes the file from storage after a successful import. |
Delete permission on storage |
|
Rename |
Appends a prefix or suffix to the file name (default suffix: |
Write permission on storage |
|
Move to folder |
Moves the file to an auto-created processed folder within the same directory. |
Write permission on storage |
Recommendation: Use Rename or Move to folder as a safeguard against re-importing the same file in subsequent runs.
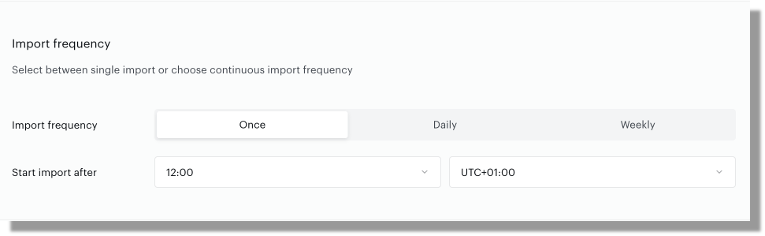
Set Import Frequency
|
Frequency |
Description |
|---|---|
|
Once |
A single import run at a specified date and time. Suitable for one-off historical data loads. |
|
Daily (default) |
Runs every day at fixed times, beginning after the configured "Start import after" time. |
|
Weekly |
Runs once per week on a selected day of the week at a fixed time. |
Set the Start import after time to a point after your upstream data pipeline has reliably finished exporting the file to storage. This prevents Piano from attempting to import a file that is still being written.
Step 4: Activate the Connection
-
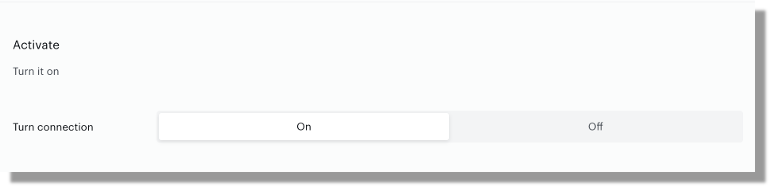
Toggle the activation switch to On.
-
Click Create (for new connections) or Save (for edits).
If the activation toggle is left in the Off position, the configuration is saved but will not execute on its scheduled frequency. Use this to stage a connection before going live.
Step 5: Enable Attributes in the Segment Builder
After a successful import, newly ingested attributes may not appear immediately in the Segment Builder. This is expected behavior.
Attributes are only surfaced in the Segment Builder once destinations have been enabled in the Composer connector. To make imported attributes available for segmentation:
-
Navigate to your Composer connector settings within Piano Audience.
-
Enable the relevant destinations for the attributes you have imported.
-
Once destinations are enabled, all imported attributes will become available for use in segment conditions.
This is a commonly missed step. If your attributes are not appearing in the Segment Builder after a confirmed successful import, check your Composer connector destination settings first.
Monitoring: History & Errors
Piano Audience provides two tabs for monitoring the status of your import connections:
-
History tab: Displays a summary of each import run, including the number of rows successfully processed and the number of rows discarded. Rows may be discarded due to empty values, incorrect data formatting, or mismatched User ID prefixes.
-
Errors tab: Displays errors that prevented an import from executing at all. Common error causes include expired storage tokens, regenerated API keys, and deleted or renamed folders that the connection can no longer locate.
Recommendation: Review both tabs after the first import run and on a recurring basis, especially following any changes to your storage environment or credentials.
Best Practices
-
Create all attributes in Integration Designer before running any imports. Attributes that do not exist at the time of import will be silently skipped, there is no error or warning for missing attributes.
-
Always use UTF-8 encoding. Files encoded in other formats may cause character corruption or import failures.
-
Validate User ID prefix alignment across your file, Data Source configuration, and Piano Audience connection settings before the first run.
-
Use the Test Connection feature every time you create or modify a connection. Do not activate a connection until the test returns a positive result.
-
Schedule imports after your upstream export pipeline completes. Use the "Start import after" time setting with an appropriate buffer to account for pipeline variability.
-
Implement a post-processing strategy (rename, move, or delete) to prevent the same file from being imported multiple times across recurring runs.
-
Enable Composer connector destinations immediately after your first import if you intend to use the imported attributes in the Segment Builder.
-
Monitor the History and Errors tabs regularly, particularly after storage credential rotations, infrastructure changes, or file naming convention updates.
-
Use name structures for dynamic file and folder paths rather than relying on manual updates to static names, especially in automated pipelines that include date-stamped output paths.
Troubleshooting
|
Symptom |
Likely Cause |
Resolution |
|---|---|---|
|
Attributes not appearing in the Segment Builder after import |
Destinations not enabled in the Composer connector |
Enable the relevant destinations in your Composer connector settings |
|
High number of discarded rows in History tab |
Incorrect data format, empty values, or mismatched User ID prefix |
Review file structure, confirm UTF-8 encoding, and validate User ID prefix alignment |
|
Import not executing on schedule |
Connection is toggled Off, or an error has occurred (e.g., expired token) |
Check the Errors tab for details; verify the activation toggle is On |
|
Connection test fails |
Incorrect credentials, insufficient storage permissions, or network restrictions |
Re-verify credentials, confirm storage permissions, and check IP allowlist if using limited IP range |
|
Attribute values not updating after re-import |
Same file being re-imported due to no post-processing configured |
Configure a post-processing option (rename, move, or delete) to ensure only new files are processed |
|
Attribute missing from the "Mapped to" dropdown in Data Source |
Attribute has not been created in Integration Designer |
Create the missing attribute in Integration Designer, then return to the Data Source mapping |