
This is a paid add-on. Please reach out to our Piano Account representative for more information about pricing for this solution.
Enterprise SSO lets your team log in to Piano product dashboards using the company credentials they already use (Microsoft, Google, Okta, and others) instead of a Piano-specific login and password. It delegates authentication to your organization’s Identity Provider (IdP), ensuring that only verified employees can access the platform.
Looking for SSO for your readers and subscribers instead? Enterprise SSO covers your own team’s access to the Piano platform. If you want your end users to sign in across your sites with a single account, see Global Mode SSO.
Enterprise SSO makes it possible for clients to log in to the Piano dashboard via their own ID Platform (IdP).
Login to the Piano dashboard is essential for publishers to access and manage their applications, audiences, and monetization efforts. In this article, we will explore how publishers with their own ID Platform (IdP) can log in to the Piano dashboard via Single Sign-On (SSO), and what steps need to be considered.
A major benefit of using Enterprise SSO is secure access to the Piano dashboard only for verified users from your IdP platform with your own security policy.
Below is a simple diagram to illustrate how the logic behind the SSO works:
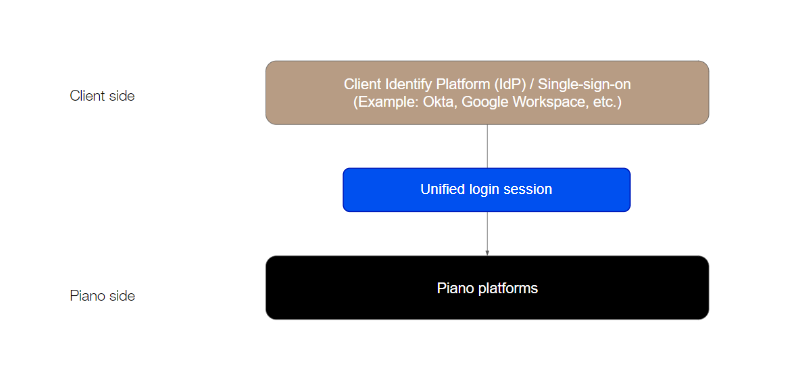
Publishers with their own IdP provider can log in to all Piano applications with their existing IdP accounts. This is especially beneficial for clients, whose employees might be enforced to use corporate SSO by explicit request instead of login/password or Google authentication.
Supported IdP providers include:
-
SAML
-
OpenID connection
-
Okta Workforce
-
Google Workspace
-
Microsoft Entra ID
-
ADFS
-
Active Directory / LDAP
-
Ping Federate
Please note, that Enterprise SSO works on a domain name basis, meaning all login attempts of the given domain will be redirected to the configured IdP provider and only for domains owned by the client (not Gmail, for example).
Enterprise SSO is only used for the login, roles and rights need to be assigned by the administrator in the Piano dashboard / Piano Analytics Rights management / Cxense Users management (= in all our products independently of each other).
In Piano Analytics, it is possible to create a default group with "all users and future users", while within Audience and Management + Billing there are no user groups.
It's also possible to have setups with multiple merchant IDs or multiple brands accessed with different email addresses or email domains. For example:
-
Different Merchant IDs
email@domain1.com -> Access to all apps from MerchantID1
email@domain2.com -> Access to all apps from MerchantID2 -
Different brands
email@brand1.com → access to brand 1 (merchantID A)
email@brand2.com → access to brand 2 (merchantID B)
email@allbrands.com → access to all brands
Our enterprise connectors allow users on correspondingly connected domains to switch from a user-password-based auth to a corresponding SSO provider. It doesn’t change the user’s access to applications/merchants (authorization), it only handles authentication for users on those domains.
If all domains are served by the same SSO provider, we will have to add only one enterprise connector for all domains, since we can associate multiple email domains to the same Enterprise SSO Connector. If SSO providers are different, one connector per provider needs to be configured.
In both cases, after Enterprise SSO is activated, all users with emails on those domains will start logging in to the Piano product dashboards exclusively through the SSO provider(s). Their access to Piano application(s) or merchants should stay entirely intact, so they can connect to different merchant IDs/brands as before.
However, if a user has multiple email addresses, depending on the IdP provider, they may need to log out of the dashboard first and then log out of the IdP to log in with a different email address.
Implementation
To log in to the Piano dashboard via Enterprise SSO, publishers need to configure their IdP provider on their end according to the below documentation. Once this is done, the client provides Piano with any relevant details based on the IdP provides, so the activation on the Piano side can proceed, including the creation of SSO enterprise connectors that are needed to connect the IdP provider with the Piano dashboard.
The following steps need to be done to enable Enterprise SSO:
-
Registration of an application with the IdP Provider (Client task)
-
Send the required setup information to Piano (Client task)
-
Configuration of the Enterprise SSO (Piano task)
-
Piano Subscriptions (Piano task)
As mentioned in the previous section, we currently offer support for multiple IdP providers. Since each provider has a different setup and configuration, we're going to be providing you with detailed steps for each provider separately.
Microsoft Entra ID
As a client, you may want to use Microsoft's Entra ID (formerly Azure AD) as your identity provider. This requires you to first register an application with Entra ID and then provide the necessary information to Piano to complete the Enterprise SSO configuration. Below we will walk you through the steps involved in Entra ID configuration for this integration.
Client tasks include:
1. Application Registration on Entra ID
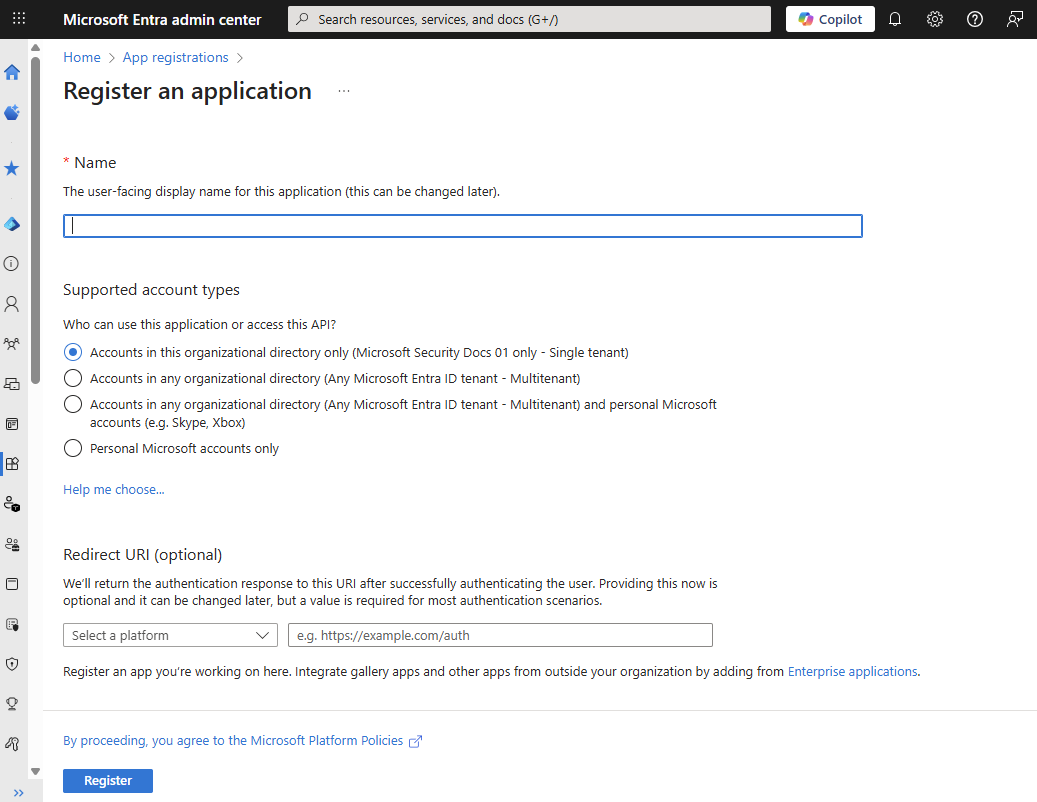
To register an application with Entra ID, you need to follow the steps described in this Quickstart guide. Here are the key steps to follow:
-
Choose the kind of redirection: Web
-
Enter your redirect URL: https://auth.piano.io/login/callback
-
Choose a name for your application (any name will do)
-
Choose the supported account types (this will depend on your Entra ID configuration, it will often be a single tenant account type)
An Entra ID application registration screenshot is provided for reference below.
2. Creating a Secret
Once you have registered the application, you need to add a secret to it. To do this, follow these steps:
-
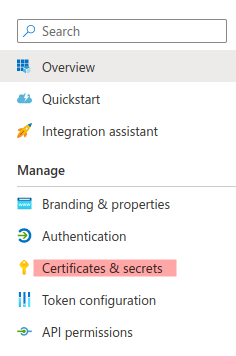
Go to Certificates & Secrets on the left menu
-
Choose Secrets (Piano's SSO integration currently only supports Secrets for its Entra ID enterprise connector). More information about this is available here.
-
Set the expiration date for the secret (we recommend a one-year expiration)
Note: Entra ID secrets have an expiration date, and it is the responsibility of the Entra ID administrator to renew them. As we do not have access to this information, please ensure that you keep us informed of any secret renewals, so we can update the secret on our end. It's possible to have multiple secrets active at the same time, so the secret exchange should be a seamless process. Once the new secret is updated in Piano, you can delete the old secret in your Entra ID account.
3. Approving the application
An Entra ID Admin must approve your application, through the button Grant admin consent for … under the API permissions section:
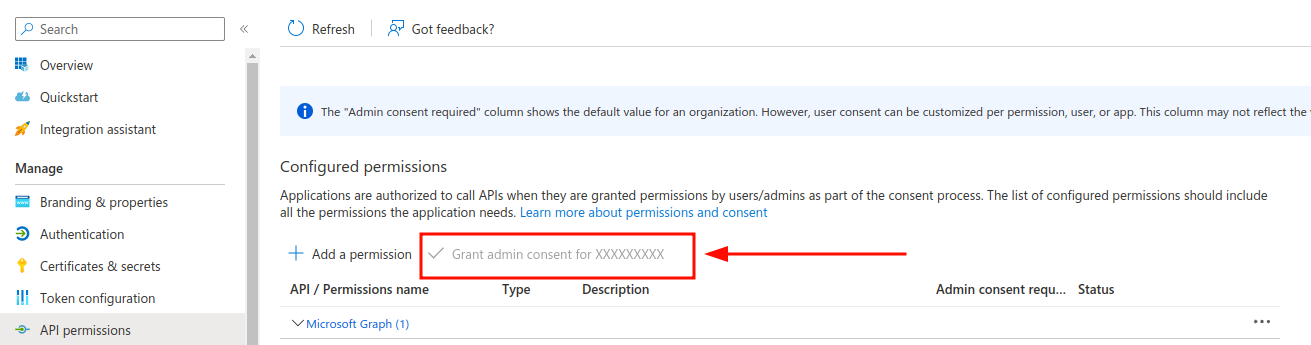
Otherwise, if the application is not approved, you users will see a screen similar to the one below:
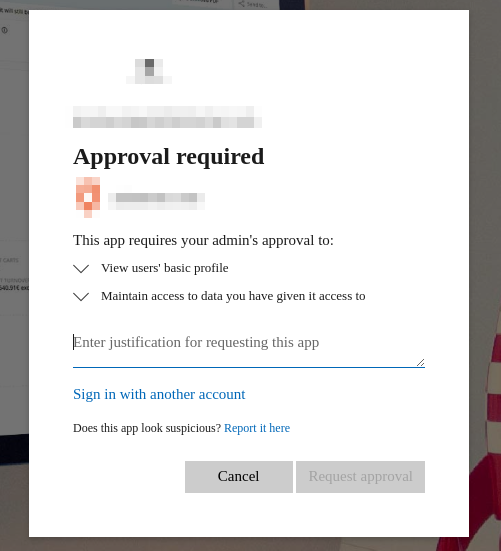
Piano tasks include:
1. Enterprise SSO Configuration
Once you have registered the application with Entra ID and created a secret, you can now provide Piano with the relevant information so that we may proceed with the Enterprise SSO configuration.
Please provide Piano with the below 5 mandatory pieces of information:
-
Your Entra ID domain name
-
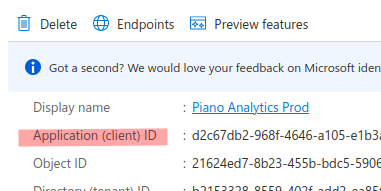
The application Client ID (this information is publicly available)
-
Your Entra ID Tenant ID
-
The application's Client Secret value (this information is sensitive, and should only be shared via a secure channel)
-
The type of tenant (single/multiple tenants…)
With this information, we will be able to continue the configuration on our side.
2. Enterprise SSO activation
However, the configuration will not be activated immediately. This is because when we activate the configuration, all your users will be automatically redirected to Entra ID for login, which may not be the desired scenario.
Okta Workforce
In order to create an SSO connector with Okta, you need to create an application on your Okta tenant.
More information on how to configure Okta can be retrieved from the linked article.
Client tasks include:
-
Creating an application on your Okta tenant
-
Configure the Okta tenant with this callback URL:
https://auth.piano.io/login/callback
-
After the creation of the application on your Okta tenant, please provide your Piano representative with the following information:
-
Okta Domain (e.g. domain-name.okta.com)
-
The application Client ID
-
The application Client Secret
-
List of email domains for which SSO needs to be enabled
-
Piano tasks include:
-
Add the Okta SSO configuration on Piano's backend
-
Activate the connector
After we have made the necessary configuration on our side, we are ready to activate the connector.
This can be done quickly for a date and time determined by the client.
Google Workspace
To configure this IdP provider, please provide Piano with the following mandatory information so that we may proceed with the Enterprise SSO setup:
-
The Google workspace domain
-
The application Client ID (this information is publicly available)
-
The application’s Client Secret value (this information is sensitive, and should only be shared via a secure channel)
OpenID Connect
To configure this IdP provider, please provide Piano with the following mandatory information so that we may proceed with the Enterprise SSO setup:
-
Your OpenID Connect apps client_id
-
Your OpenID Connect apps secret_client (a secret provided by your Identity Provider)
-
Your OpenId Connect configuration URL that is provided by your IdP provider in the following format:
https://{oauth-provider-hostname}/.well-known/openid-configuration
SAML 2.0
To configure this IdP provider, please provide Piano with the following mandatory information so that we may proceed with the Enterprise SSO setup:
-
Your metadata (IDP)
We will then provide you with an XML metadata file to add to your Identity Provider (and any additional information if needed).
Testing and Piano Subscriptions
Tests
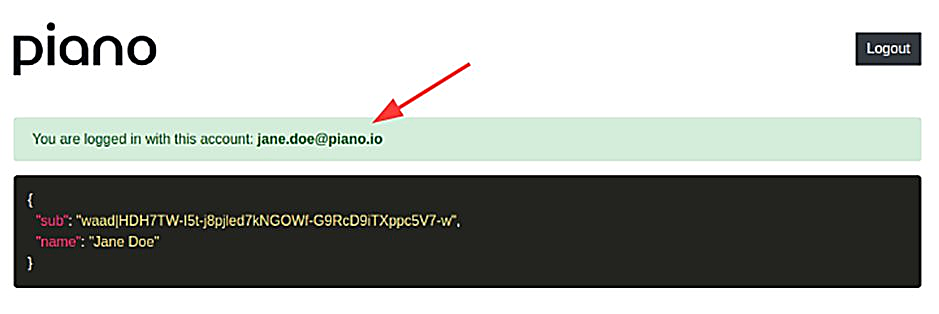
After Piano deploys the updated configuration, you can start testing. To verify everything is set up correctly, sign in using the test application available at https://my.piano.io/client-testing-application/.
If, after signing in, the test user sees an interface showing them as logged in and their email address as the account, the configuration is ready for production.
Production activation
After testing is completed and confirmed, Piano will activate the new configuration for production on the scheduled date and shut down the previous one.
Supported Use Cases
The supported use cases for clients who want to log in to the Piano dashboard via their own IdP provider include:
-
logging in
-
logging out
-
changing/resetting passwords
-
creating new app users
-
blocking app users
Dashboard Login Changes
Clients with Enterprise SSO will use one of the below URLs to log in to the respective Piano Product.
Management + Billing, Composer, ID:
https://dashboard.piano.io/ (US dashboard)
https://dashboard-eu.piano.io/ (EU dashboard)
https://dashboard-au.piano.io/ (Australia dashboard)
https://dashboard-ap.piano.io/ (Asia-Pacific dashboard)
https://sandbox.piano.io/ (Sandbox)
Piano Audience - https://audience.piano.io/
Piano Insight - https://audience-insight.piano.io/
CCE: https://login.cxense.com/
Piano Analytics: https://analytics.piano.io/
Also, the email sender address for user emails, such as registration and password reset, will be updated based on the IdP provider that has been implemented.
Once the Enterprise SSO is activated, a user that is already logged in to the client's IdP will be automatically redirected to the Piano dashboard once accessing the above links.
If a user is not already logged in to the client's IdP, they will be redirected to the IdP login.
SSO Shortcuts
Special shortcut links can speed up and simplify the connection to our products for our SSO clients.
By using these URLs, client users will never see our login interface, but only the login interface of their IdP (if they are not already logged in), or nothing if they are already logged in.
These links take this form:
https://connect.piano.io/sso/v1/login?c=CLIENT_SSO_CONNECTOR&p=PIANO_PRODUCT
Where you would replace:
-
CLIENT_SSO_CONNECTOR: with the name of the client's connector, defined during the SSO on-boarding process.
-
PIANO_PRODUCT: with name of the Piano product. Possible values are:
-
activation -
sandbox -
analytics -
dmpIn case of the activation product, you can add a zone information with the
zparameter.Possible values:
au,ap,eu,us(the default zone is set to us)
-
Example:
In order to connect as a user of "My Newspaper" (connector name = mynewspaper) to the Piano product Piano Subscriptions (product name = activation) to the zone US, the url will be:
https://connect.piano.io/sso/v1/login?c=mynewspaper&p=activation&z=us