
OAuth support
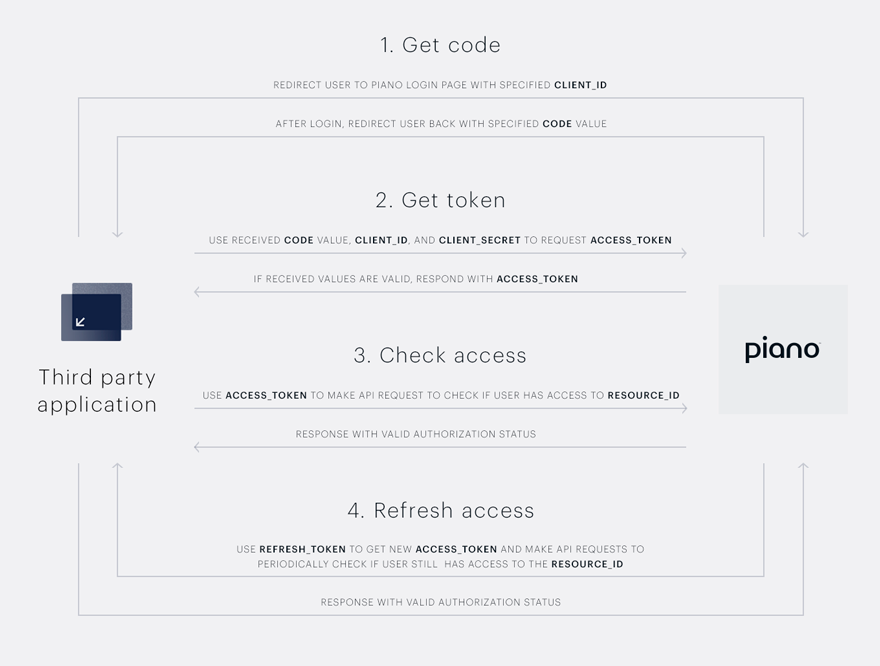
There are four steps when working with OAuth (click the diagram above for an overview of the flow). For users with an existing valid access token, skip to Step 3. For users with an expired access token, skip to Step 4.
Step 1: Get authorization code
Important: If you want to use the OAuth authorization code flow instead of JWT for OIDC, you must contact Piano Support to manually activate this feature for your account.
Endpoint. Get OAuth authorization code: /id/api/v1/identity/authorize
Redirects the user to a Piano-hosted login/registration page. On successful authentication, the user is sent back to your redirect_uri with the OAuth authorization code as the code query parameter. In addition to email and password, clients using Piano ID can also offer social login and passwordless login.
Important: The redirect_uri must be registered in your Piano ID configuration as an authorized redirect URL.
|
Parameter |
Type |
Required |
Description |
|
|
String |
Yes |
Your Piano AID. |
|
|
String |
Yes |
Set to the literal value |
|
|
String |
Yes |
The callback URL of your application. Must be registered in your Piano ID configuration as an authorized redirect URL. |
|
|
String |
No |
Recommended for CSRF protection. An opaque value set by your application, returned unchanged in the redirect response, allowing you to verify the response originates from this request. |
|
|
String |
No |
PKCE only. Base64URLSafe-encoded SHA-256 hash of the |
|
|
String |
No |
PKCE only. Set to the literal value |
|
|
Boolean |
No |
Set to |
|
|
String |
No |
Set to |
Authorization request:
GET https://api.piano.io/id/api/v1/identity/authorize?response_type=code&client_id=<AID>&redirect_uri=<REDIRECT_URI>&state=<STATE>
This URL is opened in a browser; the user authenticates on the Piano ID page, then is redirected back to your application. You can also use it in automated testing via cURL:
curl -v 'https://api.piano.io/id/api/v1/identity/authorize?response_type=code&client_id=<AID>&redirect_uri=<REDIRECT_URI>&state=<STATE>'
On successful authentication, the user is redirected to:
<REDIRECT_URI>?code=<AUTHORIZATION_CODE>&state=<STATE>
Pass the code value to Step 2. Verify that the returned state matches the value you sent.
Step 2: Get access token
Endpoint. Get or refresh access token: /id/api/v1/identity/token
Exchanges the OAuth authorization code from Step 1 for an access token. Store the access_token for use in subsequent API requests. Parameters are sent as a form-encoded POST body.
|
Parameter |
Type |
Required |
Description |
|
|
String |
Yes |
Your Piano AID. |
|
|
String |
Yes |
OAuth client secret, configured during Piano Identity management setup. |
|
|
String |
Yes |
The OAuth authorization code received in Step 1. |
|
|
String |
Yes |
Set to the literal value |
|
|
String |
Yes |
The callback URL of your application. Must match the value sent in Step 1. |
Token request:
POST https://api.piano.io/id/api/v1/identity/token
Content-Type: application/x-www-form-urlencoded

client_id=<AID>&client_secret=<OAUTH_CLIENT_SECRET>&redirect_uri=<REDIRECT_URI>&grant_type=authorization_code&code=<AUTHORIZATION_CODE>
cURL example:
curl --location --request POST 'https://sandbox.piano.io/id/api/v1/identity/token' \
--header 'Content-Type: application/x-www-form-urlencoded' \
--data-urlencode 'client_id=<AID>' \
--data-urlencode 'client_secret=<OAUTH_CLIENT_SECRET>' \
--data-urlencode 'redirect_uri=<REDIRECT_URI>' \
--data-urlencode 'grant_type=authorization_code' \
--data-urlencode 'code=<AUTHORIZATION_CODE>'
If the request is successful, the response will look like the following JSON:
{
    "access_token": "eyJhbGci...",
    "token_type": "Bearer",
    "refresh_token": "RFbqr...",
    "expires_in": 3600,
    "email_confirmation_required": false
}
The expires_in value is in seconds. The default is 3600 (1 hour) and is configurable in your Piano Identity management configuration.
When using Auth Sync in a mobile app and calling /identity/token/validation from a custom script, you must include the Device-Id header in the request to ensure identity.create events are associated with visitors in Piano Analytics.
On iOS, the device ID can be retrieved using PianoConfiguration.shared.deviceId. On Android, where no public API is currently available, the device ID can be read from SharedPreferences as a workaround. More details are available in the Identity linking documentation.
If your client cannot send application/x-www-form-urlencoded, use /id/api/v1/identity/oauth/token instead; it accepts the same parameters with Content-Type: application/json.
Step 3: Check access
Once you have the access token, check whether the user should be granted access to a resource.
Endpoint. Check resource access: /api/v3/access/check
Use your AID and Resource ID to check whether the user has access to a specific resource.
|
Parameter |
Type |
Required |
Description |
|
|
String |
Yes |
Resource ID to check access for. |
|
|
String |
Yes |
Your Piano AID. |
|
|
String |
Yes |
Request header. Pass the access token as |
Access check request:
GET https://api.piano.io/api/v3/access/check?rid=<RESOURCE_ID>&aid=<AID>
Authorization: Bearer <ACCESS_TOKEN>
cURL example:
curl 'https://api.piano.io/api/v3/access/check?rid=<RESOURCE_ID>&aid=<AID>' \
--header 'Authorization: Bearer <ACCESS_TOKEN>'
If the request is successful, the response will look like the following JSON:
{
    "code": 0,
    "ts": 1469127375,
    "access": {
        "access_id": null,
        "granted": false,
        "resource": null,
        "user": null,
        "expire_date": 1469127374
    }
}
If the user has access to the resource, granted will be true.
Endpoint. Get user access list: /api/v3/user/access/list
Alternatively, get all current access objects for the user. Use this method if multiple resources can grant access, or if you prefer not to hard-code a Resource ID into your application.
|
Parameter |
Type |
Required |
Description |
|
|
String |
Yes |
Your Piano AID. |
|
|
String |
Yes |
Request header. Pass the access token as |
User access list request:
GET https://api.piano.io/api/v3/user/access/list?aid=<AID>
Authorization: Bearer <ACCESS_TOKEN>
cURL example:
curl 'https://api.piano.io/api/v3/user/access/list?aid=<AID>' \
--header 'Authorization: Bearer <ACCESS_TOKEN>'
For more information, see our API documentation: /access/check, /user/access/list, /user/access/get, and /user/get.
Step 4: Refresh access token
Endpoint. Get or refresh access token: /id/api/v1/identity/token
Access tokens expire; the duration is configurable in your Piano Identity management configuration. Use the refresh_token from Step 2 to get a new access token without restarting the full OAuth flow. Note that client_secret and redirect_uri are not required for the refresh token flow. Parameters are sent as a form-encoded POST body.
|
Parameter |
Type |
Required |
Description |
|
|
String |
Yes |
Your Piano AID. |
|
|
String |
Yes |
Set to the literal value |
|
|
String |
Yes |
The refresh token received in Step 2. |
Token refresh request:
POST https://api.piano.io/id/api/v1/identity/token
Content-Type: application/x-www-form-urlencoded

client_id=<AID>&grant_type=refresh_token&refresh_token=<REFRESH_TOKEN>
cURL example:
curl --location --request POST 'https://api.piano.io/id/api/v1/identity/token' \
--header 'Content-Type: application/x-www-form-urlencoded' \
--data-urlencode 'client_id=<AID>' \
--data-urlencode 'grant_type=refresh_token' \
--data-urlencode 'refresh_token=<REFRESH_TOKEN>'
If the request is successful, the response will look like the following JSON:
{
    "access_token": "eyJhbGci...",
    "token_type": "Bearer",
    "refresh_token": "RFbqr...",
    "expires_in": 3600,
    "email_confirmation_required": false
}
By default, a new refresh_token is issued with each refresh response. Always use the latest refresh_token for subsequent refresh requests. If your application is configured to use a fixed refresh token, the same value is reused. To change this behavior, contact Piano support.
Refresh token lifetime. A refresh token expires access token lifetime + 30 days from the moment it was issued. Each successful refresh resets the clock; the new refresh token again expires access token lifetime + 30 days from that moment. This means a user's session continues indefinitely as long as the app performs at least one refresh within each window. A user is only logged out if no refresh occurs for the entire duration of a refresh token window.
Example: with the default access token lifetime of 1 hour, each refresh token lasts approximately 30 days (1 h + 720 h). After a successful refresh, the new refresh token expires 30 days from that moment, not from the original login.
In addition to refreshing the access token, periodically recheck whether the user should still have access. This ensures access is revoked for users whose subscriptions have lapsed. To recheck access, repeat Step 3.
PKCE support
Piano's OAuth integration supports the PKCE extension.
The Proof Key for Code Exchange (PKCE) extension protects public clients against authorization code interception. The client generates a random secret (code_verifier) and includes its hash (code_challenge) in the PKCE Step 1 authorization request. When exchanging the authorization code for a token in PKCE Step 2, the original code_verifier is provided. If the authorization code is intercepted, it cannot be used without the matching code_verifier.
Step 1: Get authorization code
Endpoint. Get OAuth authorization code: /id/api/v1/identity/authorize
The same endpoint as Step 1 in the OAuth support section above, with code_challenge and code_challenge_method added as required parameters.
|
Parameter |
Type |
Required |
Description |
|
|
String |
Yes |
Your Piano AID. |
|
|
String |
Yes |
Set to the literal value |
|
|
String |
Yes |
The callback URL of your application, registered in your Piano ID configuration. |
|
|
String |
Yes |
Base64URLSafe-encoded SHA-256 hash of the |
|
|
String |
Yes |
Set to the literal value |
|
|
String |
No |
Recommended for CSRF protection. Returned unchanged in the redirect response. |
Authorization request:
GET https://api.piano.io/id/api/v1/identity/authorize?response_type=code&client_id=<AID>&redirect_uri=<REDIRECT_URI>&code_challenge=<CODE_CHALLENGE>&code_challenge_method=S256&state=<STATE>
cURL example:
curl -v 'https://api.piano.io/id/api/v1/identity/authorize?response_type=code&client_id=<AID>&redirect_uri=<REDIRECT_URI>&code_challenge=<CODE_CHALLENGE>&code_challenge_method=S256&state=<STATE>'
On success, you are redirected to a URL containing the OAuth authorization code:
<REDIRECT_URI>?code=<AUTHORIZATION_CODE>&state=<STATE>
The code_challenge is the Base64URLSafe-encoded SHA-256 hash of the code_verifier. Example in Java can be found below.
Generating code_verifier and code_challenge:
import java.security.MessageDigest;
import java.security.NoSuchAlgorithmException;
import java.security.SecureRandom;
import java.nio.charset.StandardCharsets;
import org.apache.commons.codec.binary.Base64;

public static void main(String[] args) throws NoSuchAlgorithmException {
    byte[] randomBytes = new byte[32];
    new SecureRandom().nextBytes(randomBytes);

    String codeVerifier = Base64.encodeBase64URLSafeString(randomBytes);

    MessageDigest hash = MessageDigest.getInstance("SHA-256");
    hash.update(codeVerifier.getBytes(StandardCharsets.US_ASCII));
    String codeChallenge = Base64.encodeBase64URLSafeString(hash.digest());

    System.out.println("code_verifier:  " + codeVerifier);
    System.out.println("code_challenge: " + codeChallenge);
}
Step 2: Get access token
Endpoint. Get or refresh access token: /id/api/v1/identity/token
Exchanges the authorization code from Step 1 for a Piano access token. Use code_verifier in place of client_secret, not both. Parameters are sent as a form-encoded POST body.
|
Parameter |
Type |
Required |
Description |
|
|
String |
Yes |
Your Piano AID. |
|
|
String |
Yes |
Set to the literal value |
|
|
String |
Yes |
The OAuth authorization code received in Step 1. |
|
|
String |
Yes |
Same value used in Step 1. |
|
|
String |
Yes |
The plain-text secret generated in Step 1. |
Token request:
POST https://api.piano.io/id/api/v1/identity/token
Content-Type: application/x-www-form-urlencoded

client_id=<AID>&redirect_uri=<REDIRECT_URI>&grant_type=authorization_code&code=<AUTHORIZATION_CODE>&code_verifier=<CODE_VERIFIER>
cURL example:
curl --location --request POST 'https://api.piano.io/id/api/v1/identity/token' \
--header 'Content-Type: application/x-www-form-urlencoded' \
--data-urlencode 'client_id=<AID>' \
--data-urlencode 'redirect_uri=<REDIRECT_URI>' \
--data-urlencode 'grant_type=authorization_code' \
--data-urlencode 'code=<AUTHORIZATION_CODE>' \
--data-urlencode 'code_verifier=<CODE_VERIFIER>'
Response:
{
    "access_token": "eyJhbGci...",
    "token_type": "Bearer",
    "refresh_token": "RFbqr...",
    "expires_in": 3600,
    "email_confirmation_required": false
}
If your client cannot send application/x-www-form-urlencoded, use /id/api/v1/identity/oauth/token instead; it accepts the same parameters with Content-Type: application/json.
Step 3: Refresh access token
Endpoint. Get or refresh access token: /id/api/v1/identity/token
The refresh flow for PKCE uses the same endpoint, parameters, and cURL example as Step 4 in the OAuth support section above. No code_verifier is required for refresh.
For more information on the general OAuth flow, see the OAuth support section above. All available base URLs are listed in the Piano ID API reference.