
Implementation Details
Composer 1x functionality is available to all Composer clients. However, some features require certain licenses to other Piano product offerings to have full access to all functionality. The table below represents what features require which licenses:
|
Composer 1x Features |
Required License |
|||
|---|---|---|---|---|
|
|
Composer |
Composer + VX |
Composer + Audience |
Composer+ VX + Audience |
|
Onsite Recommendations |
✔ |
✔ |
✔ |
✔ |
|
Interest Segments |
✔ |
✔ |
✔ |
✔ |
|
User Engagement Segments |
✔ |
✔ |
✔ |
✔ |
|
Subscription Journey Segments |
✘ |
✔ |
With Services |
✔ |
|
Likelihood to Subscribe Segments (LtS) |
With Services |
✔ |
With Services |
✔ |
|
Likelihood to Cancel Segments (LtC) |
✘ |
✔ |
With Services |
✔ |
|
Bespoke Segments |
✘ |
✘ |
✔ |
✔ |
Global Frequency Cap. The Global (audience-wide) option in the Frequency Cap card requires Composer 1x. It is available to all Composer clients once this is enabled on the application, including Sandbox applications.
For a detailed explanation of the individual segments that Compose 1x offers, please see the Composer 1x segments documentation.
Composer 1x Site Group Structure
Access to the C1x structure is granted through the permissions_only (top-most) site group only.
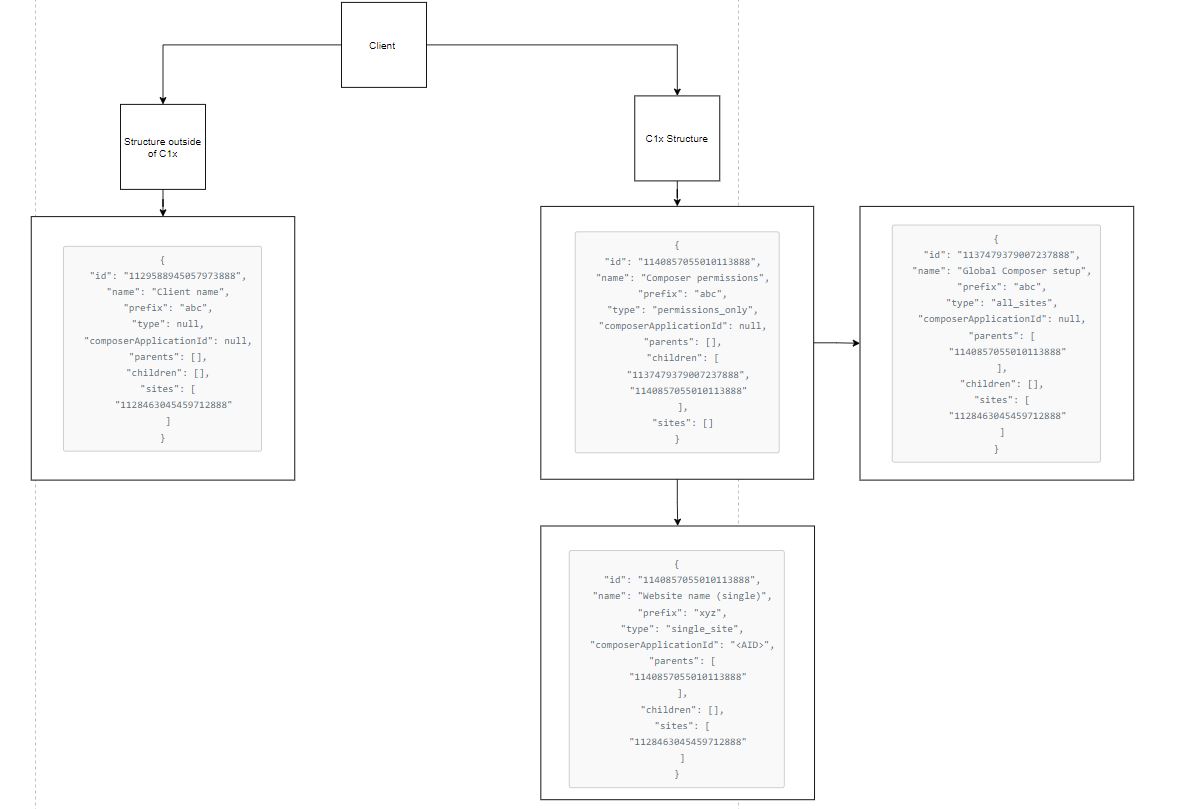
With the above permissions, users will have access to all C1x groups under this group. Access can be granted as explained in this article. You add permissions to the c1x site groups made for that purpose, other site groups will inherit permissions from there.
Please note that permission entries SHOULD NOT be added to the single_site site group itself.
All the C1x pre-defined segments are created within the single_site site group, thus all of them can be found for export under the single_site site group.
All the pre-defined segments get automatically populated under "Configure segments" in the Audience dashboard for the relevant site group.
The Implementation Process
If you are a new customer, please scroll to theHow to Implement Composer 1x | c1xhowtoimplementsection.
For existing Composer customers
Your account manager will reach out to you once we are ready to activate the new functionality for your Composer applications.
If you are a Composer customer using the Piano load.js script, we will do the majority of the necessary work to activate Composer 1x on your account. After our activation process, you will have to follow the steps to whitelist our crawler. For more information about the Composer 1X crawler, please visit our FAQ.
If you are a Composer customer that is not using the Piano load.js script, your Account manager will provide a code snippet that you can use to update your website’s code. After updating the Composer script, you will have to follow the steps to whitelist our crawler.
Our content crawler is a key part of our technology that extracts data from your user's interactions with your articles. We extract this data to be able to automatically provide you with machine learning generated user interest segments, Likelihood to Subscribe models, as well as onsite recommendations. By default, our content crawler does not have access to content that sits behind a paywall, or it could be blocked by consent messages and other things you serve on your pages The crawler must be whitelisted so that it can access all relevant pages. Once the crawler has been whitelisted, you will have access to a more robust segmentation engine and onsite recommendation engine, powered by Composer 1x. After the crawler is whitelisted, your account manager will perform a health check on your account. If something is set up incorrectly, they will let you know and provide direction on how to fix it. Once everything is installed correctly, the crawler needs 30-days to build accurate segments of your users. Using the new Composer 1X functionality before the 30-days may result in inaccurate segmentation data being used.
For legacy Audience customers
You may keep any existing legacy Audience scripts in place.
For a standard integration, the full script (Audience + Piano) would now look like this:
<script type="text/javascript" src="https://cdn.cxense.com/cx.cce.js"></script>

<script type="text/javascript">
  var cX = window.cX = window.cX || {}; cX.callQueue = cX.callQueue || [];
  cX.CCE = cX.CCE || {}; cX.CCE.callQueue = cX.CCE.callQueue || [];
  cX.callQueue.push(['setSiteId','<siteId>']);
  cX.CCE.callQueue.push(['sendPageViewEvent', '<prefix>', '<persistedQueryId>']);
</script>

<script>(function(src){var a=document.createElement("script");a.type="text/javascript";a.async=true;a.src=src;var b=document.getElementsByTagName("script")[0];b.parentNode.insertBefore(a,b)})("https://experience.piano.io/xbuilder/experience/load?aid=<AID>");</script>
Please ensure that the Cxense script tag is placed before the Tinypass/Piano script tag or load script on the page.
If you are hosting your website on a subdomain, you would need to add the following code:
cX.options.dataLayer = { cookie: { domain: '<domain>', path: '<path>' } };
So your integration code may look as follows:
// Cxense script
<script src="https://cdn.cxense.com/cx.cce.js"></script>
<script>
    (function() {
        var cX = window.cX = window.cX || {};
        cX.options = cX.options || {};
        cX.callQueue = cX.callQueue || [];
        cX.CCE = cX.CCE || {};
        cX.CCE.callQueue = cX.CCE.callQueue || [];
        cX.callQueue.push(['setSiteId','PUT_siteId_HERE']);
        cX.CCE.callQueue.push(['sendPageViewEvent', '<prefix>', '<persistedQueryId>']);
        cX.options.dataLayer = { cookie: { domain: 'abc.pub.com', path: '/pages' } };
    }) ();
</script>

// Composer script
tp.push(["setCxenseSiteId", "PUT_siteId_HERE"]);
tp.push(["setCookieDomain", 'abc.pub.com']);
tp.push(["setCookiePath", '/pages']);
In our example, the custom domain is abc.pub.com and the custom path /pages. These values should be replaced with your own domain and path.
If you are using a Single Page Application (SPA) or custom Audience integration, please reach out to your Piano representative for more information.
Content Recommendations served via Composer don't require any further configuration for SPA websites, you'll just have to re-run the Composer Experiences upon each content load as described here.
How to implement Composer 1x
If you are a new Piano Customer, the first step is to integrate the Piano Composer script into your website. If you are an existing Piano Customer, please return to the "For existing Composer customers" section.
There are 3 approaches on how to implement Composer 1x based on your Piano integration and how you are calling the load script.
Using the Piano Composer load script
In case you are using the Piano Composer load script to run Piano experiences, you can follow the steps below:
-
-
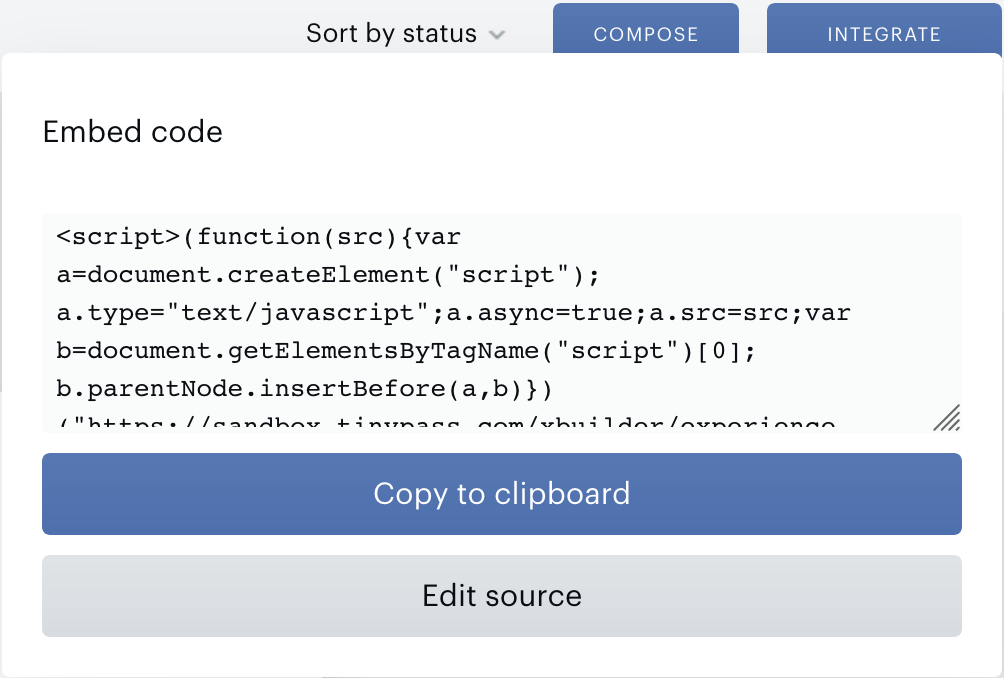
From the Composer dashboard click on the Integrate button. In this type of integration, you've copied the provided embed code to your website to run the Piano Experiences.
-
To fully integrate with Composer 1x, modify the Piano load script by clicking on the Edit source button now, and find the line that looks like
tp.push(["setAid", 'XXXXX']);(where the XXXXX is replaced by your AID) and include the following snippet after this line:tp.push(["setCxenseSiteId", "PUT_siteId_HERE"]).Your account manager will provide you with your "Site ID".
-
Loading the Piano script directly from your website
In some cases, you might be loading the Piano load script directly from your website. (For example, as described here)
For this integration, we recommend loading the script asynchronously with JavaScript so that load times are not impacted:
<script>
tp.push(["setCxenseSiteId", "PUT_siteId_HERE"])
var script = document.createElement("script");
   script.src = "tinypass.min.js";
   script.async = true;
   document.getElementsByTagName("head")[0].appendChild(script);
</script>
Or with the built-in HTML5 Async attribute, which, depending on your specific implementation, could look like this:
<script src="/path/tp/piano.js" async></script>
You can also load the snippet tp.push(["setCxenseSiteId", "PUT_siteId_HERE"]) manually by pasting the code into the <head> element of your website.
Your account manager will provide you with your "Site ID".
In most cases, simply add tp.push(["setCxenseSiteId", "PUT_siteId_HERE"]) to the location where the rest of your Piano scripts are.
Below you can find an example of a script for customers that are hosting their website on a subdomain.
In our example, the custom domain is abc.pub.com and the custom path /pages. These values should be replaced with your own domain and path.
// Composer script
tp.push(["setCxenseSiteId", "PUT_siteId_HERE"]);
tp.push(["setCookieDomain", 'abc.pub.com']);
tp.push(["setCookiePath", '/pages']);
var cX = window.cX = window.cX || {};
cX.options = cX.options || {};
cX.options.dataLayer = { cookie: { domain: 'abc.pub.com', path: '/pages' } };
Using the Piano WordPress plugin
If you are using the Piano WordPress plugin, please follow the instructions described in the Composer 1x section here in order to complete the necessary code updates.
After the script has been updated, please follow these steps to complete the Composer 1x setup successfully.
How to whitelist the crawler?
-
-
Whitelist the crawler, so Piano can crawl paywall-protected content disregarding GDPR/cookie notices. There are three recommended ways to do that:
-
(Recommended) User-Agent Header:
-
Within your web server configuration or CDN, whitelist the crawler using the following string: cXensebot
-
-
Reverse DNS Lookup
-
Depending on your CDN or webserver, whitelisting the crawler’s domain is a way to future-proof the crawlers from any changes we may have to make at Piano.
-
You can whitelist the crawlers domain with a wildcard: *.cxensebot.com
-
-
IP Address
-
You can whitelist the web crawler using these four IP addresses:
-
5.9.190.101
-
5.9.190.106
-
5.9.190.107
-
5.9.190.127
-
-
If you use an external service to manage consent, cookie policies, or prompts, please whitelist the crawler on those platforms as well.
More information about the crawler is available here.
-
-
-
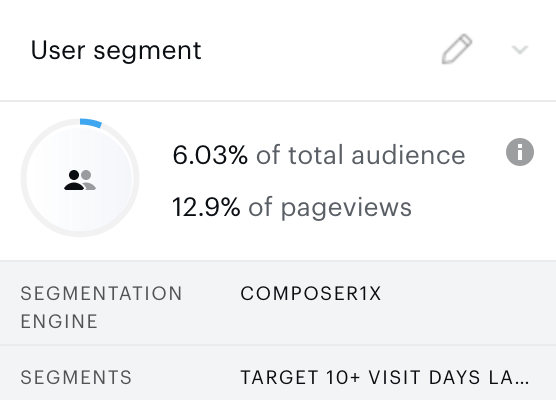
You can verify that Composer 1x has been installed correctly from within an experience by looking at the segmentation card, which now has the updated Composer 1x interface.
-
Contact your account manager so they can perform a health check and check that the crawler is up and running. At this stage, if there are any problems, we will contact you with instructions on how to fix them. It takes 30-days for the crawler to get enough information about your readers. For more accurate targeting, you should wait for 30-days before creating experiences that utilize Composer 1X.
-
How to use the new Composer 1x functionality
With the new Composer1X functionality enabled in Composer and on your website, you have access to new predefined Segments and the Content Recommendation Engine. Both have the ability to transform your capability to deliver engaging user experiences to your audience.
Segments
The new Composer 1x offering includes a range of predefined and machine learning segments defined by our teams and industry-leading best practices. Predefined segments make targeting easier by offering a menu of segmenting options, optimized to solve common use cases. Access to some segments requires additional Piano product licenses, for the full overview see this section. You can find more detailed information about all of the 11 predefined segment categories and 87 predefined segments available within the Segment documentation.
Locating segments within Composer
-
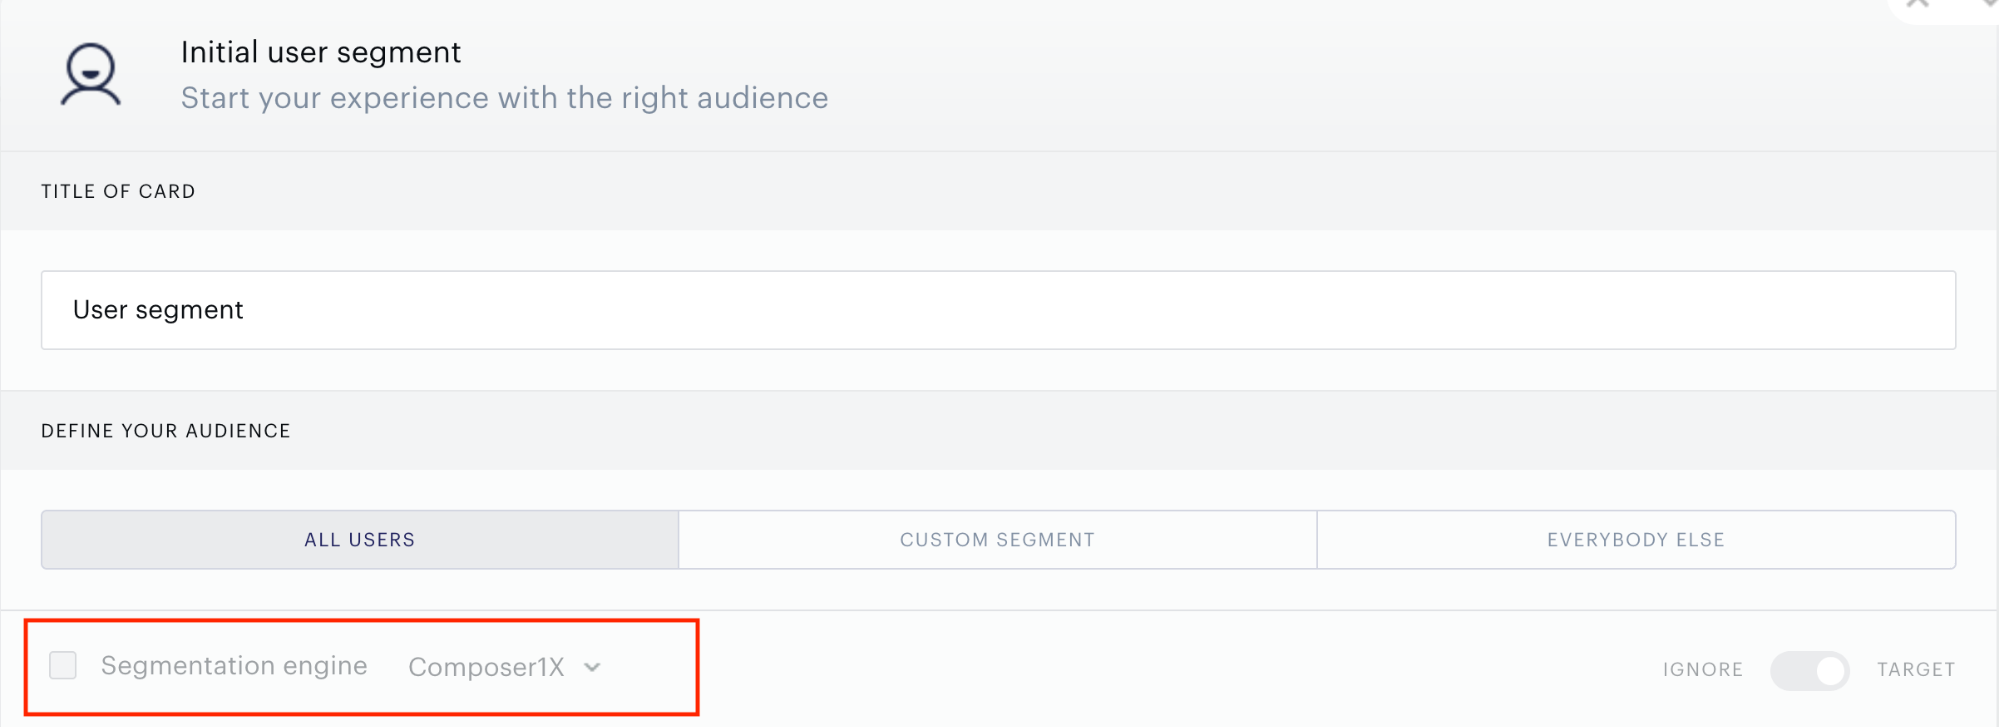
The predefined segments are available within the User Segment card in Composer. These will be located under the Custom Segment banner, with Composer 1x selected as the segmentation engine.
-
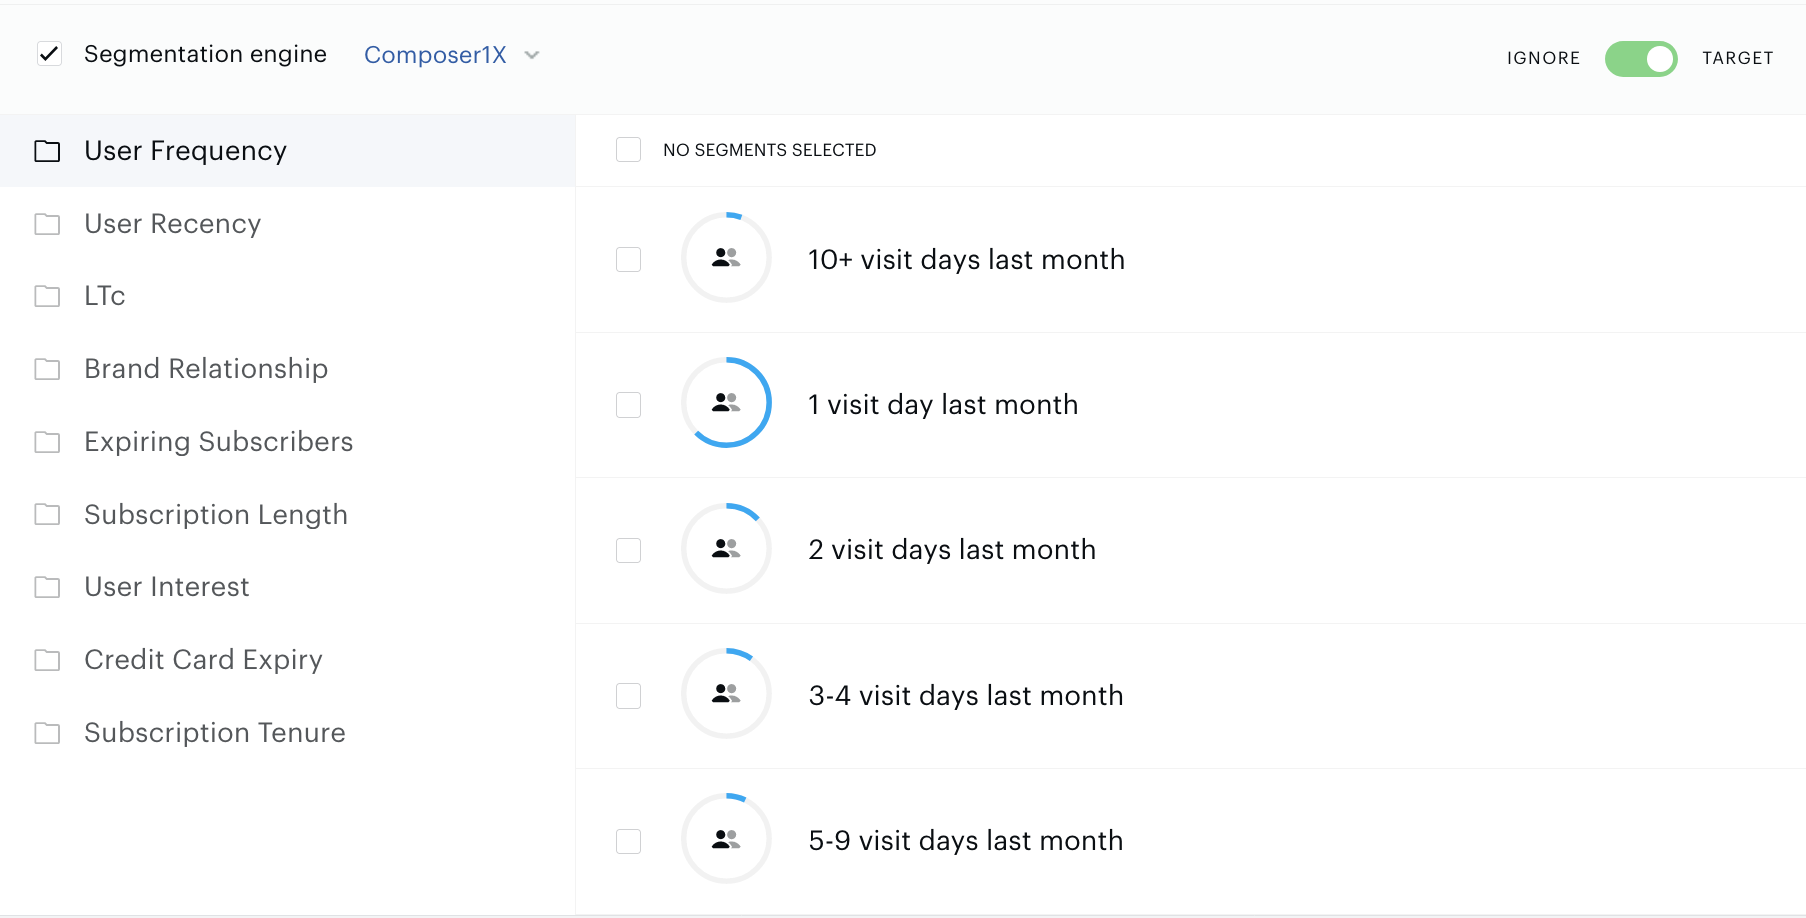
In this view, you can select from a series of predefined segments in multiple categories:
-
Composer 1x segment selection logic uses boolean operators to describe how your users will be affected by your selection choice.
-
If you select 2 segments within the same category the experience will use OR logic.
-
Selecting both food and sports, within the User Interest category, would target readers who are interested in sports OR food.
-
-
If you select 2 segments from different categories will use AND logic.
-
Selecting food from the User Interest Category, and 1 visit day last month from the User Frequency category would target users who are interested in food AND have 1 visit day last month.
-
-
-
The icon in each individual segment represents a subsection of your audience, clicking on the segment provides an estimate of the percentage of visitors and the visitor count that belong to this segment from the last 31 days. It will also show the percentage of total page views and the total number of page views this segment consumed within the last 31 days. This estimate can help you gain an understanding of the reach your experience can have by targeting the selected segment(s). users that belong to this segment:

Note: Segment populations are estimates and vary in engagement levels. Some segments with low-engagement levels could have significant discrepancies between the size of the segment and the targeted audience. -
Once you are finished, the segment should look like this:
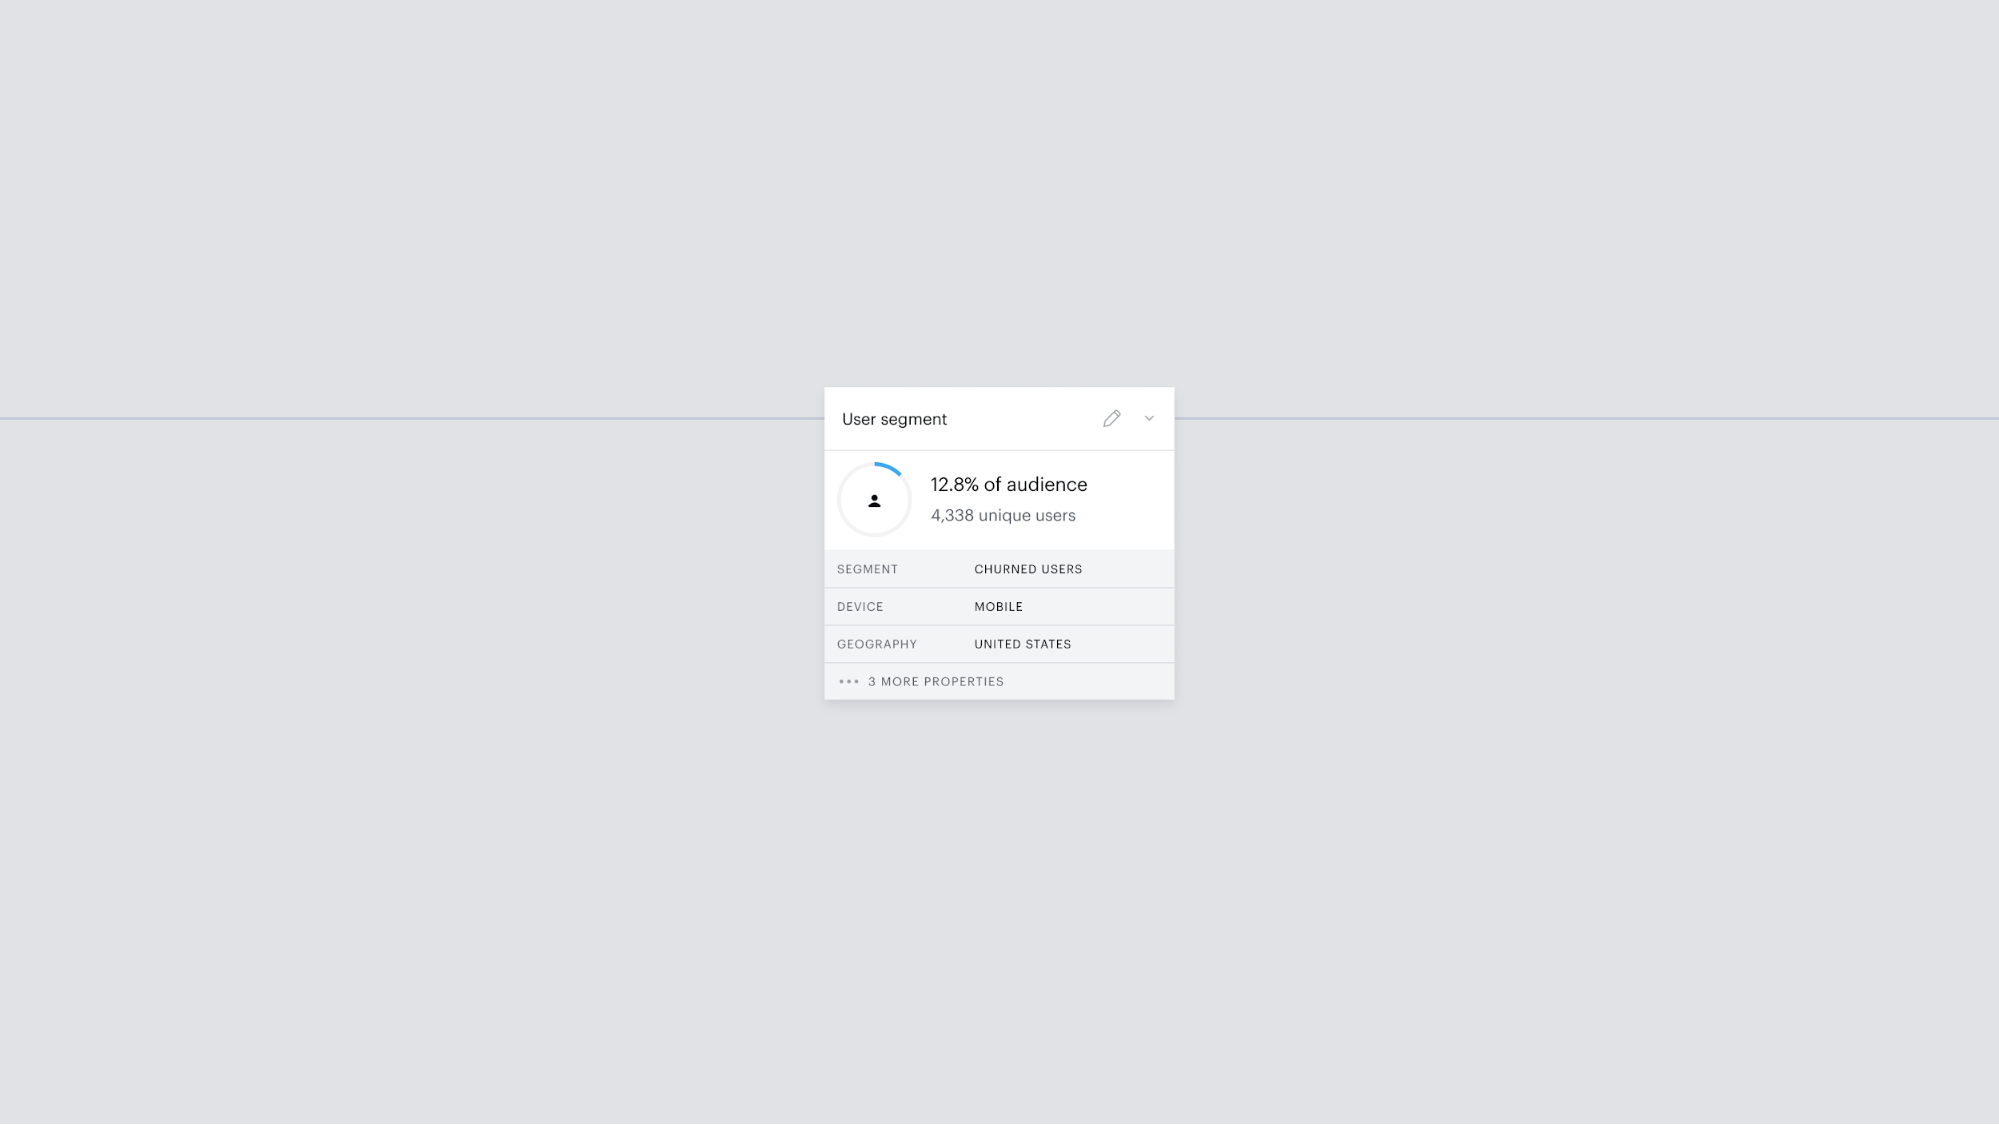
For the subscriber segments, the "total audience" number represents the visitor count, if your subscribers are accessing your website from different devices they will be represented twice. For a description of other functionality in the User Segment card, please see our guide on User Segments.
Onsite Article Recommendation
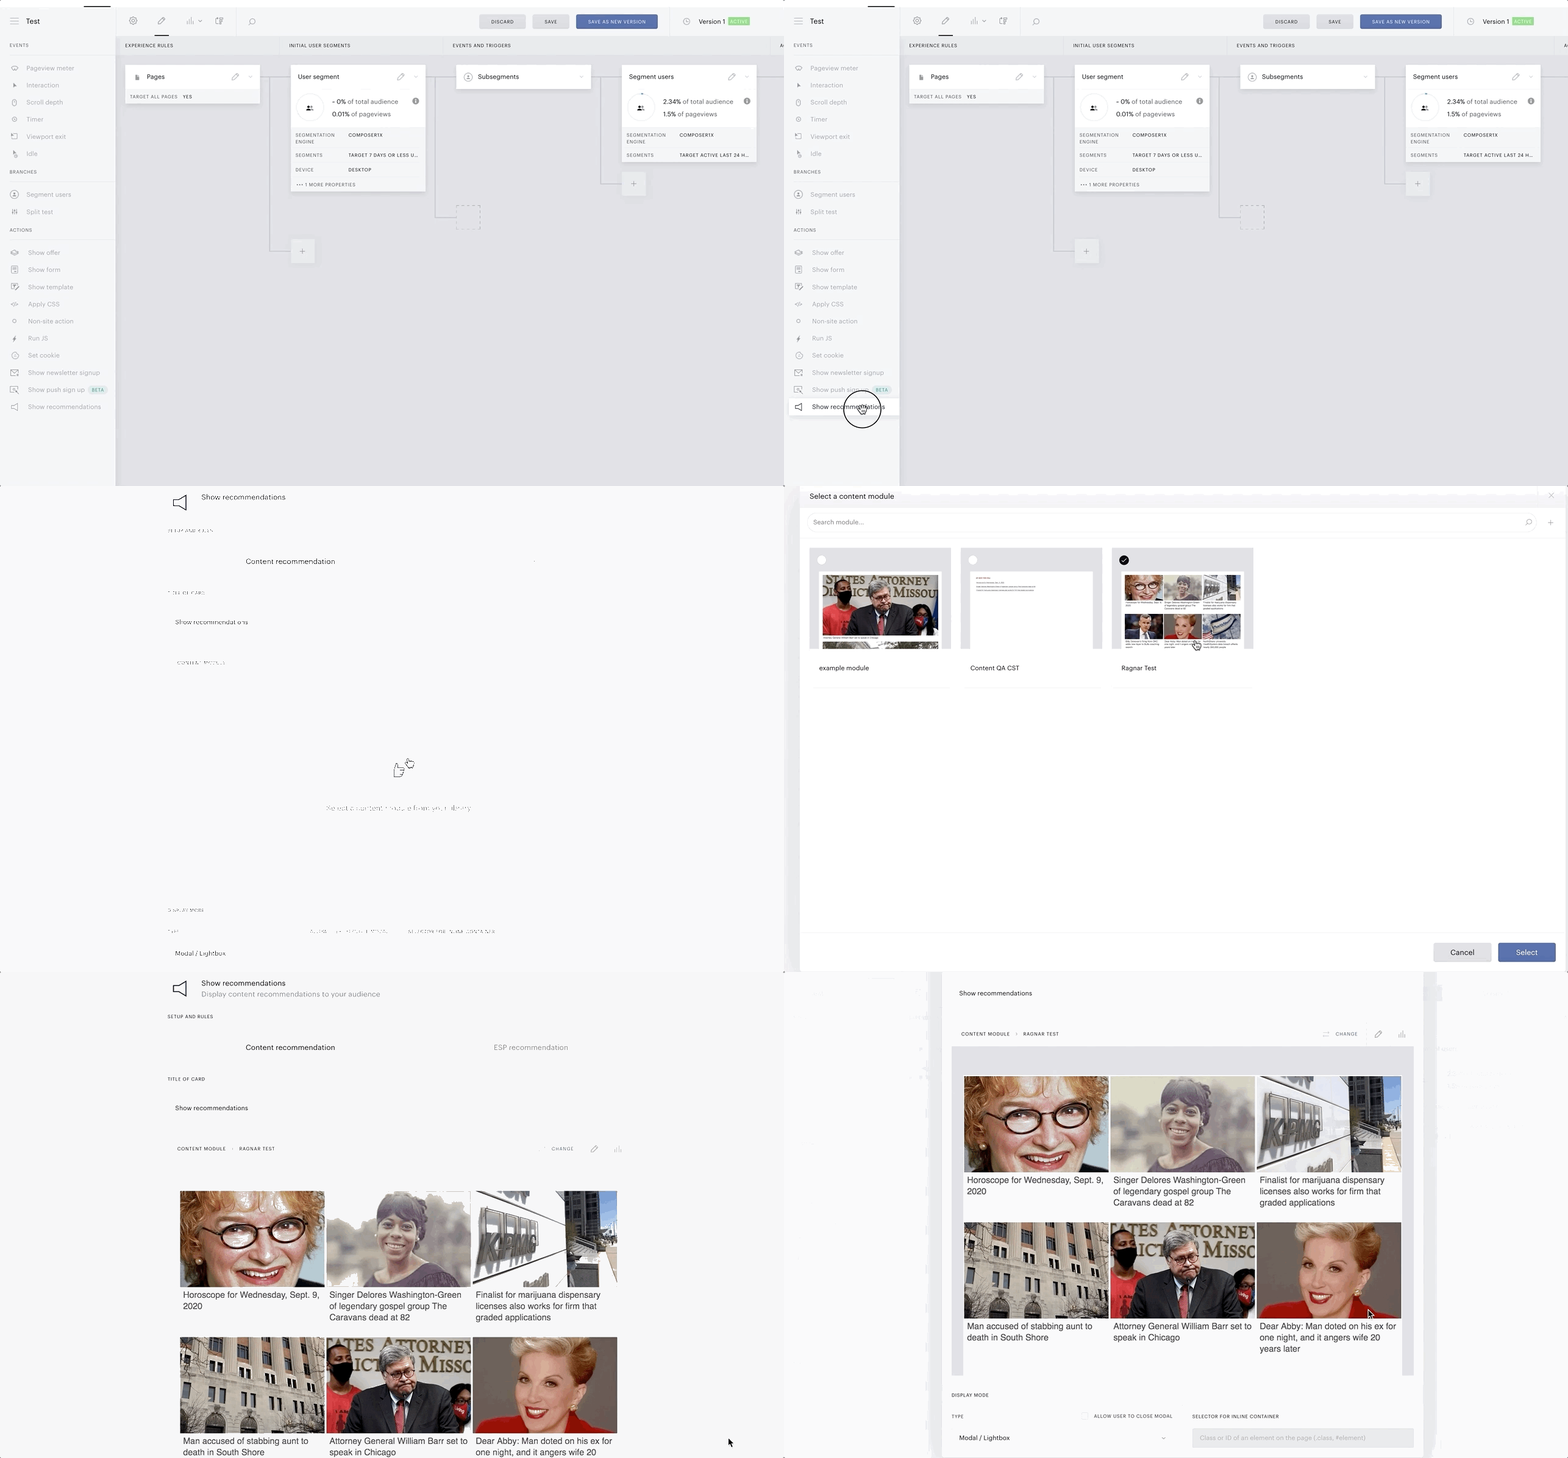
Onsite Article Recommendations are powered by Piano Content and are fully integrated into the Composer 1x experience. Piano Content is an on-site content recommendation module builder that can be included as part of a Composer Experience using the Show Recommendation action card. On-site recommendation experiences help clients drive engagement by increasing the number of articles a visitor reads and in turn their active time and the variety of articles a visitor is exposed to. Onsite article recommendations are powered in part by the Composer 1X crawler.
To integrate Onsite Article Recommendations with your Composer 1x experiences, you have to build a content module first. After you have a content module created, Composer automatically integrates it within the Show Recommendation action card, and you can simply drag it into your experience like any other action card:
How to include bespoke segments
If you need to include any Bespoke segments, you can manually add those to the connection via the Composer integration connection. Note that you would need to re-create any segments created outside of the C1x structure also under the C1x structure (as they need to be available within the same single_site site group). It is still possible to use segments outside of the Composer 1x structure for other connectivity types.
Frequently Asked Questions
We have created an FAQ that will contain common questions and answers asked by Composer 1x users. Click through to the FAQ.