
Introduction
Uploading 1st- and 3rd-party data usually aims to add user details to the data Piano already collects. This lets you create user segments for targeting. A primary use case is targeted advertising.
1st-party data most often comes from users during registration for a subscription or membership benefits, such as age and gender. 3rd-party data usually comes from vendors that gather information from social networks (for example, a user's profession from LinkedIn or "Interested In" from Facebook) or use probabilistic methods to infer likely age, gender, income, and similar attributes.
To use uploaded user data, Piano must know which Piano users the data describes. Because Piano and the other party use different user IDs, the two ID sets must be aligned. After that, Piano can map the uploaded data to the correct users.
Depending on the customer, uploads can be a one-time action or, more commonly, a recurring task—typically every 24 hours. Alternatively, uploads can occur per user when they access a page or log in. Below we discuss both approaches after covering the ID-syncing step.
Definitions
For simplicity, the term 1st party data or user data refers to both 1st- and 3rd-party user data unless stated otherwise. The ID-sync and upload processes are essentially the same for 1st- and 3rd-party data.
The term external id and the variable name externalId refer to the ID the Piano customer uses in their internal client database (CRM). The cookie-based ID Piano uses to identify the same user is the Piano (Cxense) ID.
Prerequisites
To upload, you need:
-
The site id
-
A user with write access to one of the site group(s) the site belongs to
-
The user's API key
-
The site group's customer prefix
ID syncing
ID syncing aligns Piano browser cookie user IDs with the customer's user IDs. The customer's ID typically serves as the key in their CRM user table. Below we describe the available methods.
Client-side ID syncing
In the figure below, steps 1–3 show the ID syncing operation. Step 4 shows the user data upload, which is the final objective and is discussed in the next section.
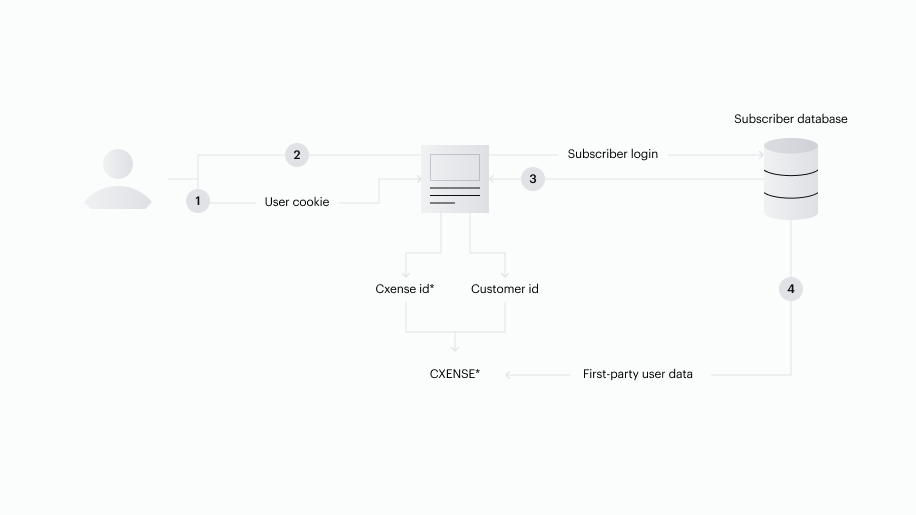
Step 1 above corresponds to line 9 in the extended Piano tracking script below (the extension is lines 4–8). A pixel request is sent with all information gathered about the user and their visit up to that point, including the Piano (Cxense) user ID. Step 2 occurs when the user logs in and reveals their identity in the customer system. That allows us to execute line 5 below, which corresponds to step 3 in the figure where the padlocked chain shows the two IDs linked from that point on.
<script>
    var cX = cX || {}; cX.callQueue = cX.callQueue || [];
    cX.callQueue.push(['setSiteId', '<SITE ID>']);
    cX.callQueue.push(['invoke', function() {
        if (typeof externalId !== "undefined") {
            cX.addExternalId({'id': externalId, 'type': '<CUSTOMER PREFIX>'});
        }
    }]);
    cX.callQueue.push(['sendPageViewEvent']);
</script>
Obtaining external ID
There are three main ways to get the customer's ID for the user visiting a page:
-
It exists as a global variable (possibly under a different name)
-
It is stored in a cookie
-
It is provided as a URL parameter
Obtaining external ID from a cookie
The first case is simple: we can reuse the code above, renaming the variable externalId if needed. For the cookie case, add one extra line to the code as shown on line 5:
<script>
    var cX = cX || {}; cX.callQueue = cX.callQueue || [];
    cX.callQueue.push(['setSiteId', '<SITE ID>']);
    cX.callQueue.push(['invoke', function() {
        var externalId = cX.getCookie("<NAME OF THE COOKIE>");
        if (typeof externalId !== "undefined") {
            cX.addExternalId({'id': externalId, 'type': '<CUSTOMER PREFIX>'});
        }
    }]);
    cX.callQueue.push(['sendPageViewEvent']);
</script>
Obtaining external ID from a URL parameter
One way to sync user ids is to have the user click a link to a landing page from within a newsletter as shown in the graphic below:
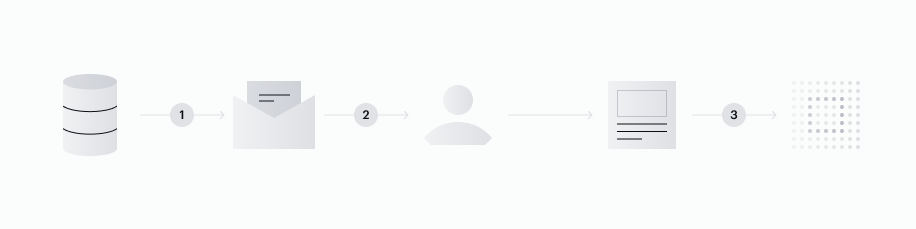
In step 1 the customer provides their newsletter distributor the newsletter content, the recipients' e-mail addresses, and each recipient's ID. In step 2 the distributor sends the newsletter to all registered users. The e-mail includes a link to a landing page extended with a URL parameter holding the user's ID in the customer's system (example: ?nlid=1234). Line 5 of the Piano script above is now changed to extract the external ID from the newsletter link. In step 3 the page-view event fires with both the Piano ID and the customer's ID.
var externalId = cX.parseUrlArgs().nlid;
Delayed pageview event
Sometimes the external id isn’t available until after the page has loaded. This often occurs a few hundred milliseconds after the visit starts, but it can take longer. If we fire the page view event immediately, the external id won’t be included in the data sent to Piano Insight. To avoid this, wrap the page event code in a function and call it when the external id becomes available, as shown here:
<script>
    function sendLatePageViewEvent(externalId) {
        window.cX = window.cX || {}; cX.callQueue = cX.callQueue || [];
        cX.callQueue.push(['invoke', function() {
            cX.setSiteId('<SITE ID>');
            cX.addExternalId({'id': externalId, 'type': '<CUSTOMER PREFIX>'});
            cX.sendPageViewEvent();
        }]);
    }
</script>

<script>
    // This line is called at some later time when the external id is available
    sendLatePageViewEvent(externalId)
<script>
The risk with this approach is delaying the page-view event until the user leaves or closes the page. If that happens, you not only fail to sync the user ID, you also fail to report the page view.
Pageview-independent syncing
So far we piggybacked on the page view event by adding the external id to the uploaded data. This is the simplest way to sync ids because cX.addExternalId() handles the work, requiring no persisted query or JSONP. However, this approach isn't always possible or desirable. For third-party data vendors, a page-view–independent id sync avoids requiring customers and vendors to coordinate their code. Below is an example of page-view–independent id syncing:
cX.callQueue.push(['invoke',function() {
   var persistedQueryId = "<YOUR PERSISTED QUERY ID>";
   var apiUrl = 'https://api.cxense.com/profile/user/external/link/update?callback={{callback}}'
                + '&persisted=' + encodeURIComponent(persistedQueryId)
                + '&json=' + encodeURIComponent(cX.JSON.stringify({ id: externalId, cxid: cX.getUserId() }));
   cX.jsonpRequest(apiUrl, function (data) {
        // Uncomment for debugging:
        //alert(cX.JSON.stringify(data))
   });
}]);
The approach requires a persisted query id that you can either obtain from Piano (to reuse an old one obtained for another use case will not work) or create yourself as described in the Persisted Query Tutorial. The function for which we need to make the persisted query is described at /profile/user/external/link/update.
Server-side ID syncing
In cases where the client side never gets to know the customer's ID for the user, that is, it is not possible to give the variable externalId in the code above the user's id, then the approach shown in the figure below can be used instead:
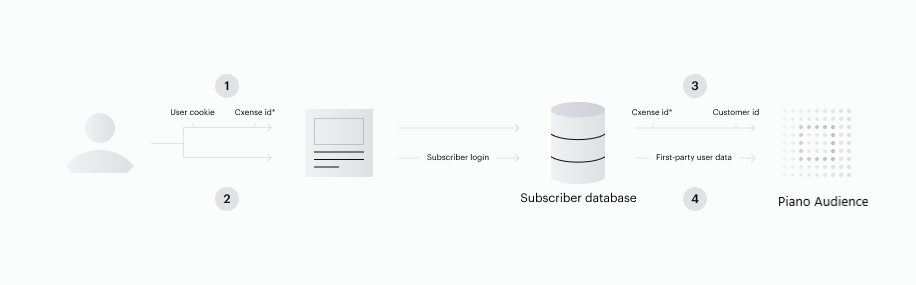
Instead of adding the customer's id (the variable externalId) to the data reported by the Piano tracking script, the Piano user id is now sent to the customer's back end (see step 2 in the figure above). The back end reads the Piano user id from the page's HTTP header as the value of the cookie named "cX_P" (the same id returned by the cx.js function cX.getUserId()).
Once the server has the user's Identity Management, the customer can run the Python 3.x example below to sync the ids for a single user (corresponding to step 3 in the figure above). Line 26 shows how the two ids are mapped.
_username   = "<YOUR PIANO AUDIENCE USER ID>"
_secret     = "<YOUR PIANO AUDIENCE API KEY>"
_prefix     = "<YOUR CUSTOMER PREFIX>"
_cxUserId   = "<THE USER'S CXENSE ID>"
_externalId = "<THE USER'S ID IN YOUR SYSTEM>"

import json, datetime, hmac, hashlib, http.client

def cxApi(path, obj):
    date = datetime.datetime.utcnow().isoformat() + "Z"
    signature = hmac.new(_secret.encode('utf-8'), date.encode('utf-8'), digestmod=hashlib.sha256).hexdigest()
    headers = {"X-cXense-Authentication": "username=%s date=%s hmac-sha256-hex=%s" % (_username, date, signature)}
    connection = http.client.HTTPSConnection("api.cxense.com", 443)
    connection.request("POST", path, json.dumps(obj), headers)
    response = connection.getresponse()
    status = response.status
    responseObj = json.loads(response.read().decode('utf-8'))
    connection.close()
    return status, responseObj

def errorHandling(status, response, message):
    if status != 200:
        raise Exception("%s (http status = %s, error details: '%s')" % (message, status, response['error']))

def syncUserIds(cxUserId, externalId, prefix):
    status, response = cxApi('/profile/user/external/link/update', {"cxid":cxUserId, "id":externalId, "type":prefix})
    errorHandling(status, response, "Failed to sync user")
    return response

syncUserIds(_cxUserId, _externalId, _prefix)
The script above is just an example. For writing your own script using the Piano API, check out the Audience/Insight/Content API tutorial. In particular, check out the batch mode section, as running the script one id at a time is highly inefficient.
The same functionality implemented in the script above can be executed with the command line below using the cx.py tool:
cx.py /profile/user/external/link/update '{"cxid":<CX_USER_ID>, "id":<EXTERNAL_ID>, "type":<PREFIX>}'
Data uploading
Above, we completed one of the two steps required to upload first- or third-party user data: syncing IDs between Piano Insight and the customer's CRM or a third-party database. Note the phrase "one of the two steps"—not "the first of the two steps"—because the operations can run in either order. Only after both operations finish for a user will the uploaded data link to that user in Piano Insight.
The common method is to export the CRM user table as a CSV file and use that file as input to a script that uploads the data. Alternatively, the script can read directly from the database. Because CSV exports are common and make the example more generic, we provide a Python script that reads a CSV file and uploads it to Piano. The sample data to be uploaded looks like this:
|
id |
gender |
age |
|---|---|---|
|
1234 |
male |
22 |
|
5678 |
female |
39 |
And here is a script that will upload the data:
_username     = '<YOUR PIANO AUDIENCE USER NAME>'
_secret       = '<YOUR SECRET API KEY>'
_prefix       = '<YOUR CUSTOMER PREFIX>'
_dataFile     = '<YOUR CSV DATA FILE PATH>'
_delimiter    = '<YOUR DATA FILE DELIMITER>'

import json, datetime, hmac, hashlib, http.client

def cxApi(path, obj):
    date = datetime.datetime.utcnow().isoformat() + "Z"
    signature = hmac.new(_secret.encode('utf-8'), date.encode('utf-8'), digestmod=hashlib.sha256).hexdigest()
    headers = {"X-cXense-Authentication": "username=%s date=%s hmac-sha256-hex=%s" % (_username, date, signature)}
    connection = http.client.HTTPSConnection("api.cxense.com", 443)
    connection.request("POST", path, json.dumps(obj), headers)
    response = connection.getresponse()
    status = response.status
    responseObj = json.loads(response.read().decode('utf-8'))
    connection.close()
    return status, responseObj

def errorHandling(status, response, message):
    if status != 200:
        raise Exception("%s (http status = %s, error details: '%s')" % (message, status, response['error']))

def uploadDataAboutSingleUser(id, type, profile):
    status, response = cxApi('/profile/user/external/update', {"id":id, "type":type, "profile":profile})
    errorHandling(status, response, 'Unable to upload external user data')
    return response

def uploadAllUsersData(dataRows, columnNames):
    for userData in dataRows:
        profile = []
        for i in range(len(columnNames)):
            if columnNames[i] == 'id':
                userId = userData[i]
            else:
                profile.append({"group":_prefix + '-' + columnNames[i], "item":userData[i]})
        print(uploadDataAboutSingleUser(userId, _prefix, profile))

dataRows = [line.strip().split(_delimiter) for line in open(_dataFile, 'rb').read().decode('utf-8').split('\n') if len(line) > 0]
uploadAllUsersData(dataRows[1:], dataRows[0])
The script above is a working example of data uploading. To keep it simple, it makes several assumptions (requires an 'id' column), performs no error handling, and uploads users one by one (inefficient). For guidance on writing your own script with the Piano API, see the Audience/Insight/Content API Tutorial.
Data formats
Our sample data above was very simple. Below you see what characters one is allowed to use for the various entities.
|
Entity |
Legal Character Set |
Legal Characters Reg Ex |
Max Length |
|---|---|---|---|
|
column names |
Digits 0 to 9, lower case characters a to z and a hyphen "-" |
[0-9a-z\-] |
26* |
|
data values |
Digits 0 to 9, any character that is categorized as a letter and the special characters "@", "&", "*","(", ")", "{" and "}" |
[\p{L}0-9@&*()\{\}] |
40 |
|
external id |
Digits 0 to 9, characters A to Z, a to z, space and the special characters "=", "@", "+", "-", "_" and "." |
[0-9a-z\-=@+\-,_\.] |
64 |
* The max length is 30 instead of 26 if one in the count includes the prefix and the dash that has to precede the column name when uploading the data. Example: "xyz-gender".
Reserved key-value pairs
As long as one sticks to the data format above, one can upload any key-value pair one can imagine with the following two exceptions. Piano has reserved these two key names for which only a specific set of values are permitted.
|
Key |
Legal Values |
|---|---|
|
|
Referring to birth year, must be a number between 1850 and the next year (current calendar year + 1) |
|
|
female, male, unknown |
One should strive to use these instead of one's own key-value pairs for gender and birth year since the ones listed above are supported by built-in Piano Insight GUI functionality.
Additionally, the following keys are reserved by Piano and should not be selected for ingestion at all:
-
<prefix>-card-paid-after-exp -
<prefix>-churned -
<prefix>-gift-recipient -
<prefix>-next-billing-date -
<prefix>-registered -
<prefix>-sub-autorenew-off -
<prefix>-sub-card-expiration -
<prefix>-sub-in-grace-period -
<prefix>-sub-ltc -
<prefix>-sub-payment-term -
<prefix>-sub-start-date -
<prefix>-subscriber -
<prefix>-trial-free -
<prefix>-trial-paid
Key-list-of-values pairs
In our example above, we only dealt with single values for each key as shown here:
profile = [{"group":"xyz-age", "item":"22"},{"group":"xyz-gender", "item":"male"}]
However, sometimes a key can have several values, as shown in the next example where the same user now has a language key with values indicating that he knows both English and Spanish:
profile = [{"group":"xyz-age", "item":"22"},{"group":"xyz-gender", "item":"male"},{"group":"xyz-language", "item":"english"}, {"group":"xyz-language", "item":"spanish"}]
Hence, it is perfectly fine to add many values for the same key. They will not overwrite each other.
Maximum number of profile items
It is not possible to upload more than 40 objects/items per profile. By items, we are not referring to keys, but to unique key-value pairs. Hence, in the previous example above where the key xyz-language appeared twice, the total number of items was four (one 'xyz-age', one 'xyz-gender' and two 'xyz-language'). It is, however, possible to exceed the 40 items limitation and go all the way up to 100 items. However, in that case one has to contact one's account manager and request a feature named prefix100.
Interweaved approach
So far we have treated ID syncing and data uploading as separate operations. We sync IDs whenever the user visits a page (if logged in) and upload data independently on a schedule (for example, every 24 hours). We can, however, perform both at once. The sample code below uploads the user's gender and age in the same block that sends page-view data:
<script>
	var prefix                = "<CUSTOMER PREFIX>";
    var profile               = {<SAME DATA AS IN PYTHON EXAMPLE ABOVE>};
    var persistedQueryId      = "<YOUR PERSISTED QUERY ID>";
	var throttleCookie        = "<NAME OF THE UPLOAD RATE CONTROL COOKIE>";
	var minTimeBetweenUpdates = <MINIMUM NUMBER OF MINUTES BETWEEN UPDATES>;

	var cX = cX || {}; cX.callQueue = cX.callQueue || [];
	cX.callQueue.push(['setSiteId', '<SITE ID>']);
	cX.callQueue.push(['invoke', function() {
		if (typeof externalId !== "undefined") {
			cX.addExternalId({'id': externalId, 'type': prefix});
    	}
    }]);
	cX.callQueue.push(['sendPageViewEvent']);

	cX.callQueue.push(['invoke', function() {
		if (!cX.getCookie(throttleCookie)) {
    		var apiUrl = 'https://api.cxense.com/profile/user/external/update?callback={{callback}}'
            		+ '&persisted=' + encodeURIComponent(persistedQueryId)
            		+ '&json=' + encodeURIComponent(cX.JSON.stringify({"id":externalId, "type":prefix, "profile":profile});
    		cX.jsonpRequest(apiUrl, function(data) {
        		// Uncomment for debugging:
        		//alert(cX.JSON.stringify(data))
    		});
			cX.setCookie(throttleCookie, "throttle", minTimeBetweenUpdates / (24 * 60))
		}
	}])
</script>
The motivation for the throttle cookie is to prevent the Piano server from getting overloaded with user data uploads. User data such as, for instance, age and gender typically don't change that often, so unless one is uploading more fluctuating types of data, then one can let hours, days, or even weeks pass by between each upload. If the Piano server receives too much traffic from a particular site, it will be blacklisted in an effort of self-protection. It is thus very much in the customer's interest to avoid overloading.
The code above assumes that you have access to the user data and can construct the same user profile variable as in the Python program above (where the external ID was 1234):
{'type': 'xyz', 'id': '1234', 'profile': [{'item': 'male', 'group': 'xyz-gender'}, {'item': '22', 'group': 'xyz-age'}]}
The code also requires you to create a persisted query for the API function /profile/user/external/update.
Verification and troubleshooting
How do we verify that everything works, and if it doesn't, where do we start looking? Below is a three-point checklist to follow:
-
Was the final objective achieved?
-
Did the ID sync occur?
-
Did the data upload occur?
First check whether the final objective, data upload, succeeded. If it did, no further troubleshooting is needed. If not, determine whether the failure was in ID syncing or in the data upload.
Was the final objective achieved?
In most cases, the final objective of uploaded user data is to enable more granular segments by letting customers filter on characteristics such as gender, age, and profession. Below we show how to verify that the data uploaded earlier in this tutorial succeeded: re-find the uploaded values in the segment creation wizard drop-downs, as shown below:
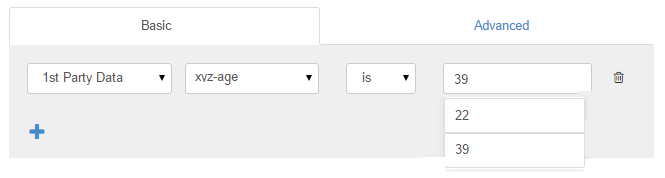
Before a successful upload of any 1st- or 3rd-party data, the leftmost drop-down will not show the 1st Party Data option (note: 3rd-party data also appears under 1st Party Data). Likewise, before any age data is uploaded, the second drop-down will not include the <prefix>-age value; and before the specific age values 22 and 39 are uploaded, they will not appear in the rightmost drop-down.
If your data does not appear, it may still have uploaded successfully. It can take time from the initial upload until values start appearing in the segment creation drop-downs because the system must index the 1st/3rd-party data the first time.
Did ID syncing take place?
If the final objective failed, we need to identify what went wrong. Could id syncing have failed?
If id syncing succeeded, you should be able to retrieve the user data collected by Piano Insight and the data uploaded by the customer using the customer's external id, as shown below. This assumes the test user actually visited the site so their id was synced (for example, if syncing occurs only on the login page, the user must have logged in before running the command below).
$ python cx.py /profile/user '{"type":"xyz", "id":"1234"}'
{
  "id": "1234",
  "type": "xyz",
  "profile": [
    {
      "item": "25",
      "groups": [
        {
          "group": "xyz-age",
          "weight": 2.0,
          "count": 1
        }
      ]
    },
    {
      "item": "male",
      "groups": [
        {
          "group": "xyz-gender",
          "weight": 2.0,
          "count": 1
        }
      ]
    },
    {
      "item": "test.com",
      "groups": [
        {
          "group": "cxe-site",
          "weight": 1.0,
          "count": 1
        }
      ]
    },
    {
      "item": "windows",
      "groups": [
        {
          "group": "device-os",
          "weight": 1.0,
          "count": 1
        }
      ]
    }
  ]
}
The command output shows a mix of uploaded data (age and gender) and Piano Insight data (the user's operating system and the URLs the user visited).
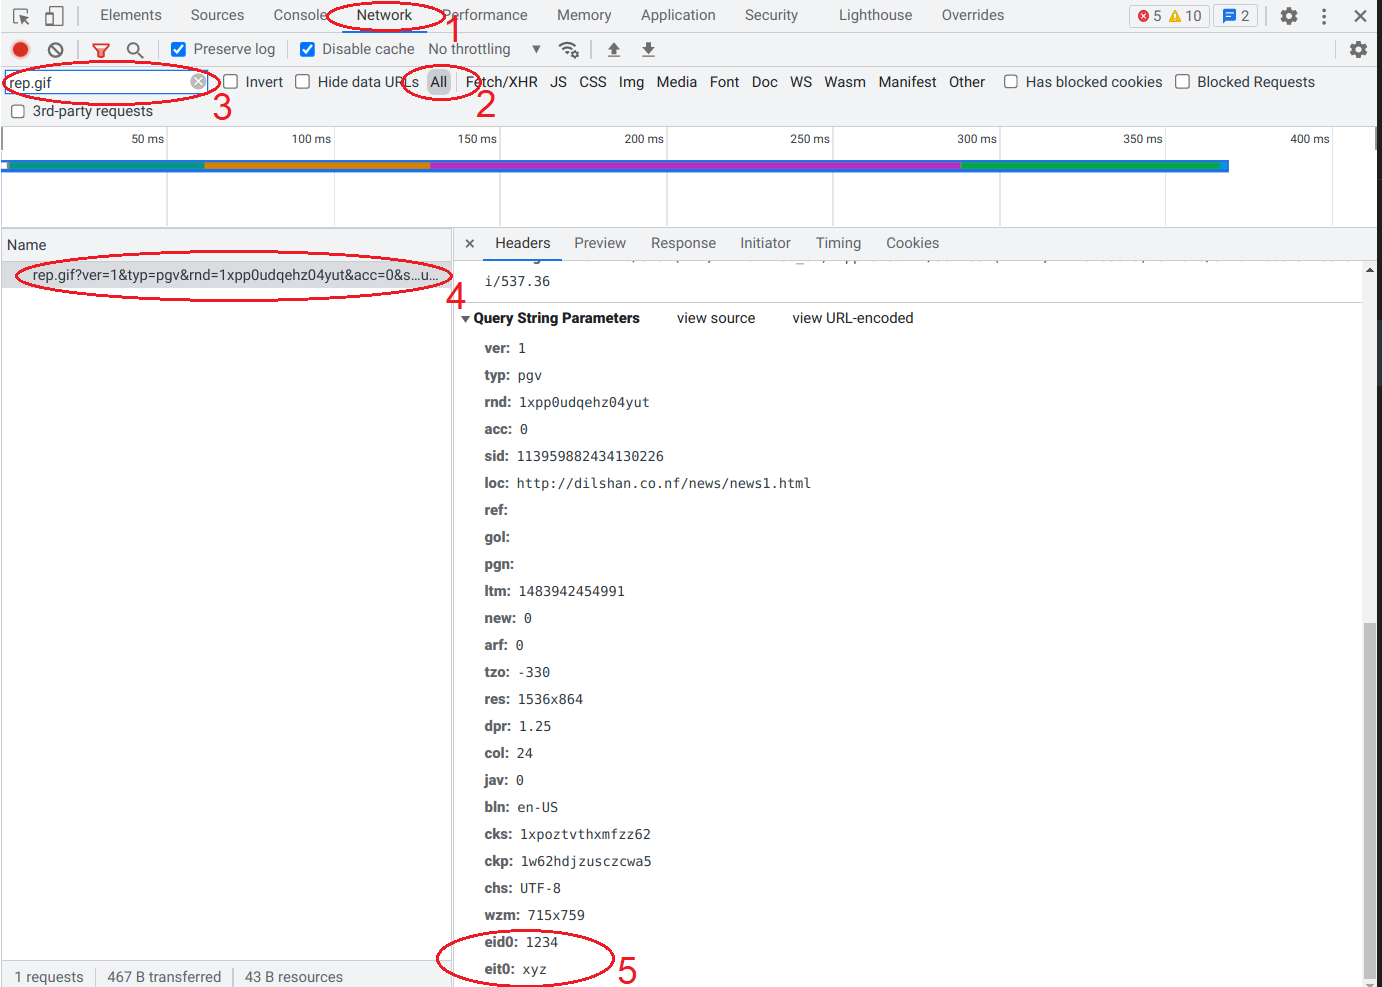
If the command does not produce the expected output, inspect the web page. All page-view information — including the external id added here — is passed as URL query parameters in a pixel request sent to Piano Insight. Check the pixel request in the browser debugger to confirm whether the external id is sent. The external id parameter is eid0; see the overview of pixel request parameters. The customer prefix is sent as the parameter eit0. The screenshot below shows how to verify this using Chrome's debugger:
Did data uploading take place?
The other thing that can have gone wrong if the data is not appearing in the Piano GUI is the data uploading itself. To check on that, we can take a random id from the data we uploaded and see if Piano can account for the data. Below we see how we can use the Piano cx.py tool for that:
$ python cx.py /profile/user/external/read '{"type":"xyz", "id":"1234"}'
{
  "data": [
    {
      "id": "1234",
      "type": "xyz",
      "profile": [
        {
          "group": "xyz-gender",
          "item": "male"
        },
        {
          "group": "xyz-age",
          "item": "22"
        }
      ]
    }
  ]
}
And if you run the same command after removing the user id, then you end up with the full list of users. Due to the amount of data, it is better to redirect the output to a file as done below:
python cx.py /profile/user/external/read '{"type":"xyz"}' > users.json
If Piano does not have the data, then we need to go back to our uploading program and find out what we did wrong there. In our uploading script above, we throw errors when something fails, and the error message can be informative in regard to the source of the problem.
Data quality and usefulness
In most cases, uploaded user data adds granularity to Piano Audience segments. Where you once could create the segment "users in London," you can now create "female users over 40 from London who are engineers or doctors" if the relevant data is uploaded.
However, having data does not mean it is suitable for upload: it may be useful, useless, or require modification.
Suitable data
The table below shows typical good data that will serve the purpose of creating meaningful user segments.
|
Suitable data |
Suitable data samples |
|---|---|
|
gender |
female |
|
age |
46 |
|
postal code |
8310 |
Data to be modified
The next category is inappropriate data represented by the left column below, which, with minimal effort, can (programmatically) be converted into good data as shown in the right column:
|
Inappropriate data |
Suitable data |
|---|---|
|
company size: 648 |
company size: midsize (501-1000) |
|
address: 42 main street, ap. 4D, Framingham, NC |
city: Framingham, state:NC |
|
education: Framingham High |
education: high school |
For data to be useful to the person creating an audience segment, the data must fall into a limited number of categories. Above, we have either converted or extracted data so that it falls into a limited number of options.
Inappropriate data
This last category holds data that is useless as audience segment data because it, in one way or another, will create single-user audience segments.
|
Inappropriate data |
Inappropriate data sample |
|---|---|
|
Interests |
I like horse reading* and being with friends |
|
mobile |
74099784 |
|
|
|
|
credit card |
2575 2432 4435 9952 |
|
first name |
Chris |
*The misspelling is done on purpose
The first field, interests, contains free-text (unique values) and a misspelling (few others, if any, will spell "horse riding" the same way). The next three fields (mobile, email, credit card) are identifiers meant for a single person; the credit card field may also violate laws in many jurisdictions. The last field (the user's first name) can match multiple people — what useful purpose does it serve? Targeted ads selling mugs with the name Chris?
Having Piano do data uploading
The above shows that customers can reasonably handle their own first-party data uploads, which is Piano's usual expectation. If a customer cannot implement uploads, they can pay Piano to do it. Piano offers a configurable tool, MAD (Moves Any Data), to upload or download various data types to and from Piano, not only user data but also traffic data, user segments, and searchable documents. Customers upload a CSV file with user data to FTP, SFTP, or Amazon S3 and provide Piano the details so MAD can download the data on a regular basis, typically every 24 hours.
Data source and schedule
Below we see the part of the MAD configuration that relates to the form where MAD is to download the data and according to what schedule. This is information the customer has to provide to Piano.
# Ftp/sftp
ftpServer           = '<FTP/SFTP IP OR FQDN>'
ftpDir              = '<FTP/SFTP DIR PATH>'
ftpUser             = '<FTP/SFTP USER>'
ftpPwd              = '<FTP/SFTP PASSWORD>'
ftpPort             = '<PORT NUMBER, DEFAULT: 22>'
ftpSecure           = '<True IF SFTP, False IF FTP, DEFAULT: True>'
ftpDeleteRemoteFile = '<True/False, DEFAULT: True>'

# Amazon S3
s3Bucket            = '<S3 BUCKET NAME>'
s3AccessKey         = '<S3 ACCESS KEY>'
s3SecretAccessKey   = '<S3 SECRET ACCESS KEY>'
s3Folder            = '<S3 KEY PREFIX, DEFAULT: None>'
s3Key               = '<S3 BUCKET KEY NAME, None (ALL KEYS)>'
s3DeleteRemoteFile  = '<True/False, DEFAULT: True>'

# Scheduling
execTimes           = ['HH:MM']
Data formats
So far, MAD supports only CSV. CSV can take many forms; below we describe the variants MAD can handle.
For clarity, we use spreadsheet screenshots to demonstrate the formats, for example:
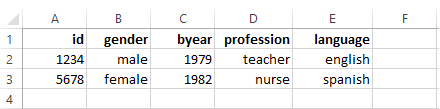
However, the data is a delimiter-separated line of text. So the spreadsheet content above looks like this (here using a semicolon):
id;gender;byear;profession;language
1234;male;1979;teacher;english
5678;female;1982;nurse;spanish
MAD is highly configurable and supports various CSV data formats. In the following, we will cover some of the options a customer has.
Fixed vs. free columns
MAD can be configured with a fixed column format or with a free column format.
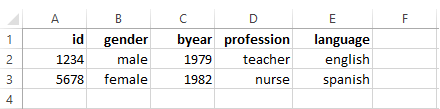
In case of fixed columns, a given column has to have the same data across all files. No column can be added or removed without MAD being reconfigured. In the example above, the five columns shown must always be present and in the same order (even though the cells may be empty). When using a fixed columns format, there is no need for a column heading line in the file. Hence, line 1 above can stay or be removed. The column headings will be "hard-coded" as a list (array) in the MAD configuration file as shown here:
inputKeys= [id', 'gender', 'byear', 'profession', 'language']
In the case of free columns, the position of the columns can be changed from file to file, and columns can be dropped and added without any need for reconfiguration. The column heading line is mandatory. Hence, line 1 in the table above must always be present, as it is this line MAD uses for mapping attribute names to attribute values. The free columns modus is set by the following MAD configuration:
inputKeys= 'firstline'
The column names used in the CSV data file do not need to be the attribute names that end up being displayed in Piano Audience. By providing Piano with the mappings, the column names in the CSV input file will be replaced before uploading. Below we see an example of an input file followed by the MAD mapping configuration.
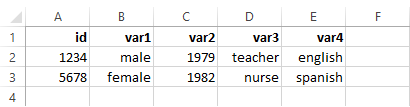
inputKeys = {'id':'id', 'var1':'gender', 'var1':'byear', 'var1':'profession', 'var1':'language'}
The input data and the mapping table will together create the very same end result as the input data in the previous example above.
Internal keys
MAD can also be configured to use a column-independent format in which each data cell holds both the key and the value.

If the first column does not have an internal key, MAD will interpret the value to be the user ID (one can also explicitly use id=1234 in the first or any other column). Below we see how to configure this modus.
inputKeys = 'internal'
internalDelimiter = '='
Again, the end result will be the very same as in the two other examples above.
Multi-value columns
Sometimes one has to deal with types of data for which a column may hold more than one value. The users in the example above are only registered with one language, but many people master two or more languages. How can such data be uploaded?
For fixed or free column formats, add extra rows with the additional data. Each row must use the same user id as the original, and all rows with the same id must be grouped; otherwise only the final row(s) for that user id will be uploaded.
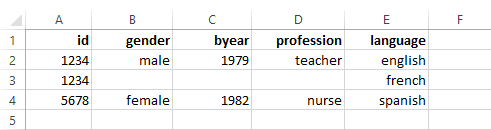
mergerColumn = 'id'
Another alternative is to use an internal cell delimiter as shown here:
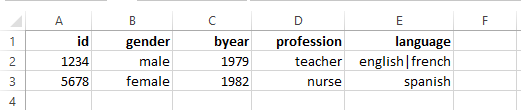
listSeperator = '|'
In the case of internal keys, it is just a matter of adding an extra column with the additional data as shown below. No additional configuration is required.

The formats shown here are the most common ones. MAD also supports other less commonly used ones.