See also:
Table of contents:
Introduction
There are several Insight & Audience APIs. At the bottom of the stack is the HTTP API, which serves as the transport. It provides generic functionality to send a function name (URL path) and its parameters to Piano Insight. Above the HTTP API sits the JavaScript API, which uses JSONP to send a function name (path) and parameters (request object) to Cxense Insight via the same transport. Besides this pass-through capability, the JavaScript API also provides its own functions (see section JavaScript API Functions below). The Piano Insight API Specification above lists and describes the functions and parameters that either transport layer can carry. For native mobile apps that do not render or rely on HTML for display, we provide a Mobile SDK (Android and iOS).
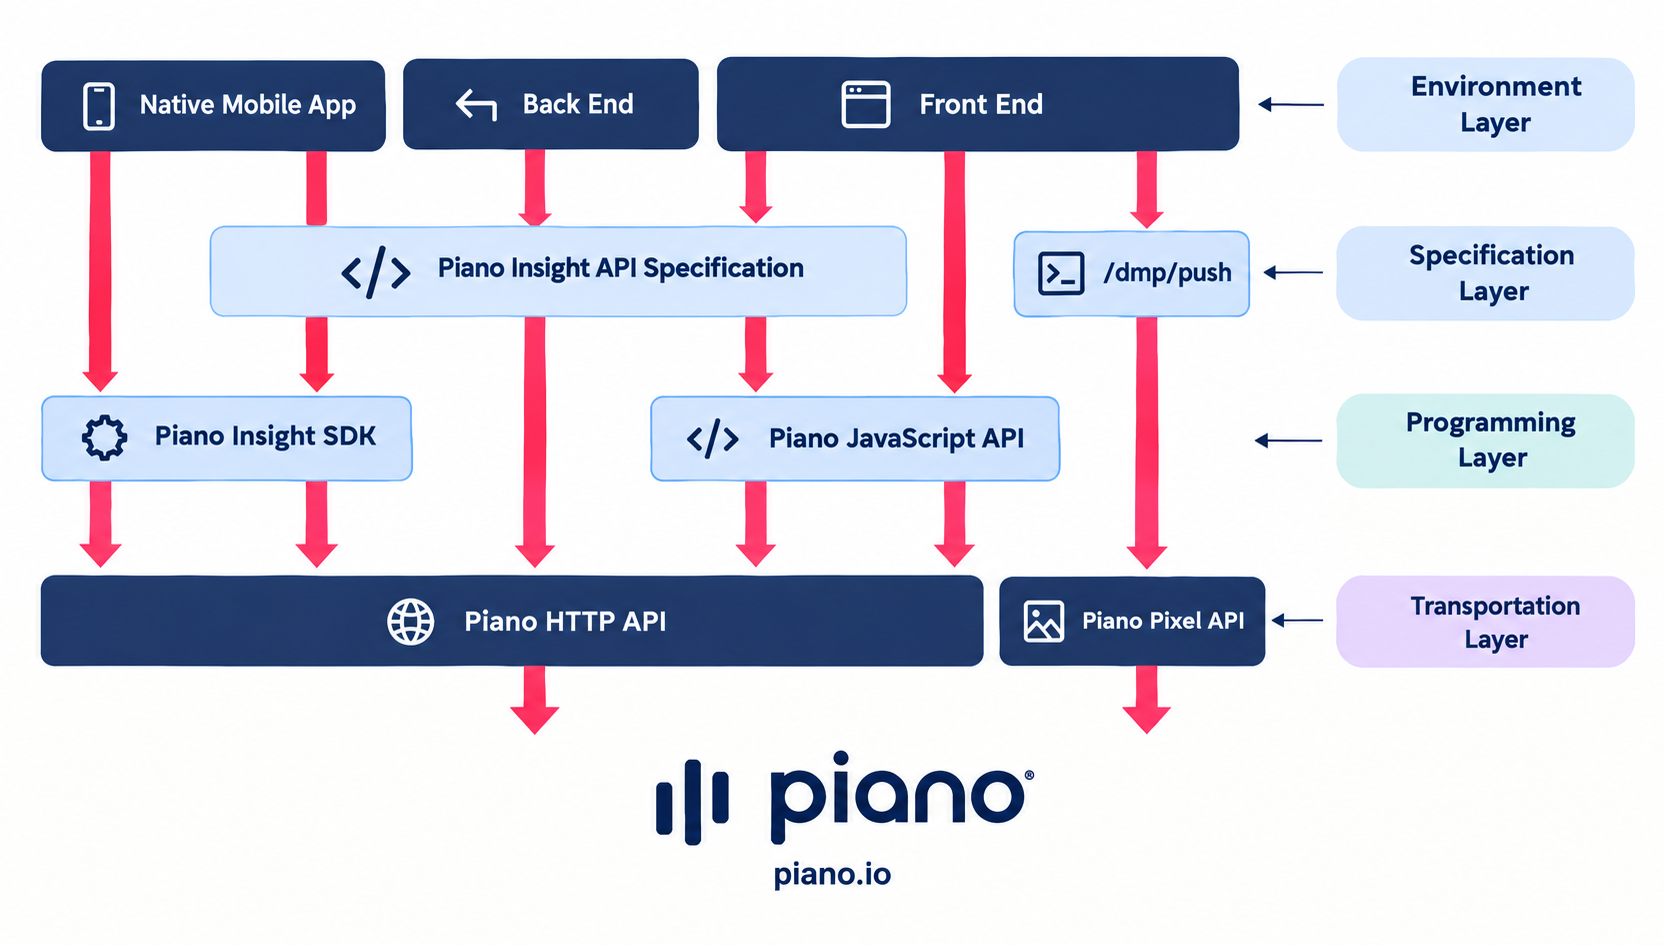
So far we described the figure's left side. On the right, a part of the Piano Insight API uses a special transport: the /dmp/push function can be sent as a pixel request, a variant of the HTTP API.
This tutorial starts by running API calls via the GUI, then using the Piano command-line tool cx.py, and finally writing our own code. Web page examples use JavaScript; backend examples use Python 3.x.
The "Hello World!" API example
Begin with the Hello World! version of the Piano Insight API. In the GUI you can see a site group named Hello World!. In the next examples, we'll retrieve that site group name as part of the site group information.
Running API Functions via the GUI
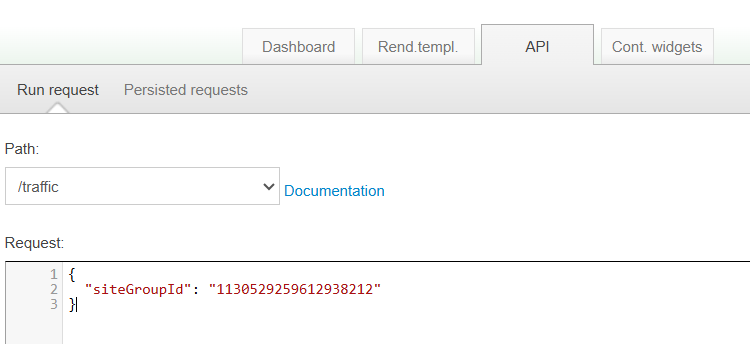
To get site group information, run the /site/group function. The easiest way is to run it from the GUI as shown below. For any site group you can read, you can retrieve its information if you know the site group id.
Running API Functions using the cx.py Tool
Piano has prepared a Python based command line tool that one can download and use following the instructions given in Installing the cx.py Tool, The command line syntax is a bit different from OS to OS. Below we see the unIx/Mac version on the first line and the Windows version on the second line of the same function as we ran via the GUI above.
|
Running API Functions from within a Python 3.x Script
In both of the two cases above where we ran the /site/group function, either via the GUI or using the cx.py tool from the command line, we did not have to deal with authentication directly. That was already taken care of when we logged into the portal or by storing our credentials in the file .cxrc in our home directory. When we write our own script however, then we need to deal with authentication directly.
Below we see the Python 3.x code for retrieving the same site group (id 1130529259612938212) as in the two previous examples:
|
We make the following observations:
-
Lines 8 through 10 are spent on constructing the HMAC-based Piano-specific authentication HTTP headers field X-cXense-Authentication:
headers = {"X-cXense-Authentication": "username=<username> date=<date> hmac-sha256-<encoding>=<signature>"}The time used, both standalone in line 9 and as part of the signature in line 10, must be in sync with the time used by the Piano server. The non-authenticated API function /public/date can be used to obtain the time used by the Piano server if you are unable to obtain the correct time using your computer clock.
-
The format of the data both sent (line 12) and received (line 15) is JSON.
-
Two result variables are being returned (line 17): an HTTP status code (variable status on line 14), and the resulting data (variable response on line 13).
-
Any status code other than 200 is an error (line 20)
If we want to pick up the credentials from the same .cxrc file that the cx.py tool uses, then we can add this functionality to the script:
|
Other Programming Languages
In the example above, we used Python 3.x. Because the API uses HTTP, you can use almost any programming language. Below are the Hello World! examples in other languages (including Python 2.x). For languages not shown, consult API authentication.
|
|
|
The instructions at How to Test PHP Code Locally show how to test PHP code locally on Windows using XAMPP.
For the PHP function file_get_contents() to avoid errors, set allow-url-fopen to 1 (or "On") in php.ini. That value is the default, but some hosts change it. In XAMPP on Windows, the file is at xampp\php\php.ini.
Batch Mode
For many operations, calling the API for one entity at a time is inefficient. You can send batches of up to 100 request objects. Note how the single dictionary from the previous examples becomes an array (called a list in Python) of the same type of dictionaries.
|
Assuming that one has access to the first site group and knowing that there is no site group id with only the digit 9 in it, we end up with the response shown below. Notice that unlike when we sent a single request object and was returned a single dictionary, this time around we are returned an array of dictionaries.
|
Below we see the Python version of the batch approach (only what is different from the non-batch approach is included). Notice how we had to change the error handling in order to be able to handle both individual results as well as a batch of them.
|
Error Handling and Retries
So far we either aborted because of an error or displayed the result. For some tasks that is enough. In many cases, though, we must handle errors gracefully and continue. That may include retrying depending on the error. Below is code that, on failure, retries less frequently until it gives up after a maximum number of tries.
|
Notice how the code above handles three error types: errors unrelated to Piano or our script (typical connection issues like the socket.gaierror shown below), Piano server errors (for example, HTTP 503 Service Unavailable), and usage errors (for example, referring to a site group id in our script that does not exist).
To test the error handling and retry logic, disconnect the computer running the script (unplug the cable or turn off wireless). Below is the output. Notice how the retries become less frequent with each attempt:
|
Using the API from within a Web Page
There are two ways to access Piano Insight & Audience API functionality from a web page. The preferred method is the Piano JavaScript API provided via cx.js (see the more readable version at cx_plain.js). If JavaScript use is restricted, the Piano HTTP API is a good fallback. The left side of the figure below shows the JavaScript API layered on the HTTP API; the right side shows direct use of the HTTP API.
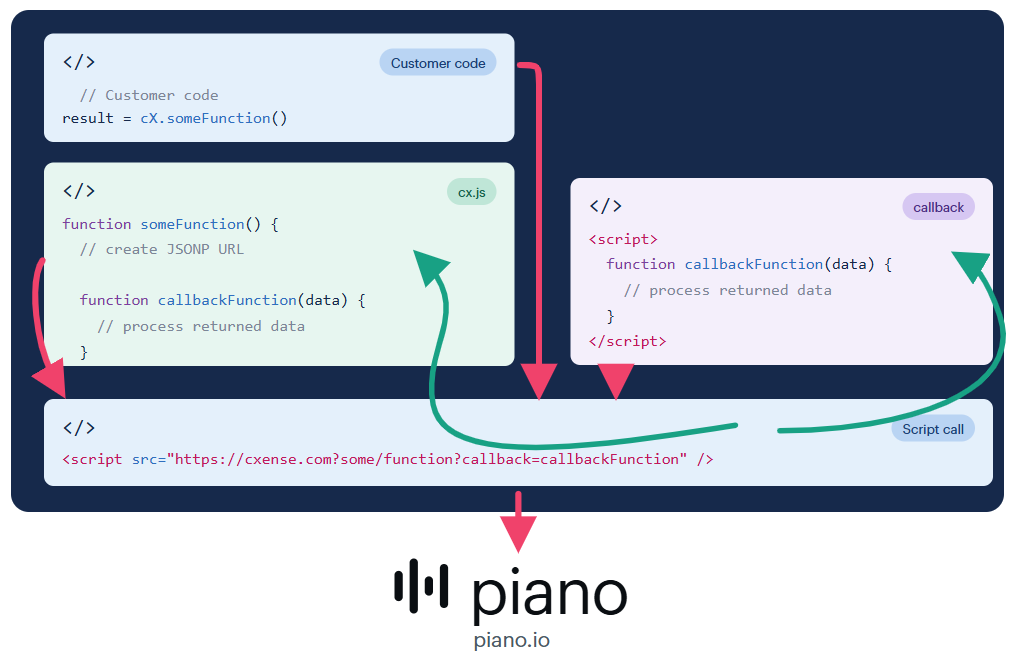
The principle is the same on both sides. Create a URL whose path contains the function name (for example, /some/function), then add a query string with the function parameters and the callback parameter (callback=callbackFunction). The callback name is the function that JSONP will call with the returned result as its single input parameter.
Using the JavaScript API
The challenge when calling the Insight API from a web page is authentication: we cannot embed our username and secret API key in JavaScript where others can see and misuse them. To protect credentials, we use a persisted query. A persisted query is an API call stored in Piano Insight and invoked later from a web page using a key. For details, see the Persisted Query Tutorial.
Below is an example of a persisted query for the API function call site/group {"siteGroupId": "1130529259612938212"}:

Below is JavaScript that uses the persisted query. The JavaScript API function jsonpRequest() takes the API URL as its first parameter and a callback to process the Piano Insight response as its second. The returned data is available in the callback's input parameter data.
|
As shown when you open the HTML page and in the screenshot below, the output matches what appeared in the GUI in the first example at the start of this tutorial.
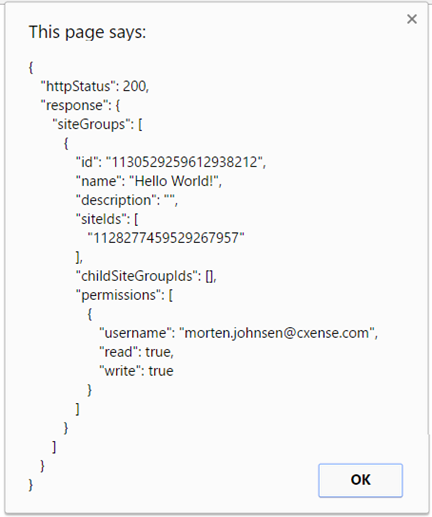
The code above omits the site group id because the persisted query already includes it. Sometimes, though, we need to change a function parameter from the web page, for example, setting the site id after a user enters it in an input box or selects it from a drop-down. The next example shows the id being set on the web page:
|
However, when opening the page, we receive the error message below rather than site group information:
|
To fix this, we have to go back to the persistent query wizard and explicitly allow the parameter to be set from the web page as shown below:
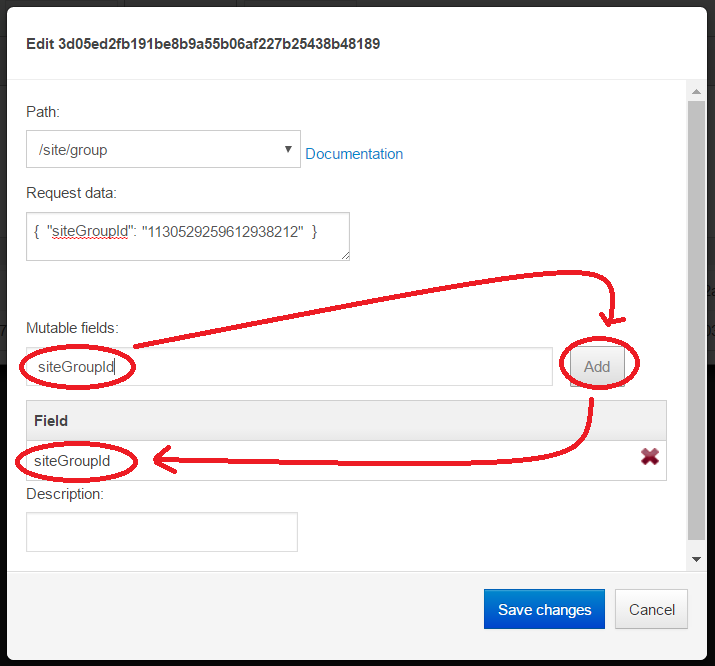
After this the web page is not only going to show the same result as before, we are now also free to change the site group id in the code to that of any site group that we have access to and the information returned will be for that site group instead.
Using the HTTP API
Instead of using the HTTP API indirectly via the JavaScript API, we can instead use the HTTP API directly. For instance, using the network traffic option of any browser's built-in debugger, we can look up the JSONP GET request from the previous example. If we do so, we will find something like this:
|
For improved readability, let's reverse the URL encoding:
|
Now we more clearly see the components of the URL used to communicate with the Piano Insight server:
|
Component/Parameter |
Value |
|---|---|
|
server |
|
|
path |
site/group |
|
callback |
cXJsonpCBixa75cstfh59sdwv |
|
persisted |
3d05ed2fb191be8b9a55b06af227b25438b48189 |
|
JSON request object |
{"siteGroupId":"1130529259612938212"} |
The callback function name clearly indicates it is dynamically created as cXJsonp + some random string, so the next use of the JavaScript API will have a different callback name. If we implement it ourselves, we can set a fixed name, for example myCallbackFunction.
|
Functionality-wise, the code above will produce the same output as the previous example (and all other examples in this tutorial up to this point).
Using the Pixel API
Above we learned how to bypass restrictions on the JavaScript API by using the Piano HTTP API directly. However, Piano Insight blocks access to some features via the HTTP API; one of them is Audience performance event tracking. For that, Piano provides a JavaScript-free alternative: the Pixel API.
|
Above we see the logo acting as a placeholder for a real ad. The pixel request reports that the ad was seen (type=impression) in a specific context (origin=dha-pixelDemo). The dha part is the customer prefix. The persisted query differs from the one used in the previous /site/group example. This query enables the /dmp/push function, the only function the pixel API supports.

JavaScript API Functions
So far, except for calling the /dmp/push function via the Pixel API in the last example, all examples, JavaScript or not, use the /site/group API function. Because that function has no dedicated JavaScript wrapper, we used the generic JavaScript API function cX.jsonpRequest() to call it. Most functions listed in the Piano Insight API must be executed this way. A few exceptions and additional features not in the Piano Insight API have dedicated JavaScript functions. The table below lists some of them; click a function name for details or sample code.
|
Function |
Description |
|---|---|
|
Used with a single-page web application to create the effect of a new page view. |
|
|
Mandatory to use before sendPageViewEvent(). Decides for which site id the page view will be registered. |
|
|
Sends a pixel request to Piano Insight with all the user information that has been obtained up to that point about the current visitor. |
|
|
getUserId(createIfMissing) |
Used to obtain the Piano cookie-based user id for the current visitor to the web page. Example: alert(cX.getUserId()) |
|
addExternalId(params) |
Used to sync the current visitor's Piano Insight user id with the id used by the customer or some third party. |
|
setCustomParameters(parameters, prefix) |
Adds additional custom parameters to the page view data |
|
invoke(func) |
Mainly used to call synchronous code asynchronously |
|
jsonpRequest() |
Generic function used to pass in any Piano Insight API function and its parameters. |
|
sendEvent(type, customParameters, providedArgs) |
Used to send Piano Insight performance events/user engagement data |
|
insertWidget(requestObject) |
Used for deploying a Piano Content recommendation widget on a web page |
|
getUserSegmentIds(requestObject) |
Used to obtain the list of all Piano Audience segments that a user is a member of |
Another good resource for reading up on what and how in regard to the JavaScript API is Event data.
Synchronous vs. Asynchronous use of the JavaScript API
The cx.js file can be loaded in a synchronous and an asynchronous way. Let's first load it synchronously.
|
Notice how we first load the cx.js file before making use of any of the functions within that file.
Contrast this with the asynchronous approach: it doesn't matter whether we call the functions before or after loading cx.js. All calls go into a queue that the library processes only after it fully loads. In the example below, we call the functions before cx.js loads; the code runs only after the library has finished loading.
|
A third alternative is to load cx.js asynchronously, but execute (most of) the code synchronously. This is done via the cx.js invoke functions as shown below:
|
In this case, the call to invoke is asynchronous (the call to invoke is placed in the queue for later processing). However, once the call is finally being processed, all function calls within the invoke function are executed synchronously (are not put in the queue, but acted upon there and then).
Single Page Application
Single Page Applications (SPA) are increasingly common with frameworks like AngularJS, EmberJS, and MeteorJS. For analytics tools such as Piano Insight, SPAs pose a challenge: users remain on the same URL while the app displays different views. Visually users see different pages, but Piano Insight, which uses the URL as the page identifier, records all page views on a single URL. To fix this, you must programmatically overwrite the current location URL and the referrer URL so reported pages match the visual experience.
Below is a sample page showing the required building blocks to achieve this:
|
The main difference between the tracking script examples above and this one is the call to initializePage(), the added location and referrer parameters in sendPageViewEvent(), and that we wrapped everything in singlePageApplicationPageViewEvent()
-
Piano Insight ignores page view events for the same URL during a single visit. initialPage() tells Piano Insight this is a new page view and should not be ignored.
-
Set location to the URL representing the current virtual page. Set referrer to the previous virtual page URL the user came from.
-
We wrap the tracking code in singlePageApplicationPageViewEvent() so developers can report a new page view from the appropriate place in their rendering code
Infinite Scroll Pages
Another increasingly common page type is infinite scroll pages where one scroll straight out of one news story and into the next one. This causes very much the same kind of issues as the single page application pages discussed in the previous section. That is, one has to operate with various logical URLs for one and the same physical URL in order to go from one virtual page to next as one scrolls down the physical page. Below we see an example of such a page with 3 news stories:
|
Notice that this implementation extends the previous SPA example. The main difference is how you detect a new page. In an SPA, you normally detect a user clicking a link or button; for infinite-scroll pages you must detect when the next page loads. In the example above, we use the cx.js library function trackElement() to do this.
Mobile Devices
As shown earlier, Piano tracks user traffic by having the site owner deploy the Piano Insight script on every page to be tracked. For default deployments, only the site id differs between deployments. This approach requires two things:
-
Web pages that can run JavaScript
-
The Piano library file
cx.jswith Piano Insight & Audience functionality
For a regular website, this is not a problem. On mobile devices it can be trickier. For Piano Insight and user tracking, mobile applications fall into three categories:
-
Web apps
-
Native apps
-
Hybrid apps
Web apps deliver content via browsers much like desktop browsers, though they must address layout and sizing (responsiveness) for smaller screens. Both desktop and mobile use HTML, CSS, and JavaScript. Native apps deliver content through an OS-specific app and must retrieve internet content via platform APIs or SDKs.
Web apps' advantage is lower development and maintenance costs. Their drawback is limited access to device resources and inconsistent browser quality across platforms.
Hybrid apps are native apps that can read and execute HTML, CSS, and JavaScript but present content with the app's own UI rather than a browser. Like native apps, hybrids can access device resources and present information in ways web apps cannot.
Mobile SDK
To do user tracking, there are no extra requirements for Web Apps and Hybrid Apps beyond what is already required for desktops and tablets. The Piano script will work out of the box as-is. However, in the case of Native Apps, the Piano script will not work, and for that reason Piano Insight provides a Mobile SDK so that the customer can implement their own user tracking. The same is also true for Hybrid Apps when it comes to more advanced functionality beyond simple user tracking.
The Mobile SDK has support for products listed below and comes with its own set of tutorials.
-
Piano Insight
-
Piano Content
-
Piano Audience
-
Cxense Advertising
-
Cxense Display
Mobile Web Page Accelerators
A web accelerator is a proxy server that reduces website access time. As the regular Piano script cannot be used, Piano provides special user tracking scripts for two mobile web page accelerators, Google's Accelerated Mobile Pages (AMP) and Facebook Instant Articles (FIA).
Deploying the Script using a Tag Manager
The Piano Insight & Audience script works with most tag managers. For tag managers that place tags inside their own functions (for example, Optimizely), use the code below. We changed the first line so cX remains a global variable regardless of where the code runs (note that var cX is replaced by window.cX):
|
Troubleshooting
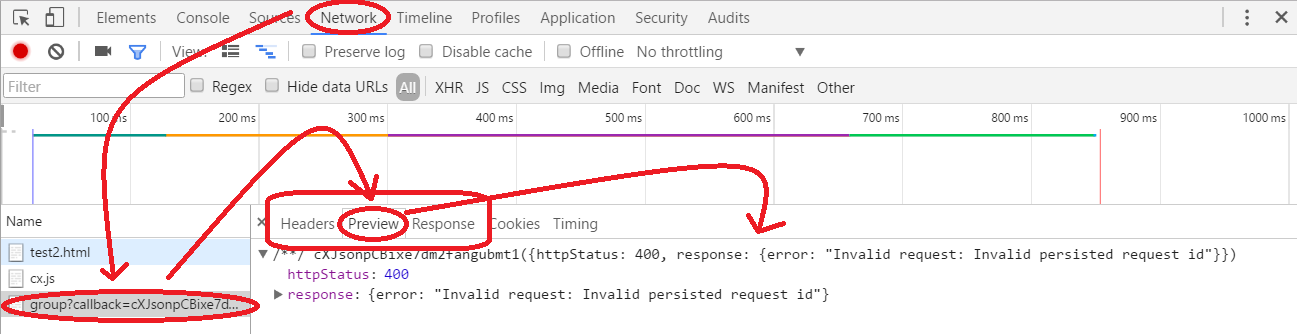
Since all API usage, regardless of what API we are talking about, will end up with information being sent back and forth over the HTTP API (the transport layer as we called it earlier), having a look at that traffic can often give the answer to what went wrong when something fails.
|
Above, we purposely introduced an error into a previously working example. The persisted query was replaced with a sequence of Xs. Because the API is used from a web page, open the browser debugger (F12 in most browsers) to inspect network traffic. The error appears in the traffic data (click the image for a larger view): "Invalid persisted request id".