
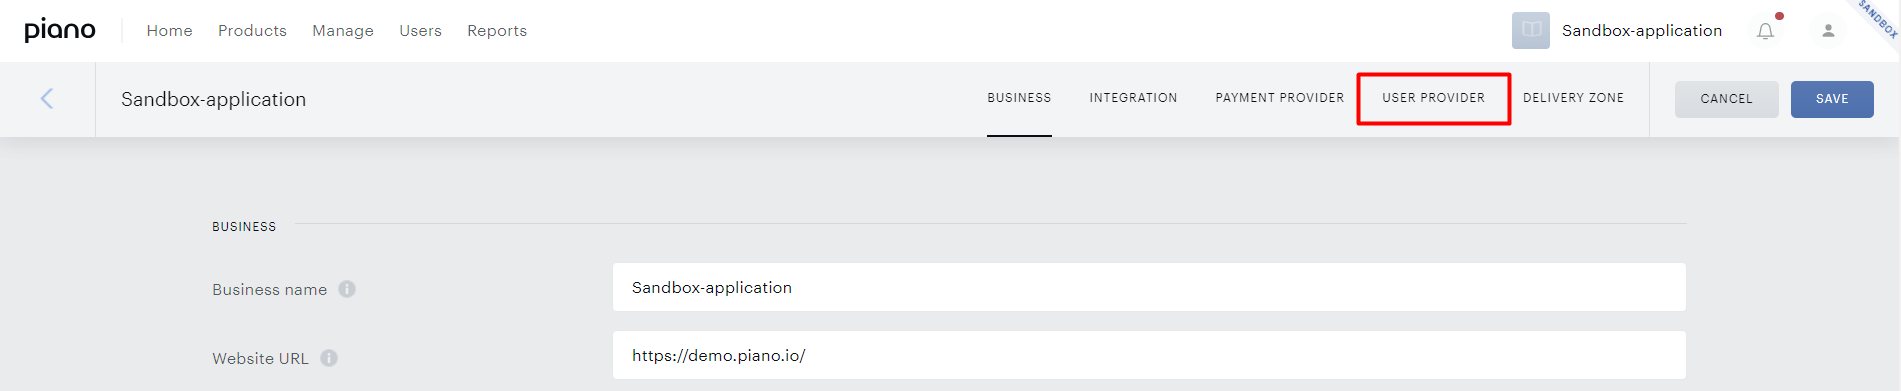
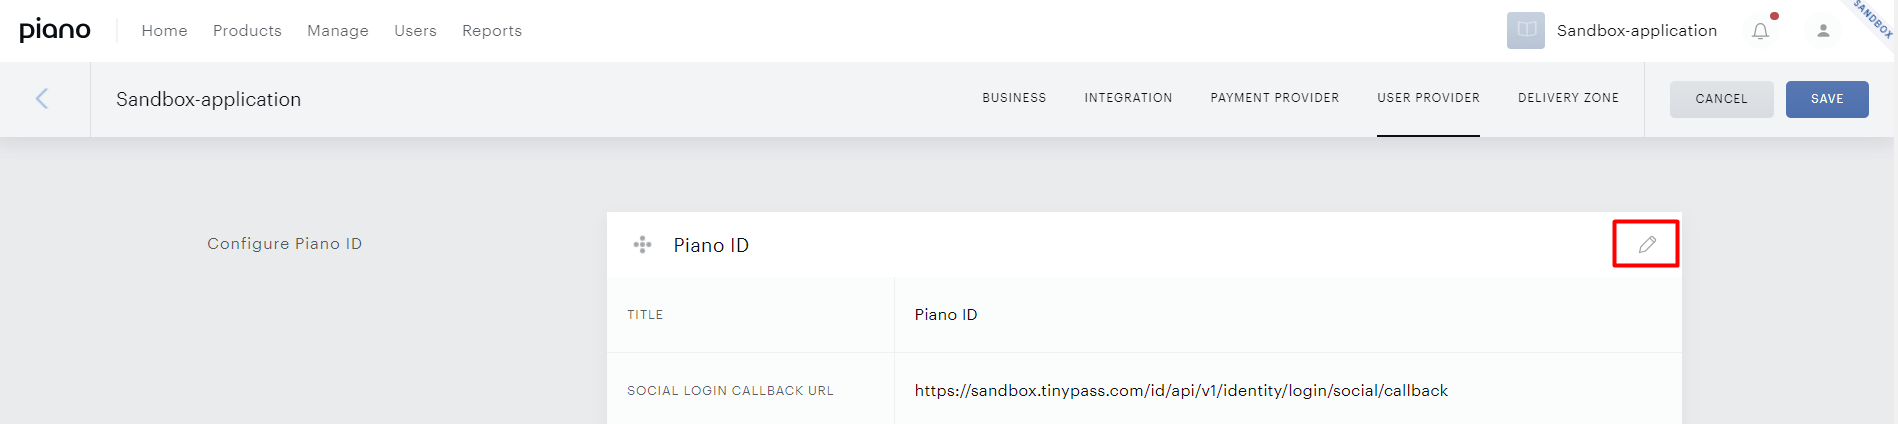
Identity Management is Piano's own user provider. It handles registration, login, password reset, social sign-in, and the profile behind My Account. This page documents every setting in its configuration, which you reach from Edit Business → User Provider, then the pencil icon on the Identity Management (Piano ID) module.
The settings sit in four tabs, and this page follows the same order. Main holds core behavior, including passwordless login, registration requirements, and token expiry. Security policy covers CAPTCHA and password rules. Other login methods covers social sign-in and the deployment host. Authorized holds the redirect URIs and JavaScript origins, without which authentication will not work at all.
Opening the configuration menu
The first step when implementing ID is to navigate from the Piano Dashboard to Edit Business:

And then proceed to the User Provider tab:
Clicking the pencil icon on the Identity Management module:
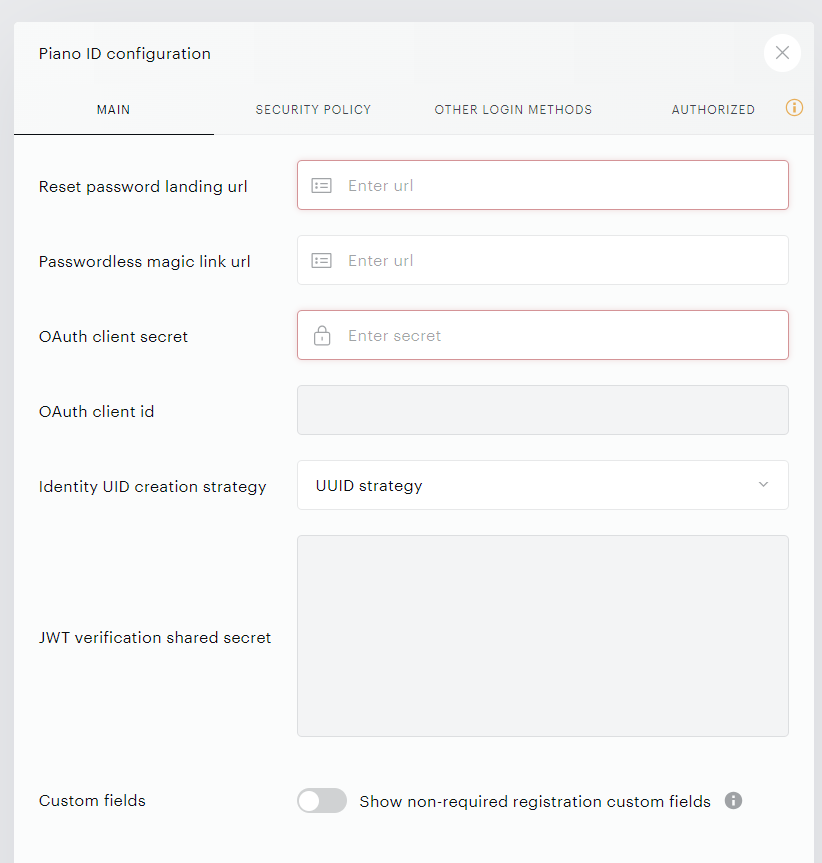
Will bring up this configuration screen:
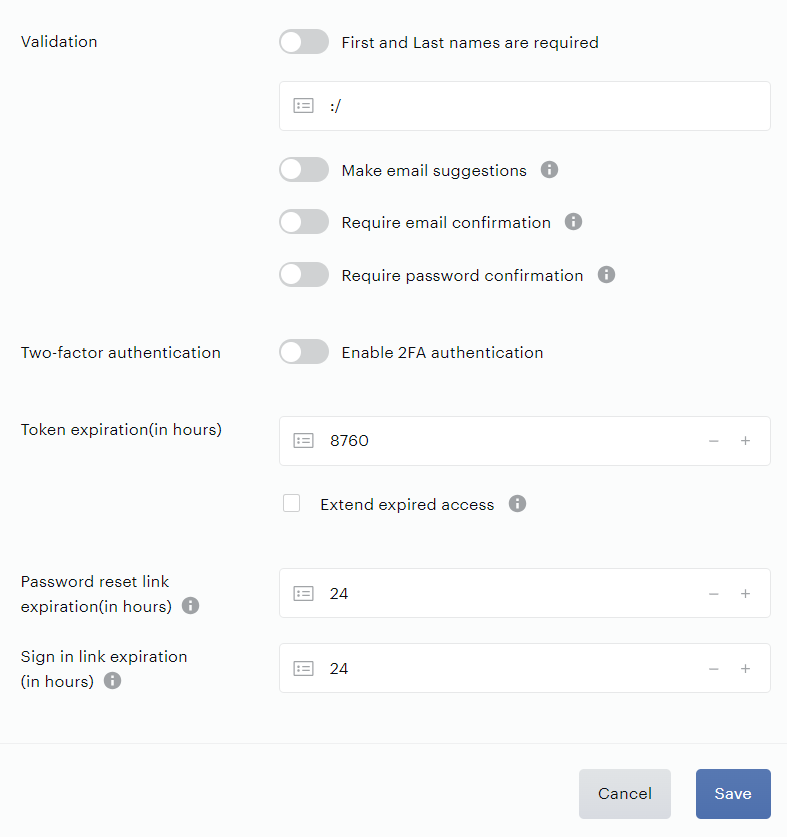
In addition to the above, you are also able to configure other settings for features offered in Identity Management:
If you have Passwordless checkout enabled, you will see additional settings:
Main tab
Reset password landing url*: Users who need to reset their passwords will receive an email with a reset password link. When they click that link, they will be redirected to the reset password landing page URL where Piano's password reset modal will appear. This landing page URL needs to be a page on your site that runs Piano's JavaScript, includes Identity Management's reset password JavaScript, and does not present a modal Piano offer. If the reset password URL is configured on the same page as a Piano modal offer, the password reset modal will be overridden by that offer modal.
Passwordless magic link url*: Passwordless users who are prompted to sign in or users with a password that select to log in via a link will receive an email with a magic link that they can use for logging in without a password. This landing page URL needs to be a page on your site. By default, it's populated with the URL of your homepage.
OAuth client secret*: OAuth allows you to grant access to third-party entitlements based on user information stored within Piano. The OAuth client secret is pre-generated as a random value, but you can edit it to be any key you would like. For more information on the mechanics of Piano's OAuth integration, see our OAuth guide. Using OAuth with Identity Management is optional.
OAuth client_id: This value should be automatically generated and uneditable. It is a way for Piano to uniquely identify your application.
Identity UID creation strategy: This tab allows you to define how your user's unique keys are formatted. UUID format (Universal User Identifier) is a universal ID-generation format that is common in user databases and creates UIDs in a longer alphanumeric format with hyphens. Common UID strategy format will generate a random string as an ID. For new applications, the UUID strategy format is the standard. For applications with the Common UID format, the UUID format can be selected from the menu.
JWT verification shared secret: This is the encryption key used to verify the token. It enables authentication of the token signature and verifies its validity.
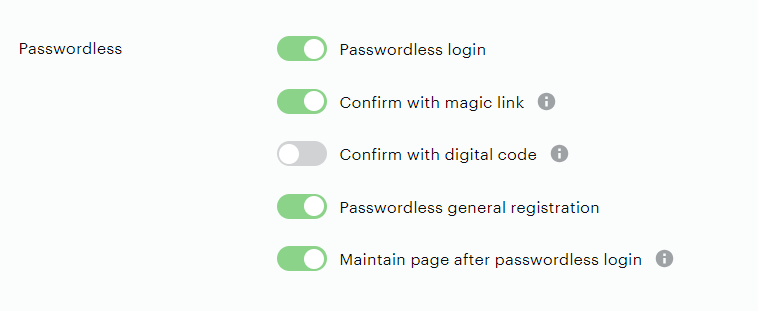
Passwordless login:
This toggle is only available in case you have the Passwordless feature enabled on your application.
Identity Management offers passwordless login functionality, allowing users to log in via a magic link or digital code, eliminating the need for traditional passwords. This setup streamlines the login process and offers flexibility
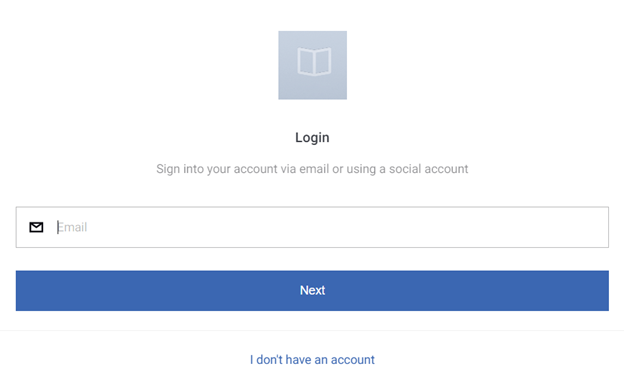
When this setting is turned on, users will be shown the passwordless login screen where they can enter their email and be sent a magic login link or code (based on the settings defined that will be discussed later on in this article).
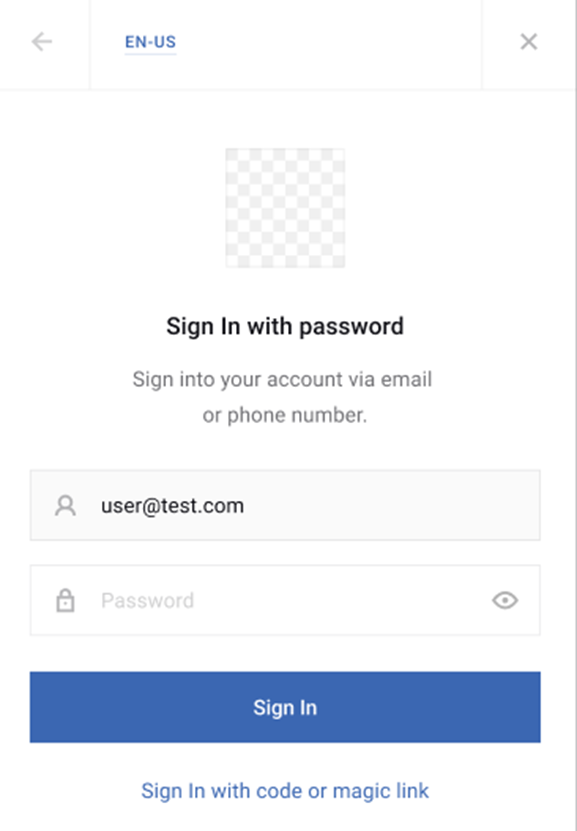
Users with a password will also be able to select the option "Sign in with code or magic link" allowing for a passwordless login also for existing users who have previously set a password.
You will be able to configure further settings as shown below:
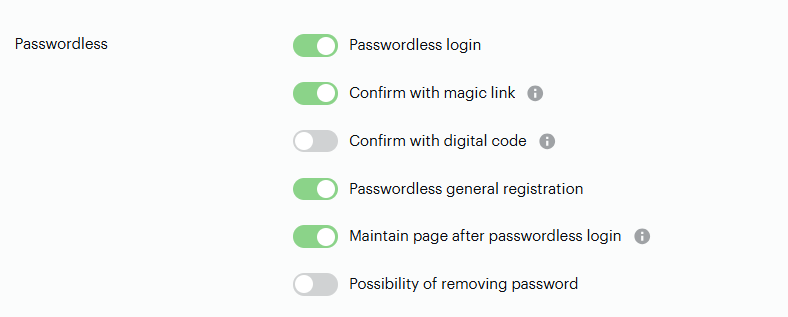
Confirm with magic link: If this toggle is enabled, a user will be sent a magic link, to re-authenticate to the site.
Confirm with digital code: If this toggle is enabled, a user will be sent a six-digit digital code, to re-authenticate to the site. The code option may be easier for users in native apps. The code will be sent to the end user via email, and they will then be prompted to enter it on the site or in-app.

So, you can decide if a user will be sent a magic link, a six-digit digital code, or both, to re-authenticate to the site.
Passwordless general registration: Once passwordless general registration is enabled, all of your non-term conversions will default to passwordless. For term conversions, you are able to specify in the Checkout flow if the registration for the individual offer will be passwordless or not. If the Default checkout flow is used, the registration will default to passwordless as well. A user can add a password to their account from the My Account menu.
If previously enabled, you can easily disable Passwordless general registration by switching off the toggle. Once you disable passwordless general registration, users will be prompted to reset their password the next time they log in.
Maintain page after passwordless login: When this toggle is activated, a magic link will lead a user to a page where the user started the passwordless login. If this toggle is deactivated, a magic link will lead a user to a page defined in the Passwordless magic link url field.
Also, you could activate this behavior for a particular page by using the returnBack property. Just call tp.pianoId.init({ returnBack: true }) or tp.pianoId.show({ returnBack: true }).
On the pages where a magic link will lead to, you need to call tp.pianoId.init() to initiate passwordless login completion.
Don't forget to set the client domain to Authorized Redirects URIs.
More details about the passwordless flows are available here.
Possibility of removing password: Enabling this setting allows you to remove a user’s stored password from their account or the end user themselves to remove it from the My Account. This is useful when invalidating credentials for security reasons, or allowing users to use passwordless login. More details about this feature are available here.
This feature can only be enabled if Passwordless login is activated.
Show non-required registration custom fields: If this toggle is enabled, an end user sees required AND non-required custom fields after social registration in the Piano ID Registration confirm template.
First and last names are required: When this toggle is activated, all users will not be able to submit the registration form without providing their first and last names.
Note: Passwordless and frictionless checkout flows will not work in case Identity Management user provider is configured to require first name and last name upon registration.
Make email suggestions: When this toggle is activated, a small prompt will display to the end user, nudging them with a possible correction if they make a common email typo. This feature does not block any user from registering.
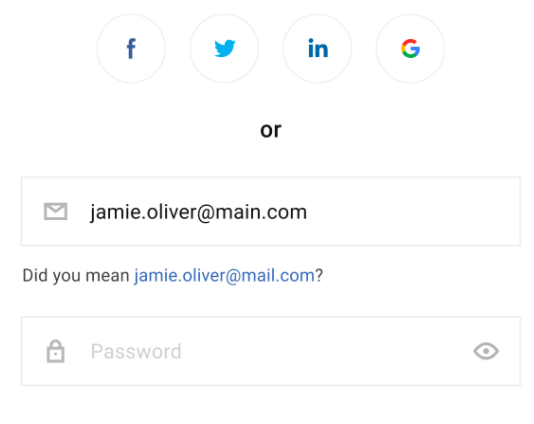
Please note that it might be necessary to update a customized Piano ID registration template and add the following line of code <span mailcheck></span> at the bottom of the email input section.
For example, like this:
<p class="input-group with-icon">
    <input fieldRegisterEmail type="text" value="" pn-autofocus>
    <span class="placeholder"><i class="icon icon-email"></i><t>email</t></span>
    <span showIfEmailInvalid class="error-message"><t>Email is required</t></span>
    <span showIfEmailInvalidBy="SERVER_ERROR" class="error-message" setEmailServerErrorMessage></span>
    <span mailcheck></span>
</p>
The feature uses a list of popular domains from a predefined source. The algorithm used to compare email domains to the user input is similar to the one found here.
Only enable name validation on registration: An additional configuration allows the above validation to only apply to user registration. When this is switched on, the validation will not apply to users created in the dashboard, imported, migrated, or via any operation outside the Piano ID Registration template.
Require email confirmation or Require password confirmation: These toggles require the user to re-enter information upon registration to confirm it is correct. This setting prevents users from entering incorrect information at registration. If a user's information is entered twice but does not match, the user will not be able to create an account. This setting can be applied to email, password, or both.
Please note that Identity Management supports email inputs with a combination of symbols and email addresses in languages other than English.
If you're not using the default Piano ID register page template, there might be some code changes needed after enabling these features.
The code below needs to be added after the code for the email input field if you enable the toggle Require email confirmation.
<p class="input-group" *showIfRequireConfirm="'email'">
    <input fieldConfirmRegisterEmail type="text" value="">
    <span class="placeholder"><i class="icon icon-email"></i><t>confirm email</t></span>
    <span showIfRegisterConfirmEmailInvalidBy="EMAIL_NOT_CONFIRMED" class="error-message"><t>Email and Confirm email does not match</t></span>
</p>
Similarly, if you enable the toggle Require password confirmation, you would need to add this code after the password input field:
<p class="input-group with-icon" *showIfRequireConfirm="'password'">
    <input fieldConfirmPassword type="password" value="">
    <span class="placeholder"><i class="icon icon-password"></i><t>confirm password</t></span>
    <span class="float">
        <i showPassword class="icon icon-show"></i>
        <i hidePassword class="icon icon-hide"></i>
  </span>
    <span showIfRegisterConfirmPasswordInvalidBy="PASSWORD_NOT_CONFIRMED" class="error-message"><t>Password and Confirm password does not match</t></span>
</p>
Note that we use salt encryption to securely store user passwords in our database.
Two-factor authentication: Two-factor authentication (2FA) adds an extra layer of security to the login process for end users. More information about this feature is available here.
Token expiration time (hrs.)*: If you are using OAuth with Identity Management or standalone Identity Management, this allows you to set the number of hours after which users' access tokens expire, and they will be required to log in again. The default is 730 hours, which is equivalent to one month. The minimum value is 2 hours, and the maximum is 8760 hours, which is equivalent to one year. There is no limit on the number of devices a user can be signed in to simultaneously.
Extend expired access: Refresh a user's session token when it lives more than 24 hours and is not yet expired. The user gets a new refresh, and the session will be extended by the same length of time as their initial period of access. If a user's session has been extended by this method, they must log in again to make a purchase or update any profile information on their My Account. Otherwise, they will be able to browse as a logged-in user.
Password reset link expiration (in hours)*: This defines the length of time (in hours) during which end users will be able to reset their passwords via the password reset links sent to their email. Bear in mind that a user is able to trigger a password reset only once every 10 minutes.
Sign in link expiration (in hours)*: This defines the length of time (in hours) during which end users will be able to log in to their accounts via the sign-in links sent to their email.
*These fields are mandatory, and without providing a value for them you won't be able to save and complete your Identity Management configuration.
Allow generate token: The Allow generate token setting controls whether your application can generate Identity Management user JWTs without an interactive password verification step. This is used to support custom server-side login integrations such as Google One Tap, Google News Showcase auto-login, or other controlled login flows.
This setting is disabled by default in all environments, including Production, due to the security implications of passwordless token generation.
Note: This setting cannot be enabled via the Piano Dashboard. To activate this functionality, please contact Piano Support.
Once enabled, your application will be able to use token-generation endpoints such as /id/api/v1/publisher/token (API documentation). If the feature is not enabled and a token-generation call is attempted, the endpoint will return {"error": "Token generation not allowed"}.
Enable Security Protection against account takeover: Piano Identity Management now offers enhanced security for email address changes through the Security Protection feature. This feature prevents account takeover attempts, protects against typos, and includes anti-enumeration protection. For more details, please visit the article here.

Security policy tab
Captcha settings
Use captcha: Toggle this setting on to enable anti-bot protection on your login and registration forms. Once enabled, confirm that the CAPTCHA code is present in the Piano ID Login Page and Piano ID Registration Page templates. It is usually located toward the bottom of the templates. The code responsible for ensuring it appears on your forms is:
<re-captcha></re-captcha>
Captcha is only available for Identity Management.
Select your preferred provider from the Captcha type dropdown:
Cloudflare Turnstile: A privacy-friendly CAPTCHA alternative that verifies users using invisible browser challenges and machine learning signals, without requiring users to solve puzzles. In most cases, users will not see or interact with any challenge at all. For full setup instructions, including how to configure widgets and keys in your Cloudflare dashboard, see Cloudflare Turnstile.
Google reCAPTCHA: Google's anti-bot technology, applied to the authentication events you have configured.
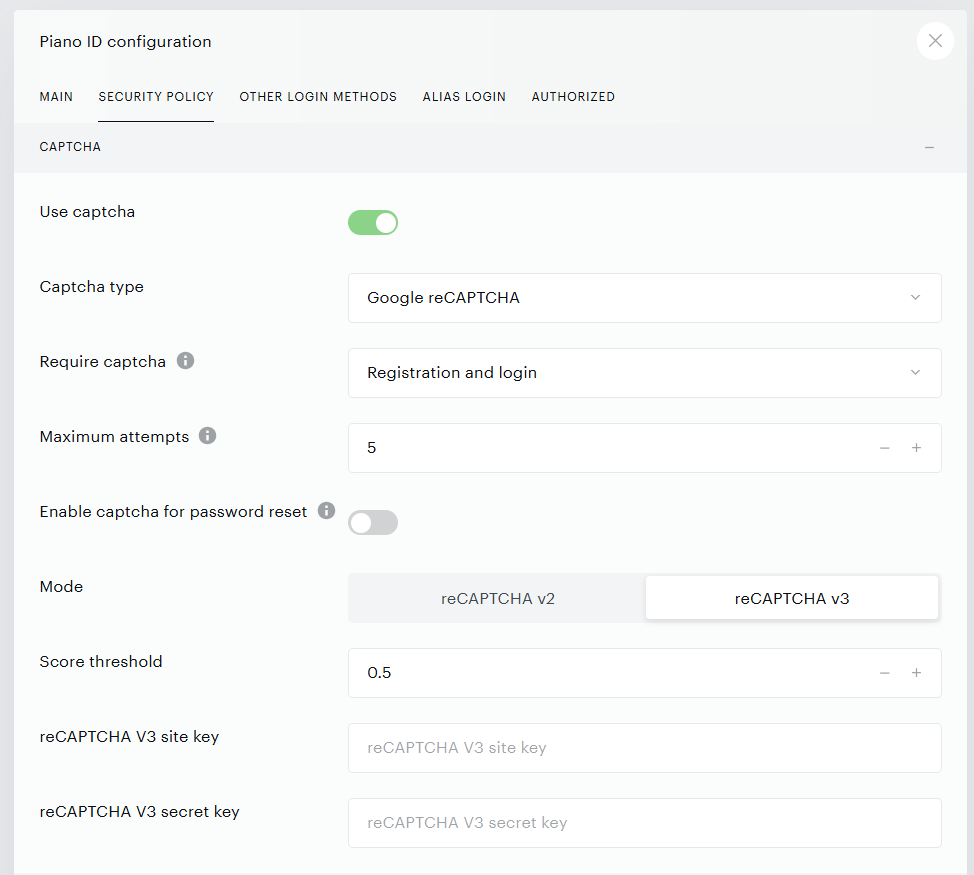
Once selected, the following additional options are available:
Use reCAPTCHA v2 or v3 : if reCAPTCHA is enabled, Google’s v2 or v3 can be enabled.
-
reCAPTCHA v2: Users check a box and are validated with a challenge. Challenges require end users to select pictures that depict a specified object.
-
reCAPTCHA v3: Users are validated by a monitoring
reCAPTCHA v3 implementation: When reCAPTCHA v3 is enabled, it's recommended that you register your domain with Google CAPTCHA admin here. If you select reCAPTCHA v3 but don't enter any credentials, your domain will automatically be assigned Piano's ID and key.
If you are using a white-labeled domain, the Google CAPTCHA registration of your own domain is recommended, as default keys may be used by multiple clients.
However, if you'd like to get your own analytics from Google about CAPTCHA events, you can register your own domain and get a unique ID and key in the Google Admin Console. Registering your domain will also allow CAPTCHA to be deployed on any of your subdomains. If you use Identity Management to handle mobile registration, you will also need to enter piano.io as a registered domain. Google also recommends adding CAPTCHA v3 to non-integration pages, so the monitoring algorithm can receive more data about your site's traffic. More about Google Analytics for CAPTCHA can be found here. Registering will allow you to get a site key and a secret key, which can be input into the v3 site key and v3 secret key fields.
When adding CAPTCHA to the frontend, this script should be embedded into all pages that have CAPTCHA enabled. Replace _reCAPTCHA_site_key with your own site key from Google.
<script src="https://www.google.com/recaptcha/api.js?render=_reCAPTCHA_site_key"></script>
<script>
grecaptcha.ready(function() {
    grecaptcha.execute('_reCAPTCHA_site_key_', {action: 'homepage'}).then(function(token) {
       //Logic to send to your backend server goes here
    });
});
</script>
Require captcha: Select which authentication events should be protected with a CAPTCHA:
-
Registration and login
-
Registration only
-
Login only
Piano may automatically enable CAPTCHA protection on your application in response to fraud or a high number of failed authentication attempts. In such cases, Cloudflare Turnstile will be used by default, relying on Piano’s keys if no client keys are configured. The only exception applies to white-labeled applications, which must provide their own Cloudflare keys before Turnstile can be activated.
Maximum attempts: Define the number of failed authentication attempts allowed before CAPTCHA is required. Once the threshold is reached, users must complete a CAPTCHA challenge to proceed. If set to 0, the CAPTCHA will always appear.
Enable captcha for password reset: Toggle this setting on to protect the password reset flow with CAPTCHA verification.
Password settings
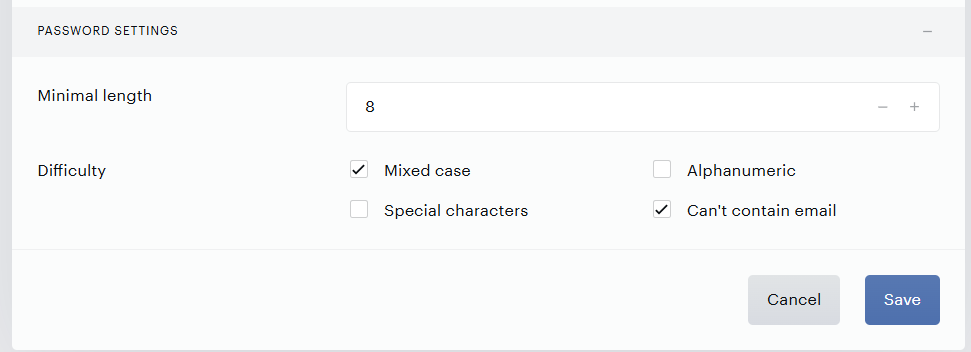
Minimal length: Minimum number of characters required for user password.
Difficulty: Decide whether password requires mixed case (lowercase and uppercase letters), special characters (any of these characters: ~'!@#$%?\/&*]|[=()}"{+_:;,.><'^-), alphanumeric (must contain both letters and numbers), and whether or not the password can contain the user’s email address.
Configuring Client Validation for Identity Management Templates
To enhance user experience and reduce unnecessary back-end calls, Client Validation can be enabled for Identity Management templates. This feature validates input fields directly on the client side, ensuring users are notified of errors in real-time without requiring communication with the back-end server.
Note: Please contact Piano Support if you’d like to enable Client validation for your application.
Client-side validation handles the following requirements for user input fields:
-
First and Last Name: Ensures these fields are not empty.
-
Empty Email: Validates that the email field is not blank.
-
Empty Password: Checks that the password field is not blank.
-
Password Difficulty Rules
-
Mixed Case: Password must include both uppercase and lowercase letters.
-
Special Characters: Password must contain at least one special character.
-
Alphanumeric: Password must include both letters and digits.
-
Email Restriction: Password must not contain the user's email address.
-
Mandatory Custom Fields: Ensures required custom fields are not empty.
-
Custom Field Validation: Enforces specific validation rules set for custom fields.
In the Security Policy tab of your Identity Management configuration, you can define detailed password security requirements to enhance account protection. These settings include enforcing password complexity rules, such as requiring mixed case, special characters, alphanumeric combinations, and restrictions on using the user's email in the password.
Certain validations remain on the back-end and are not performed client-side:
-
Mandatory Registration Consents: These are checked upon submission.
-
reCAPTCHA: Spam protection via reCAPTCHA is handled server-side.
-
Email Format Validation: The email's structure (e.g., user@example.com) is validated server-side.
When Client validation is turned off, validation errors are not handled on the client side. As a result, custom email-related validation error elements included in the template, such as the following, will not be reflected in the login template:
<span class="error-message" showIfEmailInvalid>
  <t>example@email.com</t>
</span>
<span class="error-message" showIfEmailInvalidBy="SERVER_ERROR"
      setEmailServerErrorMessage>
</span>
Below are examples of error messages you may want to include and adjust as needed in the Piano ID login page, Piano ID register page, and Piano ID new password page templates:
<span class="error-message" showIfFirstNameInvalid><t>First Name is empty</t></span>
<span class="error-message" showIfForLastNameInvalid><t>Last Name is empty</t></span>
<span class="error-message" showIfPasswordInvalidBy="PASSWORD_MIXED_CASE"><t>Password must contain uppercase and lowercase letters</t></span>
<span class="error-message" showIfPasswordInvalidBy="PASSWORD_ALPHANUMERIC"><t>Password must contain both letters and digits</t></span>
<span class="error-message" showIfPasswordInvalidBy="PASSWORD_SPECIAL_CHARACTERS"><t>Password must contain a special character</t></span>
<span class="error-message" showIfPasswordInvalidBy="PASSWORD_CANT_CONTAIN_EMAIL"><t>Password must not include the email</t></span>
Important Note: If you had Client Validation enabled before November 20th, 2024, we recommend ensuring that your templates are up-to-date.
Other login methods tab
Identity Management offers social login for Facebook, Google, Twitter, LinkedIn, Apple, and Microsoft Quick Auth. Note that there is only one set of credentials per social account per application.
By using any social media to log in, an end user must create an account on that service and agree to their (privacy) terms.
For tracking in Piano, we just use information from the social media provider to validate a user, but we do not send any further data to Facebook/Google/Twitter/LinkedIn/Apple/Microsoft.
You can view information about a user's social account via the Publisher dashboard as described here.
Deployment host: By default, the deployment host for Production is set to https://id.piano.io.
If you'd like to use another URL as the deployment host, you need to also make sure the Identity Management template is opened with the correct iframe URL, and for that, you need to add the below line of code to your Piano integration script:
tp.push(['setPianoIdUrl', '']);
Don't forget to add this URL also to the list of authorized JavaScript origins. More information about this is available here.
In special circumstances, when a client is configured to use SSO across different domains, a different host may be used. For Piano's AU (Australian) environment, the host is https://id-au.piano.io, and for the AP (Asian-Pacific) environment, the domain is https://id-ap.piano.io, and for the EU (European Union) environment, the domain is https://id-eu.piano.io. For testing in Sandbox, https://sandbox.tinypass.com should be used as the deployment host.
Social login button format
The default templates provided by Piano (Piano ID register page, Piano ID login page, and Piano ID login confirm page) support a version with rectangular buttons that comply with the guidelines of the ID providers.
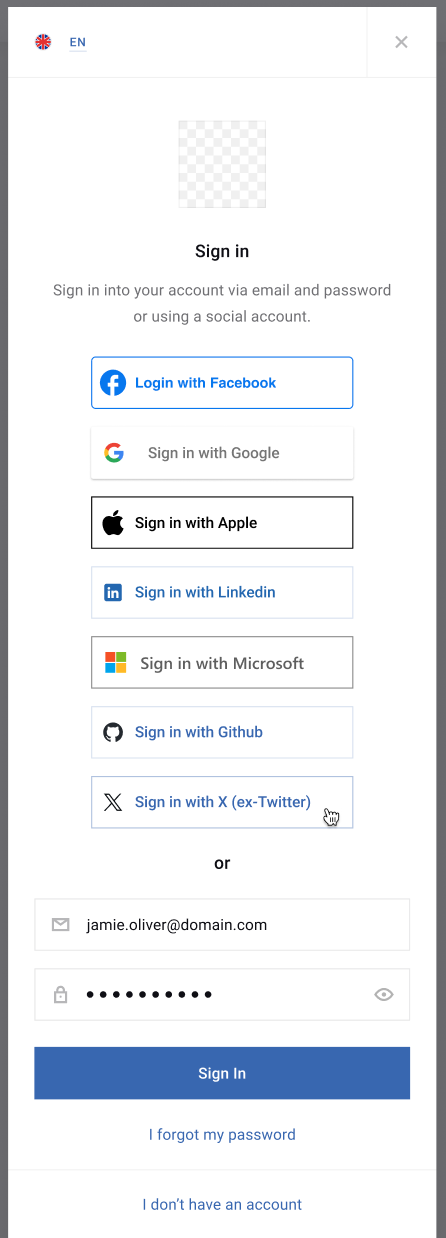
Already configured templates will remain unchanged. Newly created apps will have a rectangular button style by default, which can be reverted to the old version with round-styled buttons by removing the type="branded" parameter from the component in the Identity Management templates (Piano ID register page, Piano ID login page and Piano ID login confirm page):
<div *showIfSocialAuthAvailable class="social-wrapper">
  <div class="social-buttons-wrapper">
    <social-sign-in type="branded"></social-sign-in>
  </div>
  <span microsoftQuickAuthButton></span>
  <div class="or-text">
    <t>or</t>
  </div>
</div>
It is possible to design the buttons according to your needs in order to achieve a more consistent look and feel. Any customization of the button style should be checked to ensure that it is still compliant with the providers' style guidelines. Please note that not all providers allow the use of round buttons.
To display round buttons without text, add the type="rounded" parameter in the component in the Identity Management templates (Piano ID register page, Piano ID login page, and Piano ID login confirm page):
<div *showIfSocialAuthAvailable class="social-wrapper">
  <div class="social-buttons-wrapper">
    <social-sign-in type="rounded"></social-sign-in>
  </div>
  <span microsoftQuickAuthButton></span>
  <div class="or-text">
    <t>or</t>
  </div>
</div>
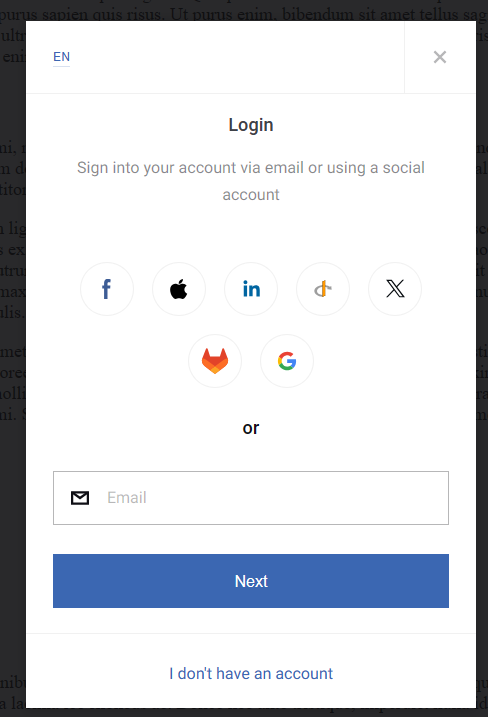
To display rectangular buttons with rounded edges and text, add the type="withTitle" parameter in the component in the Identity Management templates (Piano ID register page, Piano ID login page and Piano ID login confirm page):
<div *showIfSocialAuthAvailable class="social-wrapper">
  <div class="social-buttons-wrapper">
    <social-sign-in type="withTitle"></social-sign-in>
  </div>
  <span microsoftQuickAuthButton></span>
  <div class="or-text">
    <t>or</t>
  </div>
</div>
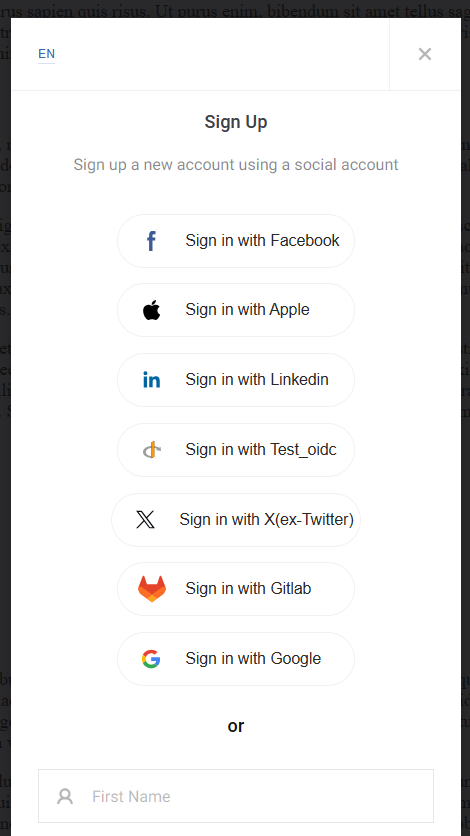
If you need further adjustments, these can be made in the CSS files.
If Microsoft Quick Authentication is used, please follow these instructions for designing the Microsoft button.
Facebook App ID and Facebook App Secret: If you want to take advantage of Identity Management's social sign-on capabilities, here you'll need to add the client ID and secret from your Facebook account. You will also need to add the deployment host URL as an authorized redirect URL within Facebook. If you need assistance on how to set up Facebook social login to link with Piano, please click here.
Google Client ID and Google Secret: If you want to allow users to sign in using their Google accounts, you’ll need to add the client ID and secret from Google. To do so, go to https://console.developers.google.com and select “Credentials” from the left sidebar. If you do not have any projects set up, you will be required to first create a new project by clicking the “create” button on the credentials widget in the bottom right corner. After you’ve set up a new project, click the “create credentials” button on the credentials widget and select “OAuth client secret” from the dropdown. On the next page, click “configure consent screen.” On the OAuth consent screen configuration page, you will need to input the product name (typically your business or site name) and your privacy policy URL and click “save.” On the next screen, you will need to select “web application” and input your Identity Management social callback URL into the “authorized redirect URIs” field. The social callback URL can be obtained from the Identity Management configuration screen after you’ve enabled social sign-on. It'll look something like this:
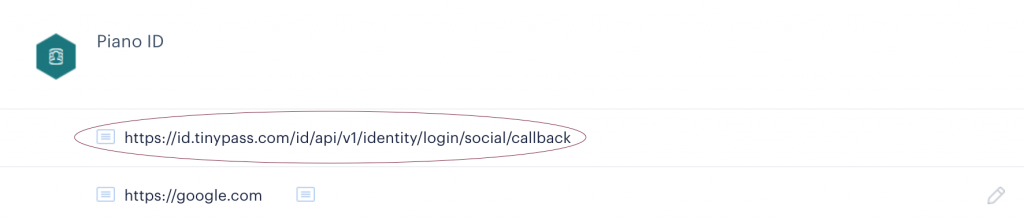
Once you enter that URL into the redirect URIs field and click “Create”, a screen will automatically appear containing the client ID and client secret you need to enter into Identity Management.
Twitter App ID and Twitter App Secret: For the App ID field, you should use the Twitter API key value. The App Secret field should contain your Twitter API secret key. Both are available in your Twitter account's settings.
Due to recent changes to Twitter's API, social login via Twitter has been temporarily turned off. Twitter users can log in using their email to request a password reset.
LinkedIn App ID and LinkedIn App Secret: For the App ID field, you should use the LinkedIn client ID value. The App Secret field should contain your LinkedIn client secret key. Both are available in your LinkedIn account's settings. If you need assistance on how to set up LinkedIn social login with Piano, please click here.
Please also add the value of the redirect_uri https://id.piano.io/id/api/v1/identity/login/social/callback (US dashboard) to your LinkedIn account's OAuth settings.
In case your application's dashboard has another locale, the available base URLs are listed here.
Apple login: In order to allow your users to be able to sign in with their Apple accounts, you will need to configure the parameters below.
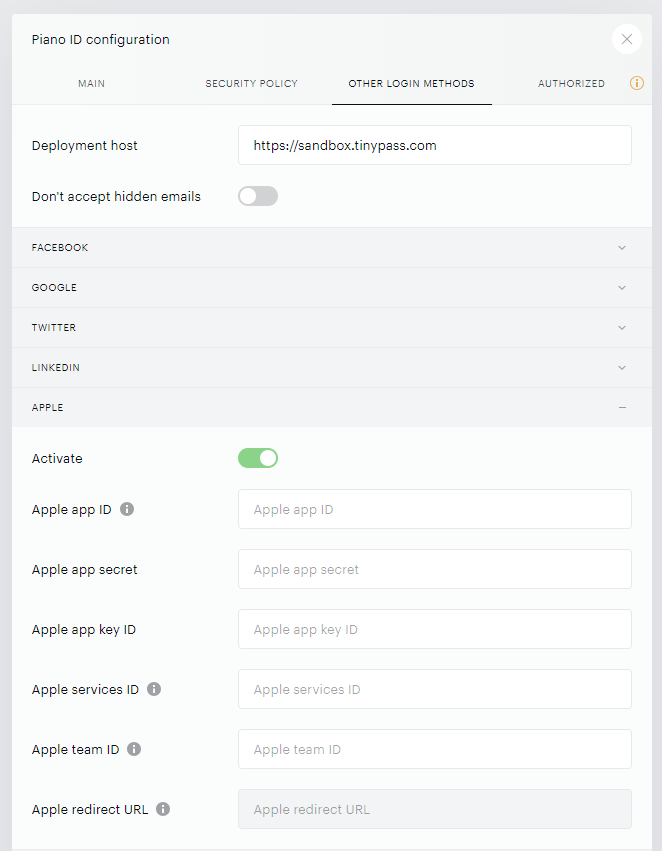
-
Apple App ID: Your unique Apple application ID for mobile and desktop
-
Apple App Secret: After you register your application with Apple here, you will be issued an Apple application ID and secret. Enter the secret's value into this field.
-
Apple App Key ID: This is a key used for the generation of the JWT. It's available in your Apple account under Certificates, Identifiers & Profiles.
-
Apple Services ID: A unique ID used as the OAuth Client ID.
-
Apple Team ID: Unique ID assigned to your developer team.
-
Apple Redirect URL: Enter the URL https://id.piano.io/id/api/v1/identity/login/social/callback/apple. In case your application's dashboard has another locale, the available base URLs are listed here.
More information about Apple login is available here.
During the login itself, the user is able to hide their email address and thus prevent it from being shared with Piano.
When the user applies the Hide My Email option during the Apple Registration flow, an obfuscated email is created.
For example, the format of such an email would be "9dpr4qjprh@privaterelay.appleid.com".
We link the user's subscription/transaction profile with the social ID (from Apple), which means that if the email in the social provider changes (like in this case from obfuscated to normal or the other way) - the social ID still remains the same, and as a result, the user won’t lose access to the subscription.
The email itself is not being changed during this transition, though. So if the user "unhides" their email, they would need to update the email also via My Account (or you can update it via the Piano dashboard in case the user reaches out to you). If they don't change it, they can continue using the obfuscated/hidden email to sign in.
Microsoft Quick Auth App ID and App secret: With MSQA, users can effortlessly sign up and log in using their Microsoft Accounts (MSA), including popular services like Outlook, OneDrive, and Microsoft 365. MSQA provides a seamless user experience, particularly for those using Microsoft Edge, offering a personalized sign-in prompt that incorporates their Microsoft account details. To enable MSQA integration, follow the steps outlined here.
OpenID Connect: If you want to take advantage of Identity Management's social sign-on capabilities, but you're not using one of the pre-integrated options available (Facebook, Google, Twitter, LinkedIn, Apple), you can still do so by filling out the required fields from your niche user provider account. Please click here for more details.
Don't accept hidden emails: This toggle is used in conjunction with Twitter and Google social sign-on. Twitter users who have signed up with a phone number will be asked to input their email after authentication.
If this toggle is not enabled, when a user tries to log in with a Twitter account using their phone number, the phone number is saved in the email field with Twitter's domain name. For example, if the phone number is 212-313, it will be saved as 212313@twitter.com.
For Google, it matches temporary Google email addresses on the domain @gtempaccount.com.
Authorized tab
This tab contains two sections for adding Redirect URIs and JavaScript Origins. More information about each of these sections is listed below.
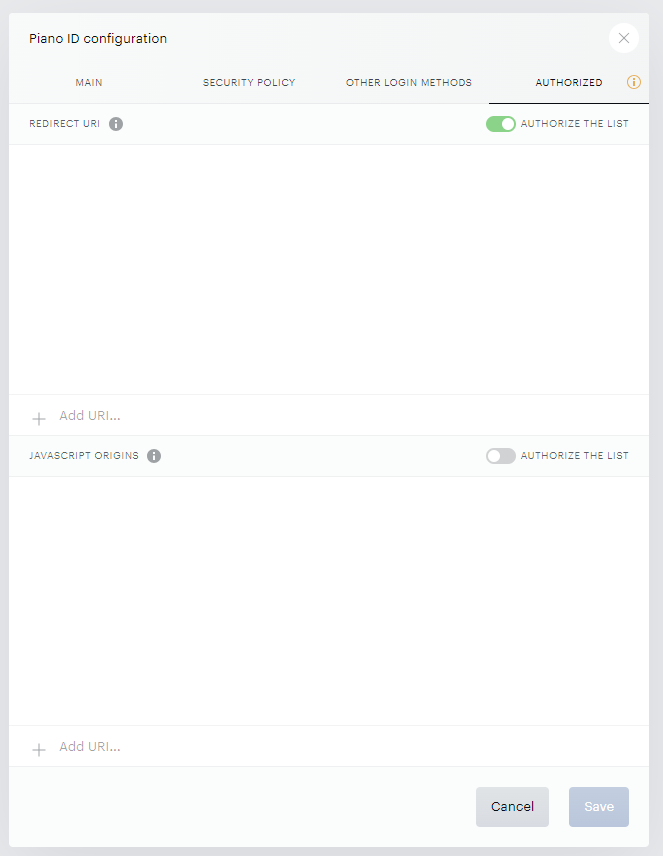
Authorized redirects URIs
The Authorized Redirect URIs section is a security setting that must be configured. It allows you to whitelist trusted URLs that users can be redirected to after a successful authorization (login, payment, double-opt-in). For more detailed information, please refer to our documentation here.
Authorized JavaScript origins
Authorized JavaScript Origins is a security setting preventing users from registering or logging in from unauthorized websites. The section displays known URLs allowed to make authorized API requests to the Piano API and must contain:
-
Identity Management's origin: Production https://id.piano.io (except for Australia with https://id-au.piano.io, Europe with https://id-eu.piano.io, and Asia-Pacific with https://id-ap.piano.io) and Sandbox https://sandbox.tinypass.com.
-
The HTTP origins that host your web application.
These URLs can use either HTTP or HTTPS protocol; they can also be IP addresses, and include port numbers. If you use a port other than port 80, you must specify it.
To add an item (URL or IP address) to the list, press "Enter" after your input.
This setting does not allow the use of wildcards or relative URL paths.
When setting cookies for Identity Management, we do not support domains on the public suffix list, as browsers block us from attaching cookies to these base domains. If you want to use Sandbox sites with those domain suffixes for testing, you need to access the site through a separate CNAME.
If the JavaScript Origins Authorize the list toggle is disabled, all requests' origins are saved to the JavaScript Origins list. This way, you can track all JS origins that were granted access. If the toggle is enabled, only JS origins from the list are authorized.