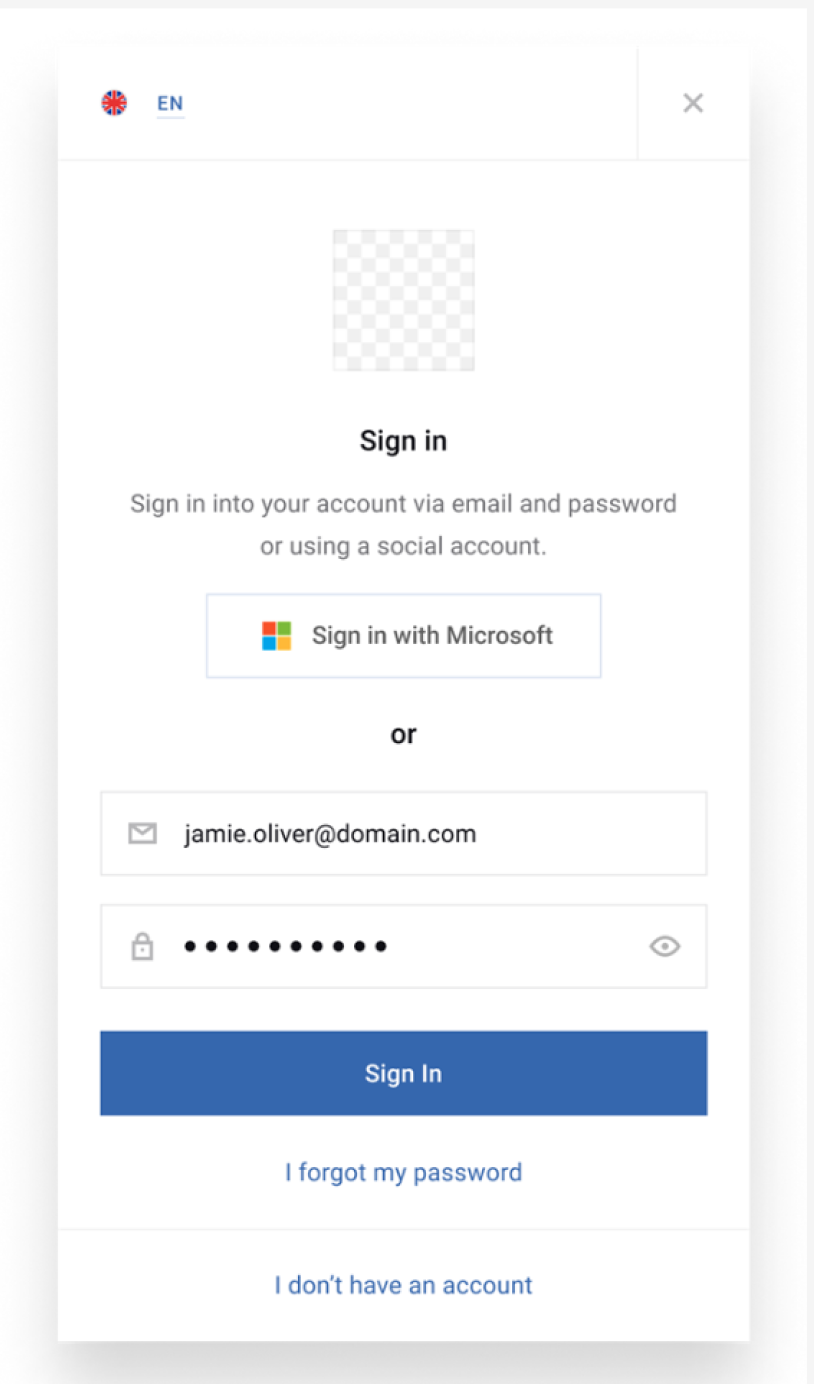
Microsoft Quick Authentication (MSQA) provides a simple and convenient way for users to sign up and sign in to your website using their Microsoft Account (MSA), which includes services like Outlook, OneDrive, Xbox LIVE, and Microsoft 365.
This guide will walk you through the steps to set up MSQA with your Piano implementation.
Setting Up MSQA
Microsoft Application Prerequisites
-
App Registration in Azure:
-
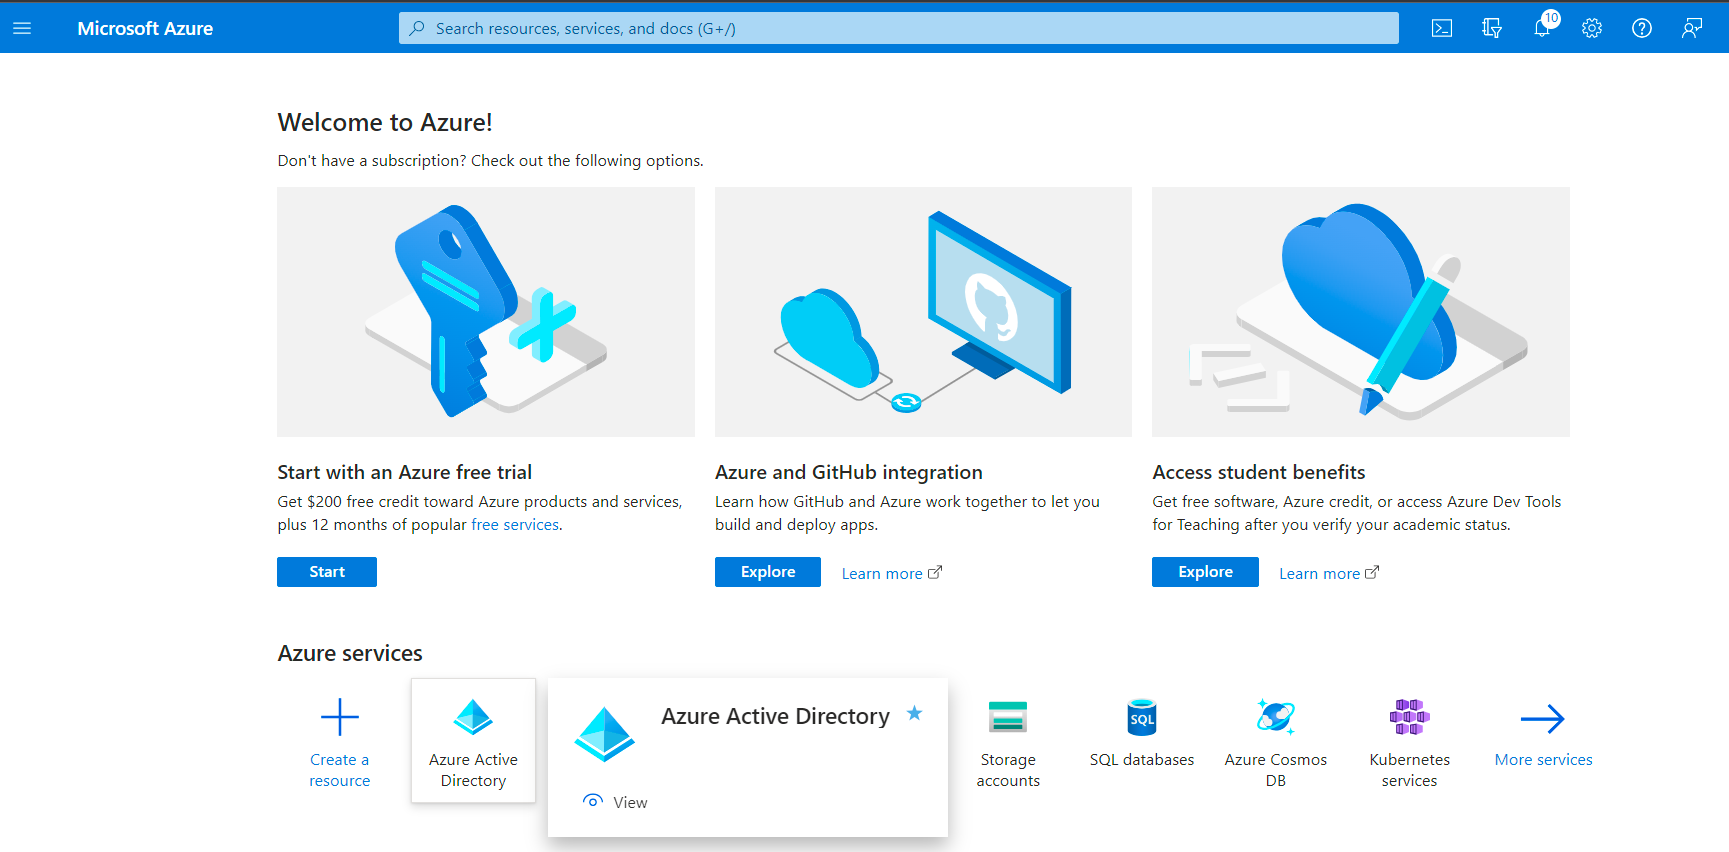
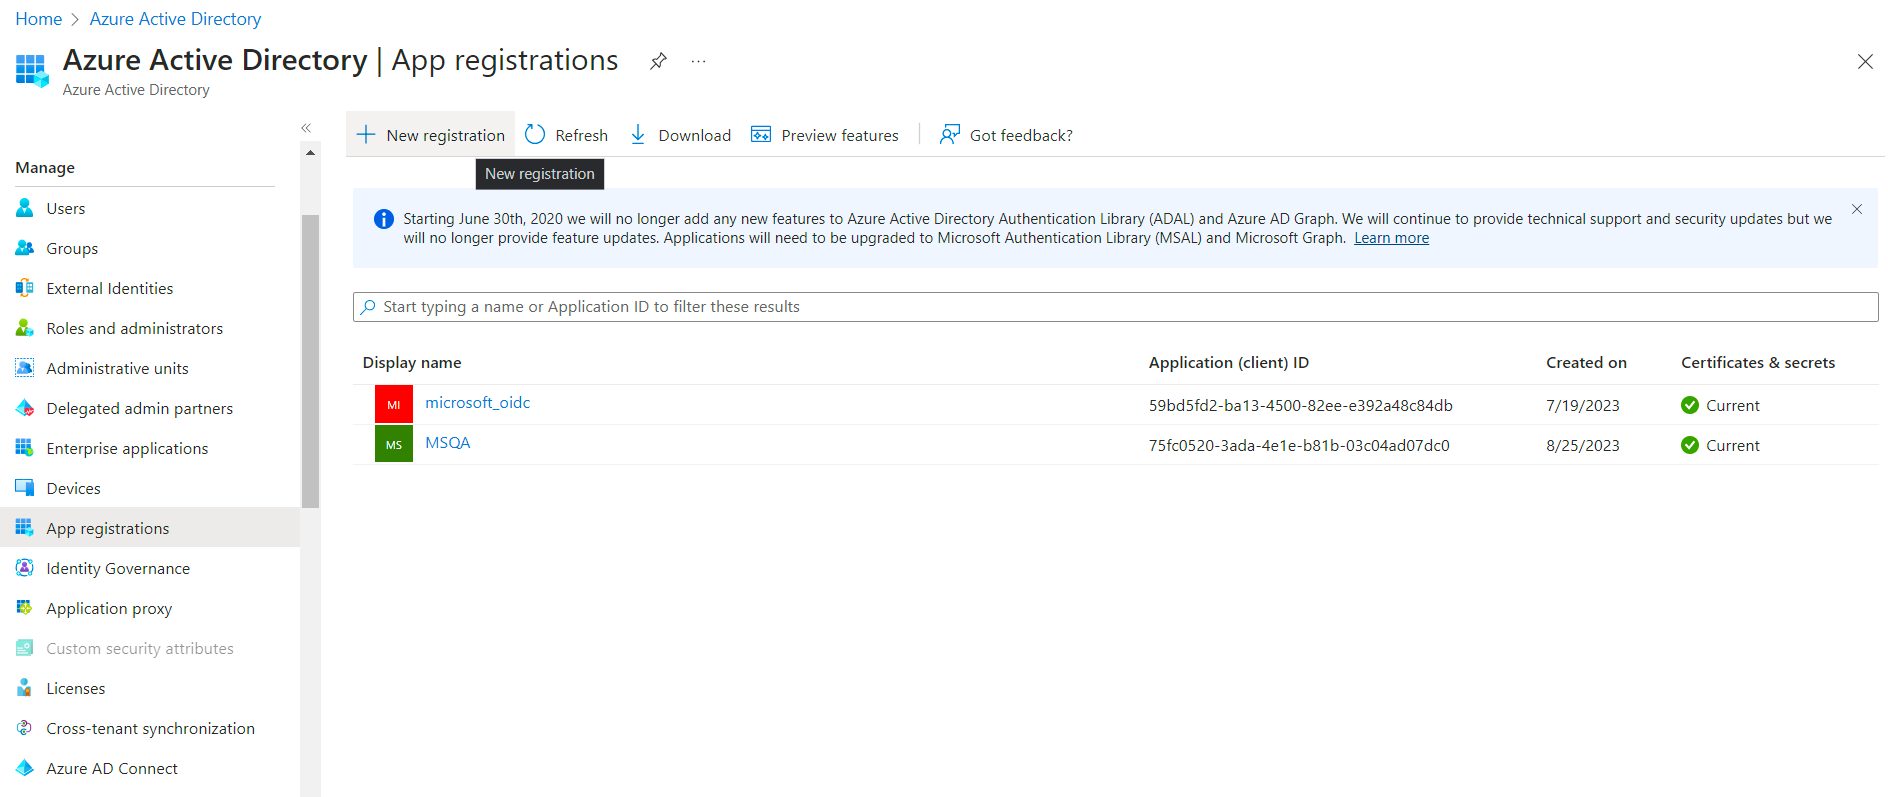
Begin by registering your application in Azure.
-
This registration will allow your website to integrate with Microsoft services securely.
-
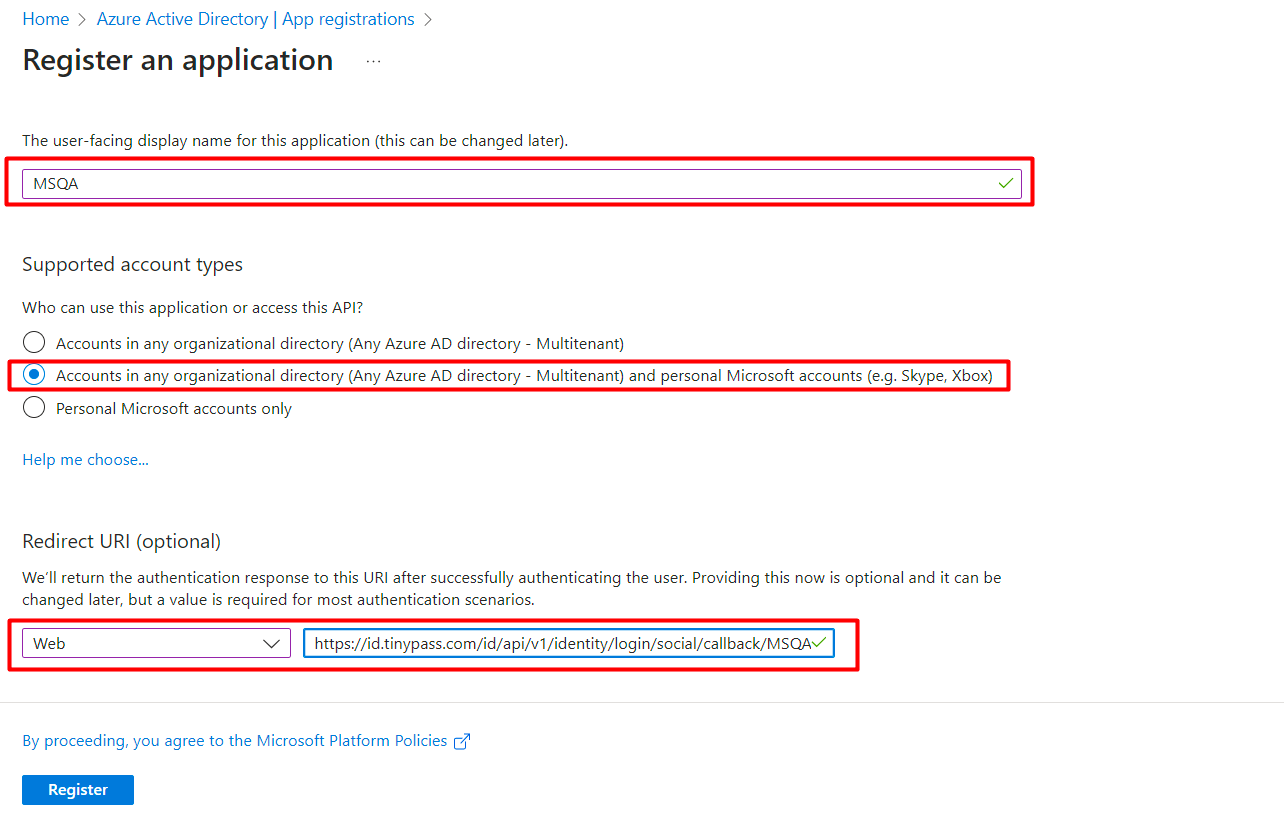
Configure the following settings in your Azure app registration:
-
Set Redirect URI: Configure the redirect URI to match the social callback URL from your Identity Management configuration, adding the MSQA component.
-
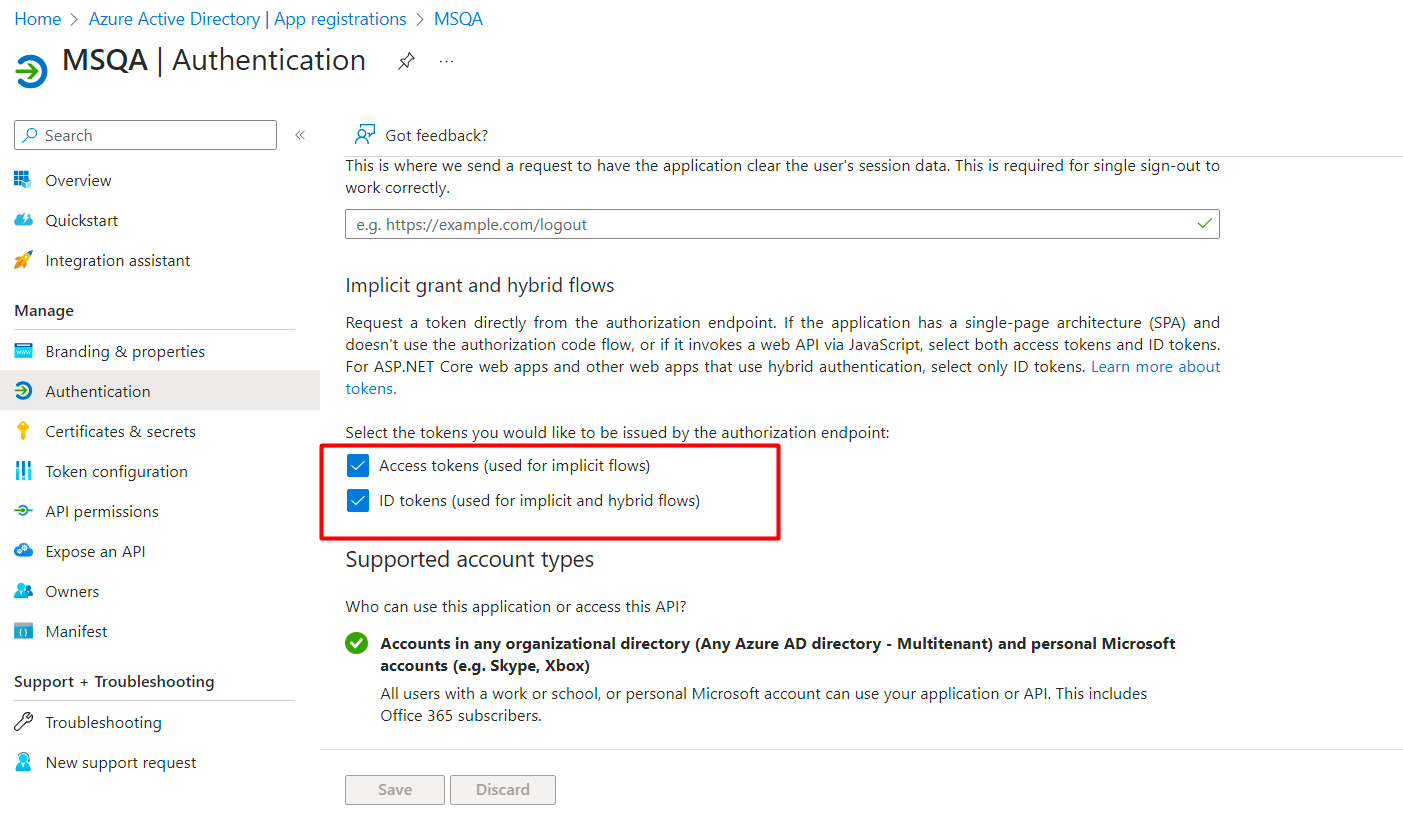
Enable Access Tokens and ID Tokens Provision: Ensure that access tokens and ID tokens are provisioned for your application.
-
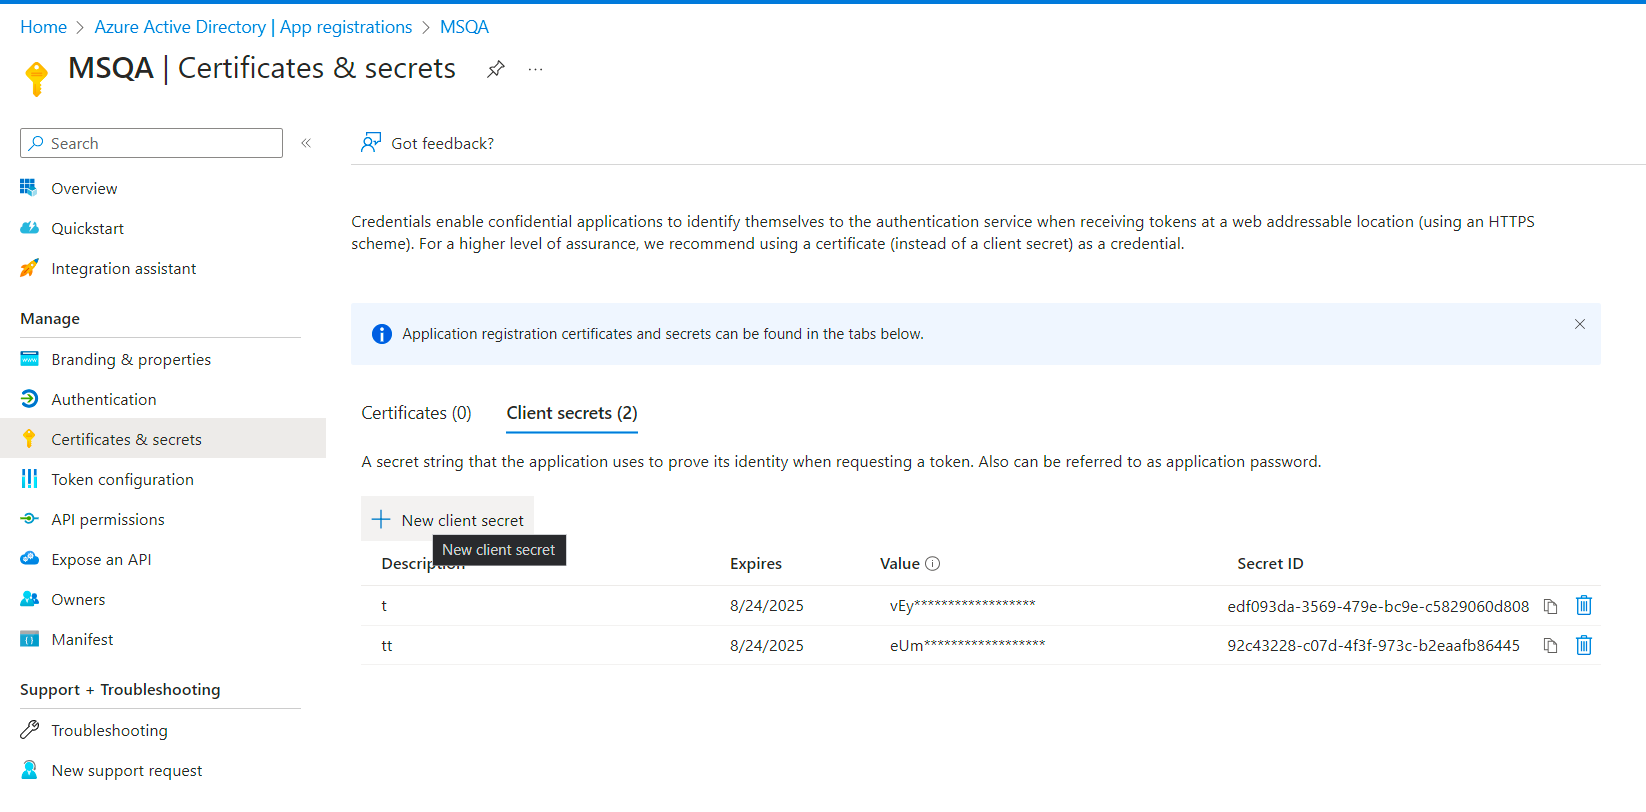
Generate Client Secret: Generate and copy a client secret for your app. This secret will be used for secure communication between your website and Microsoft services.
-
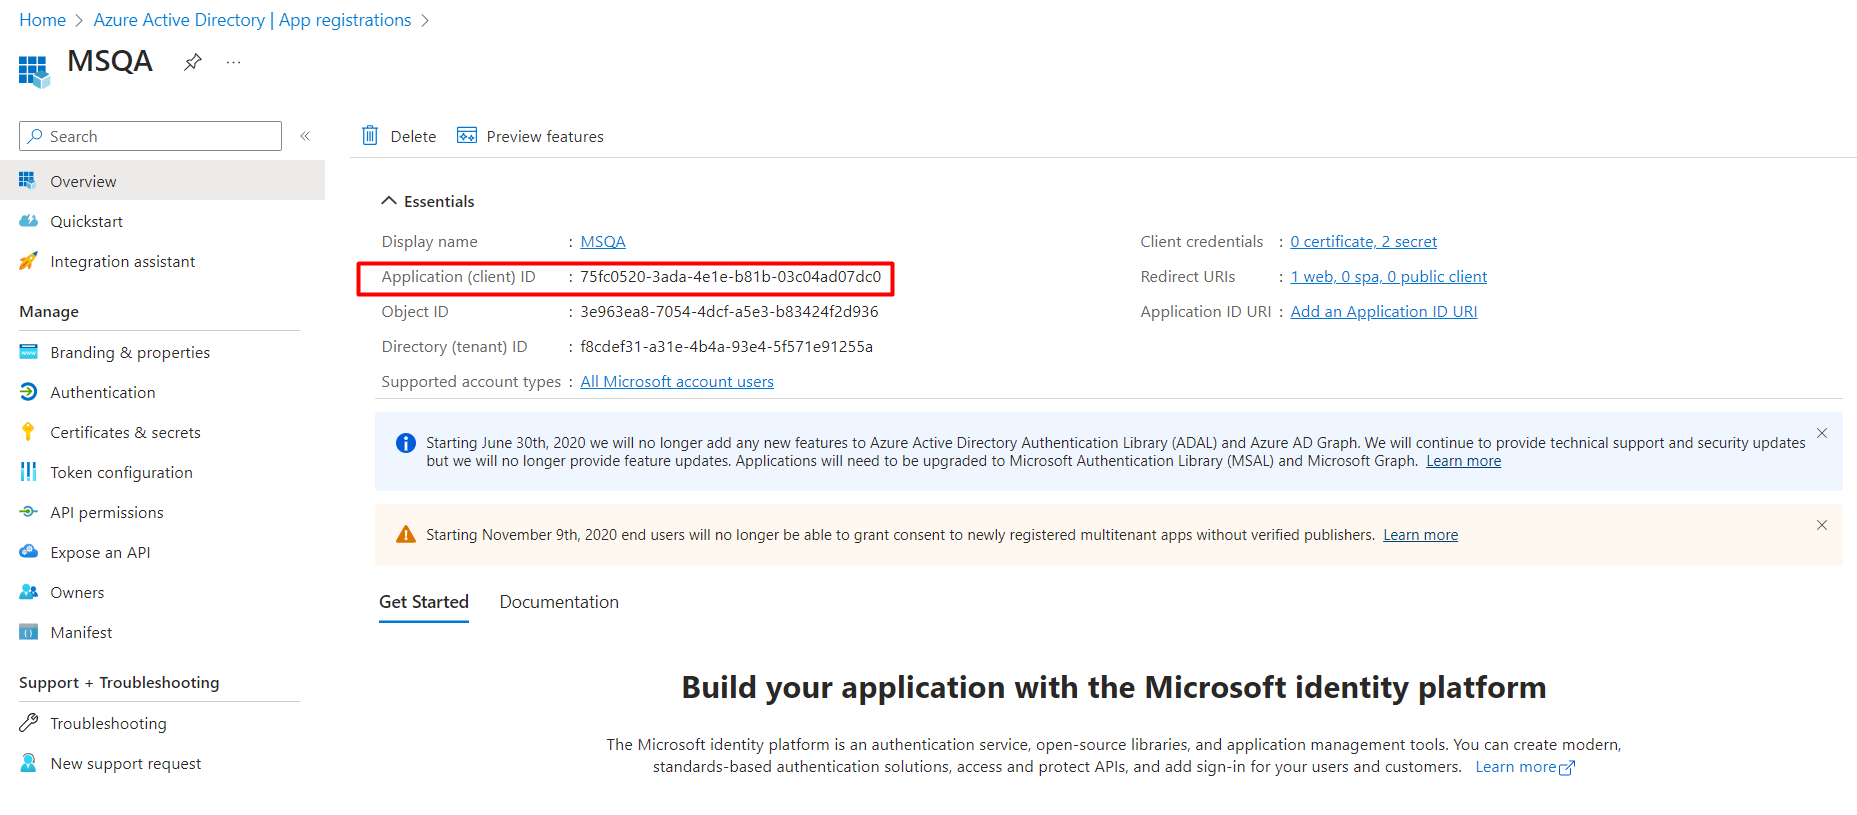
Copy App ID Value: Note down the Application (client) ID value provided during app registration; you will need it for your Piano configuration.
-
-
Configuration in Piano Dashboard
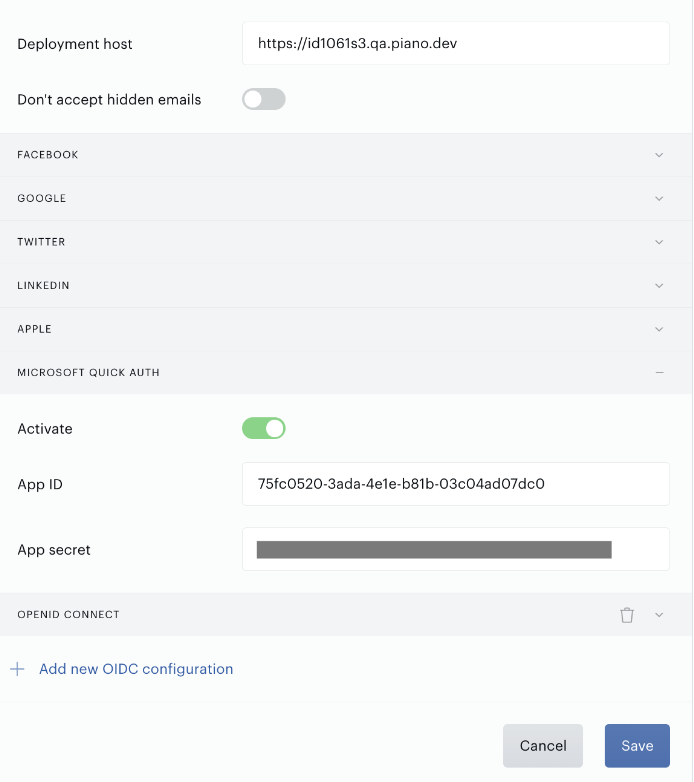
In your Piano Dashboard under Edit Business > User Provider > Identity Management > Other login methods (tab) > Microsoft Quick Auth, follow these steps to configure Microsoft Quick Authentication:
1. Microsoft App ID and Microsoft App Secret
Enter the App ID and App Secret from your Azure app registration into the corresponding fields in your Piano Dashboard.
2. Button Customization
You can customize the appearance of the Microsoft sign-in button in two ways:
-
Built-in Button: This is part of the social sign-in component class
social-wrapperincluded in the templates and uses the Piano-branded theme. Clients can customize all social sign-in buttons by specifying the type of button they want (rounded,withTitle,branded).For this type of button, the advanced Edge experience is not supported. The one-tap login is supported.
-
Custom Button: Clients can add a custom Microsoft Quick Authentication (MSQA) button to the template. They can adjust the button's properties using the attributes described below. However, note that the placement of the custom button will depend on the client's own template styling.
For this type of button, both the advanced Edge experience and the one-tap login are supported.
Example of custom MSQA button usage:
<div *showIfSocialAuthAvailable class="social-wrapper">
  <div class="social-buttons-wrapper">
    <social-sign-in type="branded"></social-sign-in>
  </div>
  <span microsoftQuickAuthButton microsoftQuickAuthButtonTheme="piano_branded"
        microsoftQuickAuthButtonWidth="240px"></span>
  <div class="or-text">
    <t>or</t>
  </div>
</div>
You can adjust the following parameters in your Piano ID login page and Piano ID register page templates:
|
Parameter |
Options |
Default value |
|
microsoftQuickAuthButtonSize |
|
|
|
microsoftQuickAuthButtonShape |
|
|
|
microsoftQuickAuthButtonLogoAlignment |
|
|
|
microsoftQuickAuthButtonTheme |
|
|
|
microsoftQuickAuthButtonType |
|
|
|
microsoftQuickAuthButtonText |
|
|
|
microsoftQuickAuthButtonWidth |
Number in CSS Pixels (200-600px) |
- |
|
microsoftQuickAuthButtonHeight |
Number in CSS Pixels (24-100px) |
- |
Please note:
-
New clients will automatically receive the updated Piano-branded styles for their MSQA buttons.
-
Existing clients can access the new styles by reverting their Piano ID login page, Piano ID login confirm page and Piano ID register page templates.
-
If existing clients wish to use Piano-branded styles, they can either remove the custom button from the template or apply the provided code:
HTML<span microsoftQuickAuthButton microsoftQuickAuthButtonTheme="piano_branded" microsoftQuickAuthButtonWidth="240px"></span>
The themes piano_branded, piano_round and piano_withTitle were introduced to harmonize Microsoft buttons with Piano social login buttons. However, advanced Edge experiences will not be compatible with these new themes.
Template Configuration
The Microsoft authorization button should be available out-of-the-box if you are using the default Piano ID login page, Piano ID register page and Piano ID login confirm page templates. If you have applied customizations NOT related to the Microsoft button, you don't need to modify the button's configuration. However, if you wish to customize the Microsoft button itself, you will need to add a custom button code to your template under Manage → Templates → Identity Management section (note you may have to use the arrow symbol > at the top to navigate to the second page to view all available Identity Management templates).
Below is the configuration for adding the Microsoft authorization button:
<span microsoftQuickAuthButton></span>
For example like this:
<div *showIfSocialAuthAvailable class="social-wrapper">
  <div class="social-buttons-wrapper">
    <social-sign-in></social-sign-in>
  </div>
  <span microsoftQuickAuthButton></span>
  <div class="or-text"><t>or</t></div>
</div>
You also need to make sure that the following block is present in the Piano ID profile in my account template so that you can link and unlink Microsoft in your profile on the My Account page:
<div class="social-group clearfix" showIfMicrosoftAvailable>
   <div class="social-caption">
      <i class="social-icon microsoft"></i>
      Microsoft
   </div>
   <span class="social-linked" showIfMicrosoftLinked><t>Account connected</t></span>
   <div class="social-buttons">
      <microsoft-unlink>
         <t>Disconnect</t>
      </microsoft-unlink>
      <microsoft-link>
         <t>Connect account</t>
      </microsoft-link>
   </div>
</div>
For example like this:
<div class="tp-form form-horizontal" showIfSocialAuthAvailable>
    <div class="control-group">
      <h2 class="control-label social-accounts-title">
        <t>Social accounts</t>
      </h2>
      <div class="controls">
        <div class="social-group clearfix" showIfAppleAvailable>
          <div class="social-caption">
            <i class="social-icon apple"></i>
            Apple
          </div>
          <span class="social-linked" showIfAppleLinked><t>Account connected</t></span>
          <div class="social-buttons">
            <apple-unlink>
              <t>Disconnect</t>
            </apple-unlink>
            <apple-link>
              <t>Connect account</t>
            </apple-link>
          </div>
        </div>
        <div class="social-group clearfix" showIfFacebookAvailable>
          <div class="social-caption">
            <i class="social-icon facebook"></i>
            Facebook
          </div>
          <span class="social-linked" showIfFacebookLinked><t>Account connected</t></span>
          <div class="social-buttons">
            <facebook-unlink>
              <t>Disconnect</t>
            </facebook-unlink>
            <facebook-link>
              <t>Connect account</t>
            </facebook-link>
          </div>
        </div>
        <div class="social-group clearfix" showIfGoogleAvailable>
          <div class="social-caption">
            <i class="social-icon google"></i>
            Google
          </div>
          <span class="social-linked" showIfGoogleLinked><t>Account connected</t></span>
          <div class="social-buttons">
            <google-unlink>
              <t>Disconnect</t>
            </google-unlink>
            <google-link>
              <t>Connect account</t>
            </google-link>
          </div>
        </div>
        <div class="social-group clearfix" showIfTwitterAvailable>
          <div class="social-caption">
            <i class="social-icon twitter"></i>
            Twitter
          </div>
          <span class="social-linked" showIfTwitterLinked><t>Account connected</t></span>
          <div class="social-buttons">
            <twitter-unlink>
              <t>Disconnect</t>
            </twitter-unlink>
            <twitter-link>
              <t>Connect account</t>
            </twitter-link>
          </div>
        </div>
        <div class="social-group clearfix" showIfLinkedinAvailable>
          <div class="social-caption">
            <i class="social-icon linkedin"></i>
            LinkedIn
          </div>
          <span class="social-linked" showIfLinkedinLinked><t>Account connected</t></span>
          <div class="social-buttons">
            <linkedin-unlink>
              <t>Disconnect</t>
            </linkedin-unlink>
            <linkedin-link>
              <t>Connect account</t>
            </linkedin-link>
          </div>
        </div>
        <div class="social-group clearfix" showIfMicrosoftAvailable>
          <div class="social-caption">
            <i class="social-icon microsoft"></i>
            Microsoft
          </div>
          <span class="social-linked" showIfMicrosoftLinked><t>Account connected</t></span>
          <div class="social-buttons">
            <microsoft-unlink>
              <t>Disconnect</t>
            </microsoft-unlink>
            <microsoft-link>
              <t>Connect account</t>
            </microsoft-link>
          </div>
        </div>
        <open-id-list showIfOpenIdAvailable>
          <ng-template>
            <div class="social-group clearfix">
              <div class="social-caption">
                <i class="social-icon openid" openIdIcon></i>
                <span openIdTitle></span>
              </div>
              <span class="social-linked" showIfOpenIdLinked><t>Account connected</t></span>
              <div class="social-buttons">
                <openid-unlink>
                  <t>Disconnect</t>
                </openid-unlink>
                <openid-link>
                  <t>Connect account</t>
                </openid-link>
              </div>
            </div>
          </ng-template>
        </open-id-list>
      </div>
    </div>
  </div>
One-Tap Customization
Microsoft Quick Authentication also offers a simplified authentication process where users can log in with a single tap.
The following parameters of the one-tap experience can be customized:
-
autoPrompt- format: boolean; default value:true -
autoSignIn- format: boolean; default value:false -
context- values:"signup"|"signin"|"use"; default value:"signin" -
cancelOnTapOutside- format: boolean; default value:true -
promptPosition- values:'left'|'center'|'right'; default value:'left'
To customize the experience the tp.pianoId.init code needs to be adapted accordingly.
tp.pianoId.init({
  ...,
  msqaPromptConfiguration: {...}
})
The payload should have the following format and values:
{
  autoPrompt: boolean; // default: true
  autoSignIn: boolean; // default: false
  context: "signup" | "signin" | "use"; // default: signin
  cancelOnTapOutside: boolean; // default: true
  promptPosition: 'left' | 'center' | 'right'; // default: left
}
Note, that each parameter is optional. For any parameters not explicitly defined, the default value will be applied.
To display the prompt manually, publishers can use the tp.pianoId.showMsqaPrompt() function. The behavior of this function depends on the auto_prompt parameter. If auto_prompt is set to true, the prompt is displayed immediately after tp.pianoId.init() is loaded.
However, if auto_prompt is set to false, the prompt will not be shown automatically, and you need to call tp.pianoId.showMsqaPrompt() manually to display the prompt.
It's important to note that while this function (tp.pianoId.showMsqaPrompt()) is available on any browser, it is specifically designed for the Edge browser to show the prompt. In other browsers, this function does nothing. Publishers should ensure that the tp.pianoId.init() function is completed before calling tp.pianoId.showMsqaPrompt() to display the prompt manually.
tp.pianoId.init({
  msqaPromptConfiguration: {
    autoPrompt: false,
    autoSignIn: true,
    context: 'signup'
  }
})

...

tp.pianoId.init().then(() => {
  setTimeout(() => tp.pianoId.showMsqaPrompt(), 10000) // show prompt in 10 seconds after PianoId initialization
})
Localization
Microsoft Quick Authentication supports localization. The language of the Microsoft sign-in button will be changed according to the localization settings. For a consistent UX/UI, the locale from the Identity Management UI is transferred directly to the MSQA button in an xx-XX format. If no locale is available for any reason, MSQA is displayed with en-US.
For the one-tap prompt, the button text can be explicitly changed to one of the supported languages listed here.
For example like this:
tp.pianoId.init({
  ...,
  msqaPromptConfiguration: {
    ...,
    locale: 'en-US'
  }
})
The payload should have the following format:
{
  ..., // other parameters
  locale: string; // piano locale by default
}
The locale parameter is optional - if the language is not explicitly set, the default language defined in the Piano dashboard under Manage → Localization will apply.
Login Flows
-
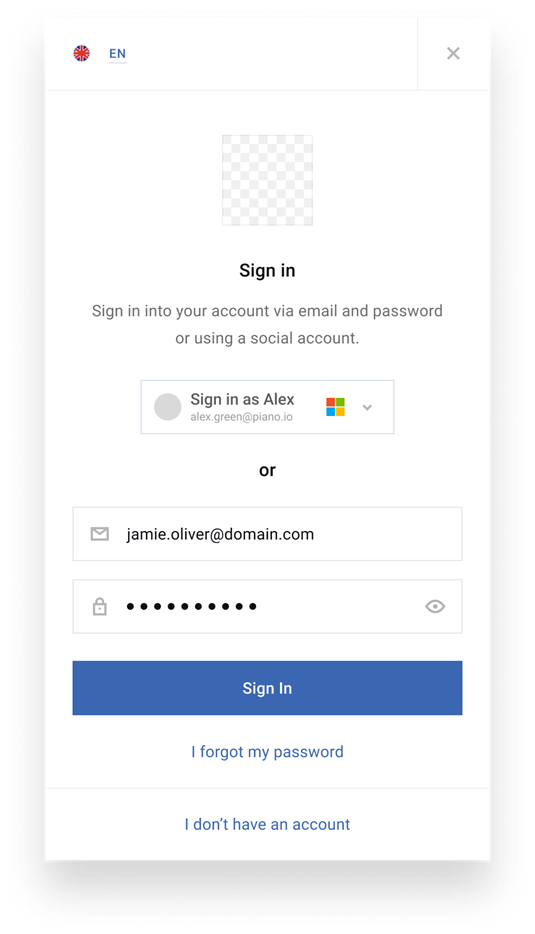
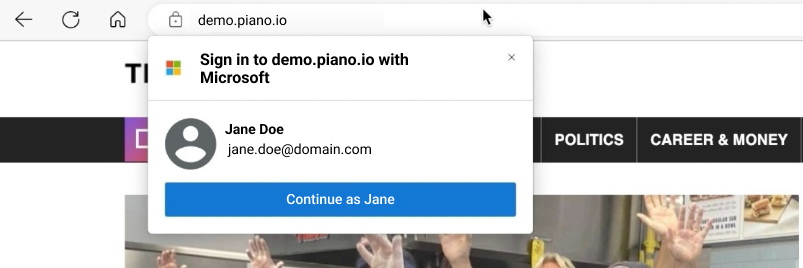
Login Experience with Edge Browser: Users who sign in using Microsoft Quick Authentication will have an enhanced experience when using Microsoft Edge, as it integrates seamlessly with their Microsoft Account.
Additionally, Microsoft Edge users will be presented with a one-tap login prompt when they visit the page.
-
Login Experience with Other Browsers: Microsoft Quick Authentication is a cross-browser solution, ensuring a consistent experience for users across various browsers.