
Inquiries Overview
Users can submit their questions, requests, and complaints regarding their experience through the My Account Component. After a user sends such an inquiry, you will receive an email with the text of the user's inquiry to the support email address you specified in the Edit Business section. By the Inquiries tab on the Admin dashboard, you will see the total number of open inquiries. To see inquiries within an application, click Inquiries on the Users tab of the Client Dashboard.
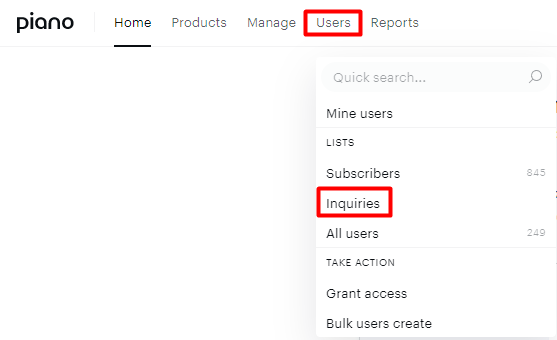
To handle an inquiry, click it from the list in the Inquiries window. That will pull up a screen like this:
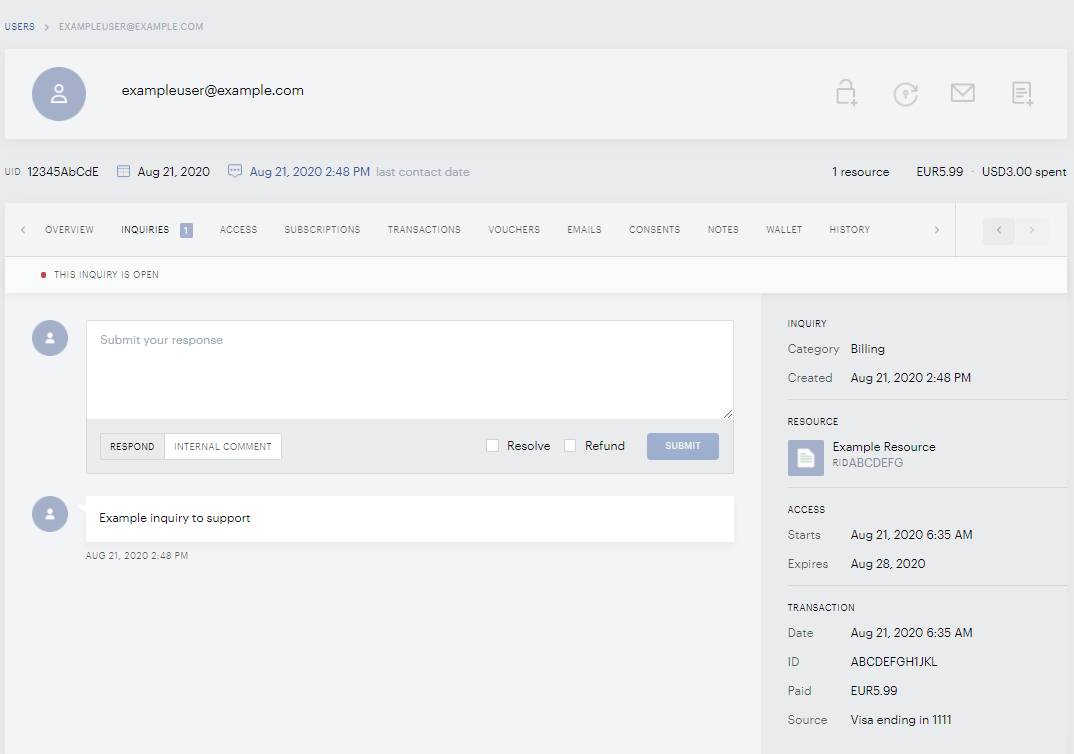
When a user creates an inquiry concerning a term, the term transaction in the TRANSACTIONS menu changes its status to "Disputed"; you can read more about it on this page. The inquiry dialogue box will allow you to send messages either to the inquiring user (select Respond, enter your message to the user, click send) or to create an internal note for yourself or your colleagues (select internal comment, enter your message, click add). If you check the resolve box before hitting submit, the inquiry's status will change from Open to Resolved.
Beneath the dialogue box, you will see the entire conversation history related to the inquiry. In the right sidebar, you will see the inquiry category (determined by the type of term), the resource the user is asking about when the user's access started when the access renews/expires (if it expires), and information about the user's most recent transaction.
Note that the Inquiry window is only used for communication with the user. You can answer questions, politely refuse requests, or inform users that you've modified their accounts. But in order to take extra action to resolve an inquiry — for example, refunding a transaction or granting access — you have to go into the individual user's account and make the change. The types of changes you can make to user accounts are covered in the next sections.
Modifying User Accounts
Locating Users
Searching for Users: To locate an individual user account, open the User dropdown, where you can:
-
fill the Quick search field at the top of the dropdown to do a keyword search by name or email address.
-
select the Mine users button for parametrized search.
-
use the dropdown options to select a user from:
-
users with subscriptions,
-
users with inquiries, or
-
all users as described below.
-
More information about the search bar can be found here.
Users → LISTS: Subscribers: If you want to browse your full subscriber database, you can click on the "Subscribers" option on the "Users" tab to view a full, paginated list of all of your subscribers. Each user in the subscriber's list has a subscription to your content (defined as a payment term with or without auto-renewal enabled).
Users → LISTS: All Users: If you want to browse your full user database, you can click All users on the User tab. When the "All users" option is selected, the result will show you all of your users that are in Piano in a full, paginated list organized alphabetically by email address. Each row in the user's list represents an individual user. Each user entry is clickable to access user details.

In case you are utilizing the Double-opt-in feature, you'll have the ability to see if a user has not yet confirmed their account by the label "Unconfirmed" displayed below the user's email address.
The action buttons on the top right-hand side allow you to:
-
Add to a mailing list (ESP license required)
Deleting Users
Users can be deleted directly via the Piano dashboard by searching for the user record(s) under the Users tab, selecting the relevant record(s) and clicking on the bin icon:

Alternatively, you can also use this API endpoint.
More detailed instructions about the GDPR deletion of user data via API can be found here.
Individual User Pages
When you click on an individual user account, you will see an overview of that user's account showing recent values for each category: Recent inquiries, Access, Subscriptions, Transactions, Emails, Vouchers, Consents, Notes, Wallet, and History. Scroll down to a category or go to it by hitting a tab from the top navigation bar.
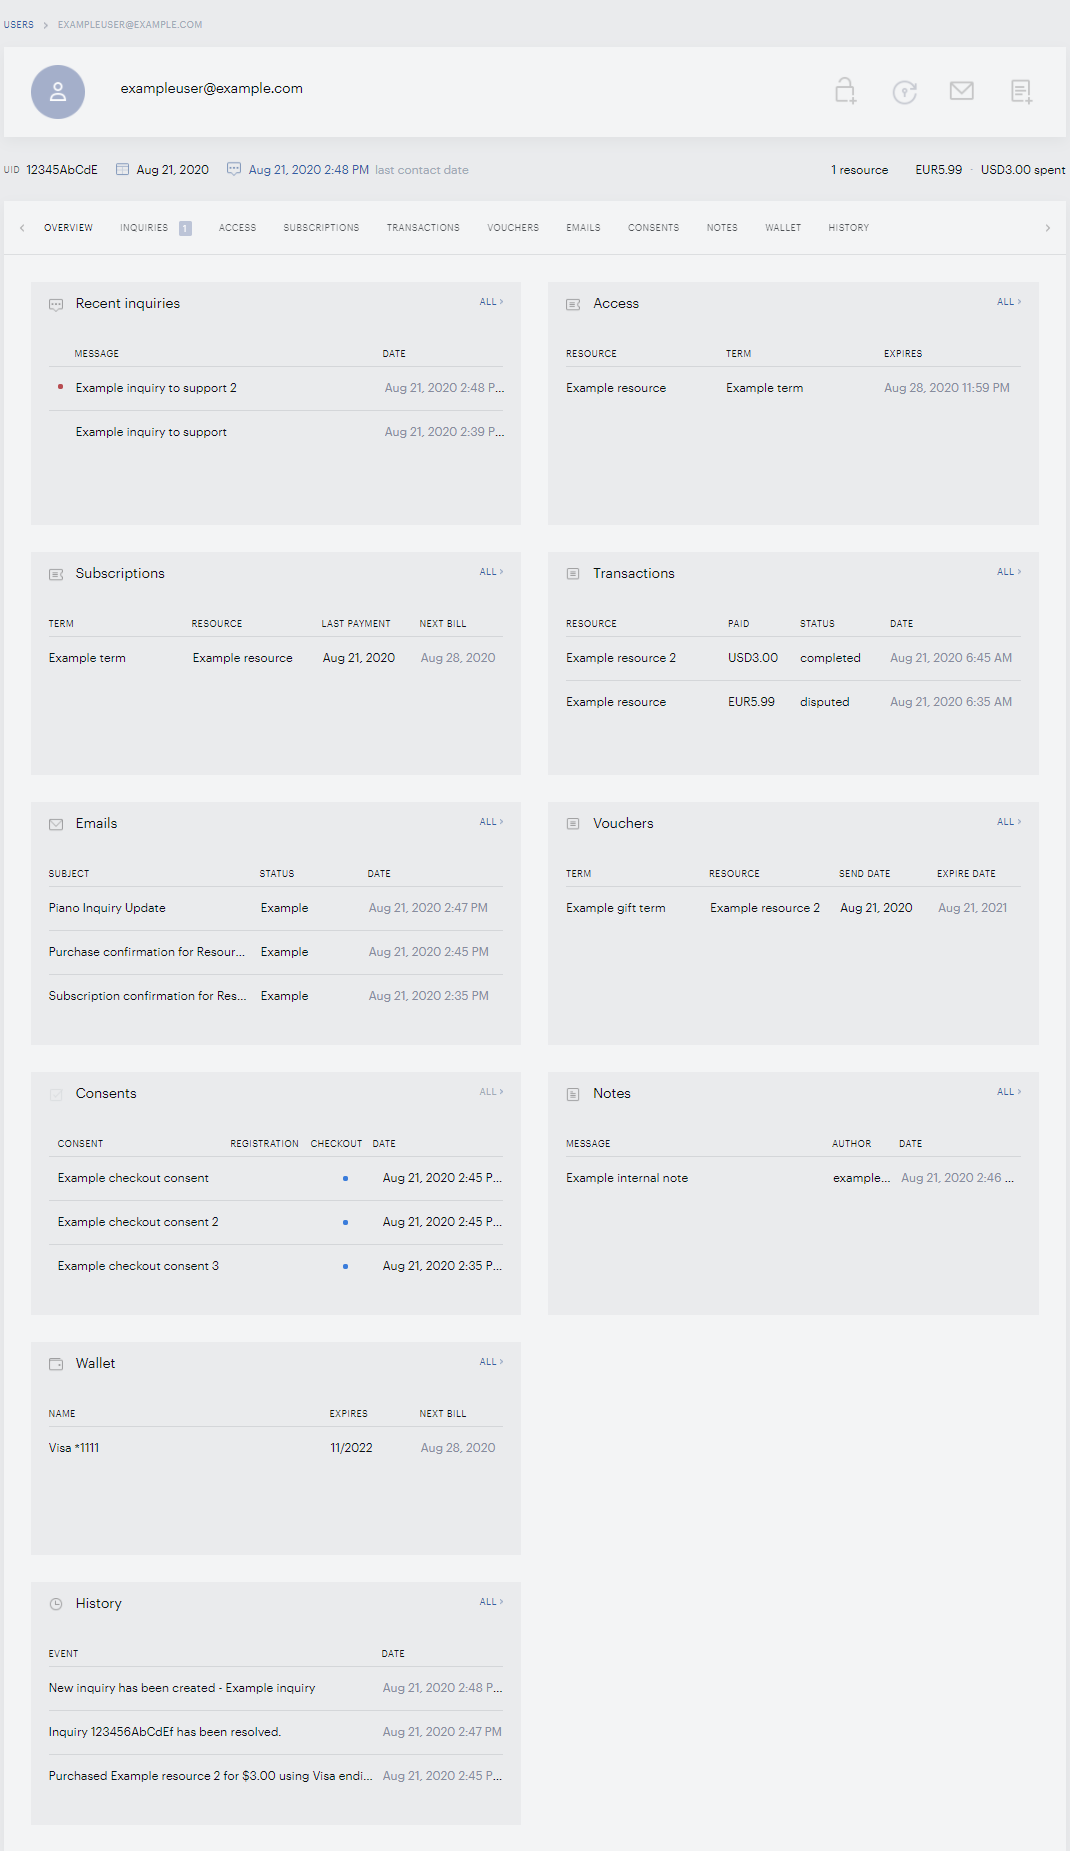
At the top of the user profile, there are three icons that can be used to grant the user access to a resource, to email the user, and to write an internal note that will be attached to the user's account. You can also click between the tabs at the top to view and edit the following parameters of an individual user:
Recent inquiries: Shows the user's open or closed inquiries starting from the latest one.
Access: Shows all the resources that the user has access to currently and those resources where the user's access has expired. If you have used "Grant Access" to provide access to a resource, you can click on that access to change the expiration date of the access or revoke access immediately. If the access is associated with a subscription, you will need to click on the Subscriptions tab cancel the subscription, or revoke access.
Subscriptions: Allows you to see and manage the user’s current subscriptions. Select a subscription to view its details. You can cancel it or, if it is allowed by the refund settings set in Edit Business, cancel and refund it. You can also upgrade the term, and renew mode (auto or manual). Please note, that is no longer possible to edit the user's next billing date during their grace period, not even via API. The billing date depends only on the billing plan now.
In case of a pending upgrade, an additional Cancel upgrade button will be visible, which allows you to cancel the scheduled upgrade and reactivate the previously active subscription.
When you cancel a subscription, access will be revoked immediately. If you instead want a user to continue to have access until the next billing period, simply switch Renew to Manual.
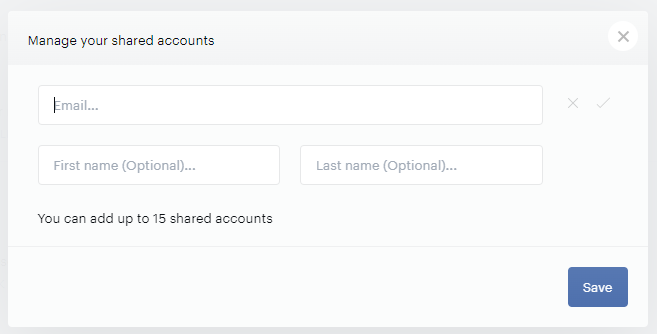
If a user has purchased a Shared subscription, you can also manage the child accounts on the user's behalf:
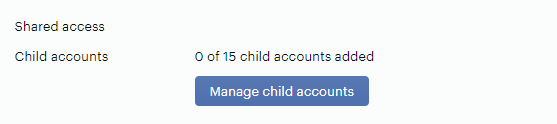
Clicking on Manage child accounts will open a modal window, where you can add child account emails, up to the maximum limit defined in the Shared subscription term, or remove child accounts if needed.
In addition, you might see a badge with a number next to the name of the Subscriptions tab.

This indicates the number of external subscriptions, that have or have not been verified. If a subscription has not been verified, you will see a tooltip with the following information: This user’s external subscription(s) did not verify successfully. The call to our API (conversion/external/create) with the user's external payment receipt failed - this could have happened due to numerous reasons - e.g. incorrect API call, invalid receipt, a duplicate submission, etc.
Transactions: Shows all transactions the user has made in Piano, regardless of the subscription or resource those transactions were associated with. Clicking on an individual transaction will allow you to refund the transaction directly without revoking access. To issue a prorated refund, please follow the instructions here. Note that refunds can only be made after a user's transaction has settled and that only one refund per transaction is allowed. You can also use the transactions tab to send an email receipt with all transaction details.
A refund for a gift payment will only refund the payment itself without revoking the gifted access.
Emails: Shows all emails sent through Piano to the user. Click on an individual email to see the details of that particular email. You can also resend the email to the user from this screen by clicking the Resend button.
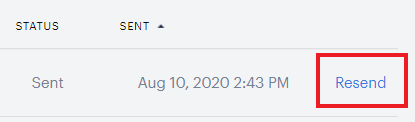
Please note, that we don't process notifications immediately after they are created, so it may take up to one minute for the sent email notification to appear in the Piano dashboard.
Vouchers: Shows the accesses purchased for other users under gift terms. You can select a voucher to see its details, revoke access, revoke & refund purchase, or resend the email to the recipient.
Consents: Lists all consent fields the user checked or left unchecked.
Notes: Shows all internal notes that your customer care representatives or administrators have made regarding a particular user. Notes can be edited and deleted.
Addresses: Stores postal addresses associated with the user. May be relevant for users with print subscriptions. To see an address, choose a PSC term in Subscriptions. The user can see the address in My Account's Library under the PSC term. To update the address, the user clicks the Manage button against the PSC term.
Wallet: Allows you to view and edit a user’s payment methods. To edit a card, hover over the card and click the pencil icon. From there you can add or change the credit card details. Some payment providers do not allow you to edit the details of an existing credit card – in these cases, you can add a new payment method with the correct details and then change the payment method within Subscriptions. If you have your own merchant account with Braintree, World Pay, or any other Piano-approved payment provider, you can also manually add a new credit card to a user's wallet. This allows you, for example, to input a new card from a customer when the user provides that information to your customer service representative over the phone.
You can also apply a payment method to all active subscriptions for a user. To do this, edit an existing card or enter a new one on behalf of the user, and you will be brought to this interface:
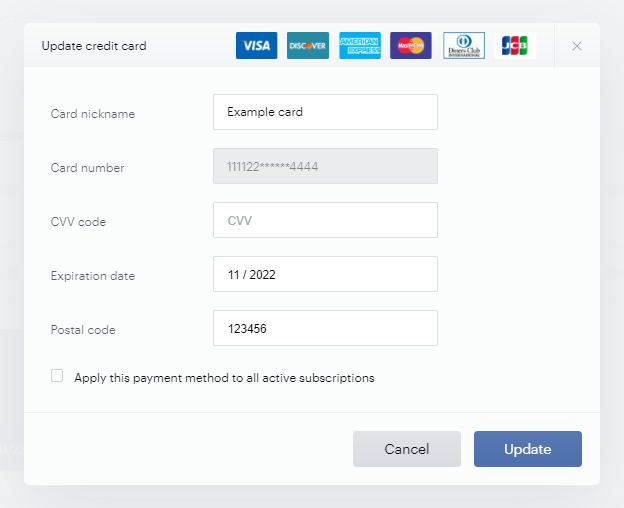
Select 'Apply this payment method to all active subscriptions. Once this occurs, hovering over the card will display text that indicates the card is the user's default payment method.
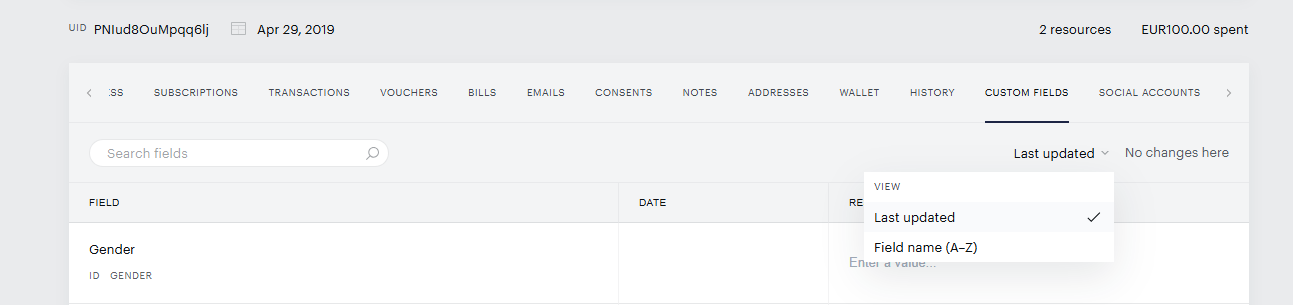
Custom fields: Allows you to view and edit the custom field values associated with a user. Use the search bar to find a specific field by name, or sort the list alphabetically (A–Z) or by last updated. To edit a field, click Enter a value in the Response column, type the new value, and then click Submit to save your changes (or Discard to cancel them). Any URL entered in a custom field is automatically clickable, so you can open linked resources directly from the user's profile. More details about Custom fields are available here.
History: Shows all of the activity related to the user's account — including purchases, refunds, subscriptions, authentication events, and profile updates. The list can be sorted by date or by event name. For example, the event User failed authentication attempt is connected to a user entering an incorrect password and the CAPTCHA feature or the event 3DS authentication payment error during automatic subscription renewal to a payment renewal failure that was related to a missing 3DS authentication.
The event User has logged on refers to the process where a user enters their login credentials (username and password) to access a website or application. When the user successfully logs in, a new session is created, and the user is considered to be logged on.
The event User session has been extended refers to the process where a user's existing session is prolonged without requiring them to log in again. This can happen when the user continues to interact with the website or application, or when a feature like "Extend expired access" is enabled in the Identity Management settings. In this case, the user's session token is refreshed, and the session duration is extended by the same length of time as their initial period of access. The user does not need to log in again, but they will need to log in if they want to make a purchase or update their profile information.
|
Identity Management Events |
Management + Billing (Subscription & Transaction) Events |
|
User has logged on |
New purchase |
|
User has logged out |
Payment verified |
|
User session has been refreshed* |
Payment refund |
|
User session has been extended |
Free promo redemption |
|
User failed authentication attempt |
PSC purchase |
|
Profile update** |
New gift received |
|
Email update |
New gift credit received |
|
Password reset |
Voucher purchase |
|
Password update |
Voucher redeemed |
|
User registered |
Subscription auto-renewed |
|
|
Subscription manually renewed |
|
|
Subscription auto-renew enabled |
|
|
Subscription auto-renew disabled |
|
|
Subscription resumed |
|
|
Subscription deferred canceled |
|
|
Subscription expired |
|
|
Subscription canceled |
|
|
Subscription auto-renewed with authentication failure |
|
|
Subscription auto-renewed with failure |
|
|
Dynamic subscription unlimited period converted |
|
|
Shared subscription parent created |
|
|
Shared subscription child added |
|
|
Shared subscription child access revoked |
|
|
Shared subscription parent access revoked |
|
|
Shared subscription canceled |
|
|
Shared subscription child has left |
|
|
Shared subscription left |
|
|
Shared subscription renewal failed |
|
|
New inquiry created |
|
|
New inquiry comment |
|
|
Inquiry resolved |
|
|
Inquiry refund |
|
|
Free access granted |
|
|
Term applied by publisher |
|
|
Term change started |
|
|
Term change finished |
|
|
Term change canceled |
|
|
User has registered |
|
|
Licensee contract redeemed |
|
|
Licensee contract auto-renewed |
|
|
Licensee contract subscription canceled |
*Triggered when /publisher/token/refresh, /identity/token, /identity/vxauth/token or /identity/oauth/token is called.
**The Profile updated event is triggered when a user’s first name, last name or email is changed. Updates to custom fields, whether made by a publisher, admin, import, or the user, do not trigger a Profile updated event and are currently not reflected in the user history. The Email update event is recorded together with the Profile update event.
Social Accounts: The Social Accounts tab in the Piano Dashboard provides publishers with valuable insights into the connection between user accounts and social networks. This feature allows publishers to see which social accounts users link to their Piano profiles, helping improve user management and visibility into registration or login methods.
If a user has a social account linked, it appears next to their email address and name in the user profile.

Clicking on the linked social account redirects to the Social Accounts tab.
Here, publishers can view:
-
The external provider (social media platform)
-
The provider’s user ID (if available)
-
The email address associated with the social account
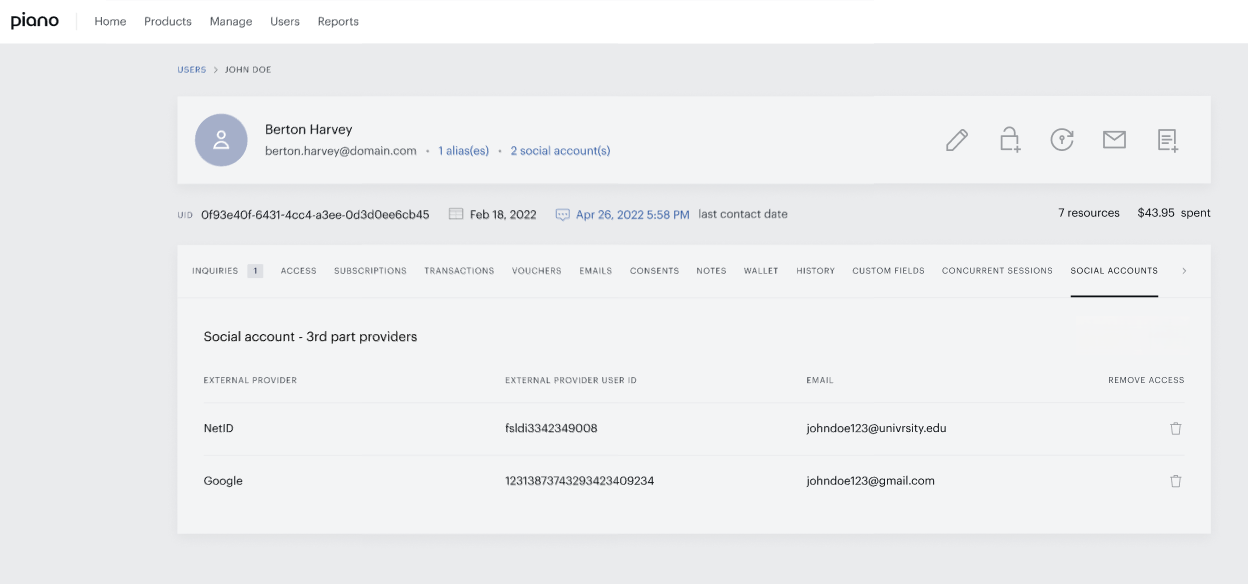
If the email addresses from social logins are not displayed in the Social Accounts tab, this may be caused by incorrect settings in the social provider’s developer account. Clients should verify that their developer account is configured to allow sharing of user email addresses via the provider’s API.
Publishers can manage these linked social accounts directly from this tab removing accounts. Currently, the only available action is to remove accounts. To remove a linked social account:
-
Click the trash can icon next to the account.
-
Confirm deletion in the warning dialog.
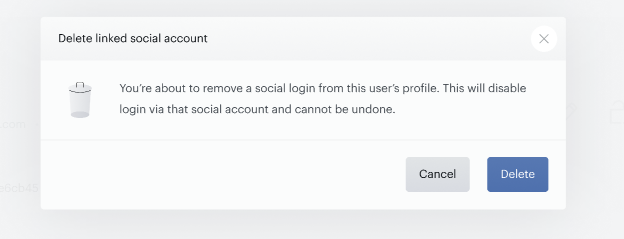
Important: Deletion is permanent and cannot be undone. Removing a linked social account disables login via that account. The user must either use another linked social account or log in with their Piano email. To log in via the removed account again, the user must reconnect it through My Account or the login modal.
Common Customer Services Tasks
Since the user section of the Piano dashboard allows customer care representatives to take many actions, we've created a cheat sheet below for easy reference.
|
Customer Service Action |
User Page Tab |
Steps and Result |
|
Cancel subscription and revoke access immediately without issuing a refund |
Subscriptions |
Click on the subscription in question and hit the "Cancel" button. This action will revoke access immediately. If the cancellation email is configured, it will be sent to the user. |
|
Cancel subscription and revoke access immediately while issuing a refund |
Subscriptions |
Click on the subscription in question and hit the "Cancel and Refund" button. This action immediately revokes access and issues a full refund for the most recent payment. |
|
End subscription without revoking access until the next payment date |
Subscriptions |
Click on the subscription and switch Renew to Manual. This will ensure that the user is not charged again (unless they manually renew) and that they retain the length of access they have purchased. |
|
Refund transaction (without revoking access) |
Transactions |
Click on the transaction, click "Refund," select the refund amount, and click "Refund" again. The full or partial refund will be issued immediately without revoking access. If the refund notification email is configured, it will be sent to the user. |
|
Give a "free month" to a user who has experienced a customer service issue |
Subscriptions |
To give a user a “free” amount of time, click on the subscription and edit the “Next bill date.” By pushing the next bill date out for any amount of time – one day, week or month from their current next bill date – the user will continue to have access, but will not be billed again until the designated date. If the user has auto-renew enabled, that user will renew based on that new date going forward. |
|
Turn off auto-renew |
Subscriptions |
Click on the subscription and switch Renew to Manual. The subscription will expire at end of the current access period unless it's manually renewed. |
|
Grant Access |
Access (or Grant Access button in the upper-right corner of the user page) |
See here for step-by-step instructions for granting access. After access is granted, the user will receive free access until the specified date. |
|
Email receipt |
Transactions |
Click on a transaction, click "Email receipt," and an email with transaction details will be sent to the user. |
|
Change credit card information |
Wallet |
Click on an existing credit card, edit the details, and click "Update." The updated credit card info will be used for transactions going forward. Updating card information is not possible with some payment providers, and you must instead add a new card. See here. |
|
Edit user |
Pencil button in the upper-right corner of the user page |
Click the pencil icon at the top right corner of the User page, and change the user's first name, last name, and/or email. |
|
Remove password |
Remove password button in the upper-right corner of the user page. |
Click on the Remove password icon at the top right corner of the User page to clear the user's stored password. After removal, the user can log in using passwordless login. More details here. |
|
Reset password |
Reset password button in the upper-right corner of the user page |
Click on the reset password icon at the top right corner of the User page, and either send the user a password reset email or change their password. More details here. |
|
Resend email |
Emails |
Click on an email, hit "resend," and the selected email will be resent to the user. |
|
Send new email |
Email button in the upper-right corner of the user page |
Click the email icon at the top right corner of the User page, write your subject line and message, click "send," and the new email will be sent to the user. |
|
Add note |
The note button in the upper-right corner of the user page |
Click the note button, write your note, click "add," and the note will be added to the user account for internal use. |
|
Read/respond/resolve inquiry |
Inquiries |
Internal and external messaging to resolve a user inquiry. |
|
Create a subscription for a new or existing user |
Subscribe user |
Follow the steps outlined here to create a subscription on behalf of a user. |
|
Resend gift email |
Vouchers |
In the account of the gift purchaser, go to the tab Vouchers, click on the gift voucher that should be resent and select the option "Resend". You'll be able to adjust the recipient's email address, and the delivery date of the gift, or add a personal message. |
|
Upgrade or downgrade a user's subscription |
Subscriptions |
Please follow the steps outlined here in order to change a user's subscription. You have the option to downgrade or upgrade it to another eligible term. |