
The step-by-step guide below describes how to set up gifting. Steps include:
This article covers voucher-based gifting, where the gift is redeemed with a voucher code and ends when the gifted access period runs out. If you want gift subscriptions that renew automatically on the gifter's payment method, see Renewable gifting. To compare the two approaches before you choose one, see this comparison table.
1. Creating a dedicated page for gift receivers
The first step when setting up a gifting offer is to create a page on your site where gift receivers will be directed when redeeming a gift (we call this the "Redemption URL"). Technically, the Redemption URL can be any page on your site with Piano's JavaScript running on it, but clients generally create a dedicated URL with a message welcoming gift receivers and outlining the benefits of the gift subscription they've just received. Here's an example of such a page:
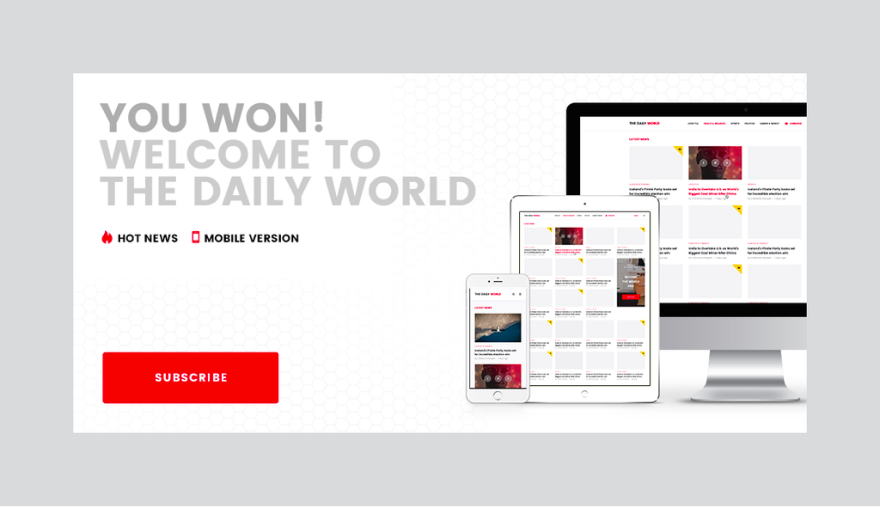
If you prefer to create this page later in the set-up process, you can edit your gift term's Redemption URL up until that term is purchased for the first time.
2. Creating a gift term
Go go Manage → Terms → New. Select Gift from the term selection screen shown below. If you do not see the gift option, please reach out to Piano Support (support@piano.io) to activate gifting on your Piano application.
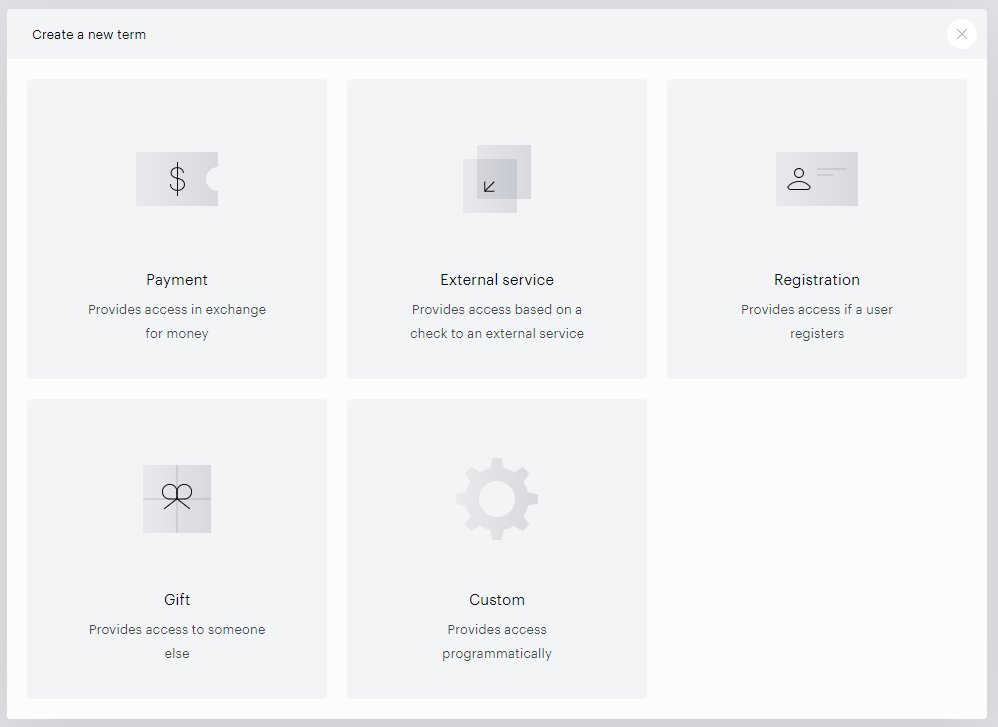
3. Configuring your gift term
As with any other term, you'll need to add a name and a description (keep in mind that you can expose the text in the name and description fields to end-users in your Offer Template and in your gift emails if you so choose). Using Avalara tax provider, you also see the Product tax category field which is filled according to the settings of your application.
As with a payment term, you'll then need to connect your term to a resource you've created, set a price, and select an access period (1 week, 4 weeks, 1 month, 3 months, 6 months, or 1 year). Gift terms are time-limited and non-renewing by nature.
For renewable gift options, see the Renewable gifting article.
Select Add shared access tokens to avail yourself of Shared Subscriptions.
The way this works is, that the gift purchaser sends the gift to one person and then they choose who else can redeem that gift.
The one field unique to gift terms is the Redemption URL, noted above. When gift receivers get the email informing them that they've been given a gift, that email will contain a link with the Redemption URL. When recipients then visit the Redemption URL page, a Piano modal/lightbox will automatically pop-up with the gift voucher code needed to redeem the gift auto-populated.
Please note, that since all gift purchases are non-recurring payments, users will see a "Remember my card for future payments" checkbox at checkout. In case a user does not check this box, their payment method information won't be saved and is not available in the dashboard or reports.
Currently, the platform does not support promotional discounts for users who purchase gift subscriptions, nor does it offer tiered pricing based on the quantity of gifts purchased.
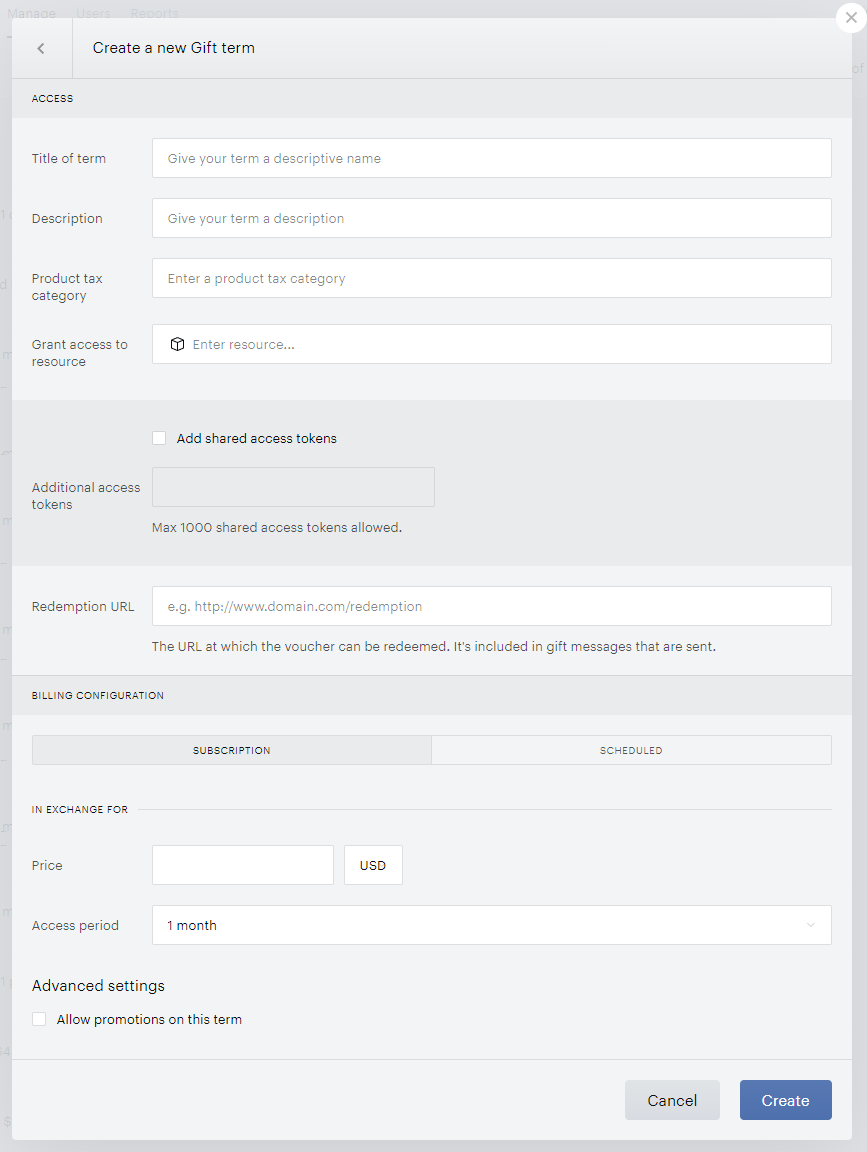
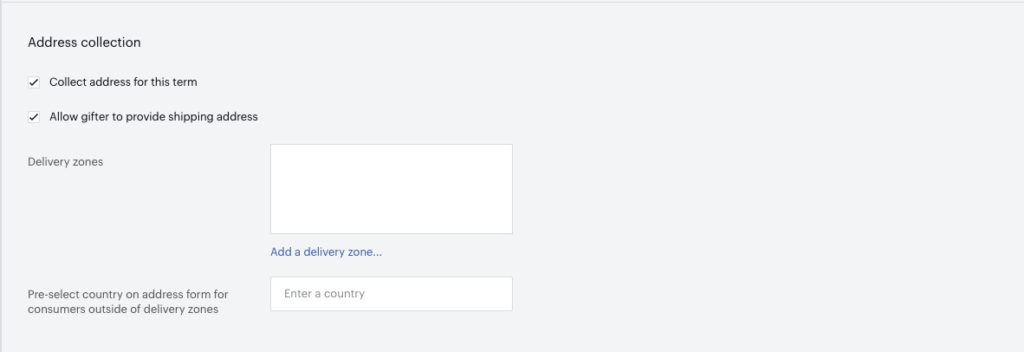
Address collection - checking "Collect address for this term" will offer one of two options for collecting addresses for gift terms:
-
Allow gifter to provide shipping address [unchecked] - this option will bypass address collection for the gifter and will allow the gift recipient to enter their own print address upon redeeming the gift term.

-
Allow gifter to provide shipping address [checked] - this option will allow the gifter to enter the physical address of the gift recipient at checkout

All template updates for address collection and shipping address support are detailed here.
4. Creating a gifting Offer Template
The next step is creating an Offer Template for your gift offer. As with any type of term, our Offer Template guide will be your best resource during that process. Though gift offer templates work much like any other offer template, there are a few methods specific to gift terms that you should be aware of:
-
startRedemption(): triggers the screen where users who have received gift subscriptions are able input a redemption code in order to activate their subscriptions.
-
isGiftTerm(term): returnstrueif a gift term is displayed. This method, as with all term-specific methods, can be used to customize language for different types of terms or to display them in particular parts of the template. For example, you might want to present a gift term separately from the main list of terms. In that case, you could use an Angular JSng-ifdirective in combination with theisGiftTerm(term)method.
You may also notice that there is some gift-specific language at the bottom of the Default Offer Template:
<div class="offer-redemption" ng-show="allowRedemption()">
		<table>
			<tr>
				<td class="title">
						<t>Did you receive a voucher?</t>
			</td>
			<td class="choose">
					<a ng-click="startRedemption()" class="button big"><t>Redeem</t></a>
				</td>
			</tr>
	</table>
</div>
The allowRedemption() method in the Default Offer Template code block above returns true when gifting has been enabled on a Piano application. Since gifting must be enabled for you to set up a gift term, this method will always return true for Piano clients who are creating gifting offers. It, therefore, doesn't have much utility within Offer Templates constructed specifically for gifting.
5. Activating and customizing gift emails
If you have not already done so, you'll also want to ensure that you have set up SPF and DKIM records so you can send emails that appear to come from your own domain (instructions on how to do so are here.) You'll also want to customize the "Master Email Layout," the design template for all emails you send. If you do not customize that template, the style of your emails will default to Piano's own.
In order for gift receivers to get an email informing them of their new gift, you'll want to go to Manage → Email Manager and toggle on the Gift delivery email. Here's the default copy of that email (which you are free to customize):
|
Email name in Dashboard |
Gift delivery |
|
When it's sent |
To a consumer when they receive a gift from someone else |
|
Default email subject line |
You just received a gift for |
|
The default email body copy HTML
|
|
As you can see from the default email body copy above, there are a number of variables that are available within the gift delivery email template. They include:
-
business_name: Taken from the "Business name" field in the "Edit business" section of your Piano application (accessible from the Piano Dashboard).
-
resource_name: The name you specified when creating the resource the gift recipient is gaining access to.
-
resource_url: The URL you specified when creating the resource the gift recipient is gaining access to.
-
user: The name of the user who sent the gift.
-
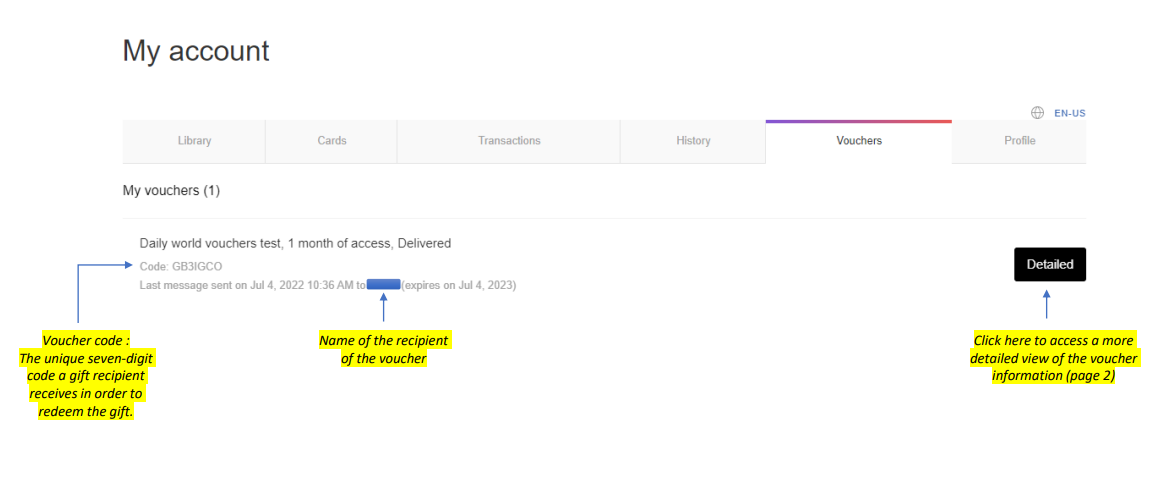
voucher_code: The unique seven-digit code a gift recipient receives in order to redeem the gift.
-
voucher_expires: An unredeemed gift voucher expires a year after the purchase date. If a voucher is not redeemed before the expiration date, the gift giver can request a refund.
-
voucher_message: The personalized message a gift giver writes to a gift receiver.
-
voucher_period: The duration of access being given (1 week, 4 weeks, 1 month, 3 months, 6 months, or 1 year).
-
voucher_recipient_name: The name of the gift recipient (specified by the gift giver during purchase).
-
voucher_redeem_url: The Redemption URL specified when creating the gift term where the gift receiver goes to input the voucher code and redeem the gift.
In order to use a variable within an email template, simply surround the variable name with double curly brackets. Like so: {{business_name}}. You're also able to use directives to dynamically insert or remove elements from your emails based on the existence and status of particular variables. For example, in the email above part of the email is bounded by a {{#if voucher_message}} ... {{/if}} directive. Because of that code, that entire part of the email won't be included if the gift giver doesn't add a personalized message for the gift receiver.
In case the gift purchaser has selected a future gift delivery date, this email will be sent out by one of our automated tasks triggered at 8 AM, 12 PM, and 16 PM at the relevant timezones for each publisher dashboard.
https://dashboard.piano.io/ (US) → timezone UTC-5/UTC-4 (EST/EDT)
https://dashboard-ap.piano.io/ (AP) → timezone UTC+9 (JST)
https://dashboard-au.piano.io/ (AU) → timezone UTC+11/UTC+10 (AEST/AEDT)
https://dashboard-eu.piano.io/ (EU) → timezone UTC+0 (GMT)
In addition to the Gift delivery email, you'll want to activate and customize the Gift purchase email located in Email Manager so that gift givers are sent confirmation of their purchase. Here's the default copy of that email (which you are also free to customize):
|
Email name in Dashboard |
Gift purchase |
|
When it's sent |
To a consumer when they purchase a gift for someone else |
|
Default email subject line |
Purchase confirmation for |
|
The default email body copy HTML
|
|
As you can see from the default email body copy above, many of the variables used within these two email templates are the same. But there are a few new ones available within "Gift purchase":
-
current_date: Today's date (shown like this: Feb 09, 2022)
-
purchase_term: The name of the gift term that has been purchased.
In addition, you can also configure a Gift revoke and Gift subscription expiration email. More information about these notifications is available here.
If needed, you can also send emails to gift recipients after they've redeemed a gift by using our "X-days" notifications listed below:
X Days after gift subscription ends
X Days after gift subscription starts
X Days until gift subscription ends
6. Configuring system templates for gifts
There are two system templates related to gifting that you may want to customize by going to Manage → Templates → System Templates. The Gift Components template is used by gift givers when checking out. The Redemption Components template is used by gift receivers when redeeming gifts.
As with all system templates, we recommend only changing colors, fonts, and text within these templates. In order to ensure proper functioning, the overall HTML layout should remain static for all system templates.
You do not need to write any additional code to display the redemption template. By including the URL redemption page within the term set up, you allow Piano to automatically render that template when a user visits that page. You may style your redemption page however you like, as the template is independent of the content on the page.
7. Testing your gifting set-up
Once you've set up gifting, you'll want to test your implementation to make sure everything is working properly. As you prepare to publicly release your gifting offer, here are answers to a few commonly asked questions about how gifts work that you should be aware of:
-
Piano's Sandbox environment won't allow you to send customer emails, but you can still test gift voucher codes by finding them in the user dashboard under the purchaser's account.
-
Guest checkout is not permitted for gifts. The gift purchaser will need to register/log in, the same as the gift recipient.
-
Users cannot send gifts to themselves.
If a user redeems a gift and they already have access to the same resource through an eligible subscription type, such as recurring payment subscriptions, one-off subscriptions, or existing gifts, their current access will be extended by the duration of the newly redeemed gift.
However, access will not be extended (and voucher redemption is not allowed) in the following cases:
-
The user has child access through a shared subscription for the same resource.
-
The user has an existing subscription on an external service term for the same resource.
-
The user has access on a dynamic term for the same resource.
-
The user has a pending upgrade to the same resource.
To redirect the user back to the homepage, My Account or a specific landing page when the gift redemption flow is completed, you can add a redirect to another page for this specific scenario in the Piano load script under Products → Composer → Integrate → Edit Source by editing the following part:
function onCheckoutClose(event) {
        /* Default behavior is to refresh the page on successful checkout */
        if (event && event.state == "checkoutCompleted") {
            location.reload();
        }
    }
To:
function onCheckoutClose(event) {
        /* Default behavior is to refresh the page on successful checkout */
        if (event && event.state == "checkoutCompleted") {
            location.reload();
        }
      if (event && event.state == "voucherRedemptionCompleted") {
            window.location.href = '<URL>';
        }
    }
And replace the "<URL>" with the page you'd like the user to be redirected to after the redemption of the gift (e.g. the homepage of your website or My Account).
Gift senders are able to view more information about their gift under the Vouchers tab in the My Account section:
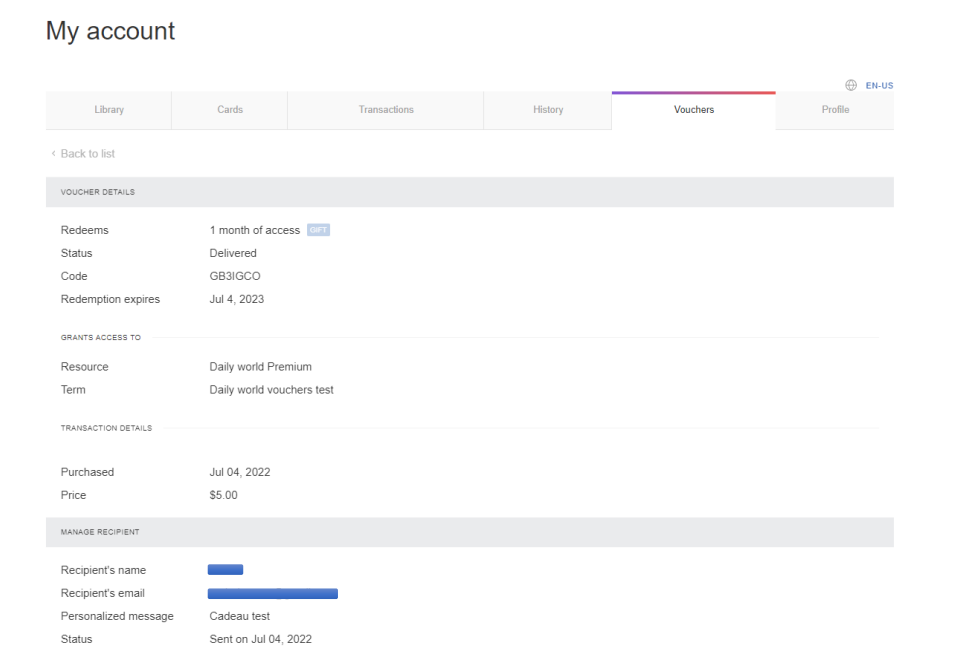
Clicking on the Detailed button will show a detailed gift overview:
8. Revoking or Returning a Gift
If a gift giver wishes to revoke a gift, they will need to either request that you do so on their behalf or manage this via My Account themselves. You can then decide whether or not to grant the request to revoke the gift. If you decide to grant the gift giver's request, the giver's gift vouchers can be found in the giver’s user profile. You can either revoke a voucher without refunding the purchase price or revoke and refund it. If you choose to revoke and refund it, the paid sum returns to the payment source used for payment (the giver’s credit card, PayPal account, or another payment method).
If the gift giver purchases a gift voucher and then you revoke it before the receiver manages to redeem it, the receiver (if already a registered user) will not have any access period recorded in his or her account history. However, if the receiver redeems the gift before the giver revokes it, the receiver will have access from the redemption date until the day of the revocation. The date of revocation is the last day of access.
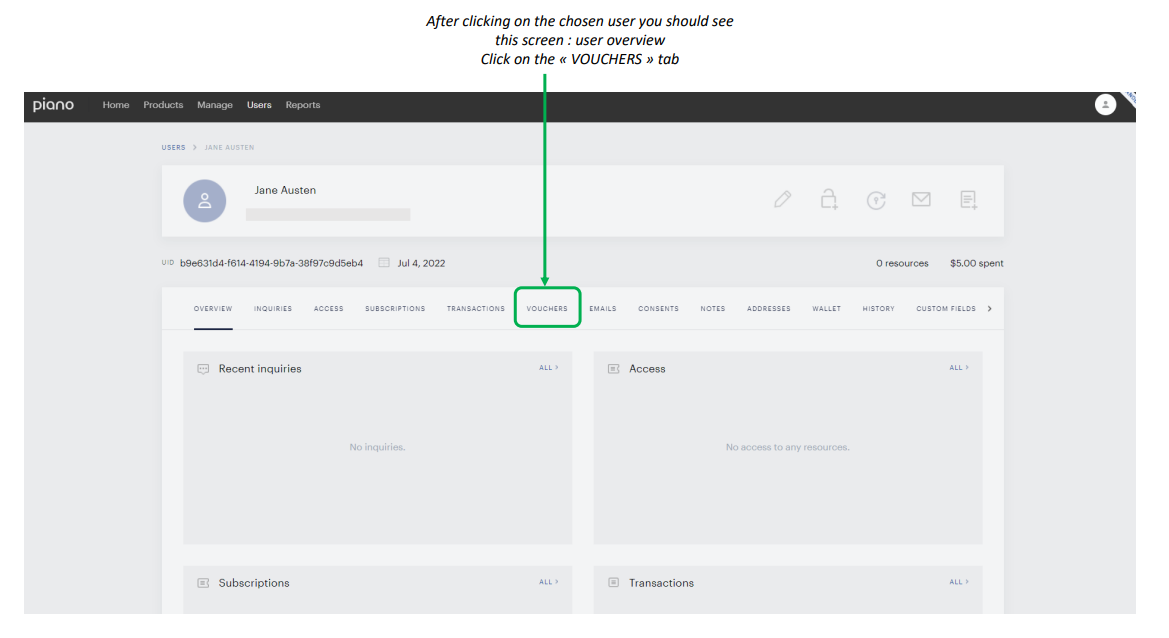
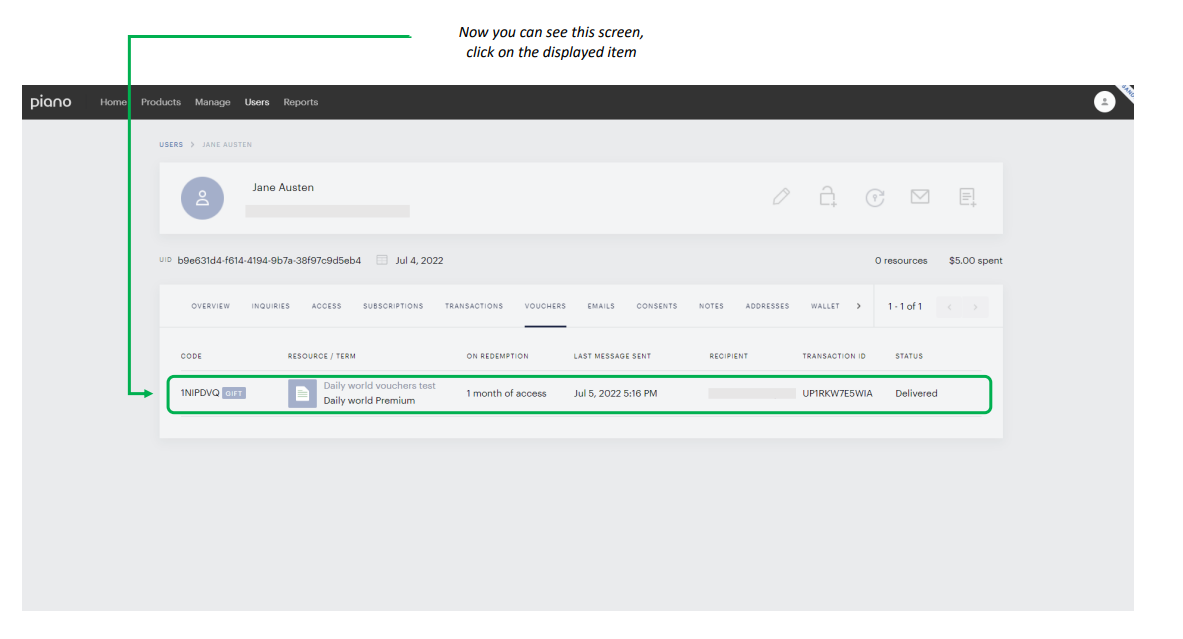
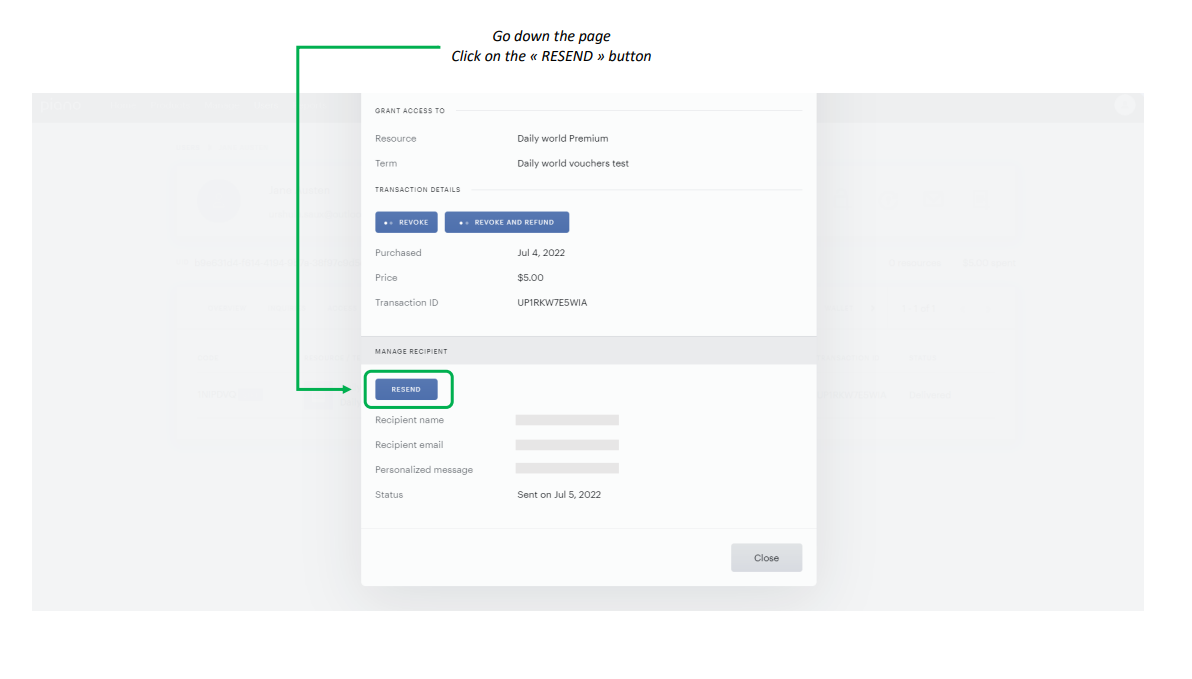
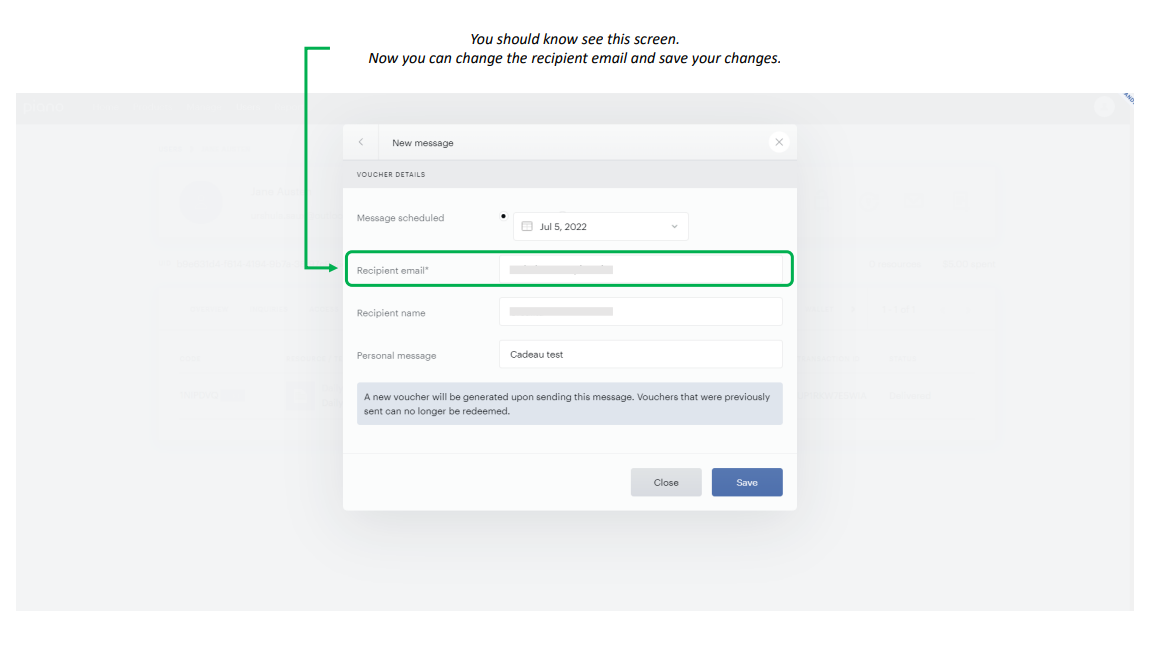
You are also able to resend a gift, for example, if the gift recipient's email address contains a typo. You can do so in the Vouchers tab of the gift sender's user account:
If a user purchases a gift with a future delivery date, they have the option to cancel the delivery and purchase prior to the actual delivery date via My Account.
The option under the Voucher tab in My Account will only be available up to the point of the gift actually being delivered to the gift recipient. So it is available while the gift/voucher is in the status "Assigned" (i.e. it was successfully purchased but has a future delivery date - so the gift recipient has not yet received an email).
If a gift purchaser takes advantage of this option, this will cancel the delivery of the gift email to the gift recipient and refund the purchase*. (And the gift voucher status will change to "Revoked")
If the purchase is refunded depends on your refund period settings here.
Once the gift receives the status "Delivered" (i.e. when the gift delivery email is sent to the gift recipient), the gift sender is no longer able to cancel the gift via My Account.
It's only possible to Revoke (or Revoke and refund) the gift from the Piano dashboard afterwards as explained above.
The statuses can be viewed in the Piano dashboard in the gift purchaser's account under the Voucher tab. And there you can also revoke/refund a gift after selecting it.