
Getting Started | Module 2: Setting up Piano Scripts
In this module, we’ll show you how to Set up Piano Scripts. Here we’ll cover:
-
Integrating your Sandbox and Production sites to your Piano apps
-
How to set up ad blocker detection
-
How to pass data to Piano
-
How to set up Identity Management scripts
-
How to set up a Identity Management password reset request
-
How to add the My Account component
Integrating Piano Scripts with Your Application
The Piano Script
When implementing Piano, one of the first steps during setup is pasting a snippet of Piano JavaScript just before the closing body tag of the main document on both your staging and production websites.
We recommend implementing both Sandbox and Production scripts at the start of the implementation, even though we’ll be working in the Sandbox for the majority of the implementation process. The Piano JavaScript loads the Composer integration script which includes your specific Piano configuration and also loads Piano’s complete JavaScript library tinypass.min.js (everything from Piano’s client-side browser API client to post a message and iframe support for Piano’s templates).
In case you are also utilizing Piano ESP, please review the instructions here on how to implement its script in combination with the one for Composer.
The following sections will detail exactly how to implement Piano’s JavaScript for any client-side implementation.
The Sandbox Environment Script
Here's the standard Piano JavaScript for a Sandbox application insert your sandbox AID and add this just before the closing body tag on your staging site):
<script>
   (function(src) {
       var a = document.createElement("script");
       a.type = "text/javascript";
       a.async = true;
       a.src = src;
       var b = document.getElementsByTagName("script")[0];
       b.parentNode.insertBefore(a, b)
   })("//sandbox.tinypass.com/xbuilder/experience/load?aid=YOUR_SANDBOX_APPLICATION_ID");
</script>
The Production Environment Script
Here's the standard Piano JavaScript for a US Production dashboard (https://dashboard.piano.io/) application. Insert your Production AID and add this script before the closing body tag on your Production site:
<script>
   (function(src) {
       var a = document.createElement("script");
       a.type = "text/javascript";
       a.async = true;
       a.src = src;
       var b = document.getElementsByTagName("script")[0];
       b.parentNode.insertBefore(a, b)
   })("//experience.tinypass.com/xbuilder/experience/load?aid=YOUR_PRODUCTION_APPLICATION_ID");
</script>
If your application is hosted on another dashboard, you would need to replace the URL as follows:
EU dashboard (https://dashboard-eu.piano.io/):
https://experience-eu.piano.io/xbuilder/experience/load?aid=YOUR_EU_PRODUCTION_APPLICATION_ID
AP dashboard (https://dashboard-ap.piano.io/):
https://experience-ap.piano.io/xbuilder/experience/load?aid=YOUR_AP_PRODUCTION_APPLICATION_ID
AU dashboard (https://dashboard-au.piano.io/):
https://experience-au.piano.io/xbuilder/experience/load?aid=YOUR_AU_PRODUCTION_APPLICATION_ID
Another method of integrating this code is to directly copy the necessary JavaScript from within your Piano application(s) by following these steps. Both methods accomplish the same outcome, but the procedure outlined in the linked article does not require you to copy and paste your AID.
Script Implementation for Single Page Applications
If you're using Single Page Applications you'll need to manually initiate all Piano JavaScript values and inform Piano every time new content is loaded or the URL changes. This is because Piano captures user data and triggers experiences upon every page load, but Single Page Applications (SPAs) dynamically load content without reloading the page.
Here is an example of Piano's JavaScript with the fields manually defined:
<script>
   tp = window.tp || [];
   // Set Application ID
   tp.push(["setAid", 'TYdG8Mh7eY']);
   // Is application in sandbox?
   tp.push(["setSandbox", false]);
   // Does application use Piano ID?
   tp.push(["setUseTinypassAccounts", false]);
   // Execute when the page is first loaded
   tp.push(["init", function() {
       tp.experience.init();
   }]);
   (function(src) {
       var a = document.createElement("script");
       a.type = "text/javascript";
       a.async = true;
       a.src = src;
       var b = document.getElementsByTagName("script")[0];
       b.parentNode.insertBefore(a, b)
   })("//cdn.tinypass.com/api/tinypass.min.js");
</script>
Whenever new content is loaded without a browser refresh, you’ll need to execute the Piano experience you've designed in Composer so that each new applicable change on the page or URL is made known to Composer in place of a true page load. You can do this wherever it applies by using this function:
tp.experience.execute();
Validating your Script Implementation
Once you've configured Piano's JavaScript on your pages, check your integration to make sure the appropriate scripts are running as expected. Below, we've provided step-by-step instruction on how to check various parts of Piano's JavaScript using Chrome’s Inspect Element tool:
-
Load the page, right-click and choose Inspect
-
Select the Network tab
-
Refresh the page
-
Filter for “tinypass” in the Network console
-
Seeing "tinypass" entries means that Piano's JavaScript is firing on the page
Here's an example of the kind of values you should see in the console when Piano JavaScript is running:
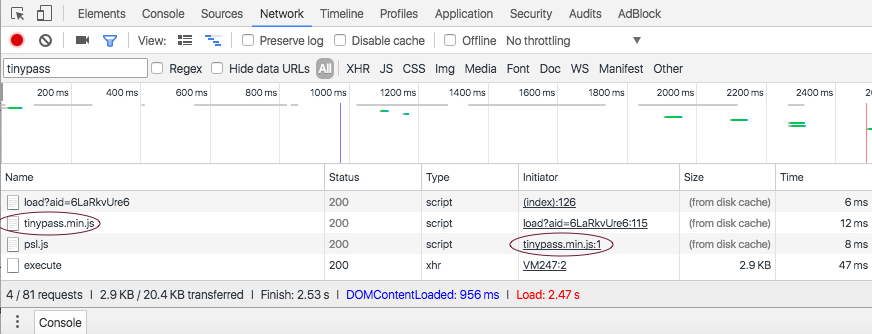
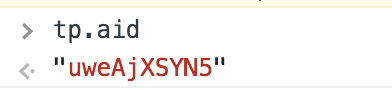
Next, in the Console tab, enter tp.aid. This will return your Application ID. If you are implementing the main Piano scripts correctly you should see your AID in the response.
Setting up Ad-block Detection
Ad-block Script Overview
Piano’s ad blocker detection methods allow us to identify and quantify ad blockers. This lets you send targeted messages to ad blockers asking them to whitelist your site, register for access, or pay for an ad-free experience.
Piano detects ad blockers by executing a call to a mock ad network and detecting whether or not that call is blocked. If it is blocked, we set cookie values to indicate the presence of an ad blocker. We then track every page view to detect whether that browser's adblocker has been turned off.
Best Practice: Piano has found that targeting users with a request to turn their ad blockers off can actually increase engagement.
Adding the Ad-block Script
Add this JavaScript as the first element in your <head> tags:
<script>
   document.cookie = "__adblocker=; expires=Thu, 01 Jan 1970 00:00:00 GMT; path=/";
   var setNptTechAdblockerCookie = function(adblocker) {
       var d = new Date();
       d.setTime(d.getTime() + 60 * 5 * 1000);
       document.cookie = "__adblocker=" + (adblocker ? "true" : "false") + "; expires=" + d.toUTCString() + "; path=/";
   };
   var script = document.createElement("script");
   script.setAttribute("async", true);
   script.setAttribute("src", "//www.npttech.com/advertising.js");
   script.setAttribute("onerror", "setNptTechAdblockerCookie(true);");
   document.getElementsByTagName("head")[0].appendChild(script);
</script>
We also recommend that you add this script inline. If you instead use a tag manager to load the script, detection may be less accurate as a result.
Validating the Ad-block Script
To use Chrome's Inspect Element tool to validate that Piano's ad-block detection script is running, follow these steps:
-
Load the page in Incognito mode, right-click and choose Inspect
-
Click on the Console tab
-
Type tp.util.getAdblockStatus()
If the JavaScript library is initialized correctly, you should see 0, indicating that ad-block is not enabled. If you see -1, the library was not properly initialized.
Shipping Data to Piano
Most tracking and segmentation is built directly into Piano's JavaScript library. However, because there are some segmentation and tracking capabilities that are unique to your site's configuration, you'll need to send that information to Piano using a few simple tp.push commands.
For example, Piano cannot read your site’s metadata, so many clients will send us page type (e.g., “article” or “section front”) so that we can set up experiences that target only those types of pages.)
Finally, for clients who have a freemium subscription model, we recommend that you set up tags to tell Piano which pages are premium and which are free.
How to Send Page Data to Piano
You can send page data to Piano as part of the Tags or Section categories. Usually, clients use Section for the site section (e.g., Sports, Fashion, etc.), and Tags for everything else — including page type.
To segment using tags first, initialize the tp object:
tp = window.tp || [];
Then, store the tags in the array:
tp.push(["setTags", ["sports", "breaking-news", "premium"]]);
If you used the provided integration script to set up Piano, you do not need to initialize the tp object.
Verify your Data Pipeline
-
Load the page in an Incognito window
-
Open your browser's Developer Console
-
Type tp.tags to return any tags that you applied to that given page
-
Type tp.contentSection to return any sections that you applied to that given page

If the result is empty, then you are not passing us tags or sections on that page.
Identity Management Scripts
Initializing Identity Management
Identity Management scripts allow you to leverage user management functionality like login, registration, logout, and password-reset flows.
By default, the Identity Management login and registration screens are modals that look like this:
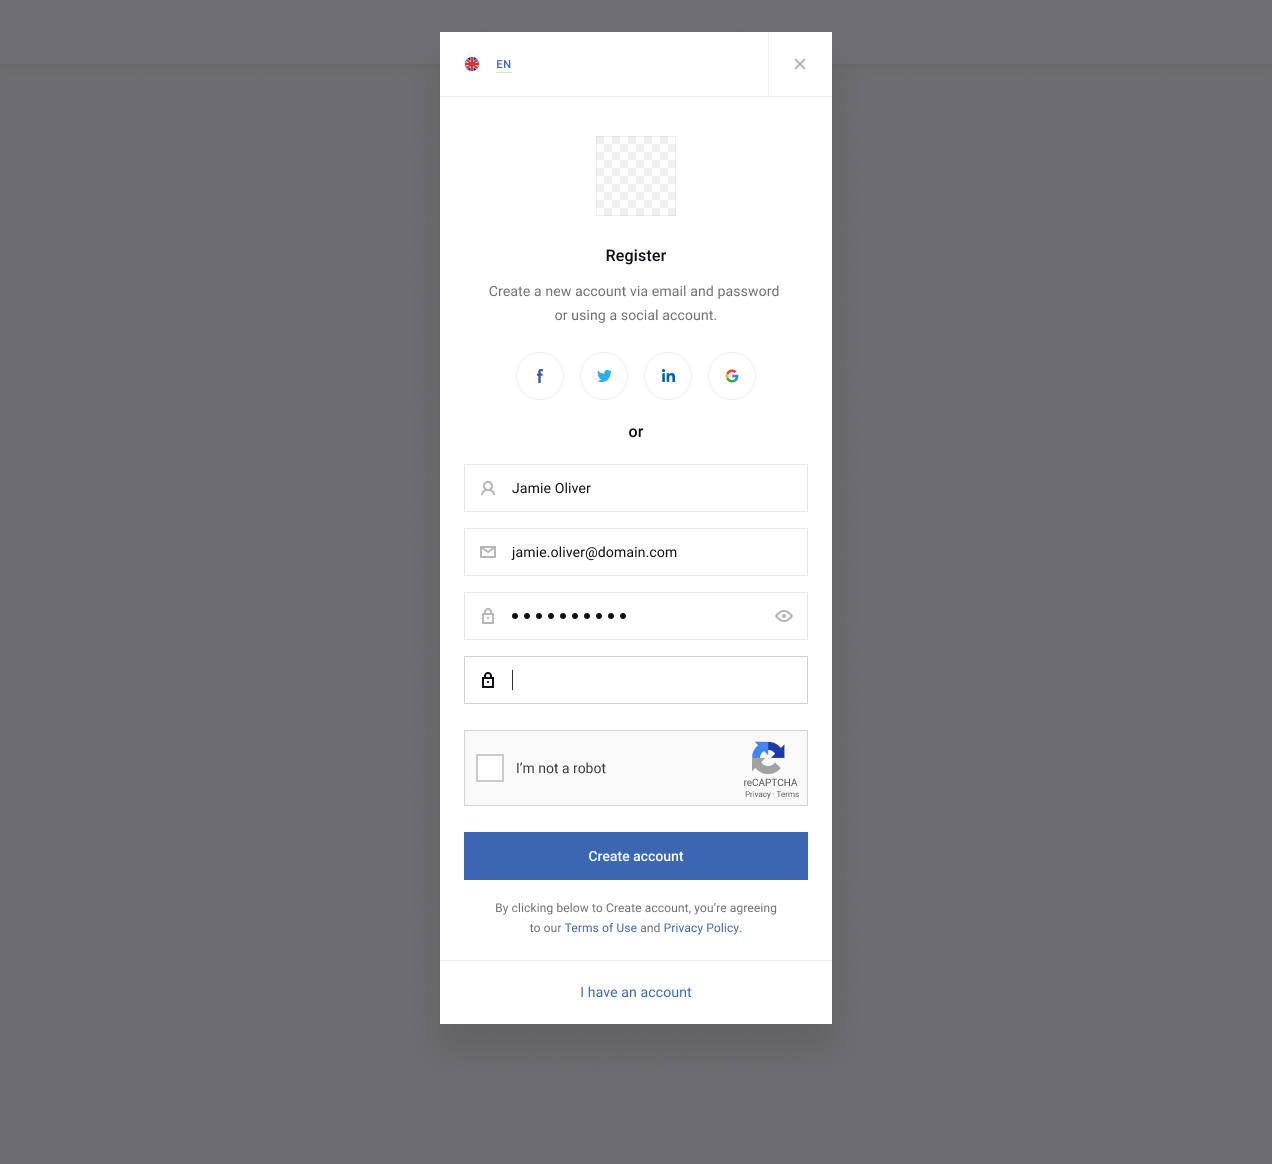
You can pass parameters into the tp.pianoId.init() function to override default settings and customize some of the behavior and display characteristics of the login/reg screens. In the following example, we’ve set the display mode to inline, by passing in the “inline” value and providing the container selector with an id for the element on your front-end serving as the container for the template:
tp = window.tp || [];
tp.push(['setUsePianoIdUserProvider', true]);
tp.push(["init", function() {
   tp.pianoId.init({
       displayMode: 'inline',
       containerSelector: '#login-form',
       loggedIn: function(data) {
           console.log('user ', data.user, ' logged in with token', data.token);
       },
       loggedOut: function() {
           console.log('user logged out');
       }
   });
}]);
Once you make any desired changes to the default display settings via tp.pianoId.init(), by passing in the appropriate parameter values, they will be applied any time the tp.pianoId.show() method is used.
These parameters can also be passed into tp.pianoId.show()to customize the behavior or display of the login or registration screens in a particular instance.
A full list of available parameters for these functions (and the values they accept) can be found in our documentation. The following are some examples of commonly used parameters:
displayMode
This allows you to set the display mode to modal (default), inline or popup (popup opens a new window with its own URL).
containerSelector
If you set displayMode to inline, this is where you identify the id or class of the element that will house the template.
disableSignUp
If set to true, the ability to register will be disabled by removing “I don’t have an account” from the login template.
screen
This allows you to specify which Identity Management screen to show (login, register, restore, new_password).
You could show an inline login page, with registration disabled, like this:
tp.push(["init", function() {
   tp.pianoId.show({
       displayMode: 'inline',
       containerSelector: '#login-landing-page’,
    disableSignUp: true,
       loggedIn: function(data) {
           console.log('user ', data.user, ' logged in with token', data.token);
       },
       loggedOut: function() {
           console.log('user logged out');
       }
   });
}]);
Similarly, you could create a reset password landing page like this:
tp.push(["init", function() {
   tp.pianoId.show({
       displayMode: 'inline',
       containerSelector: '#reset-pw-landing-page’,
    screen: 'new_password'
   });
}]);
User-login Script
Once you’ve initialized Identity Management, you are able to attach various Identity Management functions to buttons on your site.
For example, you could handle a click event on a login button like this:
function PianoLogin() {
    console.log('login');
    tp = window.tp || [];
    tp.push(["init", function () {
        tp.pianoId.show({
            disableSignUp: true,
            displayMode: 'modal',
            screen: 'login',
            containerSelector: '#login-form',
            loggedIn: function (data) {
                console.log('user ', data.user, ' logged in with token', data.token);
            },
            //Set the CSS and HTML here for what the signup button should look like when the user is logged in
            //e.g. unhide the signout button, hide the sign-in button

            loggedOut: function () {
                console.log('user logged out');
                //Set the CSS and HTML here for what the signup button should look like when the user is logged out //e.g. unhide the sign in button, hide the signout button

            }
        });
    }]);
}


function PianoLogout() {
    tp.push(["init", function () {
        console.log('logout');
        tp = window.tp || [];
        tp.pianoId.logout()
        //reload the page
        location.reload();
    }]);
}
</script>
<button onclick="PianoLogin();" value="Sign In">Sign In</button>Sign out
<button onclick="PianoLogout();">Sign Out<button>
For registration buttons, you can specify showing the registration screen by passing in the screen parameter:
function pianoRegistration() {
   tp.pianoId.show({
      displayMode: 'modal',
      screen: register
  });
}
And for logout buttons, you’ll use this function:
tp.pianoId.logout()
Commonly, clients will only display logout buttons if a user is logged in. To determine which UI components to show, you can use tp.pianoId.isUserValid() to determine if a user is logged in, and display buttons accordingly.
Password Reset Requests
In the first module, we showed you where to configure the password reset URL, which becomes the page where users are redirected to reset their password when they click the link in the password reset email.
In order for the reset password modal to appear when a user lands on the page, you’ve designated, you’ll need to add this JavaScript to that page:
tp.push(['init', function() {
   // Password can be reset only if user is anonymous
   if (!tp.user.isUserValid()) {
       // If URL has reset_token parameter
       var tokenMatch = location.search.match(/reset_token=([A-Za-z0-9]+)/);
       if (tokenMatch) {
           // Get value of the token
           var token = tokenMatch[1];
           // Present password reset form with the found token
           tp.pianoId.show({
               'resetPasswordToken': token, loggedIn: function () {
                   // Once user logs in - refresh the page
                   location.reload();
               }
           });
       }
   }
}]);
Verifying Your Configuration
If you’ve configured all of the Identity Management scripts correctly, then Running tp.aid in the console should return your Piano application’s application ID.
To verify if the login function is working correctly:
-
Log in and enter
tp.pianoId.isUserValid()in the browser’s console. It should returntrue. -
After logging out, entering
tp.pianoId.isUserValid()in the browser’s console should returnfalse. -
After creating a user, you should be able to trigger a password reset email, and copy and paste the link within the user’s email tab into a new Incognito window. A New Password modal should load if you are logged out.
You can verify that adblocking is configured correctly by navigating to your application and checking for the __adblocker:"True" cookie in your browser’s developer console.
The My Account Component
The white-labeled My Account component allows your users to seamlessly manage their accounts directly on your website. Your users can add, edit, and remove their credit cards, open customer service inquiries, manage their subscription(s) and perform other account-related functions without ever leaving your site.
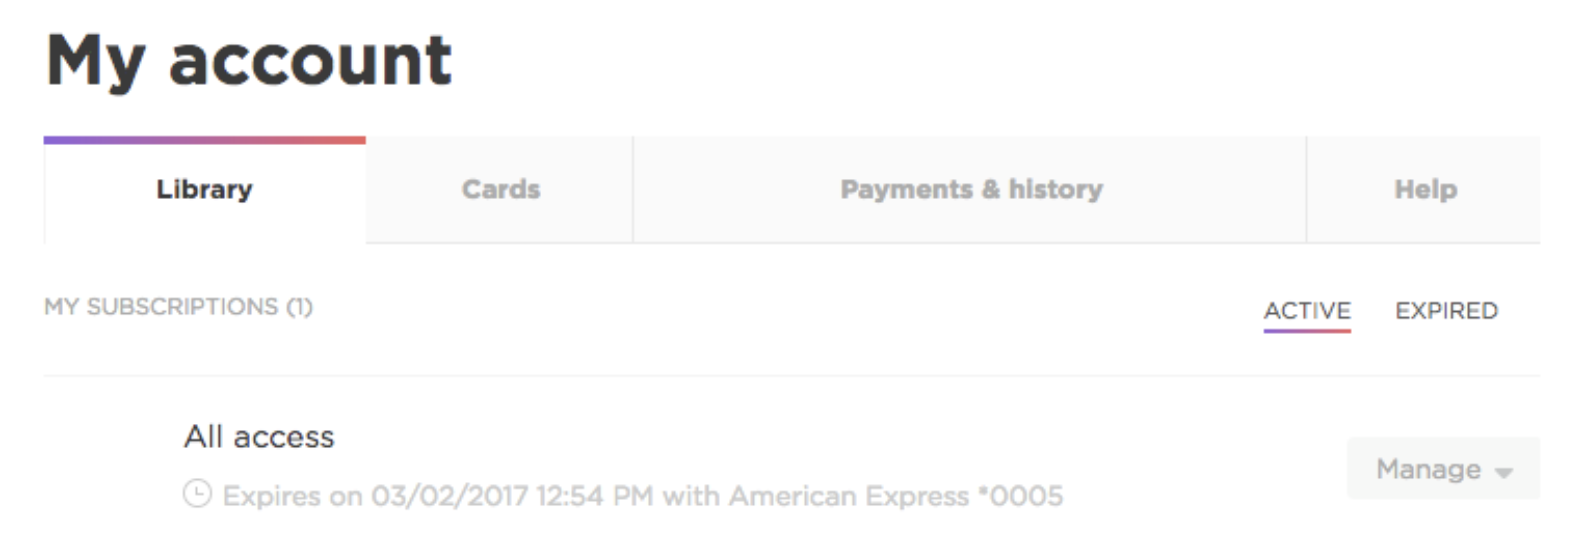
Usually, clients create a separate page on their site that hosts the My Account component.
You can have two buttons for Log In and Sign Up, created with the help of Identity Management functions described here, and have them dynamically become My Account and Log Out buttons after a user logs in.

These buttons are not part of the My Account templates and we recommend them to be implemented on your site directly.
As for the Log Out button, the simplest way that this can be implemented is by adding additional code to your website's CMS which would be checking if a user is logged in (via the Identity Management function tp.pianoId.isUserValid()) and, if this is true, changing the text of the Log In button to My Account and adding a Log Out button that calls the Identity Management function tp.pianoId.logout() once clicked. This will log out the user and reload the page.
Please reach out to our Support team at support@piano.io in case of any further questions.
Integrating the My Account Script
Enabling the My Account component is requires adding the following lines of JavaScript:
// Get the tp object
tp = window["tp"] || [];
tp.push(["init", function() {
   tp.myaccount.show({
       displayMode: "inline",
       containerSelector: "#my-account"
   });
}]);
Display mode will always be inline.
For containerSelector, you can use any element ID or class that exists in the HTML of your page as a container for the My Account component. For example, to use a <div id="my-account"></div> element as a container, you would enter #my-account as the containerSelector value as shown in the example above. If you instead wanted to use a class like <div class="useraccount"></div> as a container, you'd use .useraccount for containerSelector. Piano supports all selectors supported by JQuery.
Verifying Your Configuration
If you’re logged in, you should see the My Account component loading. If it does not load, then make sure the scripts are added and that the container being targeted by the component is on the page.
Additional Information
This is part 2 of our 4-part onboarding experience that we have created to help make your introduction to Piano as seamless as possible. The other guides in this series will help you understand various aspects of our product suite.
Our third module in this series provides an introduction to subscriptions, resources, terms, and offers. You can move on to that module now: Getting Started | Module 3: Building your product in Piano