
Getting Started with Piano | Configuring your Applications
Welcome to Piano! Whether you’re a media company here to implement an online subscription or advertising strategy, a marketer hoping to personalize your user journey, or a digital business wanting to get the most from your data, we help companies like yours understand, engage and monetize their users better. Our series of Getting Started modules will take you through the process of setting up within Piano so that you can begin to use our solutions on your sites.
In this module we’ll cover configuring your application through five steps:
-
The difference between your Sandbox and Production apps
-
How to edit your business settings
-
How to set up your payment provider
-
How to configure your Identity Management settings
-
How to Migrate from Sandbox to Production
Sandbox and Production
As part of the onboarding process, we will give you access to two applications within Piano:
-
Sandbox is hosted at sandbox.piano.io
-
Production is hosted at dashboard.piano.io, dashboard-ap.piano.io, dashboard-au.piano.io or dashboard-eu.piano.io
Each application has a unique Application ID (or AID), which can be found on the home screen of your application:
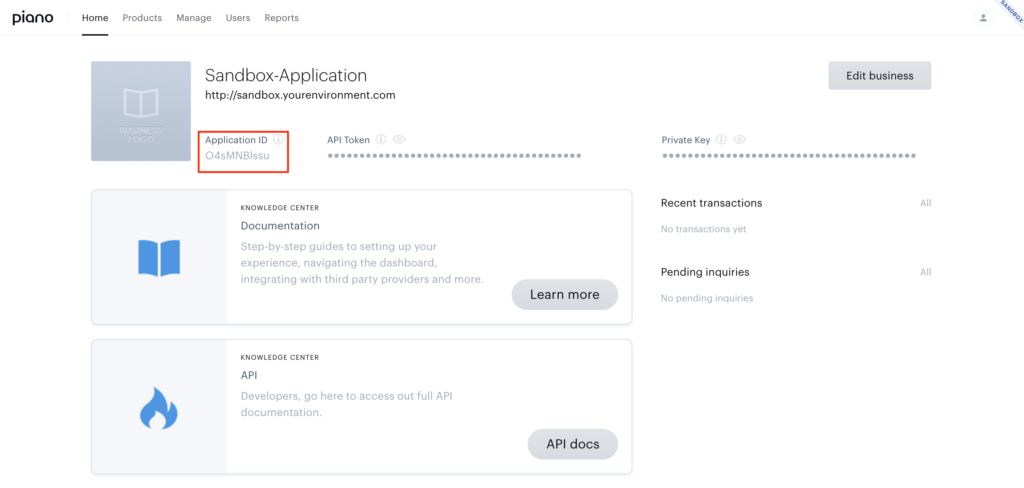
Sandbox Application
Linked to your staging site, your Sandbox application is used for testing. It’s a replica of what you want to see in Production. When first building out your products and experiences in Piano, you should do so exclusively in Sandbox.
Sandbox and Production are nearly identical in appearance. The two notable differences are:
1) The URL
2) The Sandbox web application has a diagonal Sandbox label in the right-hand corner of the home screen.
Always double check to ensure that you’re working in Sandbox and not Production when first implementing your products and experiences.
Production Application
Your Production application is linked to your live site. Once you’ve integrated the Piano application with your site, any experience that is built-in Production and set to live will start appearing. We don’t recommend having any experiences there until you’re ready to start QAing in Production. Unlike the sandbox application, changes that you make here will be seen by your customers.
When you’re ready to have your products and experiences in Production, contact support for help migrating the final site setup from Sandbox to Production.
Key Difference
There is an important difference in functionality between Sandbox and Production:
-
When working in Sandbox, Piano’s transactional emails will not send. Sandbox does, however, maintain a record of emails that each user would receive in Production, under the Emails tab for each user. Notice that the status of these emails is mock.
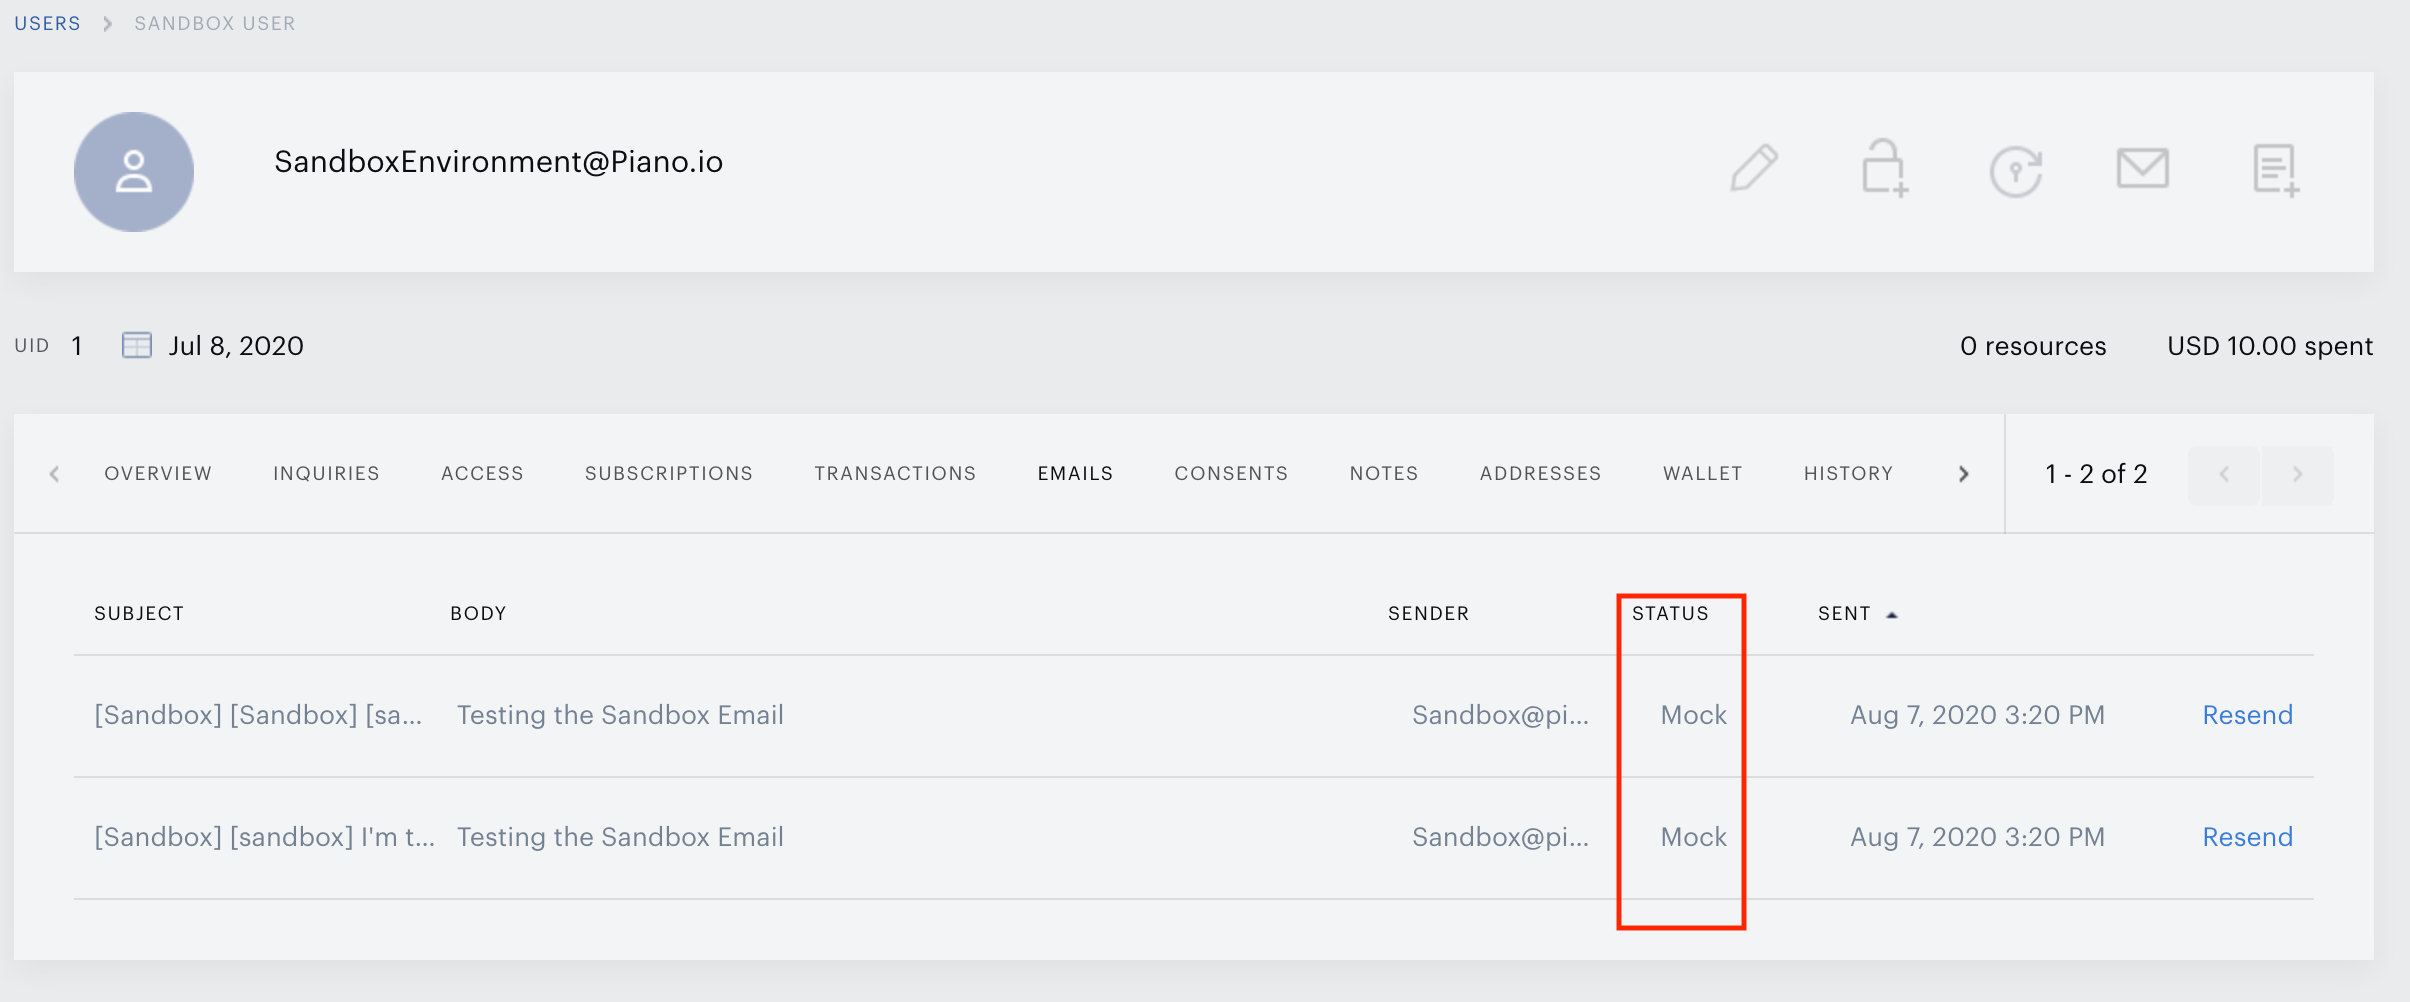
User Management
Adding Users to Your Application
If you want to invite another member of your team to join the Piano applications, it’s easy to do so under Team Manager. You’ll need to enter their name and email address and choose their level of access.
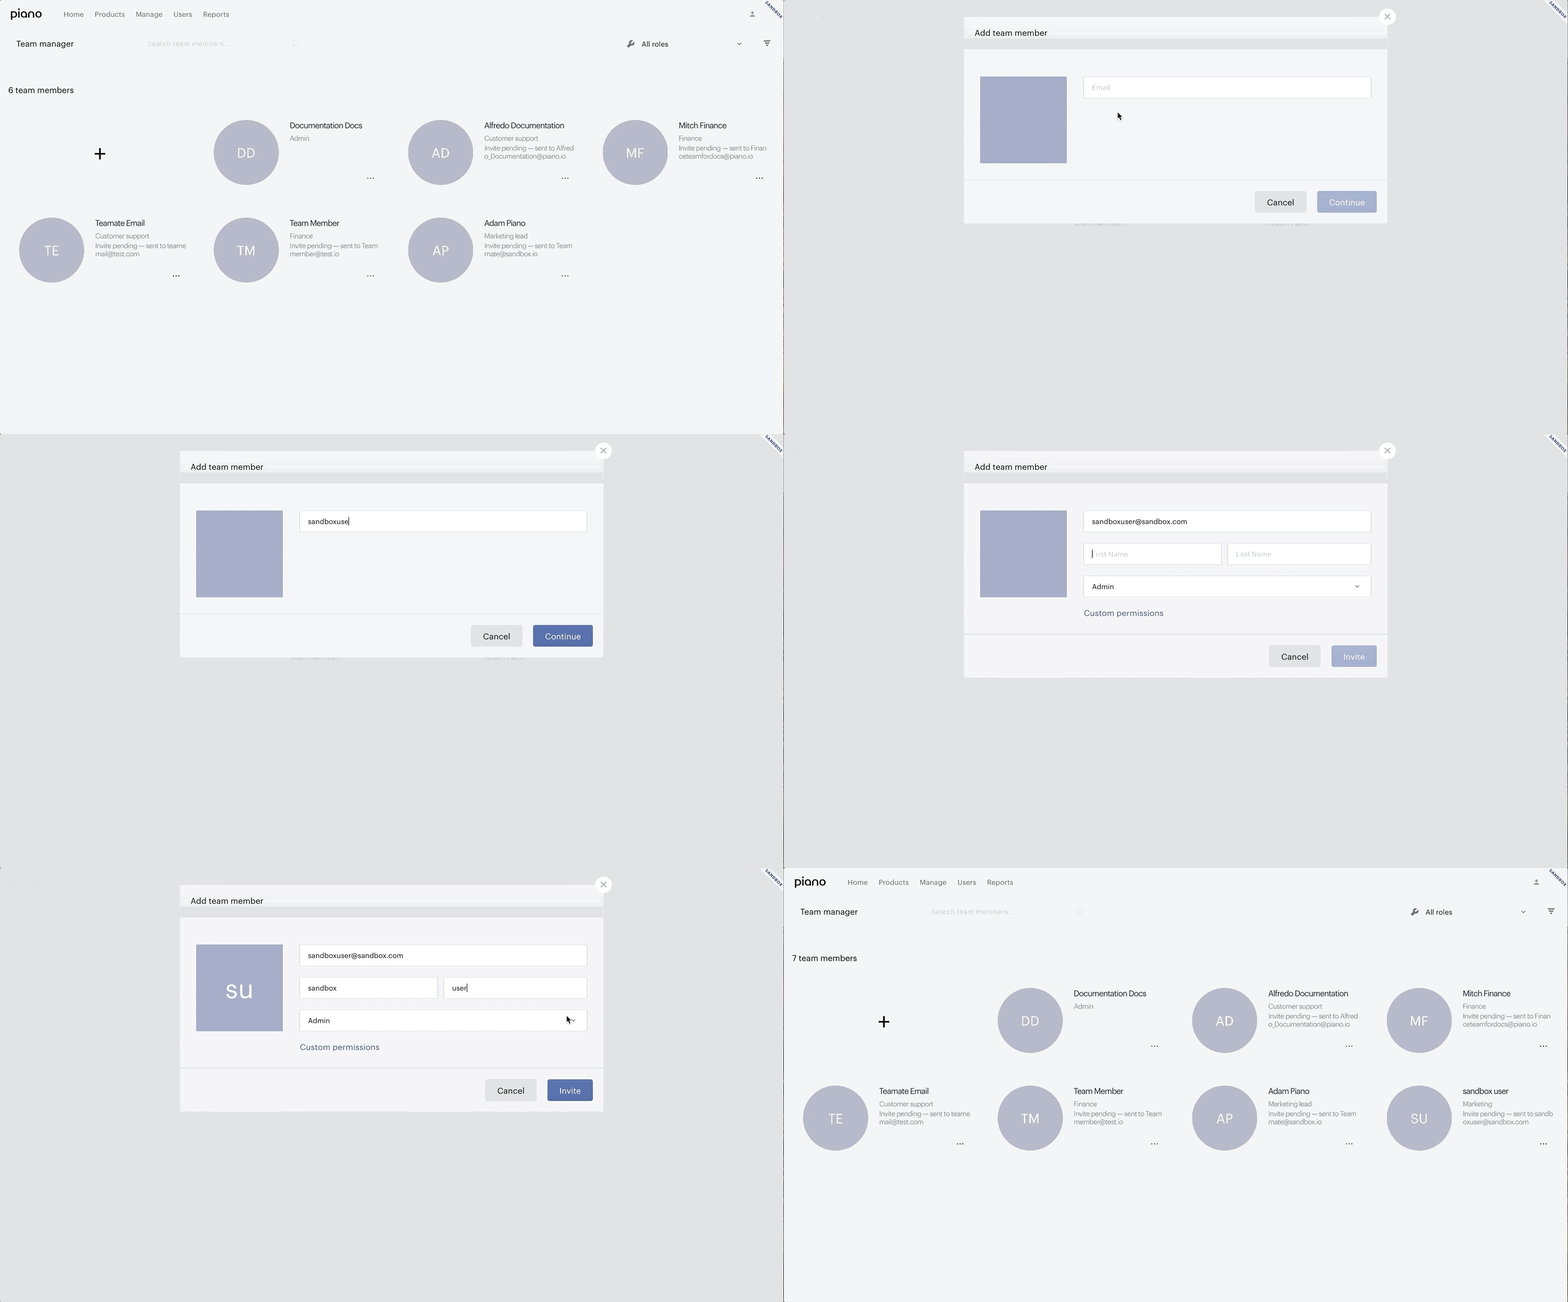
Permissions Management
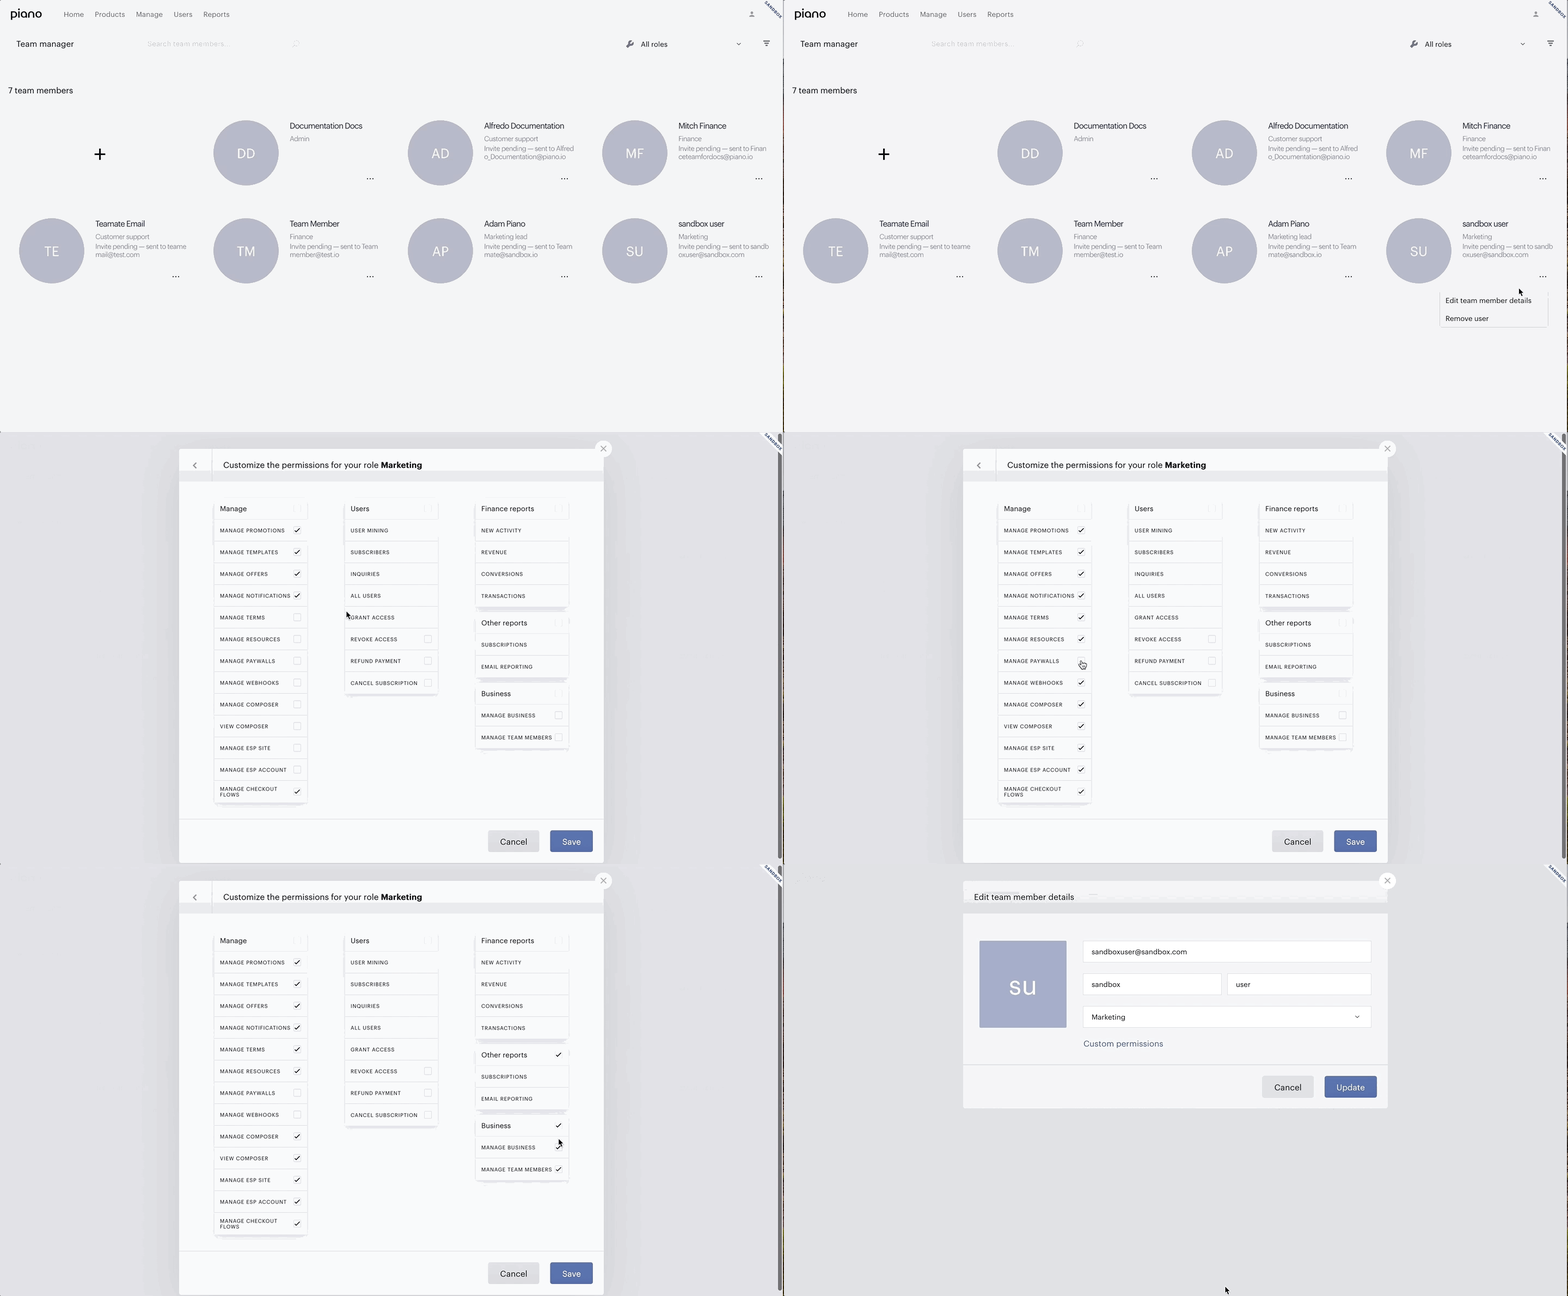
As an admin, you can edit each team member's permissions by clicking the pencil icon next to each team member's name. For your convenience, Piano provides a number of default roles with an associated set of default permissions. The default roles include Marketing, Marketing lead, Finance, Customer support, and Admin.
To see the permissions associated with each role, click “Custom permissions” when viewing a team member's account or creating a new team member account. On the custom permissions screen, you will see a list of granular permissions pre-checked for the role you have chosen.
Business Settings
Piano’s business settings can be accessed from the home screen by clicking on Edit Business. These settings are responsible for a variety of Piano functions.
Business Settings Checklist
You’ll need to update your business settings in both Sandbox and Production. This is not something that can be migrated from Sandbox to Production by Piano support.
Piano’s documentation explains the multiple settings you’ll need to configure. Use the checklist below to ensure that you’ve configured everything that’s necessary. The settings marked with asterisks are very important.
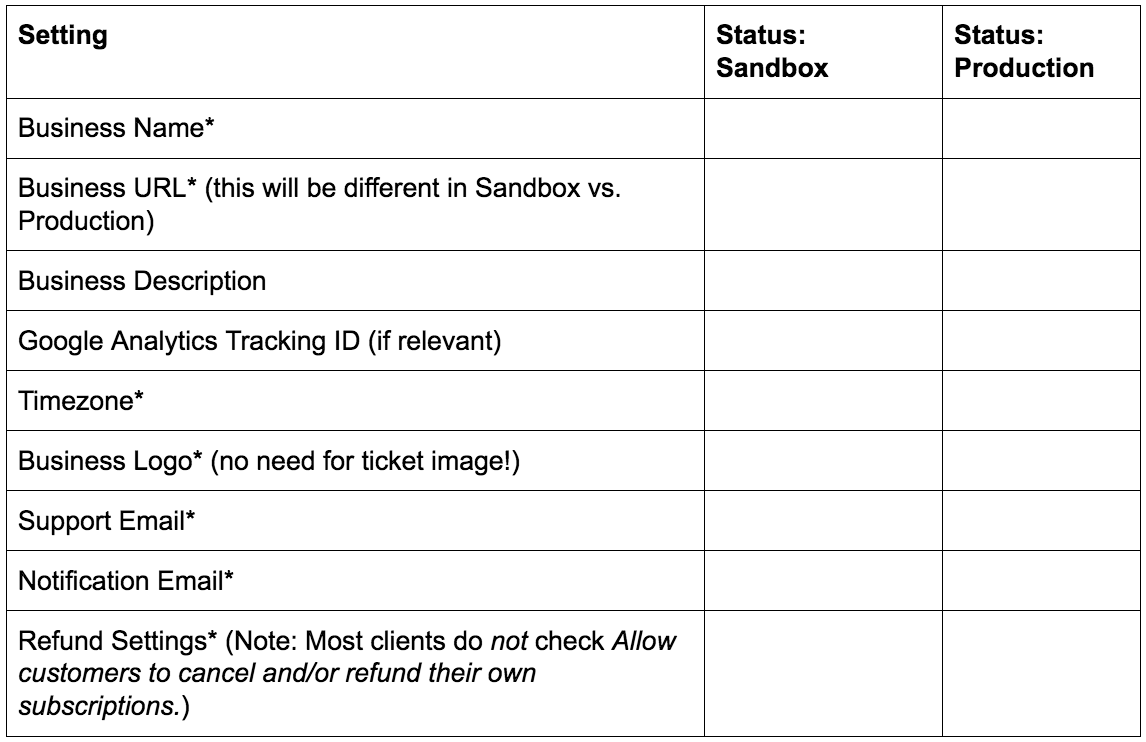
All other settings can be left as default.
Payment Providers
Piano integrates with many payment providers, by default. The full list can be found here.
If you have not chosen a payment provider, we recommend Braintree or Stripe, because they both offer Apple Pay as part of their Piano integration.
Integrating your Payment Provider
Once you’ve chosen a payment provider and opened an account, you’ll need to link your payment provider to Piano. You’ll do this in Production in the payment provider settings. For more information, read our documentation for more details.
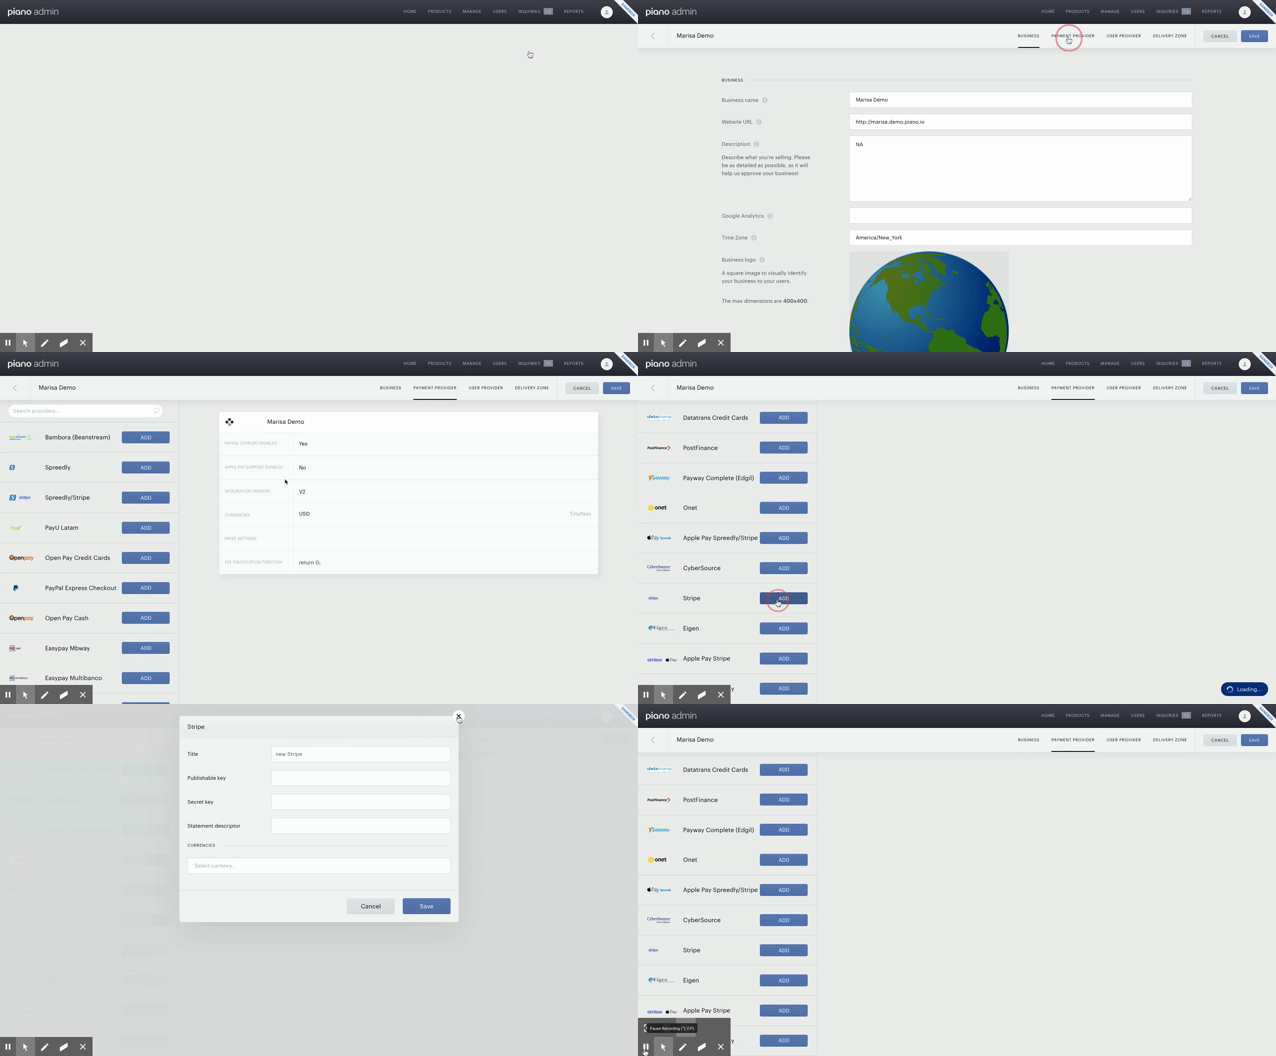
Adding Payment Credentials to Sandbox
You also need to connect the Sandbox version of your payment provider to Piano’s Sandbox application. This allows you to make test payments in Piano using test credit cards. Most payment providers make it easy to do this by providing you access to testing credentials. For example, you can quickly sign up for a Braintree Sandbox account here, input your Sandbox credentials in your Piano Sandbox app, and then use Braintree’s test credit cards to simulate purchases.
Note: You cannot use your Production credentials in Sandbox, and you cannot use your Sandbox credentials in Production.
Identity Management
Identity Management Settings
Your Identity Management settings impact elements of your user authentication, including password requirements and social login. You’ll configure these in the user provider settings.
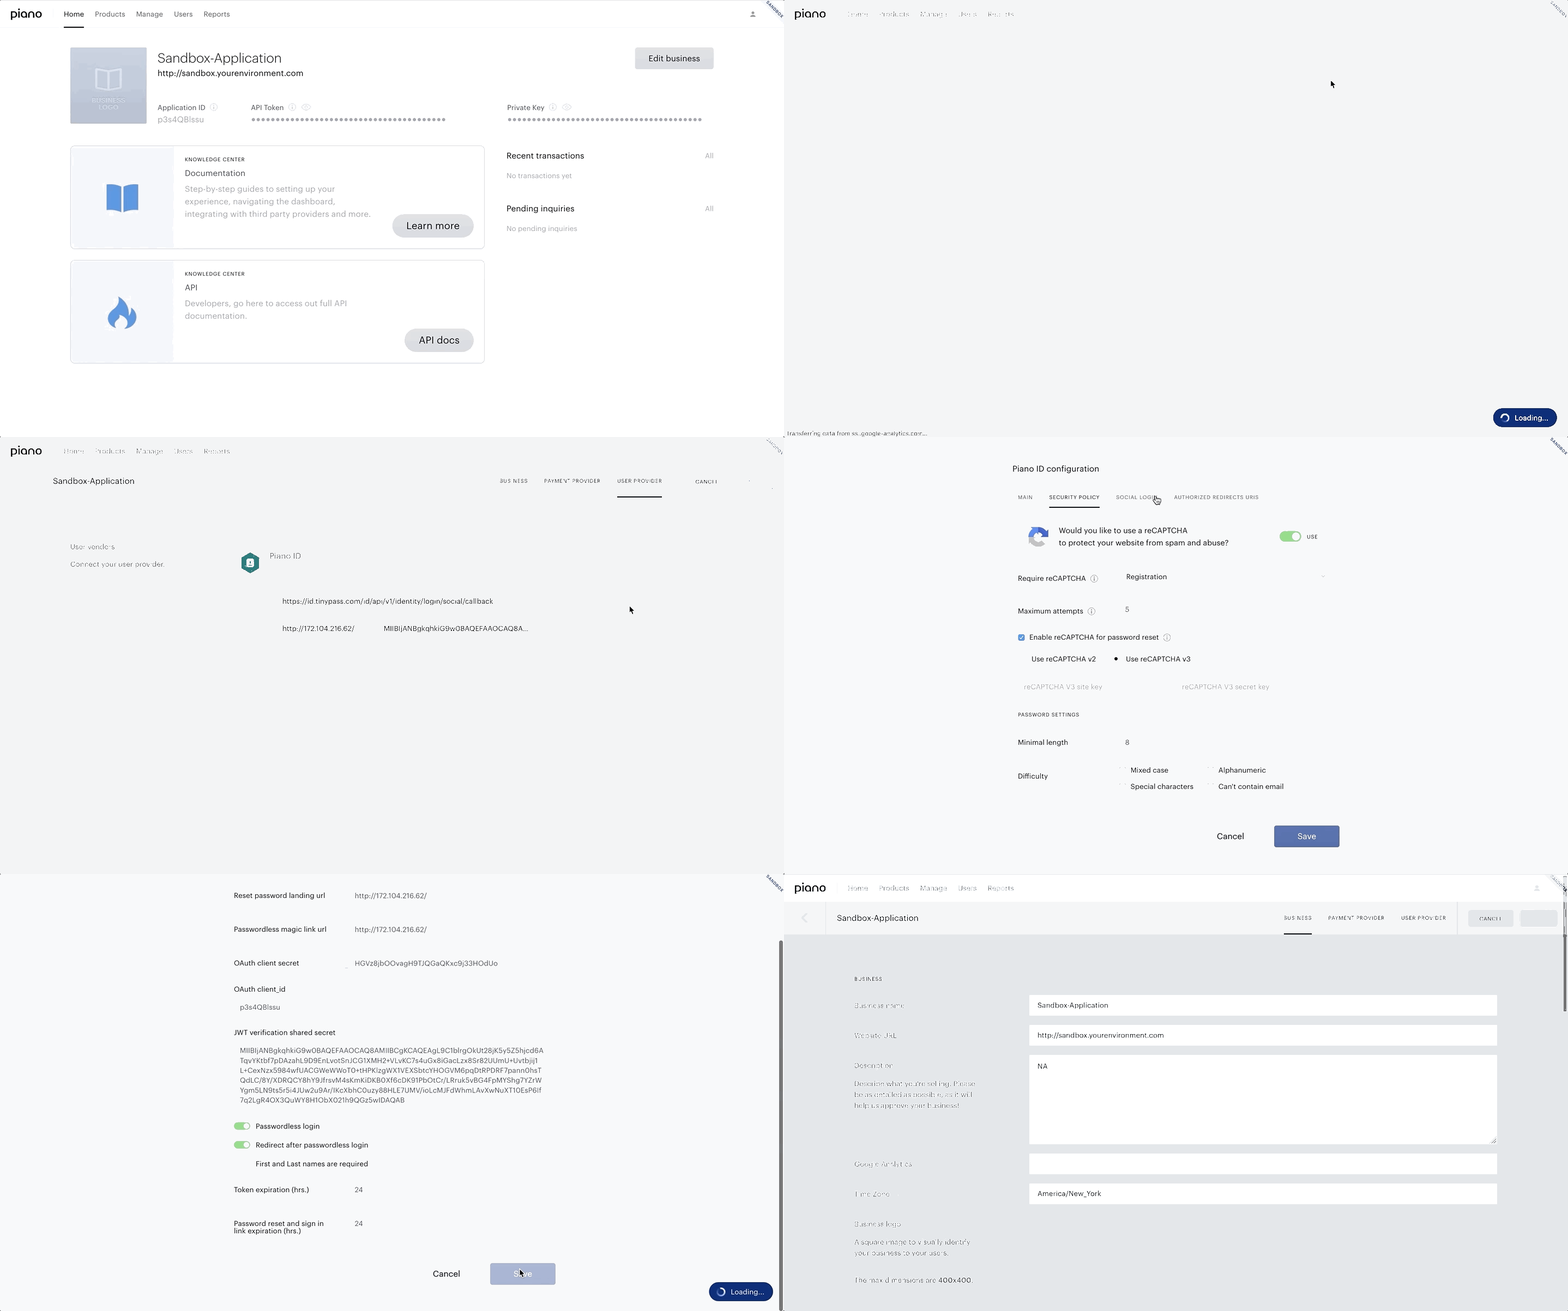
Identity Management Checklist
You’ll need to update the Identity Management settings in both Sandbox and Production. This is not something that can be migrated by Piano support.
Piano’s documentation explains the various fields and settings in Identity Management. All of these fields can be left as default with the exception of the Reset Password Landing URL. This is the first field in the Main tab, and it controls where users are sent to redeem their passwords.
Eventually, you will need to add Piano JavaScript to this exact URL, in order to trigger a password reset modal. It’s important that the URL in the Sandbox app link to your staging site, and that the URL in the Production app link to your production site.
Migrating from Sandbox to Production
When you’ve built and tested your products and experiences, you are ready to migrate them into production. The best way to do that is to contact Piano’s support team and they'll work with you to migrate to production.
Support has the ability to migrate the majority of your Piano Suite into production, their scope includes:
-
Resources
-
Custom, External, Gift, Payment, Registration and Dynamic Terms
-
Offers, Offer Templates, and Offer Template Variants
-
System Templates, Identity Management Templates, and Composer experiences
-
Emails Templates and Term Emails
-
Custom Fields and Custom Forms
-
Consent Fields
-
Promotions
-
Delivery Zones
-
Schedules
You are responsible for manually migrating:
-
Localization
-
Webhooks
-
External API (overall configuration and within each term)
-
Edit Business Settings (includes support and notification emails, My Account settings)
-
Payment provider set up
For a seamless transition, you must first email support at support@piano.io with the confirmation that you have reviewed the scope of support’s migration, and are ready to start the migration process. If you would like to have continuous migration, let support know, they will have you fill out a form before starting the process.
Additional Information
This is part 1 of our 4-part onboarding experience that we have created to help make your introduction to Piano as seamless as possible. The other guides in this series will help you understand various aspects of our product suite.
Our Setting up Piano Scripts module will show you how to integrate Piano with your website, you can move on to that module now: Getting Started | Module 2: Setting up Piano Scripts.