
Introduction
This feature enables a range of strategic subscription offerings. Customers can sign up well in advance for seasonal promotions, such as holiday offerings or special streaming releases, ensuring access aligns with anticipated events. For businesses, it enables corporate subscriptions to begin on a specific date, conveniently aligning with fiscal or operational cycles. Additionally, future-start dates enhance pre-sale campaigns by engaging customers early and ensuring activation coincides with launch dates or service availability.
Setting Up Future Start for Subscriptions
Configuring Future Start Settings at Application Level
This feature needs to be first enabled at the application level. Please get in touch with Piano Support at support@piano.io to enable this feature on your application.
In addition to just enabling the feature, Piano Support can also define the maximum number of days (from 0 to 365) that client users can delay the end users' subscription start date when creating a subscription via the Piano dashboard. By default, this value is set to 0, meaning an immediate subscription start date without the option to select a future start date, but this can be adjusted to your preference during the enablement process. Note, that this only applies to subscriptions created via the Publisher dashboard, term-level configuration options for a future start date during checkout on your website are described in the next section.
Note: Enabling or disabling this feature will not impact the activation of subscriptions with a future start that have already been purchased. These subscriptions will still activate on their scheduled start date, even if the feature is turned off during the waiting period.
Configuring Future Start Settings at Term Level
Once the feature is enabled at the application level, client users can selectively enable future start dates for any subscription terms as needed. This setting is available only for dynamic and recurring payment terms and does not automatically apply to all terms by default. Instead, it must be activated individually on each term where a future start date option is desired.
To activate the feature for a specific term:
-
Open the term settings for the desired term.
-
Tick the checkbox Allow start in the future.

-
Set the Maximum days in advance to define how many days in advance the end user can delay their subscription start when completing a purchase at checkout. The allowed range is 1 to 30 days, with a default of 30 days.
With this setup, client users can selectively apply deferred start dates only to specific terms, allowing other terms to begin immediately if needed.
Adjusting the Maximum days in advance setting will not impact already-purchased subscriptions with a deferred start. These subscriptions will activate on their designated start date, regardless of later changes to the maximum days allowed for future start dates in term settings.
Template Changes
To ensure the future start date feature is available in My Account as well as during the checkout, a few adjustments are required within 3 templates: My Account Library Components, Already has access and Checkout.
The following instructions outline each step in locating and editing the necessary template code.
My Account Templates
My Account Library Components
To add the "Scheduled" tab to the My Account screen, follow these steps:
1. Navigate to Manage → Templates → My Account.
2. Find the My Account Library Components template, and edit it in the 4 sections highlighted below.
Locate the code blocks marked in red, and replace them with the code blocks marked in green, and then save the changes.
1. Section

Here's the code example of how it should be after the changes.
<div class="screen--my-subscriptions" ng-show="isScreen(SCREEN_SUBSCRIPTIONS)">
2. Section

Here's the code example of how it should be after the changes.
<t context="checkout.platform">My subscriptions</t> ({{ selectedSubscriptionsCount }})
3. Section
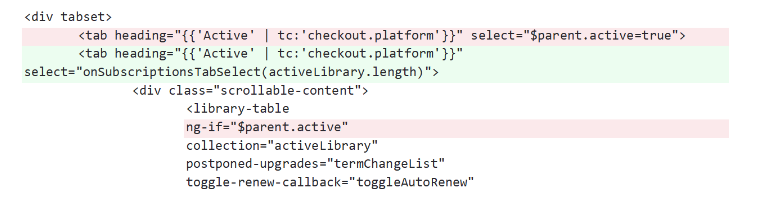
Here's the code example of how it should be after the changes.
<div tabset>
        <tab heading="{{ 'Active' | tc:'checkout.platform' }}" select="onSubscriptionsTabSelect(activeLibrary.length)">
            <div class="scrollable-content">
                <library-table
                    collection="activeLibrary"
                    postponed-upgrades="termChangeList"
                    toggle-renew-callback="toggleAutoRenew"
4. Section
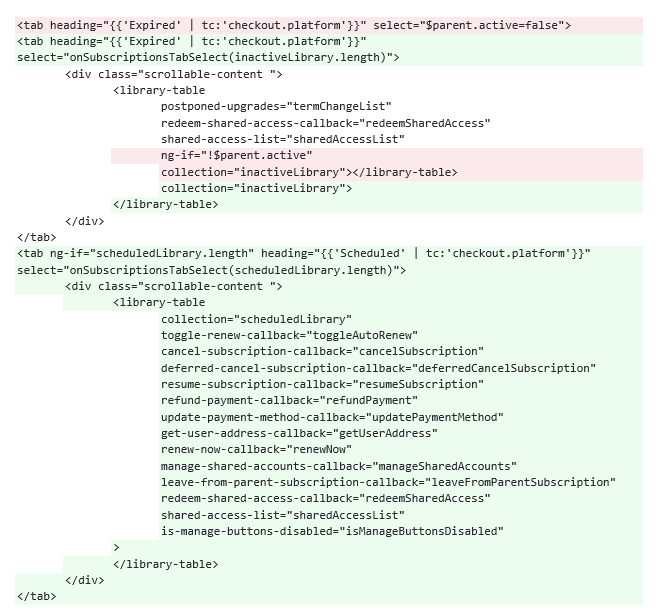
Here's the code example of how it should be after the changes.
<tab heading="{{ 'Expired' | tc:'checkout.platform' }}" select="onSubscriptionsTabSelect(inactiveLibrary.length)">
        <div class="scrollable-content">
            <library-table
                postponed-upgrades="termChangeList"
                redeem-shared-access-callback="redeemSharedAccess"
                shared-access-list="sharedAccessList"
                collection="inactiveLibrary">
            </library-table>
        </div>
    </tab>

    <tab ng-if="scheduledLibrary.length" heading="{{ 'Scheduled' | tc:'checkout.platform' }}" select="onSubscriptionsTabSelect(scheduledLibrary.length)">
        <div class="scrollable-content">
            <library-table
                collection="scheduledLibrary"
                toggle-renew-callback="toggleAutoRenew"
                cancel-subscription-callback="cancelSubscription"
                deferred-cancel-subscription-callback="deferredCancelSubscription"
                resume-subscription-callback="resumeSubscription"
                refund-payment-callback="refundPayment"
                update-payment-method-callback="updatePaymentMethod"
                get-user-address-callback="getUserAddress"
                renew-now-callback="renewNow"
                manage-shared-accounts-callback="manageSharedAccounts"
                leave-from-parent-subscription-callback="leaveFromParentSubscription"
                redeem-shared-access-callback="redeemSharedAccess"
                shared-access-list="sharedAccessList"
                is-manage-buttons-disabled="isManageButtonsDisabled">
            </library-table>
        </div>
    </tab>
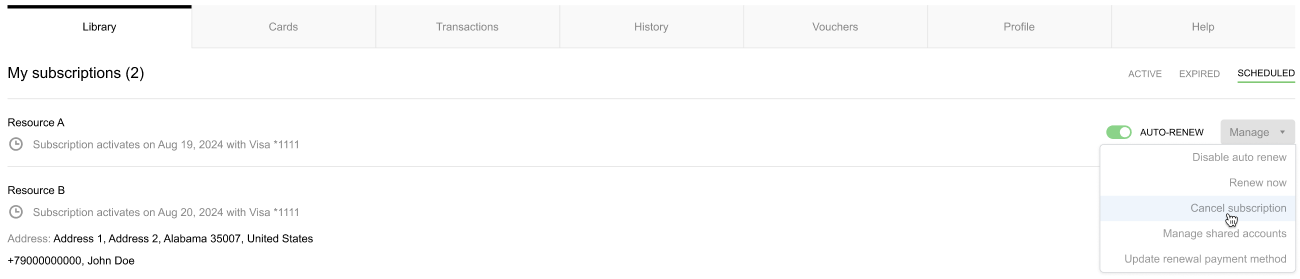
The image below illustrates the new options that will become available in My Account after making the above template changes.
System Templates
Already has access
To notify the end user during checkout that they already have access to the selected resource, but it has not yet begun, follow these steps:
1. Navigate to Manage → Templates → System.
2. Find and edit the Already has access template as follows.
Locate the code blocks marked in red, and replace them with the code blocks marked in green, and then save the changes.
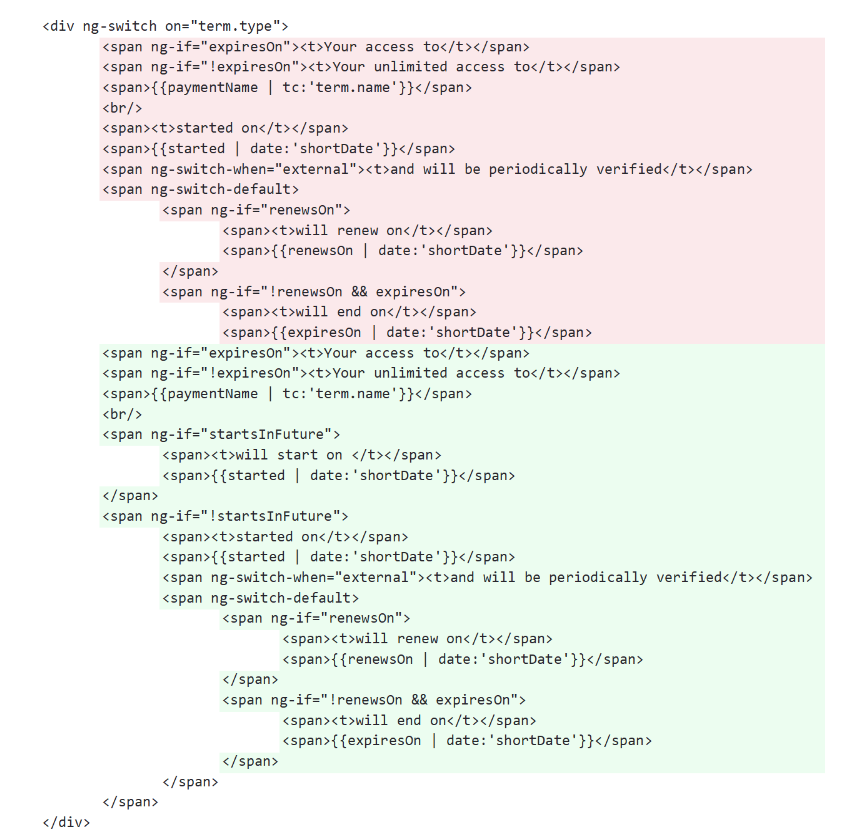
Here's the code example of how it should be after all changes.
<div ng-switch on="term.type">
<span ng-if="expiresOn"><t>Your access to</t></span>
<span ng-if="!expiresOn"><t>Your unlimited access to</t></span>
<span>{{paymentName | tc:'term.name'}}</span>
<br/>
<span ng-if="startsInFuture">
<span><t>will start on </t></span>
<span>{{started | date:'shortDate'}}</span>
</span>
<span ng-if="!startsInFuture">
<span><t>started on</t></span>
<span>{{started | date:'shortDate'}}</span>
<span ng-switch-when="external"><t>and will be periodically verified</t></span>
<span ng-switch-default>
<span ng-if="renewsOn">
<span><t>will renew on</t></span>
<span>{{renewsOn | date:'shortDate'}}</span>
</span>
<span ng-if="!renewsOn && expiresOn">
<span><t>will end on</t></span>
<span>{{expiresOn | date:'shortDate'}}</span>
</span>
</span>
</span>
</div>
Checkout
To allow selecting a future start date for subscriptions in the checkout follow these steps:
1. Navigate to Manage → Templates → System.
2. Find and edit the Checkout template as follows (add the row marked in green):

Here's the code example of how it should be after the changes.
<div auth-component></div>
<div future-start-component></div>
<div promo-code-component></div>
<div payment-form-component></div>
Future Start Components
To enable manual input and support keyboard navigation in the future start date datepicker during checkout, follow these steps:
1. Navigate to Manage → Templates → System.
2. Find and edit the Future Start Components template as follows.
Locate the code blocks marked in red, and replace them with the code blocks marked in green, and then save the changes.
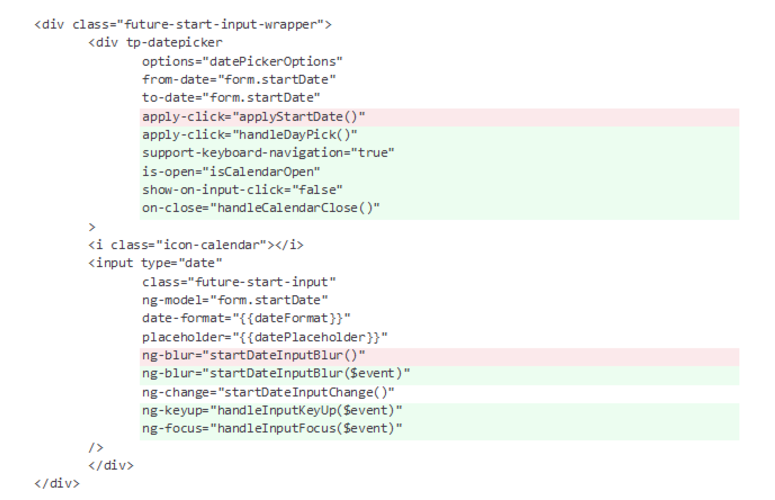
Here's the code example of how it should be after the changes.
<div class="future-start-input-wrapper">
  <div
    tp-datepicker
    options="datePickerOptions"
    from-date="form.startDate"
    to-date="form.startDate"
    apply-click="handleDayPick()"
    support-keyboard-navigation="true"
    is-open="isCalendarOpen"
    show-on-input-click="false"
    on-close="handleCalendarClose()"
  >
    <i class="icon-calendar"></i>
    <input type="date"
      class="future-start-input"
      ng-model="form.startDate"
      date-format="{{dateFormat}}"
      placeholder="{{datePlaceholder}}"
      ng-blur="startDateInputBlur($event)"
      ng-change="startDateInputChange()"
      ng-keyup="handleInputKeyUp($event)"
      ng-focus="handleInputFocus($event)"
    />
  </div>
</div>
How Future Start Works in Practice
Checkout Process
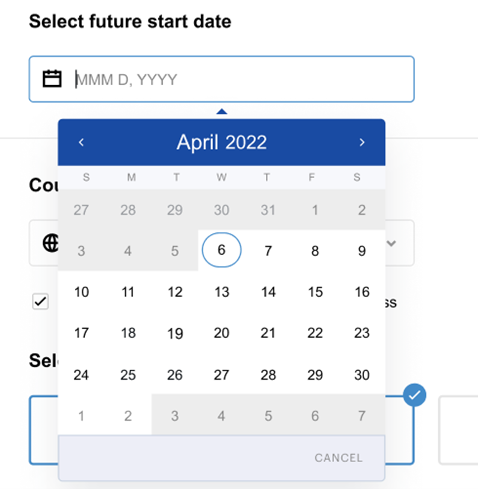
During checkout users are able to select a specific start date for their subscription directly from a date picker. This date picker dynamically adjusts according to the term settings configured, such as the minimum allowable start date and the maximum time window into the future for activation. Within these limits, users can easily schedule their subscriptions to start on the date that best fits their needs.
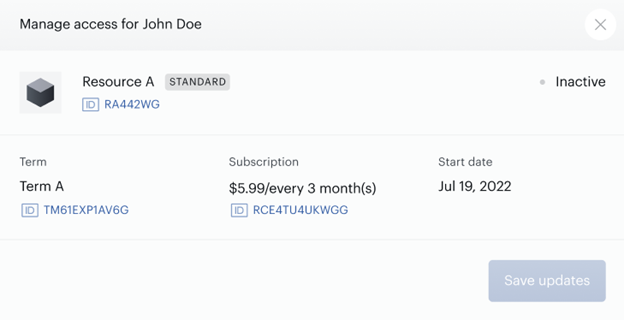
When a future start date is set during checkout:
The subscriber’s access remains in the status "Inactive" until the activation date:
While the user’s subscription will have the status “Not started”:
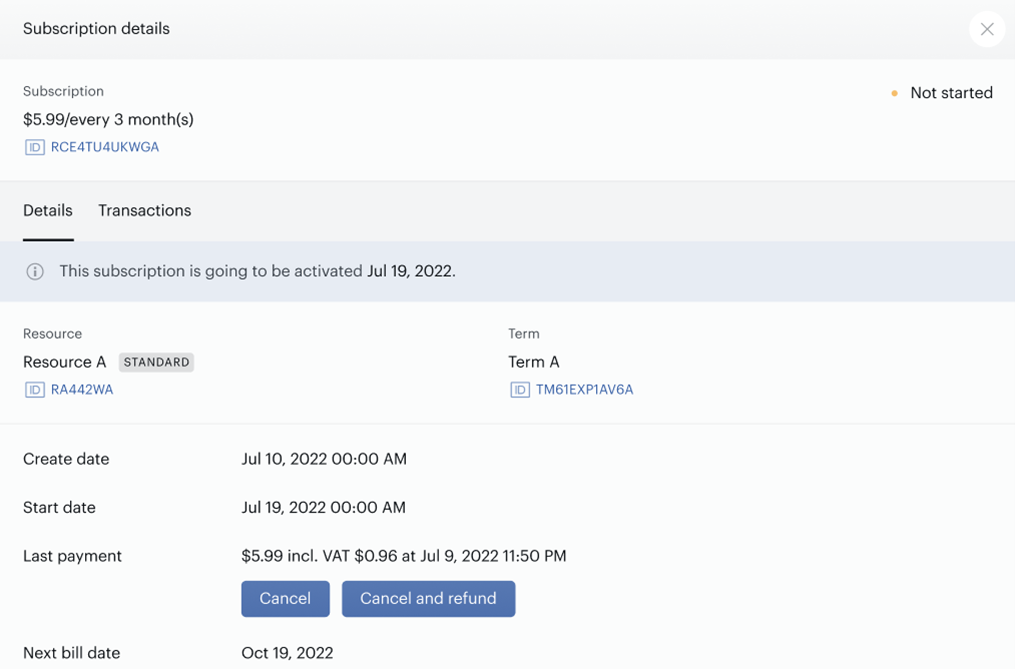
In the Subscription Details screen, clients will see several key dates that provide a timeline of the subscription:
-
Create Date: This indicates the date the subscription was initially purchased and created.
-
Start Date: This is the activation date for the subscription, marking when it becomes available for use by the end user.
-
Last Payment: The date of the most recent payment made for the subscription.
-
Next Bill Date: The date when the next renewal payment is due, which occurs after the initial subscription period has ended.
The Create Date and Start Date may either coincide or differ based on the subscription type:
-
For subscriptions with an immediate start, the Create Date and Start Date are the same.
-
For subscriptions with a future start, the Create Date and Start Date will differ.
Publisher Dashboard
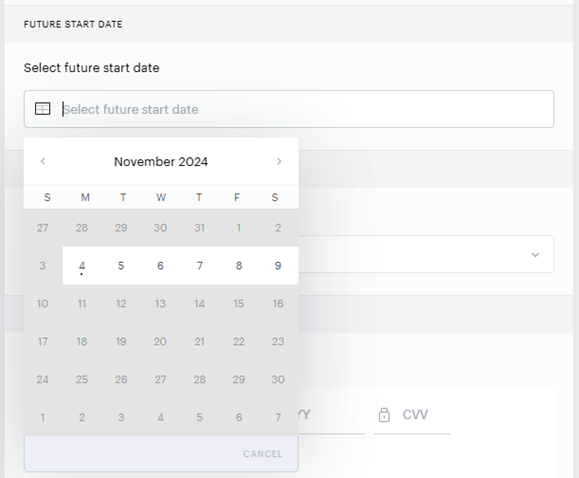
If all necessary configurations are in place (application and term settings), client users can use a date picker in the Publisher dashboard when subscribing a user to a term to specify start dates for end users’ subscriptions.
When a subscription is pending activation, a blue notification displays the message, “This subscription is going to be activated on [date],” helping clients distinguish subscriptions that are yet to be activated on a future start date.
During the waiting period, the end user cannot purchase a new subscription to the same resource.
The subscription will automatically activate on that date, and access is granted according to the term’s settings.
Available Actions in My Account and Publisher Dashboard in the Waiting Period
While subscriptions are in the waiting period between the purchase date and the activation date, clients and users can manage various aspects of their subscriptions.
Cancelation Options: Users can manage their subscriptions as follows:
-
Immediate Cancellation: Available for payment term subscriptions through the Publisher Dashboard and My Account. Users with payment term subscriptions can also enable or disable auto-renewal during the waiting period.
-
Deferred Cancellation: Users can opt for deferred cancellation for dynamic subscriptions, which can be managed in both My Account and Publisher Dashboard. Additionally, users can resume dynamic subscriptions during the waiting period.
Updating Delivery and Billing Dates: Users can update their delivery address or change the renewal payment method as needed.
Shared Account Management: Users can add, remove, or manage shared accounts for the subscription during this waiting period. However, please note that no email notifications will be sent to child accounts until activation.
Manual Renewals: Users can also manually renew their subscriptions within the waiting period.
Run Scheduler Piano Subscriptions: The "Run scheduler activation" button appears for subscriptions that are in a "Not started" state. When clicked, it manually triggers an activation process by placing the subscription in the system scheduler’s queue. This allows the subscription lifecycle to begin ahead of its originally scheduled future start date.
Limitations: Please be aware that users cannot upgrade their subscriptions during this waiting period.
Notification Emails
Several emails are automatically triggered based on the subscription’s actions and updates, keeping users informed of changes.
Purchase Confirmation Emails
When a subscription is purchased, relevant confirmation emails are automatically sent to ensure end users are informed about their subscription details.
-
Recurring payment term subscriptions: For payment term subscription purchases, the Purchase of a recurring subscription email is sent.
-
Dynamic subscriptions: For dynamic terms, the Dynamic subscription checkout purchase confirmation email is sent.
-
Recurring payment term subscriptions via Dashboard: If a client user subscribes an end user to a recurring payment term via the dashboard, the Subscription confirmation and Purchase of a recurring subscription email is sent.
-
Dynamic subscriptions via Dashboard: If a client user subscribes an end user to a dynamic term via the dashboard, the Dynamic subscription apply term wizard purchase confirmation email is sent.
Piano Subscriptions Notification
When a subscription with a future start is activated, the Piano Subscriptions of the subscription with deferred start email is triggered and sent to the user.
Cancelation Emails
The system sends various cancelation-related emails to notify users of the action taken:
-
Cancel Now: When an immediate cancelation for a payment term subscription is selected, the Subscription cancellation email is sent.
-
Deferred Cancel: For deferred cancelations of Dynamic terms, the Dynamic subscription deferred cancellation email is sent.
Auto-Renew Notifications
Notifications related to enabling or disabling auto-renew for payment terms are sent.
Resuming Canceled Subscriptions
For dynamic subscriptions, users can resume previously canceled subscriptions during the waiting period, with the email Dynamic subscription resumption being sent to end users to confirm the resumed status.
Refund Notifications
If a transaction refund is issued, the system sends the email notification Purchase refunded to end users.
Renewal and Manual Resend Emails
For users who initiated a receipt resending, the relevant Transaction info email is sent to provide transaction details.
During the waiting period, emails related to manual renewals are sent based on the subscription type:
-
Dynamic Subscriptions: Based on the conditions of the manual renewal, either Dynamic subscription manual billing confirmation or Dynamic subscription manual renewal confirmation is sent.
-
Payment Terms: The Subscription manually renewed email is sent
Blocked Emails
Emails related to shared account management are restricted until the subscription becomes active.
Other Actions
-
Change Payment Method: No emails are sent.
-
Change Next Bill Date: No emails are sent.
-
Change Delivery Address: No emails are sent.
Limitations
-
Reporting Exclusion: Subscriptions set to start in the future do not appear in reporting functions until they are activated.
-
Scope Limitation: Only recurring payment and dynamic subscription terms are supported. Single-payment, scheduled-payment and linked terms are excluded from this feature.