
Overview
A pageview event or traffic event aggregates data describing a visit (visit time and duration; previous, current, and next page URLs, etc.) and the visitor (their browser, OS, location, IP address, etc). User segments are based on traffic events.
User segments list
The User Segments screen is the list you see when you navigate to Audience→Segments→User segments:
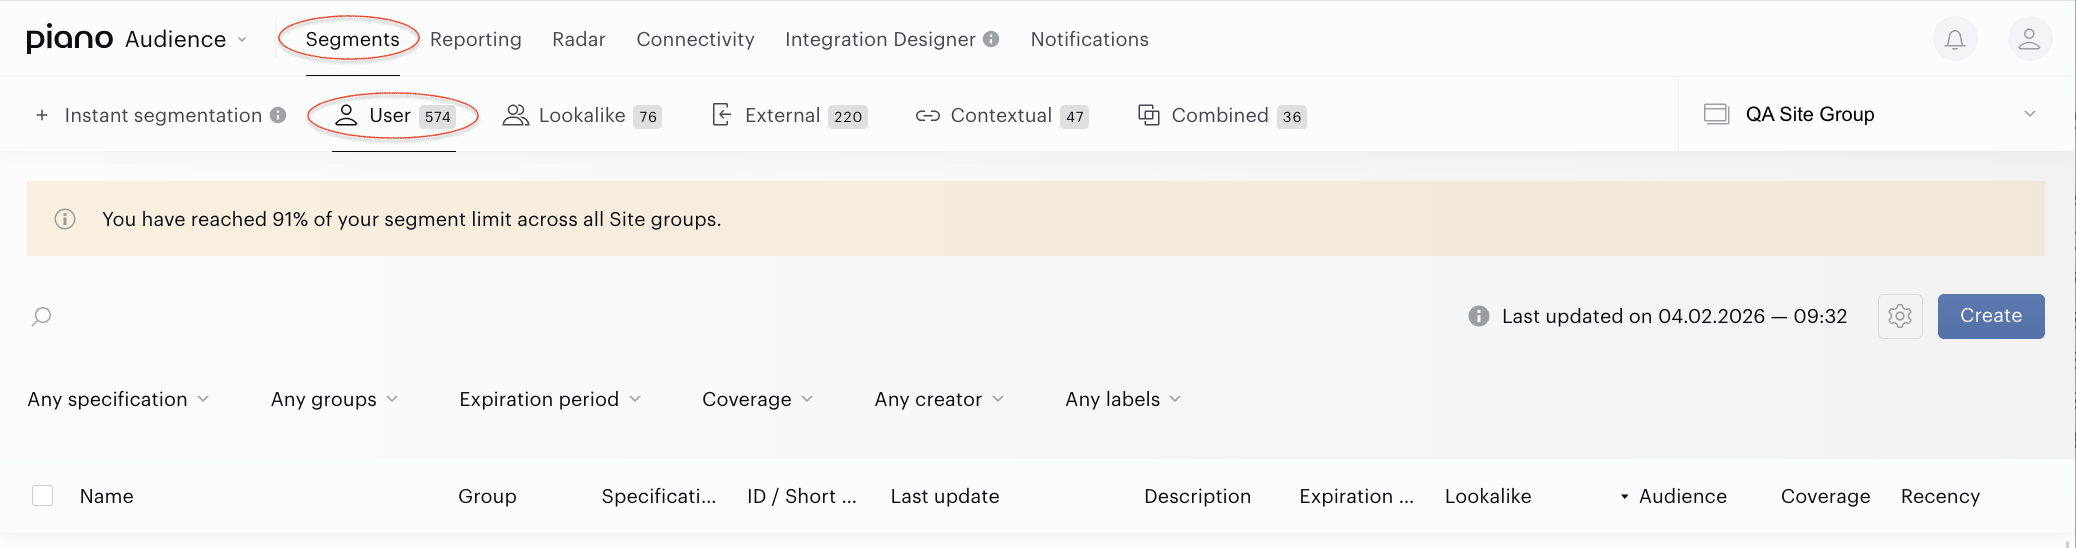
This page contains all the User segments created in your account for the selected site group. The list contains the segments earlier known as Traffic, DMP, etc., and main information about them:
-
Name. When you click on the segment name, the Segment builder with the segment’s details is opened.
-
Specifications. Icons in this column indicate, for example, the Usage parameter, if the segment is used in the Composer, etc.
-
ID/Short ID. Unique segment identifiers.
-
Group. If a segment was added to the segment group, you will see the segment group name.
-
Last update. It shows the date and time when the segment was created and updated for the last time.
-
Description. If a description was added, you will see it in this column.
-
Expiration date. The date when the segment can be deleted automatically, read more here.
-
Lookalike. The names of lookalike segments are based on the current traffic segments.
-
Audience. The size of the segment audience.
-
Coverage. The number of segmented users from the total audience of the site group as a percentage.
-
Recency. The count of days of traffic to be considered for defining the audience; the recency for traffic segments is "last month" by default.
Audience and Coverage are two parameters based on Reach report data. After segment creation, you can see the text "There is no data yet". This is the usual behavior. You will see the values after the Reach calculation. It may take several minutes or several hours for just created segments. Calculation time depends on the difficulty of your segment.
Additionally in the User Segments page the following features are available:
-
Site group selector in the top right corner that lets you select the site group for work.
-
Filters by specification, segment type, expiration period, segment group, coverage, label, and segment creator that allow you to find User segments faster.
-
Search bar for searching segments by type, name, id, or description.
-
Clicking the name of the column sorts the data in the column and in all tables.
-
Checkboxes for each segment in the segment list that allow providing group operations with segments:
-
Move to operation allows you to move selected segments from one segment group to another, remove them from the segment group or add them into a segment group for the very first time.
-
Add into connection operation allows you to add selected segments in the existing connections right here without redirection to the Connectivity application.
-
Delete operation allows you to delete one or multiple segments at the same time.
-
Change usage operation allows you to update the usage status for selected segments (Full/Reporting only).
-
Add labels operation allows you to add the same label to the several selected contextual segments at the same time.
-
Change expiration date operation allows you to add the Expiration date or change existing ones.
-
Read more about bulk operations, about their capabilities and restrictions here.
The Customize columns button next to the Create button allows you to customize the table view. Read details here.
User segment builder
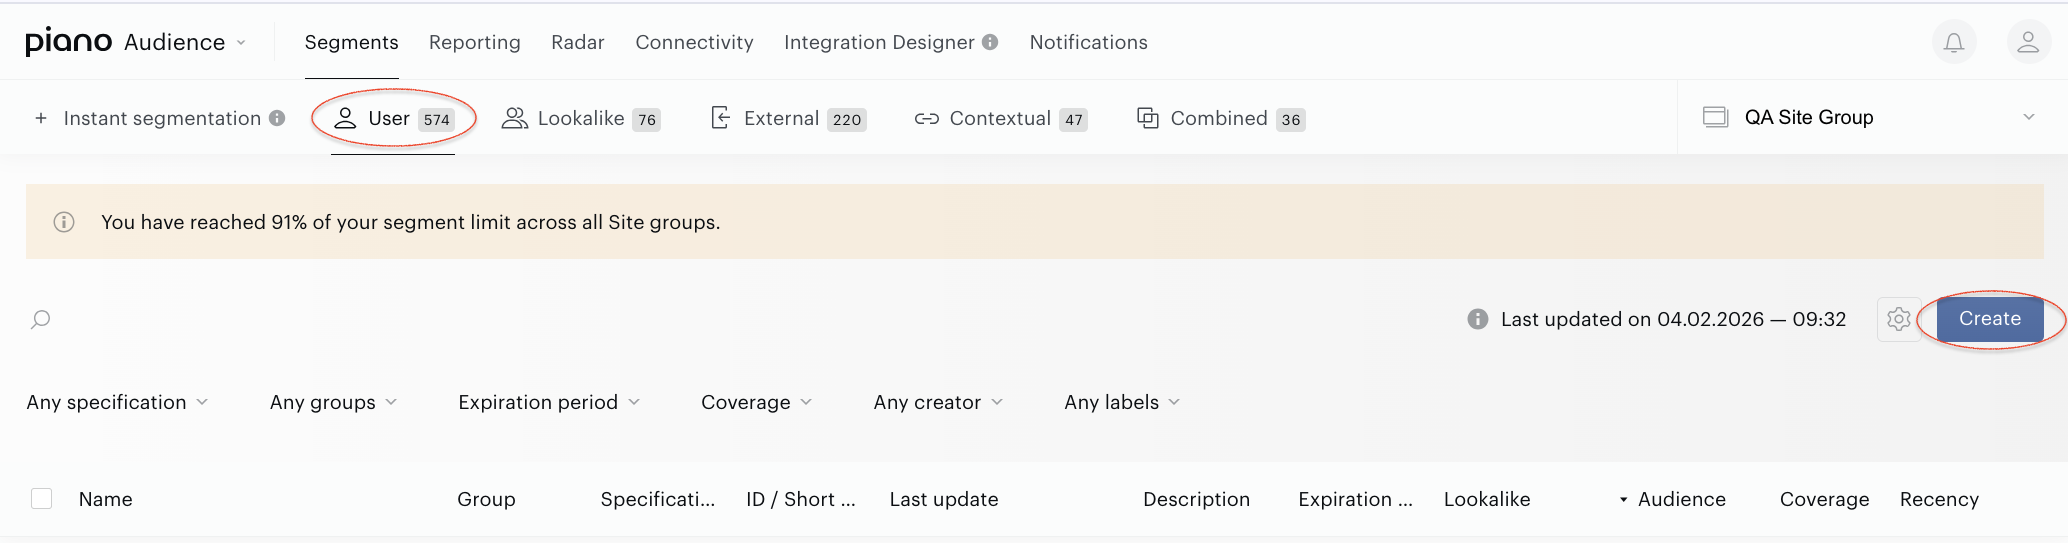
To create a User segment and open the Segment Builder page, navigate to: Audience→Segments→User segments→Create.
Main parameters
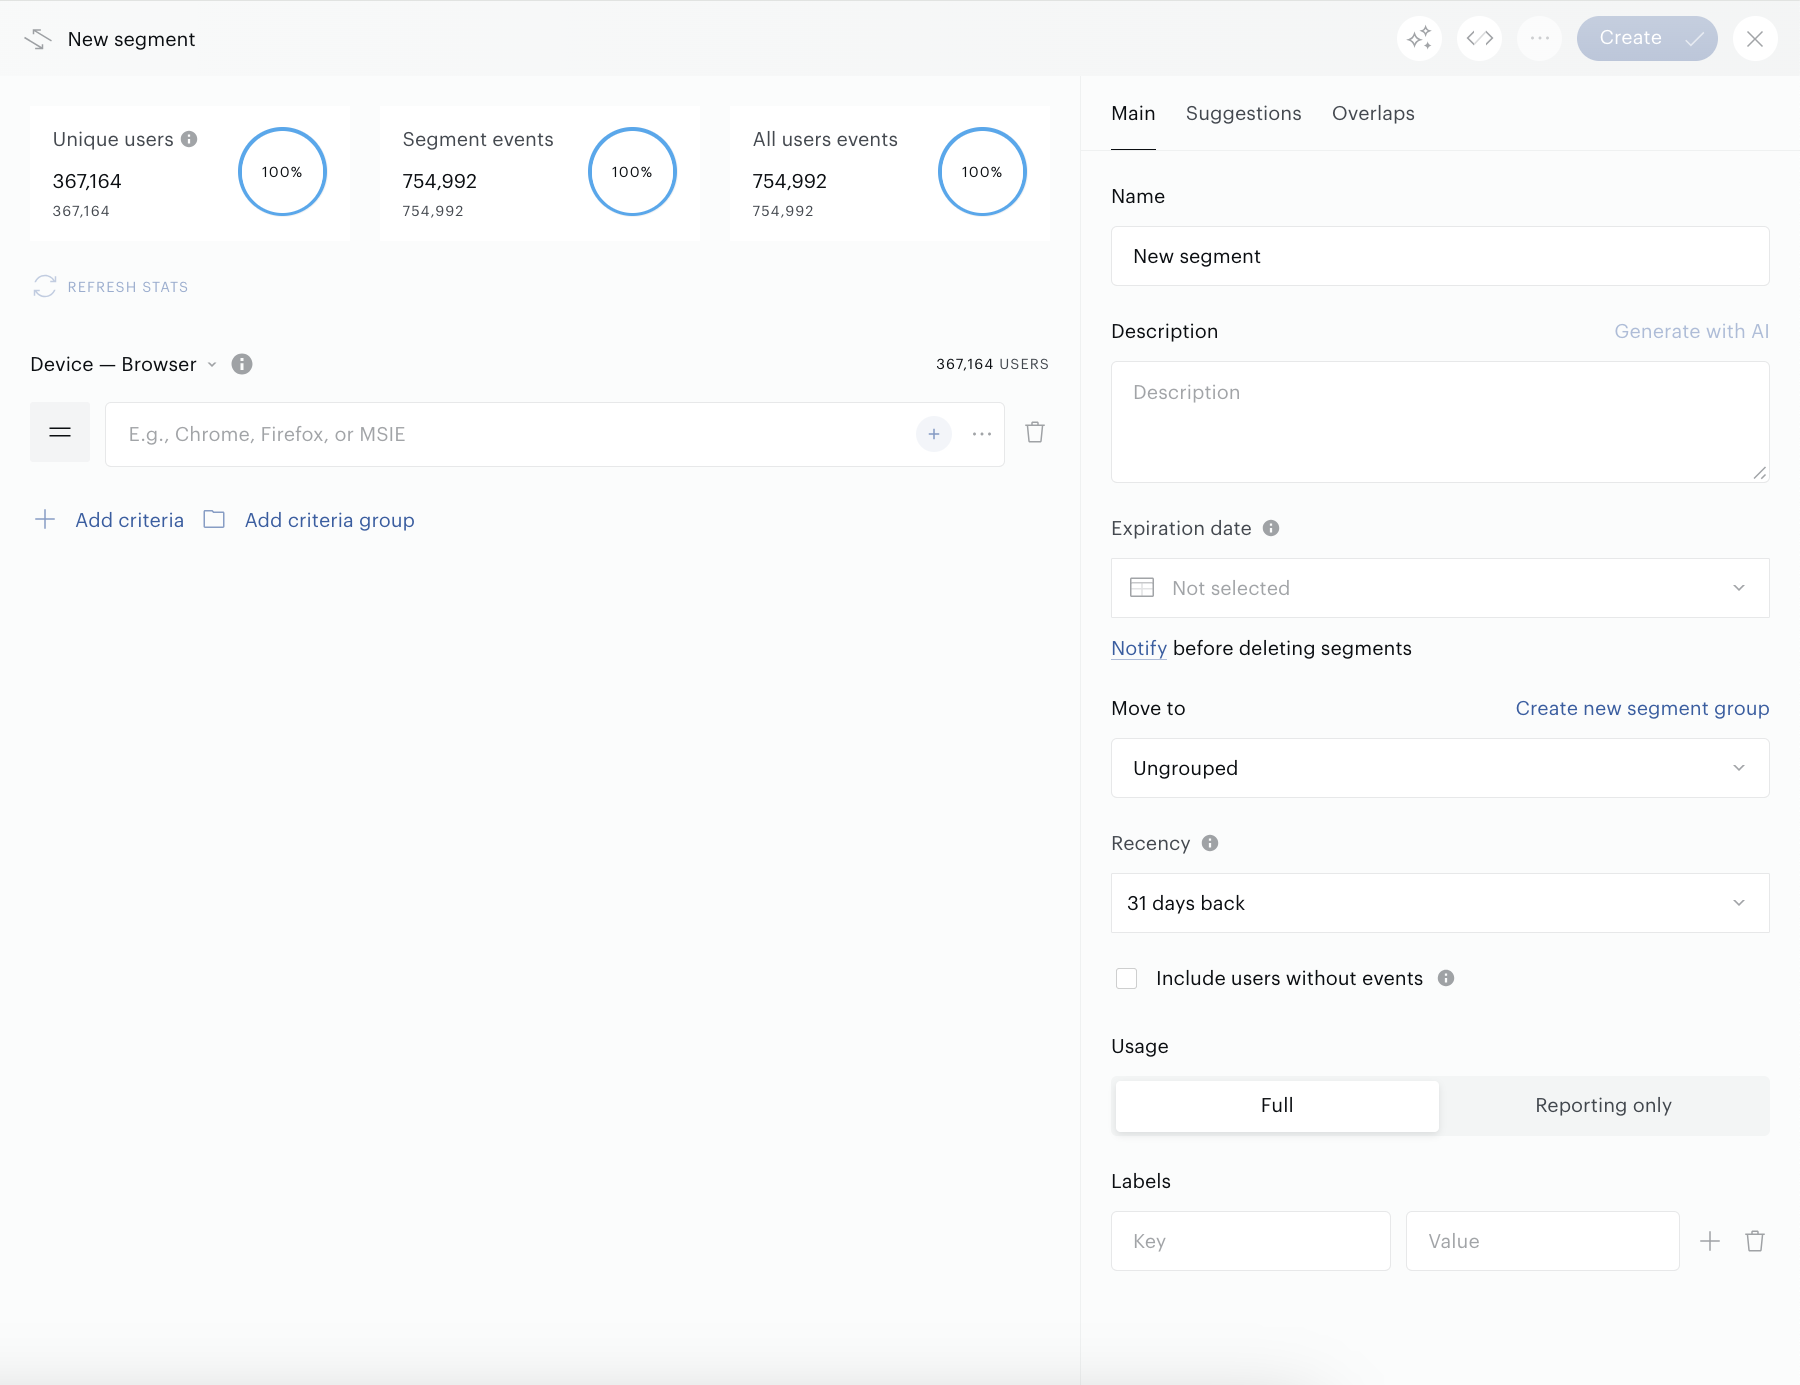
In Segment Builder, you see multiple fields identifying the segment and the criteria section:
Name
Enter the segment name in the right-side panel (up to 250 characters).
Description
It is also recommended to add a meaningful description in the Description area.
Manual Segment Description
-
In the segment creation or editing interface, enter the segment name in the right-side panel.
-
Add a meaningful description in the Description area, e.g., "Users who visited the sports section 3+ times this month."
Using AI-Powered Segment Description
-
Define your segment filters (e.g. first-party or behavioral data).
-
Click the Generate with AI button in the segment interface.
-
The AI generates a concise summary, e.g., "Active subscribers aged 25-34 engaging with tech news."
-
Edit the AI-generated description in the Description area if needed.
Expiration Date
Expiration date shows when a segment can be deleted automatically. Upon pressing the link Notify…, customer is redirected to the Notifications functionality and can activate an event providing notifications before segment deletion.
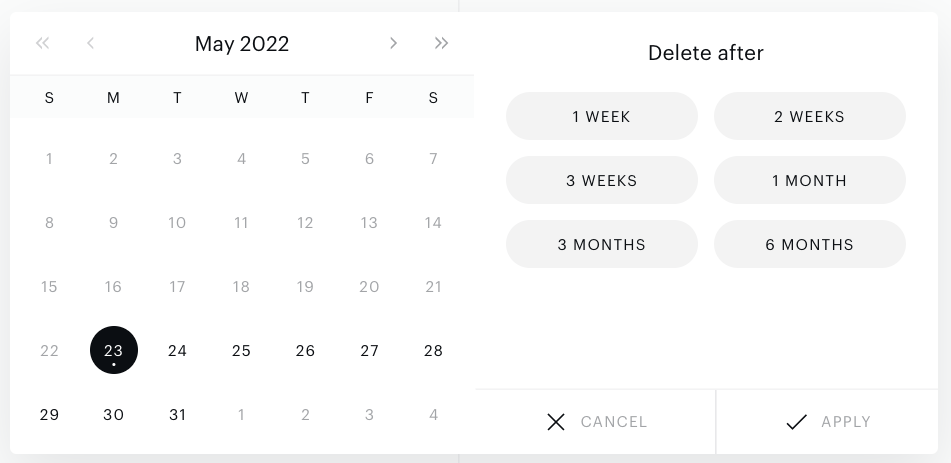
The Expiration date can be updated at any moment, can be filled during the creation or later, or just cleared.
Segment Grouping
Move to enables you to match the segment with one of the existing segment groups. If there is no group to choose from, you can click Create new segment group and create a new one.
When the New segment group field is filled, the new segment can be moved there immediately. It is possible to move a segment to another group by selecting the respective group in the dropdown.
Recency
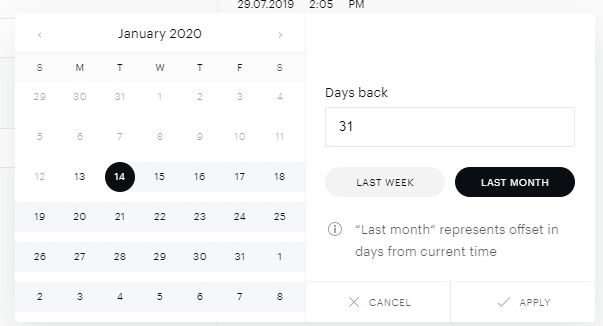
With Recency, you can set the days to consider for defining your audience traffic. Unless Long-Term Storage (LTS) is enabled for your account, the date range for calculating segments is limited to 32 days from today.
Usage
Usage defines whether the segment will be used for all the features of Piano Audience including segment export, targeting, and reporting ("Full"), or only for composing reports ("Reporting only").
"Reporting only" segments can be exported as well as "Full" segments, but they can't be used for targeting in real campaigns.
Labels
Use the Labels section to add additional metadata (generic key-value pairs) to your segments. With Labels, you can:
-
Organize a growing list of segments by grouping them into batches.
-
Filter your segments on the Segments List using the filter by the label.
-
Control programmatic steps using Piano API (/segment/create or /segment/read).
-
Select segments for export in Connectivity Hub, using labels as a filter.
The label key is a unique value of fewer than 256 characters. It should start with a letter and can only contain ASCII characters a-z, A-Z, 0-9, or _ (underscore). The label value should be less than 256 characters.
Include users without events
When the Include users without events enabled, inactive users without events will be included in the segment. Be aware that metrics may differ from current segment stats.
General
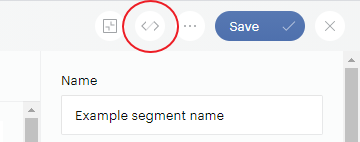
You can use an icon in the top-right corner to configure traffic segments in Advanced mode.
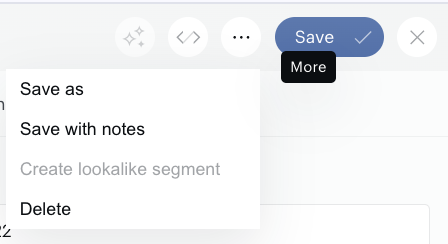
To make a copy of a segment go to the More menu and click Save as.
To save your changes and additionally save notes about the edits made, go to the More menu and click the Save with notes button.
Any changes made to the segment from the moment of its creation such as renaming, modifying criteria or description, etc., are all recorded and subsequently available in chronological order on the History tab. If you want to document the purpose of your changes when making an edit, you can select the Save with notes option, which will display a text input field.
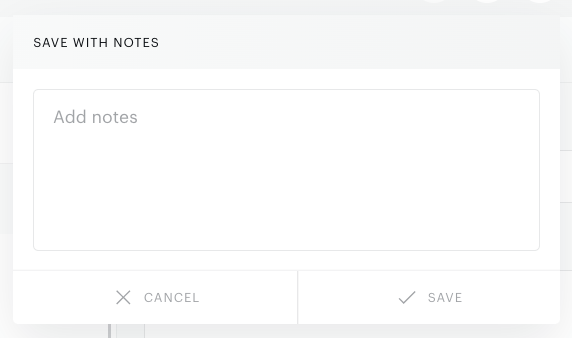
This is optional: you may save changes without entering any note. The note will also be accessible on the History tab.
Read how to create segments based on the marketing campaigns data here.
Suggestions
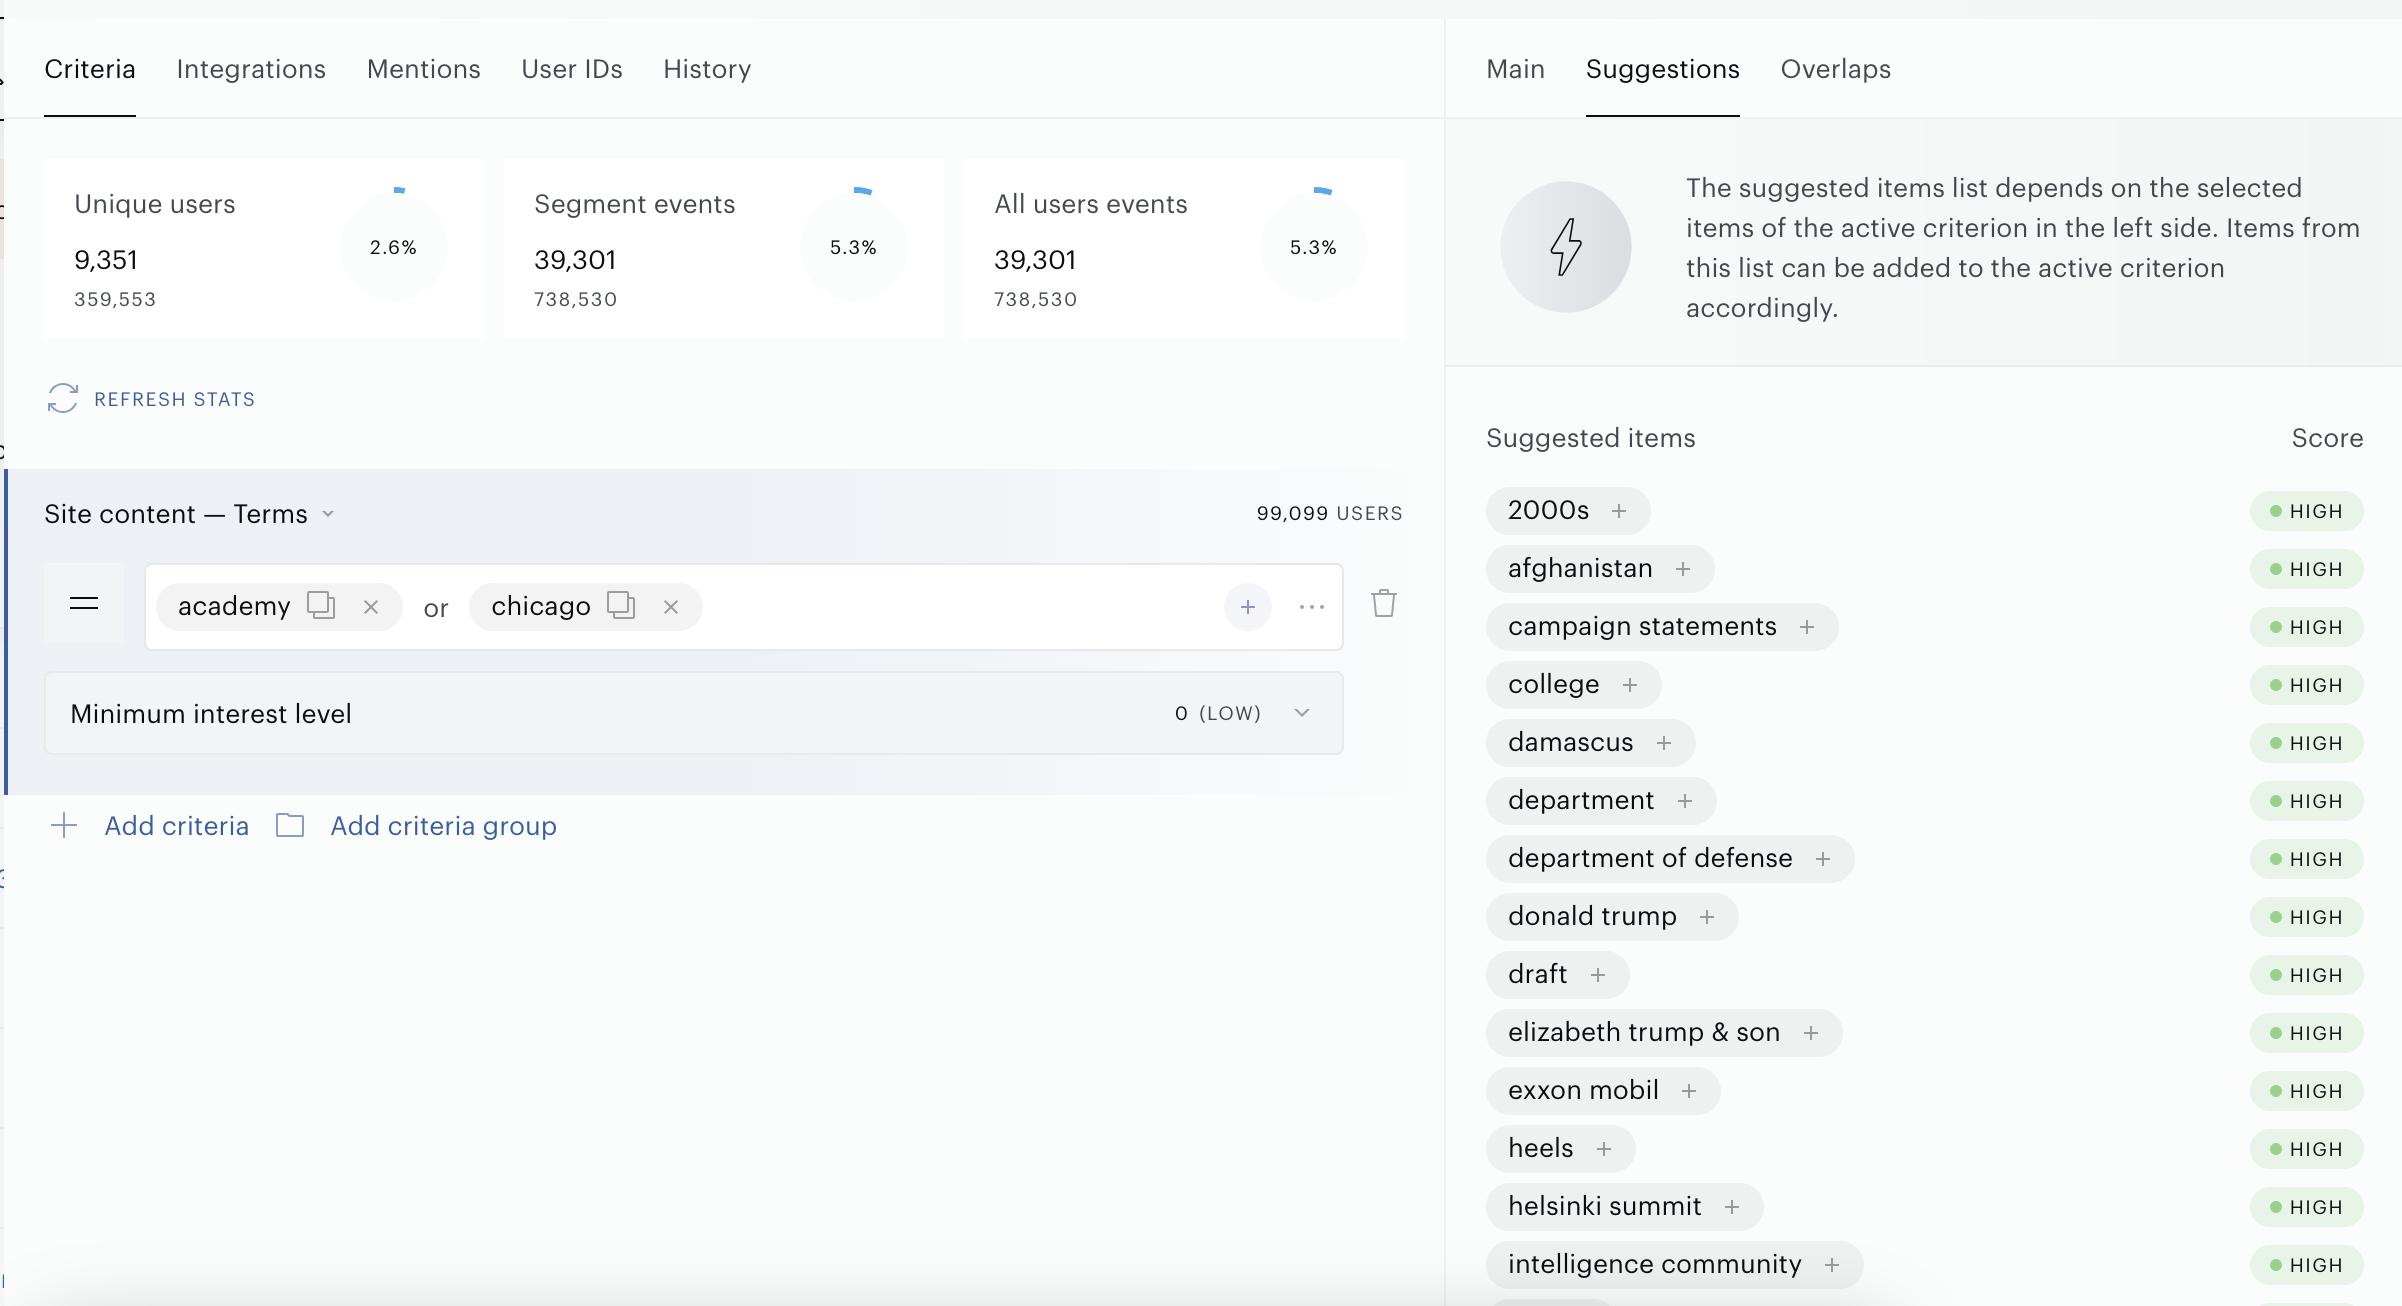
The Suggestions feature in the Segment Builder UI enhances user segment creation by providing data-driven keyword recommendations based on content profiles. It retrieves a set of keywords sorted by their relative relevancy to one or more keywords provided by the user, prioritizing those that frequently co-occur with the specified keywords in content profile data.
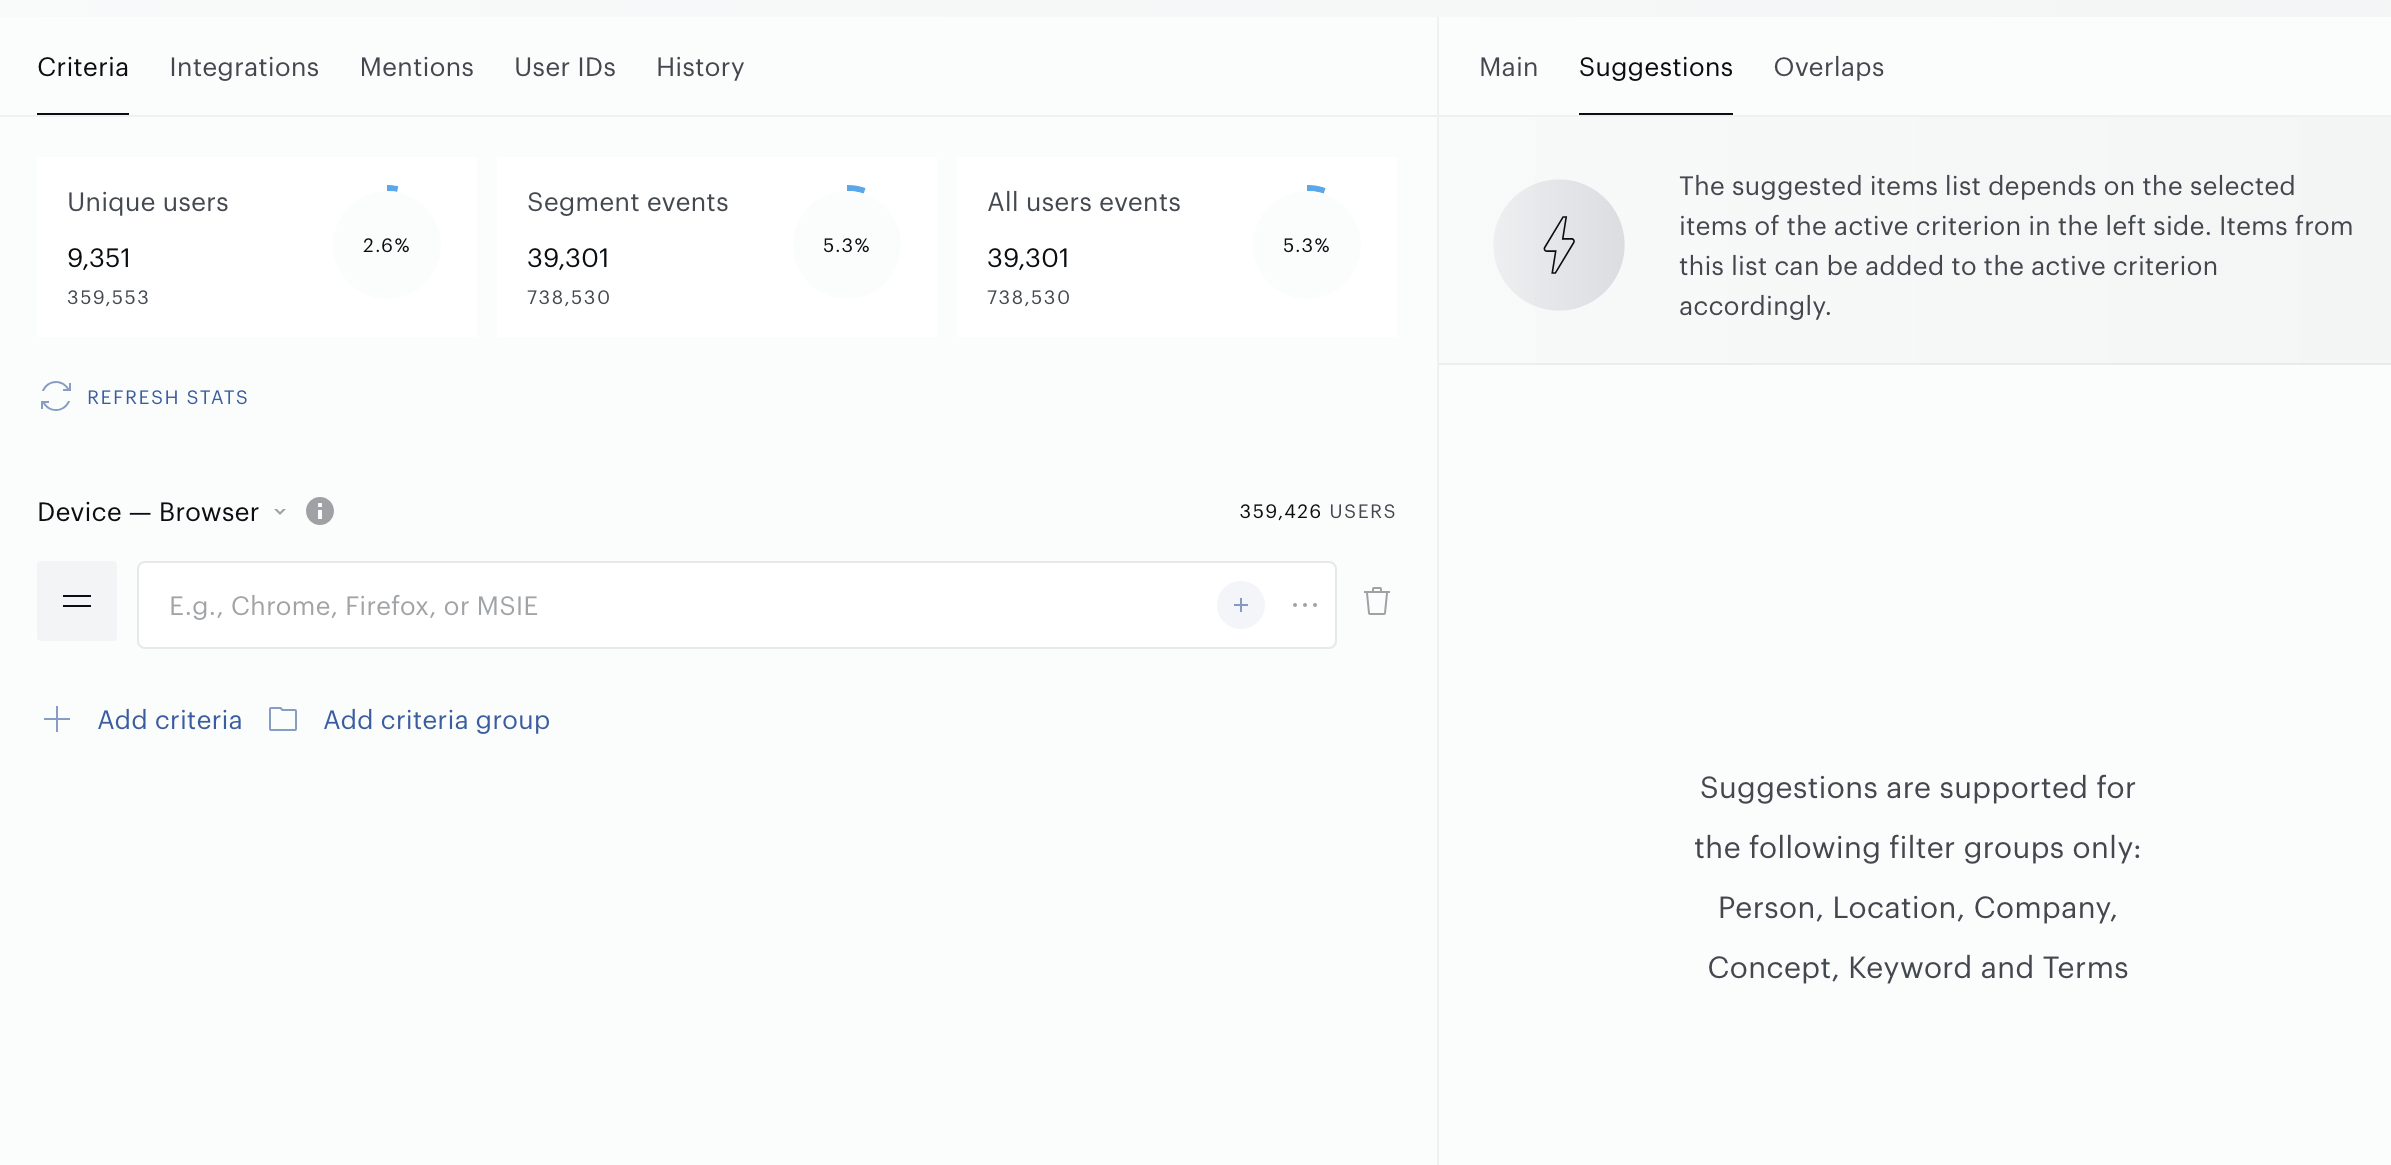
How It Works
-
In the Segment Builder, after defining initial criteria (e.g., users who viewed articles tagged with "Business & Finance" in the content profile), navigate to the Suggestions tab.
-
Enter one or more keywords related to your segment (e.g., "finance," "investment").
-
The system analyzes content profile data, such as topics, categories, or tags associated with user interactions, to suggest additional keywords that co-occur with your input.
-
Example: For a segment targeting users engaging with content tagged "finance" in the content profile, the Suggestions tab might recommend keywords like "stock market," "investment tips," or "wealth management" based on their co-occurrence in content profiles.
-
Apply suggested keywords as criteria with a single click or customize them to refine your segment.
-
Suggestions are updated dynamically as you modify keywords or segment criteria, ensuring real-time relevance.
Benefits
-
Enhanced Precision: Identify relevant keywords to create more targeted user segments based on content engagement
-
Use Case Flexibility: Discover related queries for personalization or bid phrases for ad campaigns.
-
Time Efficiency: Streamline segment creation with analytics-based keyword recommendations.
Overlaps
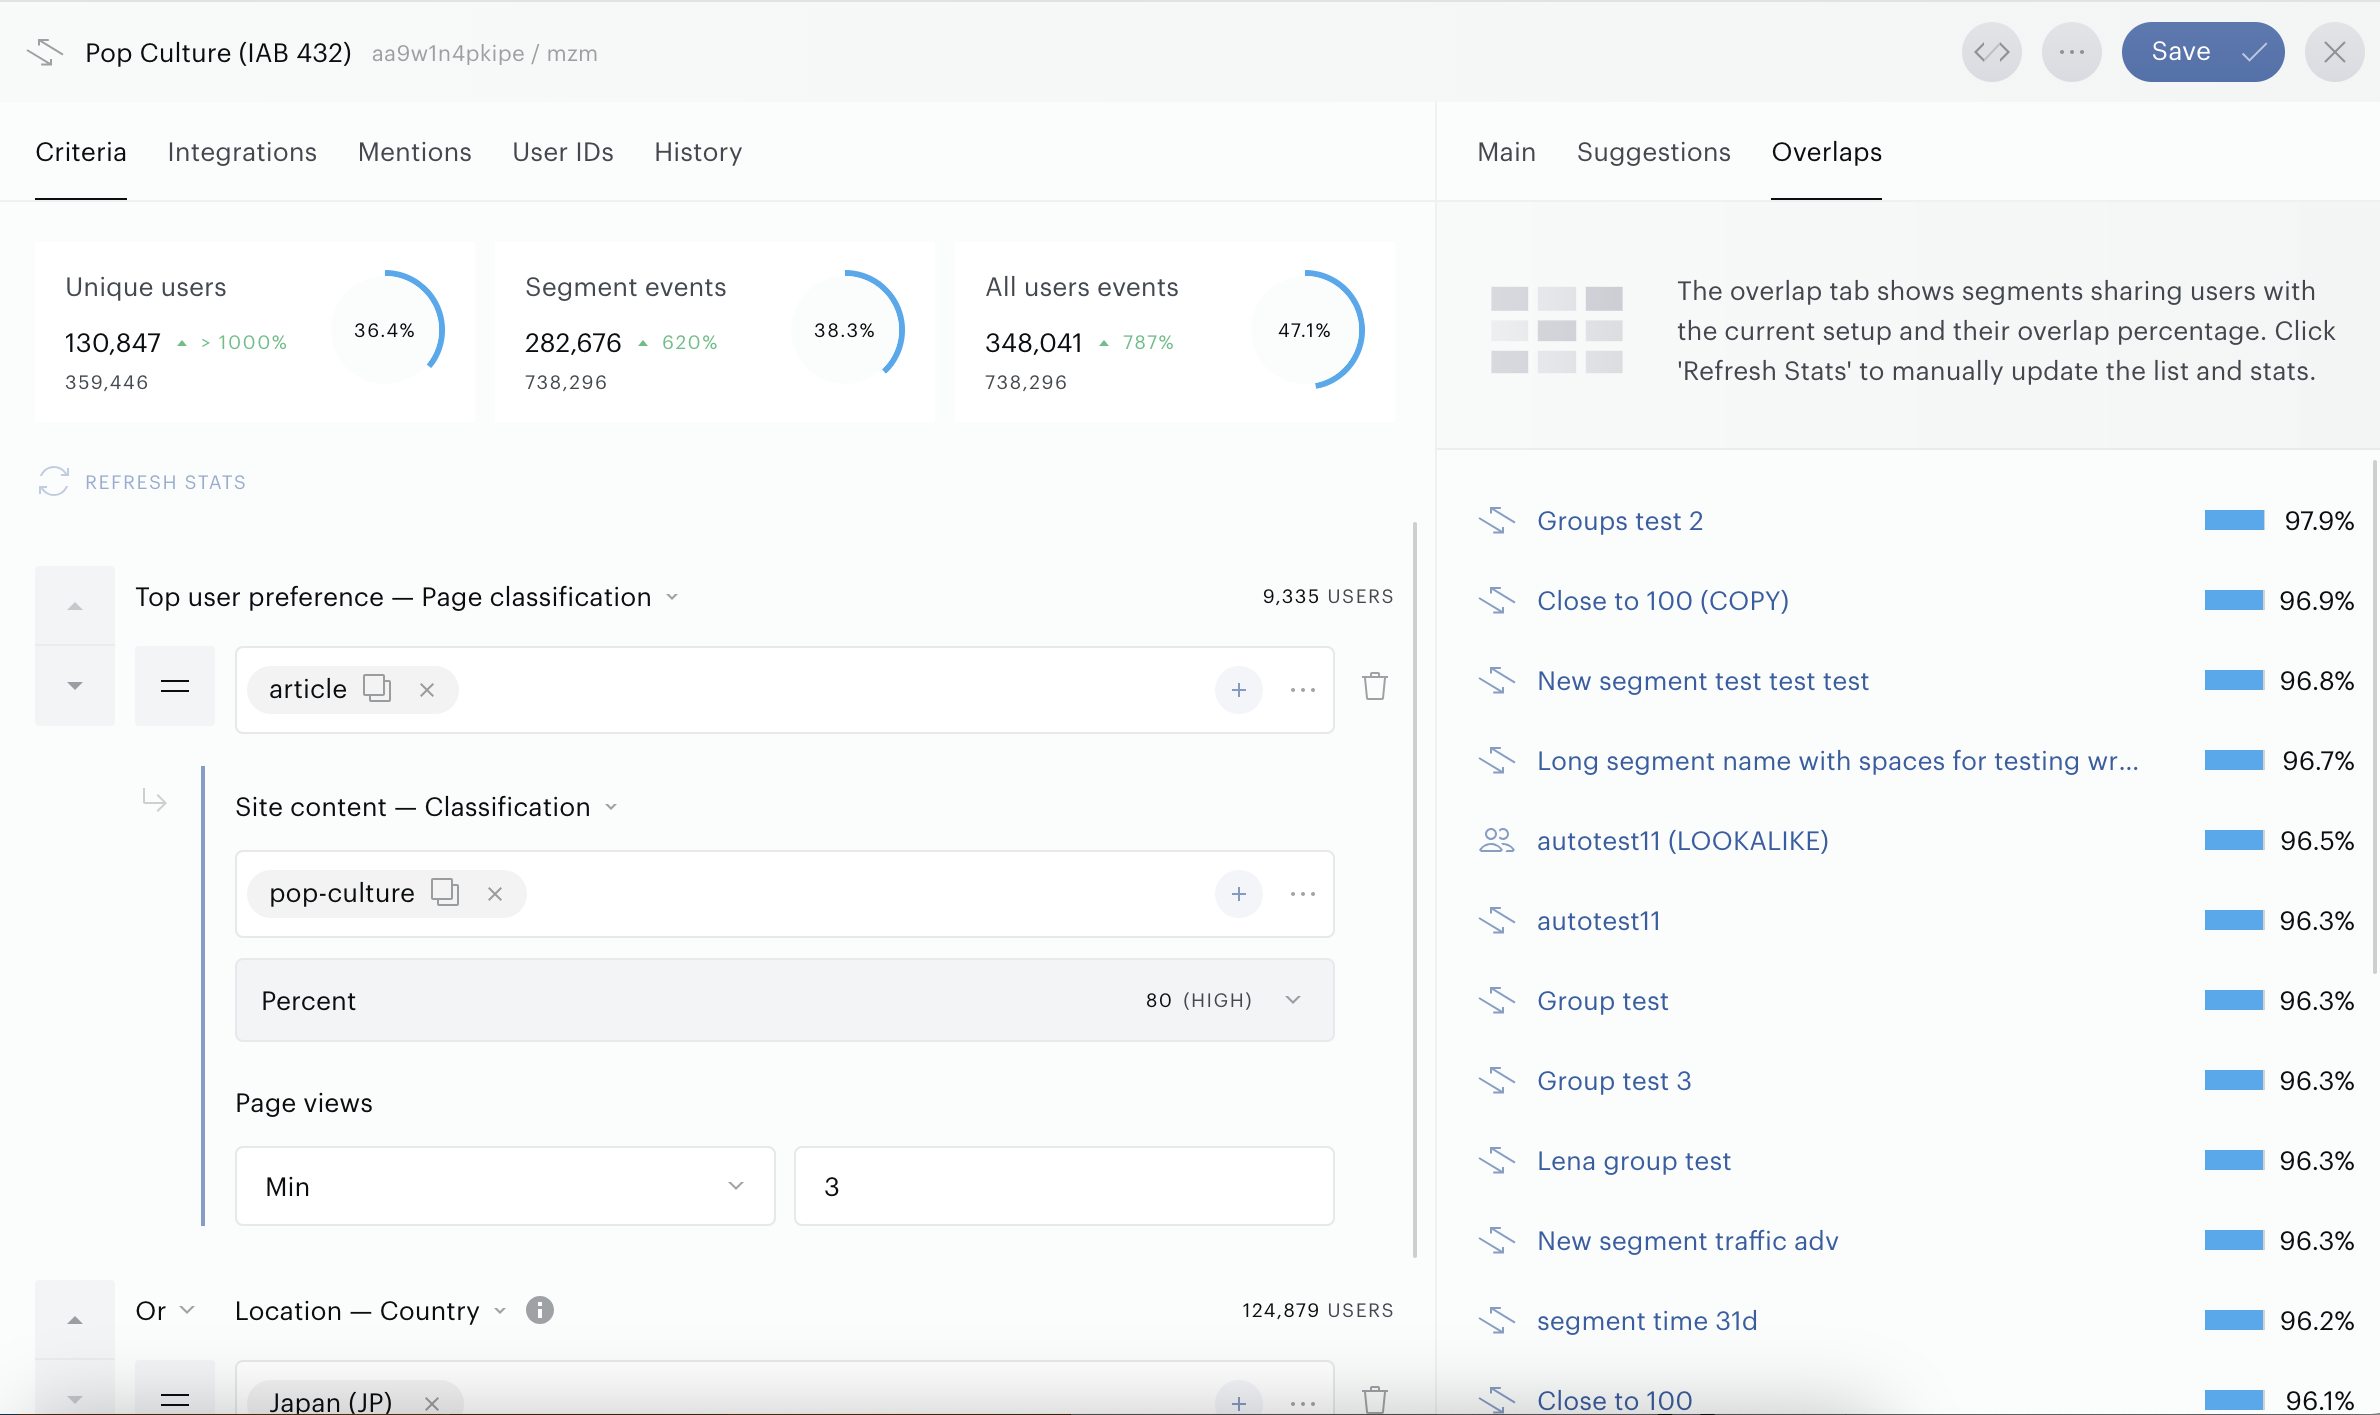
The Overlaps feature provides real-time feedback on how a new user segment overlaps with existing segments during creation, helping you optimize audience definitions and avoid duplication. Available in the Segment Builder UI, this feature is subject to specific limitations to ensure relevance and accuracy.
How It Works
-
In the Segment Builder, after defining criteria (e.g., users engaging with "Business & Finance" content), switch to the Overlaps tab.
-
Click Refresh Stats to generate a report showing the percentage and number of users in the new segment that overlap with existing segments.
-
Only segments with an overlap of at least 50% with the new segment appear in the list.
-
Right-click on listed segments to open them in a new tab for side-by-side comparison, aiding decisions on whether to refine or proceed with the new segment.
-
Overlaps is only supported for segments with a recency of 31 days or less
Benefits
-
Avoid Redundancy: Identify duplicate audiences before saving
-
Optimize Targeting: Refine criteria to focus on unique user groups
-
Real-Time Insights: Get immediate feedback without running separate reports
When the segment is opened for editing you can see different tabs such as:
Criteria
In the central panel, use the Criterion and Criterion group options and logical operators (and, or) to filter your audience and compose segments like “Women using Windows laptops and the Chrome browser” or “Young men which don't have a car and like sports”:
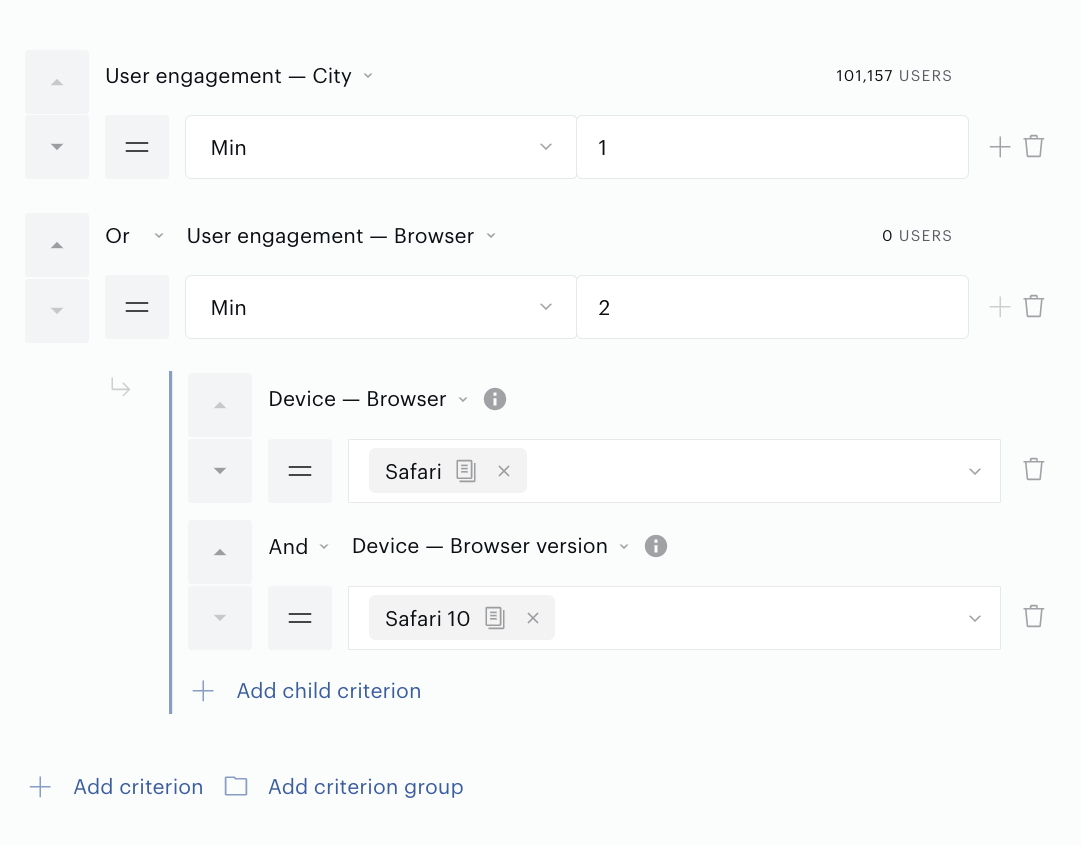
Logical operations can be applied to separate criteria or criterion groups.
If a segment is created without stating criteria, the default criterion "Device - Browser" is applied. If there is only one criterion in a segment, this criterion can't be removed.
Using Move filter up or Move filter down (those buttons are located next to the filter, on the left side) it is possible to move a criterion within the Criteria section. This function is more suitable for complex segments with a lot of filters.
Using Copy to clipboard elements (those elements are available next to filter names) it is possible to copy an item and past it in another filter that supports the same set of items then.
The match rate diagram is a widget showing the segment size (unique users matching the criteria) and the traffic events of matching users.
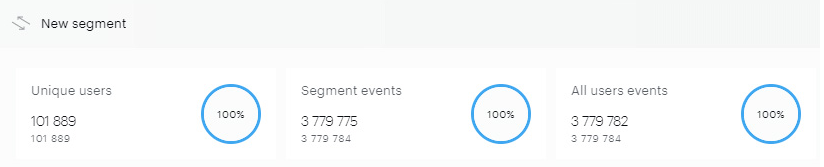
When you are creating a segment and want to see how adding some criteria would influence the widget, click Refresh match rate. When you are done and click Create or Save, the widget is updated automatically.
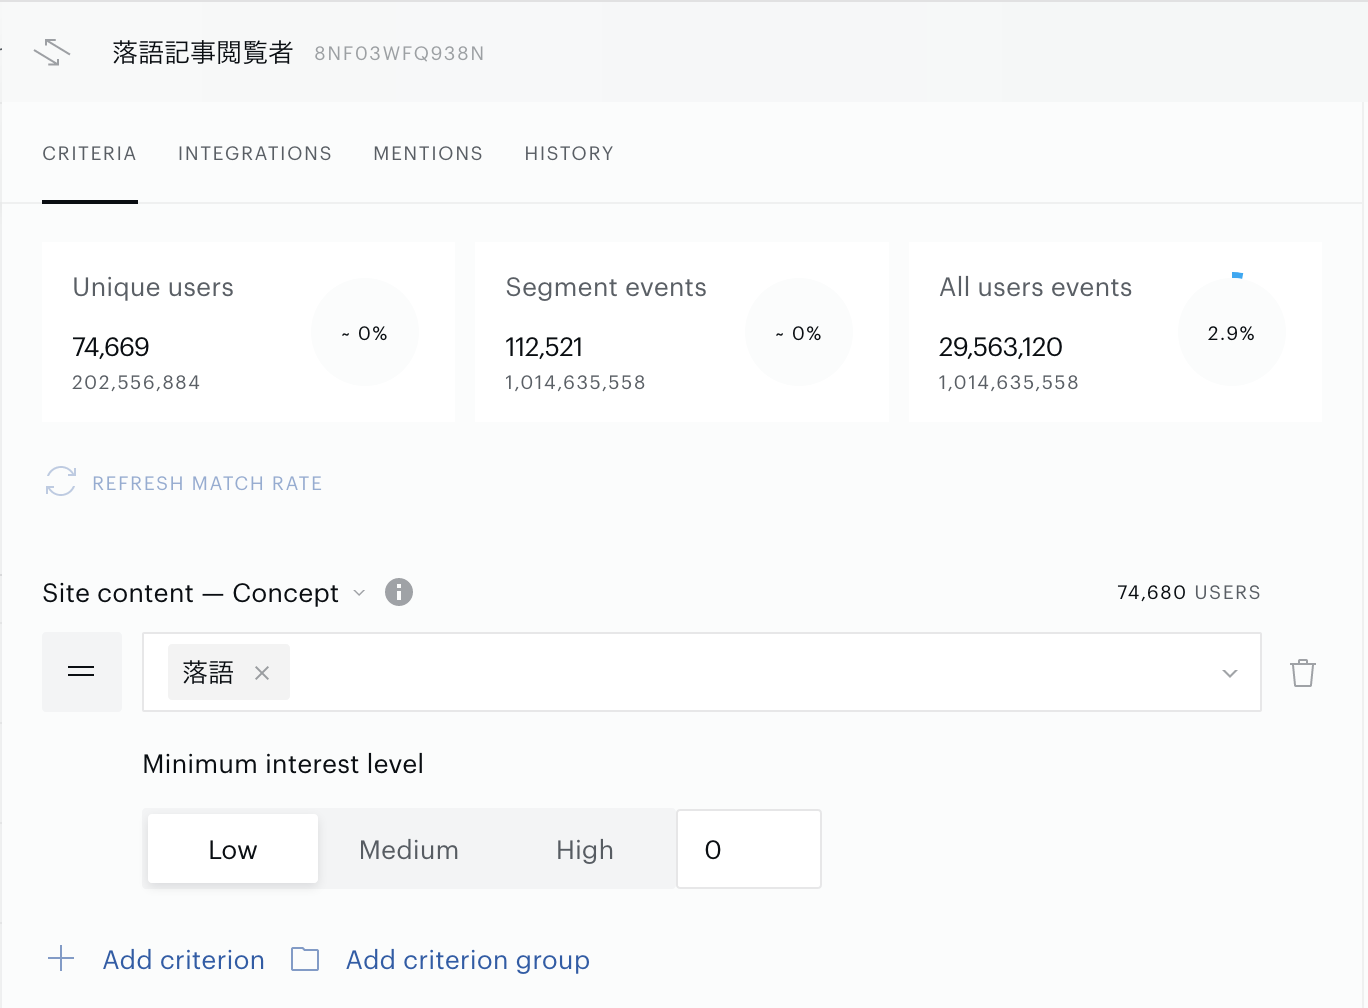
There are 3 main metrics in the Match rate widget: "Unique users", "Segment events", and "All users events".
In most cases, "Segment events" and "All users events" are quite similar in terms of their values.
At the technical level, these 2 metrics differ from each other by the only filter "User explosion".
What does it mean on the business level? An end-user can see the difference with the segment criteria like “Users who viewed pages mentioning Covid-19”.
“Segment events” in this case will match the pageviews on Covid articles whilst “All users events” will be the total pageviews by the users who viewed the articles. See an example below. The two numbers significantly differ.
Integrations
This tab shows you the list of connections (integrations) where the specific segment is used (is exported through the connection).
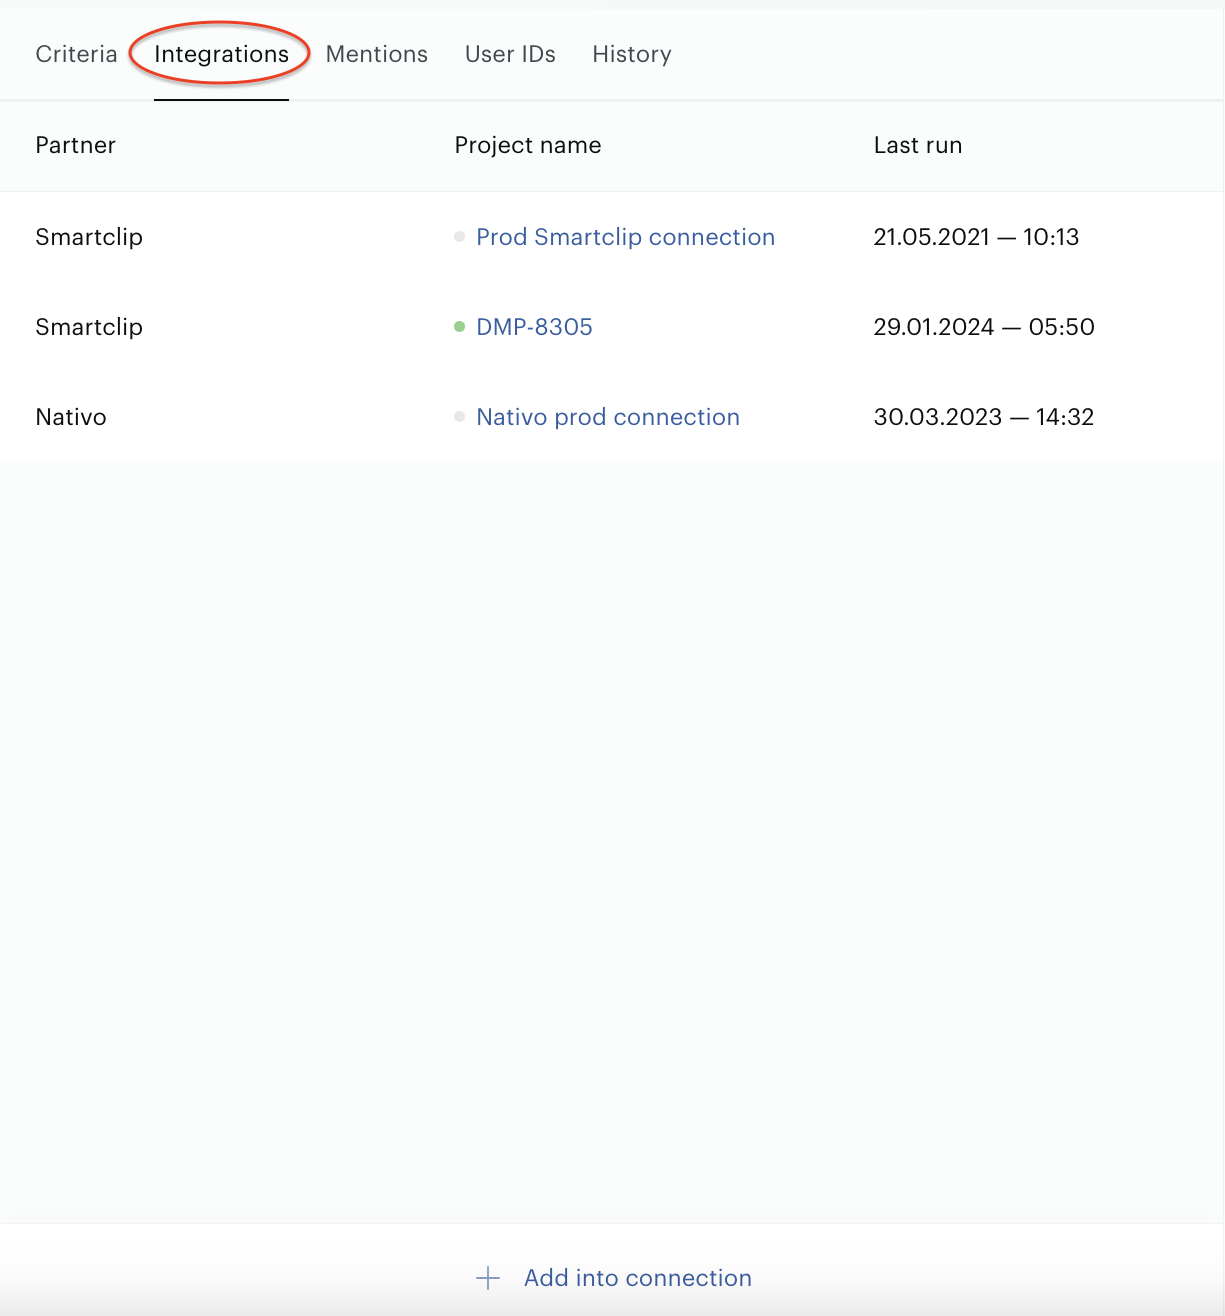
The table view consists of the following columns:
-
Partner shows the Partner name.
-
Project name shows the specific configuration name.
-
Last run shows when the last successful export happened.
When you press on the Project name link you will be redirected to the Audience→Connectivity, a specific connection form will be opened.
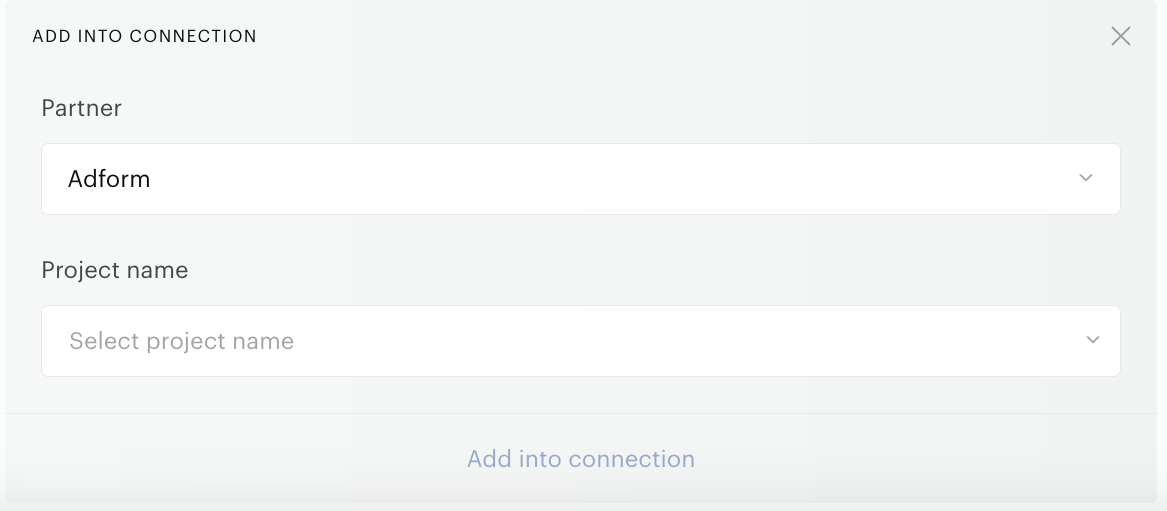
In addition to the table view the Add into connection feature is available. It allows you to add the segment in various existing connections being in the segment builder.
Mentions
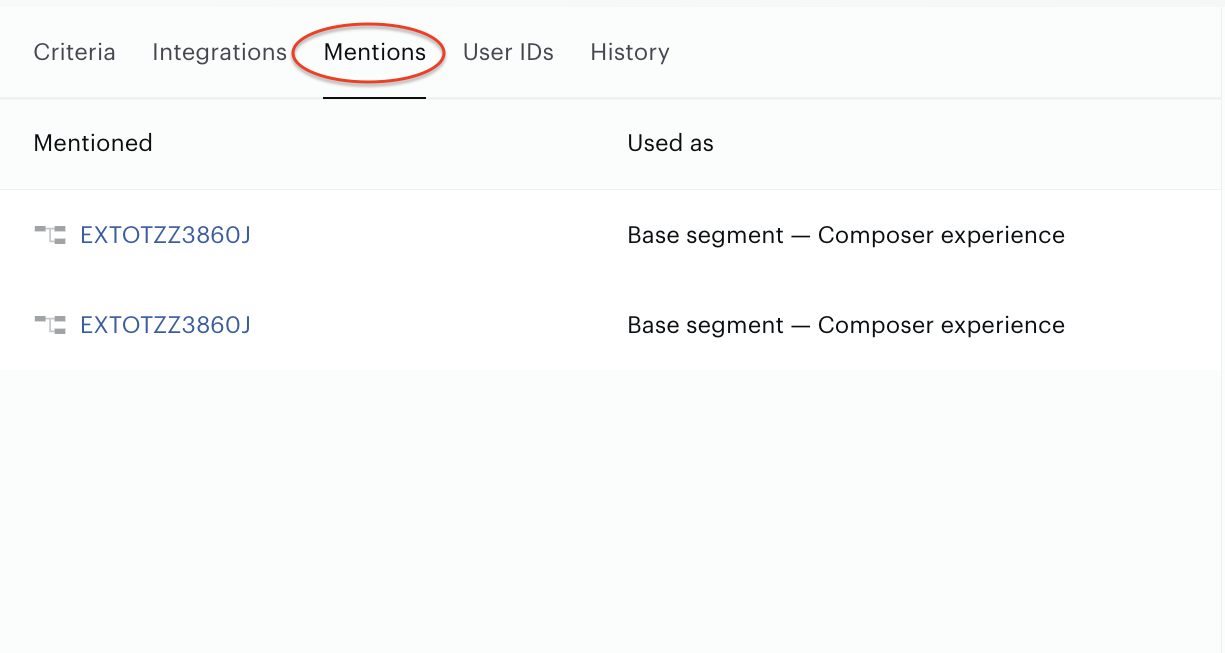
It is possible to create segments referring to other segments as filters (see Segments – Match, Segments – Member filter groups). This tab shows the list of related segments. Clicking the link in the Mentioned column, you will be redirected to the specific segment – a new browser tab will be opened.
Also, it is possible to see when the segment is used in the specific Composer Experience. Clicking on the link in the Mentioned column you will be redirected to the Composer, the Experience form will be opened.
History
From the time it is created until it is deleted, a segment can be modified many times. If there are no specific restrictions, it is possible to change the segment at any time by changing any parameter, from the name to the criteria, which, in turn, can lead to a change in the consistency and size of the segment’s audience.
Any such changes are recorded and displayed on the History tab. You can always see what exactly has been done, by whom and of course when it has been done.
User IDs tab
This tab allows you to understand how many different (external) IDs are linked to the users of a specific segment. In other words with the External user IDs information that is shown in the tab, you can review how many actual users are linked to a given segment.
External IDs mean identifiers with customers’ prefixes.
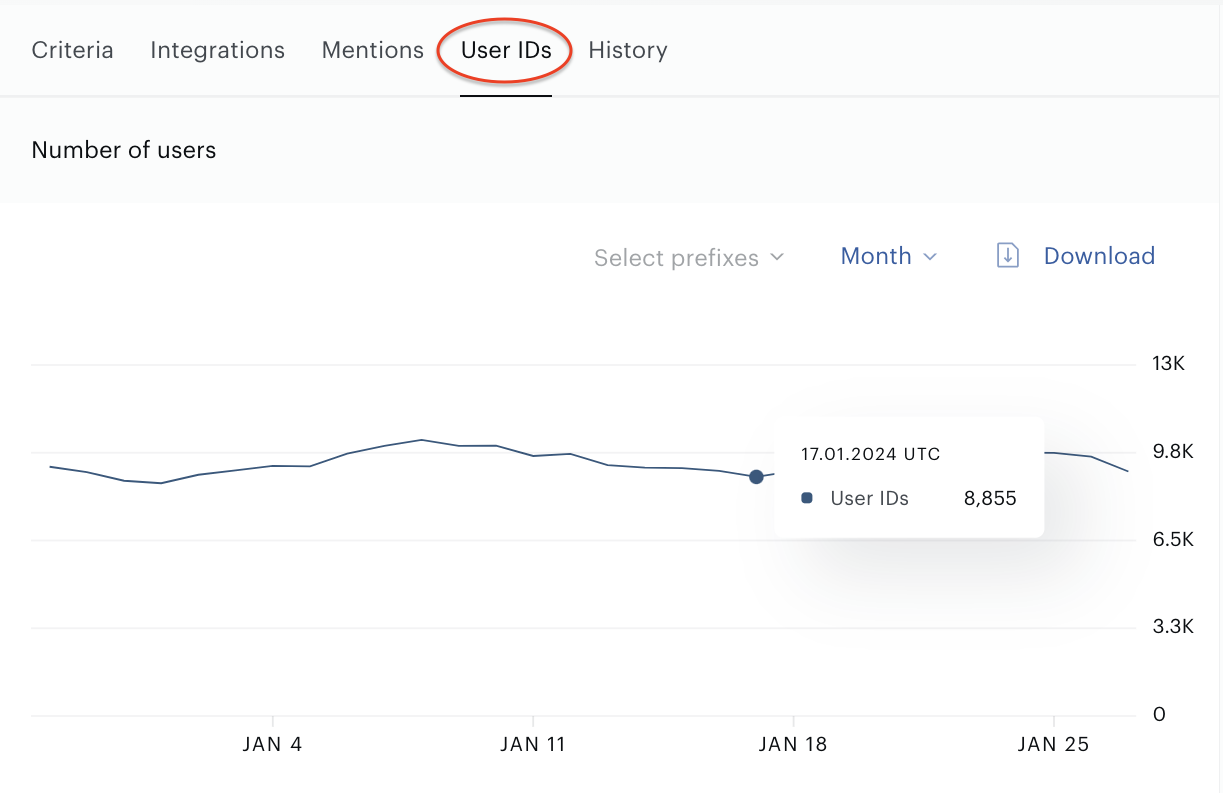
User IDs tab consists of Graph and Table views.
This graph view allows you to see at least one user IDs line that showing the segment audience changes. If there are data related to the customer’s prefixes, the extra lines can be added to the graph by configuring the Select prefixes option.
Be aware that both parameters Customer's prefix and date range affect the graph view and lines visibility.
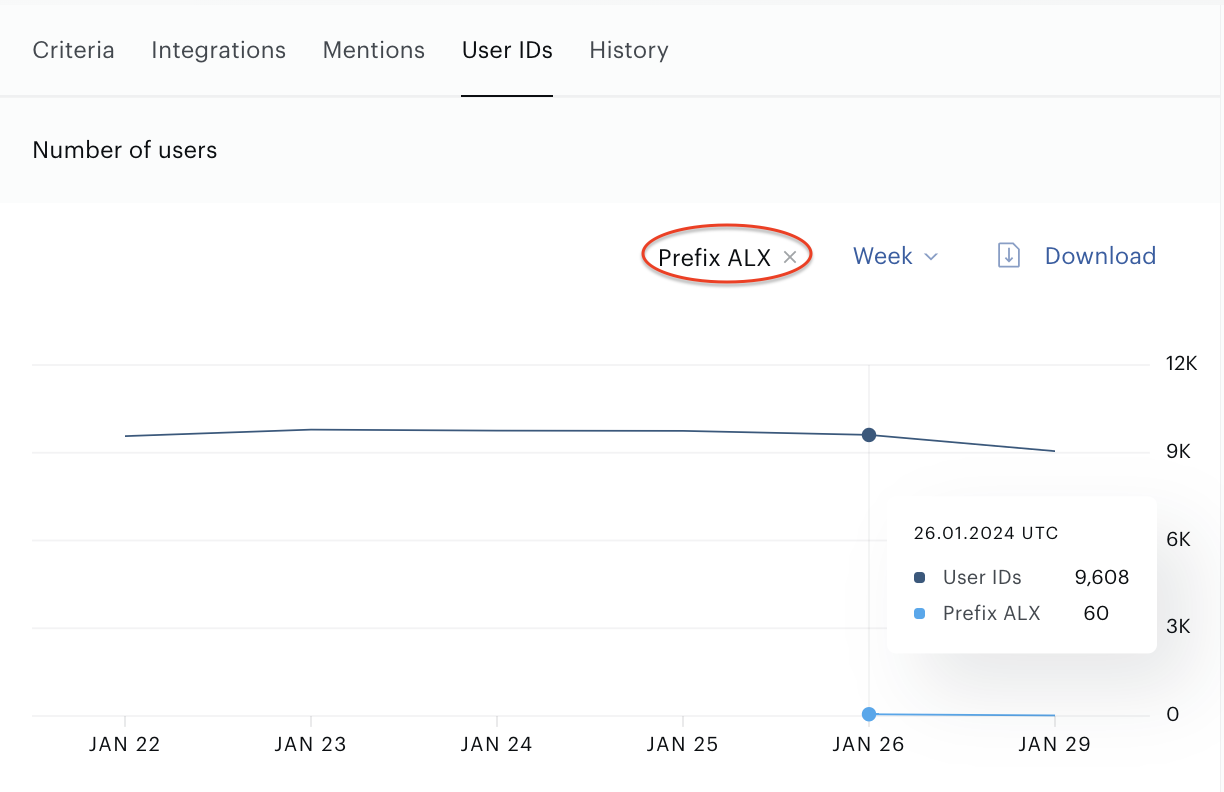
The table view shows the last calculated data.
Transparency
To build trust and ensure you have full visibility into how this works, we're committed to transparency in our use of AI. Piano Audience's new segment description feature utilizes Anthropic’s Claude, a state-of-the-art large language model designed for safe and helpful text generation.
-
How it works: When you click the "Generate AI Description" button, the Claude model is queried with specific instructions to generate the description, along with contextual information from your segment filters. This includes filter names, values, operators (e.g., "AND," "OR"), and any associated metadata - all of which is already visible to you in the Audience interface. No additional or hidden data is used; the AI only processes the exact filter details you provide for that segment.
-
Data usage and privacy: We do not store or use your segment data for training the model or any other purposes beyond generating the description in real-time. Insights are based solely on the model's ability to interpret and summarize the provided context.
-
Limitations: As with any AI-generated content, descriptions are suggestions and may occasionally require review for accuracy, especially if filter names are ambiguous. We recommend always verifying against your original filters.