
Setting up Apple Pay
Piano uses Apple's canMakePaymentsWithActiveCard method returning true or false to check whether a user is ready to make an Apple Pay payment right now. The method is relevant for user segmentation within Composer and for enabling or disabling the Pay with Apple button during the checkout process.
The only argument for this method is the Apple Pay merchant identifier which needs to be set as an environment variable, you can do it by adding the following string to Piano's JavaScript:
tp.push(['setApplePayMerchantId','example.apple.pay.merchant.id']);
The merchant ID can be retrieved either from your Apple Pay dashboard (if available) or by contacting the Support team of the respective payment provider.
For example it may look like this:
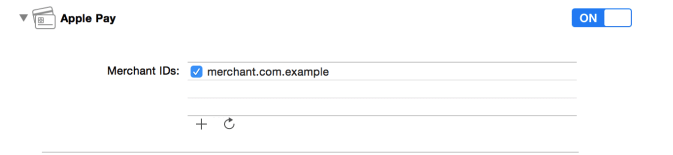
Please note, that in case you are trying to test Apple Pay on Sandbox, your staging site and especially the path where the Apple domain association file is hosted need to be publicly accessible (so they can't be blocked by IP address restrictions or require access credentials).
Apple Pay Integration Requirements
-
Only works over HTTPS.
-
Your website should be publicly available over the Internet (no IP filtering, no passwords).
-
There should be an Apple validation certificate publicly available. (See where to host it in the following section)
-
There should be a proper Apple Pay merchant ID set on the page. This is done either on your website's script or, for example, in Composer by using
tp.push(['setApplePayMerchantId','proper_merchant_id']);in the Piano integration script.
For some providers (like Stripe or Braintree), this can be a provider-specific merchant ID, not the one from Apple. For example, when using Apple Pay through Braintree, use the Braintree-specific merchant ID found in your Braintree account settings.
For Stripe, the format is "merchant." + [location.hostname, stripeAccount].filter(Boolean).join(".") + ".stripe".
For example: merchant.example.com.acct_ABC123XXXXXXXX.stripe
-
For Sandbox testing, clients should be using a dev Apple ID account, not the personal account you are using on your iPhones or iOS device on a regular basis.
-
For Production testing, you can use any actual Apple ID. But keep in mind that using it will cause a real transaction.
Braintree
To configure Apple Pay, first you should log in to the Braintree sandbox control panel for your Sandbox environment, or log in to the Braintree production control panel for your production environment. Follow Settings → Processing → Apple Pay and then click on Options. Under Web Domains, click Add a domain, enter your respective sandbox or production domain name and then click Agree & Add Domain.
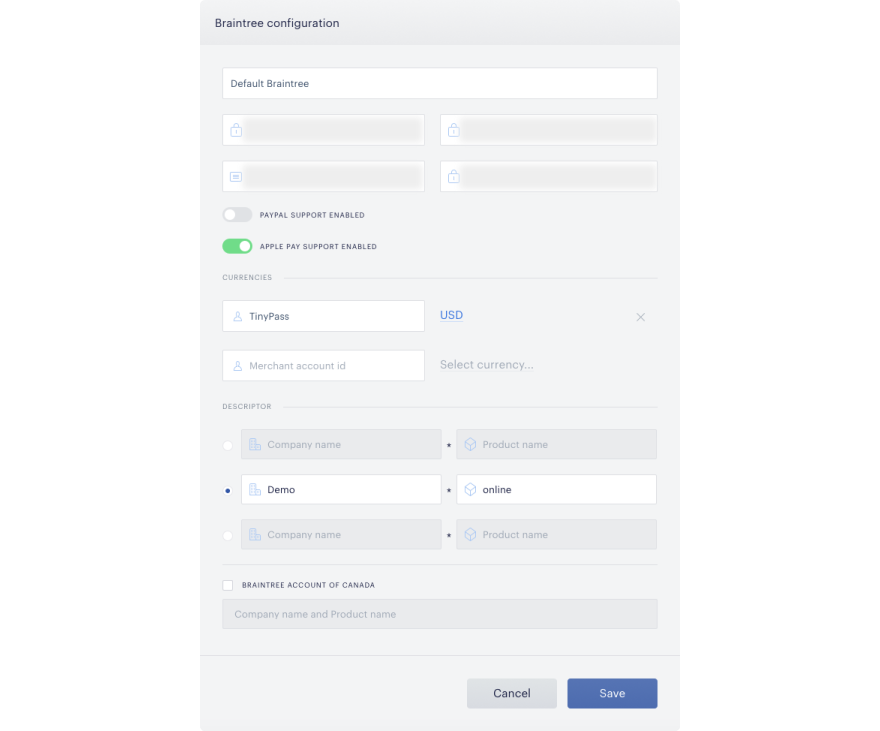
Then, within the Piano dashboard, click on Edit business and navigate to the Payment Provider tab. Edit your Braintree configuration by clicking on the appropriate pencil icon, and toggle Apple Pay Support Enabled to the "on" configuration.
Stripe
In the Piano dashboard, click on Edit Business and navigate to the Payment Provider tab. Add the Apple Pay Stripe configuration by clicking on the appropriate Add button on the left side of the screen. Then click the Connect button to authenticate your Stripe account; this will automatically fetch the required parameters to establish the connection. Complete the fields and click Save.
Please note that you need to verify your domain within Apple Pay as well. More information about this is available here. When configuring the domain, it is not sufficient to add only the top-level domain. The full subdomain, including www. must also be specified to ensure proper functionality.
Payway
In the Payway platform, you will need to find your User name, Password, and Source values. Then, within the Piano dashboard, click on Edit Business and navigate to the Payment Provider tab. Add the Payway Apple Pay configuration by clicking on the appropriate Add button on the left side of the screen. Complete the fields and click Save. More information about this is available here.
Datatrans
In the Datatrans dashboard, you will need to locate your Merchant ID, Password, and Sign values. More information about these is available here. Then, within the Piano dashboard, click on Edit business and navigate to the Payment Provider tab. Add the Datatrans: Apple Pay configuration by clicking on the appropriate Add button on the left side of the screen. Complete the fields and click Save.
Additional Steps for Production
Braintree
For your production environment, you must also host the domain association file on your site. You can download the domain association file here.
On your site, you must host this file at /.well-known/apple-developer-merchantid-domain-association. For example, if your domain name is http://www.example.com, you would host the file at http://www.example.com/.well-known/apple-developer-merchantid-domain-association.
More information is available under this link.
Stripe
In order to set up Apple Pay, please follow the instructions described here.
In addition, the domain needs to be registered with Stripe either through your Stripe account or using the API call as follows:
curl https://api.stripe.com/v1/apple_pay/domains \
 -u "sk_live_<REDACTED>": \
 -d domain_name="example.com"
If the domain is not registered, the Apple Pay button will be active but the payment will be failing when it's clicked. More information is available here.
Payway
In case you are using Payway as your payment provider, the domain association .txt file comes from Payway. The steps that you need to follow are below:
-
Contact Payway support and provide the domain name associated with each site conducting transactions through Apple Pay.
-
Payway will provide a domain name association .txt file from Payway for each application.
-
This .txt file must be hosted at a very specific URL:
https://<your_domain_name.com>/.well-known/apple-developer-merchantid-domain-association.txt
NOTE: Please make sure you host this as a
.txtfile.
No additional JavaScript is required; Piano's platform will handle it from here.
Datatrans
Your website's domain should be whitelisted as per the Datatrans documentation available here.
It’s necessary to host the domain association file on your website site as well. You will be able to download this file once you click on Add domain in your Datatrans dashboard's Apple Pay Settings.
User Experience
Please note that mobile users can only take advantage of Apple Pay if they have an iPhone 6 or higher and are browsing your site using Safari. If a user wishes to use Apple Pay on their Mac, they must have macOS 10.12 Sierra installed and have their iPhone present during the transaction as Touch ID is required for payment. MacBook Pro computers with touchbar capability are compatible with Apple Pay without the need of an iPhone. For more information, follow this link.
User Flow
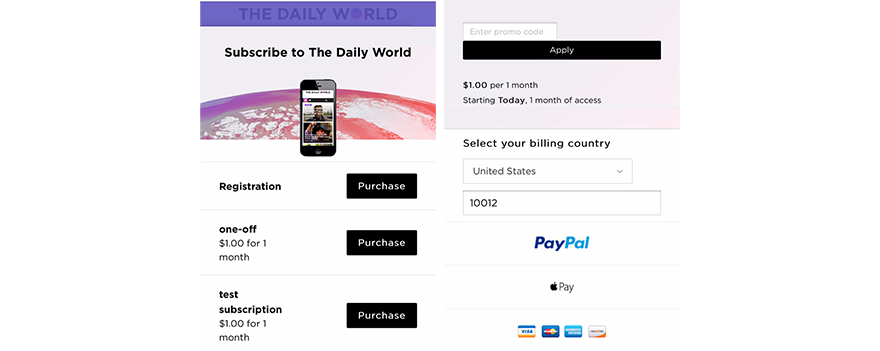
The user will select the desired subscription option and be brought to the payment screen. From there, the user will have the option to select PayPal, Apple Pay, or credit card:
If the user selects Apple Pay, they will be prompted to pay with Touch ID:
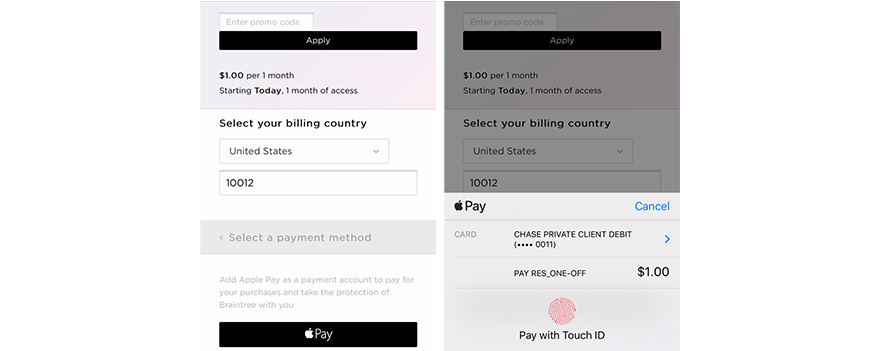
A verification screen will then appear and the user will click "Complete Purchase" to complete the purchase:

End users are able to check out with just one touch to create their account and access content without having to enter an email or password.
In the backend, we pull their information through an API from Apple to create their account and send their confirmation of purchase to their email address. A unique ID (based on their email address) is created to ensure there aren’t any duplicates in the backend of the Identity Management. All future purchases using that account will be tracked to that ID.
Troubleshooting tips
One of the following hardware requirements needs to be met in order to be able to use ApplePay:
-
iPhone 6 and higher with Touch- or FaceID features
-
iOS 6.0 and higher
-
Mac computers:
-
2012 production models and higher with iPhone devices (end-users should be using the same Apple ID on Mac and iPhone and the iPhone should be within the radius of the Bluetooth connection with the Mac computer)
-
Standalone Mac computers with TouchID feature
-
-
Safari browser version 12.0 and higher
Please note that Apple Pay is not compatible with passwordless authentication. To use Apple Pay integrations, you must utilize the frictionless flow or opt not to use passwordless authentication.
Apple Pay as a payment method is currently not supported for frictionless checkout with Dynamic terms that have a first free period.
Verify the Apple Pay Merchant ID
You can check if the Apple Pay Merchant ID is properly set by running tp.applePayMerchantId() in Safari's developer tools console. This snippet should return the Apple Pay Merchant ID.
To see if your environment is ready for Apple Pay payments, run ApplePaySession.canMakePayments() in Safari's developer tools console.
You can verify Composer's Apple Pay segmentation by running the following code snippet. Don’t forget to replace the <apple_pay_merchant_id> in the script with your own.
if (window.ApplePaySession) {
              var merchantIdentifier = '<apple_pay_merchant_id>';
              var promise = ApplePaySession.canMakePaymentsWithActiveCard(merchantIdentifier);
              promise.then(function (canMakePayments) {
                alert(canMakePayments);
              });
            } else {
              console.warn("no session");
            }