

GoCardless Drop-in Overview
Piano’s integration with GoCardless Drop-in permits the collection of Direct Debit transactions across multiple schemes and locations.
This document provides information on how to implement the GoCardless Drop-in integration in your application, as well as details on functionality specific to GoCardless Drop-in that Piano has introduced for this integration. Please reach out to your Piano Account Manager for an introduction to a GoCardless representative.
Piano supports every Direct Debit scheme offered by GoCardless, listed below:
-
ACH
-
Bacs
-
BECS
-
BECS NZ
-
Betalingsservice
-
PAD
-
SEPA
Supported Countries
If you are using GoCardless, your customers must be in the following countries:
-
Australia
-
Austria
-
Belgium
-
Croatia
-
Czech Republic
-
Denmark
-
Estonia
-
Finland
-
France
-
Germany
-
Greece
-
Hungary
-
Ireland
-
Italy
-
Latvia
-
Liechtenstein
-
Lithuania
-
Luxembourg
-
Netherlands
-
New Zealand
-
Norway
-
Poland
-
Portugal
-
Slovakia
-
Slovenia
-
Spain
-
Sweden
-
Switzerland
-
United Kingdom
-
United States
Supported Currency
Piano supports the following GoCardless supported currencies:
|
Supported Currencies |
||||||
|---|---|---|---|---|---|---|
|
GBP |
EUR |
SEK |
NZD |
CAD |
USD |
AUD |
Note, that Piano may support only selected currencies available in the payment providers dashboard.
Supported Payment Methods
Piano supports the following payment methods for this payment provider:
|
Payment method name |
Are renewals supported? |
||||||||||||
|---|---|---|---|---|---|---|---|---|---|---|---|---|---|
|
Direct Debit |
Yes |
Supported Features and Functionality
|
Feature/Functionality |
Supported? |
|---|---|
|
Refunds |
Yes |
|
Apply Terms Wizard |
Yes |
|
My Account - Add payment method |
Yes |
|
My Account - Edit payment method |
No |
|
My Account - Delete payment method |
Yes |
|
Publisher dashboard - Add payment method |
Yes |
|
Publisher dashboard - Edit payment method |
No |
|
Publisher dashboard - Delete payment method |
Yes |
|
Tax Providers and Types |
TaxJar / Avalara |
|
Transaction descriptors |
None |
|
Frictionless |
No |
|
3DS / SCA |
No* |
|
Account Updater |
Yes |
|
Fraud prevention |
No |
|
Passive churn prevention |
Not supported |
|
Payment token import support |
Yes** |
*Paperless Direct Debit mandates that are used by GoCardless Drop-in are out of scope of SCA and are fully PSD2 compliant.
**For more information about the payment token import please visit this link.
Changes Implemented in Comparison to Earlier Direct Debit Versions
-
GoCardless drop-in interface language is now automatically set based on the browser’s locale
-
Purchase steps between Piano checkout and GoCardless mandate form have been streamlined improving the UX
-
Purchase button now states Pay with *Scheme’s name* (e.g. Pay with SEPA) in both Checkout and MyAccount, instead of Pay with GoCardless. The schemes are shown based on the currency selected as listed in GoCardless documentation.
-
Pending transaction status has been introduced to enable better tracking of the asynchronous payment processing flow, transactions enter this status until Piano receives a confirmation response from GoCardless webhook that the payment has been successfully completed
-
Connecting a GoCardless account across multiple Piano applications automatically updates access tokens based on the organization ID
-
Additional webhook processing and events syncing improvements were implemented to provide better reconciliation
Mandate status handling
When the mandate is created the user is given access immediately, even if the mandate is in processing, the transaction will be in pending status until confirmed.
Retry process and Success+
It is highly recommended to configure the Success+ service provided by GoCardless in order to ensure the most optimal failed payment recovery.
If the mandate fails to process, the transaction is being retried by GoCardless Success+ retry (if enabled in your GoCardless account). Piano retry logic is not currently compatible with asynchronous payment processing. Please ensure you have enabled Success+.
The Piano retry logic if a grace period is configured on the term is only used in case Piano wasn’t able to initiate payment with GoCardless upon renewal due to server connection timeout. If the transaction is not successful, then the access is revoked and the user is sent a notification about it. Please note, upon initial failure when Success+ is enabled, Piano automatically extends access until the next billing date and listens for GoCardless webhooks. Upon receiving "Payment failed will retry" status, Piano continues to wait until receiving "Payment failed won’t retry" response at which point Piano expires the subscription and revokes access.
Important Notes and Limitations
Limited to direct debit transactions. Instant Bank Pay transactions are not supported.
GoCardless Direct Debit has a minimum transaction amount (e.g. 1 EUR or 2 USD), for more information and other currencies please review this documentation.
Refunds are disabled by default in your GoCardless account. Please enable this feature on your end in order to be able to process transaction refunds via the Piano dashboard. DO NOT make refunds directly through the GoCardless dashboard as this will lead to discrepancies - always use Piano to request refunds.
Piano does not import existing mandates attached to an existing merchant account upon the authentication and linking of a GoCardless account into a Piano application. Please reach out to the Piano support team at support@piano.io if an import of users and existing mandates are needed.
Please note, if you authenticate with the same GoCardless account into multiple Piano applications, Piano will automatically update access tokens using your account’s Organization ID, since every time you authenticate a new access token is generated.
Funds processed through the bank debit network do not settle immediately. Although rare, there can be instances where payment is initially marked as successful by the paying bank, only to be subsequently marked as having failed (late failure payments). For this reason, as a rule for direct debit payments, it is not possible to request refunds within 7 days of being charged.
The new drop-in API supports Instant Bank Payments, this is not implemented in Piano Management + Billing. Please note, that Instant Bank Pay is best suited for one-off payments since it requires the payer to authorize every payment (clicking on a link and authenticating it with their face-ID or fingerprint), therefore Direct Debit rails have to be used for recurring payments anyway.
How to Integrate GoCardless Drop-in with Piano
As with our other integrations, Piano uses your credentials to make requests to GoCardless on your behalf. To begin inputting your credentials, navigate to Edit business → Payment provider → GoCardless Drop-in Direct Debit → ADD.
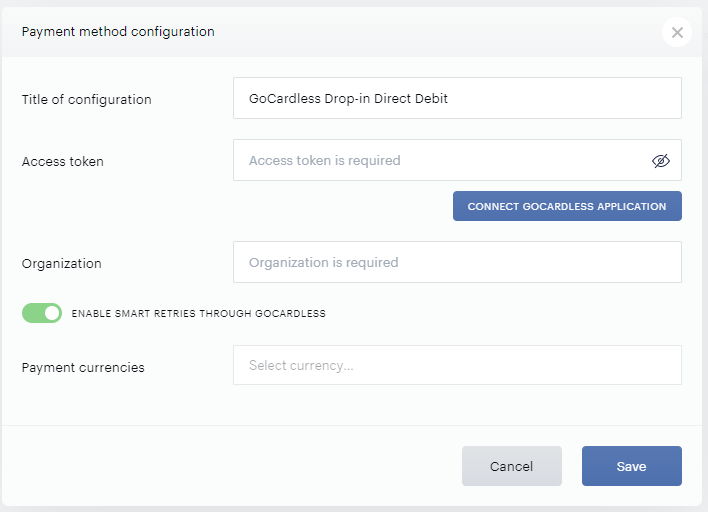
-
Title: The title of the payment integration
-
Access Token: The Access token from your GoCardless account. This information will be automatically populated once you click on Connect GoCardless application.
-
Organization: Your GoCardless Organization ID. This information will be automatically populated once you click on Connect GoCardless application.
-
Enable Smart Retries through GoCardless: Switch on this toggle to enable support for the Success+ Intelligent retries in Piano, please note you have to get this feature enabled for your GoCardless account first, you may need to reach out to your GoCardless representative to do so. Switching this toggle on in the Piano dashboard will not have an effect if this service wasn’t enabled by GoCardless.
-
Currencies: The currencies you need to support within GoCardless. Please note specific currencies are tied to individual schemes. (e.g. BACS - GBP, SEPA - Euro, etc.)
For this integration, we will need the following information:
-
Your GoCardless account credentials
-
List of currencies that you'd like to process payments in
Once you click on Connect GoCardless application, you will be taken to a secure GoCardless website, where you'll be able to authenticate your GoCardless account and connect it to Piano. Once this step has been successfully completed, the Access token and Organization fields will be automatically filled in with the relevant values.
IMPORTANT: Copying access token or organization values from an old GoCardless Direct Debit configuration is not recommended. On Piano's side, this will result in incorrect synchronization of payments. GoCardless must be connected by clicking the "Connect GoCardless application" button.
Once you have input these credentials and select the currencies in which you would like to transact, simply click Save, and you will be able to begin conducting transactions.
Please note, if you authenticate with the same GoCardless account into multiple Piano applications, Piano will automatically update access tokens using your account’s Organization ID, since every time you authenticate a new access token is generated.
If you are testing in Sandbox, you will need a GoCardless Sandbox Merchant account. You will be asked to enter the company information and then will receive a confirmation email from GoCardless. You can use the following direct debit information to simulate a test payment on Sandbox.
How to Switch to New Drop-in Integration from the Legacy GoCardless Version
-
First please update your system templates to ensure the latest code is available in your application by following the steps outlined in the section Template changes.
-
Set up the new Drop-in version by following the steps How to integrate GoCardless Drop-in. You can and should use your existing GoCardless account.
-
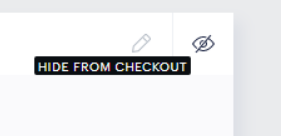
After completing your testing of the Drop-in integration successfully (either Sandbox and/or Dashboard testing), you can hide the old GoCardless integration in your checkout from within the Payment Provider section in the Piano dashboard's Edit Business settings (via the button below), and start using the newly enhanced integration for any new subscribers immediately.
-
Your existing mandates will continue to be processed using the legacy GoCardless integration until Piano has updated the processing of your existing mandates to be driven by the newly configured Drop-in version. This is an automated process, after you have configured and processed the first couple of transactions using the new Drop-in version, reach out to support@piano.io to include your application database in an update job process which will port your mandates to be used by the Drop-in version. End users should have a seamless experience during this process. Their active subscriptions will work as they worked before and their mandates remain the same. After your mandates have moved over to the new version, the Piano Support team will notify you and you can safely remove the old version configuration from your application.
Mandate Migration from a 3rd Party Provider
See the GoCardless support portal for the mandate migration process for SEPA (what is usually called bulk change or bulk migration), which is a standard process for the scheme and doesn't necessarily differ by provider (i.e. we won't have a different approach for Stripe vs. another provider).
This is a process that GoCardless teams are accustomed to doing on a regular basis and there are dedicated resources to support merchants with this process.
Here you can see a page highlighting the different processes for each scheme for your reference.
From a technical perspective, they have in their developer portal a specific guide on Migrating Mandates from a Different Provider.
Administrative Options
Users, as well as client service representatives, are able to add a direct debit payment method via My Account or the Piano dashboard respectively.
My Account
In the My Account section under the Library tab, end users are able to add a new direct debit account which will be linked to the subscription and used for any subsequent renewals.
For this, they should navigate to your My Account section, login and under the Library tab click the Manage drop-down and select the option Update renewal payment method.
In the new modal, they can select +Add Direct Debit → Pay "Scheme’s name" (e.g. Pay with SEPA) and enter their billing details and direct debit account. Once completed and confirmed, the new direct debit account will be linked to their subscription and their next payment will be taken out of this account.
Piano dashboard
In the Piano dashboard, client service representatives have the option to subscribe users to a payment term under All Users → Subscribe user as described here.
Now, you'll also be able to select GoCardless direct debit as a payment method and enter the following billing information of the user (incl. their IBAN or account number):
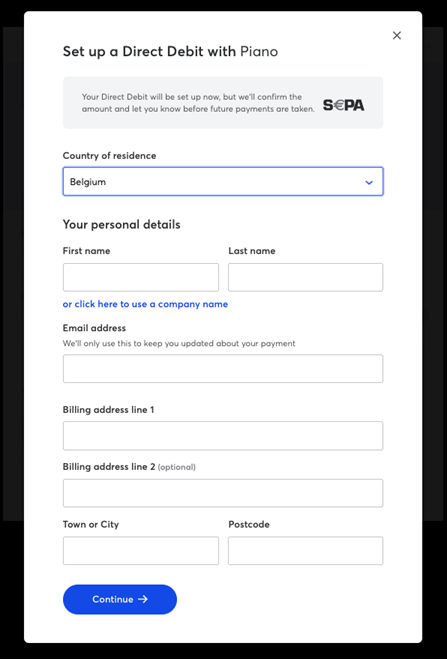
Once you click Continue, and confirm the user's details, the direct debit account will be linked to their user's account and you can proceed with subscribing them to the selected term.
Template Changes
To ensure the latest code is loaded in the Checkout and MyAccount if your application has been created before October 2022, system template changes are required. There are a few ways to update your templates;
-
The easiest way is to reset to default if you haven’t stylized the templates.
-
If you did, then you can use the Compare code feature and compare the code between the default version and your current version, and carry over any new code line by line.
-
Alternatively, please see the updated code below:
The Payment Components template should contain the following code. If missing, you can add it to the end of the template's HTML.
<script type="text/ng-template" id="/frontend/providers/components/gocardlessdropin/checkout/component.shtml">
<div class="gocardless-dropin new-card-form">
<div class="row">
<div desktop class="cc_stored_cards" ng-show="!cc.payWithNew && cc.initiated">
<div class="add-credit-card-wrapper">
<h4>
<t>Mandates</t>
</h4>
<a href="javascript:void(0)" class="add-credit-card" ng-click="cc.payWithNew = true"
ng-show="cc.stored.length > 0">
+
<t>Add a new mandate</t>
</a>
</div>
<table class="payment-method-card" ng-show="cc.stored.length > 0">
<tr class="payment-method-card-row" ng-repeat="method in cc.stored"
ng-class="{'selected' : $parent.cc.selectedUpiId == method.id}">
<td class="payment-method-card-cell">
<input type="radio" name="stored_method" value="{{method.id}}"
ng-model="$parent.cc.selectedUpiId"/>
</td>
<td class="payment-method-card-cell payment-method-card-cell-no-indents">
</td>
<td class="payment-method-card-cell">
<div>{{method.description | tc:"checkout.platform"}} *{{method.ending_in}}</div>
<span class="gocardless-dropin-charge-currency">{{input.chargeCurrency}}</span>
</td>
<td class="payment-method-card-cell payment-method-card-cell-default-payment">
<div class="payment-method-card-default-payment"
ng-show="method.id === cc.defaultPaymentMethodId">
<t>Default</t>
</div>
<button ng-hide="method.id === cc.defaultPaymentMethodId"
ng-click="setAsDefaultPaymentMethod(method)"
type="button"
class="set-as-default-button"
>
<t>Set as default</t>
</button>
</td>
</tr>
</table>
</div>
<div mobile class="cc_stored_cards" ng-show="cc.initiated">
<table class="payment-method-card" ng-show="cc.stored.length > 0">
<tr class="payment-method-card-row" ng-repeat="method in cc.stored"
ng-class="{'selected' : $parent.cc.selectedUpiId == method.id && $parent.cc.payWithNew != true}">
<td class="payment-method-card-cell">
<input type="radio" name="stored_method" value="{{method.id}}"
ng-model="$parent.cc.selectedUpiId"
ng-click="$parent.cc.payWithNew = false"/>
</td>
<td class="payment-method-card-cell">
<div>*{{method.ending_in}}</div>
</td>
<td class="payment-method-card-cell payment-method-card-cell-default-payment">
<div class="payment-method-card-default-payment"
ng-show="method.id === cc.defaultPaymentMethodId">
<t>Default</t>
</div>
<button ng-hide="method.id === cc.defaultPaymentMethodId"
ng-click="setAsDefaultPaymentMethod(method)"
type="button"
class="set-as-default-button"
>
<t>Set as default</t>
</button>
</td>
</tr>
<tr class="payment-method-card-row" ng-class="{'selected' : $parent.cc.payWithNew == true}">
<td class="payment-method-card-cell">
<input type="radio" name="stored_method" ng-model="$parent.cc.payWithNew" ng-value="true"/>
</td>
<td class="payment-method-card-cell" colspan="2">
<t>Add a new mandate</t>
</td>
</tr>
</table>
</div>
<div class="cc_new_card" ng-show="cc.payWithNew && cc.initiated">
<div desktop class="go-back-to-cards-wrapper">
<a href="javascript:void(0)" class="go-back-to-cards" ng-click="cc.payWithNew = false"
ng-show="cc.stored.length > 0 && !failPaymentComplete">
<t>Return to saved mandates</t>
</a>
<h4 ng-if="!failPaymentComplete">
<t>Add a new mandate</t>
</h4>
<h4 ng-if="failPaymentComplete">
<t>Mandate</t>
</h4>
</div>
<form class="new-card-form" name="ccForm" role="form">
<div ng-if="failPaymentComplete" class="gocardless-dropin-mandate-wrapper">
<div class="gocardless-dropin-mandate-left-column">
<div class="gocardless-dropin-mandate-description">{{cc.upi.description}}</div>
<span class="gocardless-dropin-charge-currency">{{input.chargeCurrency}}</span>
</div>
<div class="gocardless-dropin-mandate-right-column">
<span class="gocardless-dropin-cancel-mandate" ng-click="cancelMandate()">Cancel</span>
</div>
</div>
<div ng-if="!failPaymentComplete">
<button class="gocardless-dropin-pay" ng-click="create()" ng-disabled="!isLoaded">
<t>Pay with {{schemeName}}</t>
</button>
</div>
<div class="payment-system-condition">
<div class="custom-checkbox" ng-if="credit_card.store_in_vault">
<input type="checkbox" name="needToApplyDefaultPaymentMethod"
ng-model="credit_card.needToApplyDefaultPaymentMethod"
id="default-payment-method-gocardless-dropin"/>
<label for="default-payment-method-gocardless-dropin">
<t>Apply this payment method to all active subscriptions</t>
</label>
</div>
</div>
</form>
</div>
<div consents-list></div>
<div class="footer-modal">
<div ng-show="!cc.payWithNew || failPaymentComplete">
<div class="complete-purchase-button" complete-purchase-button
title="{{'Complete Purchase' | t}}"></div>
</div>
</div>
</div>
</div>
</script>
The My Account Wallet Components template should contain the following code:
<script type="text/ng-template" id="/frontend/providers/components/gocardlessdropin/my_account/component.shtml">
<div class="content-padding-tb content-padding-tb--gocardless-dropin">
<div class="gocardless-dropin-content-wrapper">
<my-account-billing-country></my-account-billing-country>
<div class="gocardless-dropin-title">
<t context="checkout.platform">Mandate</t>
</div>
<div ng-show="state.upi">
<div class="gocardless-dropin-mandate-wrapper">
<div class="gocardless-dropin-mandate-left-column">
<div class="gocardless-dropin-number">{{state.upi.nickname}} *{{state.upi.lastTwoNumbers}}</div>
<span class="gocardless-dropin-charge-currency">{{state.currency}}</span>
</div>
<div ng-if="!readonly" class="gocardless-dropin-mandate-right-column">
<div ng-click="cancelNewMandate()" class="gocardless-dropin-cancel-button">
<t>Cancel</t>
</div>
</div>
</div>
</div>
<div ng-show="!state.upi">
<div class="currency-wrapper" ng-show="currencies.length > 1 && !readonly && !state.isMandateAdded">
<select class="gocardless-dropin-currency" name="currencySelector" id="currencySelector" ng-model="state.currency">
<option ng-repeat="option in currencies" value="{{option}}">{{option}}</option>
</select>
</div>
<button ng-click="addNewMandate()"
ng-disabled="!isLoaded"
class="gocardless-dropin-pay">
<span ng-show="isLoaded"><t>Pay with {{directDebitSchemesByCurrency[state.currency]}}</t></span>
<span ng-show="!isLoaded"><t>Loading...</t></span>
</button>
</div>
</div>
</div>
</script>
And the following line should be added to the section <script type="text/ng-template" id="/widget/myaccount/partials/wallet/wallet_list.shtml"> into the dropdown-menu manage-dropdown dropdown-menu-right class:
<li ng-if="canAddGocardlessDropin" class="manage-dropdown"
                    ng-click="addCard(gocardlessDropinSource)"><t context="checkout.platform">Add Direct Debit</t></li>
If you are not seeing the icon on the payment button for ACH/SEPA/Direct Debit, you can do the following template changes.
Find the following component in the Payment Components template: <script type="text/ng-template" id="/widget/checkout/component/partials/payment-method-selector-component.html">
And in the code containing:
<li ng-repeat="pm in paymentMethods">
  <a
    ng-click="selectPaymentMethod(pm)"
    ng-class="{'payment-method-selected': pm.selected}"
    class="button pay select-payment {{pm.identifier}}"
    ng-checked="isPaymentMethod(pm.id)">
  </a>
</li>
Add the variable {{getCurrencyClass()}}, like this:
<li ng-repeat="pm in paymentMethods">
  <a
    ng-click="selectPaymentMethod(pm)"
    ng-class="{'payment-method-selected': pm.selected}"
    class="button pay select-payment {{pm.identifier}} {{getCurrencyClass()}}"
    ng-checked="isPaymentMethod(pm.id)">
  </a>
</li>
Frequently Asked Questions
Q: Will the GoCardless resource ID length change affect Piano integrations?
A: Starting 21 April 2026, newly created GoCardless resource IDs (used for Payments, Mandates, Payouts, Billing Requests, and similar objects) may be up to 32 characters long. This change is fully backward compatible; existing resource IDs and prefixes (such as "PM" for payments) will remain unchanged. Piano is not impacted by this update, as its internal objects already support identifiers of up to 60 characters.