
If you are using Braintree as your payment provider and you'd like to change the styling (CSS) of Braintree hosted fields - for example, the CVV, credit card number, expiration date, and cardholder name, you can do so by following the steps below.
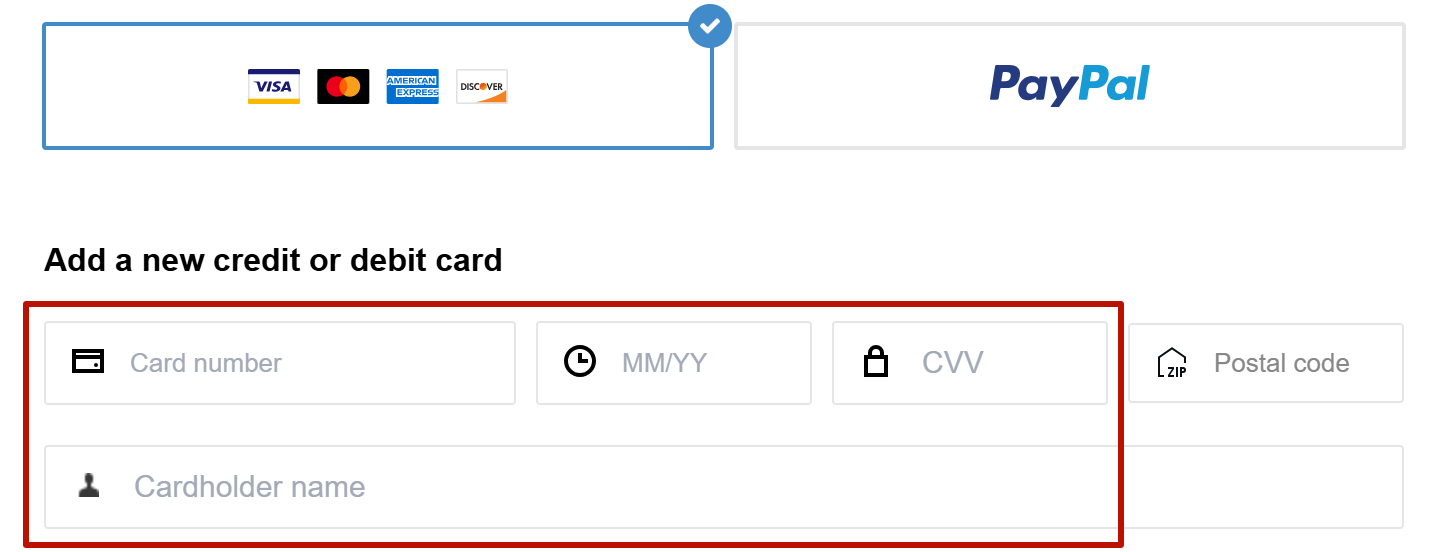
Checkout
To update the styling of the hosted fields in the Checkout, please proceed as follows.
Go to Manage → Templates → Payment Components.
In the template's HTML code, find the string <div ng-show="isBraintreeV3() === true">.
Under this, you should be able to find all Braintree hosted field containers and add hosted-field-class attributes, so that these can be styled.
For the card number field:
<div id="card-number" class="cc-field__input-wrap-container" hosted-field-class="card-number-hosted-field"></div>
For the expiration date field:
<div id="expiration-date" class="cc-field__input-wrap-container" hosted-field-class="expiration-date-hosted-field"></div>
For the CVV field:
<div id="cvv" class="cc-field__input-wrap-container" hosted-field-class="cvv-hosted-field"></div>
For the cardholder name field:
<div id="cardholder-name" class="cc-field__input-wrap-container" hosted-field-class="cardholder-name-hosted-field"></div>
So the final template's code may look like this:
<div ng-show="isBraintreeV3() === true">
    <table class="table-form-inline" cellpadding="0" cellspacing="0">
        <tr>
            <td class="field-card-number">
                <div class="field-wrapper" braintree-validate="number">
                    <label class="icon card"></label>
                    <div class="input">
                        <div id="card-number" class="cc-field__input-wrap-container" hosted-field-class="card-number-hosted-field"></div>
                    </div>
                </div>
            </td>
            <td class="field-card-expiry-month">
                <div class="field-wrapper" braintree-validate="expirationDate">
                    <label class="icon expiry"></label>
                    <div class="input">
                        <div id="expiration-date" class="cc-field__input-wrap-container" hosted-field-class="expiration-date-hosted-field"></div>
                    </div>
                </div>
            </td>
            <td class="field-card-cvv">
                <div class="field-wrapper" braintree-validate="cvv">
                    <label class="icon password"></label>
                    <div class="input">
                        <div id="cvv" class="cc-field__input-wrap-container" hosted-field-class="cvv-hosted-field"></div>
                    </div>
                </div>
            </td>
            <td class="field-card-postal-code">
                <div class="field-wrapper" braintree-validate="postalCode">
                    <label class="icon cc-field__icon--zip-code"></label>
                    <div class="input">
                        <input type="text" name="postal_code" id="pn-postal-code" class="flat" data-e2e="pn-postal-code" placeholder="{{'Postal code' | t}}" ng-model="input.zipCode" ng-change="onZipCodeChange()" required />
                    </div>
                </div>
            </td>
        </tr>
        <tr ng-show="collectCardholderName">
            <td class="field-cardholder-name" colspan="4">
                <div class="field-wrapper" braintree-validate="cardholderName">
                    <label class="icon cardholder"></label>
                    <div class="input">
                        <div id="cardholder-name" class="cc-field__input-wrap-container" hosted-field-class="cardholder-name-hosted-field"></div>
                    </div>
                </div>
            </td>
        </tr>
    </table>
</div>
Once the attributes are added, go to Manage→ Templates → Checkout Style template, and add the CSS to the respective classes.
For example:
.card-number-hosted-field {
  color: red;
}

.expiration-date-hosted-field {
  color: red;
}

.cvv-hosted-field {
  color: red;
}

.cardholder-name-hosted-field {
  color: red;
}
My Account
To update the styling of the hosted fields in the My Account's Card tab, please proceed as follows.
Go to Manage → Templates → My Account Wallet Components.
In the template's HTML code, find the string <div ng-if="cardset.isBankSecure === true" class="position-relative">.
Under this, you should be able to find all Braintree hosted field containers and add hosted-field-class attributes, so that these can be styled.
For the card number field:
<div ng-if="cardset.isEditing !== true" id="card-number" class="card-number braintree-new-form--card-field" hosted-field-class="card-number-hosted-field"></div>
For the expiration date field:
<div id="expiration-date" class="expiry braintree-new-form--card-field" hosted-field-class="expiration-date-hosted-field"></div>
For the CVV field:
<div id="cvv" class="cvv braintree-new-form--card-field" hosted-field-class="cvv-hosted-field"></div>
For the cardholder name field:
<div ng-if="cardset.isEditing !== true" id="cardholder-name" class="cardholder-name cc-field__icon--card-holder braintree-new-form--card-field" hosted-field-class="cardholder-name-hosted-field"></div>
So the final template's code may look like this:
<div ng-if="cardset.isBankSecure === true" class="position-relative">
    <div id="pp-loader" class="pp-loader">
        <t>Process...</t>
    </div>
    <table class="table-view braintree-new-form">
        <tr class="table-row">
            <td class="table-cell card-number-cell">
                <div ng-if="cardset.isEditing === true" class="braintree-new-form--card-field-no-select">
                    <div class="card-number">{{cardset.number}}</div>
                </div>
                <div ng-if="cardset.isEditing !== true" id="card-number" class="card-number braintree-new-form--card-field" hosted-field-class="card-number-hosted-field"></div>
            </td>
            <td class="table-cell expiry-cell">
                <div id="expiration-date" class="expiry braintree-new-form--card-field" hosted-field-class="expiration-date-hosted-field"></div>
            </td>
            <td class="table-cell cvv-cell">
                <div id="cvv" class="cvv braintree-new-form--card-field" hosted-field-class="cvv-hosted-field"></div>
            </td>
            <td class="table-cell postal-code-cell">
                <div class="postal-code-new-form braintree-new-form--card-field"> <input type="text" ng-model="cardset.zipcode" id="pn-postal-code" data-e2e="pn-postal-code" placeholder="{{'Postal code' | tc:'checkout.platform'}}" name="zipcode" class="postal-code" /> </div>
            </td>
        </tr>
        <tr ng-show="cardset.braintreeCollectCardholderName">
            <td class="table-cell field-cardholder-name-cell" colspan="4">
                <div ng-if="cardset.isEditing === true" class="readonly-field-wrapper">
                    <div class="cardholder-name cc-field__icon--card-holder">{{cardset.cardholder}}</div>
                </div>
                <div ng-if="cardset.isEditing !== true" id="cardholder-name" class="cardholder-name cc-field__icon--card-holder braintree-new-form--card-field" hosted-field-class="cardholder-name-hosted-field"></div>
            </td>
        </tr>
    </table>
</div>
Once the attributes are added, go to Manage→ Templates → My Account Style template, and add the CSS to the respective classes.
For example:
.card-number-hosted-field {
  color: red;
}

.expiration-date-hosted-field {
  color: red;
}

.cvv-hosted-field {
  color: red;
}

.cardholder-name-hosted-field {
color: red;
}
Below you can find a set of properties, in which styling can be overridden:
{
  -webkit-font-smoothing: antialiased;
  -webkit-tap-highlight-color: rgba(0, 0, 0, 0.18);
  appearance: auto;
  box-shadow: none;
  color: rgb(0, 0, 0);
  direction: ltr;
  font-family: Arial;
  font-size: 15px;
  font-stretch: 100%;
  font-style: normal;
  font-variant-caps: normal;
  font-variant-east-asian: normal;
  font-variant-ligatures: normal;
  font-variant-numeric: normal;
  font-weight: 400;
  letter-spacing: normal;
  line-height: normal;
  margin-top: 0px;
  margin-right: 0px;
  margin-bottom: 0px;
  margin-left: 0px;
  opacity: 1;
  padding-top: 1px;
  padding-right: 2px;
  padding-bottom: 1px;
  padding-left: 2px;
  text-align: start;
  text-shadow: none;
  outline: rgb(0, 0, 0) none 0px;
  transition: all 0s ease 0s;
}